Week 14 - Interface and Application Programming
Assignment
Group assignment:
Compare as many tool options as possible.
Document your work on the group work page and reflect on your individual page what you learned.
Individual assignment:
Write an application for the embedded board that you made. that interfaces a user with an input and/or output device(s)
Summary
This week, I explored interface and application programming by developing a Python-based application that communicates with
an embedded board and a microcontroller to control an LED.
On the frontend, I designed an HTML interface with simple ON and OFF buttons. The backend uses a Python Flask app that listens
for button clicks and sends commands over a serial connection to the microcontroller, which runs an Arduino program to control the LED.
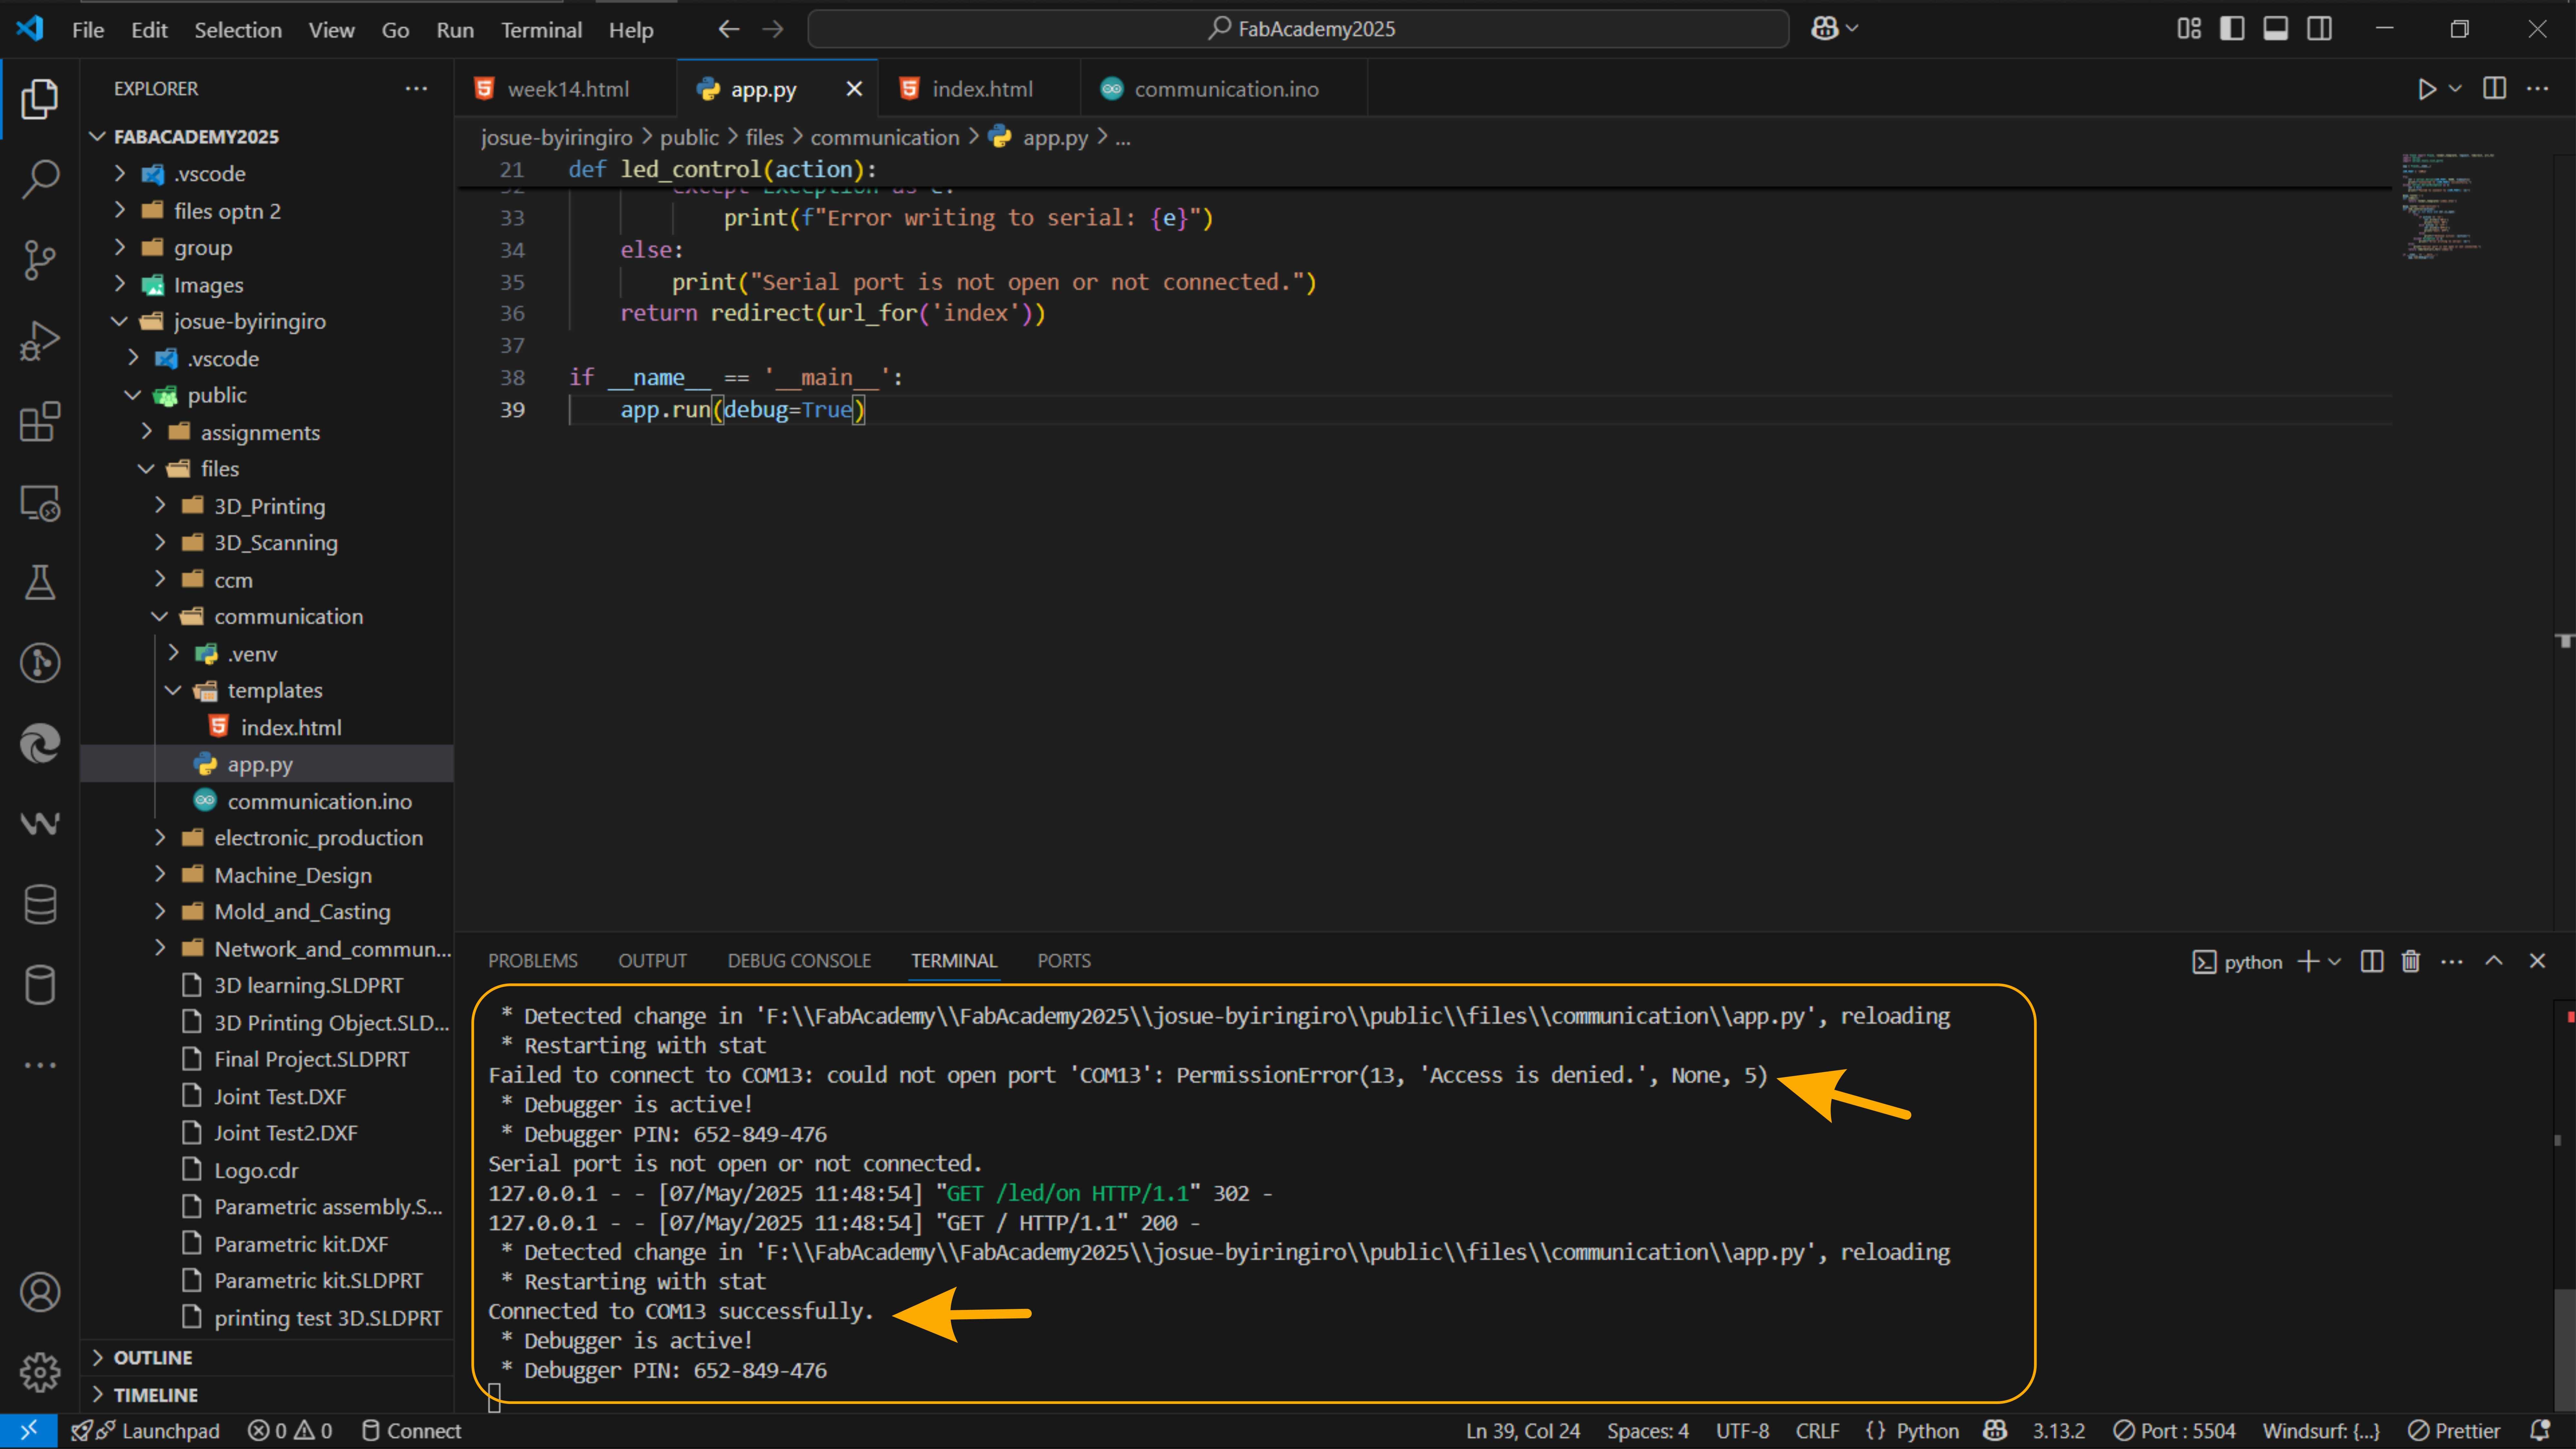
One of the key challenges I encountered was serial port access errors, where the port sometimes failed to connect.
I solved this by improving the Python code with error handling and making sure no other program (like the Arduino IDE) was occupying the port.
Keep scrolling to see how I built this project step by step!
Arduino IDE
I started by writing an Arduino sketch that controls the LED based on serial commands (ON or OFF).
I first tested this directly using the Arduino IDE Serial Monitor, manually typing commands.
Arduino Code
                  #define LED_PIN D1

                  void setup() {
                    Serial.begin(9600);
                    pinMode(LED_PIN, OUTPUT);
                    Serial.println("Ready and waiting for commands...");
                  }

                  void loop() {
                    if (Serial.available() > 0) {
                      String command = Serial.readStringUntil('\n');
                      command.trim();
                      Serial.print("Received command: ");
                      Serial.println(command);
                      if (command == "ON") {
                        digitalWrite(LED_PIN, HIGH);
                        Serial.println("LED turned ON");
                      } else if (command == "OFF") {
                        digitalWrite(LED_PIN, LOW);
                        Serial.println("LED turned OFF");
                      } else {
                        Serial.println("Unknown command");
                      }
                    }
                  }
Interface Design
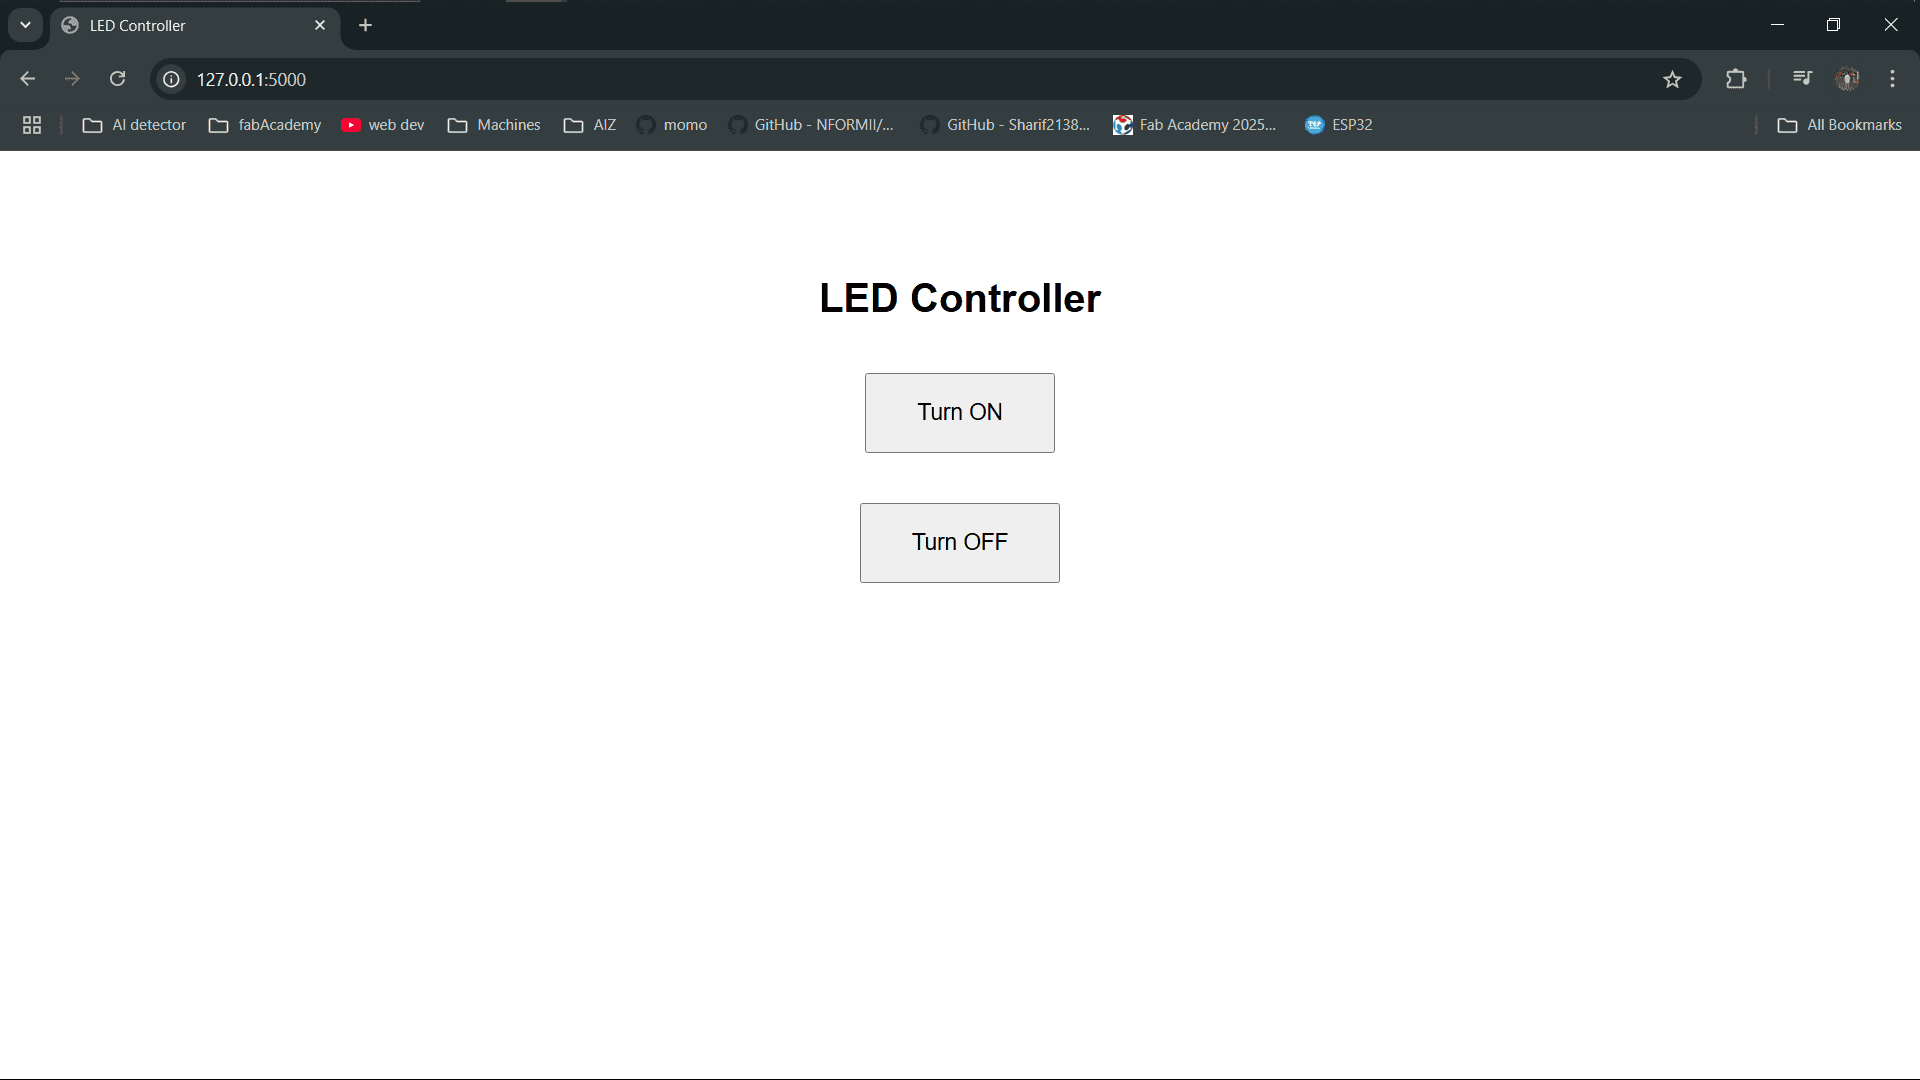
Once the Arduino part was working, I moved on to designing the web interface.
I created a simple HTML page with two buttons: Turn ON and Turn OFF, styled with basic CSS.
Python Flask Backend
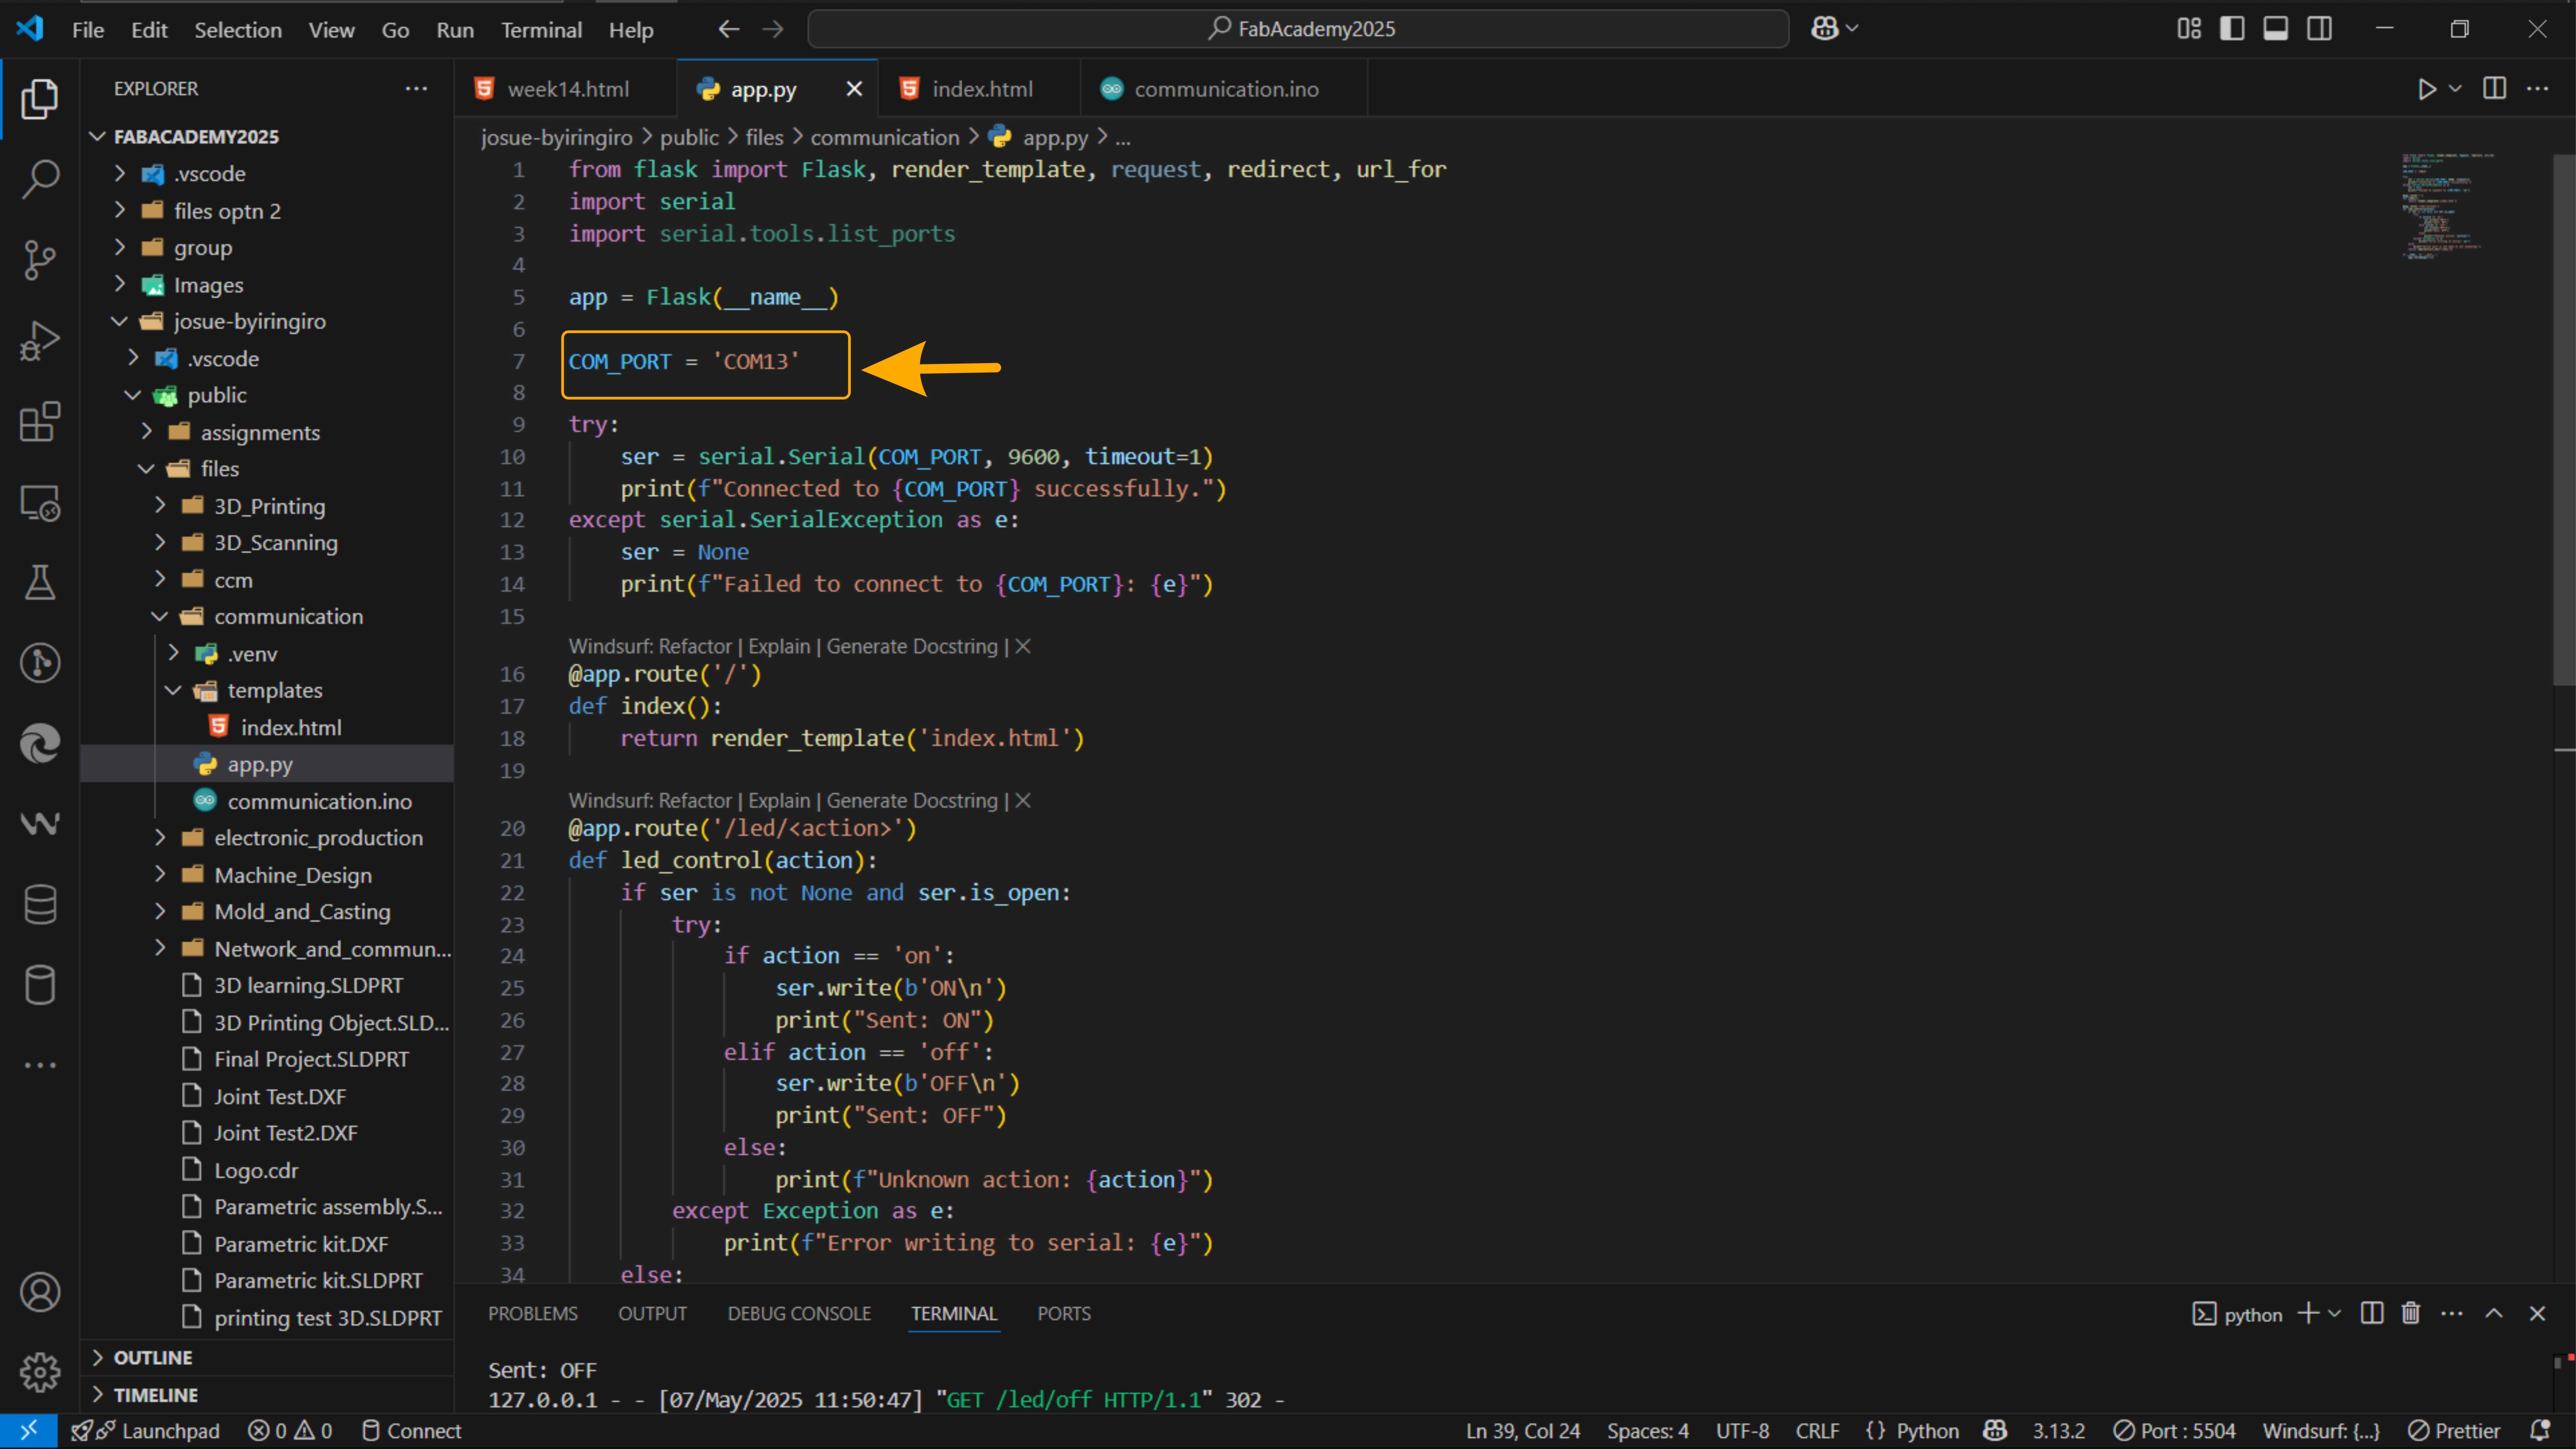
I used Flask to create a small web server that connects the frontend buttons to the microcontroller.
The Flask app listens for /led/on and /led/off routes, then sends the corresponding serial commands.
                  from flask import Flask, render_template, request, redirect, url_for
                  import serial
                  import serial.tools.list_ports

                  app = Flask(__name__)

                  COM_PORT = 'COM13'

                  try:
                      ser = serial.Serial(COM_PORT, 9600, timeout=1)
                      print(f"Connected to {COM_PORT} successfully.")
                  except serial.SerialException as e:
                      ser = None
                      print(f"Failed to connect to {COM_PORT}: {e}")

                  @app.route('/')
                  def index():
                      return render_template('index.html')

                  @app.route('/led/')
                  def led_control(action):
                      if ser is not None and ser.is_open:
                          try:
                              if action == 'on':
                                  ser.write(b'ON\n')
                                  print("Sent: ON")
                              elif action == 'off':
                                  ser.write(b'OFF\n')
                                  print("Sent: OFF")
                              else:
                                  print(f"Unknown action: {action}")
                          except Exception as e:
                              print(f"Error writing to serial: {e}")
                      else:
                          print("Serial port is not open or not connected.")
                      return redirect(url_for('index'))

                  if __name__ == '__main__':
                      app.run(debug=True)
How to run the code
Install the required Python libraries:
Flask and pyserial should be installed to run the code successfully.
pip install flask pyserial
Connect your microcontroller via USB (check its port, e.g., COM13). Run the Flask app:
python app.py
Open your browser and go to: http://127.0.0.1:5000/
Final Result
After running the code, I got this result: Simply pressing ON or OFF buttons would turn the LED ON/OFF.
Challenges
Serial Port Access Errors
Sometimes, the Python script could not open the serial port because another program (like the Arduino IDE) was already using it.
Solution: Make sure to close the Serial Monitor or quit the Arduino IDE before running the Flask app.
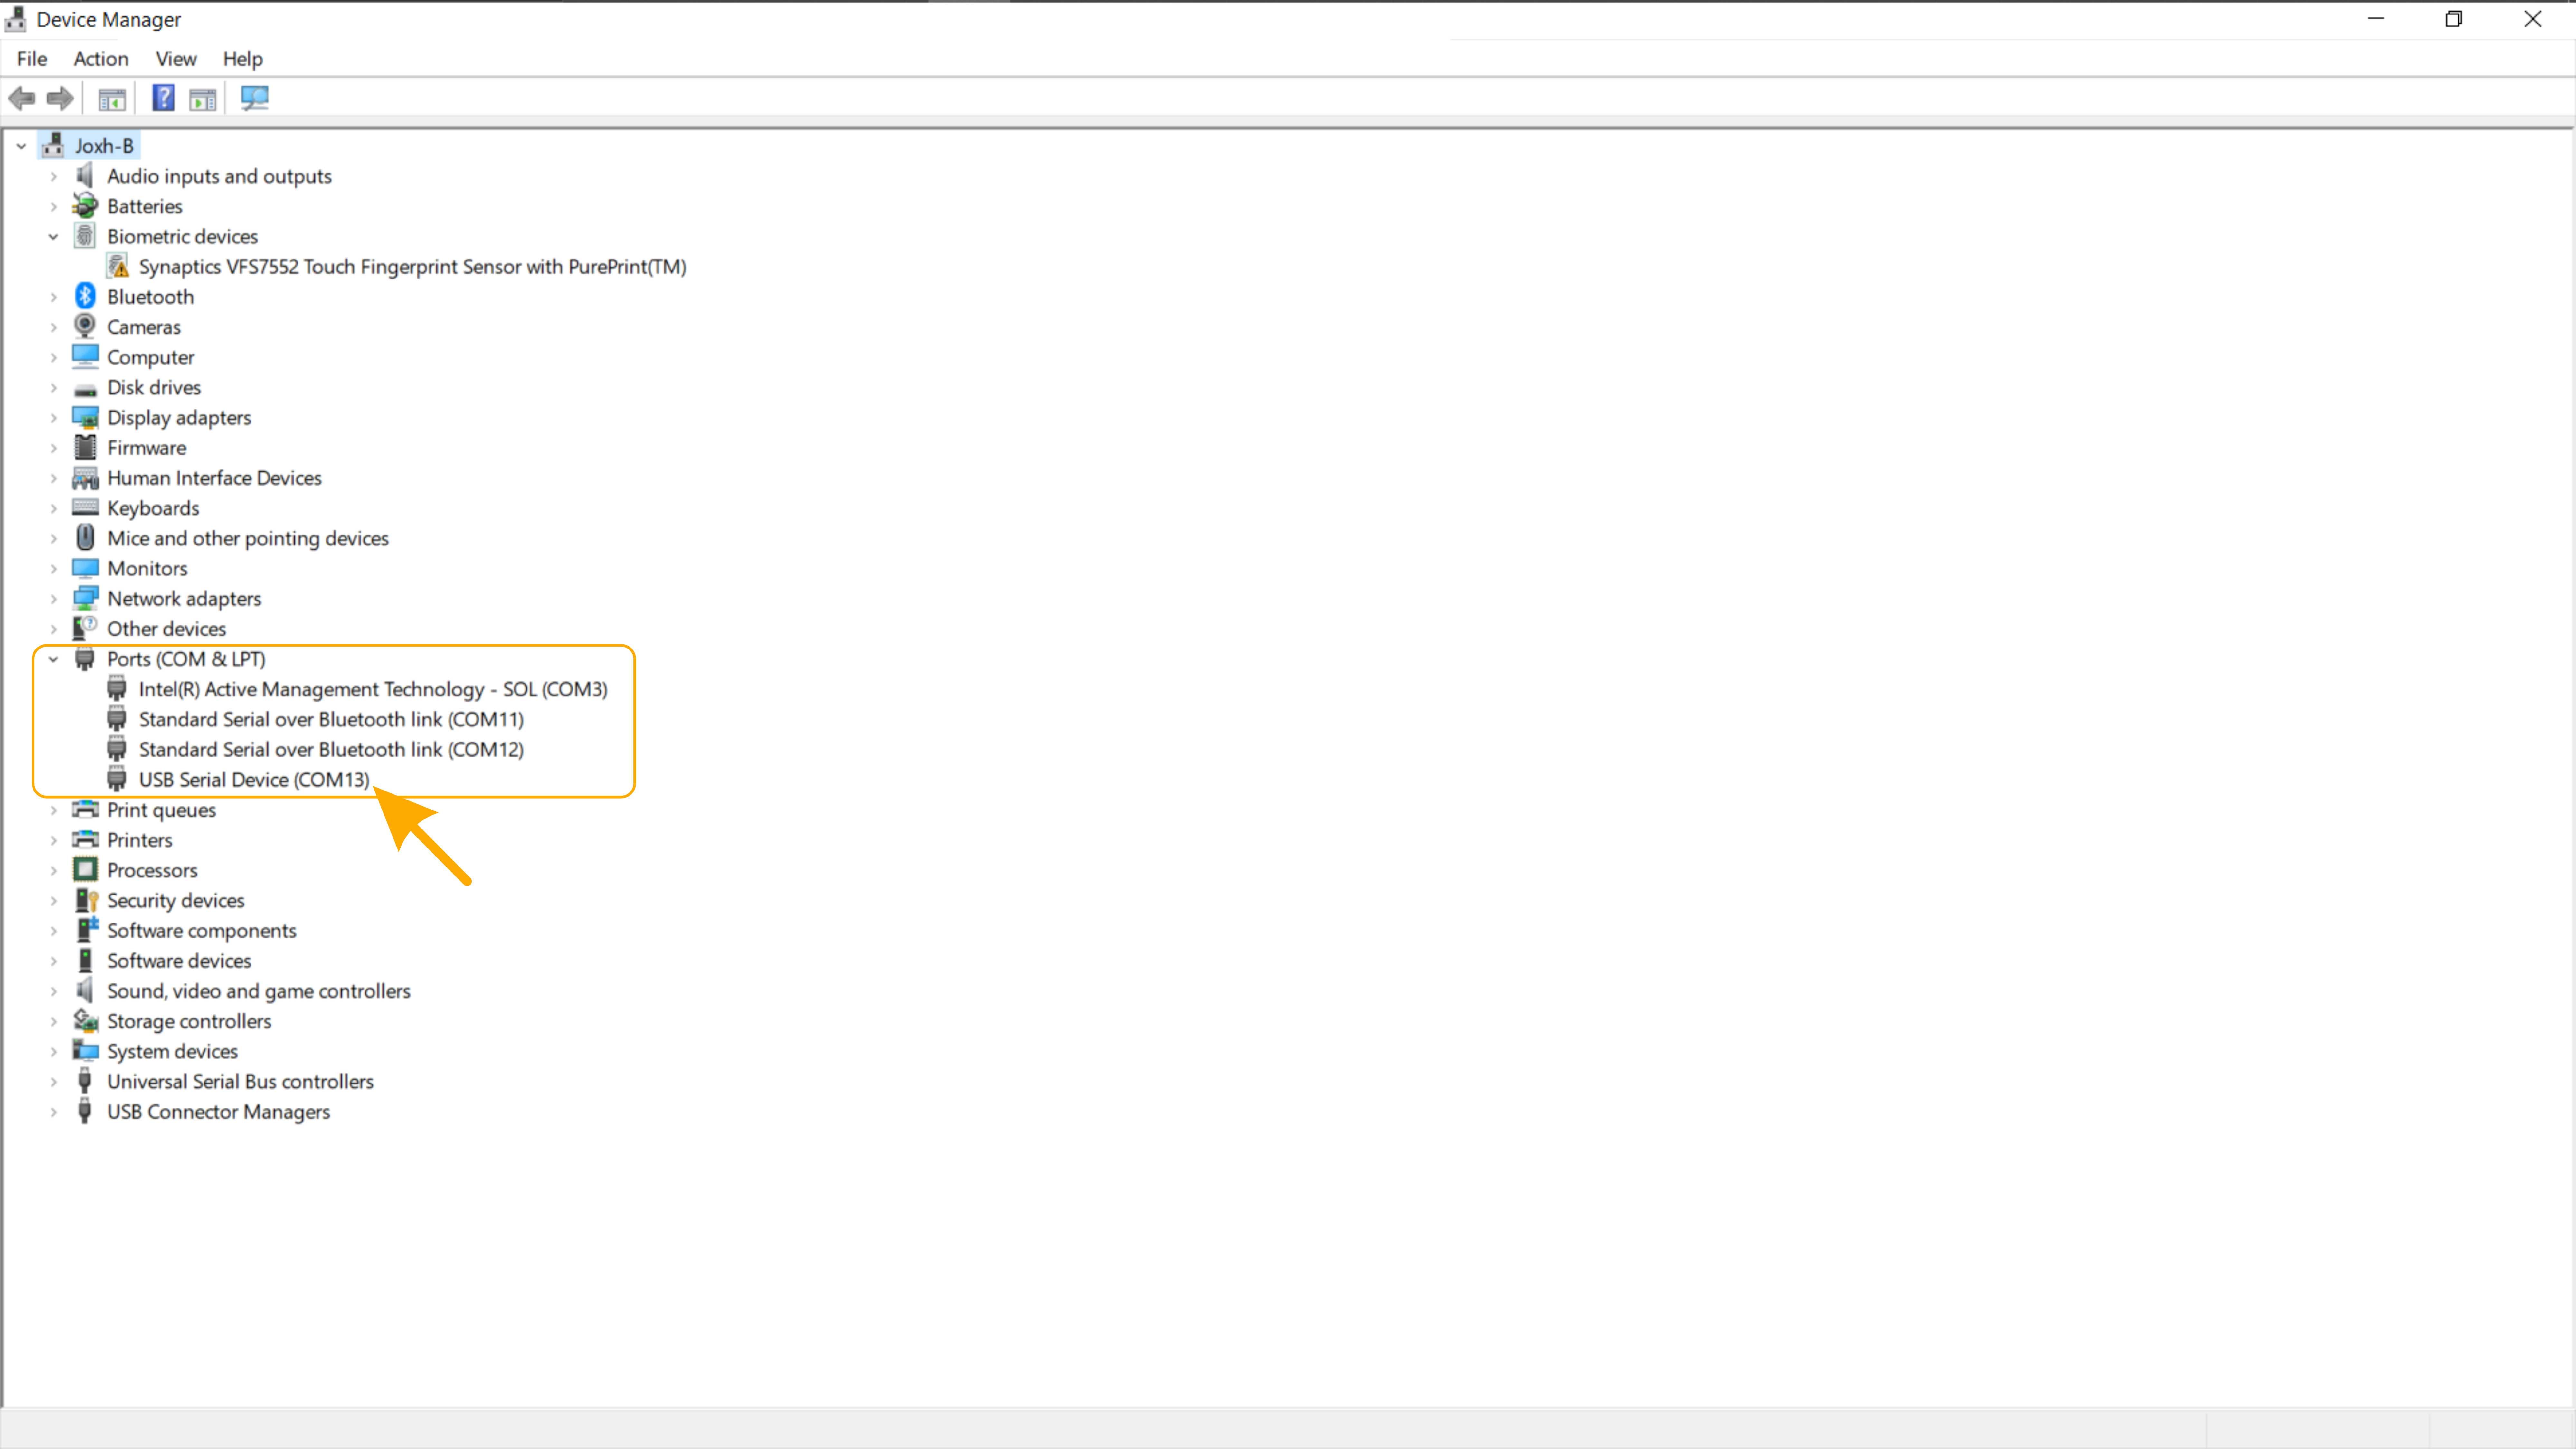
Wrong COM Port
You must check that the COM port in the Python code matches your device’s actual port.
Solution: Use Device Manager (Windows) → Ports → check the listed COM number.
I am also working on the interface which connects the microcontroller to the frontend wirelessly and having more features.
Files
Front end: Index.htmlBack end: app.py
Arduino Sketch: led_control.ino