
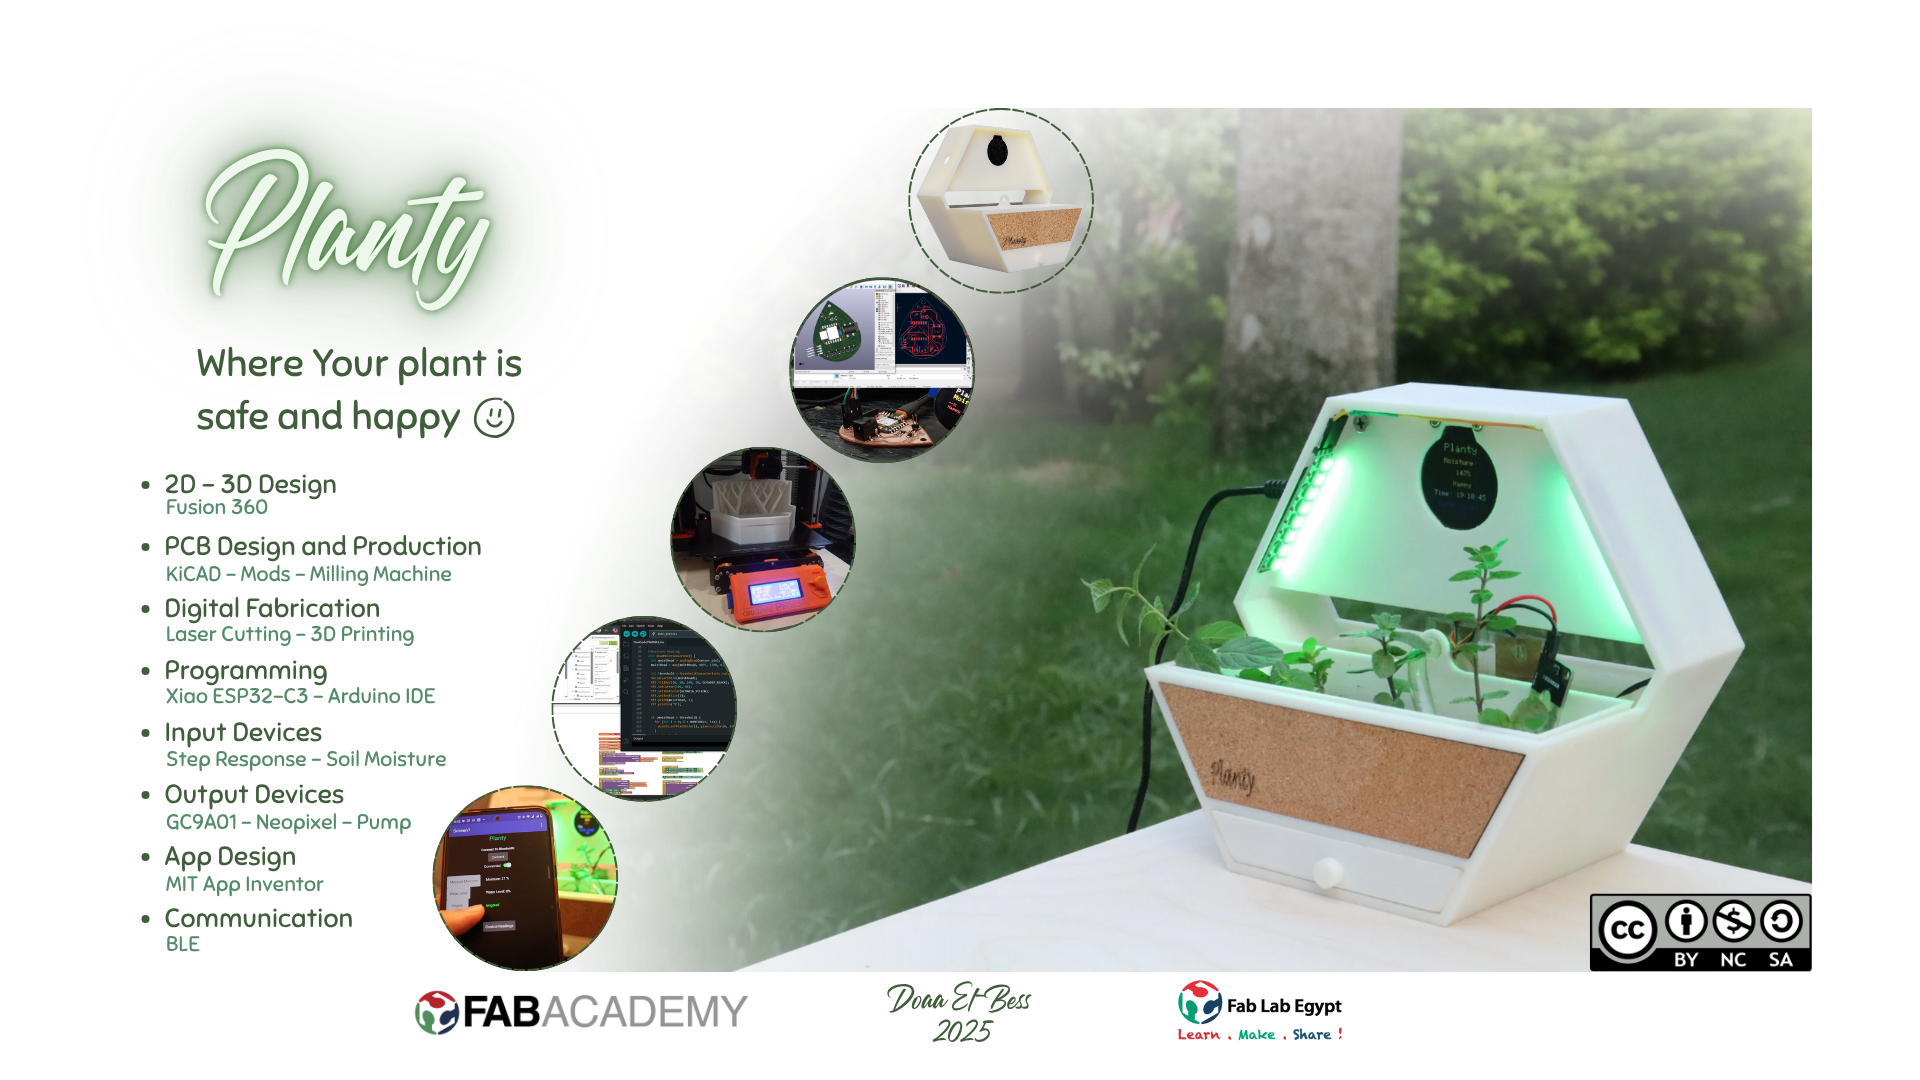
Final Project Schowcasing
Here's a summary about what you'll see next:
- 1) Project Overview
- 2) BOM
- 3) Planty Design
-
- Design Thinking
- Design in Fusion 360
- Packaging
- Fabrication
- 4) PCB Design and Production
-
- Design on KiCAD
- Preparing For Fabrication
- PCB Milling and Soldering
- 5) Electronics
-
- Input Devices
- Output Devices
- System Integration
- 6) Coding
-
- Code Logic
- NTP Server
- Automatic Irrigation
- Manual Control Through App (BLE Communication)
- 7) App Design
-
- UI
- Code Blocks
- 8) Future PLans
- 9) Original Files
1) Project Overview:
PLanty is a product where we can put different interior small plants to be automatically irrigated through a pump when it detects it needs water using the soil moisture sensor. It's connected to wi-fi and shows live time from NTP Server on the GC9A01 Display and uses the time to measure the moisture and water level every certain time. It uses neopixel to show different colors to indicate different status of the readings levels. It also has the option to control its readings and to know current readings and the option to irrigate the plant remotely if it needs irrigating and if it has water in the tank through a mobile app made with App Inventor. It can irrigate your plant up to 7 times with a full tank and it doesn't irrigate if the water level is low to protect the pump and shows a red color on the neopixel to give warning to the owner to refill the tank.
If you're interested in having this product, next you'll find all that's needed to have it. This project goes under the license CC BY-NC-SA 4.0 so you're free to use it and improve it but share it under the same license with attribution.
2) BOM:
3) Planty Design:
1- Design Thinking:
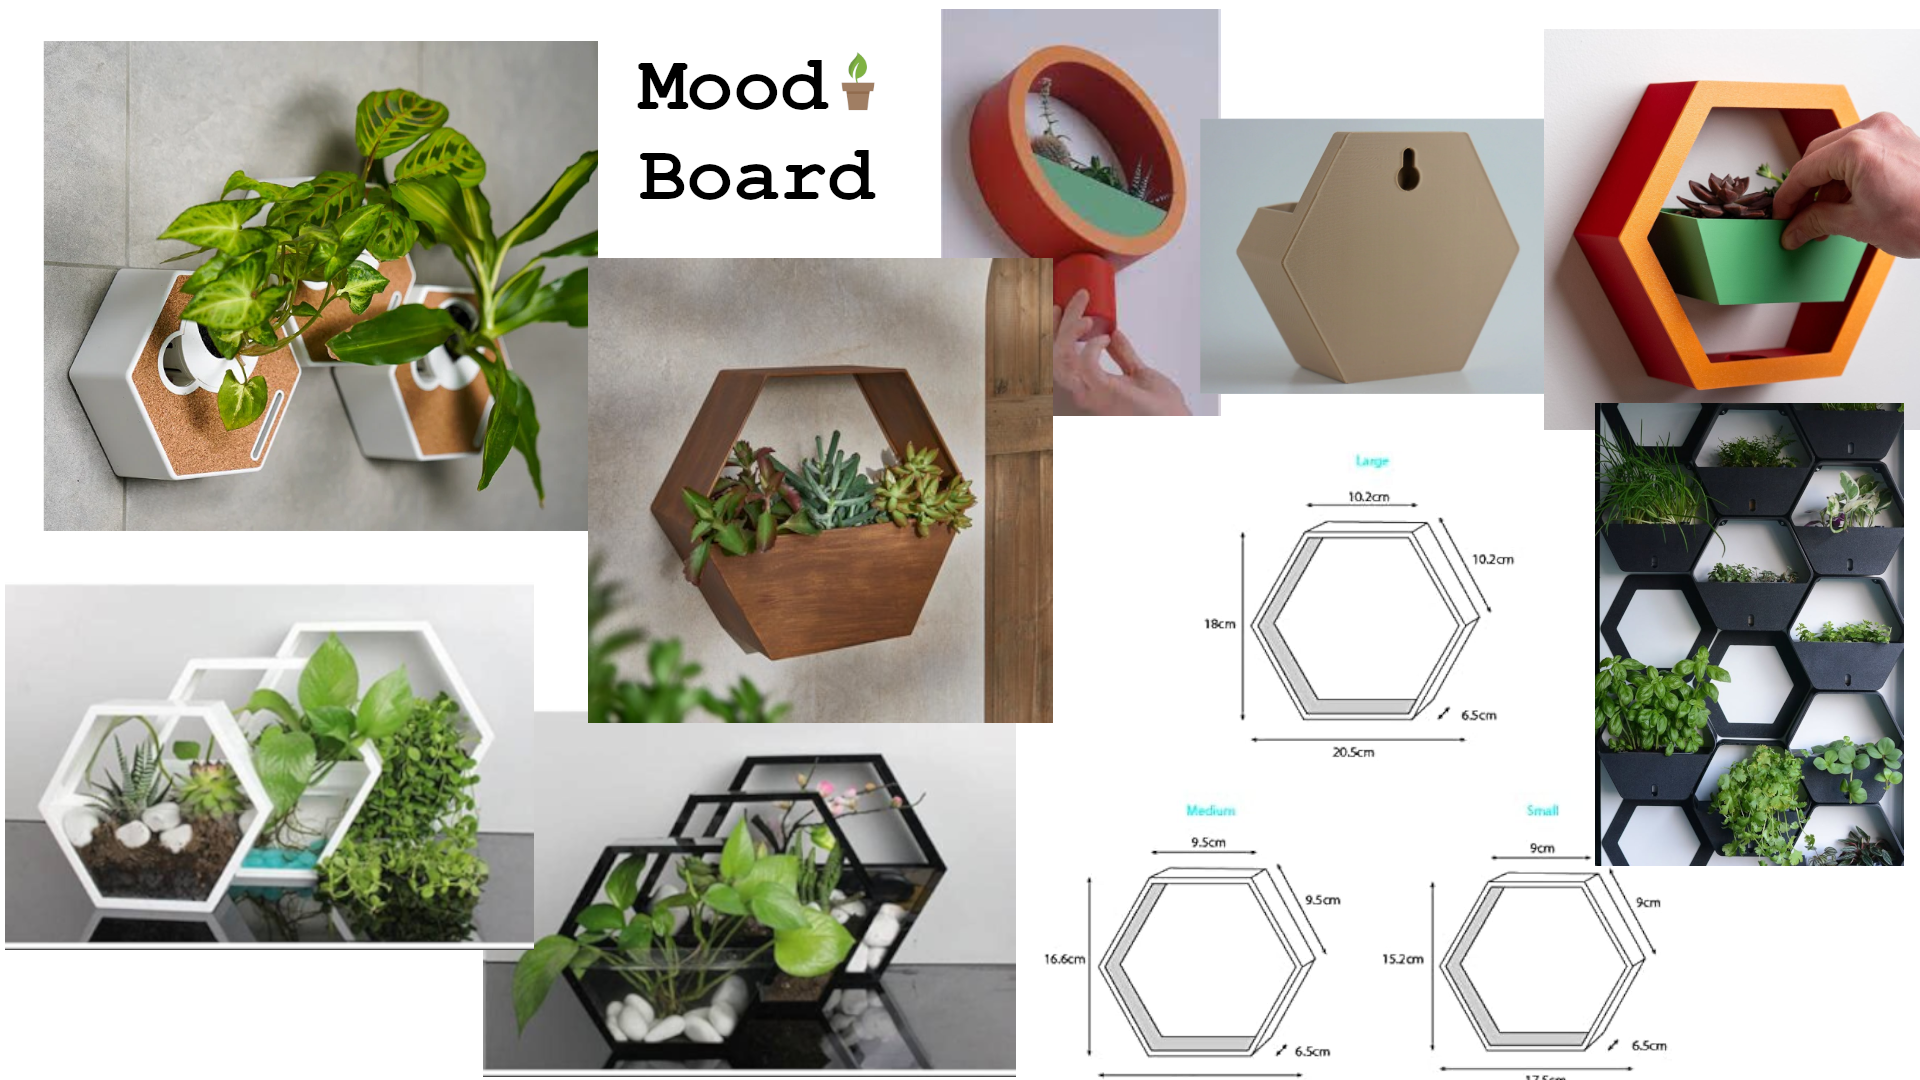
I started by searching for similar products to get inspired. I wanted my design to be modular and hexagon shape always wins in that. I started making a mood board of similar products and know the average sizes. I liked the clean white color with the touch of natural cork so I decided to go for it.
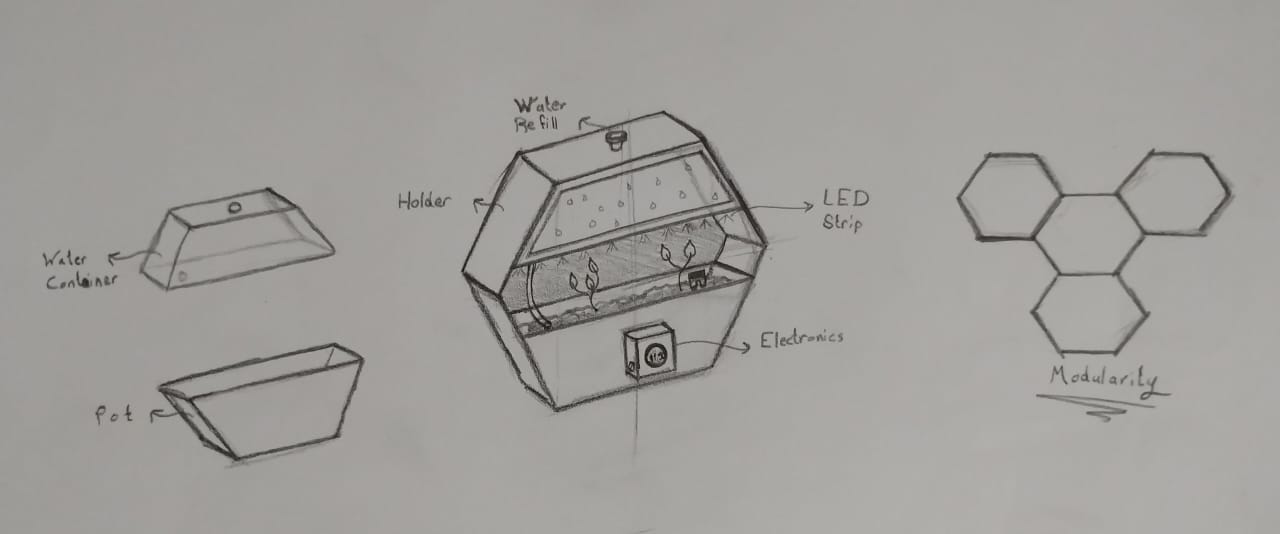
This was my first sketch for the hexagonal shape but after considering the sizes I thought it would be very tight for the plants and no room for it to grow tall because of the tank. So I started thinking of another approach of putting the pot in a place where the plants get enough space to grow and in the same time next to the water tank.
2- Design in Fusion 360:
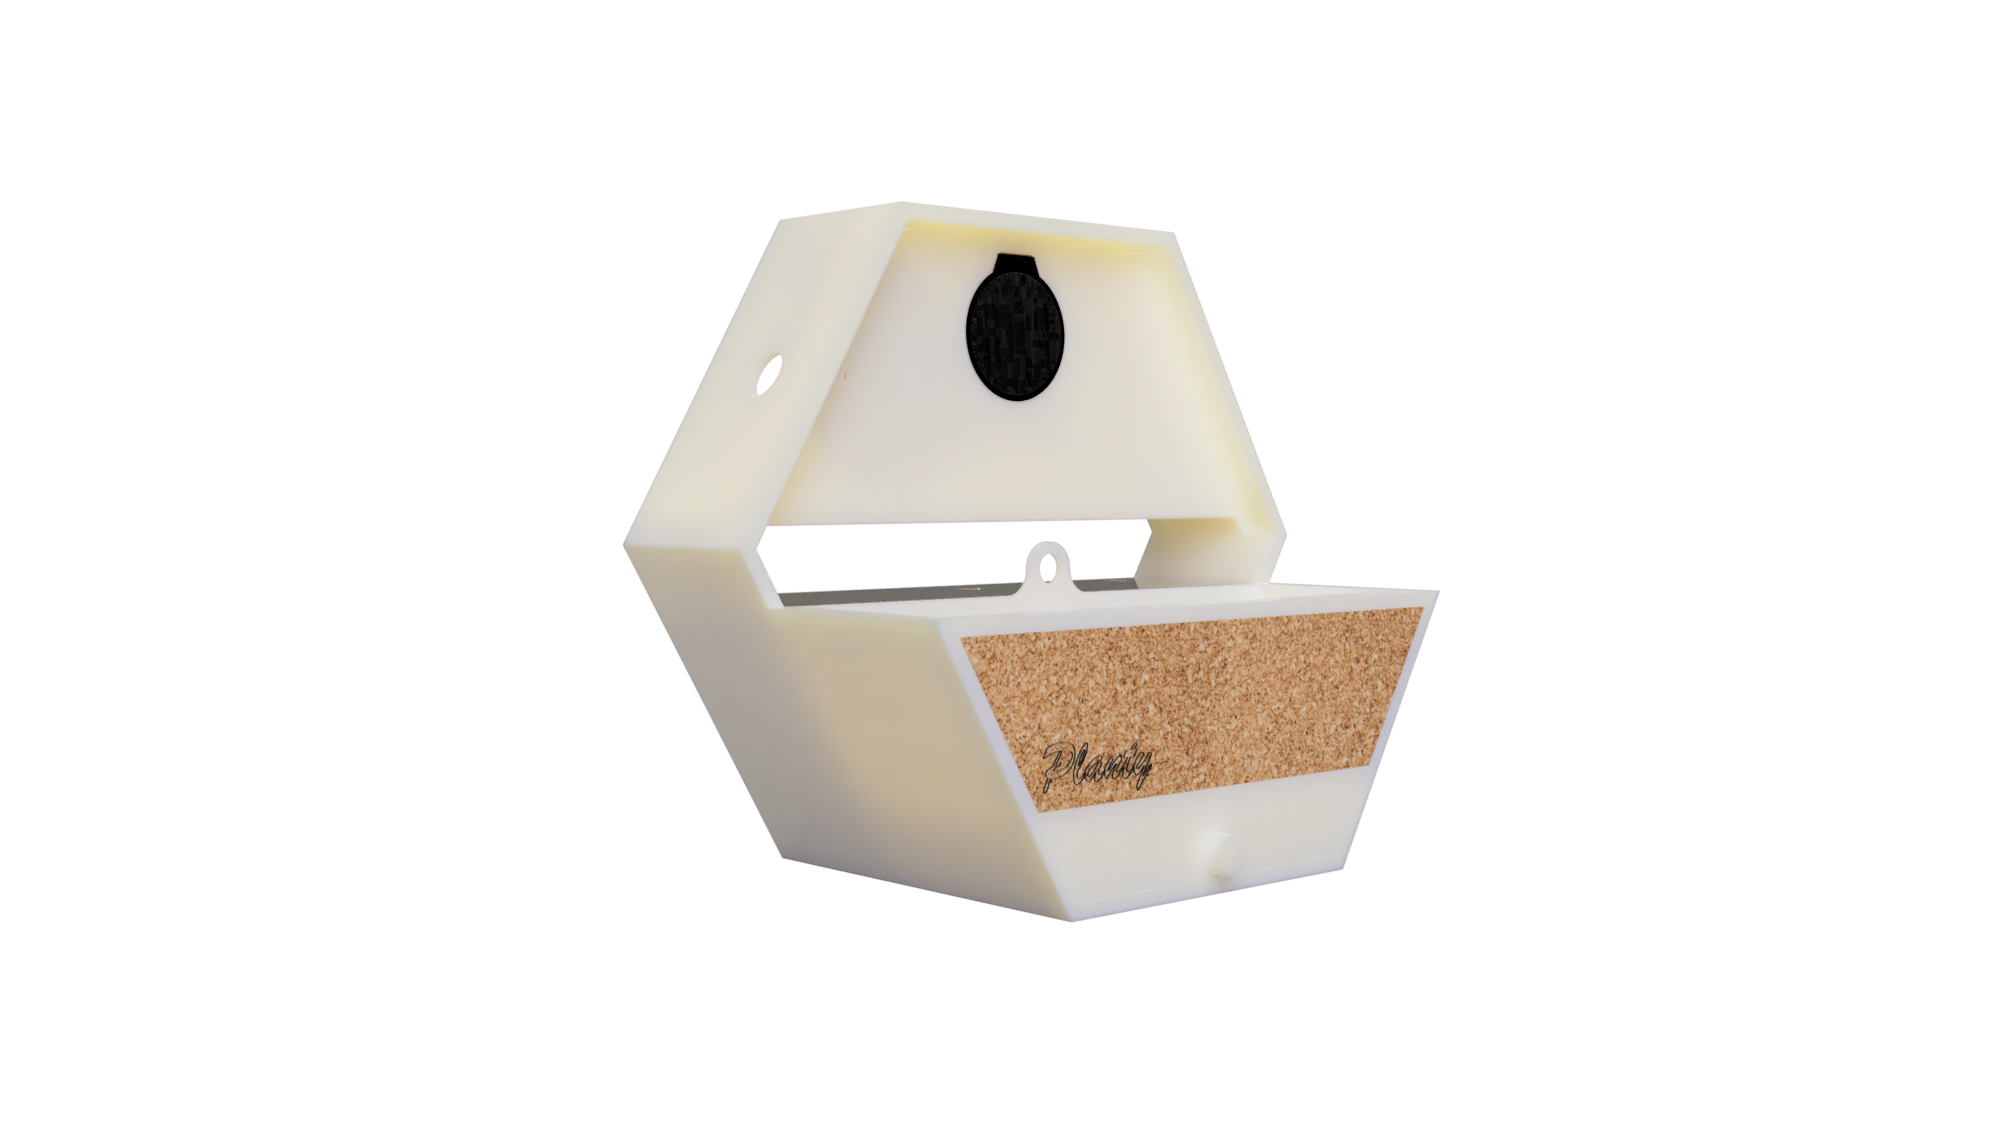
So I came up with this design and made it directly on Fusion 360. I needed to have water tank and a pot with a place to hold the excessed water and a place for all electronics with the display to show. I went for the medium size in my design to fit in printing on the prusa mk3s.
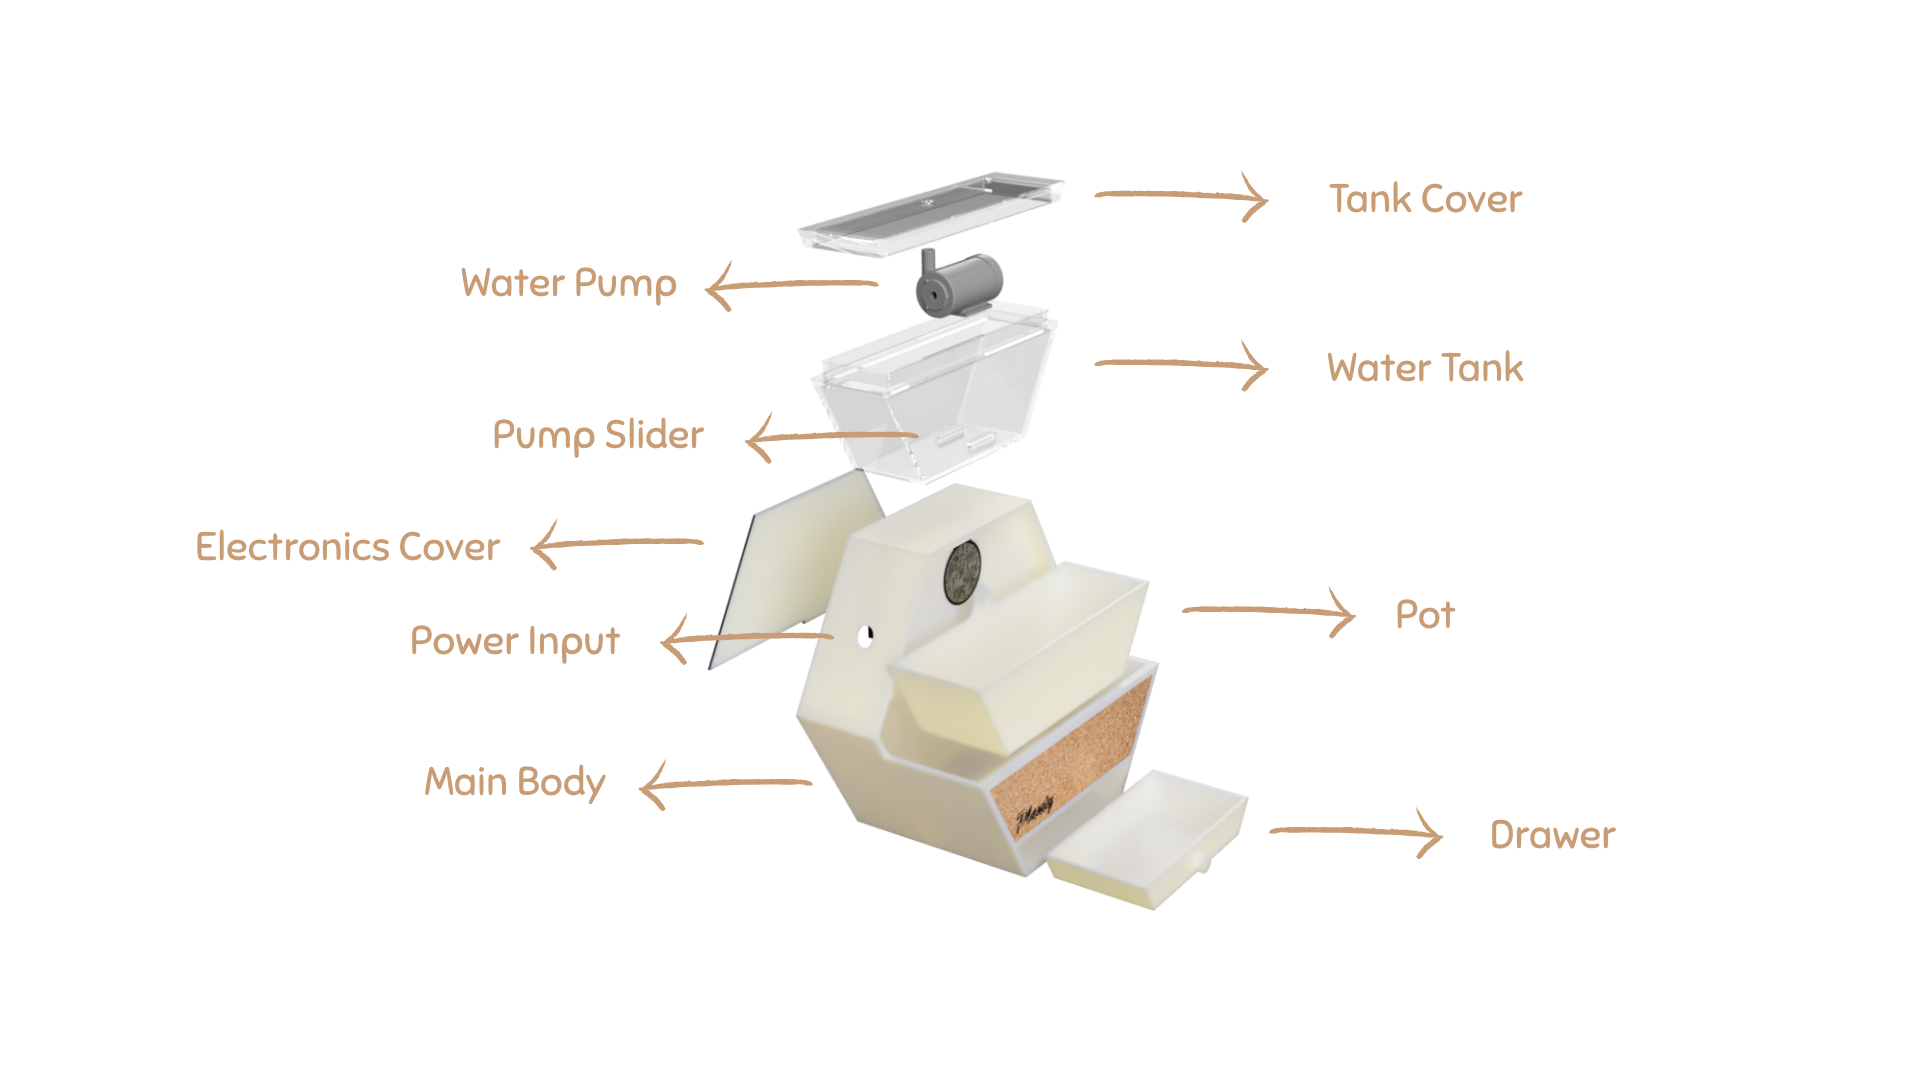
This is an exploded view of the parts of the product.
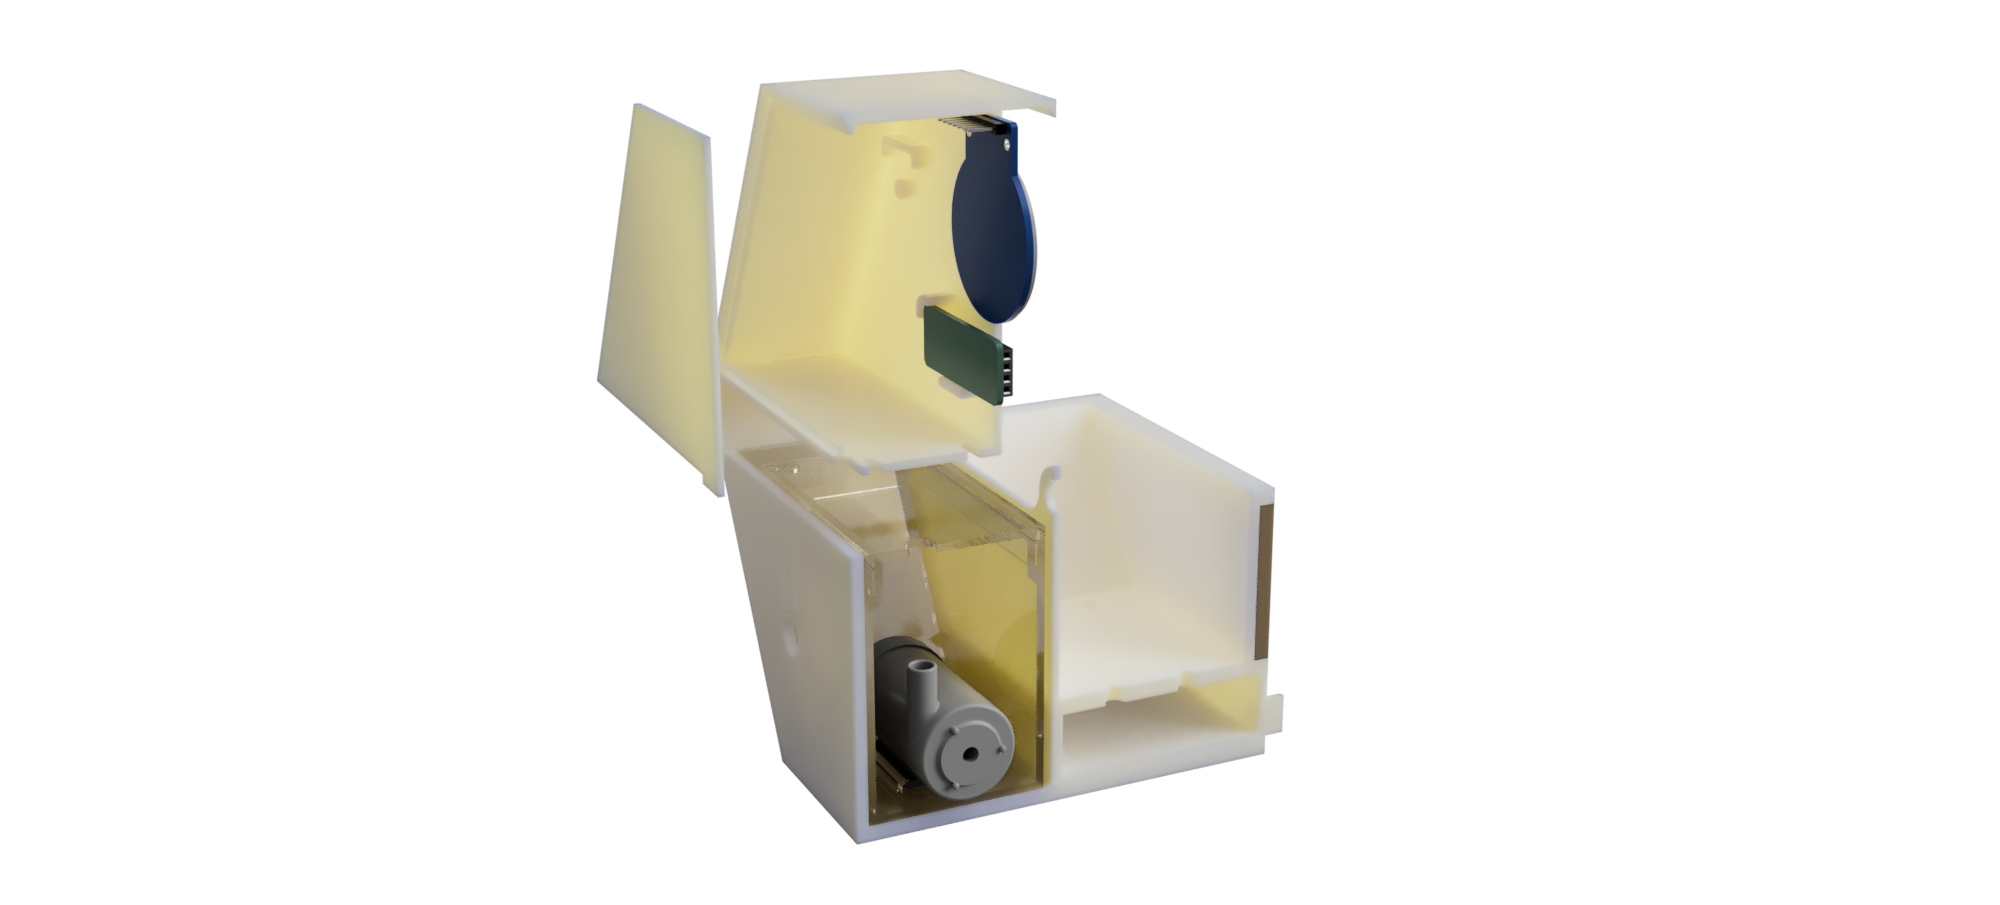
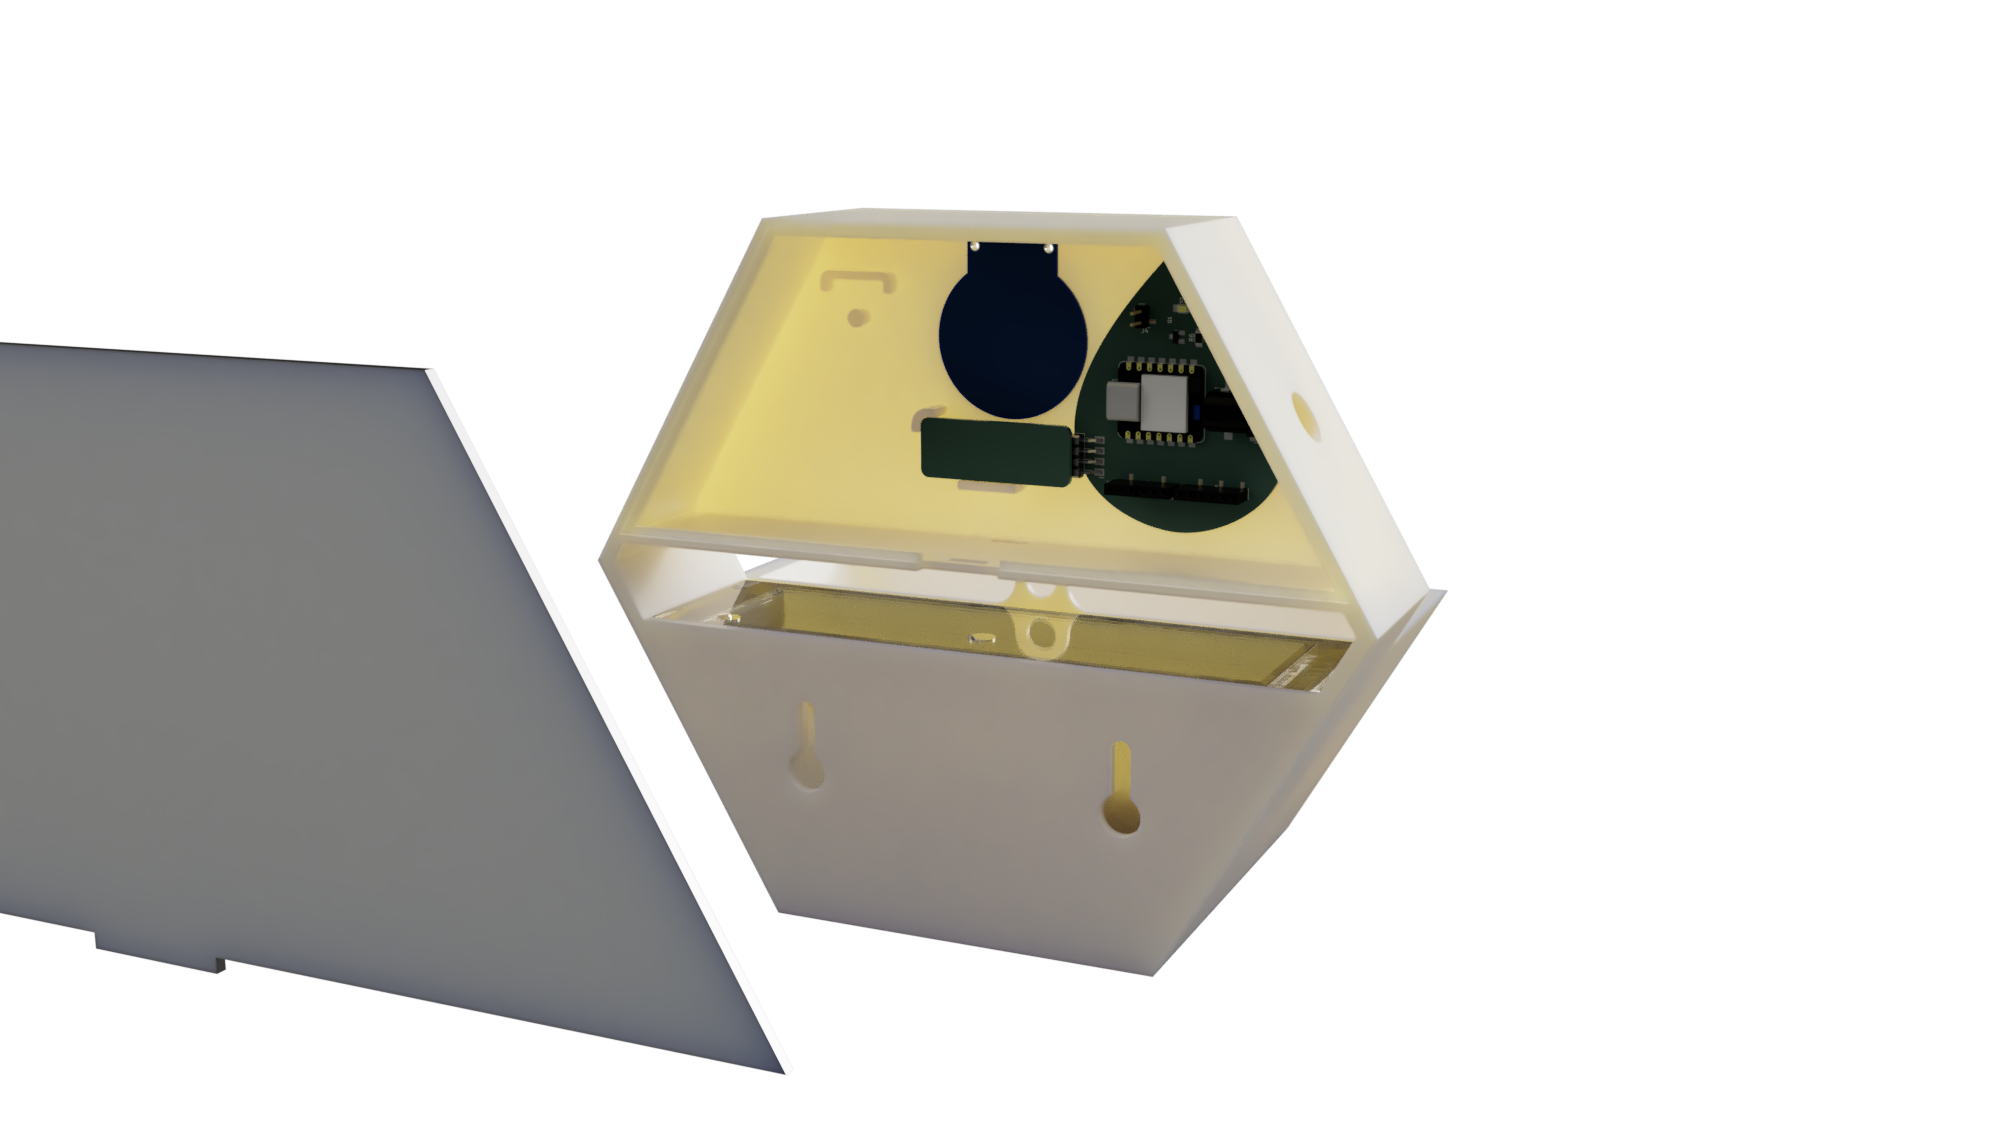
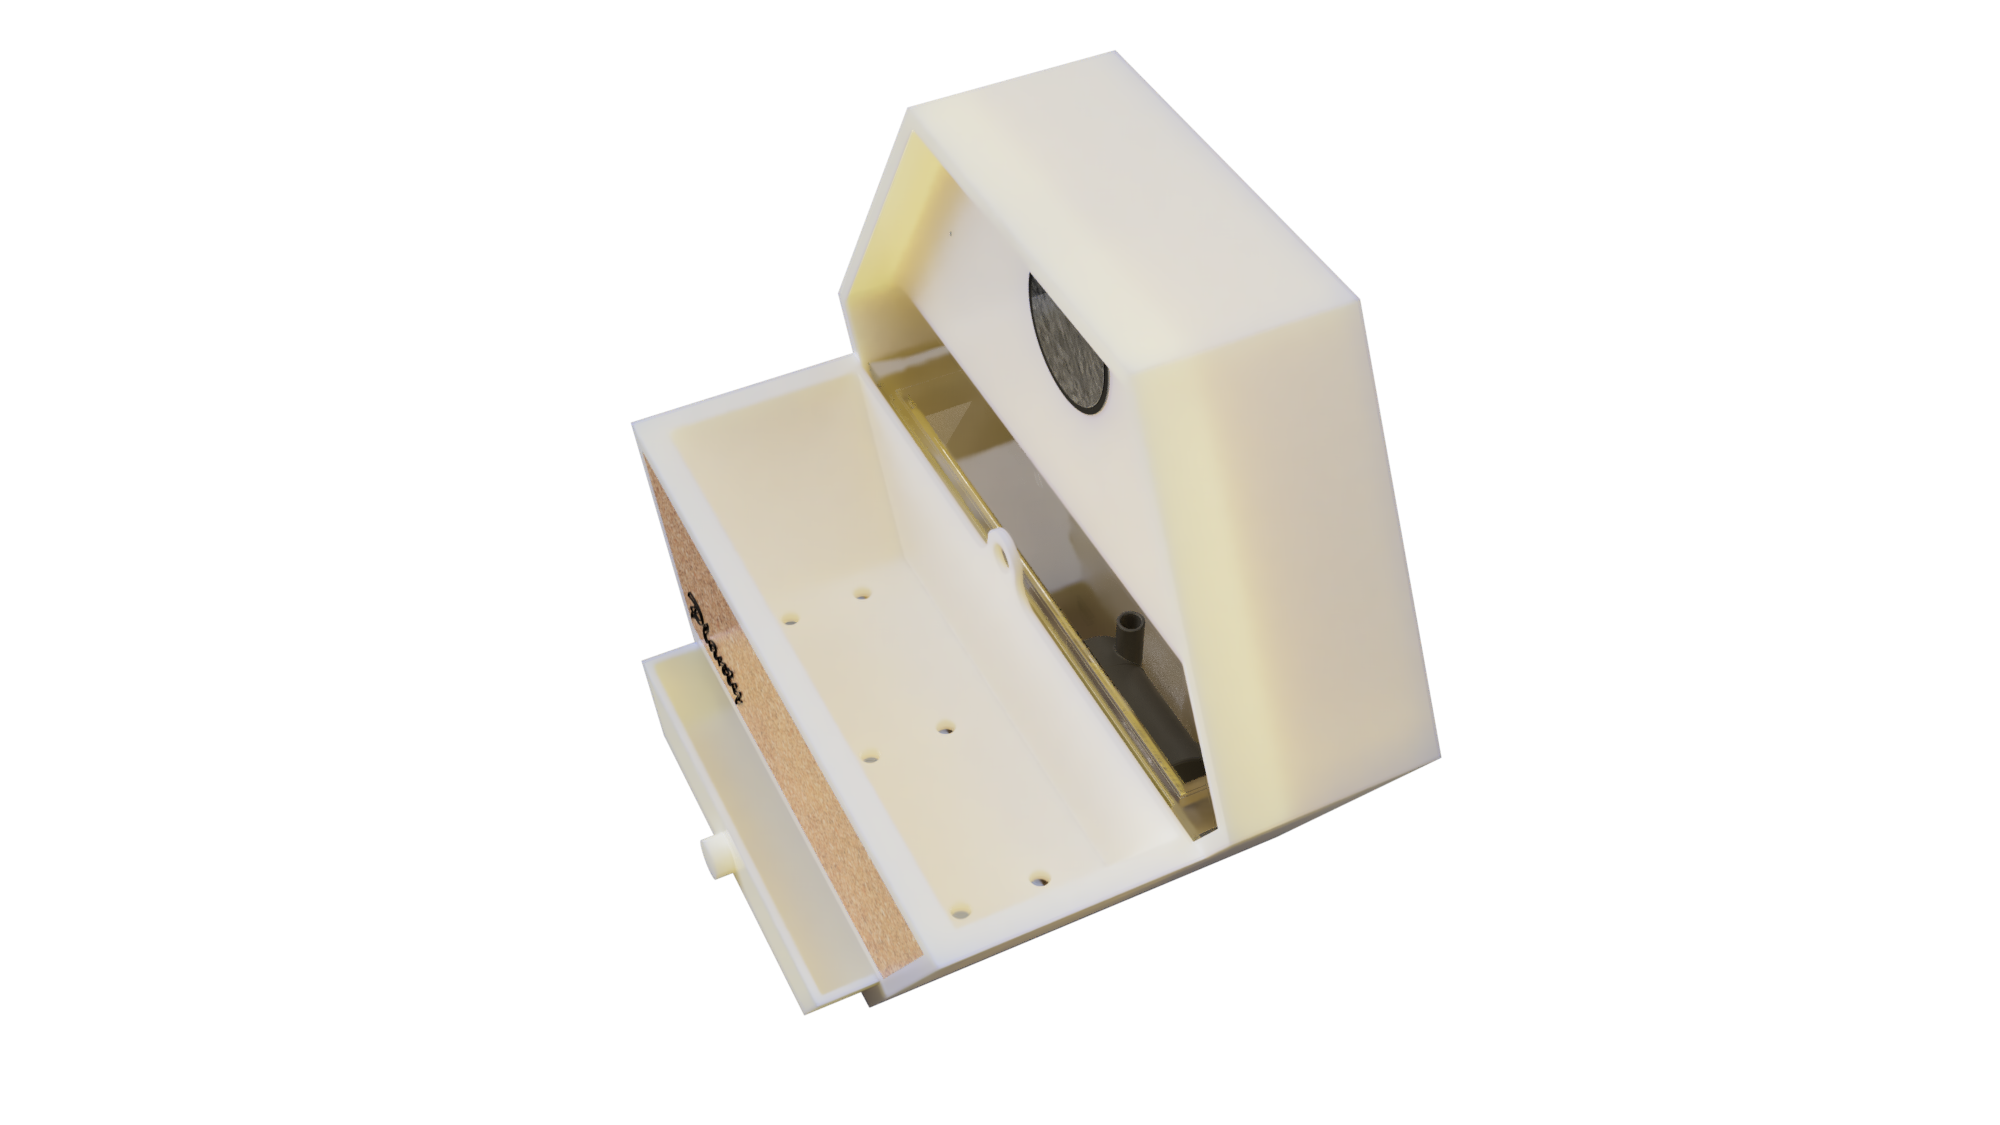
Here is a section view of the product to see how it's assembled.

3- Packaging:
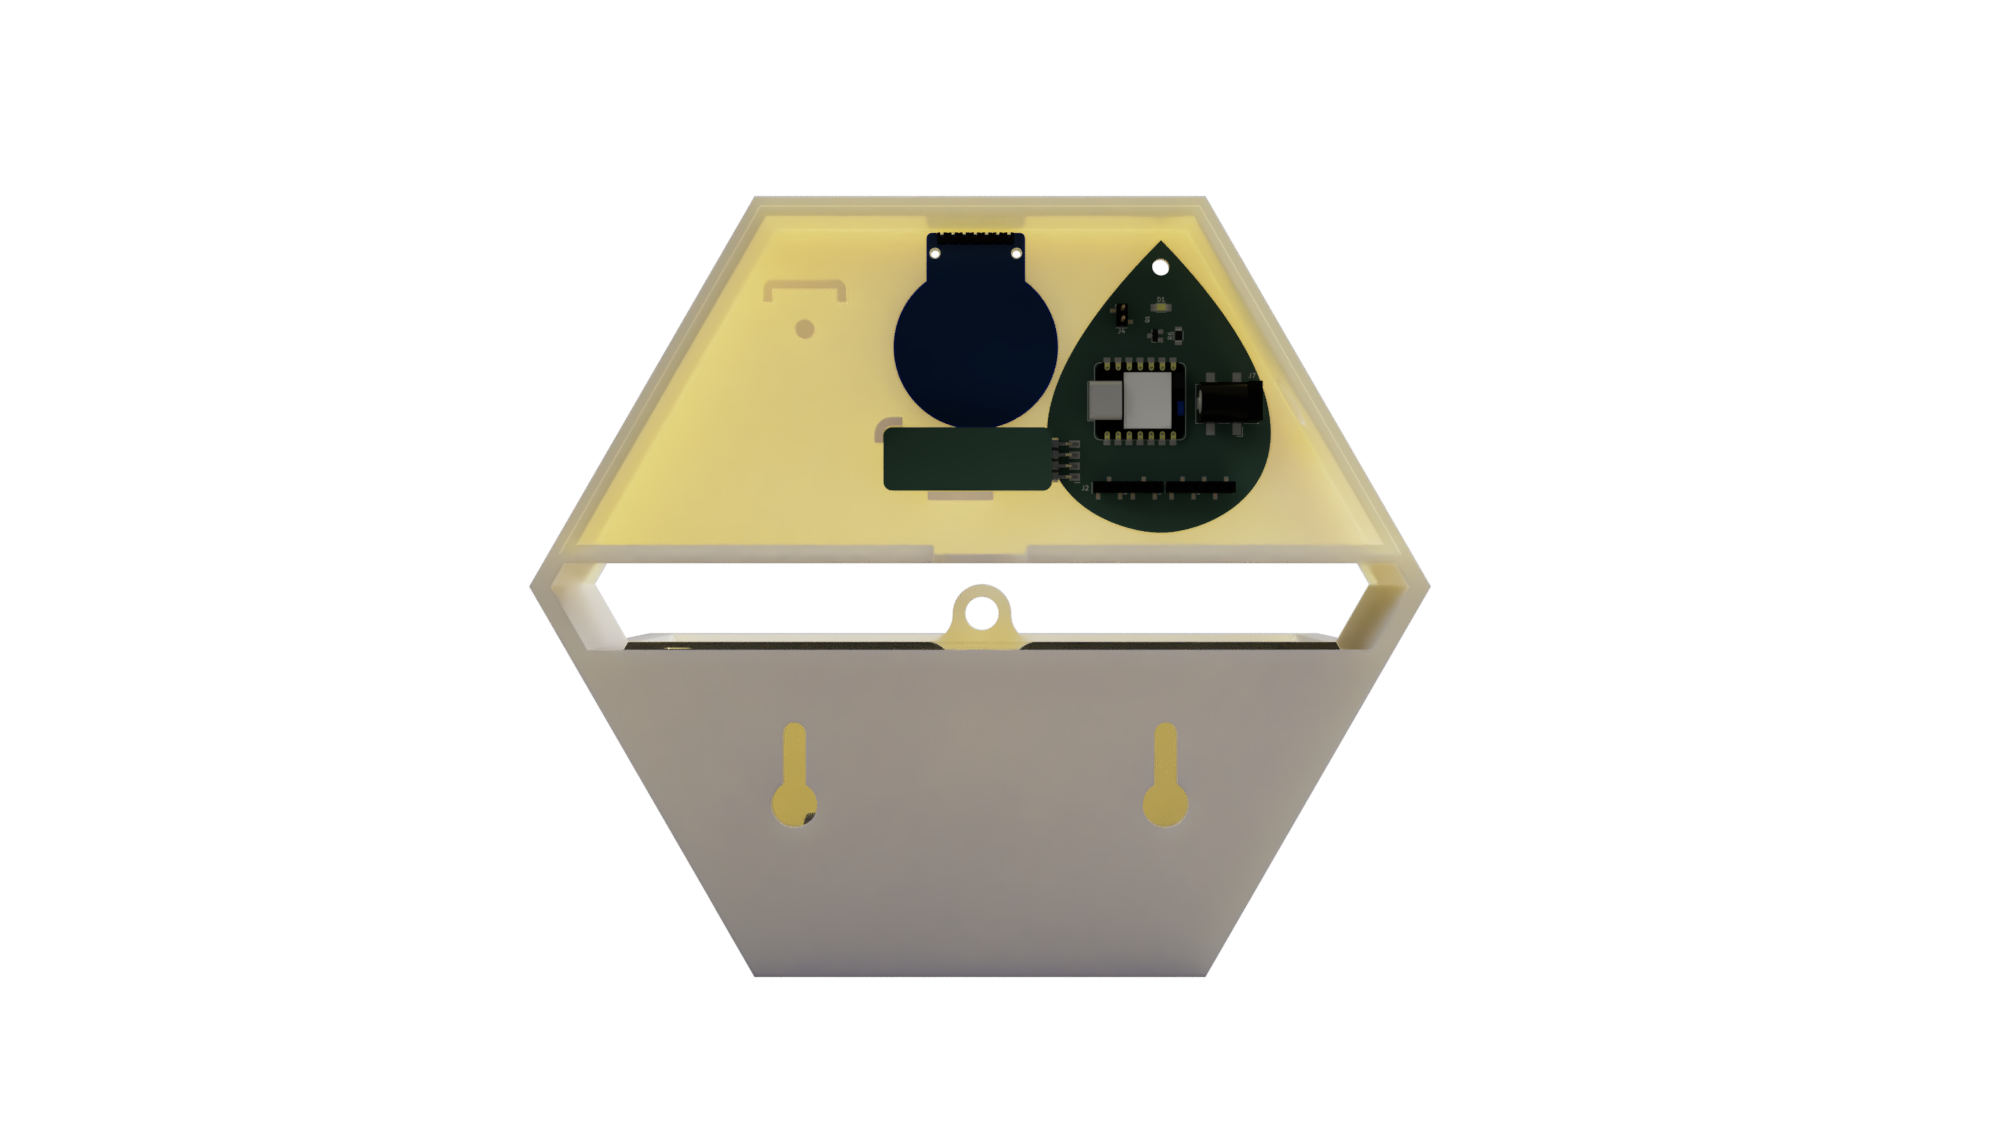
I started adding the PCBs and other electronics to the design and considered how to hold them in place in the product and where I'll put the power supply in to power the product. Each part is nearly held in a different way based on how the best I could hold it. I took into account the electronics that will be outside in different places like the soil moisture sensor that will be put in the pot so I made some opening to pass the wires through.
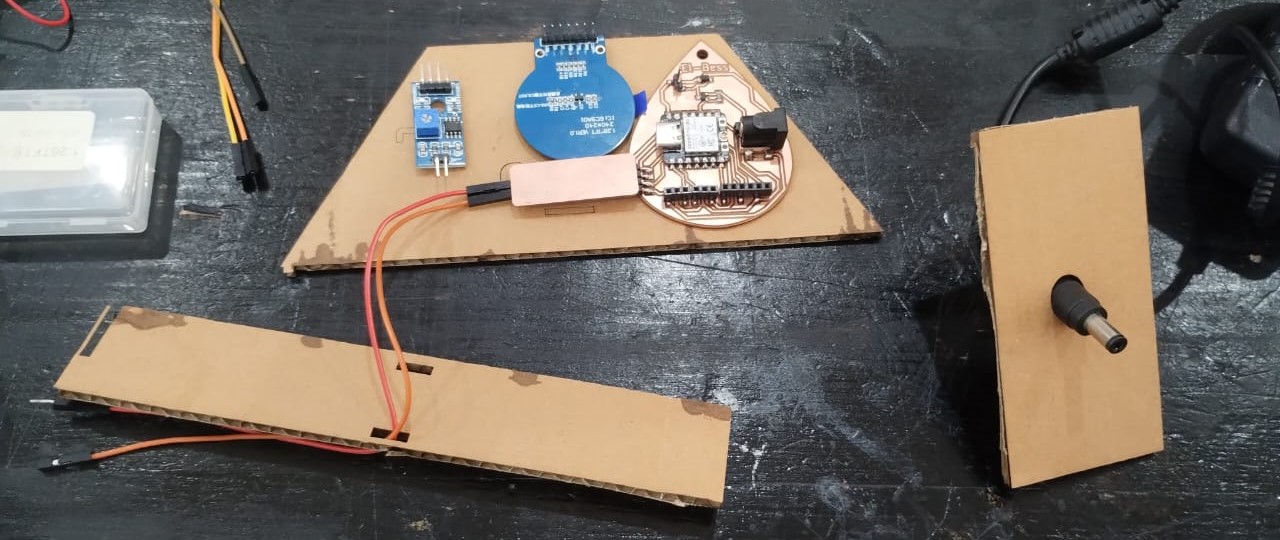
Before this final version you've seen in the 3D model I made a prototype using laser cut cardboard to make sure everything fit perfectly and made some adjustments based on what I noticed then I moved to the fabrication process.
4- Fabrication:
4.1- Laser Cutting - Subtractive
I used the laser cutting machine to cut and engrave on a 4mm Cork.
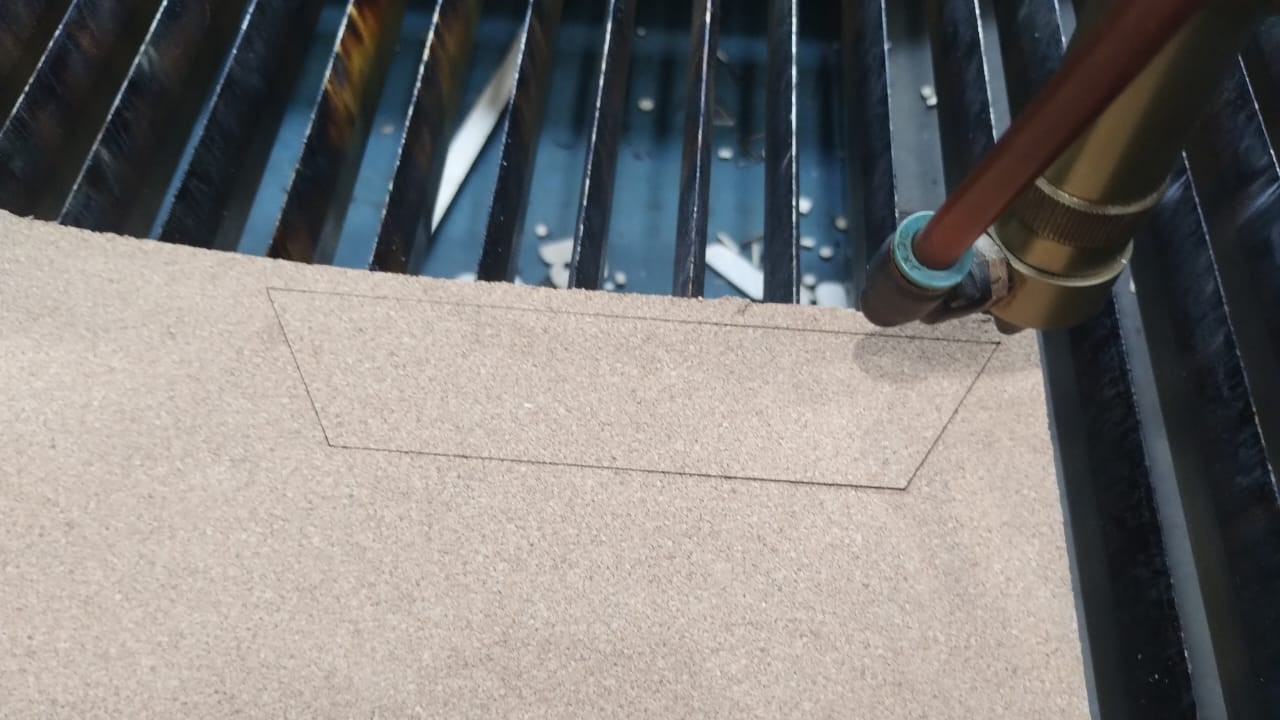
To cut I used a speed of 50mm/s and power of 35.
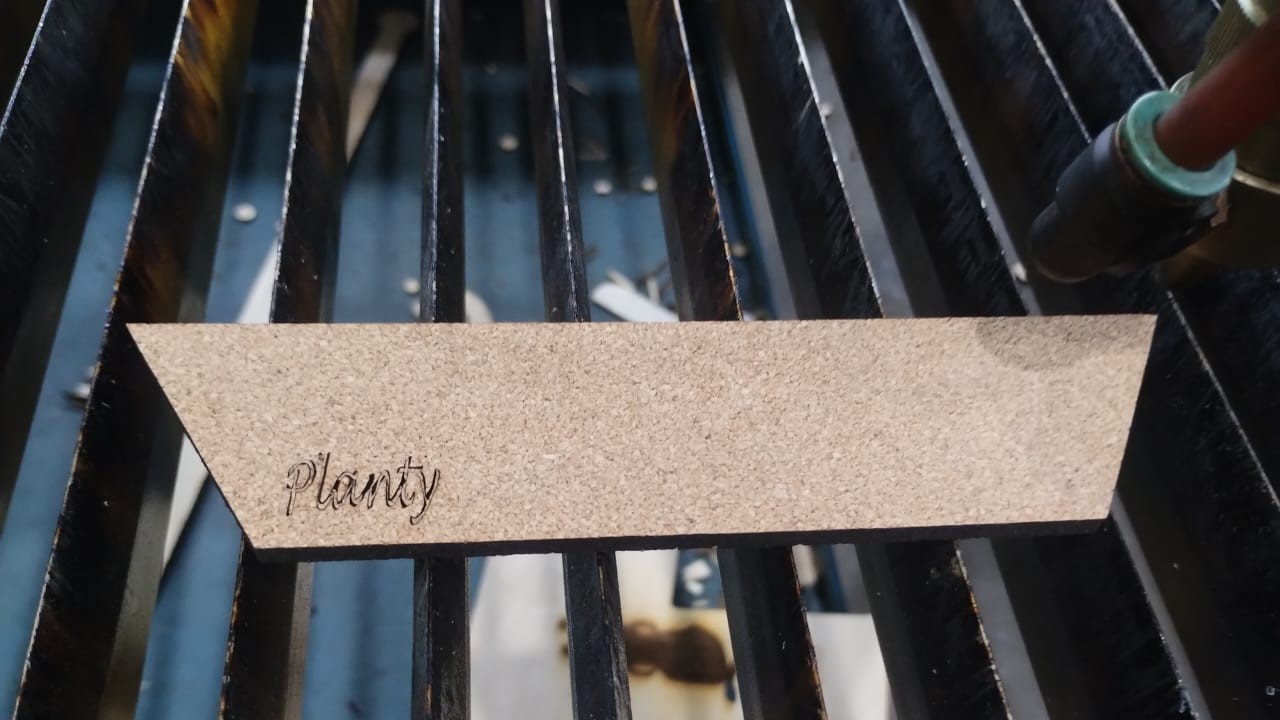
To engrave I used a speed of 350mm/s and power of 15 but I should've reduced the power way less than that. 5 maybe?
4.2- 3D Printing - Additive
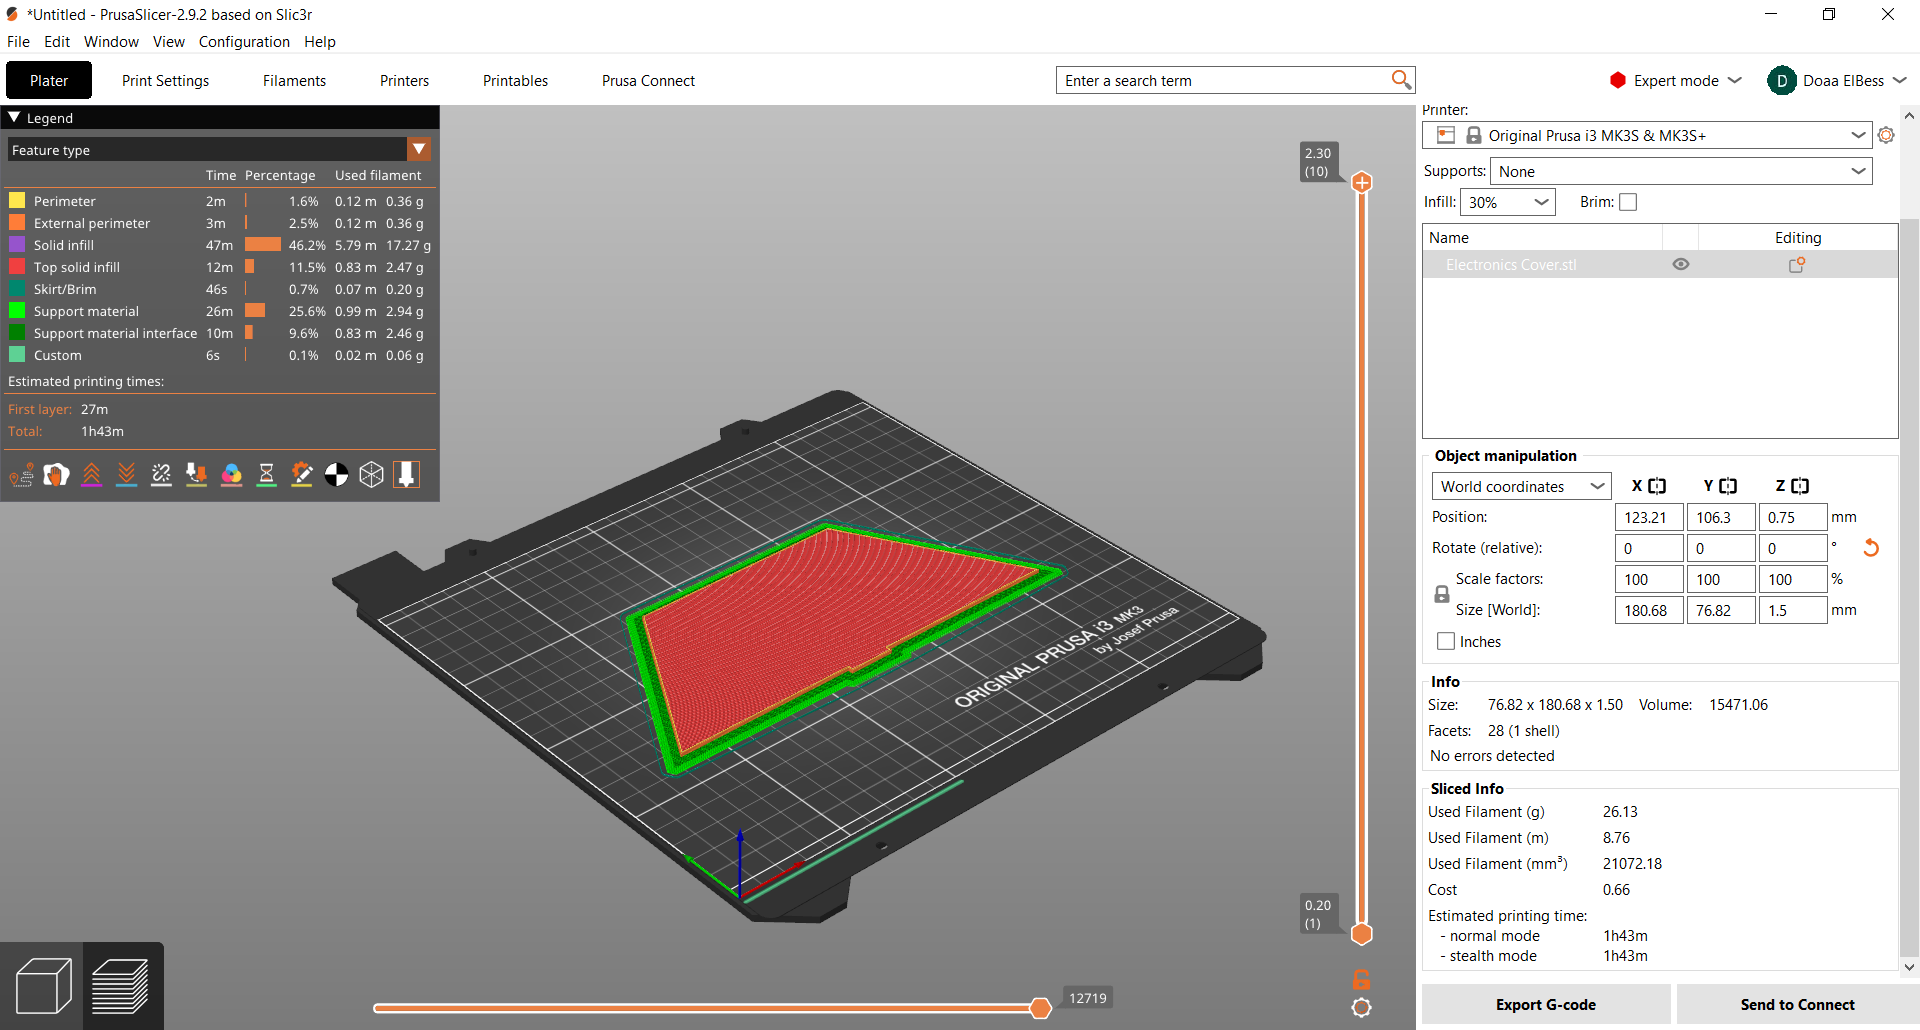
I used prusa slicer to prepare the stl files to be 3D printed on Prusa i3 MK3S.
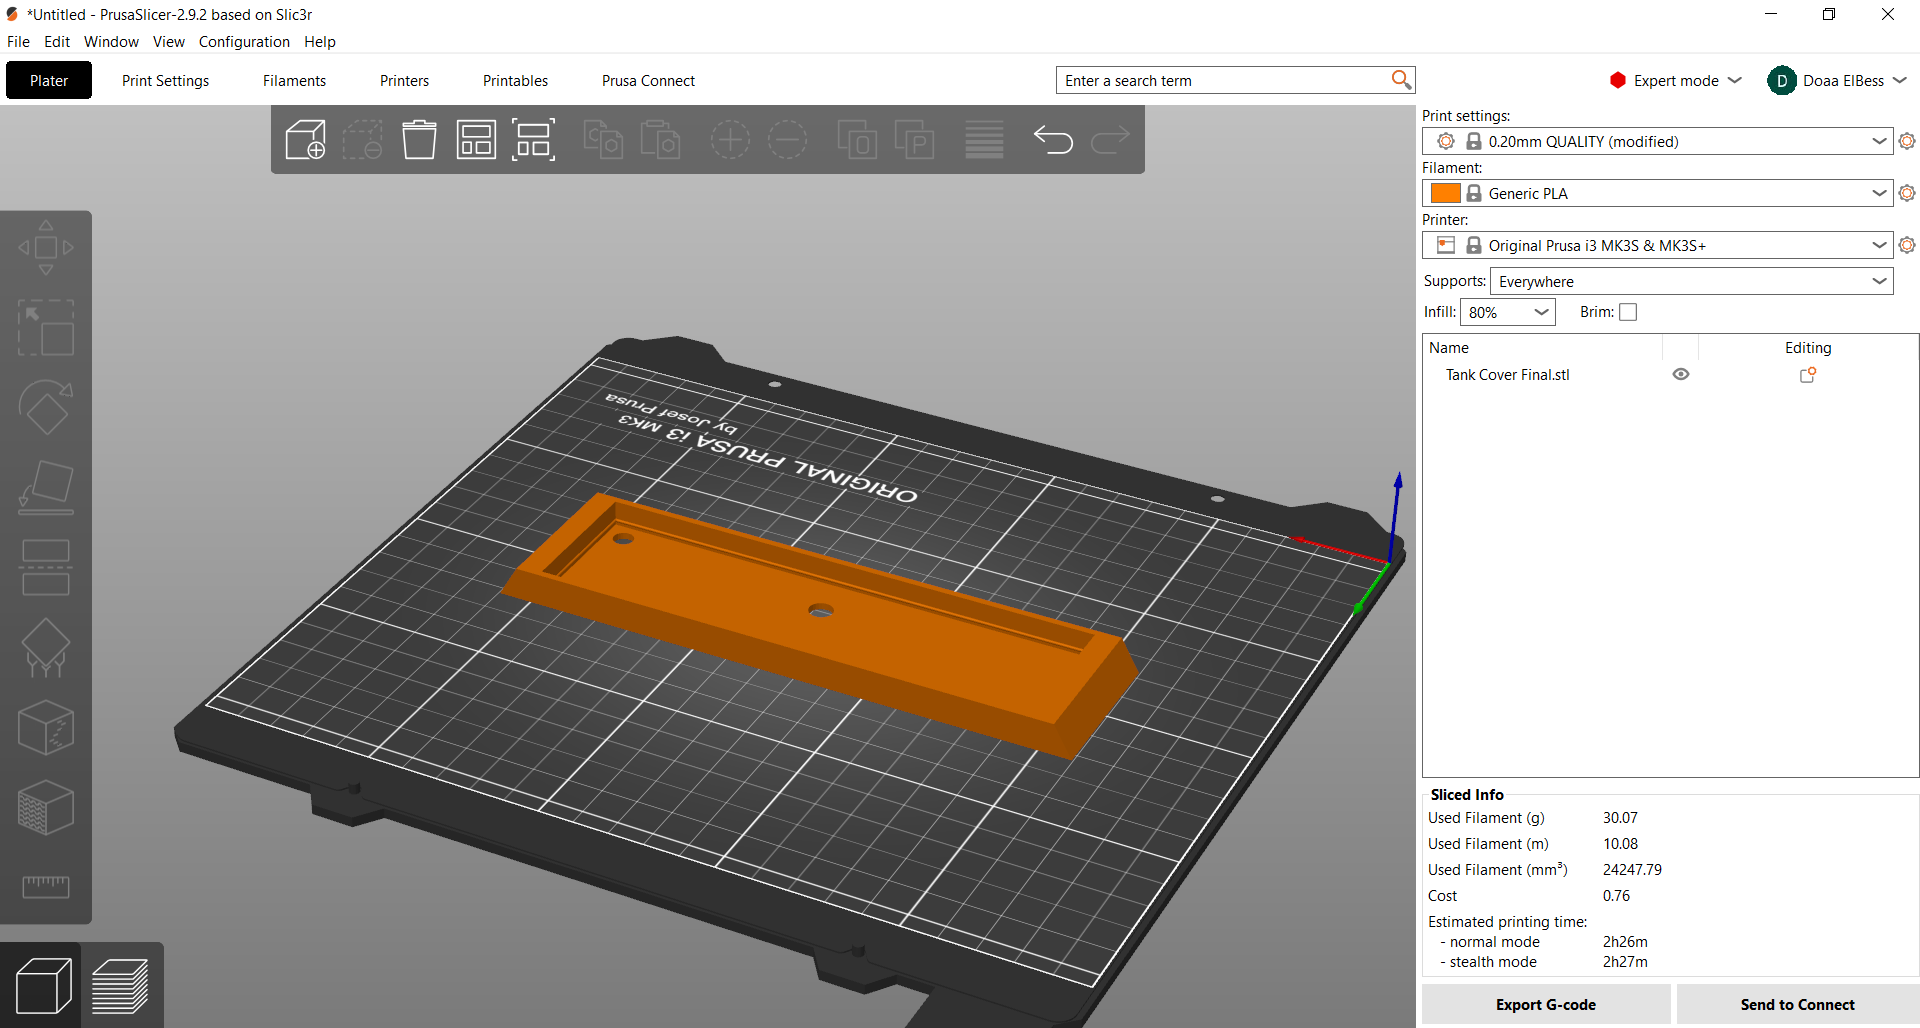
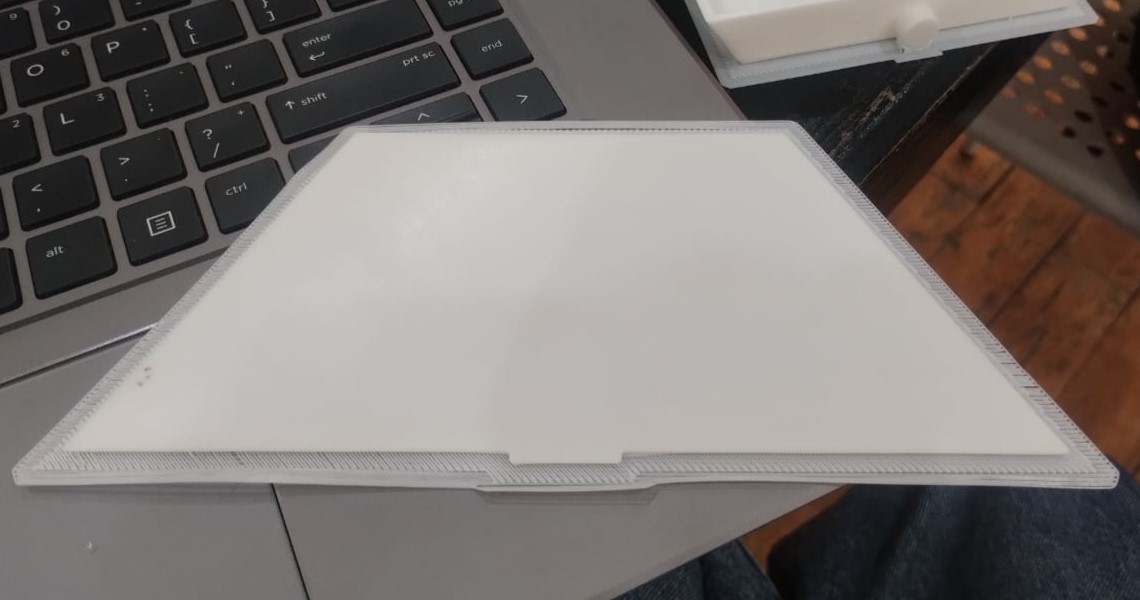
This is the parameters for the tank cover but I had problems in warping so I fixed it in the next prints.
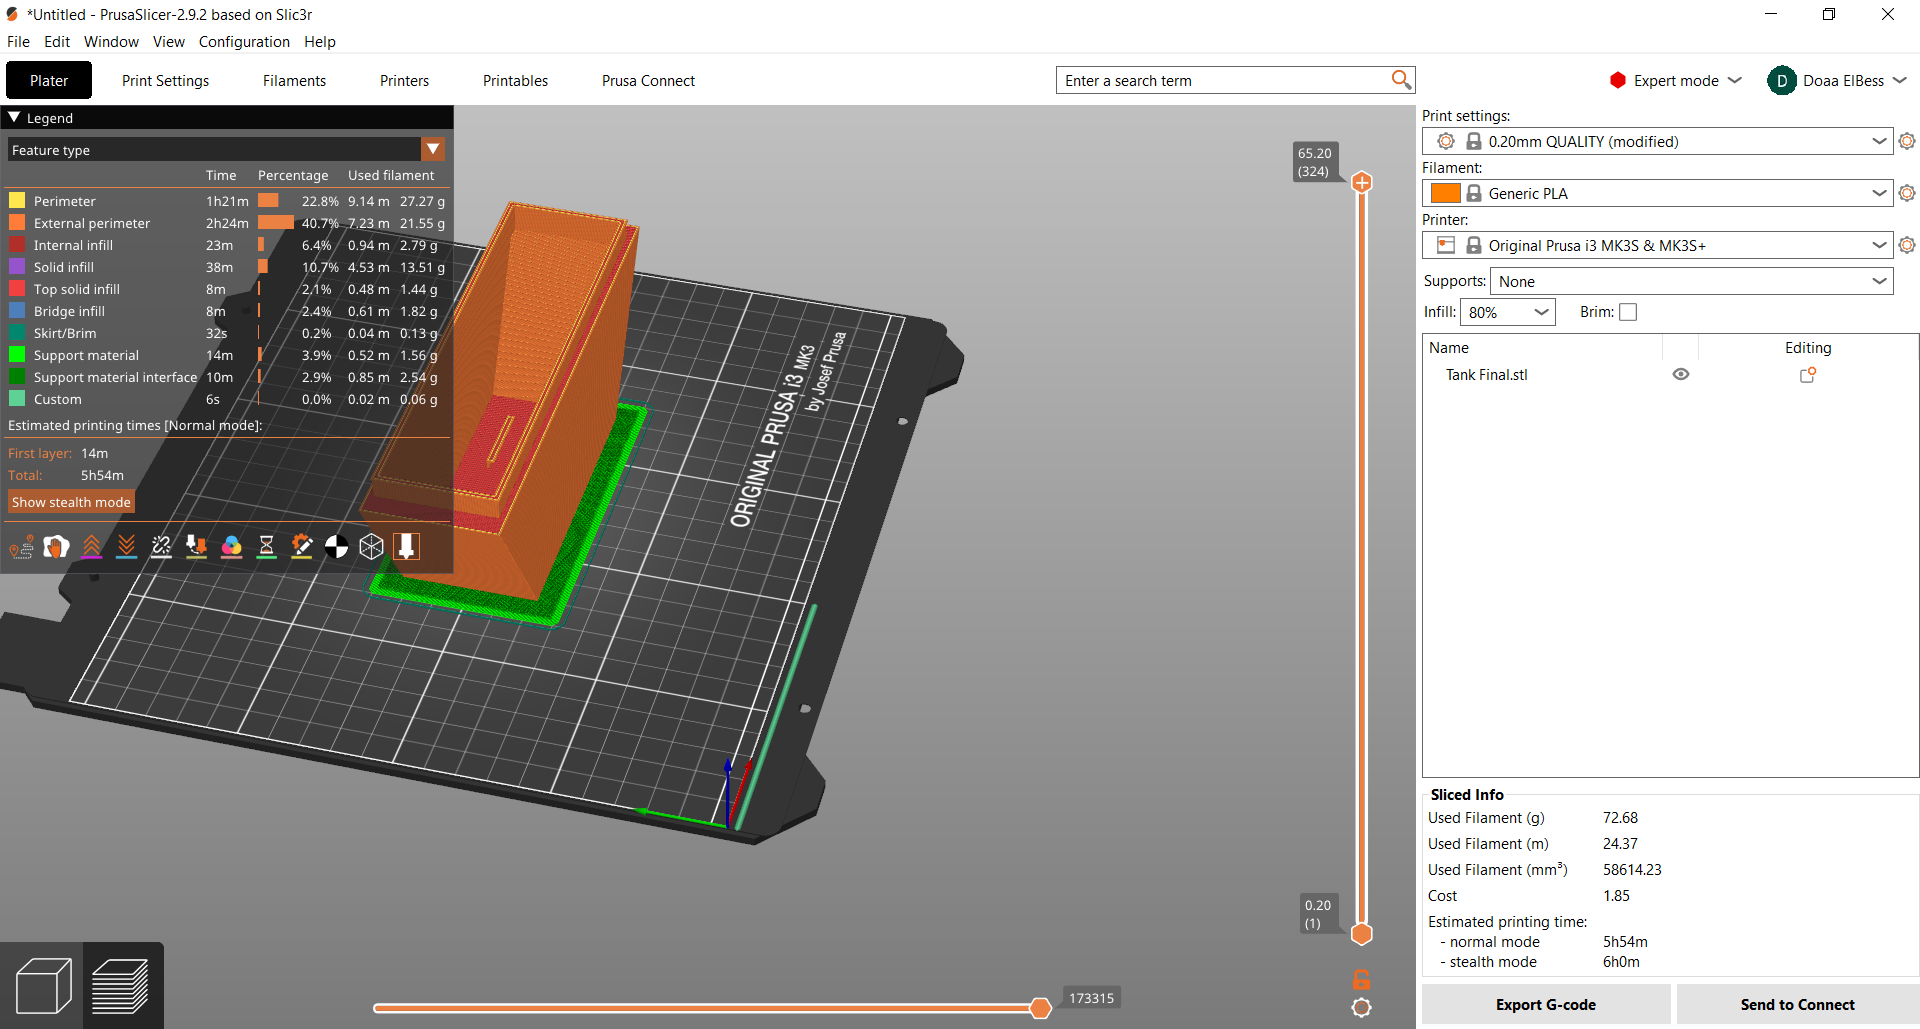
To fix the warping problem I added raft when I was printing the tank and it was printed really well.
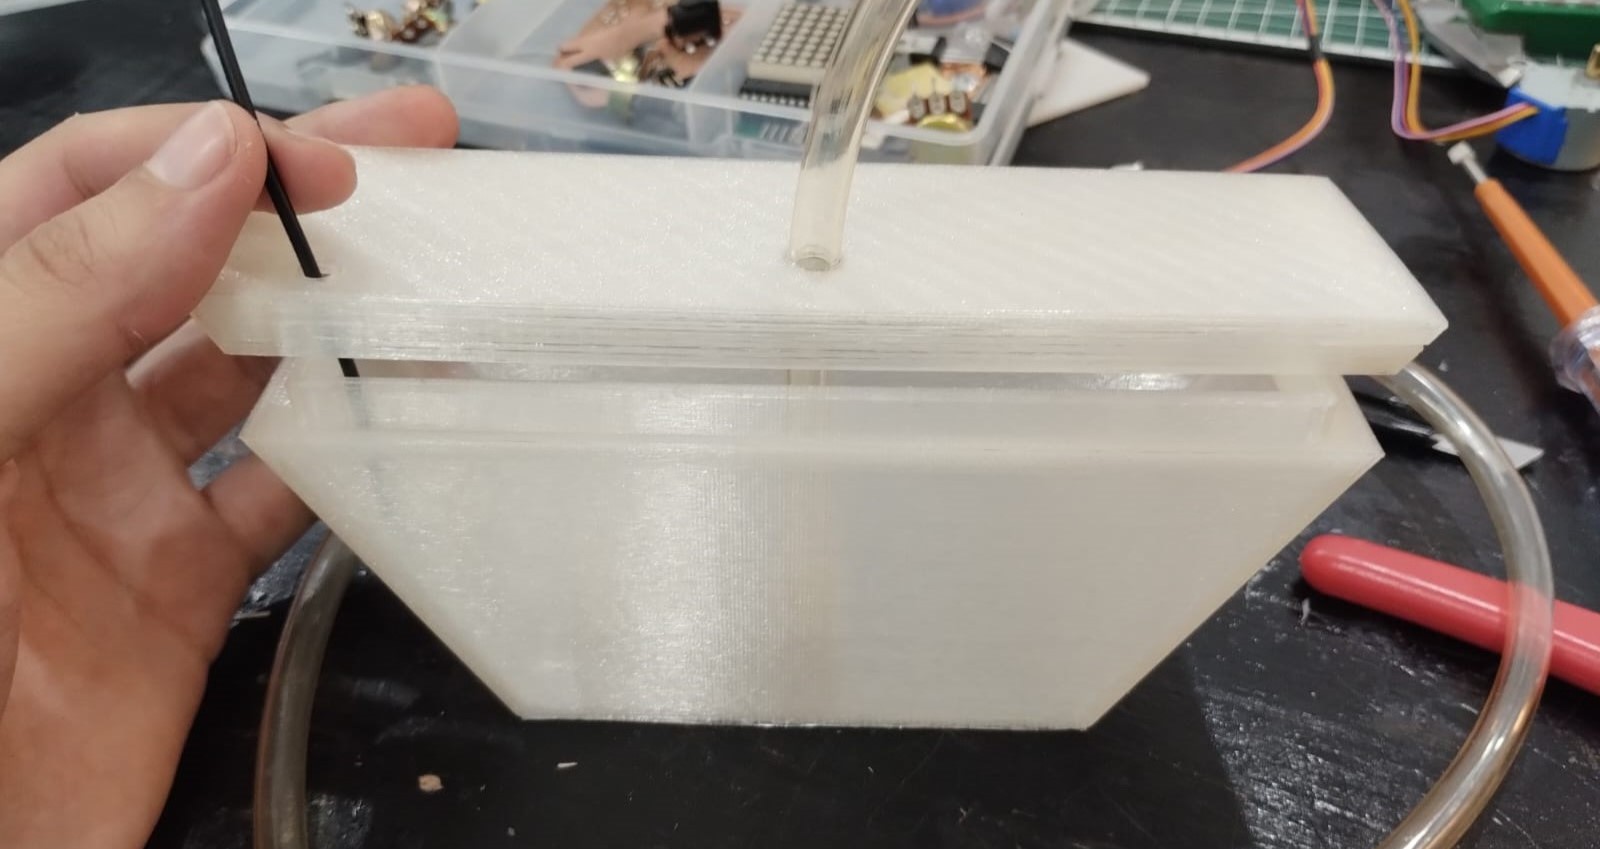
This is the result and assembling them with the pump and tube. They were printed with transparent PLA.
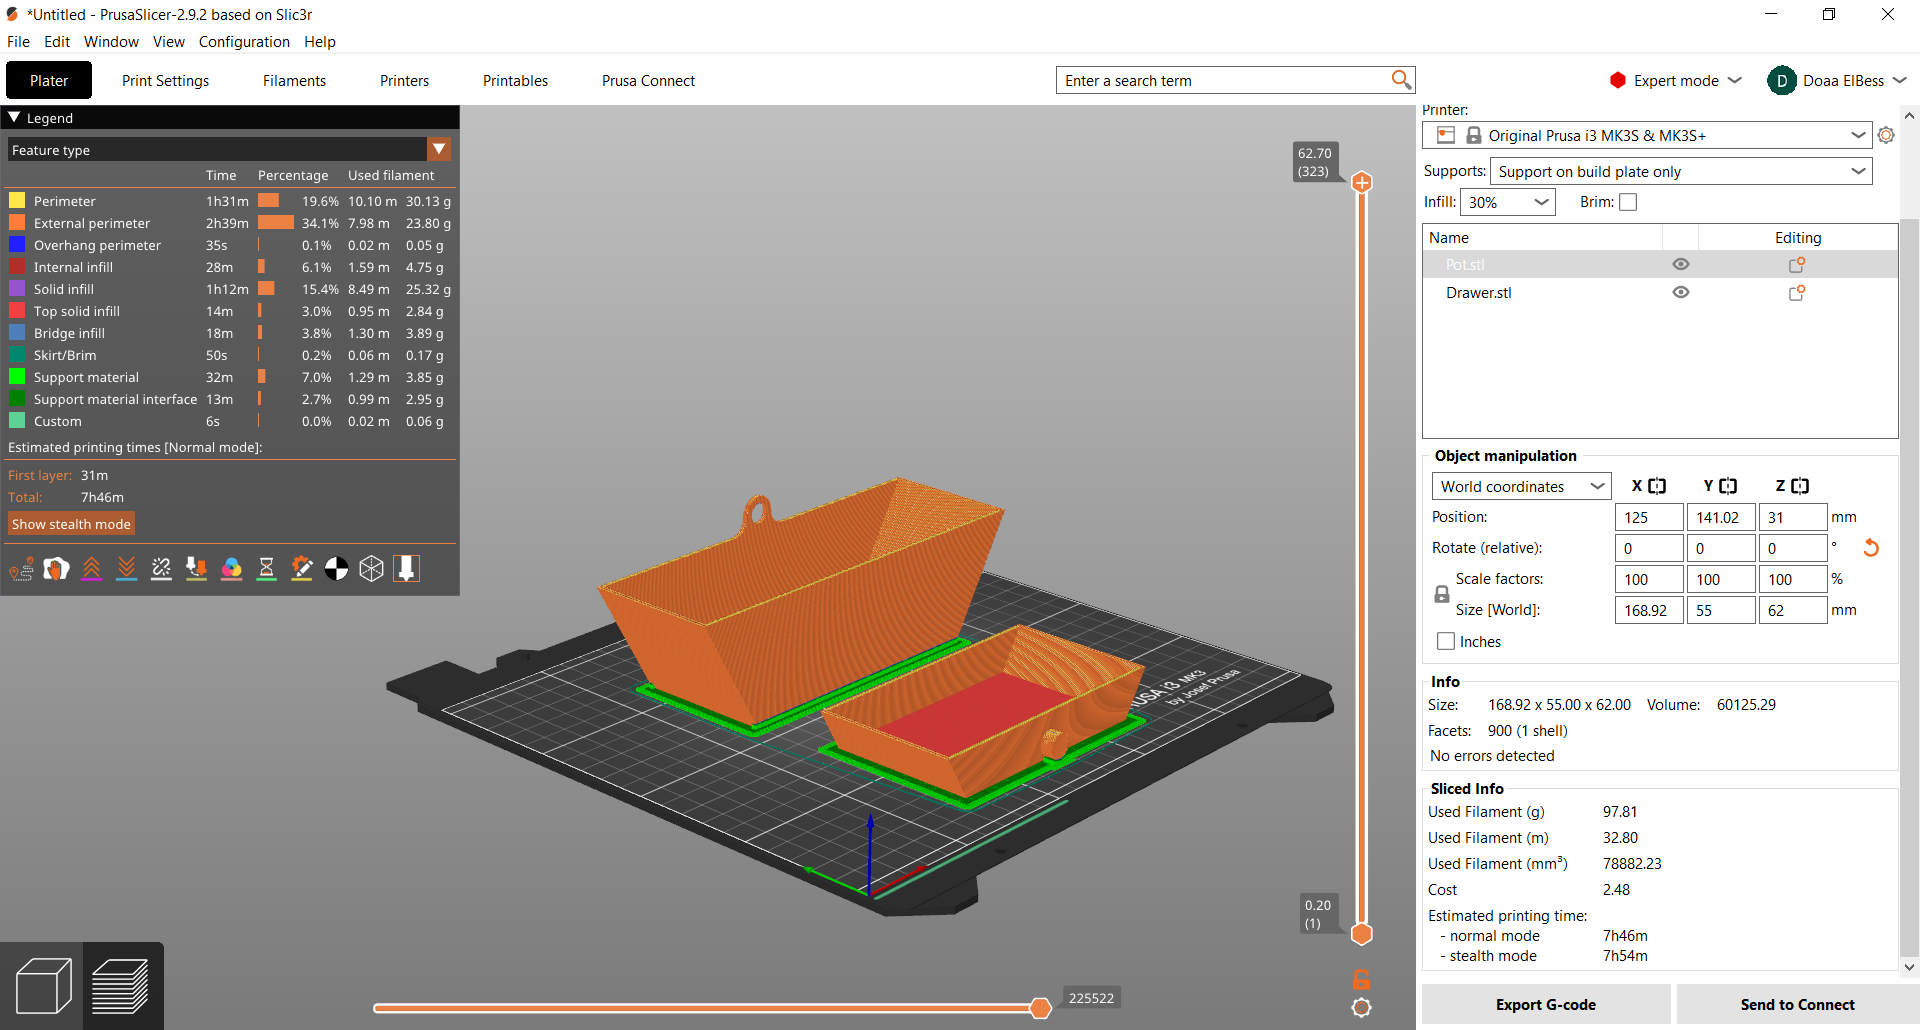
I continued adding rafts and added snug supports here.
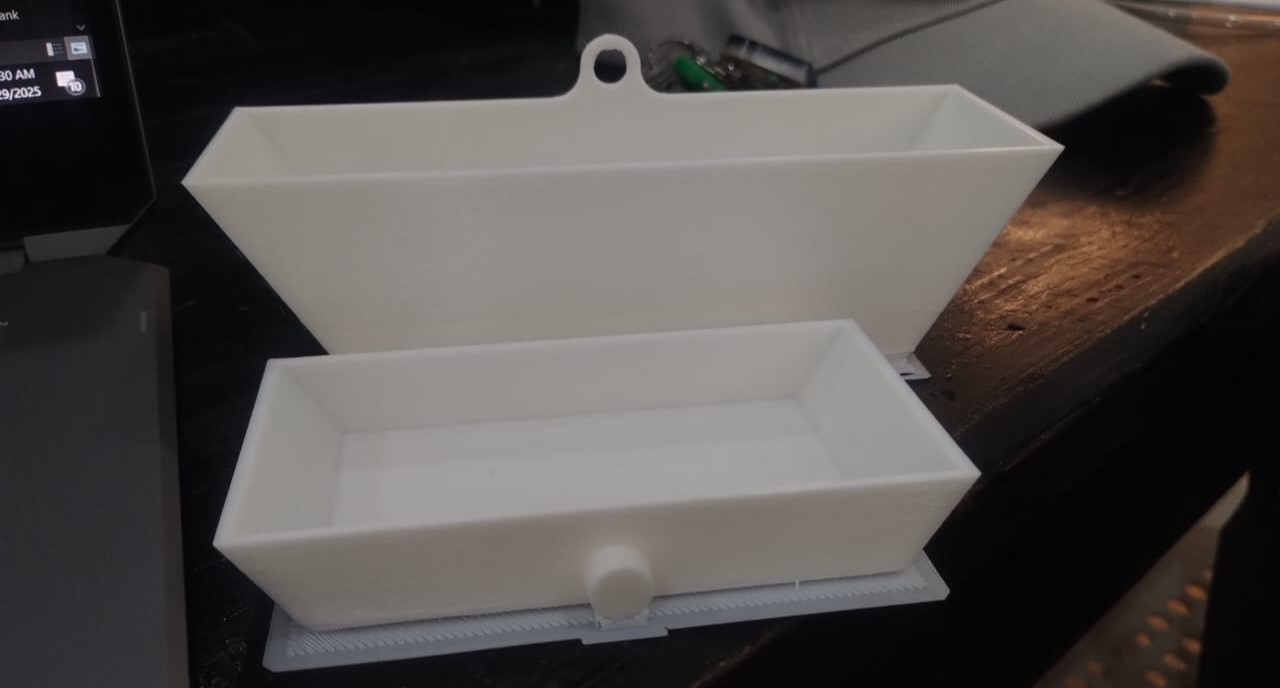
This is how it turned out with milky PLA.
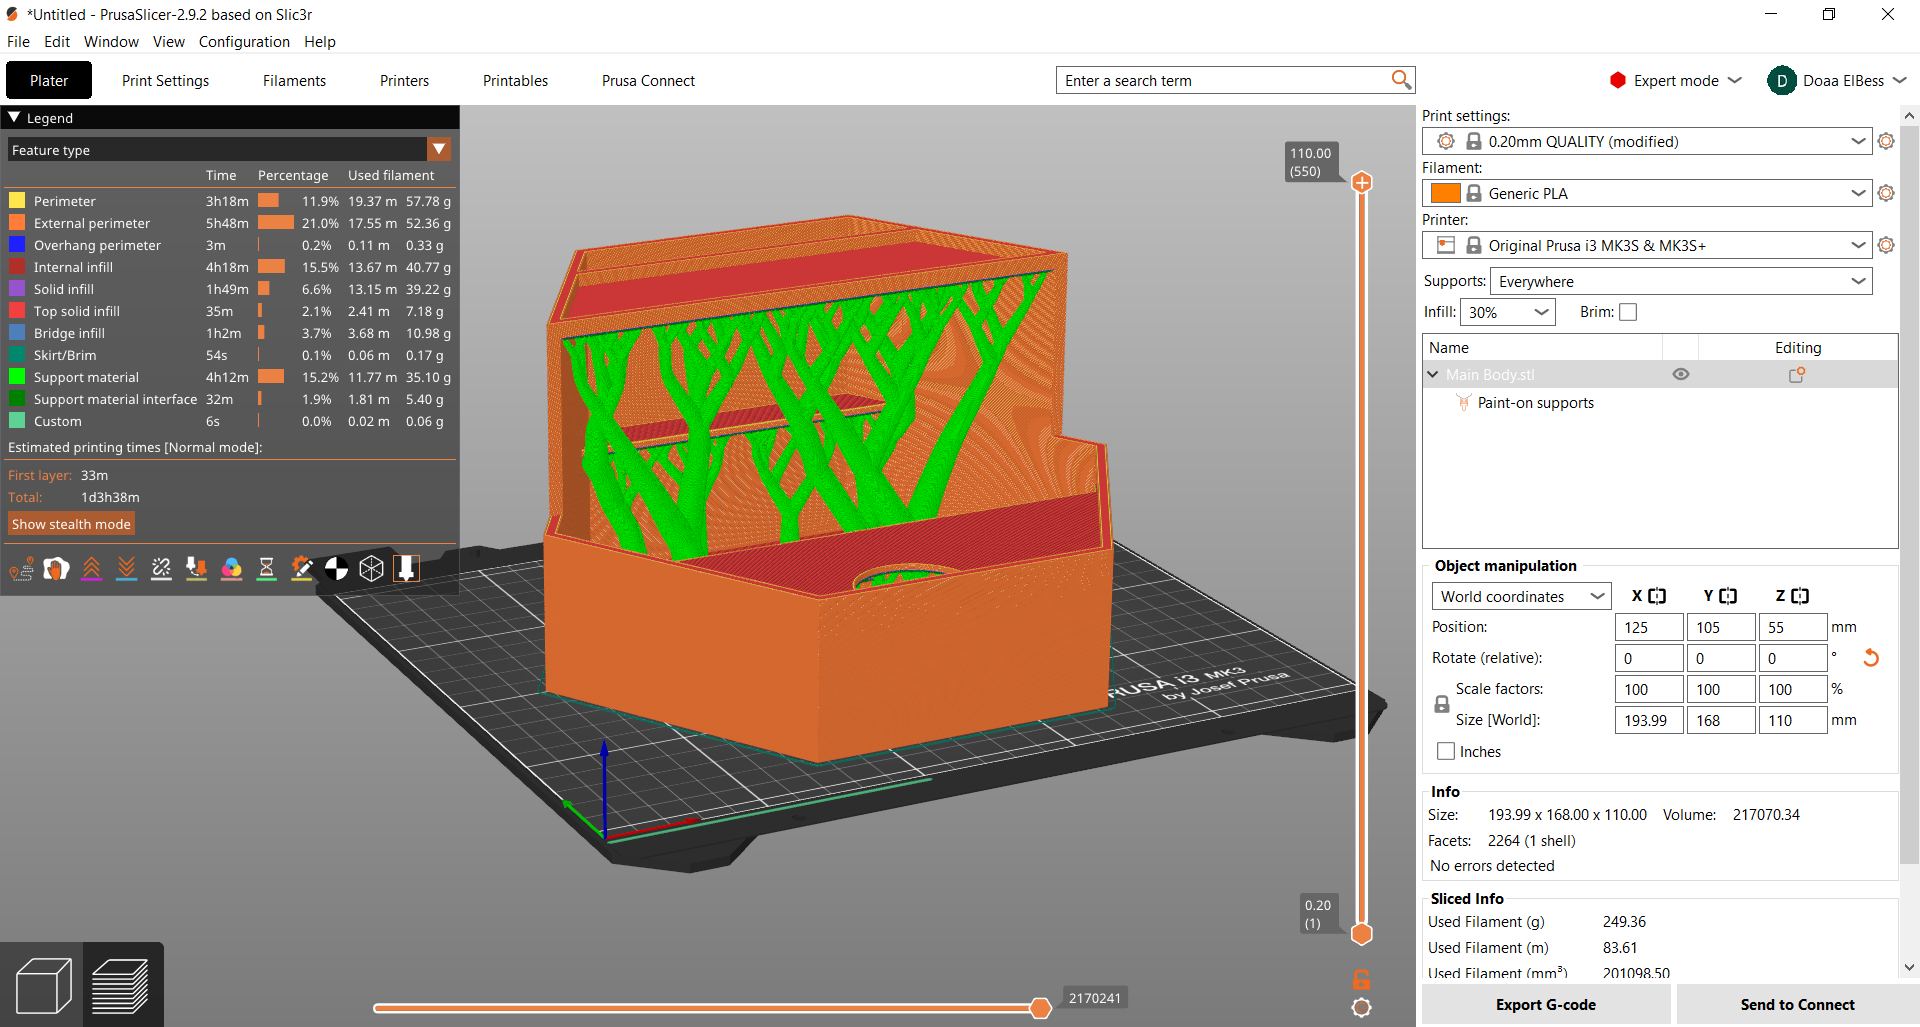
The main body was tricky to print and needed so much support and time. My friend Eman suggested I use the cut option in prusa slicer and taught me how to do it and it was great but I finally decided to print it in one piece with tree support because heey "No risk, no FUN!".
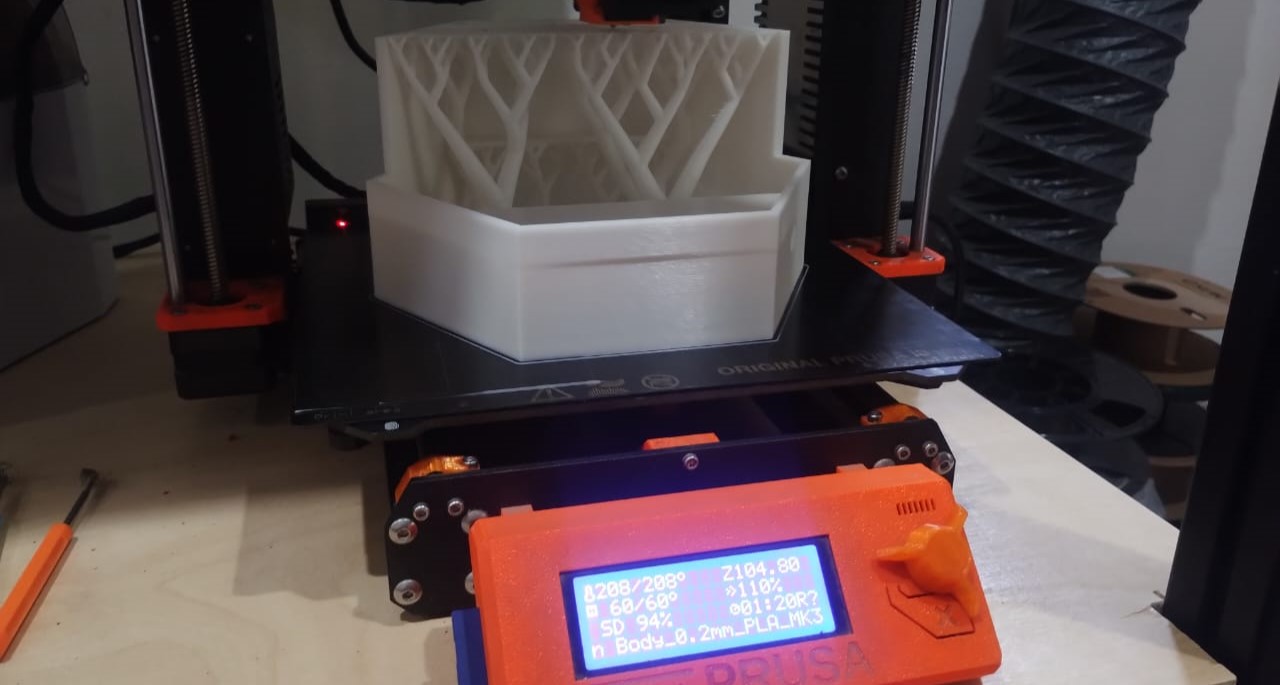
This was the longest 24 hour of my life waiting and hoping the print goes well and the printer doesn't stop or fail for any reason. Shout out to the hero Prusa it made it all the way through.
4) PCB Design and Production:
1- Design on KiCAD:
I made some changes on the PCBs I previously worked on and made it specially for the final project as I combined Planty PCB with the mosfet PCB for the pump and added a DC Jack to power the project from.
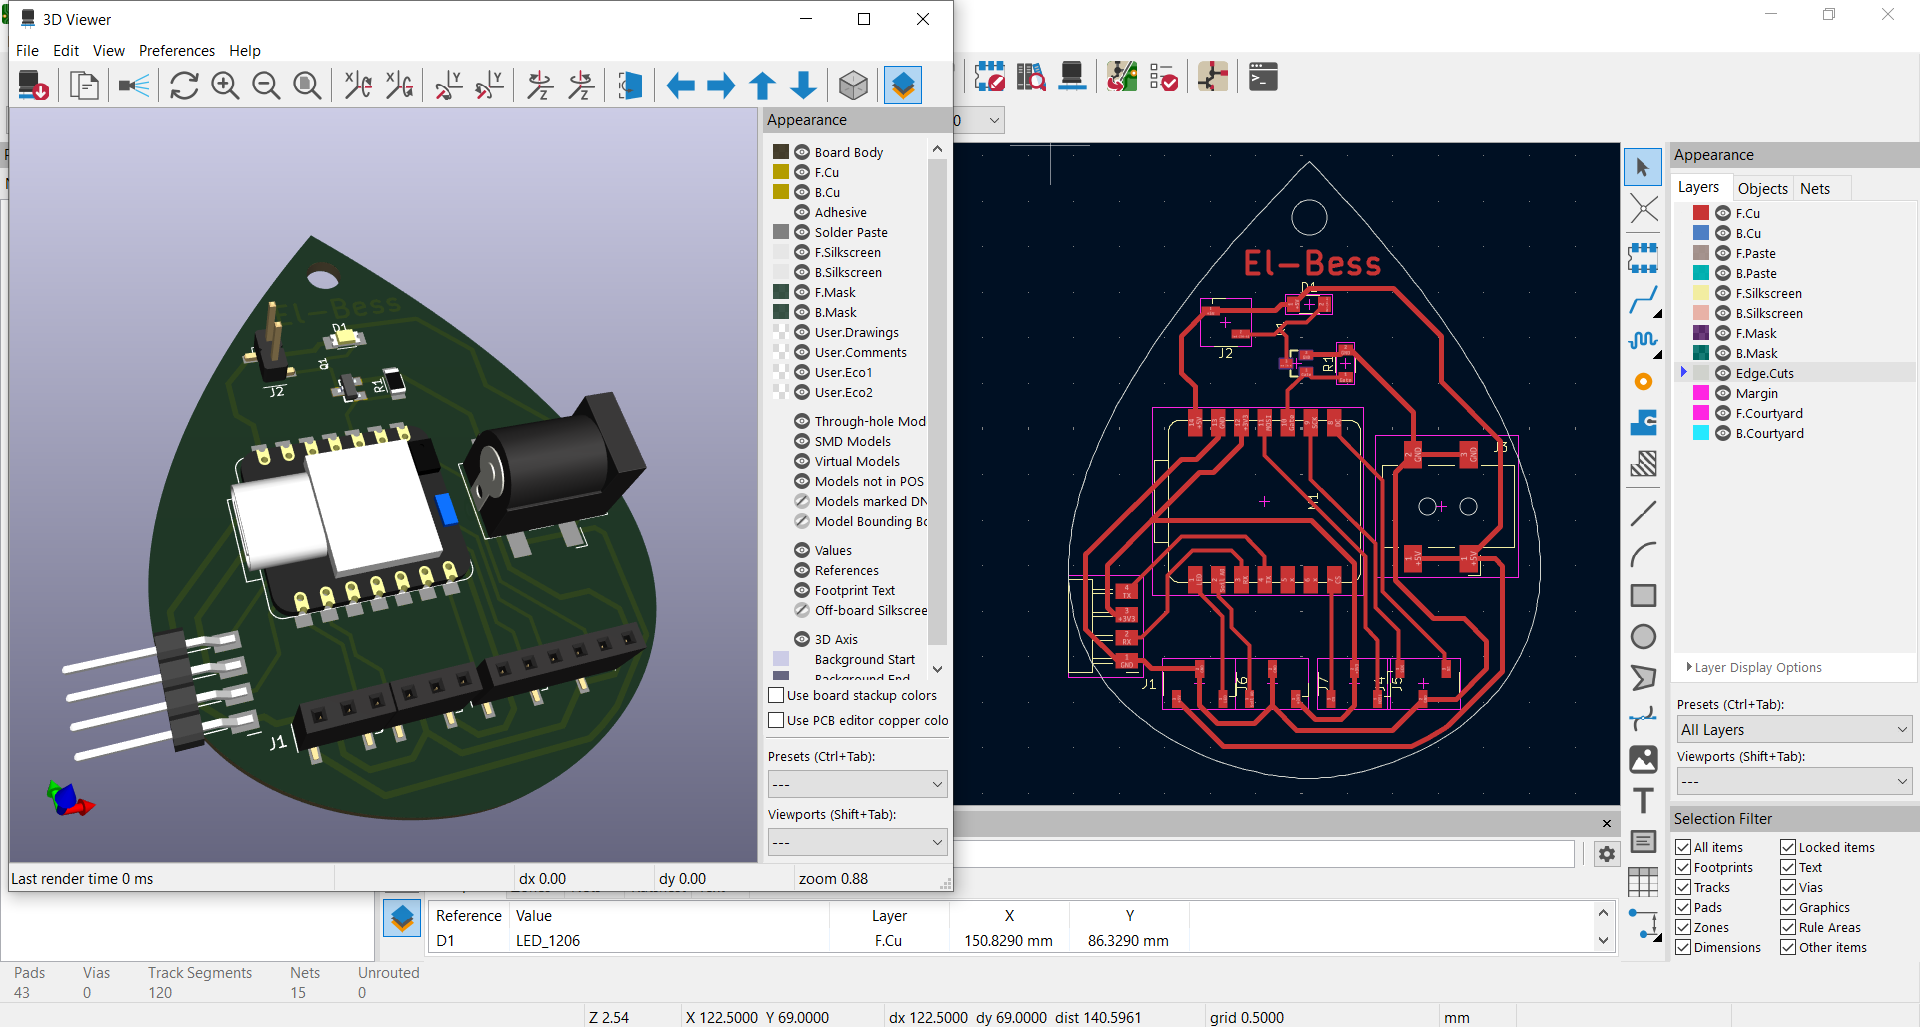
I then moved to the PCB Editor to make traces and place all the components on my Final PCB. This is how it turned out in 3D view. I also made the drop of water little smaller than previous PCBs to fit well in the final project.
2- Preparing For Fabrication:
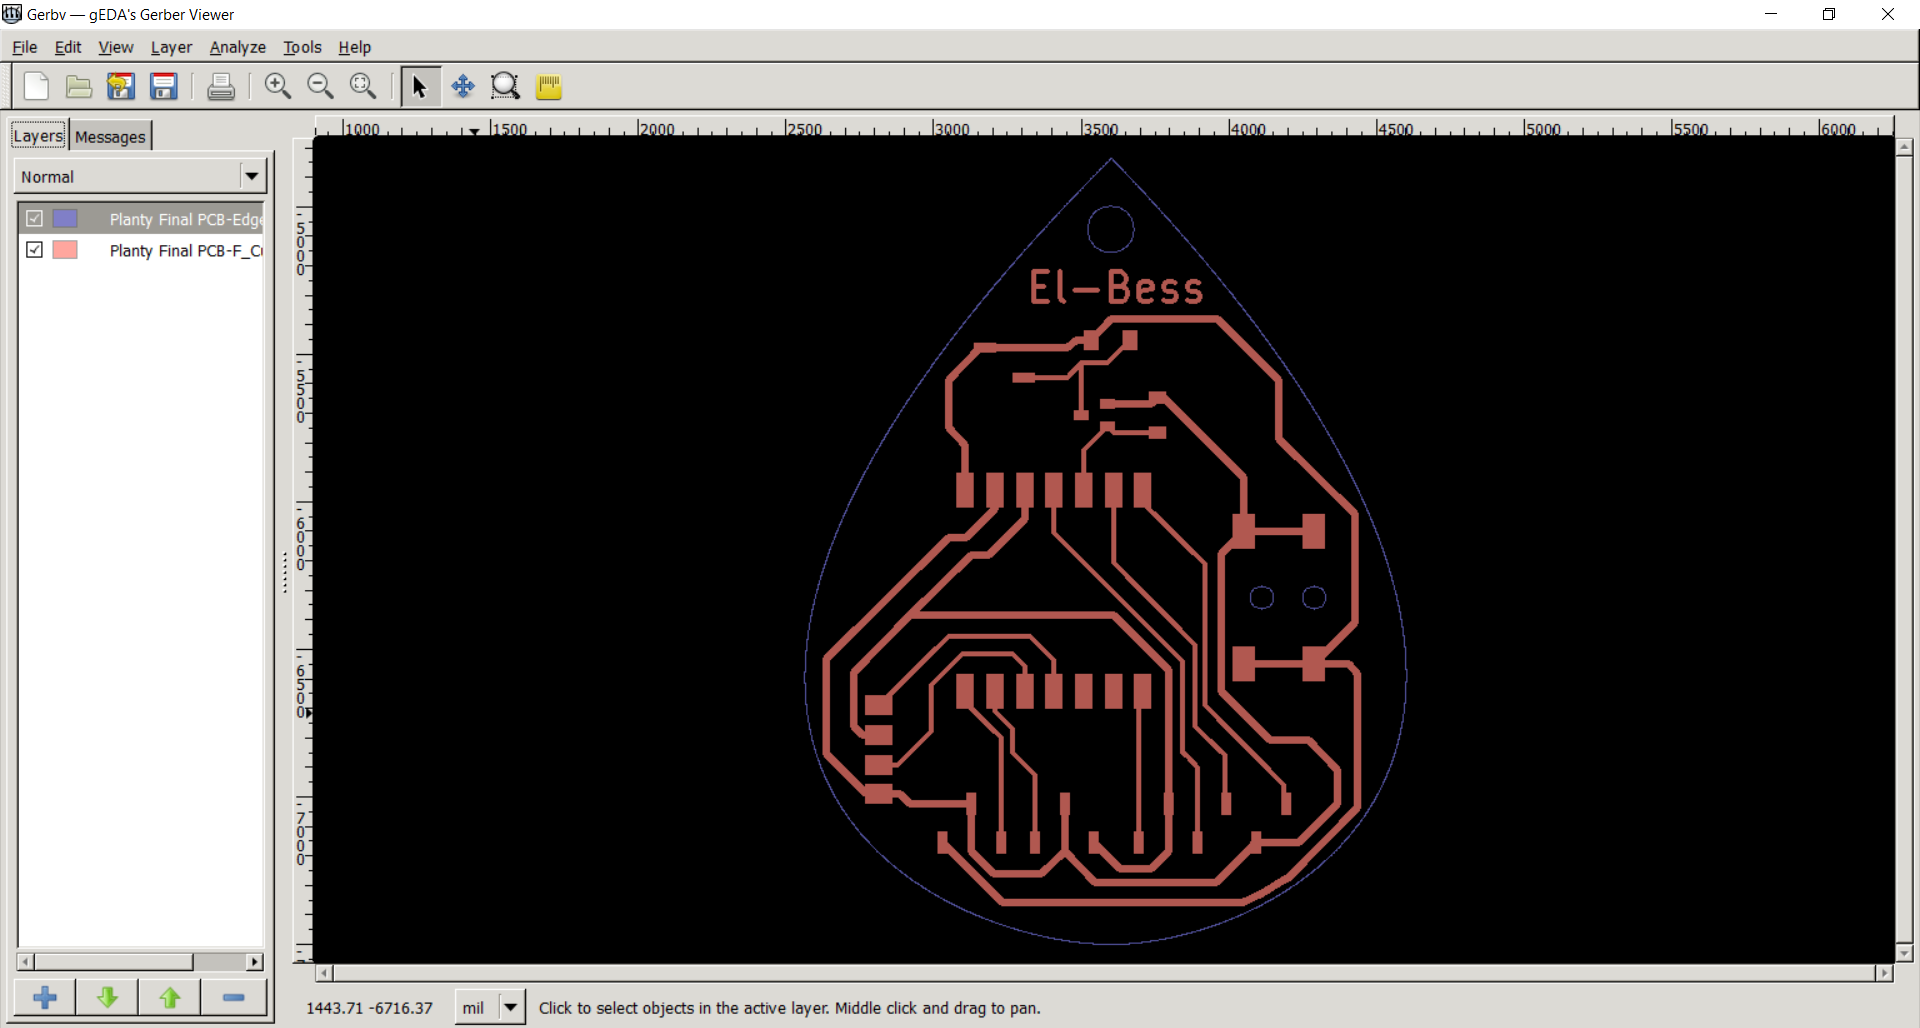
After plotting the gerber files of the F.Cu and EdgeCuts I imported them to GerbV and exported them to Pdfs. If you're not familiar with the process you can check the Electronics Production week for more details.
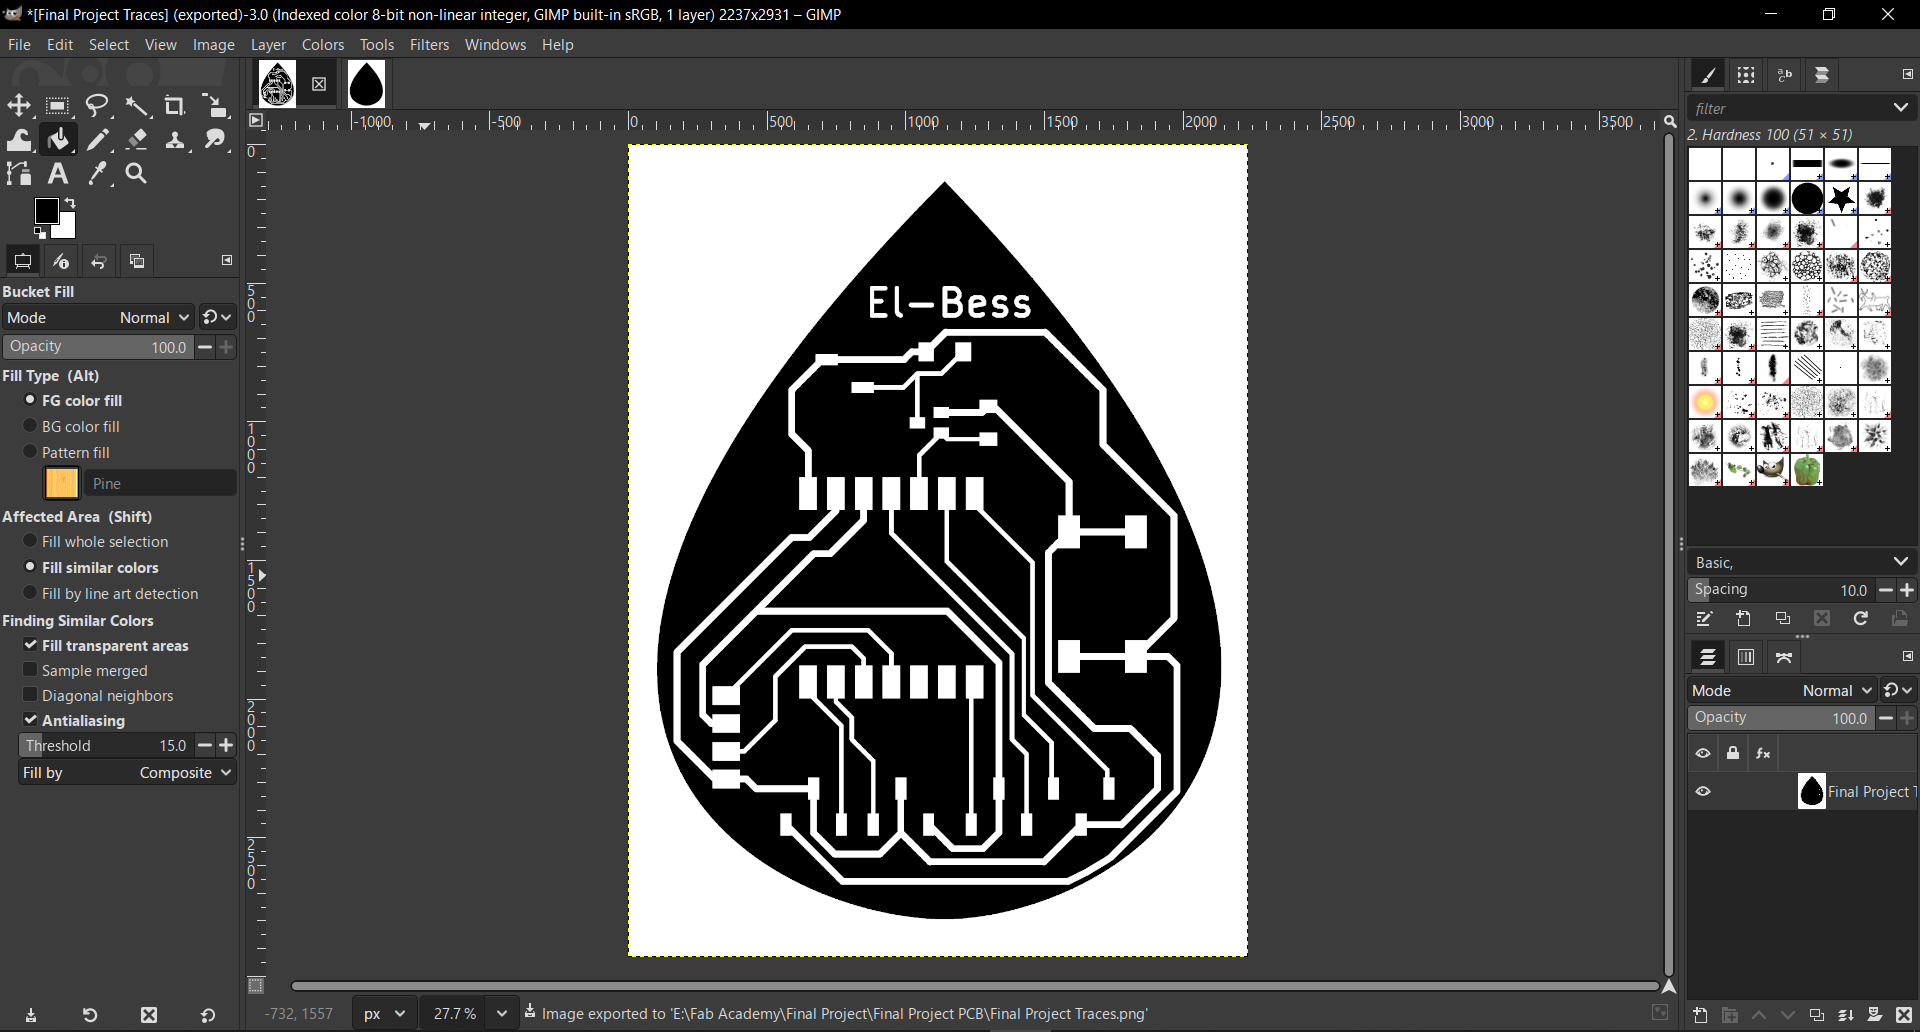
I then moved to GIMP to make the traces file and export it as PNG.
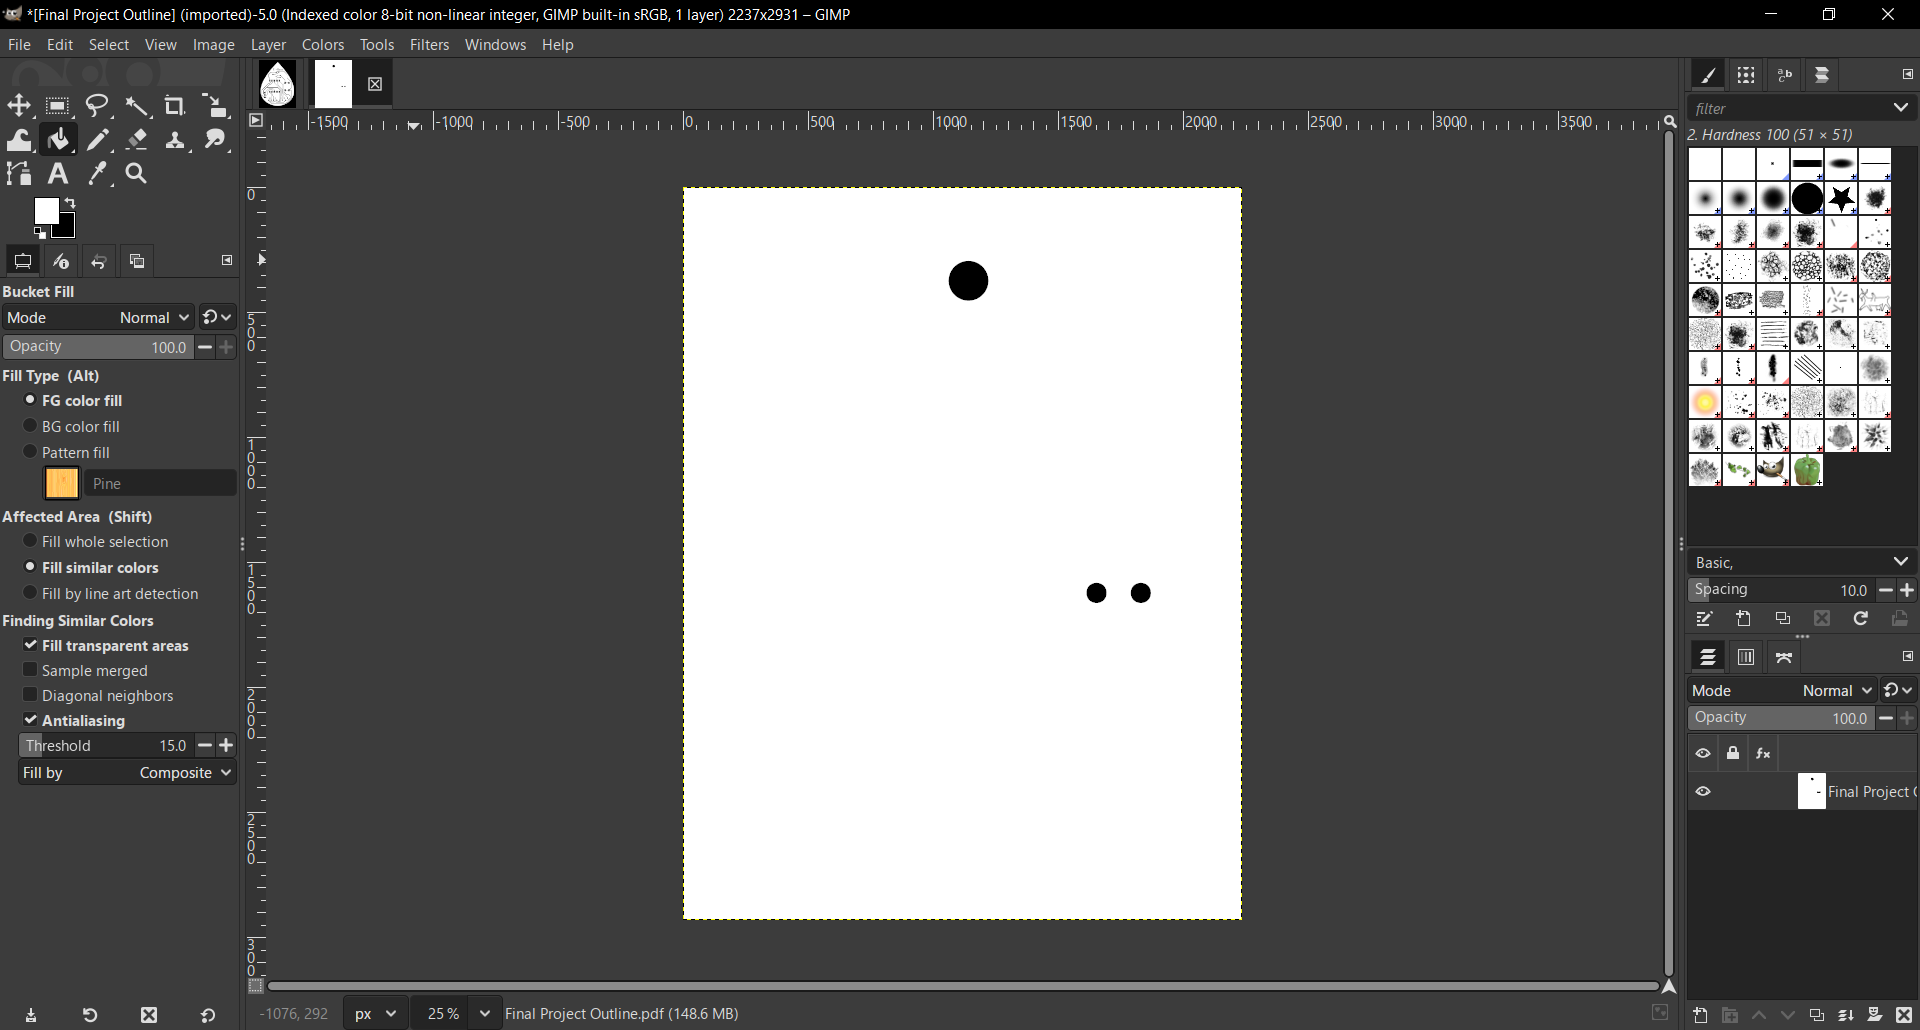
Then I separated the drills alone to make the drills first before milling the outline.
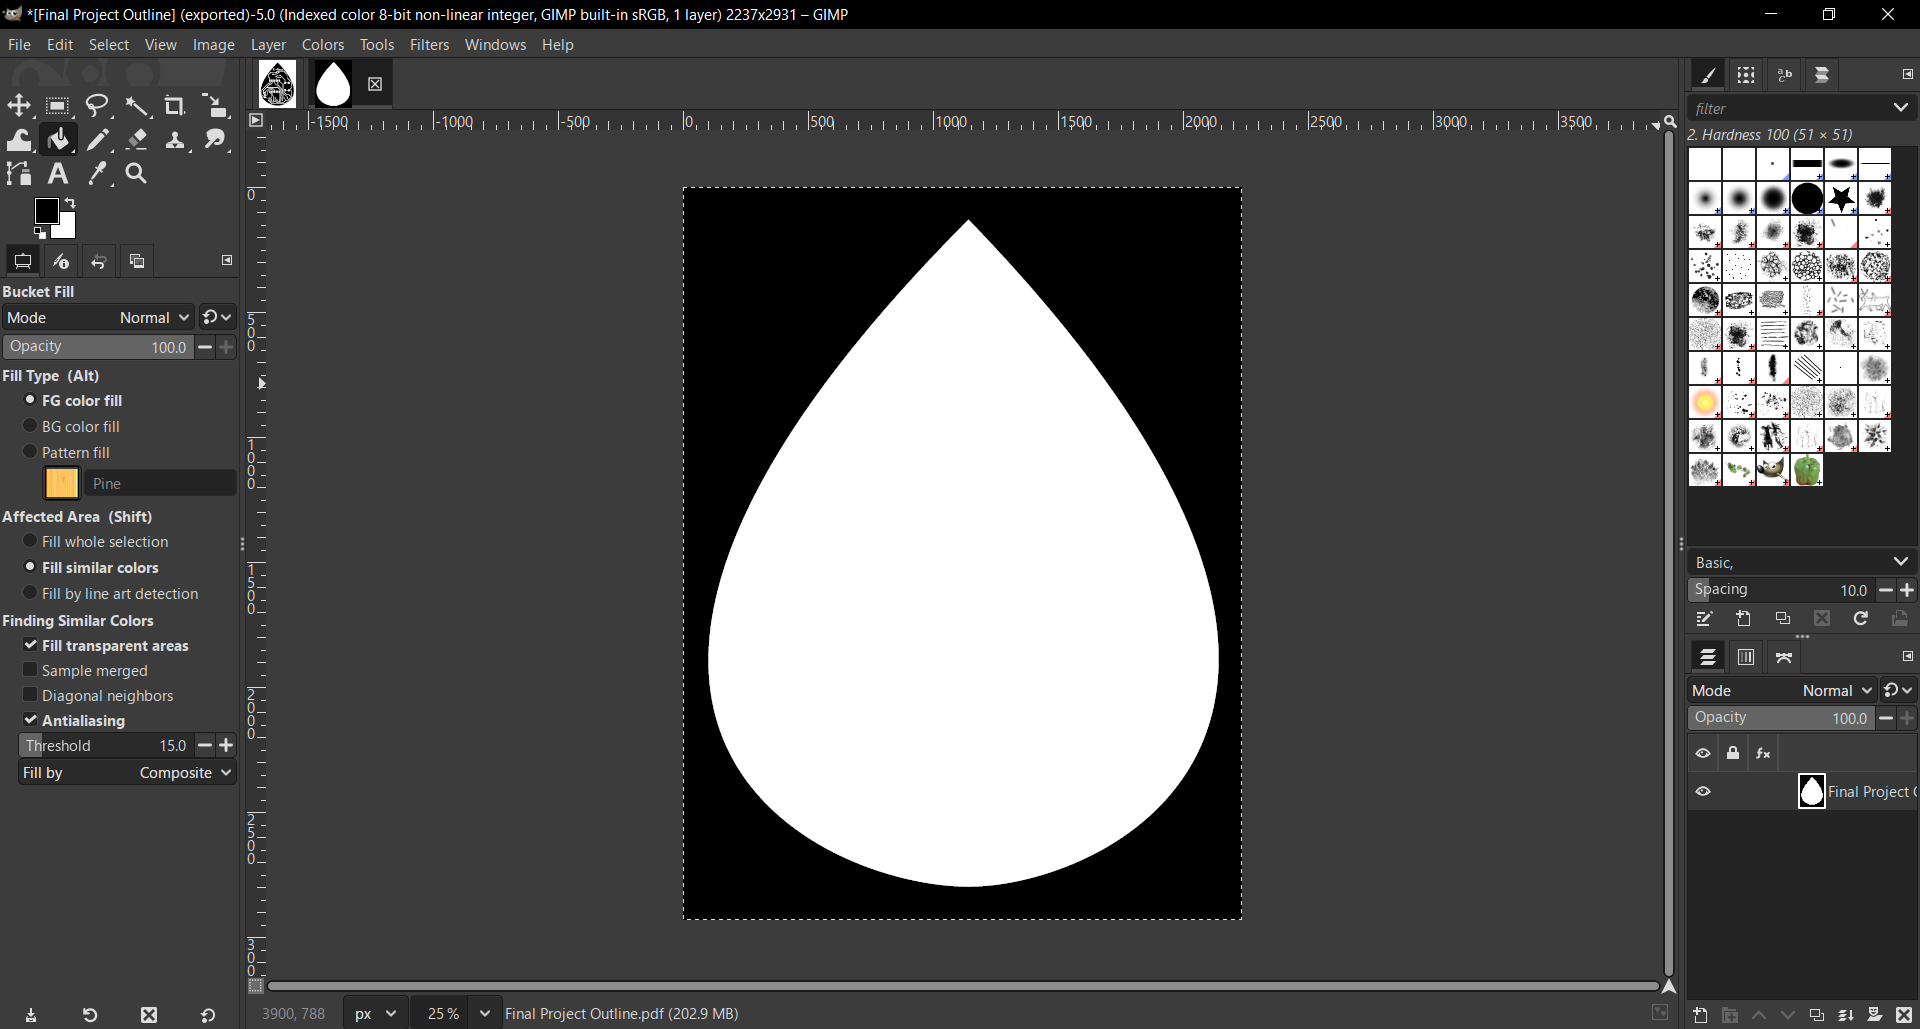
And Finally the outline alone.
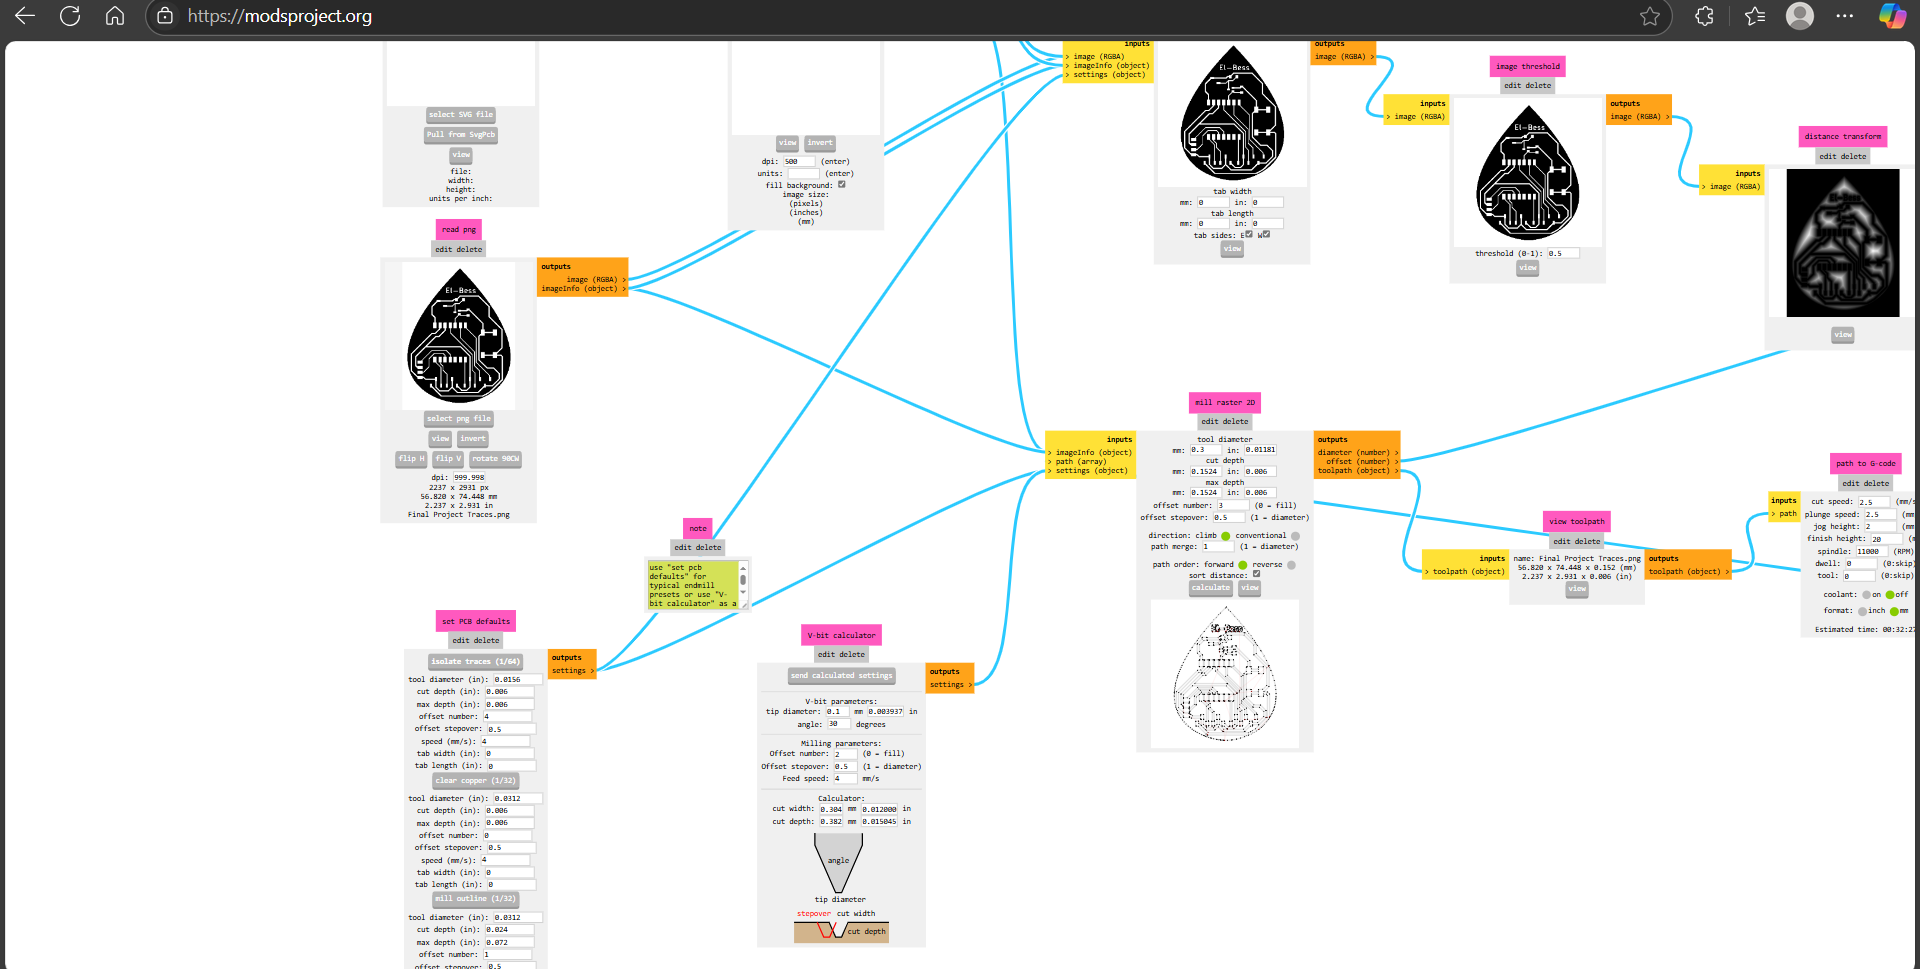
I imported the traces png and chose isolate traces and made the tool diameter 0.3mm but I actually used 0.4mm v-bit.
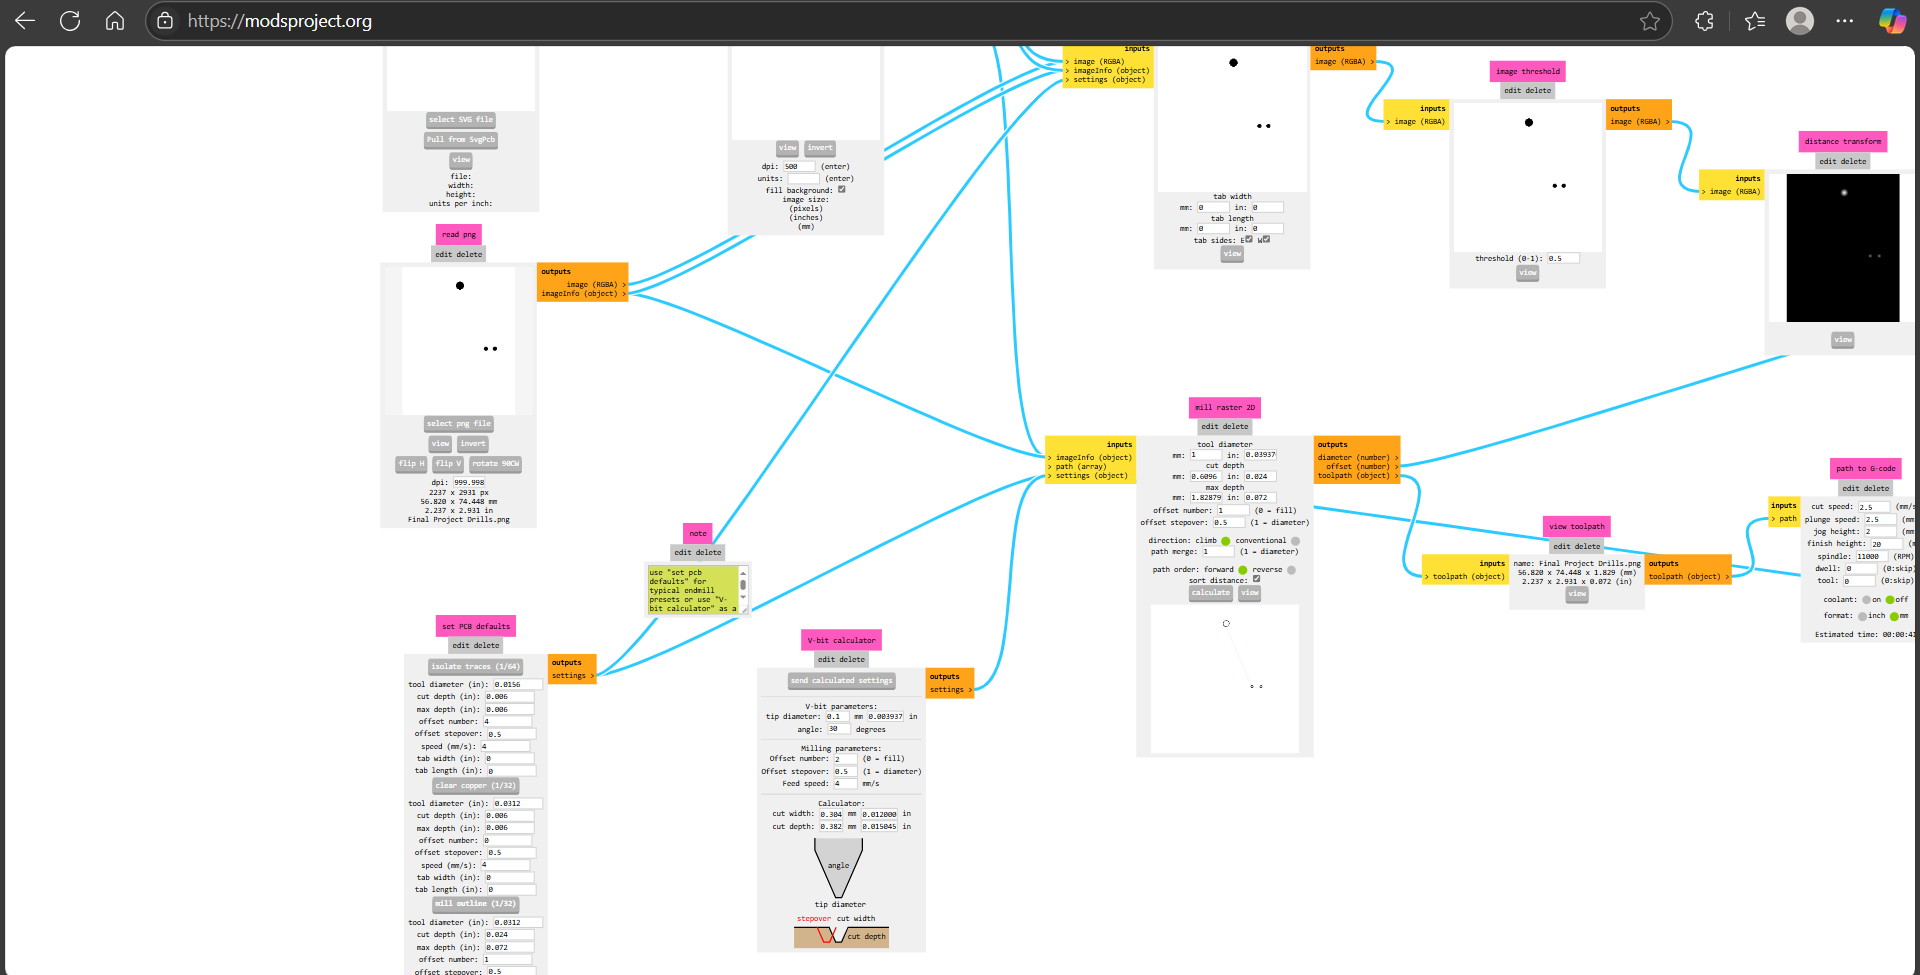
Then I prepared the drills png by milling outline and the tool diameter was 1mm endmill. Same goes for the outline png.
3- PCB Milling and Soldering:
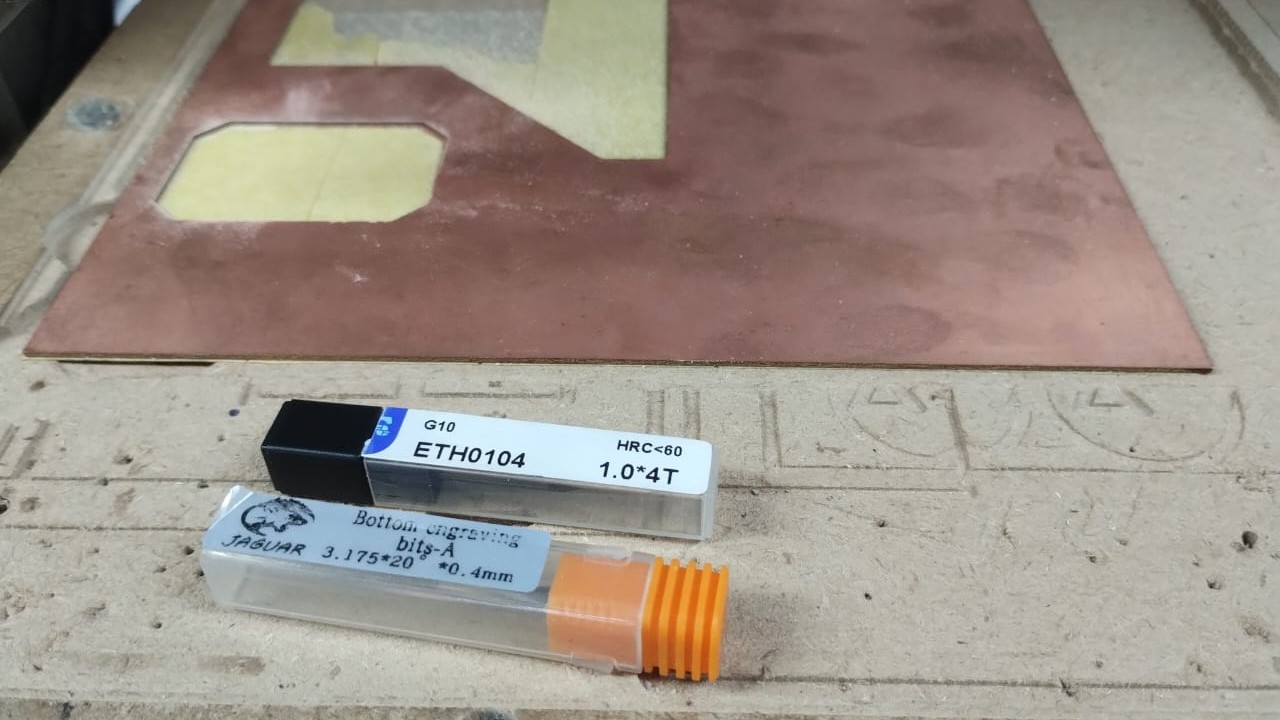
I used 0.4mm V-Bit for the traces and 1mm endmill for outlines on the China Router Machine.
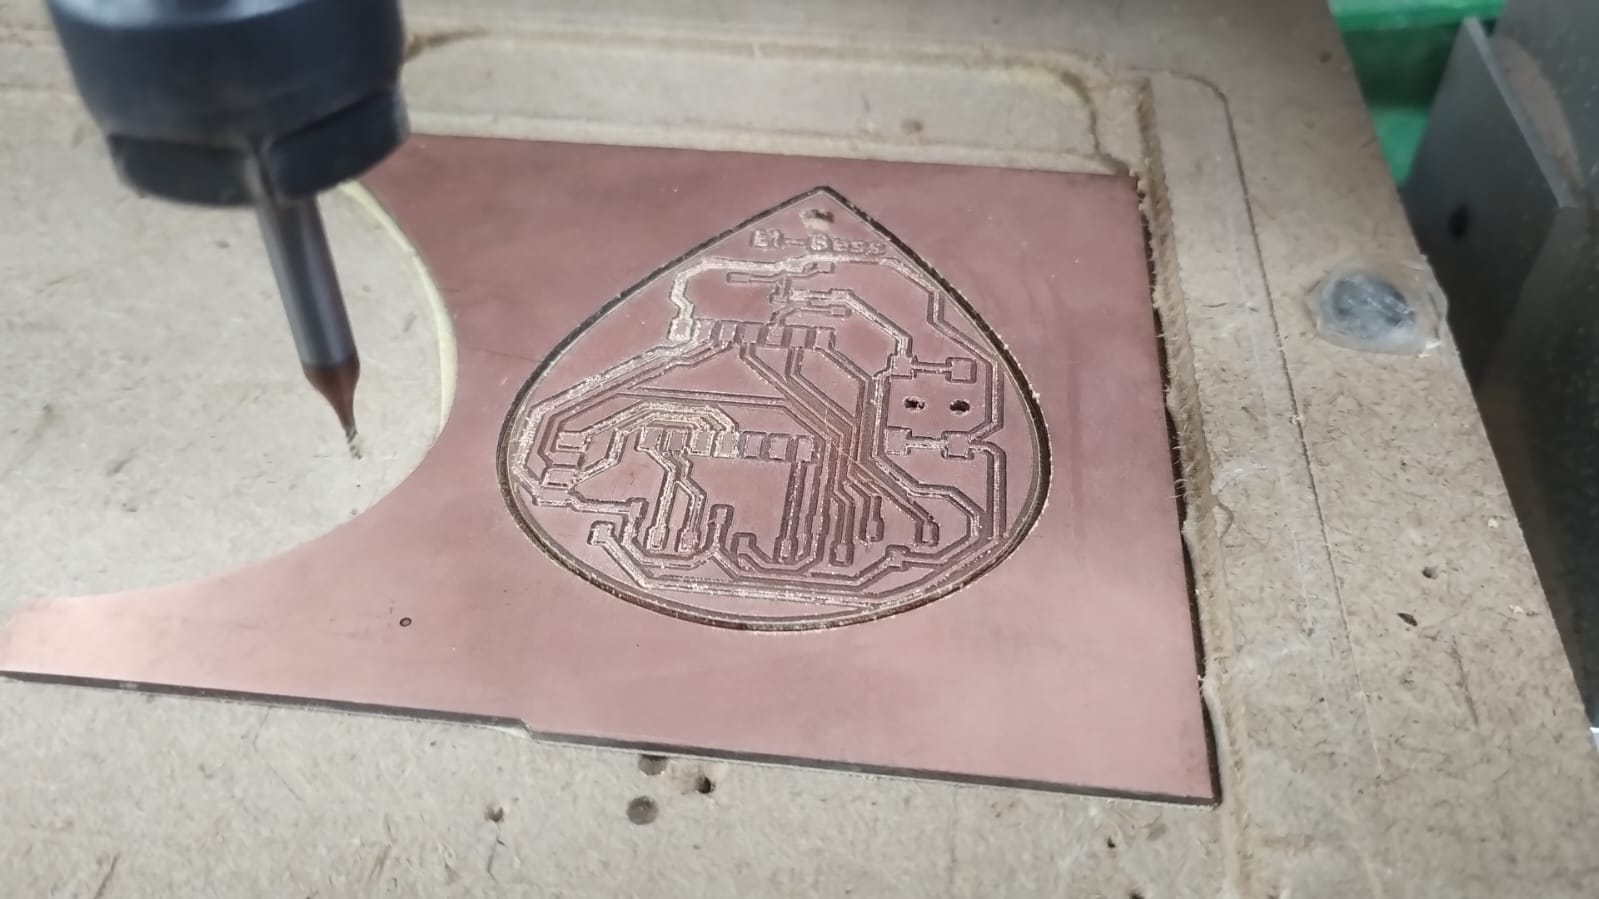
This is the result of milling the PCB. I used single layer FR4 PCB.
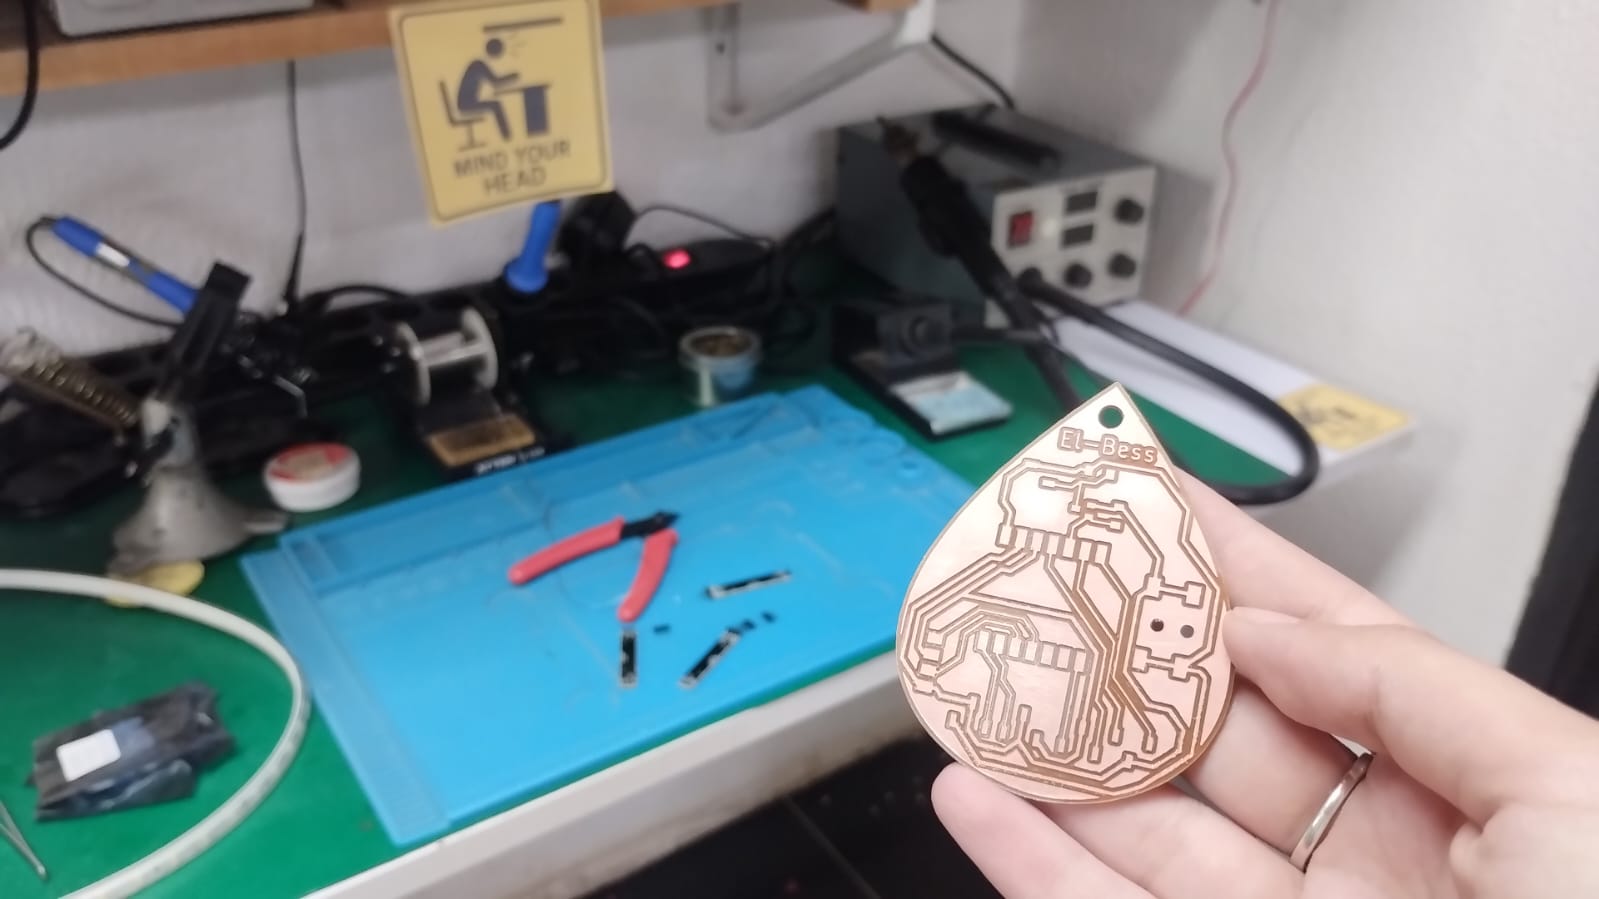
After some sanding under the water it looked shiny.
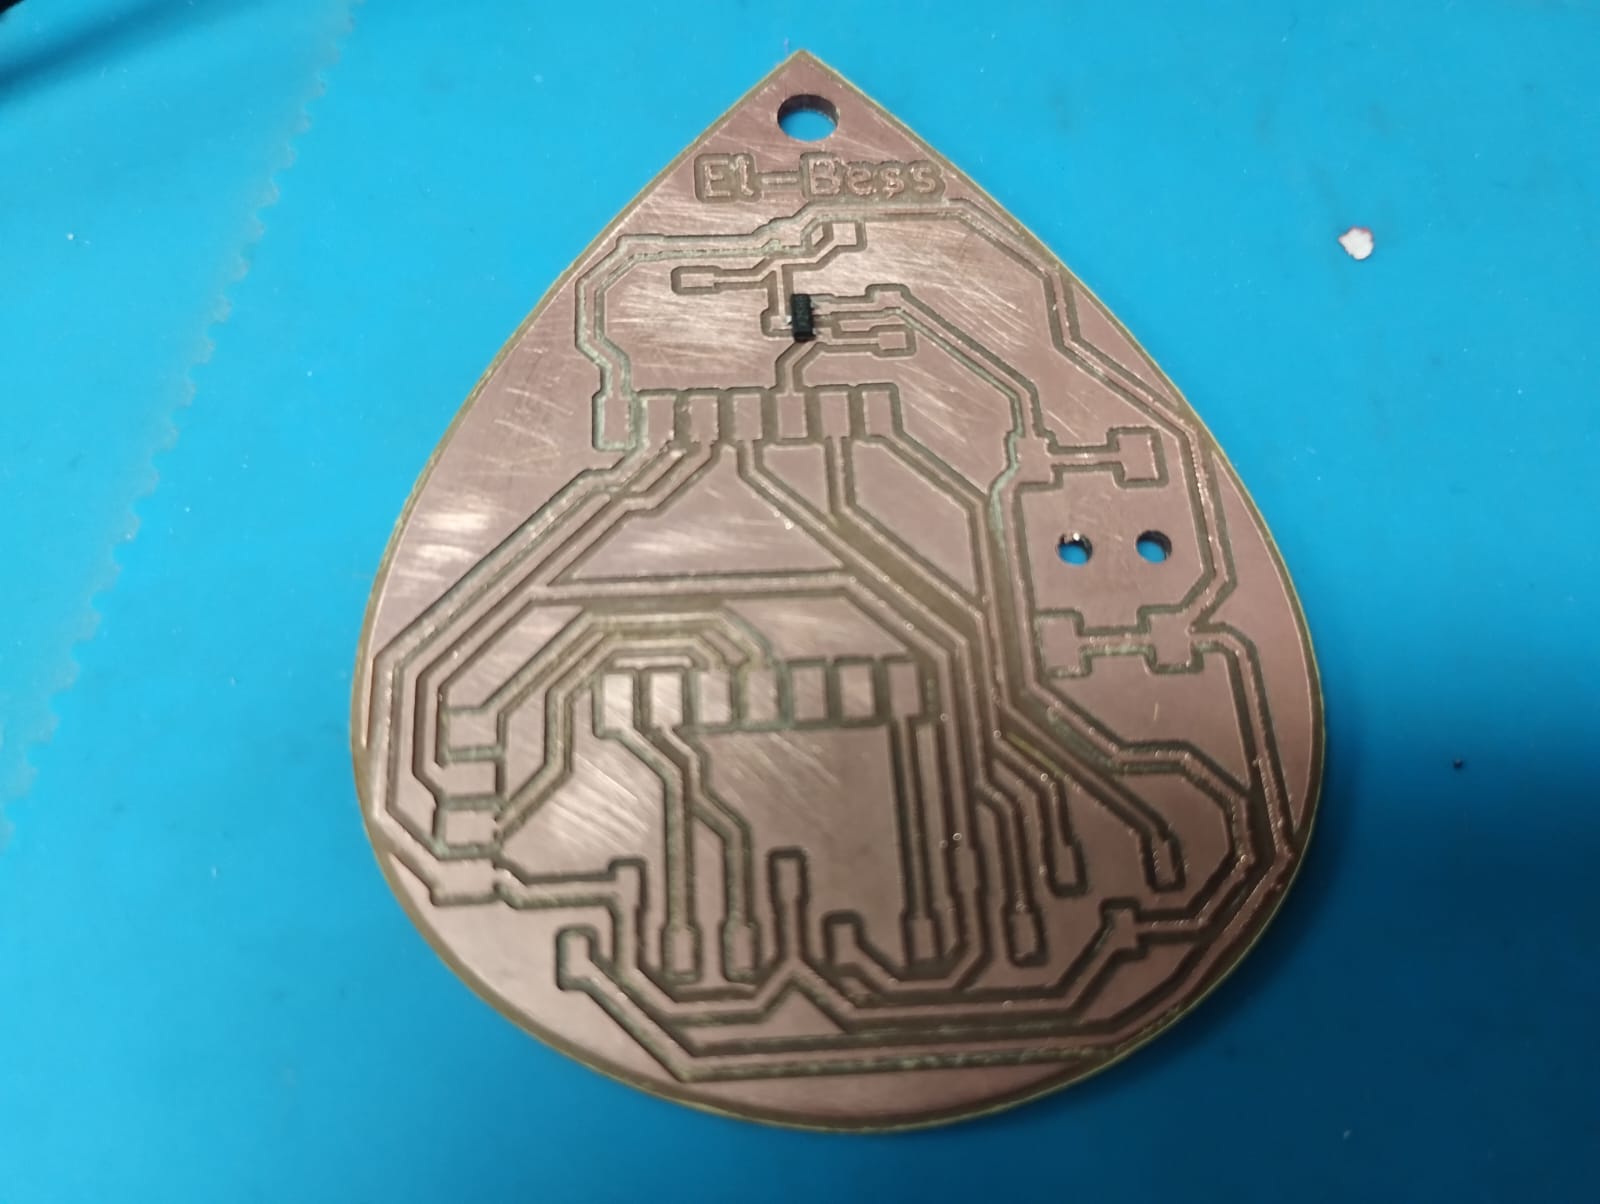
I started soldering the smallest components first using soldering paste then moved to the bigger components.
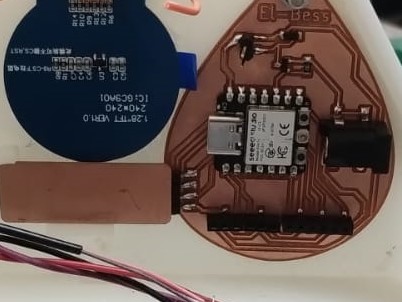
This is how it looked like after soldering and integrated but sadly it didn't end well...
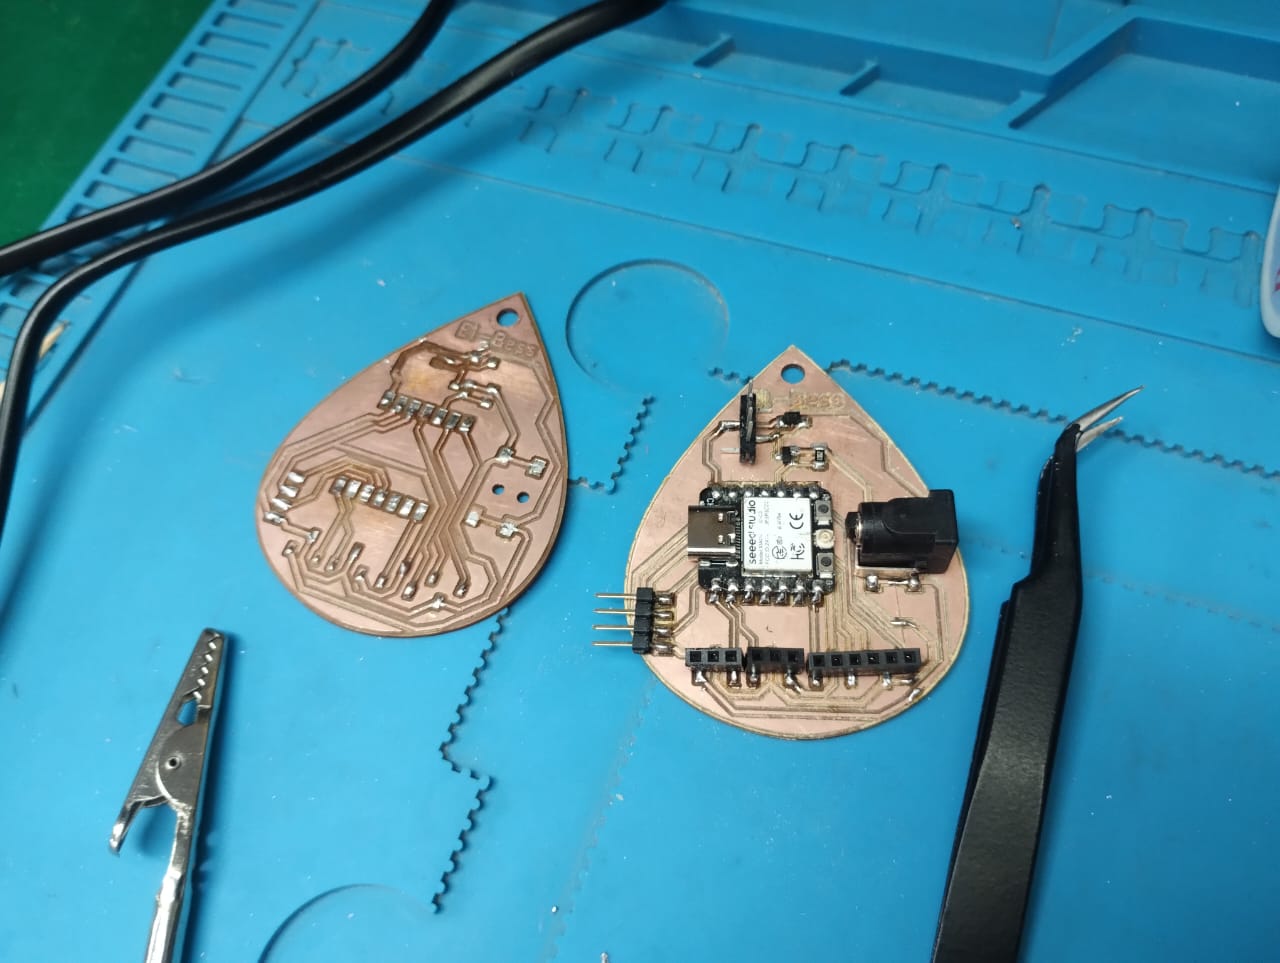
I had to refabricate it and desolder it and solder the new one as the 01x02 Vertical Pin Headers wasn't stable and their traces went out.
5) Electronics:
1- Input Devices:
1.1- Step Response For water Level
I continued working on the step response PCB I made previously in Input Devices Week. There you can see more details. I just changed the code I was using and used This Code as it gave more stable readings.
I used 2CM Copper Sticker and I wanted to cover it up for more durability so I decided to do this with stencil.
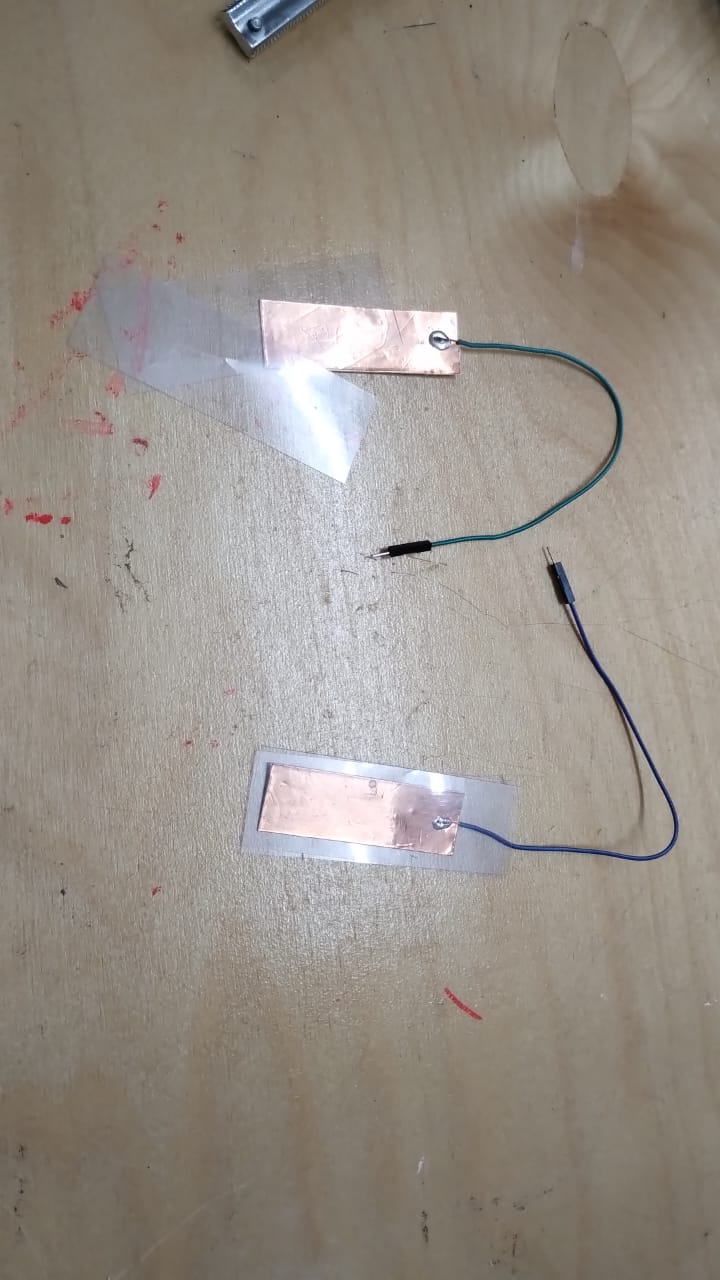
I cut 4 pieces of stencil little bigger than the sheets of copper and soldered 2 male wires on them.
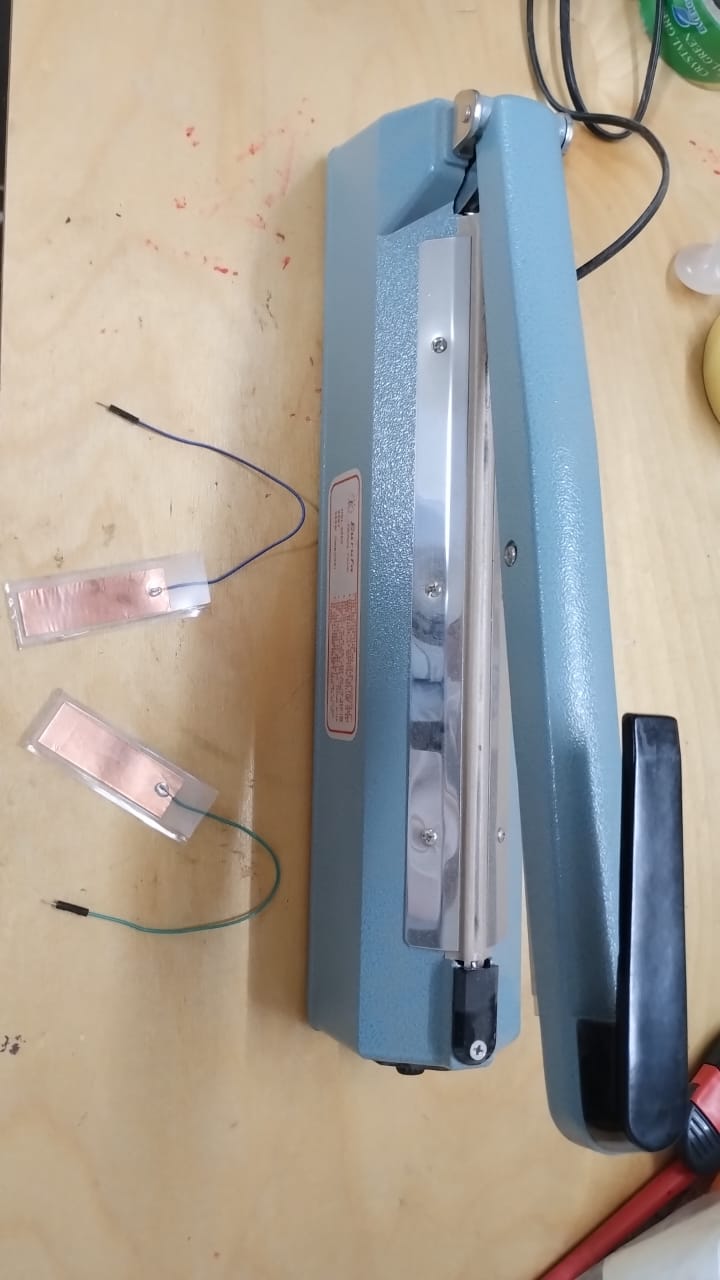
I used the Impulse Sealer Machine to seal the stencil together from 3 sides.
1.2- Soil Moisture Sensor
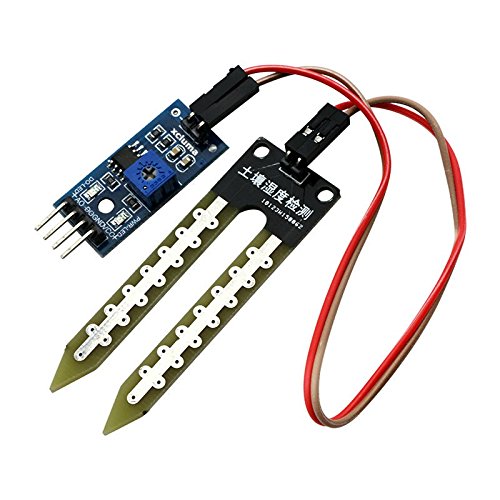
Check Week 4 for more details on the soil moisture sensor and calibrating it.
2- Output Devices:
2.1- Neopixel
I used 2 neopixel sticks 5v and connected them to the main PCB. I used the adafruit neopixel library to control them and change their colors based on the readings of the soil moisture sensor and water level.
The wiring of it is easy as GND --> GND, 4-7 VDC --> 5V, and DIN --> GPIO. If I'm connecting more than a stick the DOUT of the first stick goes to the DIN of the second stick. Each stick has 8 neopixels so we here have 16 numpixels.
---------------------------------------------------------------------------------------------------------------------------------------------------------------------
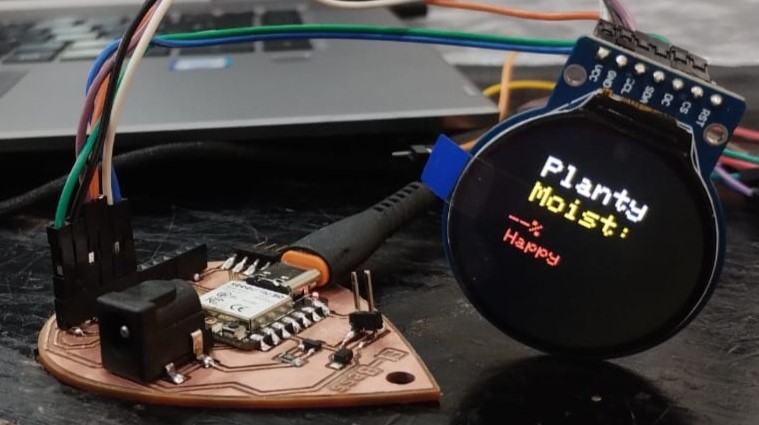
2.2- GC9A01 Display
2.3- Pump
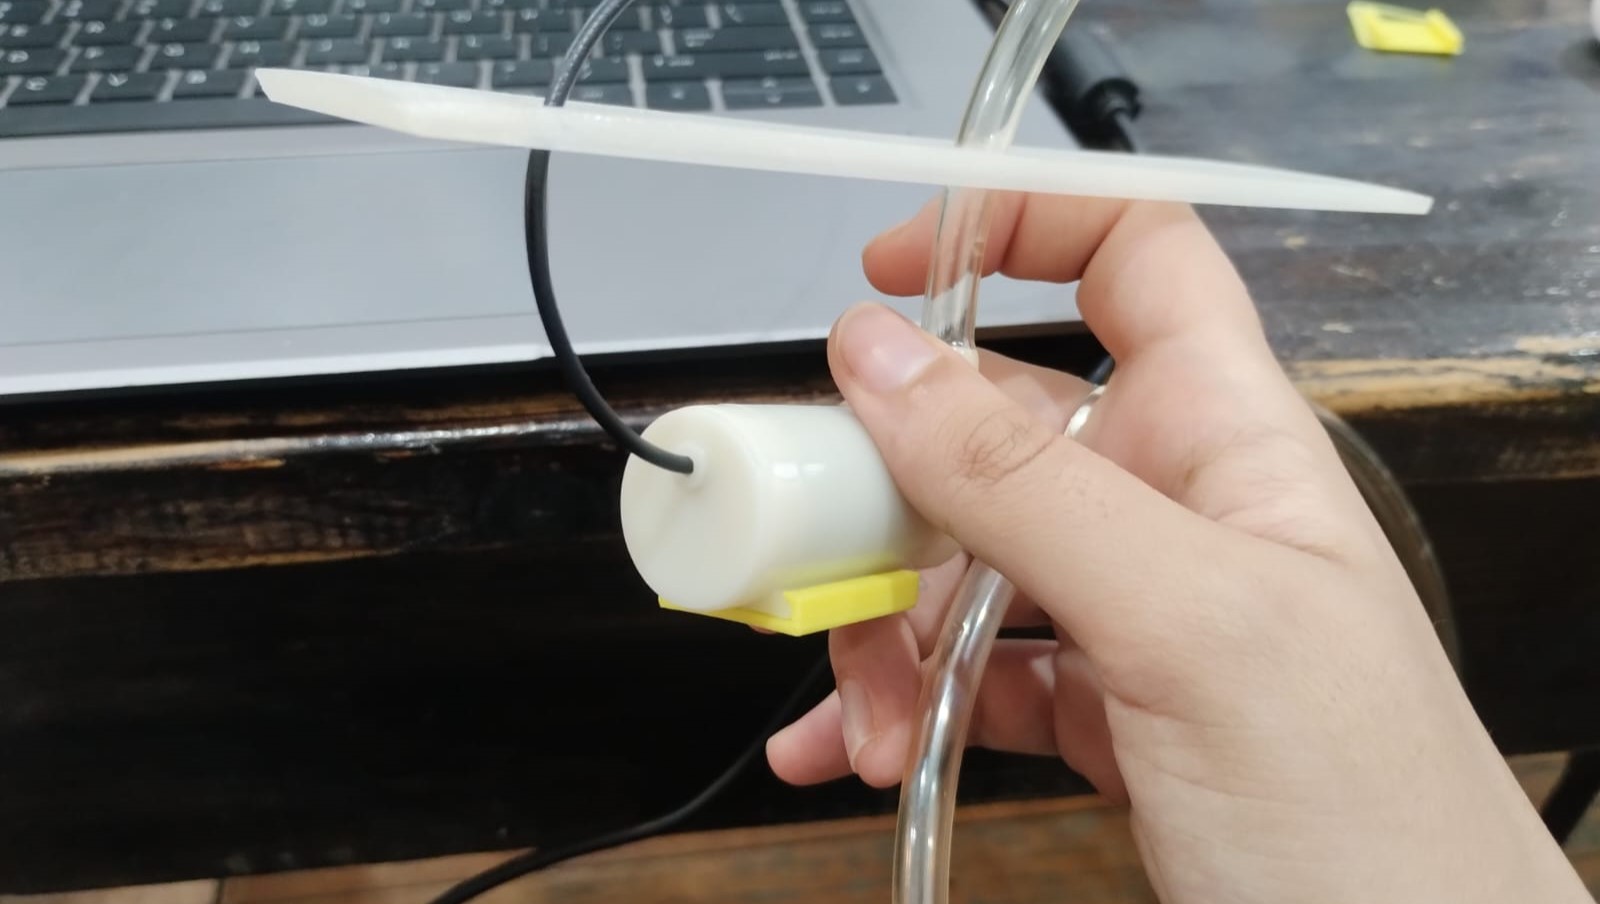
In Output Devices Week you'll find details about the display and the mosfet circuit that I'll be using similar one for the pump. The difference that I don't need a voltage regulator as both the pump and the xiao work on 5V.
3- System Integration:
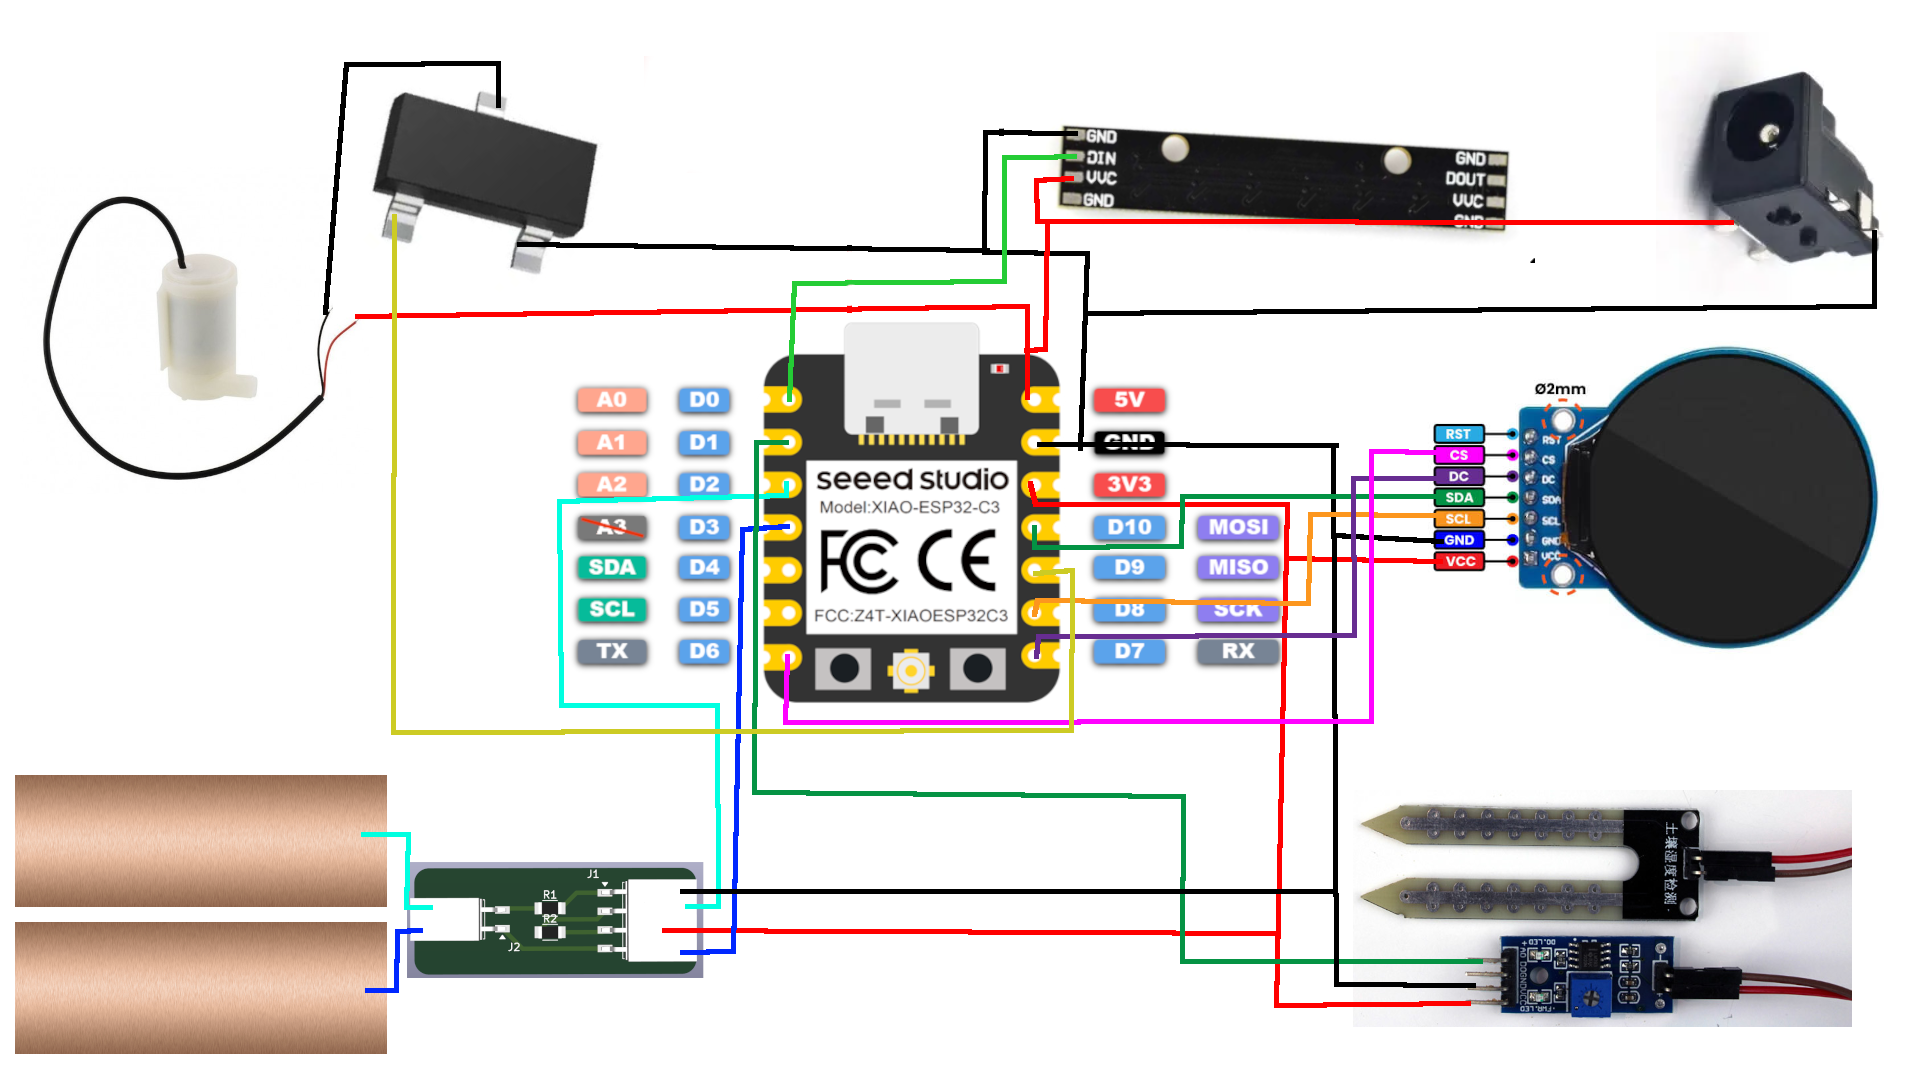
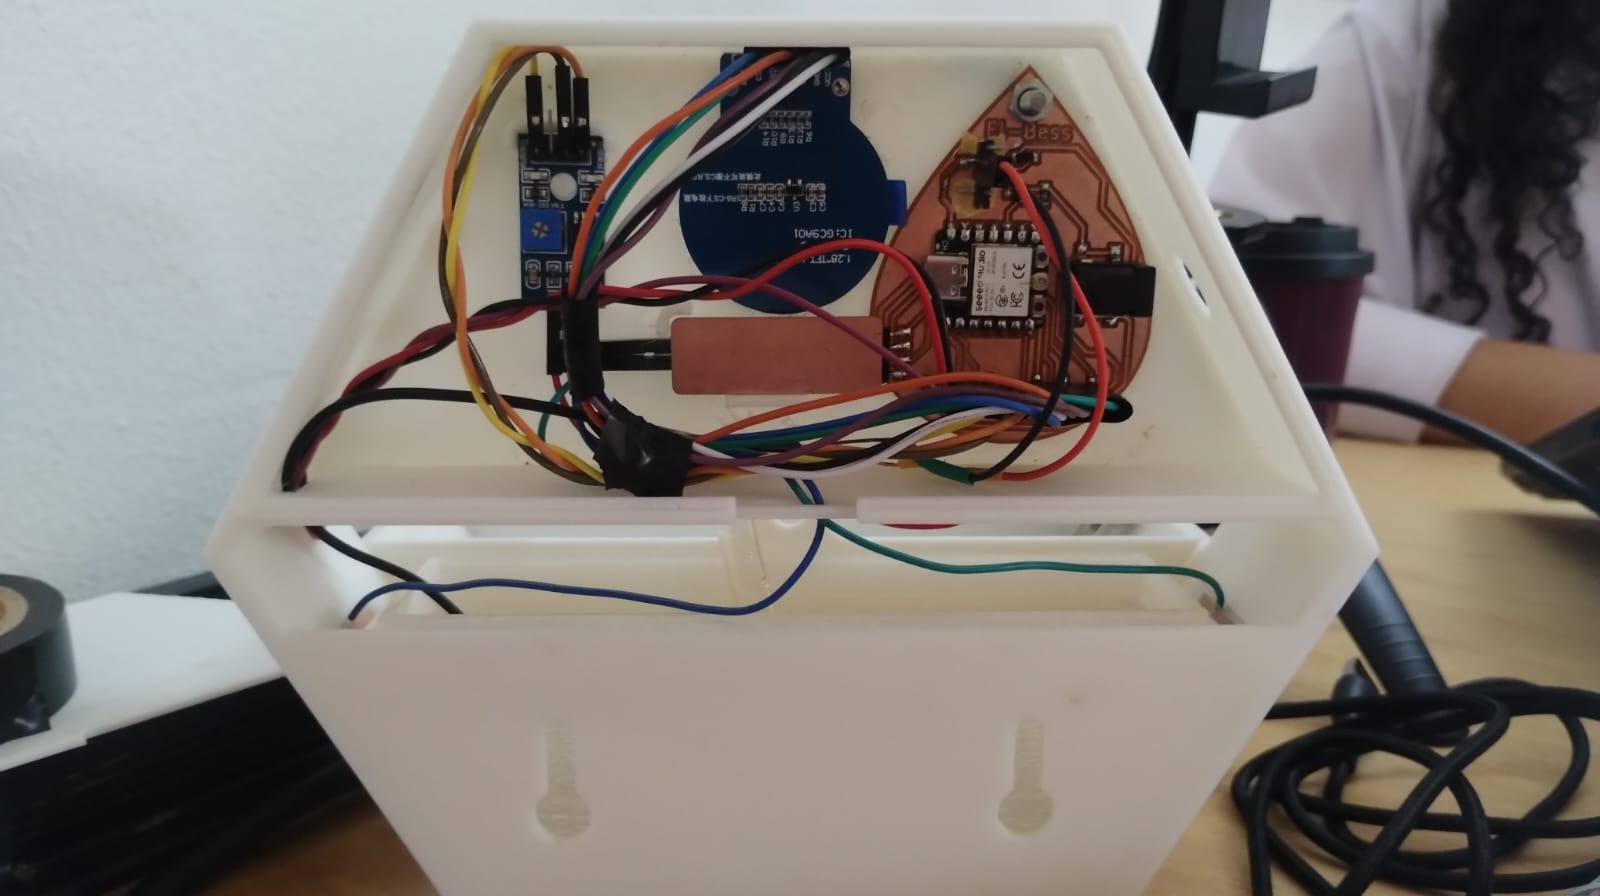
This is the final system integration I worked on. In all what came before I had one or two things working together, but now I'm integrating all the system together. There could be 2 improvements here, one is changing the pump pin from D9 to maybe D4 or D5. This because the pump always work while uploading a code and when I first power on the device because "D9 is a STRAP pin and must be HIGH when powered on". Also I had to add a line in the code because it's a MISO Pin so I had to set it to disable it in the SPI. The other is separating the power source of the pump from the xiao and see if it does any difference in the performance of all the components.
6) Coding:
1- Code Logic:
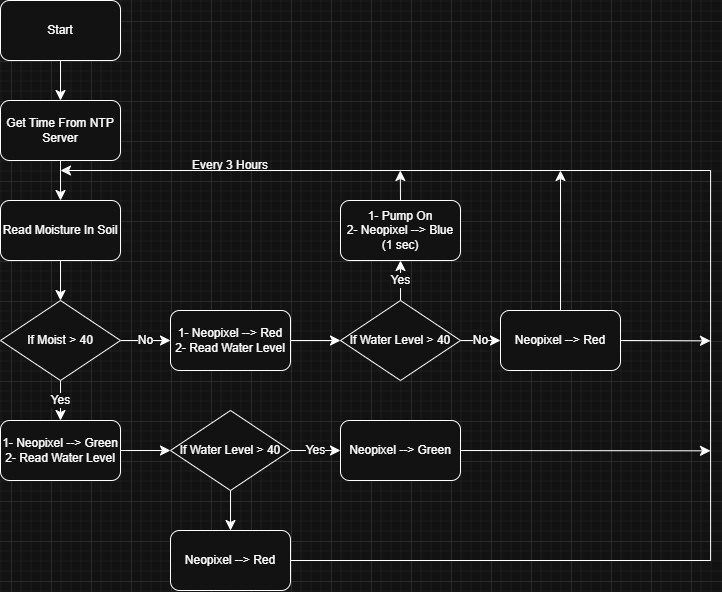
Before writing the code I started by thinking of the code logic. So you could have a look of how I thought of it. This is how the project will act automatically and also If I wanted to irrigate manually it will go in the same loop.
2- NTP Server:
Credits to Last Minute Engineers.
I went to ChatGPT to help me with the code for the NTP Server and how to get a reading from it every 3 hours for example.


This is the code it provided me and that was the first brick to build on the rest of the code for my project as everything starts from here.
#include <WiFi.h>
#include "time.h"
#include <Adafruit_GFX.h>
#include <Adafruit_GC9A01A.h>
#include <SPI.h>

// Replace with your Wi-Fi credentials
const char* ssid     = "your-SSID";
const char* password = "your-PASSWORD";

// NTP Server
const char* ntpServer = "pool.ntp.org";
const long  gmtOffset_sec = 0;       // Adjust for your timezone
const int   daylightOffset_sec = 3600;  // Set to 0 if no daylight time

// Display setup
#define TFT_CS   5
#define TFT_DC   6
#define TFT_RST  7  // Or set to -1 if tied to ESP32 reset

Adafruit_GC9A01A tft(TFT_CS, TFT_DC, TFT_RST);

// Time tracking
int lastLoggedHour = -1;  // initialize to invalid hour

void setup() {
  Serial.begin(115200);

  // Start display
  tft.begin();
  tft.fillScreen(GC9A01A_BLACK);
  tft.setRotation(0);

  // Connect to Wi-Fi
  WiFi.begin(ssid, password);
  Serial.print("Connecting to WiFi");
  while (WiFi.status() != WL_CONNECTED) {
    delay(500);
    Serial.print(".");
  }
  Serial.println("Connected!");

  // Init time via NTP
  configTime(gmtOffset_sec, daylightOffset_sec, ntpServer);

  // Wait until time is synced
  struct tm timeinfo;
  while (!getLocalTime(&timeinfo)) {
    Serial.println("Waiting for time...");
    delay(1000);
  }

  displayTime(timeinfo);
  takeReading();  // Take an immediate first reading
  lastLoggedHour = timeinfo.tm_hour;
}

void loop() {
  struct tm timeinfo;
  if (getLocalTime(&timeinfo)) {
    int currentHour = timeinfo.tm_hour;

    // Check if current hour is divisible by 3 and different from last logged hour
    if ((currentHour % 3 == 0) && (currentHour != lastLoggedHour)) {
      takeReading();
      lastLoggedHour = currentHour;
    }

    delay(10000);  // Sleep 10s to reduce WiFi/NTP load
  } else {
    Serial.println("Failed to get time.");
  }
}

// Simulate a sensor reading and display
void takeReading() {
  float value = random(100, 300) / 10.0;  // fake reading

  Serial.print("Reading at ");
  time_t now = time(nullptr);
  Serial.println(ctime(&now));
  Serial.println(value);

  tft.fillScreen(GC9A01A_BLACK);
  tft.setTextColor(GC9A01A_WHITE);
  tft.setTextSize(2);
  tft.setCursor(20, 40);
  tft.print("Value: ");
  tft.println(value);
}

// Optional: show current time
void displayTime(struct tm timeinfo) {
  char buf[64];
  strftime(buf, sizeof(buf), "%H:%M:%S", &timeinfo);
  tft.setCursor(10, 100);
  tft.setTextColor(GC9A01A_CYAN);
  tft.setTextSize(2);
  tft.print("Time: ");
  tft.println(buf);
}
I replaced the wifi credentials and adjusted the timezone for Egypt which is UTC +2 so it's (3600 x 2) and we have a daylight time UTC +1. I changed what I needed to change based on my wiring and what I need. The full code after tweeks will be provided next.
3- Automatic Irrigation:
This is the main code for the automatic irrigation that I started building on the NTP Server code. I started integrating other codes from previous weeks and writing new voids and code lines based on the code logic I made. It wasn't all written at one time but it was built brick by brick. Important thing to do is to work in spirals and go bigger each time.
//GC9A01 Display and NTP Server
#include <WiFi.h>
#include "time.h"
#include <Adafruit_GFX.h>
#include <Adafruit_GC9A01A.h>
#include <SPI.h>


// Replace with your Wi-Fi credentials
const char* ssid = "your-SSID";
const char* password = "your-PASSWORD";

// NTP Server
const char* ntpServer = "pool.ntp.org";
const long gmtOffset_sec = 7200;      // Egypt TimeZone UTC+2
const int daylightOffset_sec = 3600;  // Daylight Time UTC+1

// Time tracking
int lastLoggedHour = -1;  // initialize to invalid hour

#define TFT_DC D7
#define TFT_CS D6
#define TFT_MOSI D10
#define TFT_SCK D8

Adafruit_GC9A01A tft(TFT_CS, TFT_DC, TFT_MOSI, TFT_SCK, -1);
//------------------------------------------------------------
//Neopixel Stick
#include <Adafruit_NeoPixel.h>
#define PIN A0
#define NUMPIXELS 16
Adafruit_NeoPixel pixels(NUMPIXELS, PIN, NEO_GRB + NEO_KHZ800);
//------------------------------------------------------------
//Pump
int Pump = 9;
//------------------------------------------------------------
//Water Level Sensing
long result;  //variable for the result of the tx_rx measurement.
int analog_pin = A2;
int tx_pin = D3;
//------------------------------------------------------------
//Moisture Sensor
int moistRead;
int sensor_pin = D1;
//------------------------------------------------------------

//Water Level
long tx_rx() {  //Function to execute rx_tx algorithm and return a value
                //that depends on coupling of two electrodes.
                //Value returned is a long integer.
  int read_high;
  int read_low;
  int diff;
  long int sum;
  int N_samples = 100;  //Number of samples to take.  Larger number slows it down, but reduces scatter.

  sum = 0;

  for (int i = 0; i < N_samples; i++) {
    digitalWrite(tx_pin, HIGH);          //Step the voltage high on conductor 1.
    read_high = analogRead(analog_pin);  //Measure response of conductor 2.
    delayMicroseconds(100);              //Delay to reach steady state.
    digitalWrite(tx_pin, LOW);           //Step the voltage to zero on conductor 1.
    read_low = analogRead(analog_pin);   //Measure response of conductor 2.
    diff = read_high - read_low;         //desired answer is the difference between high and low.
    sum += diff;                         //Sums up N_samples of these measurements.
  }
  return sum;
}  //End of tx_rx function.


//Pump
void pump() {
  digitalWrite(Pump, HIGH);  // Control speed
  for (int i = 0; i < NUMPIXELS; i++) {
    pixels.setPixelColor(i, pixels.Color(0, 0, 150));  //Blue
  }
  pixels.show();
  delay(1000);

  digitalWrite(Pump, LOW);
}


//Moisture Reading
void ReadMoistSensorOne() {
  int moistRead = analogRead(sensor_pin);
  moistRead = map(moistRead, 4095, 1700, 0, 100);
  Serial.println(moistRead);
  tft.fillRect(0, 90, 240, 30, GC9A01A_BLACK);
  tft.setCursor(105, 90);
  tft.setTextColor(GC9A01A_YELLOW);
  tft.setTextSize(2);
  tft.print(moistRead, 1);
  tft.println("%");


  if (moistRead > 40) {
    for (int i = 0; i < NUMPIXELS; i++) {
      pixels.setPixelColor(i, pixels.Color(0, 150, 0));  //Green
    }
    pixels.show();
    tft.fillRect(70, 120, 240, 240, GC9A01A_BLACK);
    tft.setCursor(95, 120);
    tft.setTextColor(GC9A01A_GREEN);
    tft.println("Happy");
    delay(5000);
    tx_rx();
    result = tx_rx();
    result = map(result, 393000, 334000, 100, 0);
    tft.setCursor(50, 180);
    tft.setTextColor(GC9A01A_BLUE);
    tft.println("Water Level:");
    tft.setCursor(105, 205);
    tft.setTextColor(GC9A01A_BLUE);
    tft.println(result);
    if (result > 40) {
      for (int i = 0; i < NUMPIXELS; i++) {
        pixels.setPixelColor(i, pixels.Color(0, 150, 0));  //Green
      }
      pixels.show();
    } else {
      for (int i = 0; i < NUMPIXELS; i++) {
        pixels.setPixelColor(i, pixels.Color(150, 0, 0));
      }
      pixels.show();
    }
  } else {
    for (int i = 0; i < NUMPIXELS; i++) {
      pixels.setPixelColor(i, pixels.Color(150, 0, 0));
    }
    pixels.show();
    tft.fillRect(70, 120, 240, 240, GC9A01A_BLACK);
    tft.setCursor(95, 120);
    tft.setTextColor(GC9A01A_RED);
    tft.println("SAD");
    delay(5000);
    tx_rx();
    result = tx_rx();
    result = map(result, 393000, 334000, 100, 0);
    tft.setCursor(50, 180);
    tft.setTextColor(GC9A01A_BLUE);
    tft.println("Water Level:");
    tft.setCursor(105, 205);
    tft.setTextColor(GC9A01A_BLUE);
    tft.println(result);
    if (result > 40) {
      pump();
      for (int i = 0; i < NUMPIXELS; i++) {
        pixels.setPixelColor(i, pixels.Color(0, 150, 0));  //Green
      }
      pixels.show();
    } else {
      for (int i = 0; i < NUMPIXELS; i++) {
        pixels.setPixelColor(i, pixels.Color(150, 0, 0));
      }
      pixels.show();
    }
  }
}

String oldH, oldM, oldS;

//NTP Server and Displaying Time
void displayTime(struct tm timeinfo) {
  char buf[16];
  strftime(buf, sizeof(buf), "%H:%M:%S", &timeinfo);
  String formattedTime = String(buf);
  String newH = formattedTime.substring(0, 3);  // "13:"
  String newM = formattedTime.substring(3, 6);  // "45:"
  String newS = formattedTime.substring(6, 8); // "30"

  //tft.fillRect(20, 150, 240, 20, GC9A01A_BLACK);  // Clear only time area
  if (newH != oldH) {
    tft.fillRect(107, 150, 24, 16, GC9A01A_BLACK);
  }
  if (newM != oldM) {
    tft.fillRect(143, 150, 24, 16, GC9A01A_BLACK);
  }
  if (newS != oldS) {
    tft.fillRect(179, 150, 24, 16, GC9A01A_BLACK);
  }

  tft.setCursor(35, 150);
  tft.setTextColor(GC9A01A_CYAN);
  tft.setTextSize(2);
  tft.print("Time: ");
  tft.print(newH);
  tft.print(newM);
  tft.print(newS);
  //tft.print(buf);

  oldH = newH;
  oldM = newM;
  oldS = newS;
}

void setup() {
  Serial.begin(115200);
  pinMode(Pump, OUTPUT);
  digitalWrite(Pump, LOW);
  pixels.begin();
  pixels.show();
  // Start display
  tft.begin();
  tft.fillScreen(GC9A01A_BLACK);
  tft.setRotation(2);

  // Connect to Wi-Fi
  WiFi.begin(ssid, password);
  Serial.print("Connecting to WiFi");
  while (WiFi.status() != WL_CONNECTED) {
    delay(500);
    Serial.print(".");
  }
  Serial.println("Connected!");

  // Init time via NTP
  configTime(gmtOffset_sec, daylightOffset_sec, ntpServer);

  // Wait until time is synced
  struct tm timeinfo;
  while (!getLocalTime(&timeinfo)) {
    Serial.println("Waiting for time...");
    delay(1000);
  }

  tft.setCursor(65, 20);
  tft.setTextColor(GC9A01A_GREEN);
  tft.setTextSize(3);
  tft.println("Planty");

  tft.setCursor(65, 60);
  tft.setTextColor(GC9A01A_YELLOW);
  tft.setTextSize(2);
  tft.println("Moisture:");


  pinMode(tx_pin, OUTPUT);

  ReadMoistSensorOne();  // Take an immediate first reading
  lastLoggedHour = timeinfo.tm_hour;
}

void loop() {
  unsigned long tick = millis();
  digitalWrite(Pump, LOW);
  struct tm timeinfo;
  if (getLocalTime(&timeinfo)) {
    int currentHour = timeinfo.tm_hour;
    displayTime(timeinfo);
    // Check if current hour is divisible by 3 and different from last logged hour
    if ((currentHour % 3 == 0) && (currentHour != lastLoggedHour)) {
      ReadMoistSensorOne();
      lastLoggedHour = currentHour;
    }
  } else {
    Serial.println("Failed to get time.");
  }
  unsigned long tock = millis();

  unsigned long delayInterval = 1000 - tock + tick;
  // int moistRead = analogRead(sensor_pin);
  // moistRead = map(moistRead, 4095, 0, 0, 100);
  // Serial.println(moistRead);
  delay(int(delayInterval));
}
4- Manual Control Through App (BLE Communication)
After making sure the automatic irrigation works well I started adding the manual control using the BLE communication. I worked on that before but I received only one reading which was the soil moisture but I had difficulty getting more than one reading so Saeed helped me with the arduino code and also the code blocks for this.
//GC9A01 Display and NTP Server
#include <WiFi.h>
#include "time.h"
#include <Adafruit_GFX.h>
#include <Adafruit_GC9A01A.h>
#include <SPI.h>

#include <ArduinoBLE.h>
// See the following for generating UUIDs:
// https://www.uuidgenerator.net/

BLEService PlantyService("34bb9231-b661-49ed-9c9e-94664503c001");  // Service UUID
BLEStringCharacteristic measureCharacteristic("1d20be8f-b719-4c40-aa2a-985d72ebaff9",
 BLERead | BLEWrite | BLENotify, 20);
BLEIntCharacteristic thresholdCharacteristic("3c106432-ed69-4c13-a0ae-7bf960b90754",
 BLERead | BLEWrite | BLENotify);
BLEIntCharacteristic WaterAvgCharacteristic("a50a6058-9c22-42bf-ad25-95e3b784ddc7",
 BLERead | BLEWrite | BLENotify);

// Replace with your Wi-Fi credentials
const char* ssid = "your-SSID";
const char* password = "your-PASSWORD";

// NTP Server
const char* ntpServer = "pool.ntp.org";
const long gmtOffset_sec = 7200;      // Egypt TimeZone UTC+2
const int daylightOffset_sec = 3600;  // Daylight Time UTC+1

// Time tracking
int lastLoggedHour = -1;  // initialize to invalid hour

#define TFT_DC D7
#define TFT_CS D6
#define TFT_MOSI D10
#define TFT_SCK D8

Adafruit_GC9A01A tft(TFT_CS, TFT_DC, TFT_MOSI, TFT_SCK, -1);
//------------------------------------------------------------
//Neopixel Stick
#include <Adafruit_NeoPixel.h>
#define PIN A0
#define NUMPIXELS 16
Adafruit_NeoPixel pixels(NUMPIXELS, PIN, NEO_GRB + NEO_KHZ800);
//------------------------------------------------------------
//Pump
int Pump = 9;

bool done = false;
//------------------------------------------------------------
//Water Level Sensing
long result;  //variable for the result of the tx_rx measurement.
int analog_pin = A2;
int tx_pin = D3;
//------------------------------------------------------------
//Moisture Sensor
int moistRead;
int sensor_pin = D1;
//------------------------------------------------------------

//Water Level
long tx_rx() {  //Function to execute rx_tx algorithm and return a value
                //that depends on coupling of two electrodes.
                //Value returned is a long integer.
  int read_high;
  int read_low;
  int diff;
  long int sum;
  int N_samples = 100;
  //Number of samples to take.  Larger number slows it down, but reduces scatter.

  sum = 0;

  for (int i = 0; i < N_samples; i++) {
    digitalWrite(tx_pin, HIGH);         //Step the voltage high on conductor 1.
    read_high = analogRead(analog_pin); //Measure response of conductor 2.
    delayMicroseconds(100);             //Delay to reach steady state.
    digitalWrite(tx_pin, LOW);          //Step the voltage to zero on conductor 1.
    read_low = analogRead(analog_pin);  //Measure response of conductor 2.
    diff = read_high - read_low;        //desired answer is the difference between high and low.
    sum += diff;                        //Sums up N_samples of these measurements.
  }
  return sum;
}  //End of tx_rx function.


//Pump
void pump() {
  digitalWrite(Pump, HIGH);  // Control speed
  for (int i = 0; i < NUMPIXELS; i++) {
    pixels.setPixelColor(i, pixels.Color(0, 0, 150));  //Blue
  }
  pixels.show();
  delay(1000);

  digitalWrite(Pump, LOW);
  done = true;
}


//Moisture Reading
void ReadMoistSensorOne() {
  int moistRead = analogRead(sensor_pin);
  moistRead = map(moistRead, 4095, 1700, 0, 100);

  int threshold = thresholdCharacteristic.value();
  Serial.println(moistRead);
  tft.fillRect(0, 90, 240, 30, GC9A01A_BLACK);
  tft.setCursor(105, 90);
  tft.setTextColor(GC9A01A_YELLOW);
  tft.setTextSize(2);
  tft.print(moistRead, 1);
  tft.println("%");


  if (moistRead > threshold) {
    for (int i = 0; i < NUMPIXELS; i++) {
      pixels.setPixelColor(i, pixels.Color(0, 150, 0));  //Green
    }
    pixels.show();
    tft.fillRect(70, 120, 240, 30, GC9A01A_BLACK);
    tft.setCursor(95, 120);
    tft.setTextColor(GC9A01A_GREEN);
    tft.println("Happy");
    delay(5000);
    tx_rx();
    result = tx_rx();
    result = map(result, 301000, 225000, 100, 0);
    int WaterAvg = WaterAvgCharacteristic.value();
    tft.fillRect(50, 180, 240, 240, GC9A01A_BLACK);
    tft.setCursor(50, 180);
    tft.setTextColor(GC9A01A_BLUE);
    tft.println("Water Level:");
    tft.setCursor(105, 205);
    tft.setTextColor(GC9A01A_BLUE);
    tft.println(result);
    if (result > WaterAvg) {
      for (int i = 0; i < NUMPIXELS; i++) {
        pixels.setPixelColor(i, pixels.Color(0, 150, 0));  //Green
      }
      pixels.show();
    } else {
      for (int i = 0; i < NUMPIXELS; i++) {
        pixels.setPixelColor(i, pixels.Color(150, 0, 0));
      }
      pixels.show();
    }
  } else {
    for (int i = 0; i < NUMPIXELS; i++) {
      pixels.setPixelColor(i, pixels.Color(150, 0, 0));
    }
    pixels.show();
    tft.fillRect(70, 120, 240, 30, GC9A01A_BLACK);
    tft.setCursor(95, 120);
    tft.setTextColor(GC9A01A_RED);
    tft.println("SAD");
    delay(5000);
    tx_rx();
    result = tx_rx();
    result = map(result, 301000, 225000, 100, 0);
    int WaterAvg = WaterAvgCharacteristic.value();
    tft.fillRect(50, 180, 240, 240, GC9A01A_BLACK);
    tft.setCursor(50, 180);
    tft.setTextColor(GC9A01A_BLUE);
    tft.println("Water Level:");
    tft.setCursor(105, 205);
    tft.setTextColor(GC9A01A_BLUE);
    tft.println(result);
    if (result > WaterAvg) {
      pump();
      for (int i = 0; i < NUMPIXELS; i++) {
        pixels.setPixelColor(i, pixels.Color(0, 150, 0));  //Green
      }
      pixels.show();
    } else {
      for (int i = 0; i < NUMPIXELS; i++) {
        pixels.setPixelColor(i, pixels.Color(150, 0, 0));
      }
      pixels.show();
    }
  }
}

String oldH, oldM, oldS;

//NTP Server and Displaying Time
void displayTime(struct tm timeinfo) {
  char buf[16];
  strftime(buf, sizeof(buf), "%H:%M:%S", &timeinfo);
  String formattedTime = String(buf);
  String newH = formattedTime.substring(0, 3);  // "13:"
  String newM = formattedTime.substring(3, 6);  // "45:"
  String newS = formattedTime.substring(6, 8);  // "30"

  //tft.fillRect(20, 150, 240, 20, GC9A01A_BLACK);  // Clear only time area
  if (newH != oldH) {
    tft.fillRect(107, 150, 24, 16, GC9A01A_BLACK);
  }
  if (newM != oldM) {
    tft.fillRect(143, 150, 24, 16, GC9A01A_BLACK);
  }
  if (newS != oldS) {
    tft.fillRect(179, 150, 24, 16, GC9A01A_BLACK);
  }

  tft.setCursor(35, 150);
  tft.setTextColor(GC9A01A_CYAN);
  tft.setTextSize(2);
  tft.print("Time: ");
  tft.print(newH);
  tft.print(newM);
  tft.print(newS);
  //tft.print(buf);

  oldH = newH;
  oldM = newM;
  oldS = newS;
}

void setup() {
  Serial.begin(115200);
  pinMode(Pump, OUTPUT);
  digitalWrite(Pump, LOW);
  pixels.begin();
  pixels.show();
  // Start display
  tft.begin();
  tft.fillScreen(GC9A01A_BLACK);
  tft.setRotation(2);

  // Connect to Wi-Fi
  WiFi.begin(ssid, password);
  Serial.print("Connecting to WiFi");
  while (WiFi.status() != WL_CONNECTED) {
    delay(500);
    Serial.print(".");
  }
  Serial.println("Connected!");

  // Init time via NTP
  configTime(gmtOffset_sec, daylightOffset_sec, ntpServer);

  // Wait until time is synced
  struct tm timeinfo;
  while (!getLocalTime(&timeinfo)) {
    Serial.println("Waiting for time...");
    delay(1000);
  }

  tft.setCursor(65, 20);
  tft.setTextColor(GC9A01A_GREEN);
  tft.setTextSize(3);
  tft.println("Planty");

  tft.setCursor(65, 60);
  tft.setTextColor(GC9A01A_YELLOW);
  tft.setTextSize(2);
  tft.println("Moisture:");


  pinMode(tx_pin, OUTPUT);

  ReadMoistSensorOne();  // Take an immediate first reading
  lastLoggedHour = timeinfo.tm_hour;

  // BLE
  thresholdCharacteristic.writeValue(40);
  WaterAvgCharacteristic.writeValue(40);
  if (!BLE.begin()) {  // begin initialization
    while (1)
      ;  // wait until initialization complete
  }

  BLE.setLocalName("BLE_Planty");                           // set advertised local name
  BLE.setAdvertisedService(PlantyService);                  // set advertised service UUID
  PlantyService.addCharacteristic(measureCharacteristic);   // add the red characteristic to the service
  PlantyService.addCharacteristic(thresholdCharacteristic); // add the green characteristic to the service
  PlantyService.addCharacteristic(WaterAvgCharacteristic);
  BLE.addService(PlantyService);                            // add service
  BLE.advertise();                                          // start advertising
}

void loop() {
  unsigned long tick = millis();
  digitalWrite(Pump, LOW);
  struct tm timeinfo;
  if (getLocalTime(&timeinfo)) {
    int currentHour = timeinfo.tm_hour;
    displayTime(timeinfo);
    // Check if current hour is divisible by 3 and different from last logged hour
    if ((currentHour % 3 == 0) && (currentHour != lastLoggedHour)) {
      ReadMoistSensorOne();
      lastLoggedHour = currentHour;
    }
  } else {
    Serial.println("Failed to get time.");
  }
  unsigned long tock = millis();

  unsigned long delayInterval = 1000 - tock + tick;
  // int moistRead = analogRead(sensor_pin);
  // moistRead = map(moistRead, 4095, 0, 0, 100);
  // Serial.println(moistRead);
  delay(int(delayInterval));
  Serial.println("No Bluetooth Connection");


  BLEDevice central = BLE.central();  // listen for BLE devices to connect:

  if (central) {  // if a central is connected to peripheral:
    // put code here to preform 1 time when device is connected
    Serial.println("Connected");
    while (central.connected()) {  // while the central is still connected to peripheral
                                   // if there is an update from Android App, change light ON (0) or OFF (1)
      if (measureCharacteristic.written()) {
        String value = measureCharacteristic.value();
        Serial.println("Recieved: " + value);
        if (value == "0") {

          int moistRead = analogRead(sensor_pin);
          moistRead = map(moistRead, 4095, 1700, 0, 100);
          String moistString = "M" + String(moistRead);
          measureCharacteristic.writeValue(moistString.c_str());
          Serial.println("Sent: " + moistString);
        } else if (value == "1") {
          // Water level reading
          long result = tx_rx();
          result = map(result, 301000, 225000, 100, 0);
          String resultString = "T" + String(result);
          measureCharacteristic.writeValue(resultString.c_str());
          Serial.println("Sent: " + resultString);
        } else if (value == "2") {
          // Water level reading
          ReadMoistSensorOne();
          if (done) {
            String pump1String = "P1";
            measureCharacteristic.writeValue(pump1String.c_str());
            Serial.println("Sent: " + pump1String);
            done = false;
          } else {
            String pump2String = "P2";
            measureCharacteristic.writeValue(pump2String.c_str());
            Serial.println("Sent: " + pump2String);
          }
        }
      }
    }
    Serial.println(".");
  }
}
7) App Design:
1- UI:
I started making the user interface of the app using MIT App Inventor. I wanted to have 2 screens but this made a problem with the bluetooth connection so ChatGPT came up with an idea to fix this as I used 2 vertical arrangments to put the elements in and consider them as separate screens.
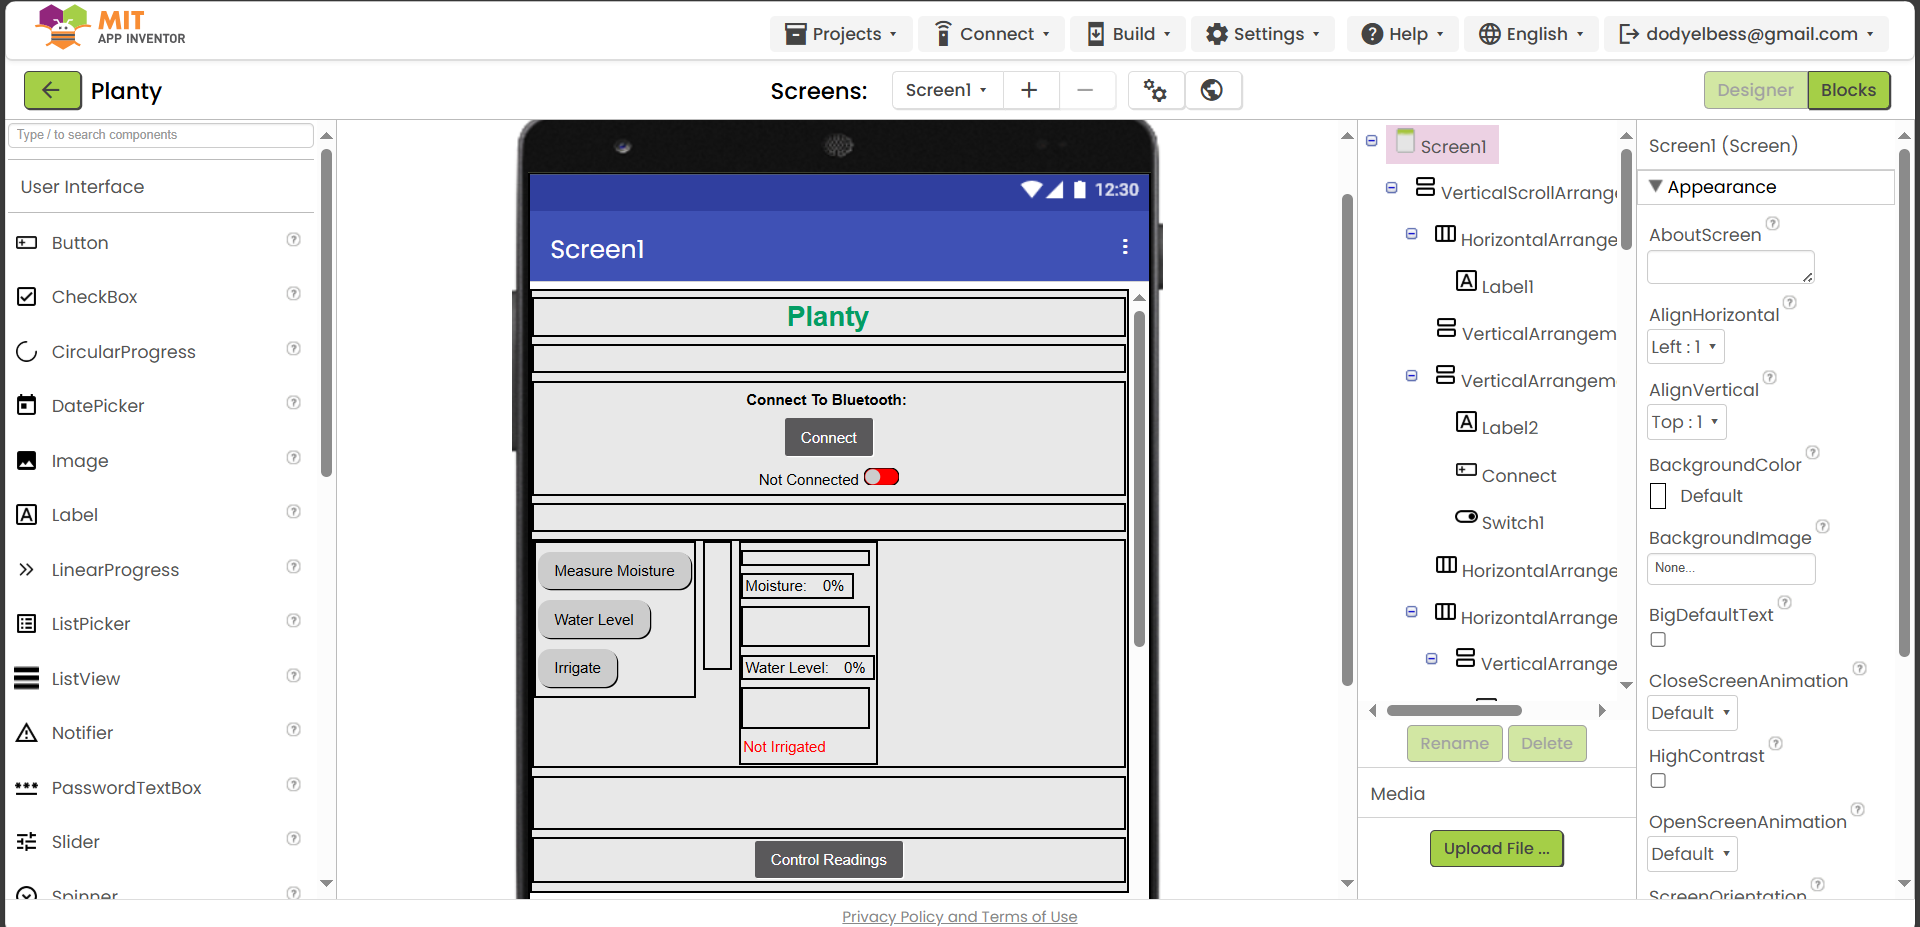
This is the first vertical arrangment which contains the elements of the first screen.
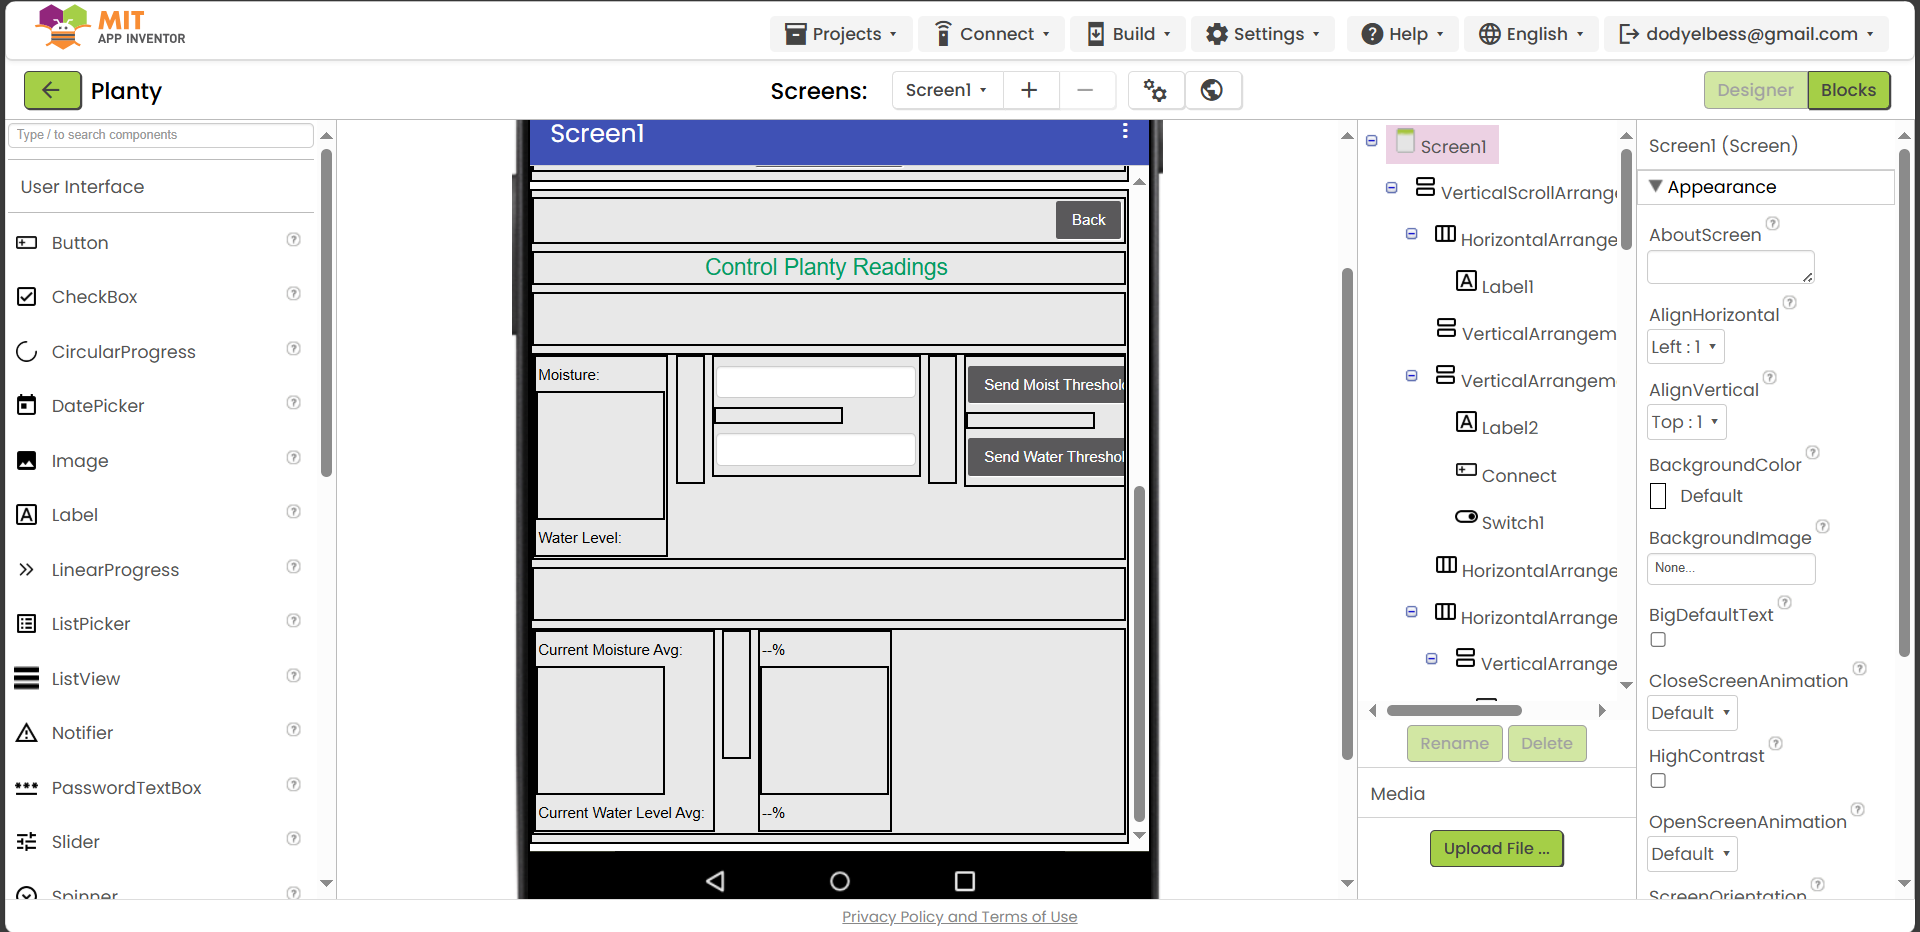
When I click on control readings it hides the first arrangment and shows the second one which is this one.
This trick makes it look like we are moving between different screens but actually we are on the same screen.
2- Code Blocks:

Making the code blocks to program the application started with initializing the BLE and characterestics. These blocks above is responsible for connecting to the bluetooth with the xiao board and making the switch disconnect the connection if changed.
The blocks on the right is responsible of showing and hiding the vertical arrangments and switching between screens.
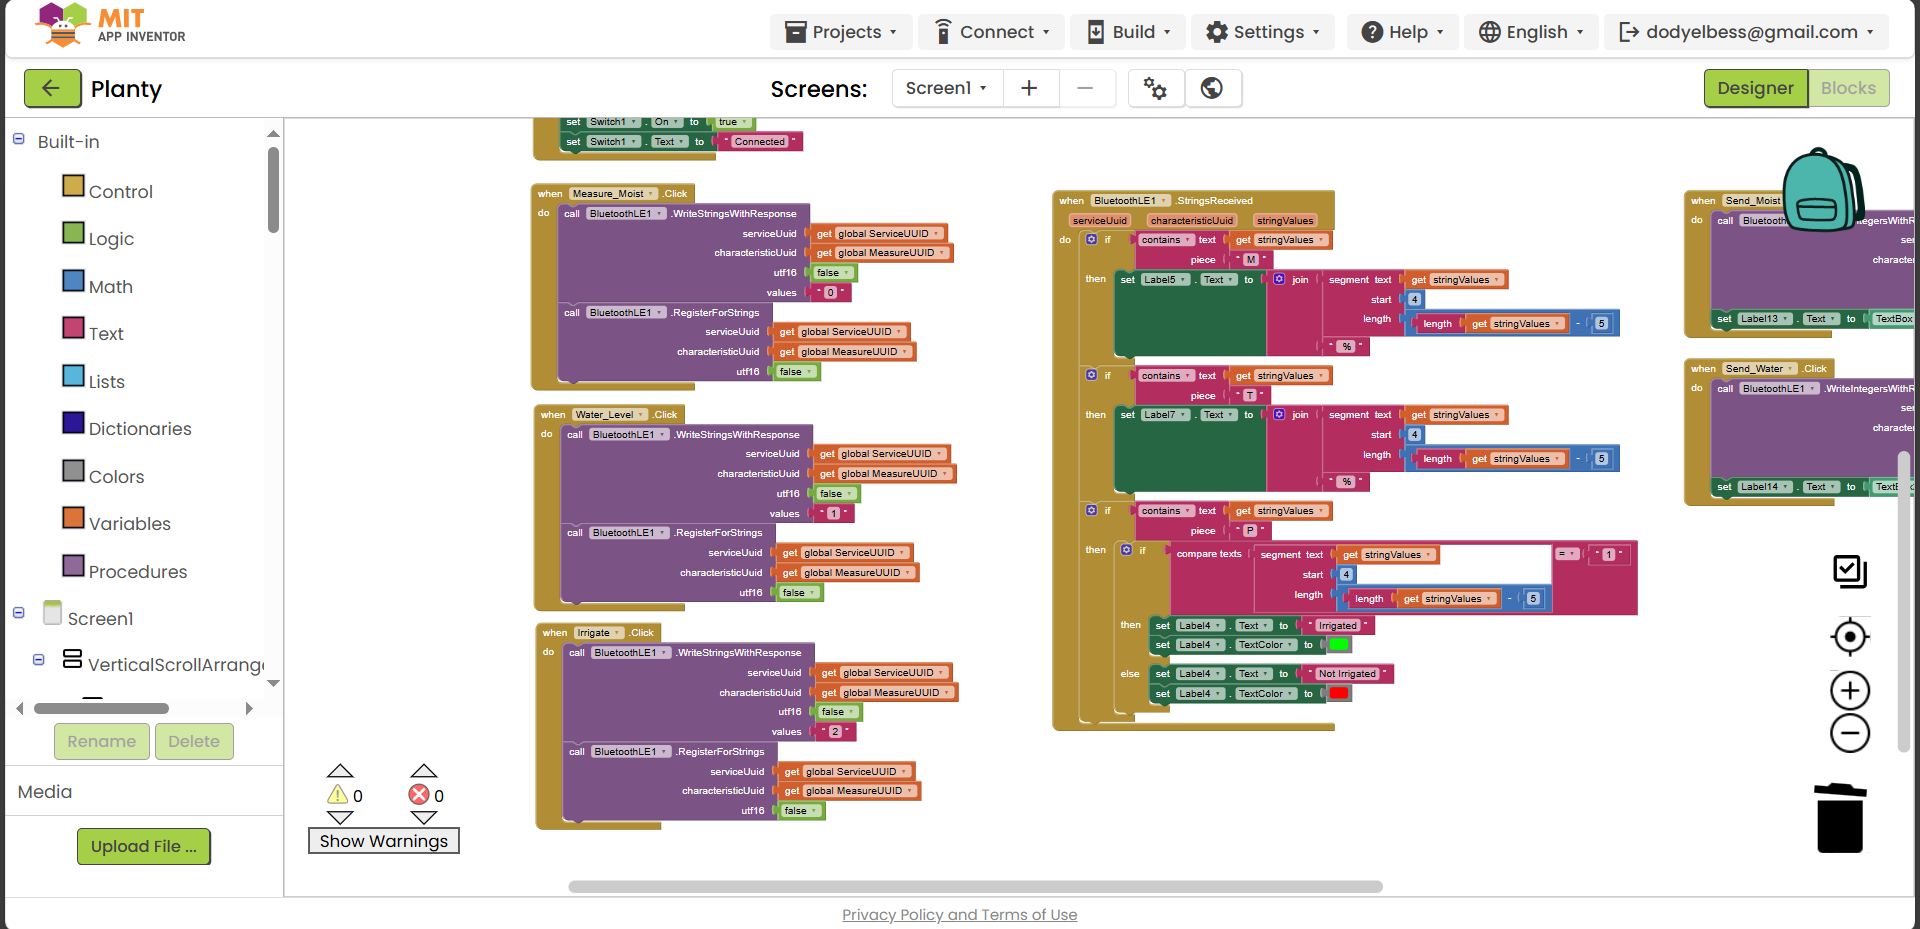
These blocks are programming the buttons in the first screen as for example when the measure moisture button is clicked it sends a string to the xiao with value of 0. Then when it receives strings it sees what's in it. If it contains the letter M so it's receiving the moisture of the soil so it sets label 5 which is the reading of the moist sensor to display the value it received with removing the M letter and other brackets then adding % at the end. Same goes for the other blocks.
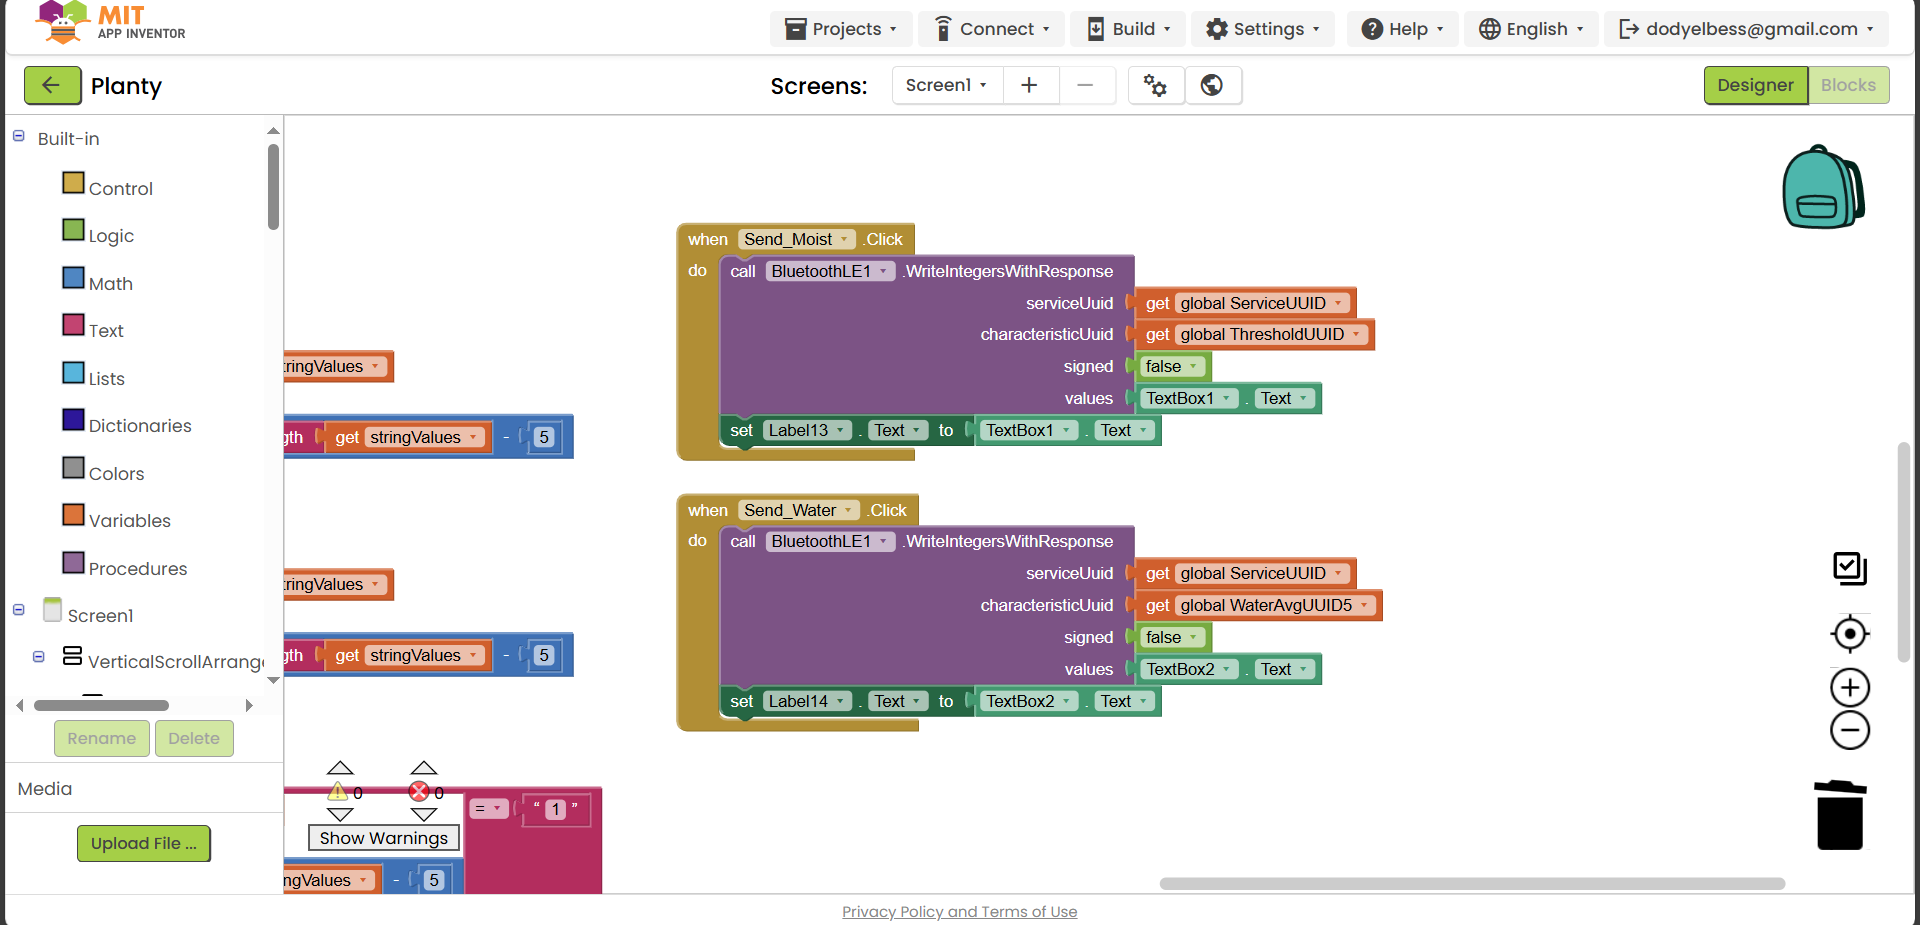
These blocks are programming the buttons in the second screen as when I click on send moist button it changes the text of the label to the text I wrote and sends this text to the xiao to put it in the threshold value. This makes us define what is the point where we say the moisture is low or not. The same goes for the water level average value. This is because the readings will vary for different reasons like how deep is the sensor in the soil so this way we are making it more reliable.
8) Future Plans:
- Make another tank cover that makes it easier to refill the tank without removing it.
- Slight change in the dimensions to make it easier to remove the tank for cleaning it.
- Adding tab to the electronics cover to hold it better.
- Making the drawer smaller in height and the pot bigger.
I'm open for any collaboration for future improvements. Don't hesitate to reach out.