Week 09. Input Devices
Let's look at some sensors and see how we can use them to interact with our project.
Assignment
Group Assignment (link):
Probe an input device's analogue levels and digital signals
Individual assignment:
Measure something: add a sensor to a microcontroller board
that you have designed and read it
Adding a sensor to a microcontroller board and measuring it
Useful links for this week
DFRobot wiki page for the MPU-6050 6-Axis Gyroscope and Accelerometer Sensor DF Robot shop link to MPU-6050 6-Axis Gyroscope and Accelerometer Sensor adafruit 9DoF BNO085 IMU F Board produced in week 8
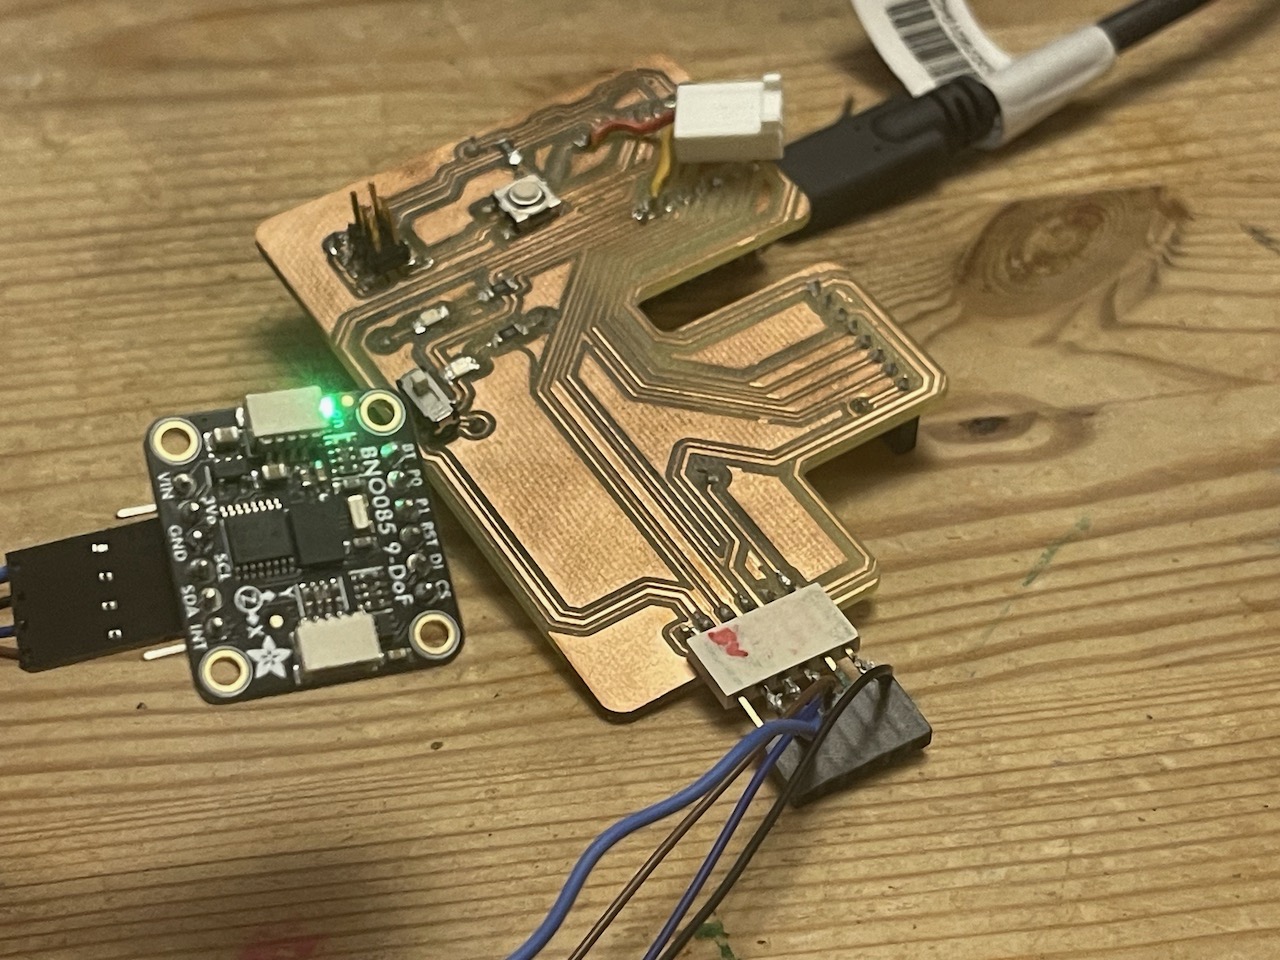
Most of this week was dedicated to finishing my Fab board (I did briefly call it my F'in board, but it has since reclaimed its proper name).
I decided to use an accelerometer and gyroscope sensor this week as I figured I would be needing it in my final project.
I also used a module that was readily available in the Creative Spark Industry Fab Lab, that was the DF Robot MPU-6050 6 DOF Sensor (Breakout).
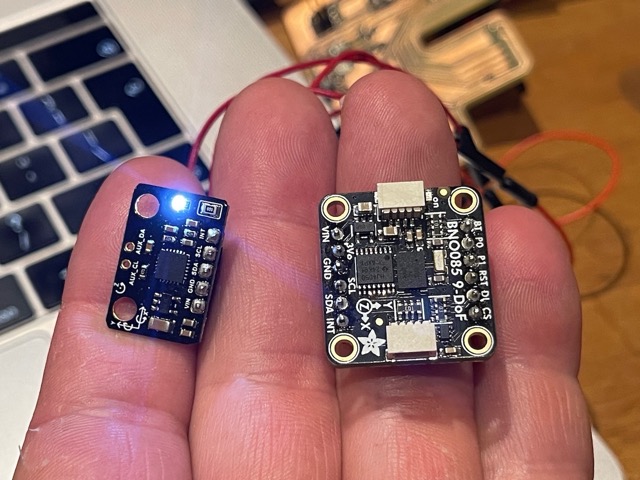
I had issues getting this sensor to work with the Seed XIAO RP2040 board and my Fab board. So at this point I decided to get the Adafruit BNO085 IMU
So back to the MPU6040 - I decided to get this one up and running as there may be issues with the BNO085 working with the XIAO ESP32 board.
Follow this link to download the libraries for the MPU6050 MPU6050 library However, it's not that straightforward as I found out - you need to download the entire repo from this link - extract - and navigate to your desired library - So follow this link https://github.com/jrowberg/i2cdevlib and download the repo - extract - and navigate to the MPU6050 folderSome missing libraries in Processing followed this link to get answers - https://forum.processing.org/two/discussion/19409/where-is-toxi-geom-i-can-not-find-it-anyware.html
Downloaded the toxiclibs from the following link -
toxiclibsScratch all that - I've gone back to the BNO085 as I will be using the XIAO RP2040 and the MPU6040 seemed to have considerable drift when using it.
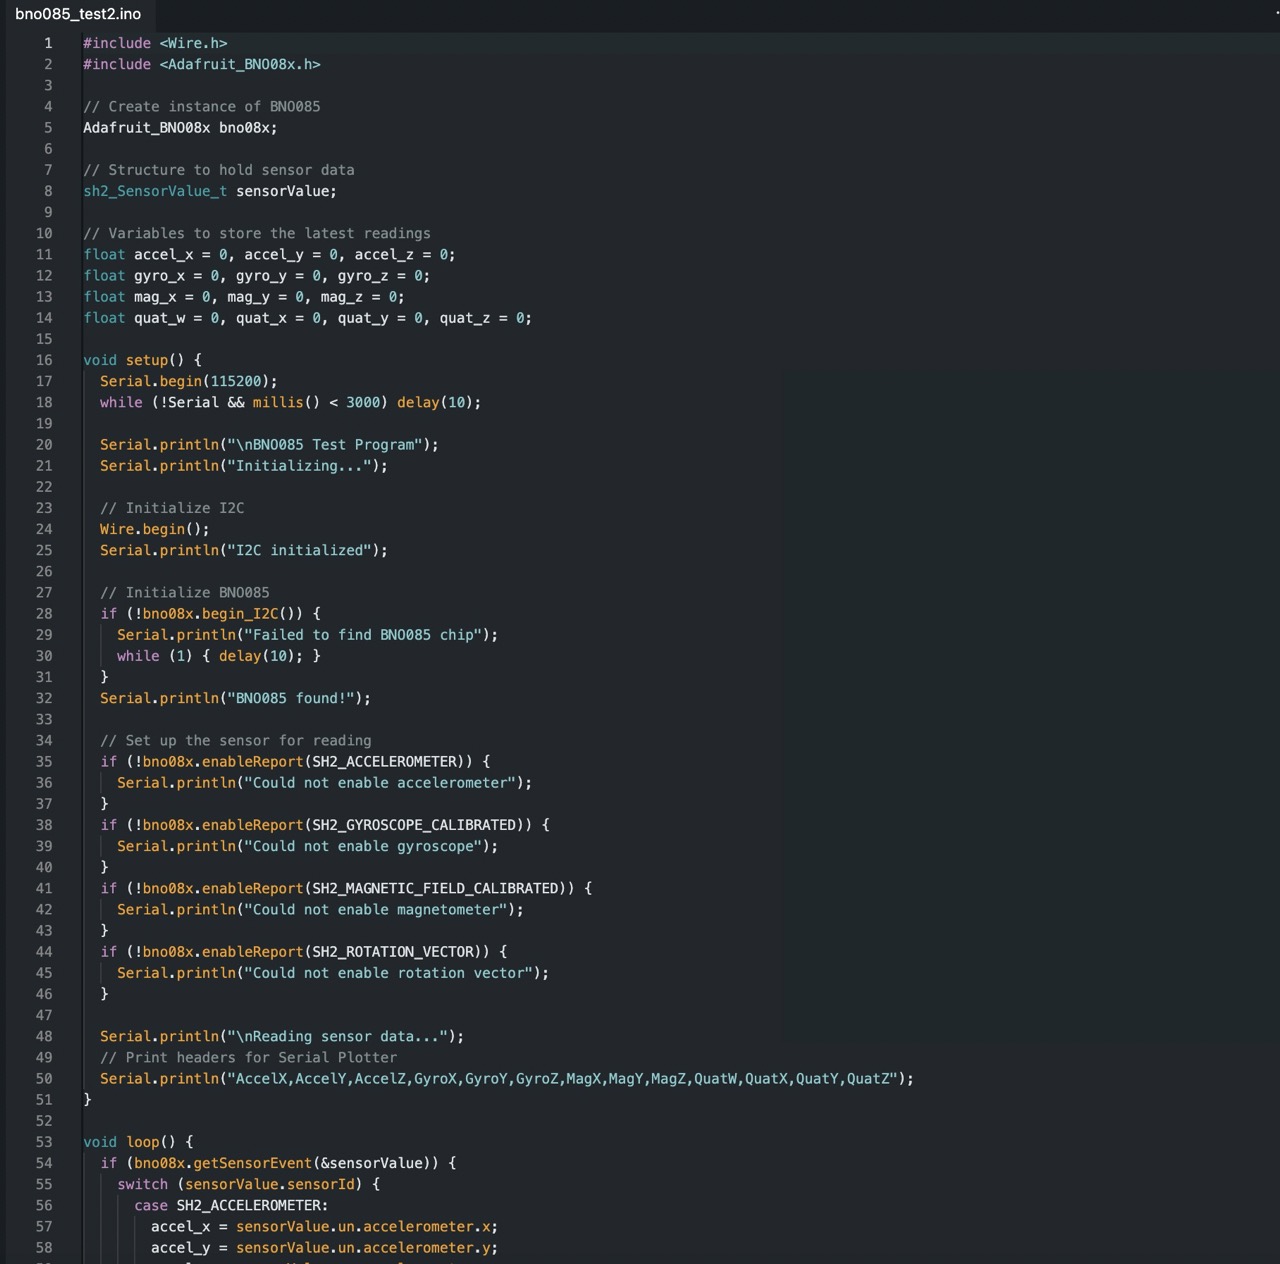
I was "vibe coding" using Cursor AI to generate some test code to test the BNO085 with the XIAO RP2040 - See prompt below worth noting the AI has context and is aware of the components I'm using - this prompt came later in the conversation
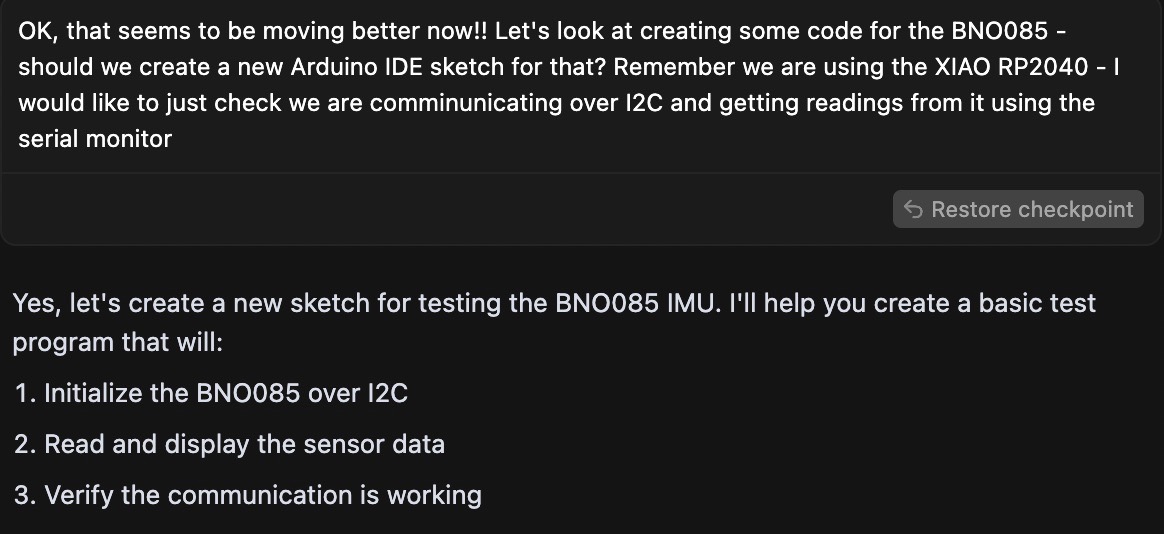
See code below
	#include <Wire.h>
#include <Adafruit_BNO08x.h>

// Create instance of BNO085
Adafruit_BNO08x bno08x;

// Structure to hold sensor data
sh2_SensorValue_t sensorValue;

// Variables to store the latest readings
float accel_x = 0, accel_y = 0, accel_z = 0;
float gyro_x = 0, gyro_y = 0, gyro_z = 0;
float mag_x = 0, mag_y = 0, mag_z = 0;
float quat_w = 0, quat_x = 0, quat_y = 0, quat_z = 0;

void setup() {
Serial.begin(115200);
while (!Serial && millis() < 3000) delay(10);

Serial.println("\nBNO085 Test Program");
Serial.println("Initializing...");

// Initialize I2C
Wire.begin();
Serial.println("I2C initialized");

// Initialize BNO085
if (!bno08x.begin_I2C()) {
Serial.println("Failed to find BNO085 chip");
while (1) { delay(10); }
}
Serial.println("BNO085 found!");

// Set up the sensor for reading
if (!bno08x.enableReport(SH2_ACCELEROMETER)) {
Serial.println("Could not enable accelerometer");
}
if (!bno08x.enableReport(SH2_GYROSCOPE_CALIBRATED)) {
Serial.println("Could not enable gyroscope");
}
if (!bno08x.enableReport(SH2_MAGNETIC_FIELD_CALIBRATED)) {
Serial.println("Could not enable magnetometer");
}
if (!bno08x.enableReport(SH2_ROTATION_VECTOR)) {
Serial.println("Could not enable rotation vector");
}

Serial.println("\nReading sensor data...");
// Print headers for Serial Plotter
Serial.println("AccelX,AccelY,AccelZ,GyroX,GyroY,GyroZ,MagX,MagY,MagZ,QuatW,QuatX,QuatY,QuatZ");
}

void loop() {
if (bno08x.getSensorEvent(&sensorValue)) {
switch (sensorValue.sensorId) {
case SH2_ACCELEROMETER:
accel_x = sensorValue.un.accelerometer.x;
accel_y = sensorValue.un.accelerometer.y;
accel_z = sensorValue.un.accelerometer.z;
break;

case SH2_GYROSCOPE_CALIBRATED:
gyro_x = sensorValue.un.gyroscope.x;
gyro_y = sensorValue.un.gyroscope.y;
gyro_z = sensorValue.un.gyroscope.z;
break;

case SH2_MAGNETIC_FIELD_CALIBRATED:
mag_x = sensorValue.un.magneticField.x;
mag_y = sensorValue.un.magneticField.y;
mag_z = sensorValue.un.magneticField.z;
break;

case SH2_ROTATION_VECTOR:
quat_w = sensorValue.un.rotationVector.real;
quat_x = sensorValue.un.rotationVector.i;
quat_y = sensorValue.un.rotationVector.j;
quat_z = sensorValue.un.rotationVector.k;
break;
}
}

// Print all values in a format suitable for Serial Plotter
Serial.print(accel_x); Serial.print(",");
Serial.print(accel_y); Serial.print(",");
Serial.print(accel_z); Serial.print(",");
Serial.print(gyro_x); Serial.print(",");
Serial.print(gyro_y); Serial.print(",");
Serial.print(gyro_z); Serial.print(",");
Serial.print(mag_x); Serial.print(",");
Serial.print(mag_y); Serial.print(",");
Serial.print(mag_z); Serial.print(",");
Serial.print(quat_w); Serial.print(",");
Serial.print(quat_x); Serial.print(",");
Serial.print(quat_y); Serial.print(",");
Serial.println(quat_z);

delay(50);  // Read at 20Hz for smoother plotting
}
video of the code running -
The first code produced results in the serial monitor however I wanted to visualise using serial plotter.
I went back to Cursor AI to ask how this could be achieved - see updated code below.
#include <Wire.h>
#include <Adafruit_BNO08x.h>

// Create instance of BNO085
Adafruit_BNO08x bno08x;

// Structure to hold sensor data
sh2_SensorValue_t sensorValue;

// Variables to store the latest readings
float accel_x = 0, accel_y = 0, accel_z = 0;
float gyro_x = 0, gyro_y = 0, gyro_z = 0;
float mag_x = 0, mag_y = 0, mag_z = 0;
float quat_w = 0, quat_x = 0, quat_y = 0, quat_z = 0;

void setup() {
  Serial.begin(115200);
  while (!Serial && millis() < 3000) delay(10);

  Serial.println("\nBNO085 Test Program");
  Serial.println("Initializing...");

  // Initialize I2C
  Wire.begin();
  Serial.println("I2C initialized");

  // Initialize BNO085
  if (!bno08x.begin_I2C()) {
    Serial.println("Failed to find BNO085 chip");
    while (1) { delay(10); }
  }
  Serial.println("BNO085 found!");

  // Set up the sensor for reading
  if (!bno08x.enableReport(SH2_ACCELEROMETER)) {
    Serial.println("Could not enable accelerometer");
  }
  if (!bno08x.enableReport(SH2_GYROSCOPE_CALIBRATED)) {
    Serial.println("Could not enable gyroscope");
  }
  if (!bno08x.enableReport(SH2_MAGNETIC_FIELD_CALIBRATED)) {
    Serial.println("Could not enable magnetometer");
  }
  if (!bno08x.enableReport(SH2_ROTATION_VECTOR)) {
    Serial.println("Could not enable rotation vector");
  }

  Serial.println("\nReading sensor data...");
  // Print headers for Serial Plotter
  Serial.println("AccelX,AccelY,AccelZ,GyroX,GyroY,GyroZ,MagX,MagY,MagZ,QuatW,QuatX,QuatY,QuatZ");
}

void loop() {
  if (bno08x.getSensorEvent(&sensorValue)) {
    switch (sensorValue.sensorId) {
      case SH2_ACCELEROMETER:
        accel_x = sensorValue.un.accelerometer.x;
        accel_y = sensorValue.un.accelerometer.y;
        accel_z = sensorValue.un.accelerometer.z;
        break;

      case SH2_GYROSCOPE_CALIBRATED:
        gyro_x = sensorValue.un.gyroscope.x;
        gyro_y = sensorValue.un.gyroscope.y;
        gyro_z = sensorValue.un.gyroscope.z;
        break;

      case SH2_MAGNETIC_FIELD_CALIBRATED:
        mag_x = sensorValue.un.magneticField.x;
        mag_y = sensorValue.un.magneticField.y;
        mag_z = sensorValue.un.magneticField.z;
        break;

      case SH2_ROTATION_VECTOR:
        quat_w = sensorValue.un.rotationVector.real;
        quat_x = sensorValue.un.rotationVector.i;
        quat_y = sensorValue.un.rotationVector.j;
        quat_z = sensorValue.un.rotationVector.k;
        break;
    }
  }

  // Print all values in a format suitable for Serial Plotter
  Serial.print(accel_x); Serial.print(",");
  Serial.print(accel_y); Serial.print(",");
  Serial.print(accel_z); Serial.print(",");
  Serial.print(gyro_x); Serial.print(",");
  Serial.print(gyro_y); Serial.print(",");
  Serial.print(gyro_z); Serial.print(",");
  Serial.print(mag_x); Serial.print(",");
  Serial.print(mag_y); Serial.print(",");
  Serial.print(mag_z); Serial.print(",");
  Serial.print(quat_w); Serial.print(",");
  Serial.print(quat_x); Serial.print(",");
  Serial.print(quat_y); Serial.print(",");
  Serial.println(quat_z);

  delay(50);  // Read at 20Hz for smoother plotting
}
video of the code running -
Issues I've encountered
AGHHHHH!
what went wrong.

what went wrong.
Learning Outcomes

This week's key learning outcomes:
- Successfully implemented IMU sensors (BNO085 and MPU-6050) with microcontrollers
- Mastered sensor data visualisation using Arduino's Serial Plotter
- Developed troubleshooting skills for sensor integration
- Gained practical experience in sensor selection and library management
Code structure and how the types of flow required - I will need to explore more of this, but this week has given me a good grounding.
I have a good grounding in the Arduino IDE and have a good understanding of the code structure and how the types of flow required.