09. Output Devices
Part one : Assignments
1. Group assignment:
-
Measure the power consumption of an output device.
-
Document your work on the group work page and reflect on your
-
individual page what you learned.
2. Individual assignment:
- Add an output device to a microcontroller board you’ve designed and program it to do something.
Part two : What I did
Group assignment:
To see our group assignment click here
Individual assignment:
1. Objective
For this week’s assignment, we chose to use a stepper motor and a relay associated with a pump and a solenoid valve with the electronic board we made in Week 8 (Electronics production).
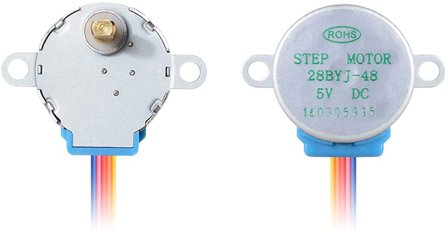
2. Stepper motor
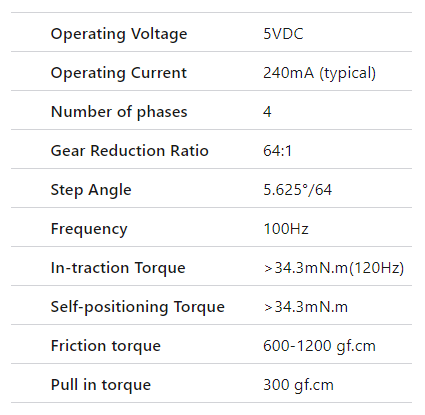
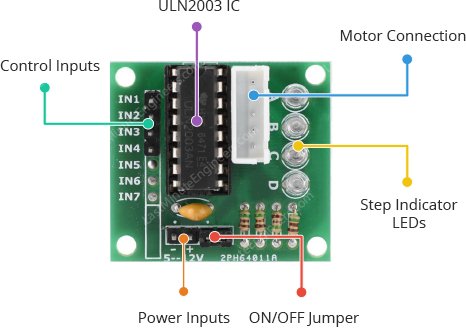
We have chosen the 28BYJ-48 stepper motor with the ULN2003 driver board.
2.1. Presentation
The 28BYJ-48 is a 5-wire unipolar stepper motor that runs on 5V.
The ULN2003 is an integrated circuit comprising an array of seven pairs of Darlington transistors, each capable of driving a load of up to 500mA and 50V. Our PCB uses four of the seven pairs.
2.2. Schematic
to use the stepper motor we have followed the wiring below.

2.3. Program
Once the wiring is complete, we’ll move on to programming. To program our circuit board, we’ve decided to write a program that turns the motor in one direction for one second, and in the other direction for one second.
| Arduino_xiao_ESP32-C3_program_1.ino | |
|---|---|
1 2 3 4 5 6 7 8 9 10 11 12 13 14 15 16 17 18 19 20 21 22 23 | |
2.4. Code Explanation
- The sketch starts by including the built-in stepper library.
1 | |
- Next, we define a constant stepsPerRevolution which contains the number of “steps” the motor takes to complete one revolution. In our case, this is 2038.
1 | |
- We have defined the various microcontroller terminals that are connected to the stepper motor driver
1 2 | |
- In the setup function, we use the setSpeed() function to specify the speed at which the stepper motor should move and the Serial.begin() function for sets the data rate in bits per second (baud) for serial data transmission. For communicating with Serial Monitor.
1 2 3 4 | |
- In the loop function, we use the step() function to specify the number of steps to be taken. Passing a negative number to the step() function turns the motor in the opposite direction. The first code snippet makes the motor turn very slowly clockwise, while the second makes it turn very quickly counter-clockwise.
1 2 3 4 5 6 7 8 9 10 11 | |
2.5. Hero video
3. Pump and Solenoid valve
For this application, we’ll use an electronic relay as an output to control the ignition and extension of a pump with a solenoid valve. In fact, this test is related to our final project.
3.1. Presentation
To make this application we used several components:
- Relay
A relay is an electronic device with an electromagnet at its heart. A relay can be thought of as an electric lever; you turn it on with a relatively small current, and it turns on another device with a much larger current. we have chosen to use the RELAY SONGLE SRD-05VDC-SL-C 10A as shown below.

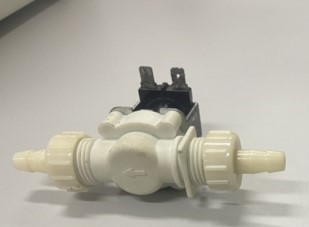
- Solenoid valve
A solenoid valve is an electrically controlled valve. For our system we chose the WPM422 solenoid valve from the manufacturer velleman.
Specifications:
| diameter (inlet - outlet): | 8 mm ( 0.315” ) |
|---|---|
| operating pressure: | 0.02 to 0.8 MPa (0.2 to 8 bar) |
| operating temperature: | from 1 °C to 60 °C |
| response time (open): | 0.15 s |
| response time (closed): | 3 s |
| voltage: | 12 VDC |
| weight: | 95 g ( 0.21 lbs ) |
| connection: | 6.3 mm (for FBF6 or FBMI) |
| type: | normally closed (open at 12 VDC) |
| max. current: | 500 mA |
- Pump
For the pump we used a micro diaphragm pump 12V 80W as shown below.

Specifications:
| Model: | GFA-12-80 |
|---|---|
| Voltage: | DC12V |
| Power(max): | 80W |
| Inlet pressure: | 9KGS |
| Rated pressure: | 5.5KGS |
| Flow rate (MAX): | 5.5l/min |
| Suction distance: | 1.5m |
| Elevator: | 55m |
| Reach: | 8m |
| Motor life: | 3-5years |
| Net weight: | approx. 0.6Kg |
| Material: | plastic |
| Color: | black |
| Size: | approx. 16.5x9.5x6cm (L * W * H) |
3.2. Schematic
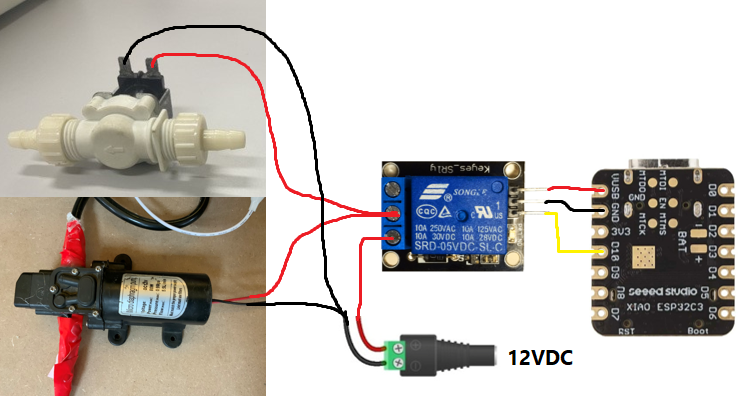
To start the pump and solenoid valve using a relay controlled by an XIAO ESP32C3, we followed the wiring diagram below.
3.3. Program
Once the wiring is complete, we move on to programming. To program our circuit board, we’ve decided to write a program that turns the pump on for 5s and then off for 5s.
| Arduino_xiao_ESP32-C3_program_2.ino | |
|---|---|
1 2 3 4 5 6 7 8 9 10 11 12 13 14 15 16 | |
3.4. Code Explanation
- The sketch begins by declaring the pin to which the relay module’s input pin is connected.
1 | |
- In the setup function, we configure the input pin to behave as an output.
1 | |
- In the loop function, we turn the device ON/OFF by pulling the relay pin LOW/HIGH. digitalWrite(RelayPin, LOW) pulls the pin LOW, whereas digitalWrite(RelayPin, HIGH) pulls the pin HIGH.
1 2 3 4 5 | |