Week 14: Interface and Application Programming
✓ write an application that interfaces a user with an input &/or output device that you made
✓ compare as many tool options as possible
Haptic belt
I saw a youtube video about a belt developed for blind people which translates an image captured by a camera or from a computer screen into touch signals in the back.
I was intrigued to how this kind of device would feel, so I resolved to try to make one. I decided to use servo motors, since it seemed to be the easiest way to achieve a similar result. I quickly realized that I couldn’t have more than one row of motors since we didn’t have too many of them in the lab.
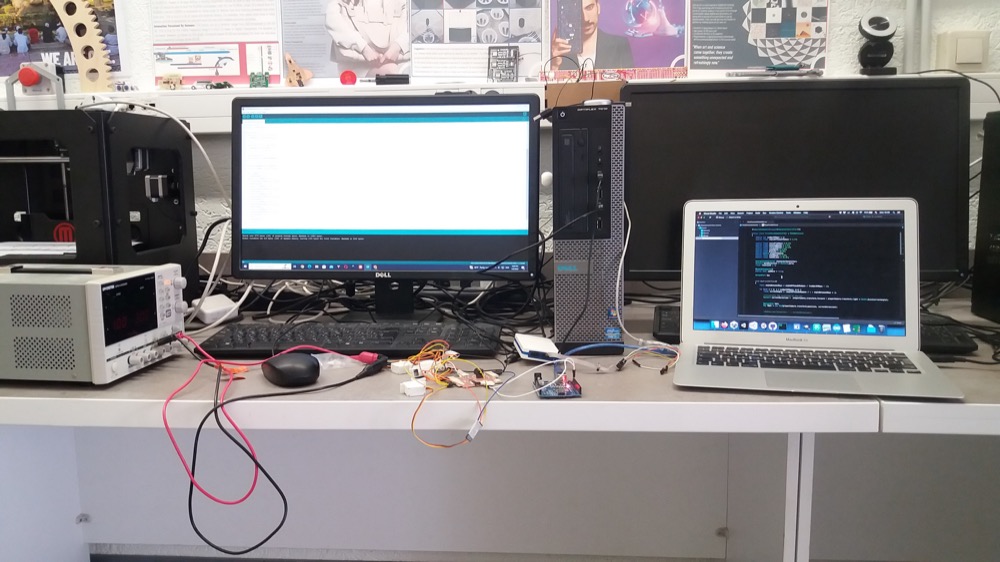
Since I have some experience with the Unity game engine, I wanted to use it to make an test environment for the belt.
Designing the board
The first step was to make the board that would control all the servo motors. Since I used the ATTINY1614 last week and I liked working with it, I thought that it would be a good idea to use this microcontroller. I was wrong! I forgot that I needed to interface it with the computer using serial communication, and it is not that straight forward to do it with this microcontroller.
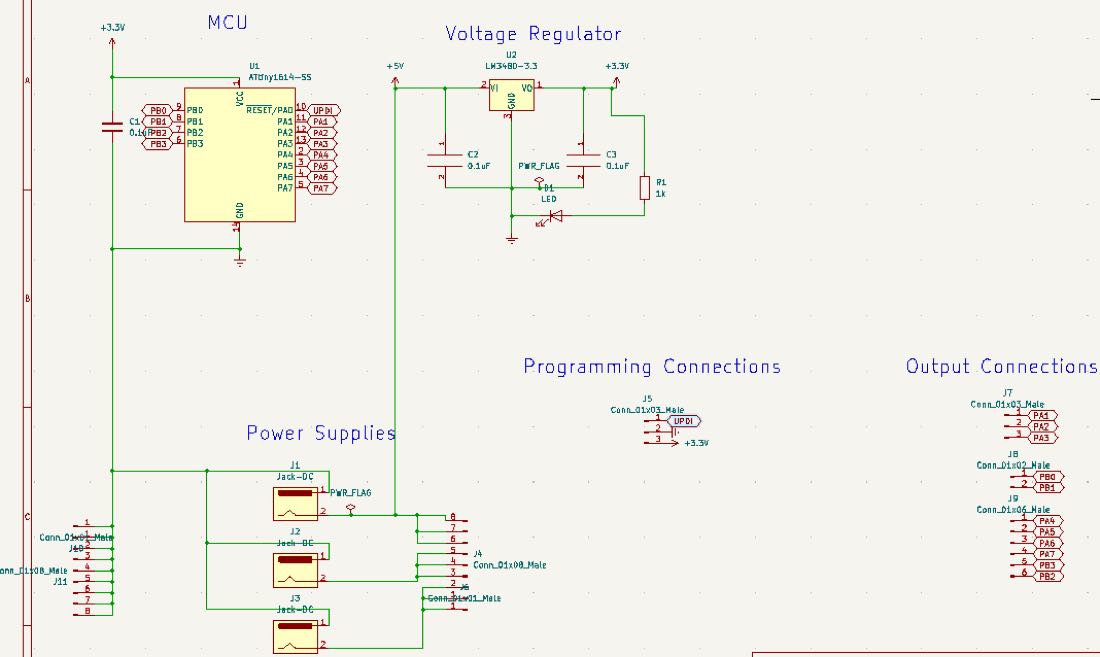
Anyway, I didn’t realize my mistake before it was too late, so here is the schematic of the board:
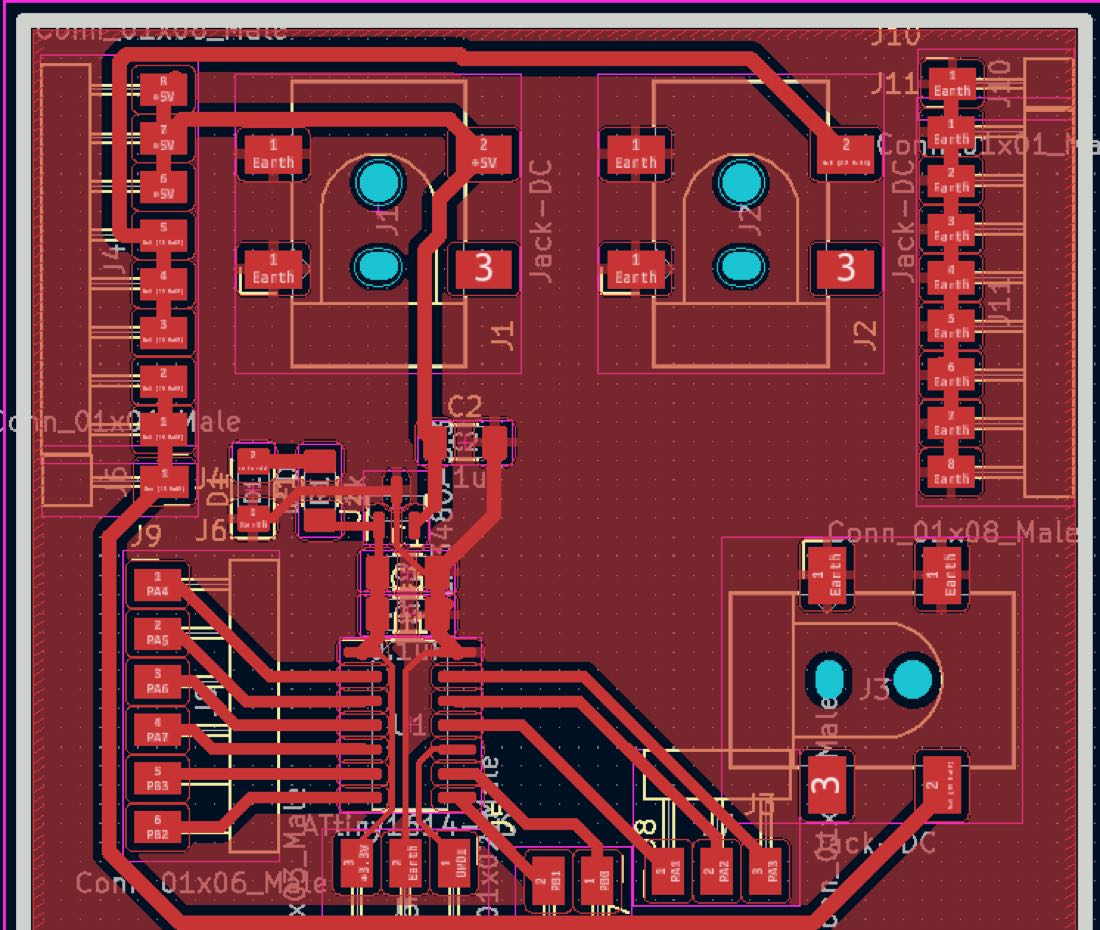
And the PCB:
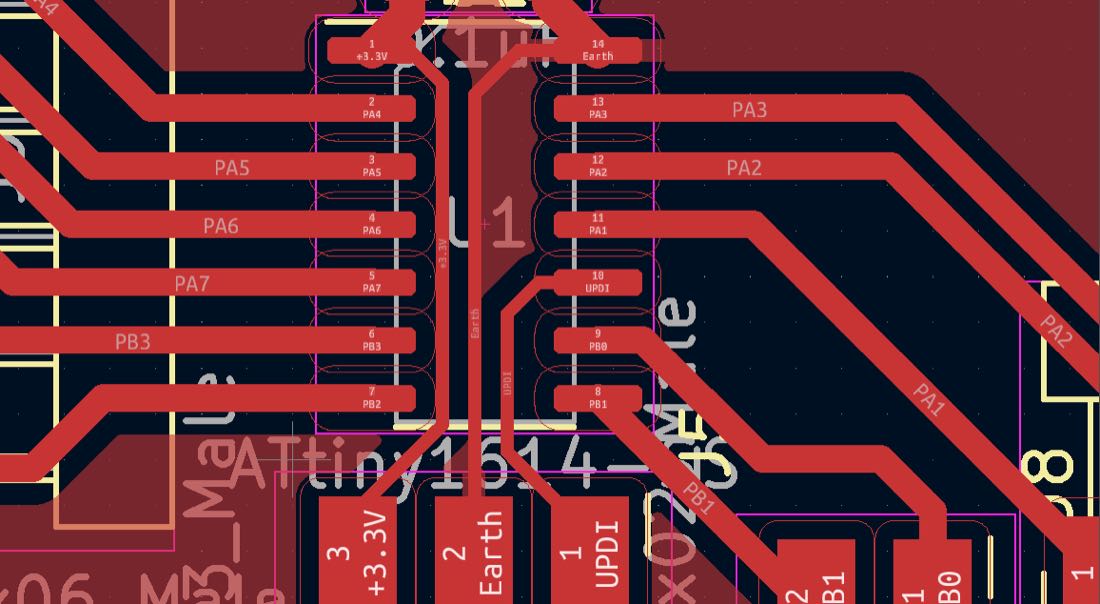
With the details of the MCU connections:
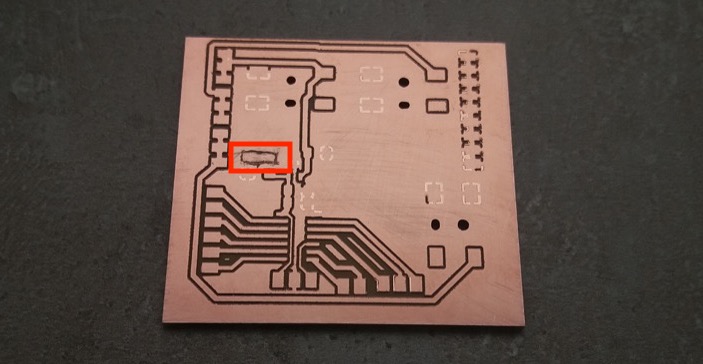
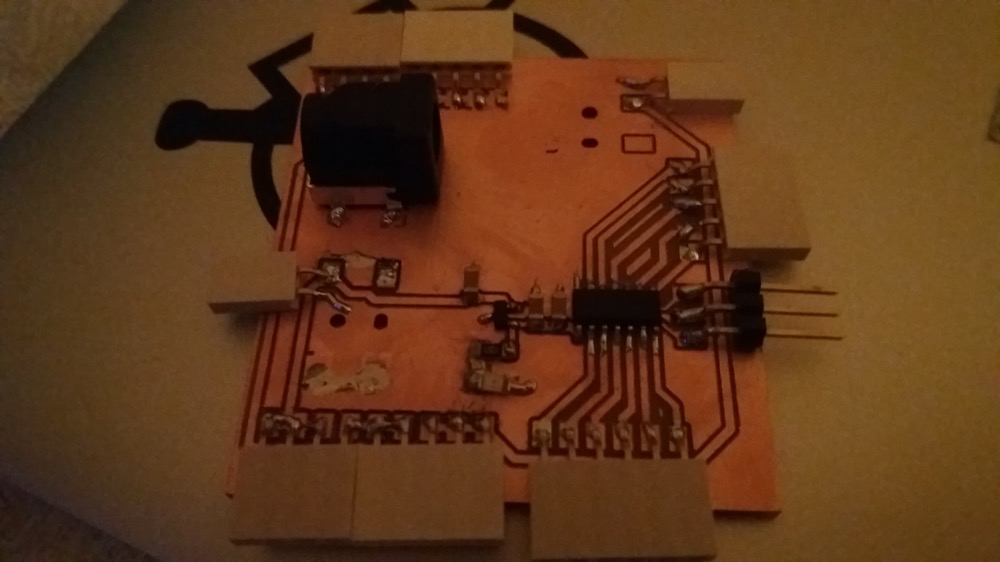
I then carved the PCB, but the table wasn’t perfectly flat and some parts weren’t carved properly. Since most of these areas were GROUND pads, it wasn’t important. I just needed to cut one area with a knife:
I then had to solder my components.
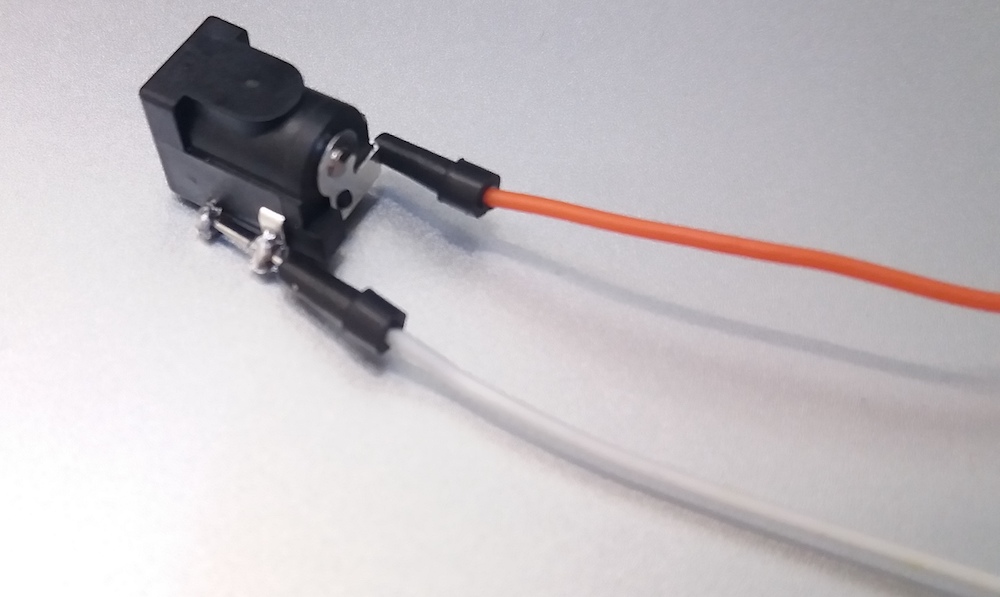
As usual, what I thought would be an easy task would take an unexpected turn. I added some jack DC power supplies because the USB port of a computer couldn’t handle that many servos. I added three of them because I read on some forums that it was common that servos need 1A at peak consumption. Since I had few 5V 3A power supplies, it made sense to put 3 servos per power supply. However, I made two mistakes: first, I oriented them in the wrong direction, so that the cables, when plugged, would obstruct each other. Then, I mixed up the the pads attribution so that GROUND was +5V and conversely. The easier solution to tackle this problem was to solder some female pinheaders:
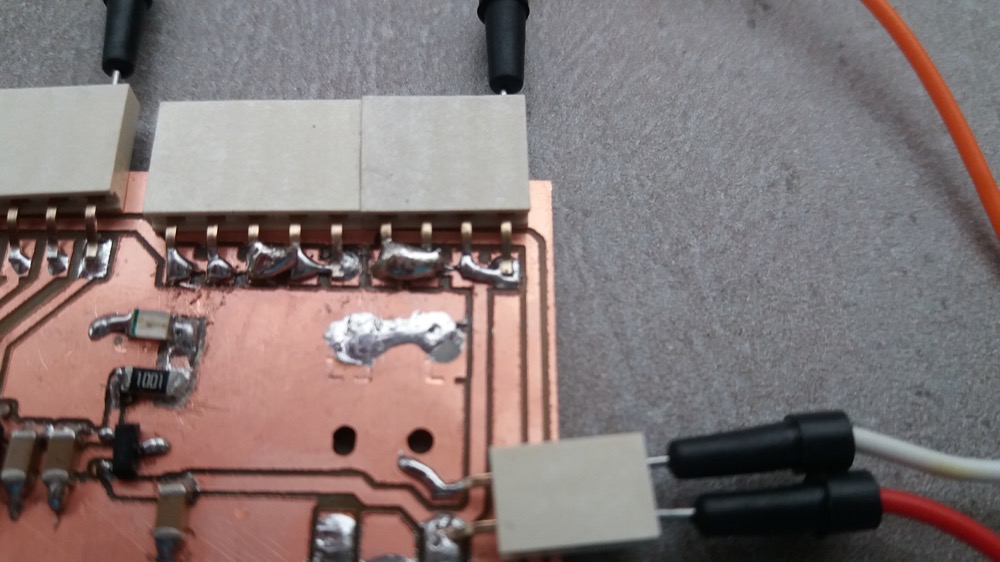
and to solder the wires to the jack:
Sewing the belt
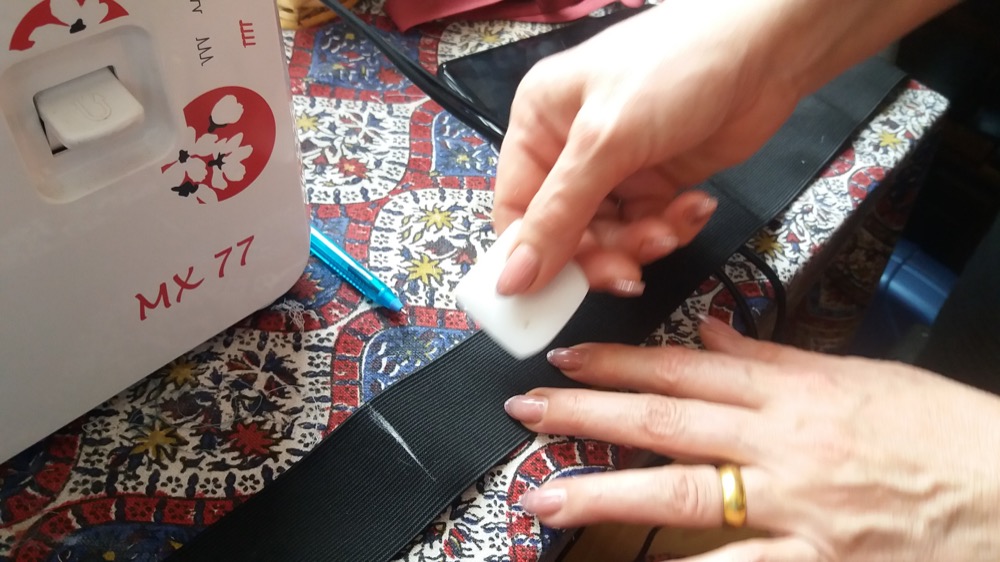
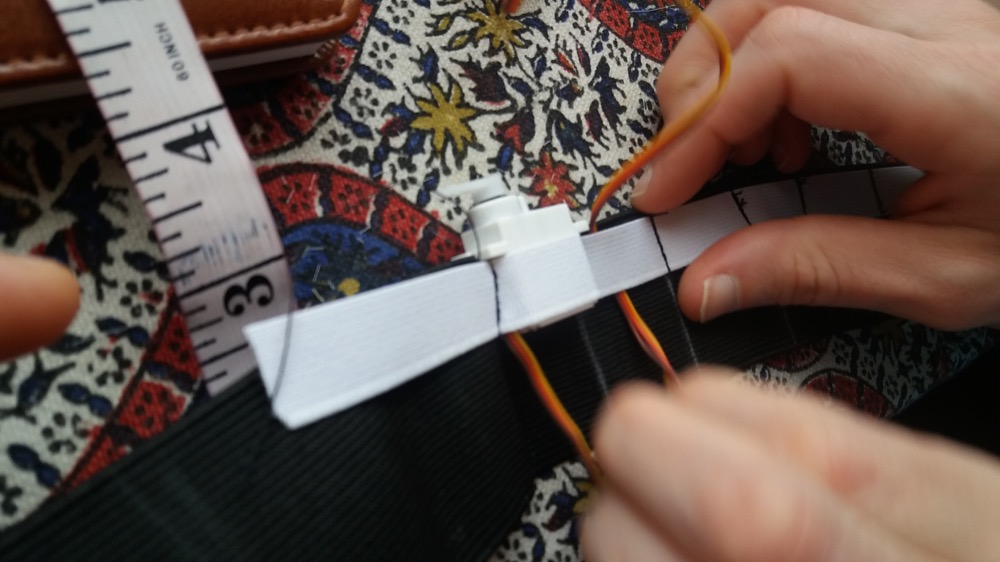
For this part, I was helped by a friend who is working in a sewing factory and owns a sewing machine. Since my knowledge of sewing is pretty inexistant I immensely appreciated her help. I chose some stretchable fabric for the belt. First, we marked the middle of the belt and the borders of each “pocket” for the servo motors:
Then, she sewed most of the “pockets”. I tried to sew a couple of them and it was much harder than it looked!

Once it was done, I tried to place some servos in the belt:
and it worked like a charm:

Unity game engine
I have some experience with this game engine, but it’s the first time that I’m trying to establish a serial connection. I am using Unity 2019.4.20f1.
Creating the environment
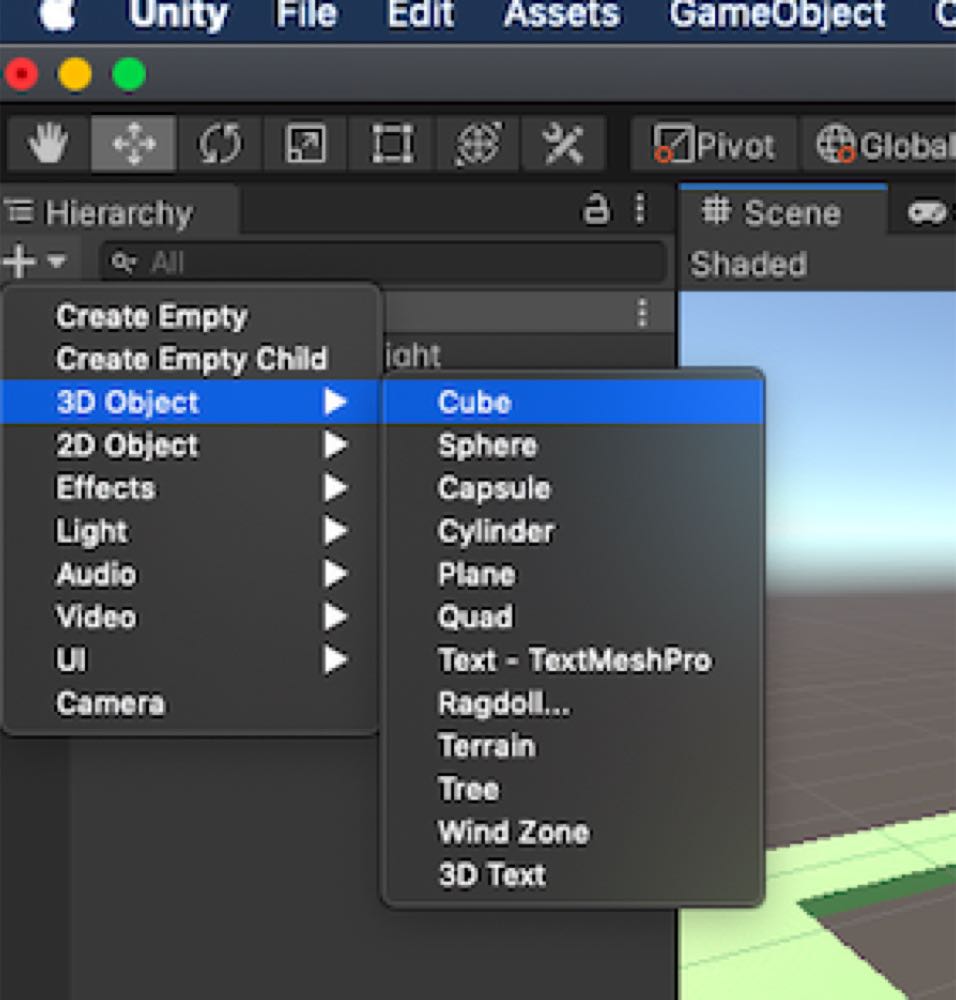
I started by making a simple environment made of few platforms. First, I created some cubes by clicking the ‘+’ inside the hierarchy:
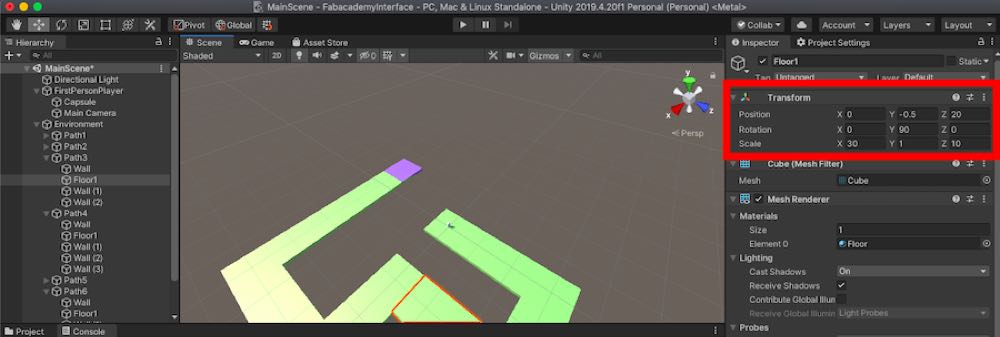
I could change the size and position of each of the platforms in the Transform from the inspector:
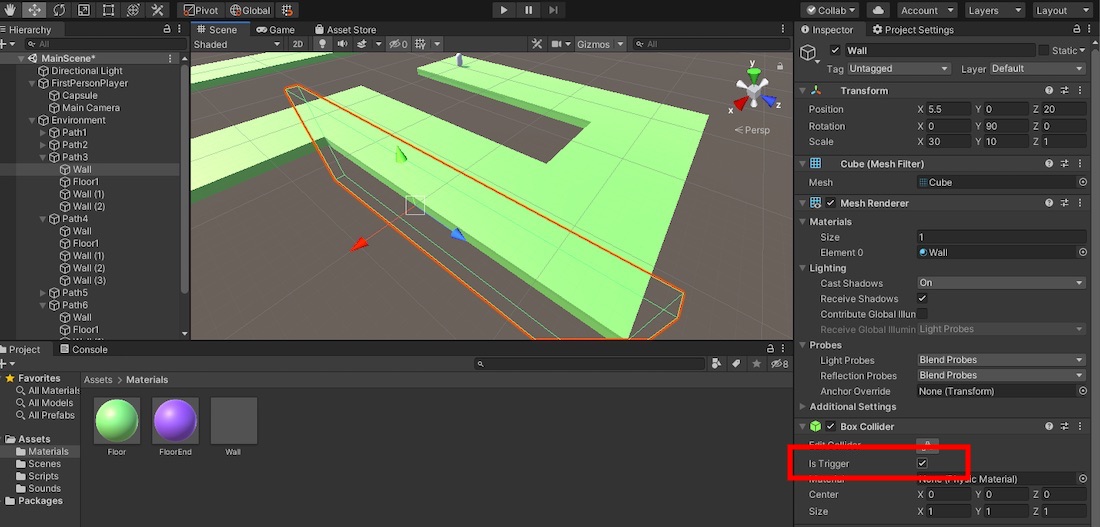
Similarly, I made some walls. Since they should be detectable by the game but shouldn’t trigger any physical collision with the player, I ticked the “isTrigger” box inside the collision component:
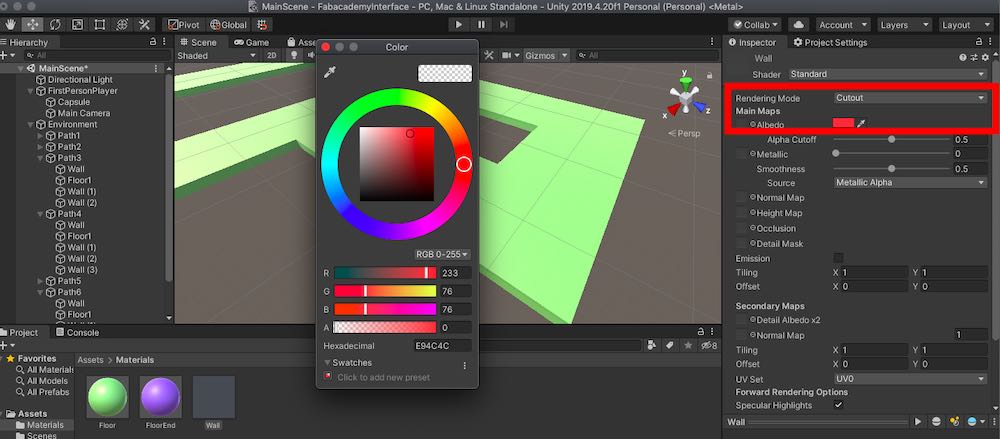
Since I wanted the walls to be invisible, I needed to change the material properties. First, I created a Material for the wall by right clicking in the Project tab:

Once the material was created, I could change the Albedo from the inspector. For a transparent wall, I set the alpha to zero and changed the rendering mode to cutout:
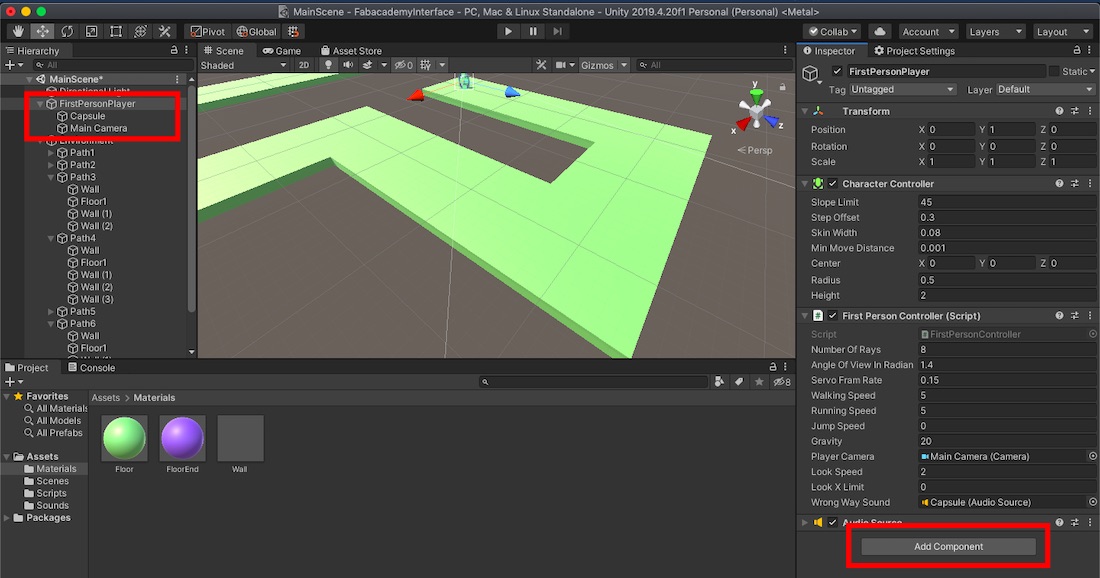
Once I had the environment, I added a simple First Person character moving on a single platform. Here is a good tutorial on how to do this. First, I saved the C# script from the tutorial inside my project. Then, I created an empty game object the same way I made the cube and renamed it “FirstPersonPlayer”. I set the “Main Camera” game object as child of this “FirstPersonPlayer” and did the same for a capsule object I created. I then selected my “FirstPersonPlayer” and added the imported script by pressing “Add Component”:
Modifying the script
The main thing I wanted to add to the script was the serial communication. For this, I followed these two tutorials: tutorial 1, tutorial 2.
I put here the whole final code, but I’ll explain below the main modifications I made:
using UnityEngine;
using System.IO.Ports;
using System.IO;

//for the line directly inside the screen: https://www.youtube.com/watch?v=USwrSUpIgLI

[RequireComponent(typeof(CharacterController))]

public class FirstPersonController : MonoBehaviour
{
    public int numberOfRays = 8;
    public float angleOfViewInRadian = 1.3f;

    public float servoFramRate = 0.2f;
    public float walkingSpeed = 7.5f;
    public float runningSpeed = 11.5f;
    public float jumpSpeed = 8.0f;
    public float gravity = 20.0f;
    public Camera playerCamera;
    public float lookSpeed = 2.0f;
    public float lookXLimit = 45.0f;

    CharacterController characterController;
    Vector3 moveDirection = Vector3.zero;
    float rotationX = 0;

    [HideInInspector]
    public bool canMove = true;

    SerialPort sp;
    private bool isFalling = false;
    private Quaternion originalRotation;
    private int currentWrongWayIndex = -1;

    [SerializeField]
    private AudioSource wrongWaySound;

    public void wrongWayIndexChanged(int newIndex)
    {
        Debug.Log("new index: " + newIndex);
        if (newIndex <= currentWrongWayIndex)
        {
            wrongWaySound.Play();
        }
        currentWrongWayIndex = newIndex;
    }

    void MapFieldOfView()
    {
        float angleBetweenRays = angleOfViewInRadian / (numberOfRays - 1);

        for (int i = 0; i < numberOfRays; i++) {
            float currentAngle = -angleOfViewInRadian / 2 + angleBetweenRays * i;

            //calculates the direction of the ray
            Vector3 currentDirection =  playerCamera.transform.forward + playerCamera.transform.right * Mathf.Asin(currentAngle);


            RaycastHit hit;
            Ray Ray1 = new Ray(playerCamera.transform.position, currentDirection);

            if (Physics.Raycast(Ray1, out hit))
            {
                if (sp.IsOpen) {
                    float distFloat = hit.distance;
                    distFloat *= 10;
                    int distInt = (int)distFloat;

                    Color color;
                    char distChar;
                    if (distInt > 79)
                    {
                        distChar = (char)69;
                        color = new Color(0, 0, 255);
                    } else if (distInt > 59)
                    {
                        distChar = (char)68;
                        color = new Color(0, 125, 125);
                    }
                    else if (distInt > 39)
                    {
                        distChar = (char)67;
                        color = new Color(0, 255, 0);
                    }
                    else if (distInt > 19)
                    {
                        distChar = (char)66;
                        color = new Color(125, 125, 0);
                    } else
                    {
                        distChar = (char)65;
                        color = new Color(255, 0, 0);
                    }

                    sp.Write(distChar.ToString());
                    Debug.DrawLine(playerCamera.transform.position + Vector3.down * 0.2f, playerCamera.transform.position + Vector3.down * 0.2f + currentDirection * 10, color, servoFramRate, true);
                } else {
                    Debug.Log("Couldn't open connection");
                }
            }
        }
        char startChar = (char)97;
        sp.Write(startChar.ToString());
    }

    private void Start()
    {
        characterController = GetComponent<CharacterController>();

        // Lock cursor
        Cursor.lockState = CursorLockMode.Locked;
        Cursor.visible = false;


        //Serial initialization
        string the_com="";

        /*foreach (string mysps in SerialPort.GetPortNames())
        {
            print(mysps);
            if (mysps != "COM1") { the_com = mysps; break; }
        }*/
        try
        {
            the_com = "/dev/cu.usbserial-1420";
            //sp = new SerialPort("\\\\.\\" + the_com, 9600);
            sp = new SerialPort(the_com, 9600);
            if (!sp.IsOpen)
            {
                print("Opening " + the_com + ", baud 9600");
                sp.ReadTimeout = 500;
                sp.Handshake = Handshake.None;
                sp.Open();
                if (sp.IsOpen) { print("Open"); }
            }

            InvokeRepeating("MapFieldOfView", 0f, servoFramRate);
        } catch (IOException exception)
        {
            Debug.Log("Serial connection not available");
            Debug.Log(exception.StackTrace);
        }

        originalRotation = transform.rotation;
    }

    private void Update()
    {
        // We are grounded, so recalculate move direction based on axes
        Vector3 forward = transform.TransformDirection(Vector3.forward);
        Vector3 right = transform.TransformDirection(Vector3.right);
        // Press Left Shift to run
        bool isRunning = Input.GetKey(KeyCode.LeftShift);
        float curSpeedX = canMove ? (isRunning ? runningSpeed : walkingSpeed) * Input.GetAxis("Vertical") : 0;
        float curSpeedY = canMove ? (isRunning ? runningSpeed : walkingSpeed) * Input.GetAxis("Horizontal") : 0;
        float movementDirectionY = moveDirection.y;
        moveDirection = (forward * curSpeedX) + (right * curSpeedY);

        if (Input.GetButton("Jump") && canMove && characterController.isGrounded)
        {
            moveDirection.y = jumpSpeed;
        }
        else
        {
            moveDirection.y = movementDirectionY;
        }

        // Apply gravity. Gravity is multiplied by deltaTime twice (once here, and once below
        // when the moveDirection is multiplied by deltaTime). This is because gravity should be applied
        // as an acceleration (ms^-2)
        if (!characterController.isGrounded)
        {
            moveDirection.y -= gravity * Time.deltaTime;
        }

        // Move the controller
        characterController.Move(moveDirection * Time.deltaTime);

        // Player and Camera rotation
        if (canMove)
        {
            rotationX += -Input.GetAxis("Mouse Y") * lookSpeed;
            rotationX = Mathf.Clamp(rotationX, -lookXLimit, lookXLimit);
            playerCamera.transform.localRotation = Quaternion.Euler(rotationX, 0, 0);
            transform.rotation *= Quaternion.Euler(0, Input.GetAxis("Mouse X") * lookSpeed, 0);
        }


        //check if player fell down
        if (transform.position.y < -1f && !isFalling)
        {
            GetComponent<AudioSource>().Play();
            isFalling = true;
        }
        if (transform.position.y < -30f)
        {
            isFalling = false;
            moveDirection.y = 0;
            transform.position = Vector3.up * 2;
            transform.rotation = originalRotation;
        }
    }
}
Serial communication
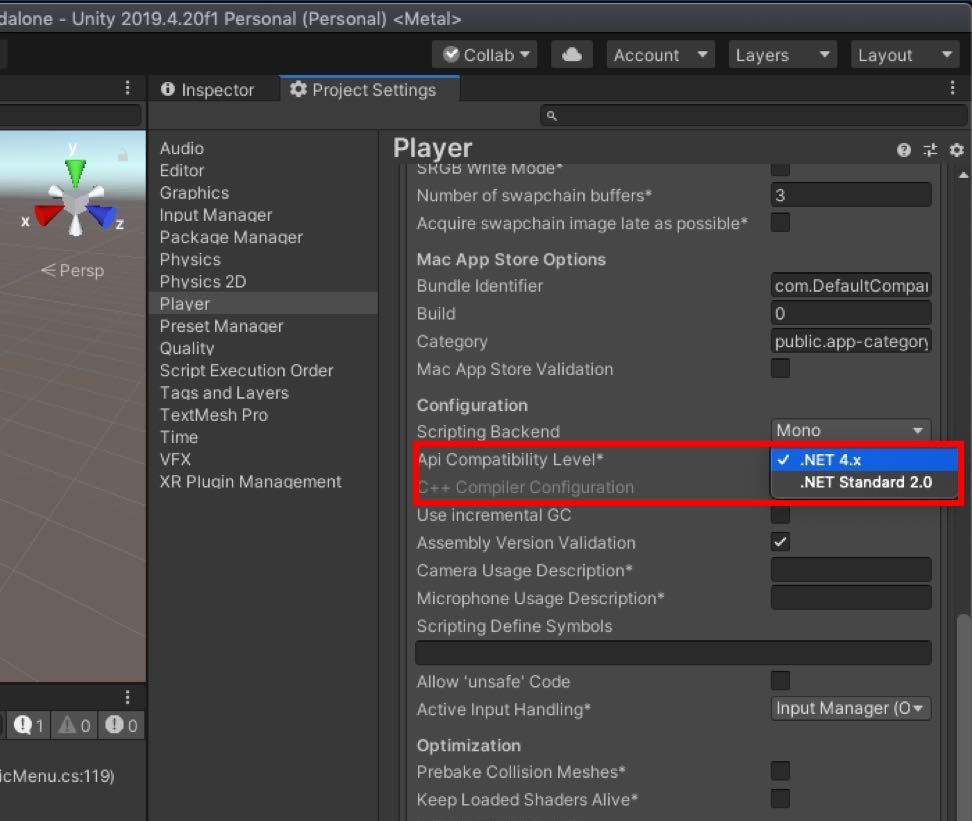
In Unity, we first need to check that we have the full .Net references in Edit–>Project Settings–>Player->Api Compatibility Level:
Then, we can start to code. The serial communication part of the C# script is this:
//Serial initialization
string the_com="";

/*foreach (string mysps in SerialPort.GetPortNames())
{
    print(mysps);
    if (mysps != "COM1") { the_com = mysps; break; }
}*/

the_com = "/dev/cu.usbserial-1420";
//sp = new SerialPort("\\\\.\\" + the_com, 9600);
sp = new SerialPort(the_com, 9600);
if (!sp.IsOpen)
{
    print("Opening " + the_com + ", baud 9600");
    sp.ReadTimeout = 500;
    sp.Handshake = Handshake.None;
    sp.Open();
    if (sp.IsOpen) { print("Open"); }
}

InvokeRepeating("MapFieldOfView", 0f, servoFramRate);
I tried it first on Windows and the (now commented) foreach loop enabled to search for the COM port
corresponding to the board. It is very useful, since this port often changes when
plugging the board. However, I later used my MacBook and the port name was very different.
For sake of simplicity, I just hard coded the name (the_com = "/dev/cu.usbserial-1420";).
Once the initialization is done, we can just transfer strings like this:
sp.Write("message");
Raycast
To map the environment of the player, I am casting some rays out of the camera and checking at which distance these rays hit an obstacle:
...

//calculates the direction of the ray
float currentAngle = -angleOfViewInRadian / 2 + angleBetweenRays * i;
Vector3 currentDirection =  playerCamera.transform.forward + playerCamera.transform.right * Mathf.Asin(currentAngle);


RaycastHit hit;
Ray Ray1 = new Ray(playerCamera.transform.position, currentDirection);

if (Physics.Raycast(Ray1, out hit))
{
  float distFloat = hit.distance;
  ...
}
The distance is then communicated to the microcontroller to translate it into an angle for the servo motor.
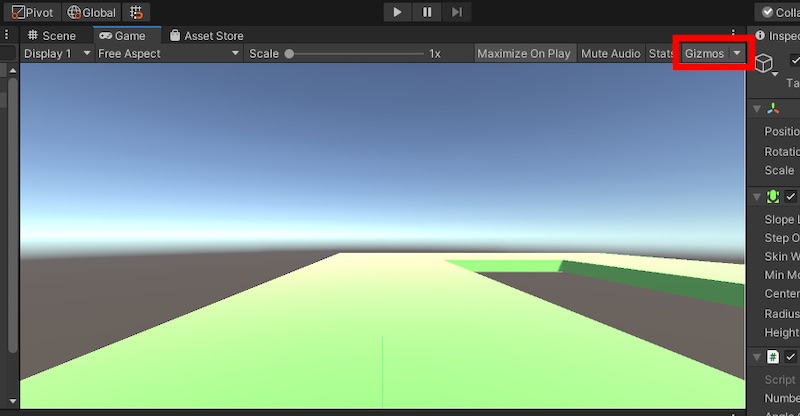
For debugging purposes, I drew lines corresponding to these rays. I had some problem at the start, because I didn’t see any line. I was missing 2 things: I needed to activate the “Gizmos” during the game phase:
Then, since I was drawing the lines straight out of the camera, their projection onto the camera plane had 0 dimension and they were thus invisible to the camera(I was helped by this video). To fix this, I just shifted them a bit:
Debug.DrawLine(playerCamera.transform.position + Vector3.down * 0.2f, playerCamera.transform.position + Vector3.down * 0.2f + currentDirection * 10, color, servoFramRate, true);
I also change the color of the lines depending on the distance of the obstacle:

First test with Arduino
To test the serial communication, I used an Arduino board with few LEDs that should turn on when approaching an obstacle. The code on the Arduino was the following:
#include <Servo.h>

uint8_t servoIndex = 0;
uint8_t pins[] = {3,5,9,10,11};

void setup() {
  Serial.begin(9600);

  pinMode(pins[0], OUTPUT);
  pinMode(pins[1], OUTPUT);
  pinMode(pins[2], OUTPUT);
  pinMode(pins[3], OUTPUT);
  pinMode(pins[4], OUTPUT);
}

void loop() {
  if (Serial.available() > 0) {
    uint8_t inByte = Serial.read();

    if (inByte > 91) {    //the C# script I had in Unity was sending the character 'a' at the start of each frame
      servoIndex = 0;
    } else {
      uint8_t outByte = map(inByte,0,90,0,20);
      analogWrite(pins[servoIndex], 20 - outByte);
      servoIndex++;
    }
  }
}
And this is the result of this little test:
Programming the boards
I used the UPDI protocol with the Atmel ICE programmer to program the ATTINY1614, as I explained in more details last week.
As I mentioned above, I made a mistake by forgetting that I would need a serial connection after programming the MCU. This wouldn’t be a problem if I had the Serial-UPDI programmer just designed by Stéphane Muller from the Sorbonne Fablab.
Since I didn’t want to make a new board, I thought of a dirty fix by connecting it with an arduino board, connected to the computer, and communicating with it through I2C. The code for the Arduino is pretty straight forward as it only serves as intermediary between the computer and the ATTINY:
#include <Wire.h>

void setup() {
  Serial.begin(9600);

  // Start the I2C Bus as Primary
  Wire.begin();
}

void loop() {

  if (Serial.available() > 0) {
    uint8_t inByte = Serial.read();
    Wire.beginTransmission(7);
    Wire.write(inByte);
    Wire.endTransmission();
  }
}
The ATTINY1614 is a bit more complicated, since it is driving the motors. Here is the full code for it (I will discuss some parts of the code below):
#include <Servo.h>
#include <Wire.h>


Servo servo1;  // create servo object to control a servo
Servo servo2; Servo servo3; Servo servo4; Servo servo5; Servo servo6; Servo servo7; Servo servo8;

Servo servos[] = {servo1, servo2, servo3, servo4, servo5, servo6, servo7, servo8};
uint8_t pins[] = {0,1,2,3,4,5,10,9};
uint8_t servoPos[] = {5,5,5,5,5,5,5,5};
uint8_t servoIndex = 0;
volatile bool currentFrameProcessed = true;     //if not volatile, cannot be modified by receiveEvent function
uint8_t inByte = -1;

void setup() {
  for (int i = 0; i <8; i++) {
    servos[i].attach(pins[i]);
  }

  for (int i = 0; i <8; i++) {
    servos[i].write(90);
  }

  Wire.begin(7);
  Wire.onReceive(receiveEvent);
}

void receiveEvent(int bytes) {
  inByte = Wire.read();
  if (inByte > 80) {
    servoIndex = 0;
    currentFrameProcessed = false;
  } else {
    servoPos[servoIndex] = inByte - 64;
    servoIndex++;
  }

}

void loop() {
  if (!currentFrameProcessed) {
    for (int i = 0; i < 8; i++) {
      if (servoPos[i] == 5) {
        servos[i].write(85);
      } else if (servoPos[i] == 4) {
        servos[i].write(68);
      } else if (servoPos[i] == 3) {
        servos[i].write(50);
      } else if (servoPos[i] == 2) {
        servos[i].write(30);
      } else if (servoPos[i] == 1) {
        servos[i].write(5);
      }
    }
    currentFrameProcessed = true;
  }
}
I decided to use the “Servo.h” library because it seemed simple to use.
The main problem I had while coding this program was that the variable “currentFrameProcessed”, which was modified inside the “receiveEvent” function, didn’t seem to be modified inside the “loop()” function. After reading few forum threads, I tried to declare this variable “volatile”, which solved the problem. According to the documentation, “A variable should be declared volatile whenever its value can be changed by something beyond the control of the code section in which it appears, such as a concurrently executing thread.” I guess that the “loop()” and “receiveEvent” functions are running on concurrent threads and that this creates a problem for variables used in both functions.
Testing the device
First, I used our adjustable power supply to see how many Amps the servos would draw:
Since these three servos didn’t seem to draw more than 1 Ampere, I thought that two 5V/3A power supplies would be more than enough (instead of 3 like I initially planned).
Eventually, I could start wiring everything and start testing the belt:
It was indeed a lot of wires!
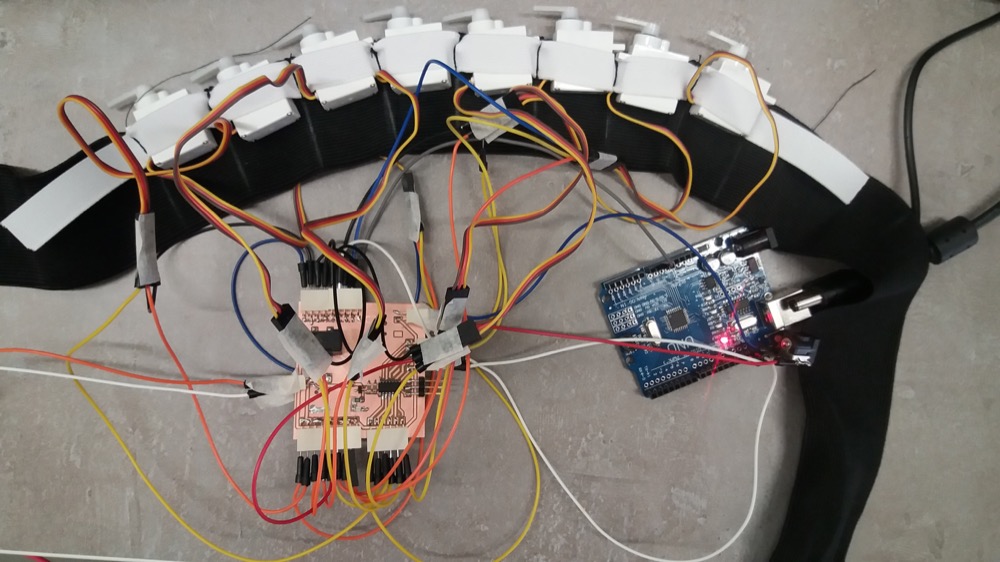
I conducted few tests without wearing the belt to see if the servos were behaving correctly (here with a rather slow “servos refreshing rate”):
It was not very convenient to wear and, sometimes, some wire would disconnect, but it was good enough for testing this prototype:

Eventually, I could run some real test with my eyes covered:
The servos reacted quite fast and I tried to reduce their refreshing rate down to 150 ms.
Group assignment
For our group assignment, we tested several tools for displaying the data collected by a sensor. We used the DS18B20 digital temperature sensor. The code to send the data to the computer by serial was pretty straight forward, since it’s the same as the one we use to debug our programs.
First, we tried out Processing, which is a programmation language and a software sketchbook. It makes it quite easy to display graphics. We plotted some very basic graph which represented our temperature data evolving in function of the time.
Then, we used Python and Matplotlib. This library enables to easily plot some graphs. The harder part was that, when trying to display the plot without blocking the program, the graph was never showing. The non-blocking behavior is important, since otherwise we couldn’t update the graph dynamically when new data would arrive. After a lot of searching, we finally read that we just had to add a pause(0.01) for the graph to show up. It was otherwise quite easy to follow the documentation for making graphs.
Eventually, we tried out Unity. Since it is a game engine, it is not really easy to plot our data inside a conventional graph. However, we can use some creativity to make our data more engaging. We chose to represent the temperature by the height of a hot air balloon. There are several tutorials on how to use Serial communication with Unity and it wasn’t very hard to implement it. The important bit to remember is to change the API compatibility level to .NET 4.x, otherwise it wouldn’t work.
Conclusion
This week was quite fun for me. I ended up with a very rough product, but I was happy that I could experiment with it. In the video that inspired the project, one of the people developing the haptic belt was saying that a key factor was the refreshing rate at which the motors react. They achieve about 80 Hz. I had a much slower refreshing rate, since I had about 8Hz.
If I would start over, I would probably choose the SAMD11C microcontroller instead of the ATTINY1614, since the serial communication would be simpler.
Files
Code driving servo motors on the ATTINY1614
assets folder in the unity project
interface board schematic and traces