7. Computer Controlled Machining
This week I designed and then used the Shopbot to CNC myself a new nightstand and I learned how to use the FesTools Domino 500.
Group Work
This week I researched the materials that could be cut using the Shotbot Desktop Max CNC machine, I also helped Dariyah with doing the material fixturing portion of the group work. You can see my work along with my group member’s Dariyah Strachan, Dylan Ferro, Stuart Christhilf, and David Tian work on the Charlotte Latin Fab Lab site for student group B.
CNC Safety
This week I also learned about CNC safety from Mr. Tom Dubick and Dr. David Taylor. They walked everyone through the proper safety precautions when using our lab’s CNC machines. I learned that when using the CNC machine, safety glasses and over the ear safety ear protection must be worn at all times. I also learned that we needed to have a second person in the room with us when starting out with the CNC machine to have an extra set of eyes while we learn how to use the machine. We also have to close all doors to the CNC machine room before use. Some safety measures they integrated into machine use was that the wrench for the collet of the CNC machine is attached to the only key for the CNC machines operation to avoid any unexpected turning of the tool or spindle while changing those parts out. Finally, we always have to have the workflow for the CNC machine open or out when using it to ensure we are following all necessary steps. I followed all of these steps while making my nightstand, and my second person in the room while I used the CNC was Mr. Tom Dubick.
CNC Nightstand
I need a new nightstand for my room because I am getting tired of using my bookshelf as a catch-all for my stuff so I decided to make myself a nightstand for this week. I originally wanted two shelves in my night stand but that didn’t end up working out, though only having one shelf turned out to be a hidden blessing as you will find out below.
Design Sketch
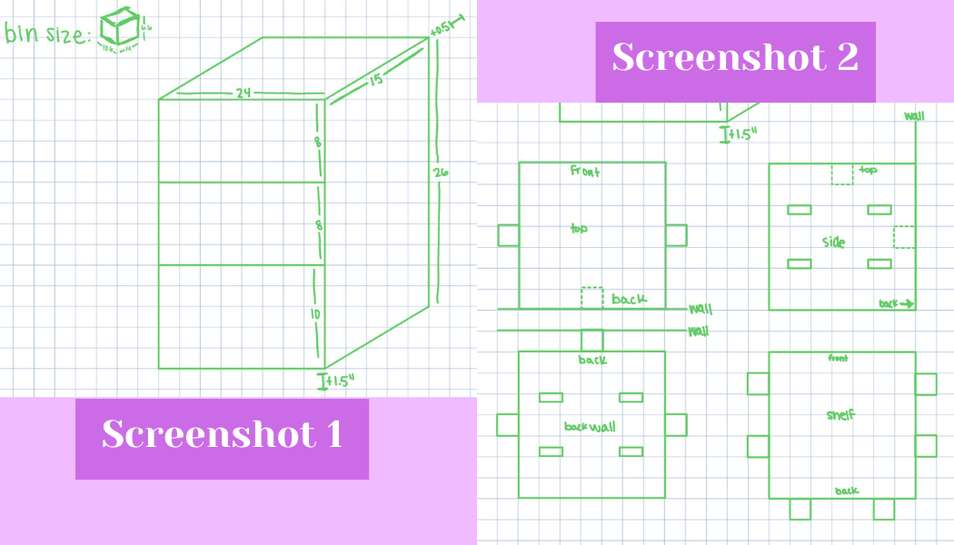
I began by planning out my design in the note-taking app Notability. I drew out how I wanted my nightstand to look and then proceeded from there. I decided on three compartments, the top two being 8” tall, and the bottom being 10”. I chose these increments because the 8” compartments would be tall enough for some cloth storage bins and the 10” compartments would be tall enough to store most standard paperback and hardcover books. This way I could have some organized storage and my books I’m currently reading with my favorite books all in one convenient place.
Fusion 360 Design
I began by making the design for the nightstand in Fusion 360 because it would allow me to make it parametric more easily. I began by entering into the sketch workspace to design because I only needed a 2D object and its vectors. I made six rectangles as my design called for and then I began adding tabs where needed on the sides of the horizontal shelves and corresponding holes on the left and right shelf sides.
 I chose not to put tabs on the top and bottom of the shelf as I could use a new tool, the FesTools Domino 500, to connect the top and bottom using mortises. With my design done I clicked file, then export, and then chose a .dxf because that was what Garret Nelson, an instructor of machining at Central Piedmont Community College recommended we do.
Aspire
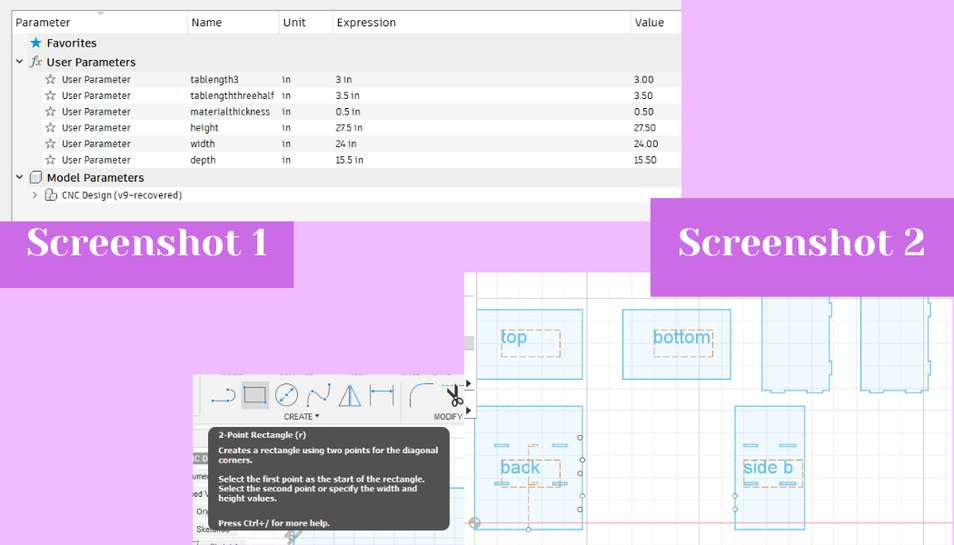
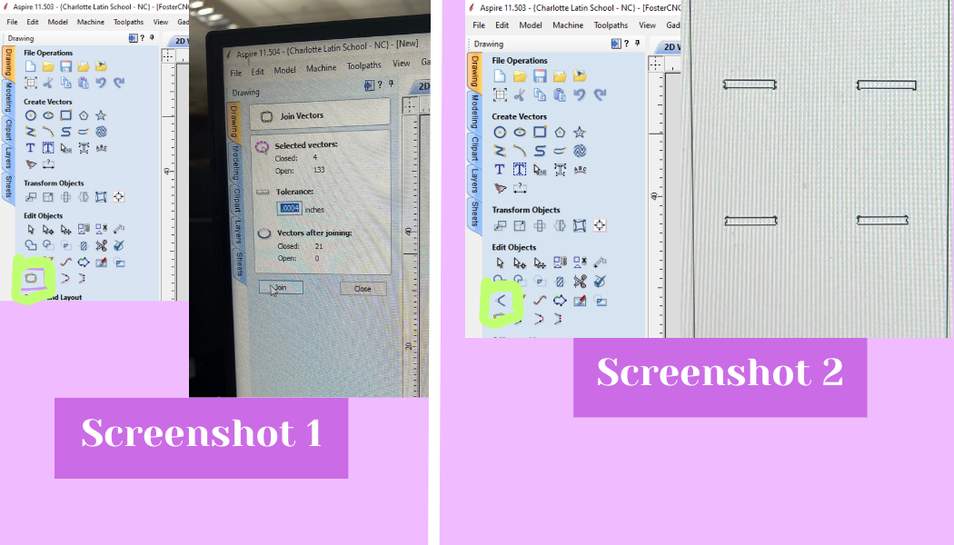
I have used Aspire once before and it was fairly easy to use. Aspire is a CAM-ing software which means that it is a software that through user input tells a machine exactly what to do. To begin I created a new file and in the set up I made the material size the size of the Shopbot bed, 96” x 48”. From there I imported my .dxf by clicking file then import. I began by using the fillet tool to dog bone any interior corners (screenshot 2). I had some trouble with it at first but I learned that I had to close all of my open vectors before using the tool (screenshot 1). I exited the fillet tool and opened the close open vectors tool to do this. From there I hit the close vectors button in the tab that opened because I could not add dog bones to the design with open vectors (screenshot 1). With everything closed I could proceed with dog bones again. Next, I went back to the fillet tool and clicked on the dog bone option. From there I hovered over each interior corner and clicked on each to add the dog bone. There was one set of interior corners that would not dog bone, but they would T-bone so I went with that instead.
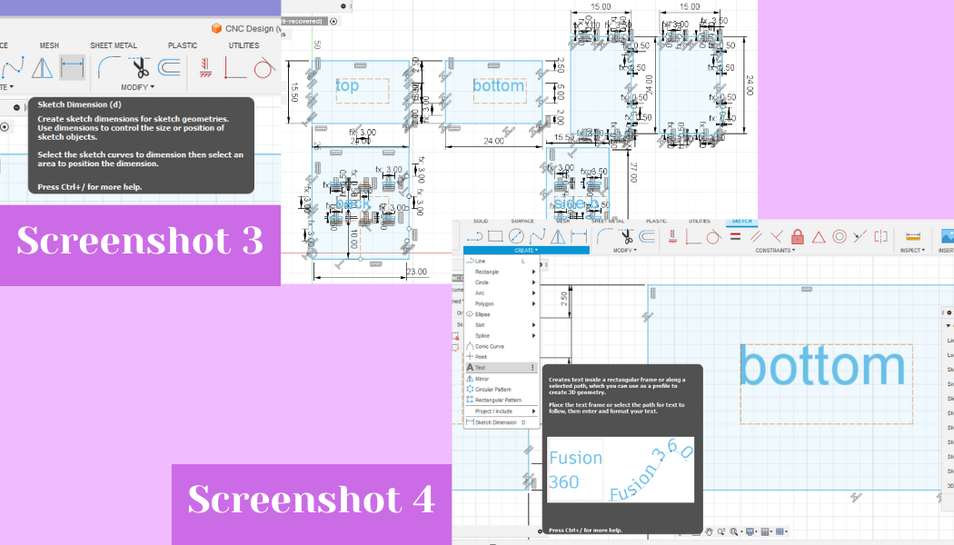
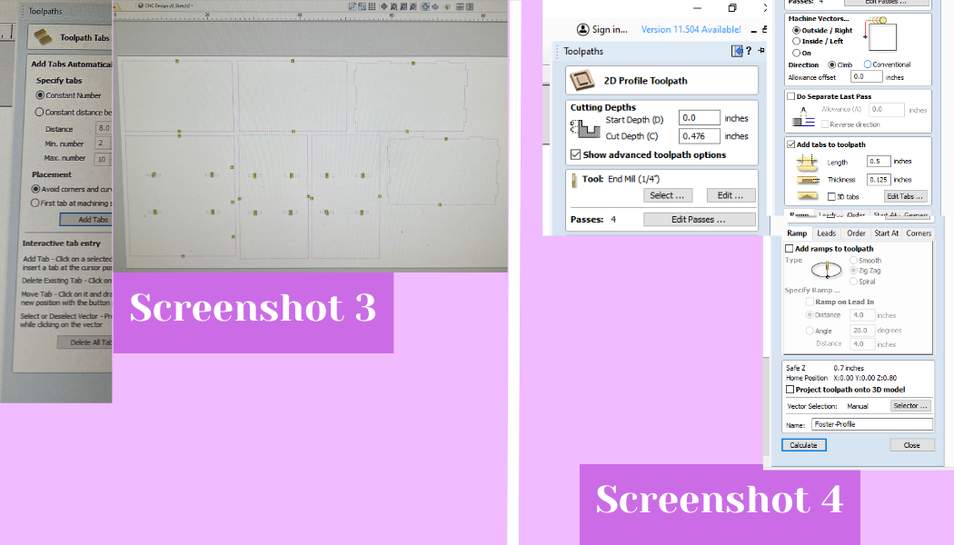
 Next, I created toolpaths. I created one toolpath which I would learn later was a partial mistake, but to make it I clicked on the profile toolpath button. I went with profile because I needed it to cut all the way through my material. I also kept the tool that it was automatically set to, the 1/4” end mill (screenshot 4). I kept it because it was a spiral and upcut bit meaning that it would be better for cutting through a material while also sending the chips out on to the material instead of down. Furthermore, the bit is an endmill which means that it was designed for cutting laterally across a material which is exactly what I am aiming to do. This bit is also our labs standard bit for CNC profile cuts. Inside the profile toolpath set up I set the cut depth, I also edited the number of passes to three (screenshot 4). The number of passes are high if Aspire picks, but in reality the number can be much lower just as long as it does not exceed the length of the flutes on the bit you cut. I also added tabs to my design. The purpose of tabs is to allow a little bit of wood to remain between the piece cut out and the parent material. This is because without it, the material might shift and the cut would not be as precise as I designed or would completely be messed up. To add tabs I clicked on the add tabs button and let Aspire automatically add them (screenshot 3). I felt that the auto generated tabs were sufficient and correct in placement so I clicked add (screenshot 3). Finally, I set the feed rate to 250 in/min, the spindle speed to 18,000 rpm.
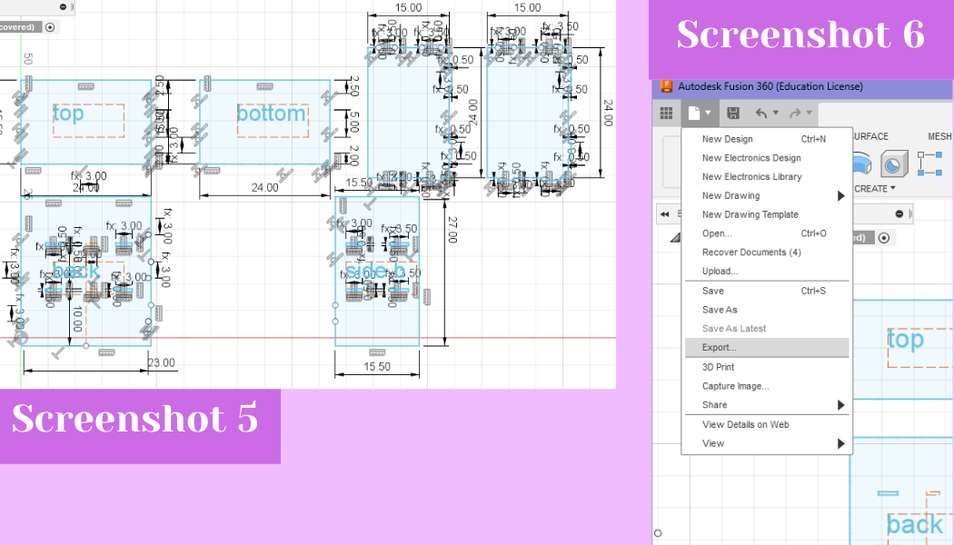
 I could then see the previewed toolpath (screenshots 5 and 6). From there I changed the name of my profile toolpath and saved it to be uploaded to our lab’s google drive.
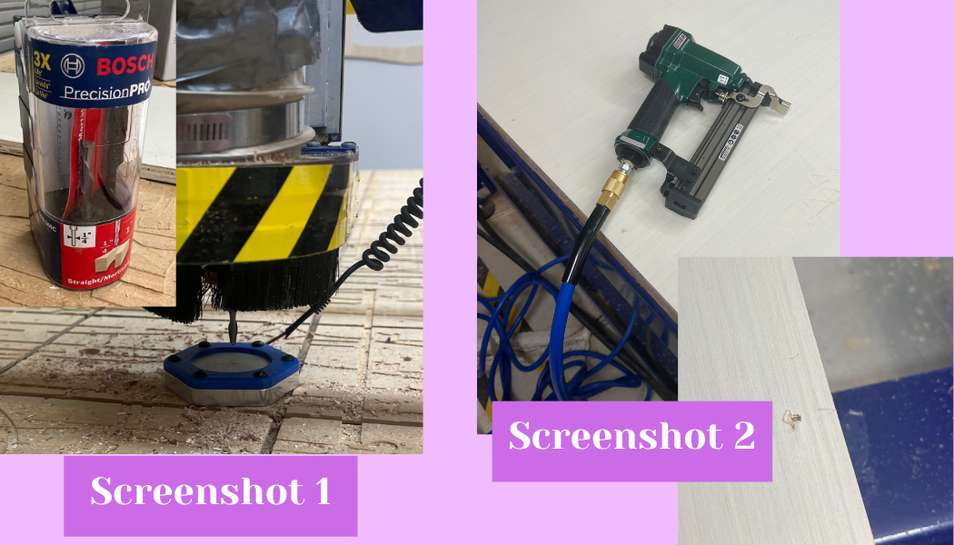
CNC-ing The Nightstand
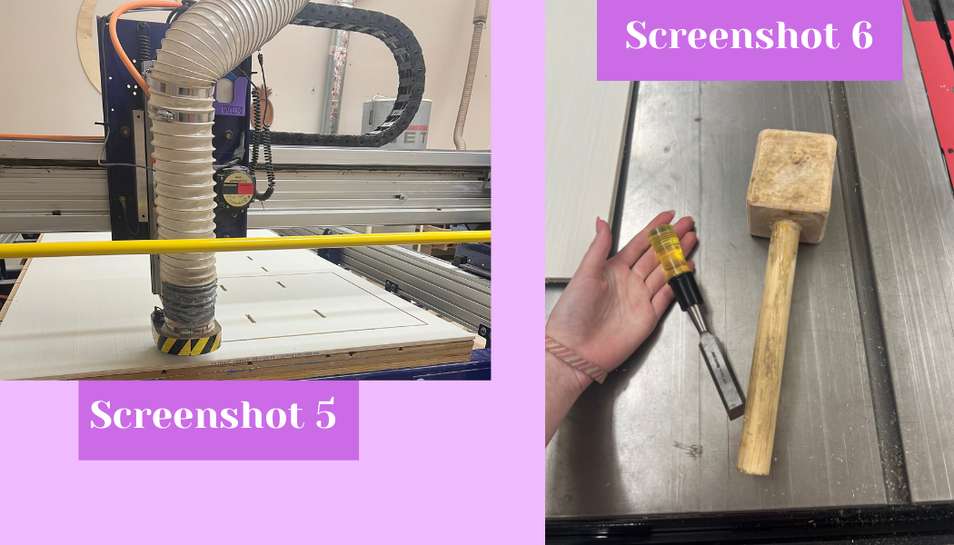
To CNC I was assisted by Mr. Tom Dubick, one of our instructors who helped guide everyone with their cuts. To begin we had to change out a bit on the machine and we did this by using the two wrenches, one of which was attached to the key for the machine to prevent bit changing while the machine could be running. I started out using the wrench around the spindle and collet but while turning I slammed by thumb into the dust collector and it hurt really bad so Mr. Dubick loosened it the rest of the way for me. We let the bit drop onto the wooden worktable and then retrieved it and swapped the bit out for a 1/4” end mill (screenshot 1). We also had to swap out the collet for a smaller one and Mr. Dubick inserted the bit into the collet and hand tightened it for me because it was being very finnicky. From there we re-zeroed the shop bot by using the proximity switches and the metal pad (screenshot 1). To re-zero it we ran the command C2 in the Shop Bot interface. The machine touched off from the metal plate the we have attached to our spindle head and with that we knew the machine was zeroed. Next, I ran the command J2 12,90 to move the spindle far down to the end of the bed so that we could load my material in without damaging anything. We picked up my plywood board and shuffled it around until it in the right position to load it. Then we brought it down on the bed. From there I had to fixture the plywood down to the Shop Bot bed using the nail gun (screenshot 2). Mr. Dubick started the compressor for me and then I attached the air hose to the nail gun. From there he showed me how to use the nail gun and I began attaching my material. To use the nail gun, you just have to press down on it into the material and the hit the trigger to fire the plastic nail into the material and bed (screenshot 2). Our lab uses plastic nails instead of metal screws because of the risk of the bit hitting a screw and spewing out metal shrapnel into anyone nearby. I went around my material and fired in about 15-ish plastic nails, making sure my material was completely attached.
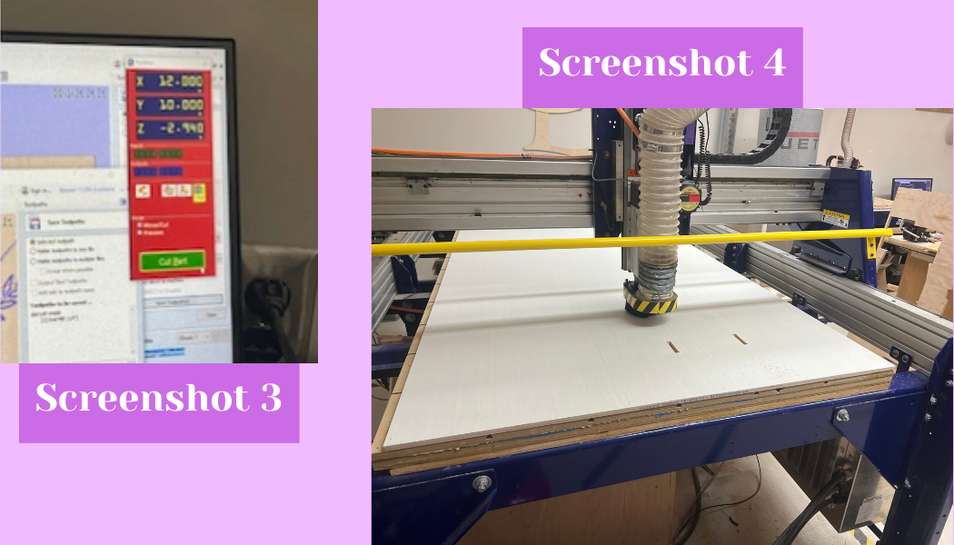
 From there I called Mr. Dubick back over and he began reviewing my Aspire file. He noted that I needed to swap my inside tab holes from an outside tool cut to an inside tool cut so they weren’t bigger than I intended them to be. This was an easy fix and all I had to do was deselect the tab holes from the outside tool path and create a new profile toolpath for the tab holes. I followed the same procedure that I did for creating the outside tool path but instead of outside I selected inside. From there my cut was ready so Mr. Dubick talked me through running an air cut of my files before actually cutting to make sure everything was running ok. I opened the Shop Bot command console and uploaded my file by clicking the “FILE-LOAD” button and then I selected the offset as 3D offset for the air cut. From there I hit the enter button the keyboard to start the spindle warm up process. Then an automated message popped up instructing me to hit the green button on the big control switch for the Shop Bot if I was ready to start the spindle. Before I hit the button I put on my safety glasses and my headphones on and closed the doors in the room to ensure safety. Then I hit the green button to start the spindle. Everything sounded good so I ran the air cut by clicking “ok” on the pop up which then prompted me to hit the space bar when I was ready to cut. (screenshot 3) I then hit the space bar and the air cut for the smaller tabs began. I needed to cut the smaller inside tabs first because if I did it after the edge cuts the material would be at risk for moving around and messing up. From the successful air cut, Mr. Dubick said that I was good to proceed with actually cutting. I changed the offset so that it wasn’t 3D and so it would actually cut and then I just hit the enter key to begin cutting. Then I hit the green button to start the spindle, and once it started up and sounded good I began the cut by hitting the space bar. They cut ran smoothly and once it was done I uploaded and cut the outside toolpath using the same process as described above (screenshots 4 and 5).
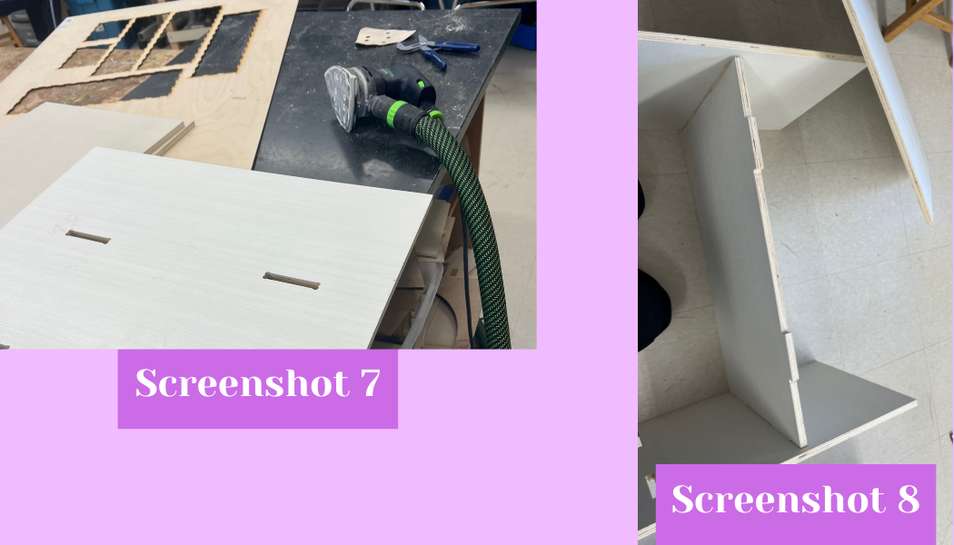
 My test air cut and actual cut went well and the next step was removing the cutout pieces from the rest of the material. I did this by taking a chisel and a wooden mallet and hitting the part of each tab that was closest to the remaining material (screenshot 6).
 From there I moved my pieces out into the hallway because they were easily detachable. Next, I just forcefully shifted the remaining material to break the plastic nails holding it down. I took a little effort but once it was off I got help to move it to the used wood pile in the hallway.
Post Processing
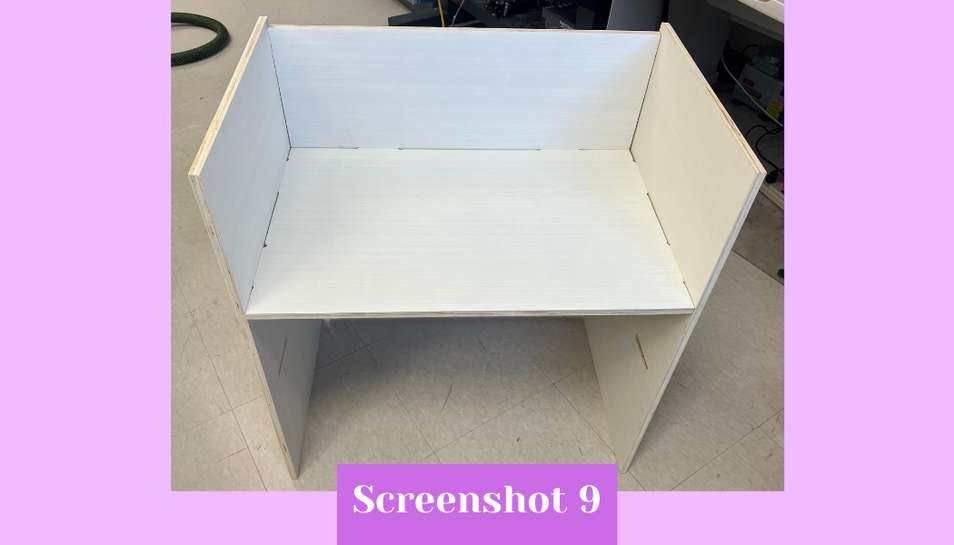
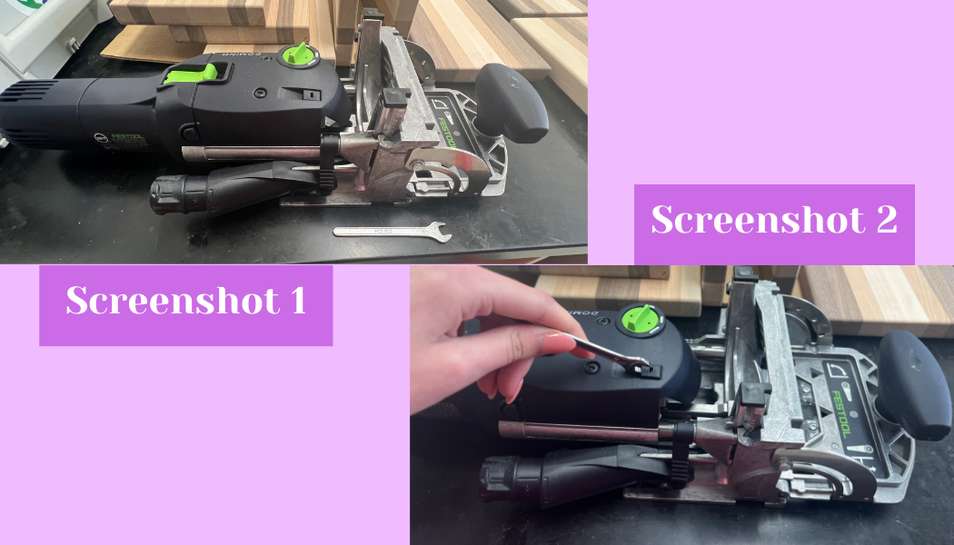
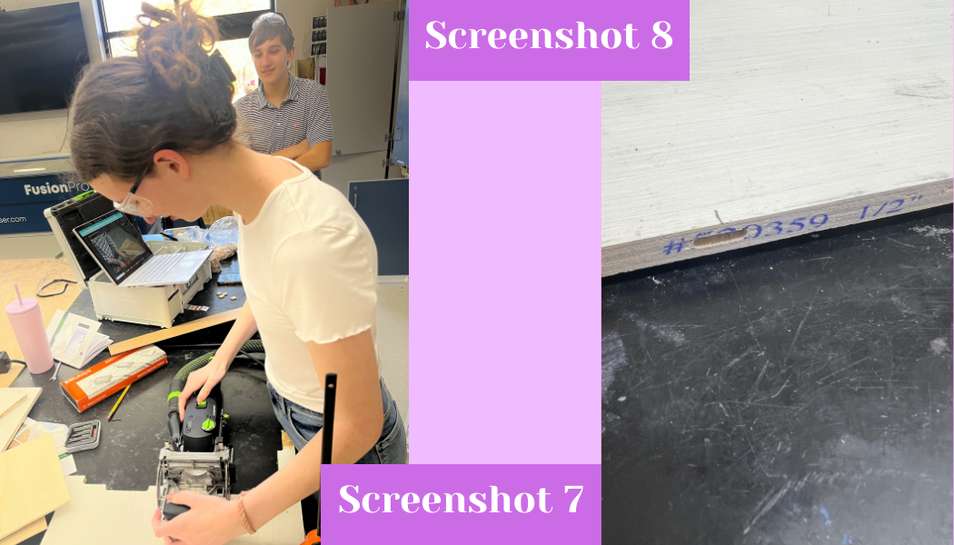
For appearance and safety I used the FesTools hand sander with 80, 120, and 200 grit sandpaper to sand down the edges of each shelf to make them smooth (screenshot 7). I also sanded down the surface of each piece just to ensure it was smooth as well. After sanding I put the shelf together just to ensure everything worked (screenshots 8 and 9).
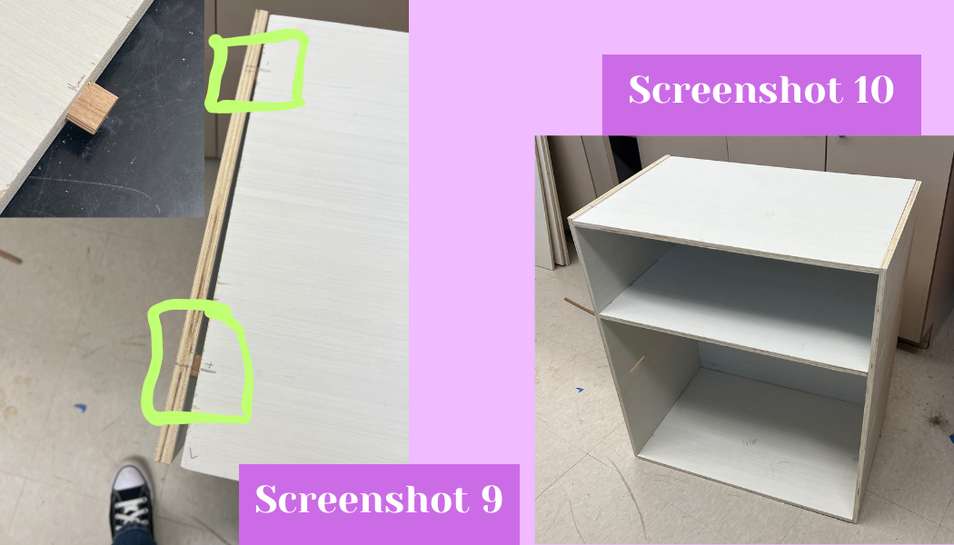
 While putting it together I realized that the back tabs of the second shelf were 0.5” too short and thus the second shelf would not fit in. This was annoying but I then realized that if I didn’t include the second shelf, the space would perfectly fit my backpack and all of my extra school binders, papers, and notebooks instead of them just laying on the floor of my room. Other than that everything fit perfectly and so I disassembled it with the help of Dariyah Strachan so I could use the domino joiner to connect that top and bottom of the shelf.
Using the Domino Joiner
Our lab has a sizable collection of Fes Tools tools and one of the things we have is the Domino DF 500. This is a machine that takes an oscillating drill bit to drill a shallow hole into a piece of wood for a rectangular biscuit which would connect two pieces of material without any obvious sign of connection. I began by changing the drilling bit out. I did this by pressing the button to loosen the body of the machine from the other parts (screenshots 1 and 2) From there I took a small wrench and loosened the bit. I hand unscrewed it off once it was loose and then screwed another bit on until it was tight. To give it a last little push I took the small wrench and tightened it a little more (screenshot 3).
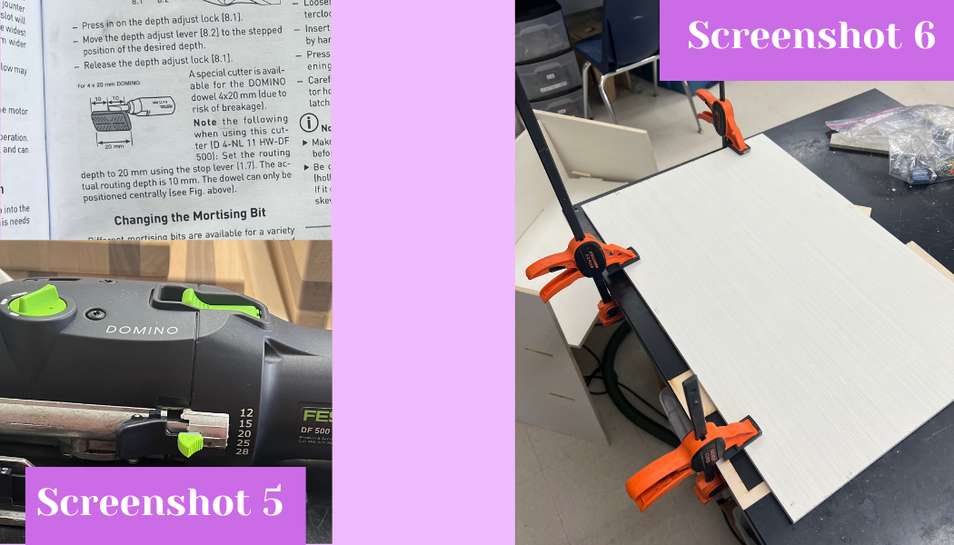
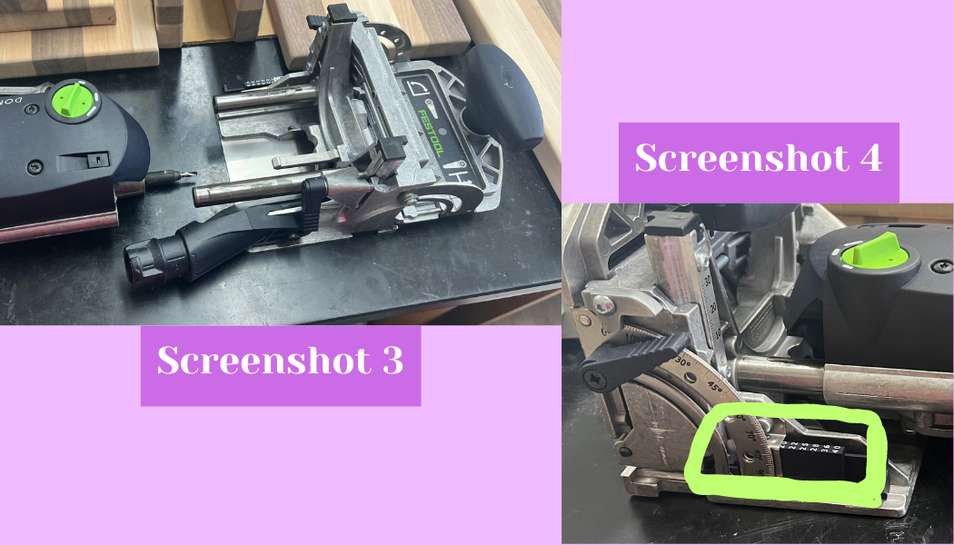 From there I had to lower the material height gauge on the side and I kept the mortise width the same but it can be changed using the top dial. Next, I changed the depth control lever on the side but I had some trouble figuring out the correct depth for the mortise (screenshot 5). The mortise I was using was a 4x20 mm piece, the smallest one available, and the manual recommends that you halve the mortise length to get the depth. If I did this the mortise depth would need to be set to 10 mm but the depth control lever doesn’t have a 10 mm setting the lowest it went was to 12 mm. I was confused for a while as was my instructor Mr. Tom Dubick, but eventually it dawned on me that the 4x20 mm bit was half the length of the other bits for the domino, so if it was half the size then you subtract 10 from each depth setting to get what depth it would cut with the shorter bit. There was also a slightly convoluted explanation of this in the user manual which I found later (screenshot 5). From there I was ready to test out using it so I attached the Festools dust extractor and connected it to the side of the Domino, I also attached the power plug. To use it, I flipped fowards the switch on the top and this began the bit spinning. To test cut, I positioned the front of the domino against the side of the material I wanted to cut. Before I did this I used clampes to fixture the material down and prevent it from moving while it cut (screenshot 6).
 To cut I switched the domino on and then I put the front flush to the the side and the I pushed forwards on the body of the domino to cut into the wood (screenshot 7). After about ~20 seconds I pulled back on the domino to retract the bit into the body of the domino. I then switched it off as it was very loud and distracting to other people in the room. It cut perfect little hole for the 4x20 piece and I was very happy with how it turned out (screenshot 8).
 From there I followed the same process for my actual shelf sides after lining everything up and making pencil marks on the sides. The pencil lines represented the middle of where the mortise hole needs to be and with the movable fence that has a clear part with lines to help you line everything up, doing the markings this way made sense. After marking and lining everything up I used the same process as above to cut 16 mortise holes in the sides of the top and bottom levels of the shelf and corresponding holes in the right and left sides of the shelf. The only difficult part was cutting the holes in the side shelves because to cut you had to move the fence up and then cut the hole vertically. It was hard to do this because the domino moved around a lot so I had to clamp another material that was slightly higher than the shelf thickness to brace the domino against while cutting. It was also slightly tedious to cut two holes and then have to release all the clamps, turn the material around, re-affix all the clamps, and then cut two more holes. Once I had all of the domino holes cut I placed 8 mortises in each hole of the top and bottom shelves, using a rubber mallet if necessary.
Final Assembly
After all of the mortises were in I began reassembling my shelf using a rubber mallet, a large hammer, and by hitting it (screenshot 9). It took some force to get everything together because the tabs fit perfectly together with not much room at all to spare. Once everything was together I just erased any visible pencil marks and sanded them away with 180 grit sandpaper if necessary. With that my shelf was done and I took it home so I could actually start using it (screenshot 10).
Concluding Thoughts
The domino joiner was an interesting tool to use for this week. It was rather easy to use in retrospect, it just requires some extensive planning and forethought which I am not always the best at and which I might not want to invest my time in if I want something quick. I also thought that the fixturing process associated with domino was tedious. Other than that, my CNC experience was pretty smooth and I think the only bump in the road was the bottom tabs. From that I learned that if I change my design at all I need to re-test-cut it again just to make sure everything still works.