1. Principles and Practices and Project Management
This week I worked on defining my final project idea and started to get used to the documentation process. The other page for my final project planning can be accessed here.
Making This Website
Getting Started
I started my journey by opening my terminal and following Fab Academy graduate of 2022 Barbara Morrow’s documentation for how she completed setting up her website. I also referenced Fab Academy graduate of 2022 Teddy Warner’s personal website. After reading some of both, I decided to download Python first from this website. After doing so and making sure to check that “pip” was selected, I opened my terminal to begin downloading mkdocs.
Mkdocs Part 1
I downloaded mkdocs by typing
pip install mkdocs
Getting an SSH Key
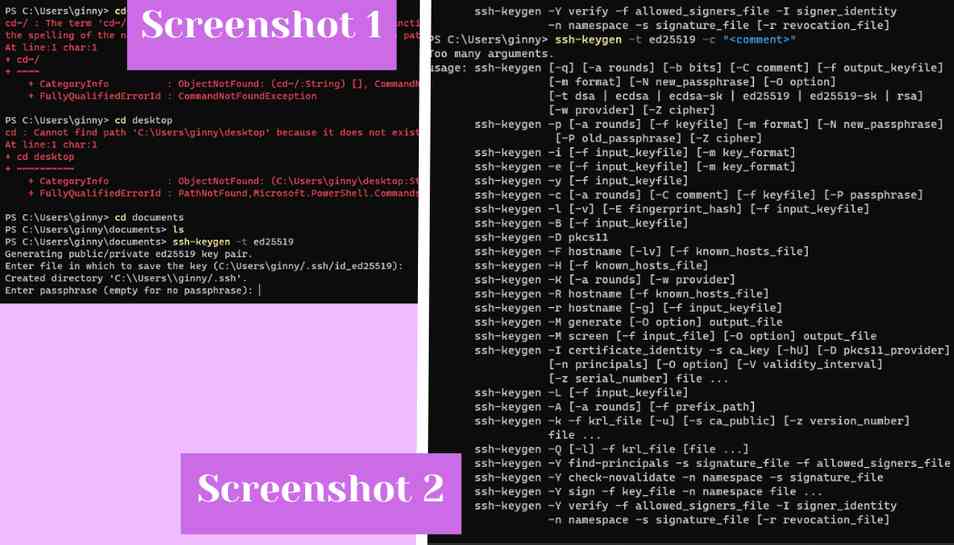
From there I began trying to generate an SSH key by typing
ssh-keygen -t ed25519
in my terminal (Screenshot 1) it told me after going through the location and password steps that “option requires an argument” so then I looked at Barbara Morrow’s documentation again and saw that I did not look far enough ahead and that she actually typed
ssh-keygen -t ed25519 -C “<comment>”
To get her key to generate, so I also typed that into my terminal, but this time my terminal told me that I had “Too many arguments.” Baffled, and unsure of how to precede, I decided to take a break. It was very convenient timing because I also had to go to my 8th period English class. After school, and still unsure of how to solve my problem, I began googling “how to generate and ssh key.” I went to a few different websites that all told me the way to do it was the same way that Barbara Morrow’s documentation had said how to do it. Confused and annoyed I decided to type in
ssh-keygen -t ed25519 -C “<comment>” again. This time it worked (Screenshot 2) and came out with my SSH key picture. Then I when to the folder it was stored in to try and find the string of letters and numbers at I could paste into the Git Lab page to add an SSH key.
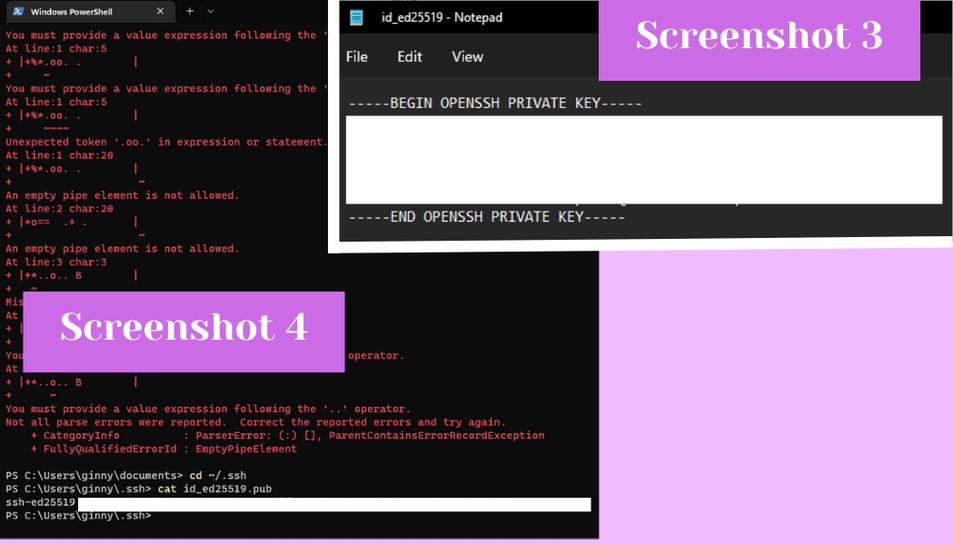
 When I went into the folder, I opened up the file that it was stored in in the Notepad app. What opened up (Screenshot 3) did not look like anything like what Barbra Morrow’s SSH key looked like in her documentation. Mine was four lines long and contained many characters and numbers that Barbra’s did not include. I tried adding this long set of characters to the Git Lab page for adding an SSH key but it would not accept it and said that the type was wrong along with two other warnings. Again very lost in what I was supposed to do, I sat on this for a while until I felt like I could come back to it with a new perspective. Eventually followed the tutorial from this website on how to make an SSH which I found accidentally when taking a break and looking for something on how to use Visual Studio Code. I reviewed how they did it but where they did something different was after making the key this website typed in
cd ~/.ssh
and then
cat id_ed25519.pub
after I entered that it gave me (Screenshot 4) something like Barbra had when she added it to GitLab. After copying that into the GitLab SSH key-adding page, it finally worked successfully. Later I realized that the steps that I took to get the public version of my SSH key to show were explained in Teddy Warner’s personal website, which I would have seen if I had read his steps fully before beginning. Oops.
Learning Visual Studio Code
Next I began trying to learn about and use Visual Studio by following the tutorial that I used for the SSH key and by following the official Visual Studio instructions at this website. To get started with Visual Studio I followed the instructions in the google slides that Dr. David Taylor (Fab Academy grad of 2016) gave us when he and Teddy Warner gave the Fab Academy class of 23’ a crash course in Git Lab and Nueval. I first downloaded Visual Studio from this link and Git Bash from this link. Next, I cloned my repo locally by copying the SSH clone URL and pasting it into git bash after typing
$ git clone
Then my repo cloned and I could open it in Visual Studio Code. The next day, Jan 26, 2023, I still felt very lost with Visual Studio, Mkdocs, and Gitlab so I tried googling “how to use Visual Studio Code with Mkdocs for Gitlab” and Fab Academy grad of 2014 Dr. Adam Harris’s video popped up and it was a complete tutorial for all of the things I was looking to do. I followed along with his tutorial starting when he installed the python extension for Visual Studio. Then I opened a terminal in Visual Studio and typed
pip install mkdocs-material
Then I typed cls to clear my screen and then typed
pip3 install mkdocs-git-revision-date-localized-plugin
After that, I typed
mkdocs serve
to see what I had done so far. At this point, I realized that I had done something wrong when I originally installed mkdocs in Visual Studio because it was not in my git folder it was in a totally new folder and I could not move it. Additionally, mkdocs said when I downloaded it that the requirements were already satisfied indicated that it had already been downloaded, but when I when to use any mkdocs formatting it wouldn’t work and if I ran mkdocs serve, it said that it could not find mkdocs.yml. Very confused, I decided that I should totally delete and uninstall Visual Studios and my repo clone because something was wrong but I did not know what. After re-downloading Visual Studios and again cloning my repo in Git Bash, I started again by typing
mkdocs install
And then followed by
mkdocs serve
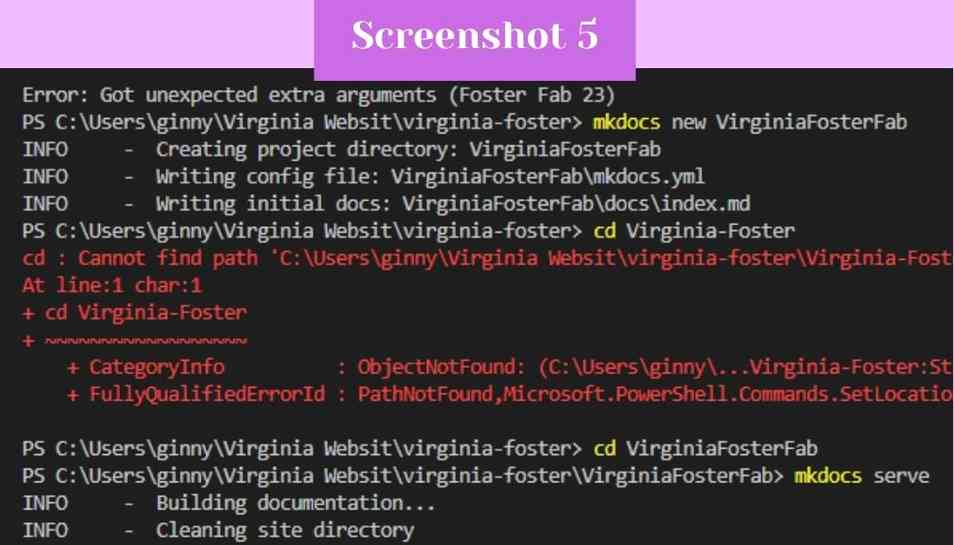
Again, it gave me the error message that mkdocs.yml did not exist even though I had just installed it. I felt very defeated and did not know how to proceed so in my frustration and anxiety about asking for help I just kept doing what I had just done for almost an hour and a half, expecting something to change. It never did. Eventually, towards the end of the night, when about half of the students were gone, I finally asked for help from fellow 2023 participant, Griffin Orsinger. He said he had the same issue, and walked me through how to “fix” it. As it turned out, I was not creating an mkdocs project before trying to serve it so I did so by typing
mkdocs new VirginiaFosterFab
In the terminal, which created an mkdocs.yml file in the clone folder. Then when I typed mkdocs serve it worked and allowed me to view the basic html template given to me with my website on my local server (Screenshot 5). When this finally happened I felt so accomplished, but I realized that I did not know how to replace the template given to me with the template that I wanted to use for my website.
The next day, Jan 27, 2023, I worked this out with some help and a little blind experimentation.
Getting The Template Up and Running
That morning during my bioengineering class, I asked Dr. David Taylor how to go about getting the template that he advised everyone participating this year to use to replace the basic template that came with my repo. He advised me to download the template as a zip file and extract the contents into my repo folder. Because he told me this during class time, I could not do what he said then, but I did do it a little later. After getting the template into my repo folder, I did not know what to do, so I started guessing. I began by deleting many of the html template files that my repo came with, but I kept some of them because I was too scared to delete them. At that point, when I mkdocs serve-d in the terminal, the template did not show up, so I was very confused as to how to proceed.
The previous day Dr. Taylor said that he would be staying a little after school if we wanted to come in with questions. I decided to take advantage of this because I did not know how to get the template to show up and work. This mini-session proved to be very helpful and informative to get my website up and running. Dr. Taylor explained everything I was confused about kind of like I did not know what I was doing but in a helpful and nice way. He said that I should delete all of the html template and the public file which would be replaced by the template and all of its files. I did this and then typed
mkdocs serve
To my surprise and delight when I opened the link it displayed the template instead of the html template. The next step was to push my changes back to my repo. I did this by typing
git add .
And then
Git commit -m “comment here”
After typing git commit -m “comment” the terminal told me that it needed me to “tell [it] who [I] was” followed by telling me to type in two lines that would give it the information it needed (Screenshot 6). Dr. Taylor told me to follow what it said so I typed in
git config --global user.email “my email here”
git config --global user.name “Virginia Foster”
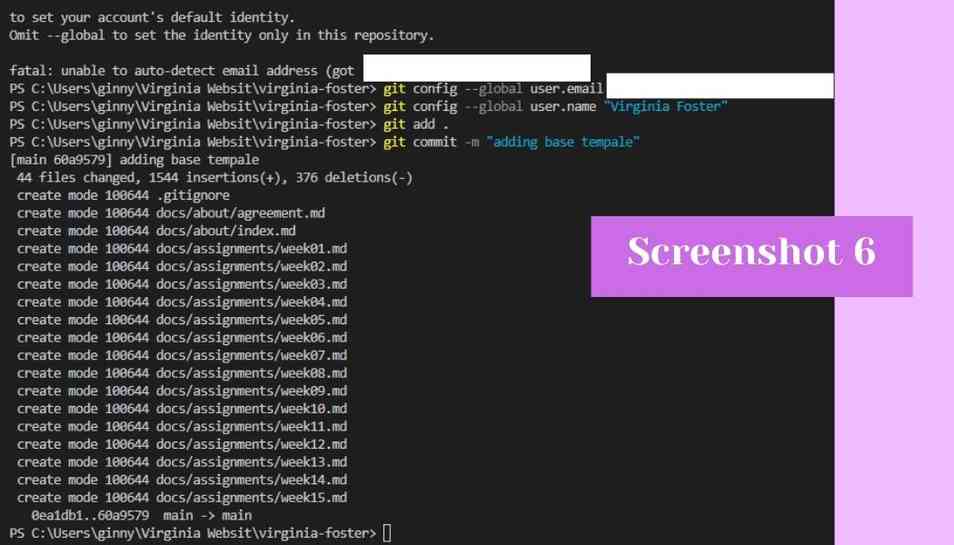
Then it finally let me proceed with adding, committing, and pushing so I typed
git add .
Followed by
git commit -m “comment here”
And finally,
git push
To send all of my changes to the server to make my changes show up. I then navigated to my Git Lab page to see if my changes had been made yet, and I had to wait a few seconds for the green check to show up which confirmed that my changes had been successfully pushed. When I went to my website, gone was the old html template, and in its place was the template you see now.