6. Embedded programming
This week I learned in a group project about different chip architectures, and learned lots of programming methods with the Arduino Uno And Attiny 412.
Group work
In our group, I performed a bit flip speed test, which measures how quickly the microcontroller can read and write to pins. The documentation can be found here.
Porgramming
This week programming, I decided to recreate a project I’ve already done on an arduino, and did the project on the Attiny 412. I also then performed no library programming on the Attiny 412
Arduino Uno
The project that I was going to do was a group assignment that I did in a previous engineering course. I used an arduino uno, ultrasonic sensor, and LED’s to create a parking sensor. The wiring was simple, but I had to put a lot of LED’s on the breadboard. Here’s what my final circuit looked like.
For coding, I used the Arduino IDE. I already had the code but looking back at it, the code could be optimized a lot better. I wasn’t exactly sure how to do this, so I asked ChatGPT. His response came with this:
const int trigPin = 9;
const int echoPin = 10;

const int ledPins[] = {2, 3, 4, 5, 6, 7, 8, 11, 12};
const int numLeds = 9;

long duration;
int distance;

void setup() {
  // Initialize the serial communication:
  Serial.begin(9600);

  // Initialize the sensor pins:
  pinMode(trigPin, OUTPUT);
  pinMode(echoPin, INPUT);

  // Initialize the LED pins:
  for (int i = 0; i < numLeds; i++) {
    pinMode(ledPins[i], OUTPUT);
    digitalWrite(ledPins[i], LOW); // Ensure all LEDs are off initially
  }
}

void loop() {
  // Clear the trigPin by setting it LOW:
  digitalWrite(trigPin, LOW);
  delayMicroseconds(2);

  // Set the trigPin on HIGH state for 10 microseconds:
  digitalWrite(trigPin, HIGH);
  delayMicroseconds(10);
  digitalWrite(trigPin, LOW);

  // Read the echoPin, return the sound wave travel time in microseconds:
  duration = pulseIn(echoPin, HIGH);

  // Calculate the distance:
  distance = duration * 0.034 / 2;

  // Print the distance to the Serial Monitor:
  Serial.print("Distance: ");
  Serial.print(distance);
  Serial.println(" cm");

  // Determine the number of LEDs to turn on based on distance:
  int ledsToLight = map(distance, 0, 50, 0, numLeds); // Adjust the range (0 to 50 cm) as needed

  // Limit the range to the number of LEDs available:
  if (ledsToLight > numLeds) {
    ledsToLight = numLeds;
  } else if (ledsToLight < 0) {
    ledsToLight = 0;
  }

  // Turn on LEDs based on the distance:
  for (int i = 0; i < numLeds; i++) {
    if (i < ledsToLight) {
      digitalWrite(ledPins[i], HIGH);
    } else {
      digitalWrite(ledPins[i], LOW);
    }
  }

  // Add a small delay before the next reading:
  delay(100);
}
This code used the string functions so that as the distance increased, an additional pin was added for each LED to turn on. However, this code only works if all the LED’s are lined up in a numerical sequence, so I changed some wiring. After I changed the wiring, the code worked.
Here’s a video:
Attiny
Next, I used the Attiny 412 microcontroller. I already had this chip soldered onto a board from pre-fab training so I could put the chip onto a breadboard. Because the 412 doesn’t have nearly as many I/O pins, I decided to only use 3 LED’s. I had to go back to my older, less efficient version of the code, because I couldn’t put all of the pins in numerical sequence. Here’s my code with explanations for the process
const int trigPin = 1;
const int echoPin = 2;
const int led1Pin = 3;
const int led2Pin = 6;
const int led3Pin = 5;

void setup() {
  pinMode(trigPin, OUTPUT);
  pinMode(echoPin, INPUT);
  pinMode(led1Pin, OUTPUT);
  pinMode(led2Pin, OUTPUT);
  pinMode(led3Pin, OUTPUT);


}

void loop() {
  long duration, distance;

  // Clear the trigPin
  digitalWrite(trigPin, LOW);
  delayMicroseconds(2);

  // Set the trigPin high for 10 microseconds
  digitalWrite(trigPin, HIGH);
  delayMicroseconds(10);
  digitalWrite(trigPin, LOW);

  // Read the echoPin, returns the sound wave travel time in microseconds
  duration = pulseIn(echoPin, HIGH);

  // Calculate the distance
  distance = (duration / 2) / 29.1; // Convert to cm

  // Update LEDs based on distance ranges
  if (distance < 10) {
    digitalWrite(led1Pin, HIGH);
    digitalWrite(led2Pin, HIGH);
    digitalWrite(led3Pin, HIGH);
  } else if (distance < 20) {
    digitalWrite(led1Pin, HIGH);
    digitalWrite(led2Pin, HIGH);
    digitalWrite(led3Pin, LOW);
  } else if (distance < 30) {
    digitalWrite(led1Pin, HIGH);
    digitalWrite(led2Pin, LOW);
    digitalWrite(led3Pin, LOW);
  } else {
    digitalWrite(led1Pin, LOW);
    digitalWrite(led2Pin, LOW);
    digitalWrite(led3Pin, LOW);
  }

  delay(100); // Delay to prevent excessive readings
}
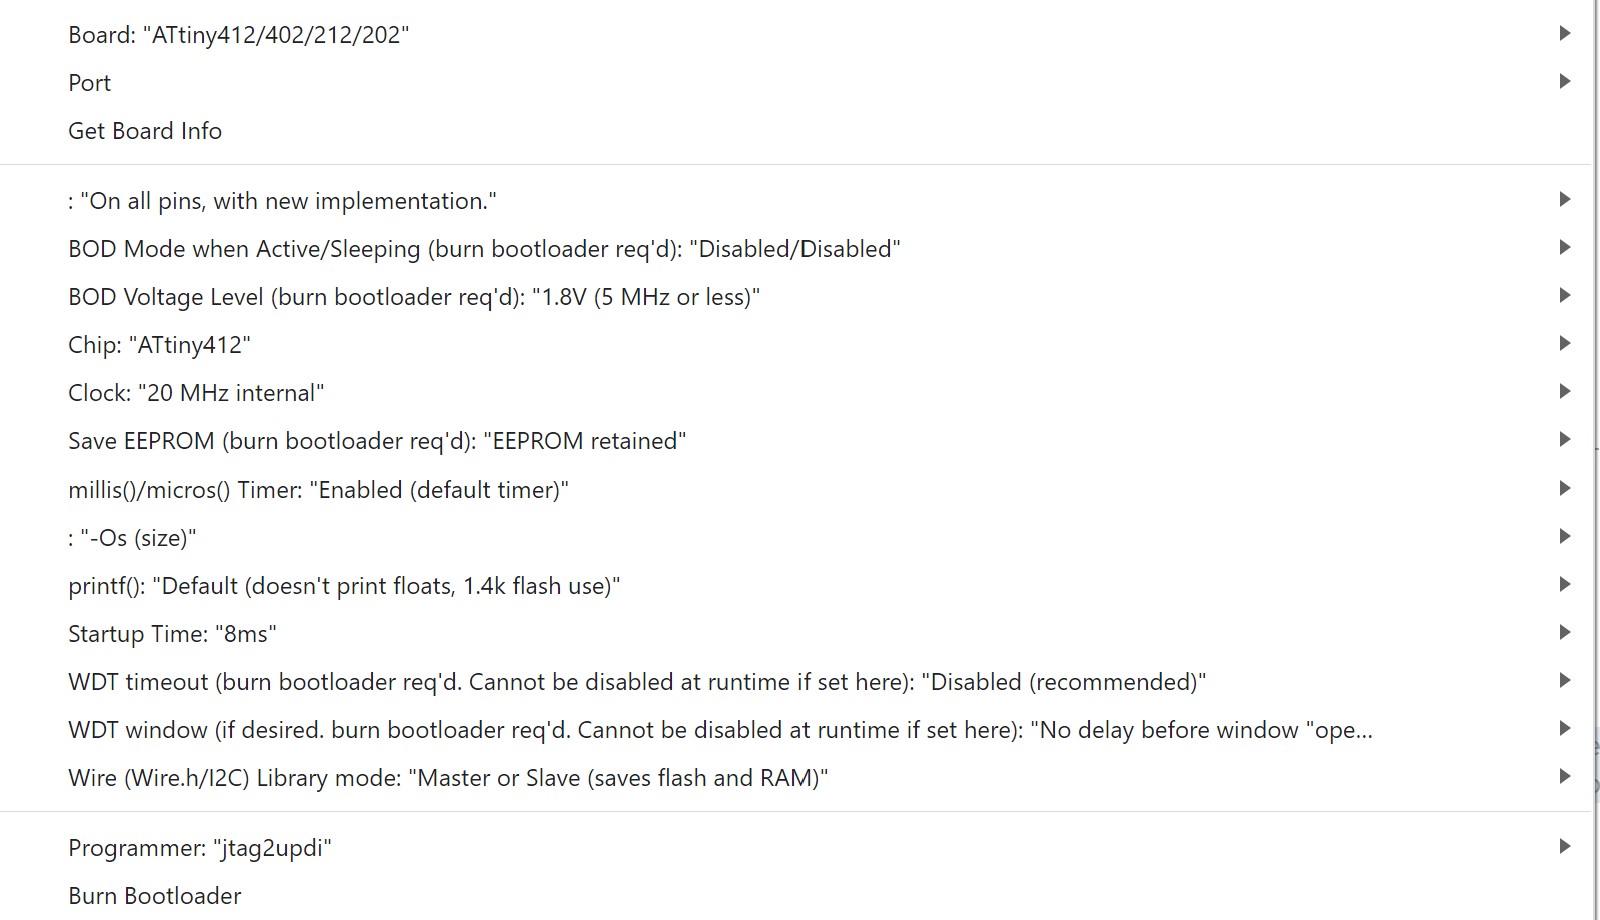
Programming the Attiny chip was different than programming an arduino. The Attiny doesnt have any type of usb interface like the arduino uno has, so instead I had to use a programmer board to upload my code using the single-wire UPDI pin. To do this, I first used a code called JTAG2UPDI, to run this code I had to extract the .zip file and then open all of the programs into one tab of the IDE. I then uploaded this code to the Arduino, which turns the board into a programmer to the 412 via UPDI. Then, I uploaded my other code into the ATtiny, making sure to use Jtag2updi as the programmer and setting the board to Attiny 412.
The settings I used
My code working
No Library Programming
The final requirement for this week is a lab specific requirement, which is blinking an LED using bare metal programming. I am coming back to this part after deciding to roll over, this section was originally named bare metal programming, but Neil suggested the term no library programming. To do this, I will use the same method of programming as before, via arduino using JTAG2UPDI. However, different from the programming that I’ve done, I have to program the LED to blink without using the built-in libraries of the Arduino. In arduino, when using the command pinmode (X, HIGH), A lot is happening behind the scenes in order to make this happen. When a specific pin is referenced, through Arduino’s built in board libraries, it is able to know exactly where in the microcontroller needs to be referenced and what change needs to be made to turn the pin high or low. With No Library programming, I will be using the 412’s datasheet to directly give commands to the part of the microcontroller’s architecture. I used this tutorial which taught me how to read a microcontroller datasheet to turn pins on and off, and then added a delay in between.
Here’s what my code looked like:
void setup()
    {
    PORTB.DIRSET = 16;
    }
void loop()
    {
  PORTB.OUTSET = 16;
  delay(1000);
  PORTA.OUTCLR = 16;
  delay(1000);
    }
Here’s a video, I took pin 6 out from the arduino to prove that after being programmed the arduino is only giving power to the 412.
Final Reflection
In terms of physical skills, the most important skills I learned was controlling a microcontroller through a programmer, which I did through JTAG2UPDI to program the ATTINY 412. I also learned a lot from no library programming which taught me how to read a microcontroller datasheet in order to make more efficent code. This week also taught me the importance of documentation, because I was able to go back to my code from a previous project and make a new iteration of it to make it even better.