9. Embedded programming
Assignments for the Week:
Group Assignment:
This week, our group assignment is to compare the performance and development workflows for other architectures. We all sat together and pulled the datasheets together. We isolated 6-7 features of each architecture that we thought were relevant. To see our group work, please visit our here.
Individual Assignment:
Browse through th edata sheet for your microcontroller. Write a program for a microcontroller, and simulate its operation, to interact (with local input and/or output devices) and communicate (with remote or wireless connections).
412 Chip
One of my first encounters EVER to using a chip was during our internal bootcamp. I knew basically nothing on how to work with them, how to program them or how to even solder them.
Our first assignment was to learn how to use Arduino IDE as a jtag programmer to program an ATTiny412 chip.
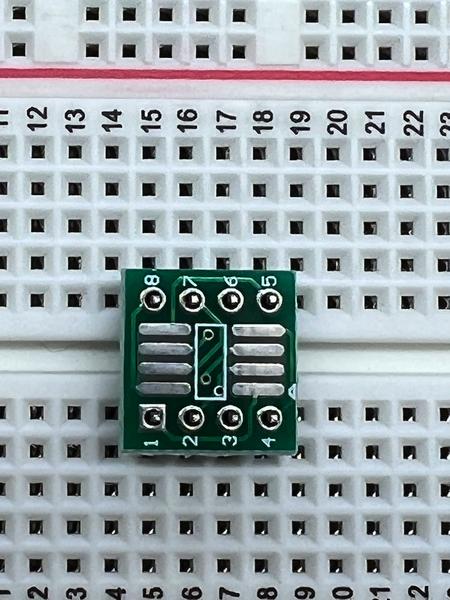
We began by soldering header pins and an ATTiny412 chip to a ready made breakout board. This was to allow us to use the board with a breadboard and wire up the LED in order to program it all. I started with a breadboard, the pins, chip and breakout board.
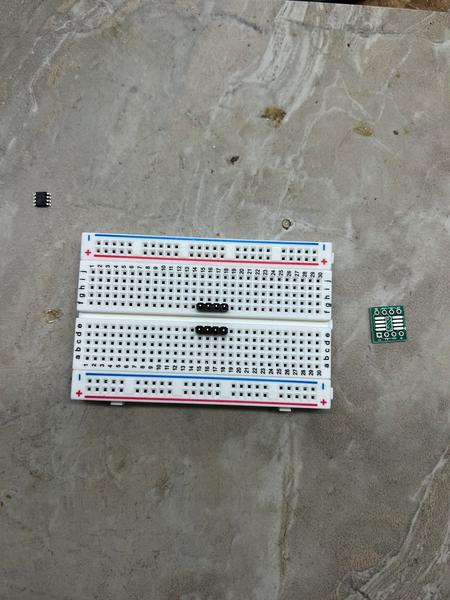
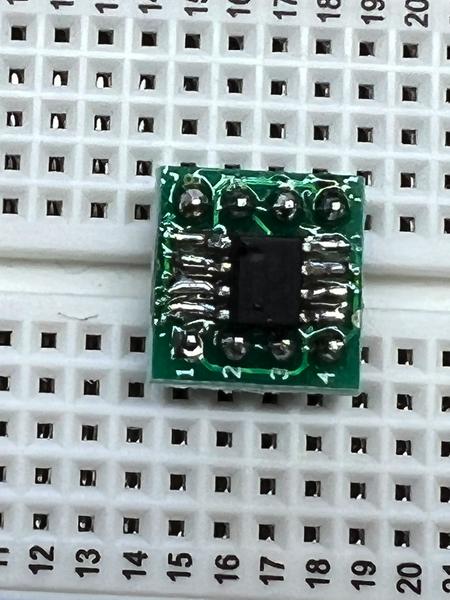
After soldering the pins, I worked on soldering the chip to the board.
Chip soldered and finished!
I loaded the required program to turn the Arduino Uno into a jtag programmer. I copied the blink program given to us and nothing happened. To check what was going on, I used a multimeter to check for continuity. That’s when we discovered I soldered my chip in the wrong orientation! Even after making sure I had the indented dot in the right location to begin with, I must have moved it at some point.
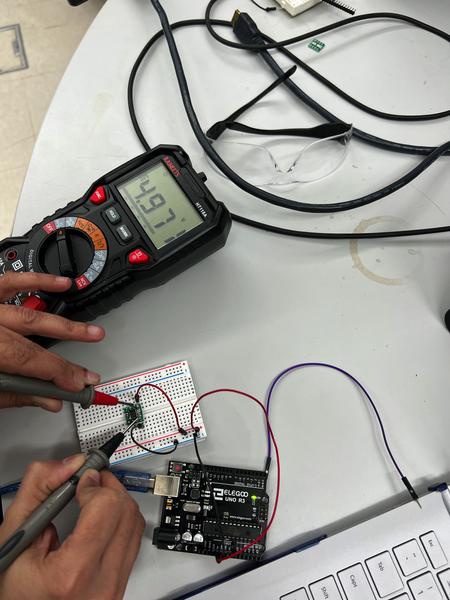
I was able to still make it work simply by rearranging the wires to work on the correct pins. When I finally rotated the wiring around, the LED lit up! For me, this was a HUGE accomplishment. (Litle did I know at the time, what I am going to accomplish later on will be even bigger!)
Continuing Student
As a continuing student for this cycle, I needed to go back and rework a few of the weeks I didn’t complete. Embedded programming was one of them. It was a crazy week during the time last year and with all of the issues we had with the regulators and waiting for components, things got away from me early on!
For my final project I knew I was going to use a color light sensor to display the perceived color and output the result to an LED strip. That was a long way off. I first needed to figure out how each component works and learn to program each one individually before putting it all together.
There are a few things I want to test in Wokwi to understand this week: - How to use Wokwi to simulate programming - Simulate a sensor to receive input - Simulate an output component - Attempt to simulate a connection using I2C - Try to use at least two different types of microcontrollers
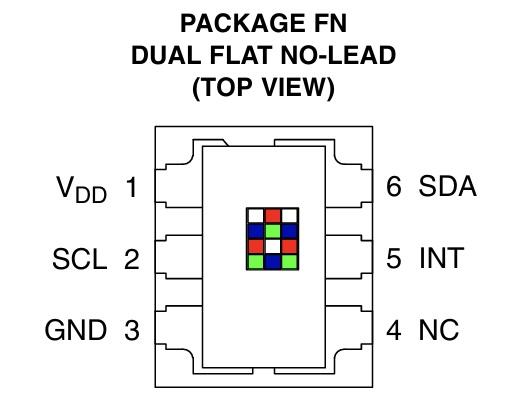
I began by researching data sheets and watching YouTube videos on how the TCS34725 sensor works. This sensor is what my project is based on. There were a lot of things I didn’t quite understand yet on the data sheet. One of the main reasons I selected this sensor was because of its I2C capability. I have a while to go before I understand that concept, although I’ve been told by my instructors it is one of the easiest connections to put together. You can see in the diagram from the datasheet that the sensor has this function.
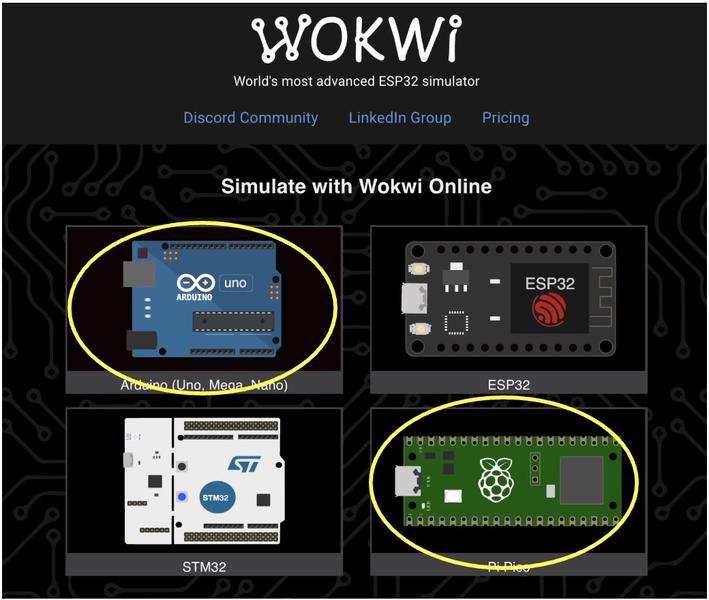
It was recommended that I use Wokwi to simulate various components, modules, sensors and types of code. Because Wokwi does have the exact sensor I will eventually be using, I will use the included ds1307 RTC (real time clock) module because it also uses I2C programming. From the main page on the Wokwi site, you can see I used the Arduino Uno and Raspberry Pi Pico.
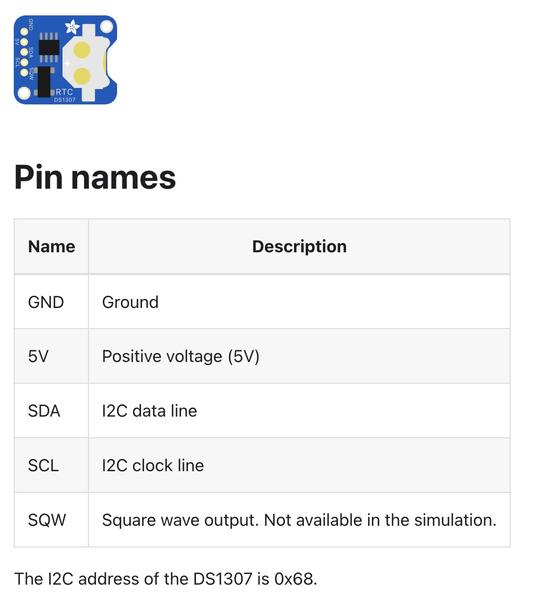
I reviewed the documentation for the clock included on Wokwi. The pins are all labeled on the module and here is a table showing the details.
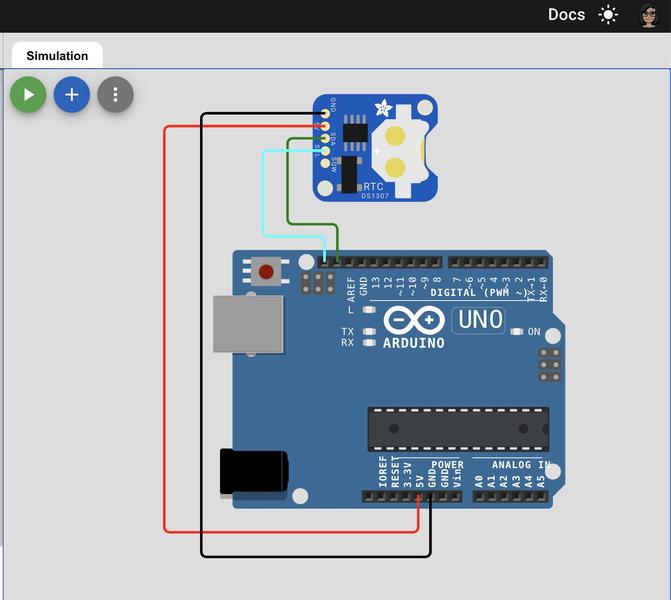
The next thing I needed to do was figure out where to attach these pins on the Uno. So, I pulled up the pinout for the Arduino Uno. I am specifically looking for SCL and SDA pins on the Uno as they are a 1:1 connection (meaning you attach SCL to SCL and SDA to SDA). At least that’s how my brain interprets the connection. The ground connects to the ground and the power connects to 5V (which is listed for reference on the module as well as in the documentation). Per the pinout, I learned these pins are the top two pins on the right side as seen in the image below.

Next, I went into Wokwi and set up the Uno with the RTC using the four pins. There are several ground pins, so just select one. In the Uno pinout, you can also see that the pins are labeled within a group called POWER. Here is my initial setup:
The next step was to begin the code. From our in class teachings, I knew I needed to find a library and then figure out what I wanted the module to do and code it accordingly. But, I actually didn’t know what the RTC could do. So, I asked the internet (my friend Gemini).
I learned that the RTC is basically like a digital watch. It will give me the current date and time information. So, that is all I asked it to do. I knew we needed to call the serial monitor to view the information. So I asked Gemini to provide me with the basic code to simply ask for the current date and time and display it in the serial monitor.
Gemini generated the code and provided it on the screen. I did not tell it I was using Wokwi to simulate the project. I wanted to see if I could figure out the steps on my own for this round.
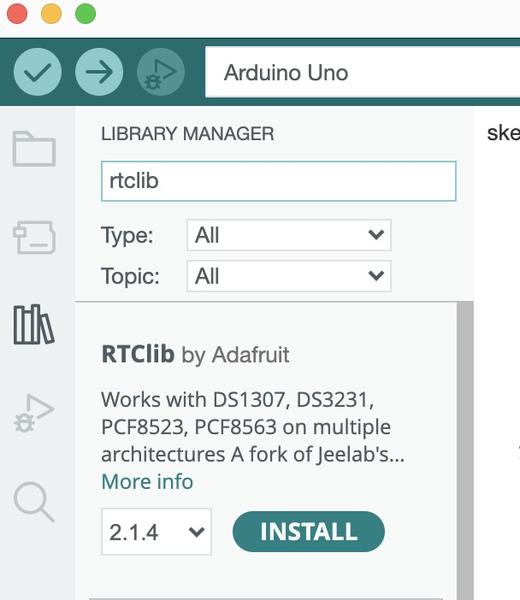
I remember when we set up Arduino .ino files in our pre-boarding classes, we had to follow a set “formula” or guidelines on what needed to be included. We began by opening a new sketch and finding any libraries we needed to install. In Arduino IDE, I would have gone to the library manager, searched for what I needed and clicked “INSTALL” when I found it. Pretty simple if the library can be found - and the IDE has thousands of libraries to choose from, so the chances of it being there are good. To make sure I was doing this correctly, I searched for RTClib in the IDE and found it.
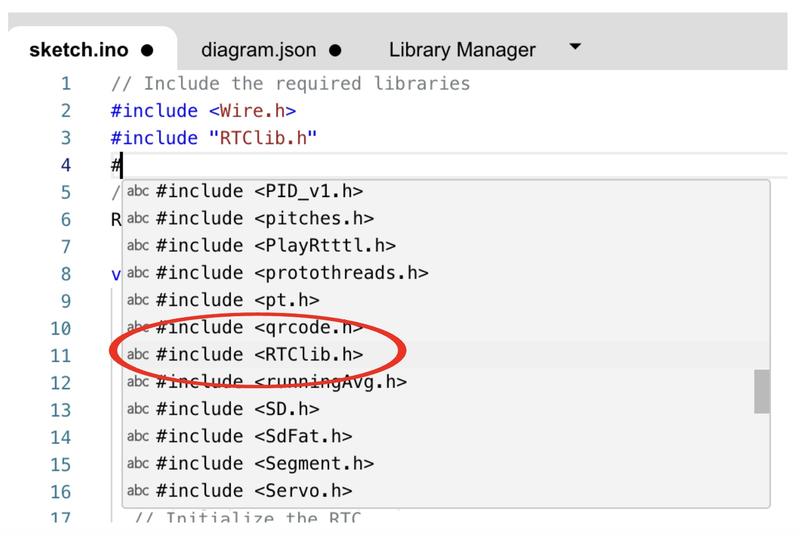
Does the Wokwi platform install them the same way? Kind of - although you don’t need to search for it the same way. Because the microcontrollers are already installed, Wokwi just allows you to drop in the code and it knows to call those libraries. Here is an example showing that if I did not already have the code from Gemini, if I type “#”, then it pulls up a list of the libraries for you to choose from. As shown, the
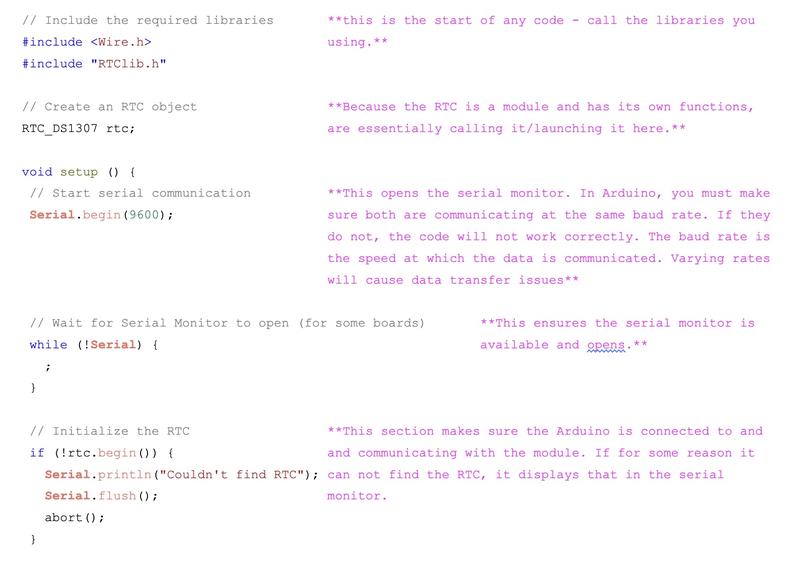
Here is what the code should do (I wrote in my comments/notes in purple to make sure I understand what is going on):
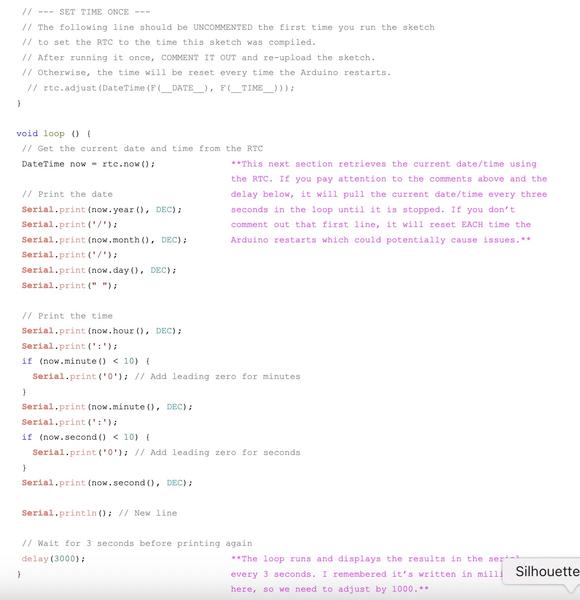
As expected, the code worked and produced the correct results. The update was listed in the serial monitor every 3 seconds.
Because I will be using neopixels in my final project, I wanted to learn the basics of programming them in a system I am getting a little comfortable with. Since I now have the RTC working, I was hoping to use this somehow to flash a neopixel.
Gemini delivered! I asked for the code to be able to “flash a single neopixel. The neopixel should alternate between dark blue and white each time a new time is listed in the serial monitor. Use the same code provided earlier and add in the new requirements.”
// Include the required libraries
#include <Wire.h>
#include "RTClib.h"
#include <Adafruit_NeoPixel.h>


// --- NeoPixel Setup ---
#define NEOPIXEL_PIN   6  // The pin the NeoPixel is connected to
#define NUMPIXELS      1  // The number of NeoPixels in the strip


// Create a NeoPixel object
Adafruit_NeoPixel pixels = Adafruit_NeoPixel(NUMPIXELS, NEOPIXEL_PIN, NEO_GRB + NEO_KHZ800);


// --- RTC Setup ---
RTC_DS1307 rtc;


// --- State Variable ---
// This variable will track which color to display next
bool isBlue = true;


void setup () {
 // Start serial communication
 Serial.begin(9600);


 // Initialize the RTC
 if (!rtc.begin()) {
   Serial.println("Couldn't find RTC");
   Serial.flush();
   abort();
 }


 // --- Initialize NeoPixel ---
 pixels.begin(); // This initializes the NeoPixel library.
 pixels.clear(); // Set all pixels to 'off'
 pixels.show();  // Send the 'off' state to the pixel


 // --- SET TIME ONCE ---
 // Uncomment this line only on the first upload to set the time.
 // Then, comment it out and re-upload.
 // rtc.adjust(DateTime(F(__DATE__), F(__TIME__)));
}


void loop () {
 // Get the current date and time from the RTC
 DateTime now = rtc.now();


 // Print the date and time to the Serial Monitor
 Serial.print(now.year(), DEC);
 Serial.print('/');
 Serial.print(now.month(), DEC);
 Serial.print('/');
 Serial.print(now.day(), DEC);
 Serial.print(" ");
 Serial.print(now.hour(), DEC);
 Serial.print(':');
 if (now.minute() < 10) Serial.print('0');
 Serial.print(now.minute(), DEC);
 Serial.print(':');
 if (now.second() < 10) Serial.print('0');
 Serial.print(now.second(), DEC);
 Serial.println();


 // --- Update NeoPixel Color ---
 if (isBlue) {
   // Set the pixel to dark blue
   pixels.setPixelColor(0, pixels.Color(0, 0, 128));
 } else {
   // Set the pixel to white
   pixels.setPixelColor(0, pixels.Color(255, 255, 255));
 }
 pixels.show(); // Send the updated color to the pixel


 // Flip the state for the next loop
 isBlue = !isBlue;


 // Wait for 3 seconds before running the loop again
 delay(3000);
}
Gemini also gave me the instructions on how to connect the neopixel to the current setup. Before reading that section, I jumped over to search for a neopixel pinout. This one has a lot of detail for the WS2812, but you can clearly see the pins labeled. I attached pin 1 (5V) to the 5V on the Uno; attached pin 3 (GND) to GND on the Uno; and finally I attached pin 4 (Din = data in) to digital pin 7 on the Uno. Then I went back in and checked the instructions from Gemini. I had done it all correctly using the pinouts! The only difference was I put mine in pin 7 instead of 6, so in the code, I switched the NEOPIXEL_PIN in the define section to 7 to make sure the data reaches the neopixel from the Uno.
![]()
I loaded the code into Wokwi as before, and prepped everything. When I hit the play button to simulate it, I was pleasantly surprised. It worked! Somehow, I thought either my reasoning or the code or the instructions I gave to Gemini would mess up somewhere. But it seems I am getting the (very, VERY basic) hang of it all!
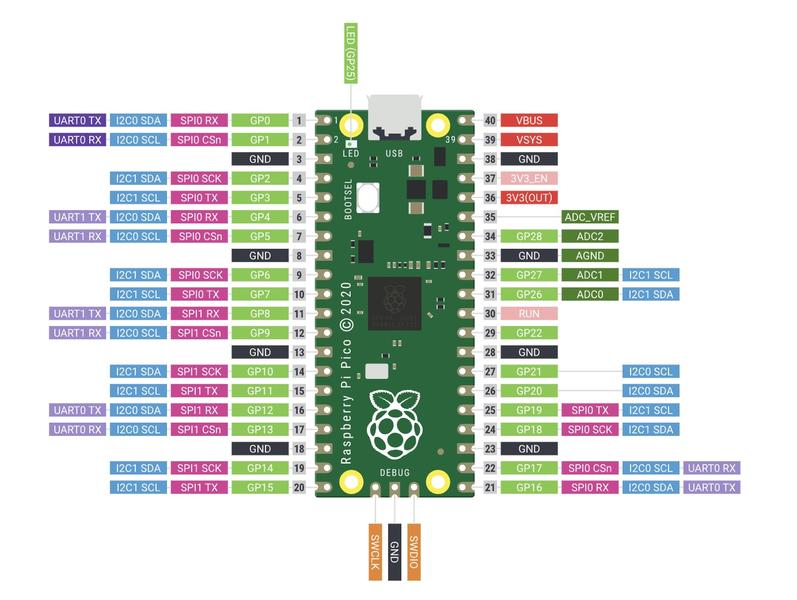
Finally, I wanted to try this same setup on the Raspberry Pi Pico microcontroller. The Pico has the same chip as the XIAO RP2040. I knew I needed to be able to learn how to work with that chip, as the XIAO is what I was using in my final project! I just wanted a basic level of understanding of programming it. So, I used Wokwi to program a neopixel to flash dark blue for two seconds and white for two seconds.
My assumption was, based on conversations with my teaching team at CLS, that I would need to learn to use Micropython for my final project. Even if I didn’t, then I would benefit from the knowledge of learning how to use a new coding platform. Wokwi doesn’t utilize Thonny for the simulation but I knew I would need to convert my code for it to be able to correctly use it. Back to Gemini!
I asked Gemini to “provide me with the code to just do the following: flash a neopixel 3 seconds dark blue, 3 seconds while in a loop until stopped? I would like to program this onto a Raspberry Pi Pico.” Gemini provided me with the code as well as instructions on how to set up the Pico in Thonny. I know I will need this information later on.
It’s interesting to note the differences between the code, yet they still provide the same information. Instead of “include” we “import”. We actually use “define” in C++, but in Python, we just list the variables. Both use a loop to continue the process of blinking the pixel between blue and white. I am so excited to know that although actually learning to code is quite a task, using AI to provide the code and then being able to dissect it to understand what it is saying is also quite valuable.
# Import necessary libraries
import machine
import neopixel
import time


# --- NeoPixel Configuration ---
PIN_NUM = 28  # GPIO pin connected to the NeoPixel's Data In (DIN) pin
NUM_LEDS = 1  # Number of NeoPixels


# Create a NeoPixel object
np = neopixel.NeoPixel(machine.Pin(PIN_NUM), NUM_LEDS)


# --- Color Definitions (R, G, B) ---
DARK_BLUE = (0, 0, 128)
WHITE = (255, 255, 255)


# --- Main Loop ---
while True:
   # Set pixel to dark blue
   np[0] = DARK_BLUE
   np.write()  # Send the color data to the pixel
   time.sleep(3)  # Wait for 3 seconds


   # Set pixel to white
   np[0] = WHITE
   np.write()  # Send the color data to the pixel
   time.sleep(3)  # Wait for 3 seconds
The code worked as expected when I connected the neopixel and set up the correct configuration. (**Note: make sure to use the GP28 pin and not the pin actually numbered 28. There is a difference between them, as pin #28 is actually a ground pin!)

Click the link for the file below to download all of the files I used in this week’s assignments. Files