4. Computer controlled cutting
Assignments for the Week:
Group Assignment:
Charaterize your lasercutter’s focus, power, speed, rate, kerf, joint clearance and types
You can view our results for our group assignment here
Individual Assignment:
Cut something on the vinyl cutter
Design, lasercut and document a parametric construction kit accounting for the lasercutter kerf, which can be assembled in multiple ways and for extra credit use elements that aren’t flat
Vinyl Stickers
This assignment was so much fun! I love using the sticker maker in the lab. Lucky for me, I also have one at home, however it is by another brand. The software for the two different machines is vastly different. I actually prefer the software for the ones we have at school, as it is more intuitive.
We used the Silhouette vinyl cutter to make our stickers for this assignment. There’s a bit of competiton between the annual Fab Academy students, with each group trying to outdo the previous years’ stickers! There is an entire window dedicated to these stickers over the years. It was such a great feeling to add mine to the group!
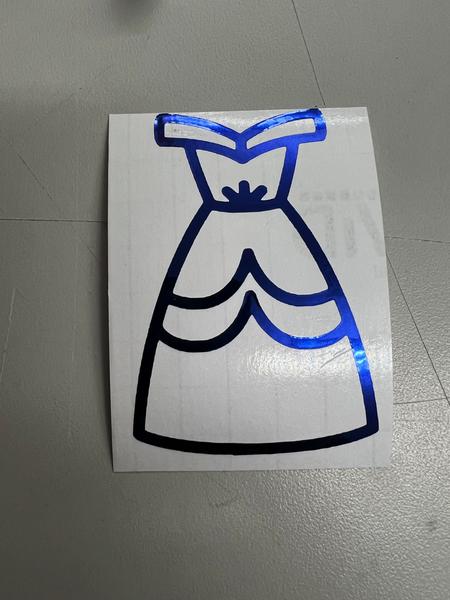
I began by searching the internet for a design I wanted to make. I shifted my idea many times before settling on a dress, since that is what I am making for my final project. I wanted a design with clean lines, but that I could add some layering and colors easily.

Once I picked my design, I saved it to my desktop and then opened it in Silhouette Studio, the software for our cutters. I have a Cricut vinyl cutter at home (Silhouette’s competitor) and I have to say the software for Silhouette Studio is much more user friendly.
I opened the file I saved from the internet search right into Studio and selected the Trace tool. The great thing about this tool is that you don’t have to convert your image or do anything special with it. It does take some tweaking to know what you want your final output to look like, but you can adjust the sliders on the screen to see a preview before finishing the step.
Once my file was traced, I selected my colors and began to cut. I added my first piece of vinyl to the cutting mat with the vinyl side up and backing down onto the stickly side of the mat. I then hit the load button on the screen and inserted the mat.

After hitting cut on the computer, the machine does the rest. Our cutters are all preset to the vinyl we have in the lab, but I were using something we don’t normally carry, I would have adjusted the blade depth and settings before cutting.
The machine cuts the design into the vinyl. In the image below, you can faintly see where the cut lines are. This piece is now ready to be weeded (the removal of the parts of the vinyl I do not need) while my other pieces cut.

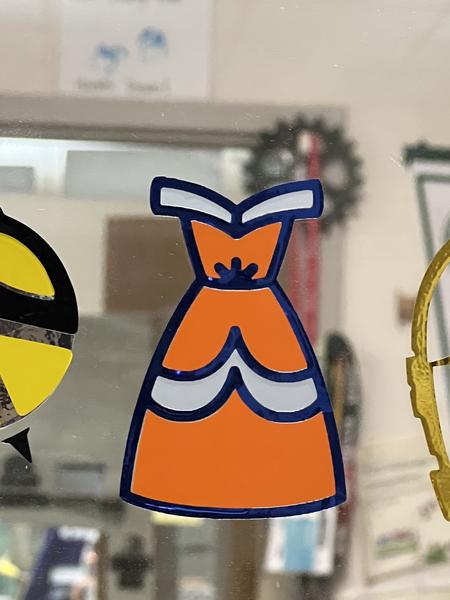
After my other colors go through the machine, I weed them all and then use transfer tape to layer them into the blue outline design!
Here is my final design!
Parametric Construction Kit
Working with the idea that Coreldraw doesn’t have a true way to do parameters, I decided to try a new software for this assignment. Since there are not very many tutorials for Cuttle in detail, a lot of this work was trial and error on my part! I began with some basic tutorials to at least set up my parameters correctly.
 

And then applied the new parameters to the side of my first component.
 
To “cut” the tab from the side, I used the Boolean Difference tool under modify.

To “cut” the tab from the side, I used the Boolean Difference tool under modify.

I then used the rotational repeat tool to repeat the cut tab to the other 3 sides. The selection defaulted to 6 repeats, but I used the slider under repetitions to change it to 4.
 
I then used the Boolean Difference once more to cut the edge from all of the sides.

I then used the Boolean Difference once more to cut the edge from all of the sides.

Once that was complete, I exported this first piece as an .svg so I could open it in CorelDraw to cut on the laser.
 
The difference in the third piece was because it was an arc, I had to make an adjustment before using the boolean tools. The use of the boolean tools directly resulted in weird shapes/cuts I did not need. So, I first had to “merge paths” to create a solid shape from the arcs and then find the difference. With the lack of tutorials out there for Cuttle currently, it took a little bit of trial and error to get this part right!


The difference in the third piece was because it was an arc, I had to make an adjustment before using the boolean tools. The use of the boolean tools directly resulted in weird shapes/cuts I did not need. So, I first had to “merge paths” to create a solid shape from the arcs and then find the difference. With the lack of tutorials out there for Cuttle currently, it took a little bit of trial and error to get this part right!


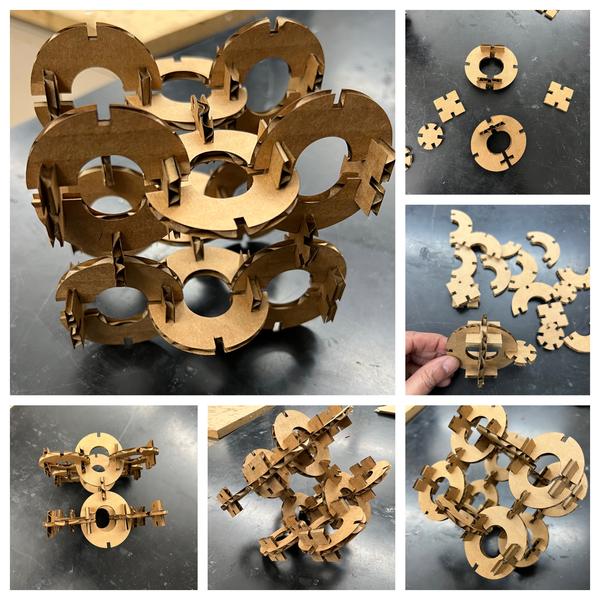
Below are pictures of my press fit kit pieces and how I decided to put it all together!
Click the link for the file below to download all of the files I used in this week’s assignments. Files