17. Wildcard week
This week was a lot of fun and allowed us to show off a personal side similar to CNC Week! I was really excited to be able to use the embroidery side of my machine. One of the things I have always been concerned with about embroidery is the cost to have the files created or purchased. And now, unfortunately, many of the sellers on sites such as Etsy are selling trademarked items without the approval to do so!
Being able to learn how to create my own files and how to digitize them correctly will make owning this machine even more productive. I do wish we could get the 8-head machine in the lab working flawlessly, but anyone who knows anything about embroidery machines knows how finicky they are. The wrong tension or setting and you’re left with a tangled mess.
My machine only stitches one color of thread at a time, but the concept is still the same. You still have to take an image and digitize it to be able to use it with the machine. I’ve laid out the steps to create a new file first; followed by how to use the machine to create the image on a piece of sample material (stabilizer).
I used the InkStitch extension for InkScape. Before beginning the software, I quickly did some research to make sure I would be able to use it to create the correct file extension for my machine. After a little bit of digging, I learned I needed to save my files as PES files, and InkStitch allows me to do so.
I used this link to install the extension on my computer. It was a very simple process. Once installed, I deleted the installer file and was ready to begin.

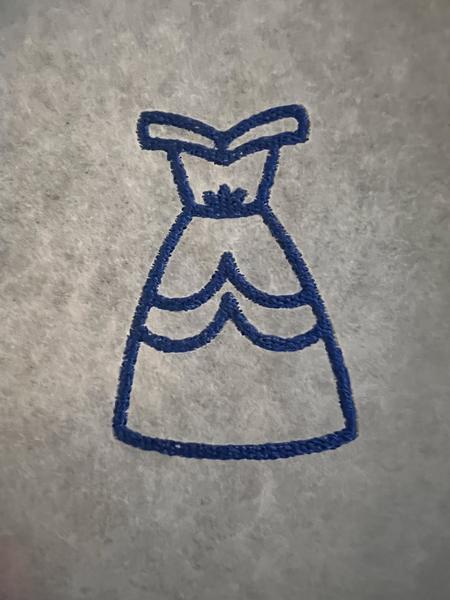
To learn how to use the sofware, I followed the tutorial for basic usage. To tie in my work from earlier in the class, I decided I wanted to try to embroider my dress design from week 4 that I used to make my vinyl sticker. I began by importing the picture of the dress I saved from a Google search into Inkscape. Once imported, I knew I needed to convert it to a vector, so I bitmap traced it.

Next, I selected all the parts of the dress. From the main menu, I clicked on Extensions –> Ink/Stitch –> Params. This design was a simple one, so the simulator did it’s magic and created the stitches. You can change the values and the simulator will update it as you do so. To understand what each of the values mean, I referred to this chart from the InkStitch Github page.

However, the simulator did such a great job of creating everything I didn’t need to really change anything at all. You can view the creation of the file with params below. Once you are satisfied with the way your file is in the viewer, close the window without saving it. You will actually save it in the next step!
When you are back in the main InkScape screen, go to the main menu and select File –> Save As… From here, name your file and save it with the extension you need for your particular machine. In my case, Brother machines use a .PES file extension. I saved my file this way and then I also saved it as a plain .SVG file in case I needed to come back and make any other changes to it later on.
My file was now ready to go. I saved it on a little USB stick and plugged it into my machine.
I’m using a Brother SE600 which is a combination sewing and embroidery machine in one. You change out the base attachment to embroider and this is what allows it to move the embroidery hoop along the X and Y axis.
Since I’ve used my machine plenty of times to sew, I quickly loaded up my bobbins with the correct color of matching thred (for embroidery, your bobbin color and top thread color must match), inserted it into the bobbin “port” and loaded the thread. Next, I needed to learn how to use the embroidery attachment on the machine.
I began by watching this video to learn how to use the embroidery function. The tutorial was easy to follow and clear with instructions. Once I had watched it a few times, I moved on to loading my design. Before doing so, I decided to do a test with one of the built in designs that came pre-loaded with the machine. And I am so happy I did! Somewhere I didn’t have the thread loaded correctly or the bobbin inserted the wrong way because when my needle started, it resulted it in knotted mess underneath the main needle housing and actually set off the emergency motor lock!
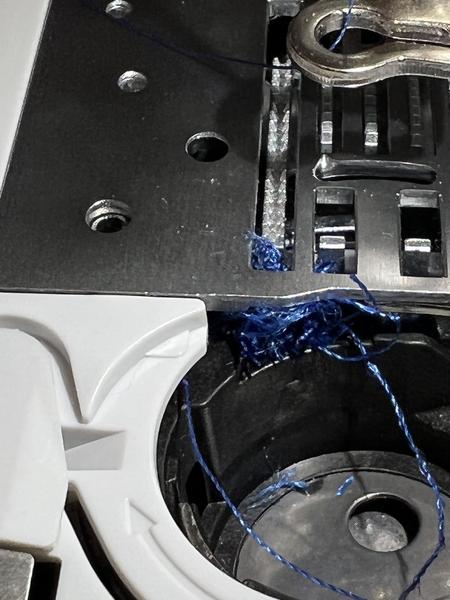
At this point I had no option but do remove the needle housing and the two main screws that hold everything in place and start pulling out the tangled thread. I cleaned it all out and worked on setting everything back up slowly. I got myself back to the point where I could try again. I reloaded the bobbin, reloaded the thread - this time taking my time and adjusting everything carefully.
This is when I also realized I had adjusted the tension the last time I used the machine because I was using a much thicker fabric, so I changed that back to ‘4’.
I loaded the stabilizer fabric into the embroidery hoop and locked it into place, making sure to lay the tail of the thread on top of the fabric. Next, I clicked through the options on the touch screen to load my file. I didn’t need to make any changes to it, so it was a simple process.
Once I was ready, I lowered the presser foot. The indicator light on the start button changed that it was ready to go. I pressed the button and watched the magic happen!
Here is the final product!
Click the link for the file below to download all of the files I used in this week’s assignments. Files