Materials and components
As the project must be accesible for every one, I need to find component and materials that are common in fablabs or online. However, I also considered the difficulty to produce my components and I’ve found different solution and alternatives to them.
Components and costs
| Description | Price | Source | Notes |
|---|---|---|---|
| Plastic spool | 20.99 € | Atom3D | This project require way less than 1Kg |
| Stepper motor | ~10 € | Multiple or recycle | |
| DRV 8825 | 2€ | Amazon, Digikey, Gotronic | |
| ABS Like Resin | 60€ | Atom3D | This project require way less than 1Kg |
| Other electronics | ~4€ | Digikey, Mouser, Radiospare | Fab-Inventory |
| Needle Bearings | 5€ | 123D roulement | |
| Bearing | 8€ | 123D roulement | |
| Thrust bearing | 10€ | Amazon | Two are needed |
Total : ~40€ / units
Machines and equipment
| Machines | Model |
|---|---|
| CNC PCB Engraver | Sainsmart Genmitsu 1810 |
| Power supply | Eventek 0-30v 0-10A |
| 3D printer | Creality Ender 3 + BLTouch |
| Soldering station | Mbuynow 852D |
| DLP Resin 3D printer | Phrozen mini 4k |
| Vaccuum cleaner for CNC | Low cost |
| Laser cutter | Arketype Jade / Agathe 40W |
| Safety |
|---|
| Vinyl or Latex gloves |
| Gaz/Vapor Mask |
| Extinguisher |
| Safety goggle |
| Ear protection |
Micro-controller

For the project, I used an Attiny 1614 microcontroller. This chip is in charge of :
- Reading the position value based on a possible sensor (encoder, potentiometer…)
- Control the stepper motor asynchronously (while doing something else)
- Control LEDs asynchronously (while doing something else)
- Communication trough I2C or using the RC control protocol (Like servomotors using PWM)
| Top | Bottom |
|---|---|
 |
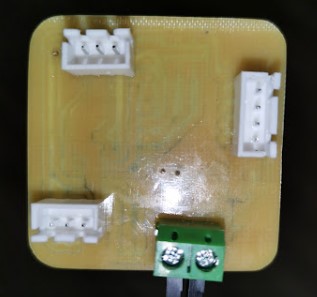 |
As the product must be as much compact as possible, I need to design a very small control board (42mm x 42mm). You can see the development of the board into the assignment on week 11, 13, 14.
Motors
For the motor, I tested several stepper motors and reducers. I have plenty of stepper motor from recycled project. Nowadays you can find very cheap stepper motor since It became mainstream with inkjet printer and 3D printing. If you find an old copy machine somewhere. Open it up ! It contains doses of stepper. You can alson by some cheap chinese Stepper motor online. It works well for prototyping.
This being said, I worked mainly with two stepper motors. A NEMA17 Stepper motor and a NEMA23.
Here is a comparison with other actuators technology :
| Type | Advantages | Disadvantages |
|---|---|---|
| Brushed DC | Low cost, Easy to find or recycle | Need an encoder |
| Brusless | High torque | Need an encoder, Specific driver, Expensive |
| Stepper | Moderate cost, Easy to find or recycle | Complex control sequence, low speed |
For robot prototype, I need a powerful motor that can be controlled in position and speed. I want the whole product to be scalable. I choose the stepper motor because :
- I have plenty of them and they are pretty common nowadays
- It can operate in a wide range of voltage (12v-24v and even 80v)
- High torque compared to Brushed DC
- Can be used with or without encoder
- I don’t need speed
So the main problem I should solve here is the control sequence. The motor should be as simple to use as a servo-motor, and Stepper motor are the exact opposite of control simplicity.
Here is the two Stepper I played with :
| Details | NEMA17 | NEMA23 |
|---|---|---|
| Size | 42x42x40mm | 57x57x56mm |
| Current | 2.0A | 2.8A |
| Stall Torque | 0.45N.m ~ 45.9 gf.m | 1.26N.m ~ 128.5 gf.m |
| Price | Moderate cost, Easy to find or recycle | Moderate cost, Easy to find or recycle |
| Resolution | 1.8° / revolution (200 step/revolution) | 1.8° / revolution (200 step/revolution) |
Torque
| Nema23 |
|---|
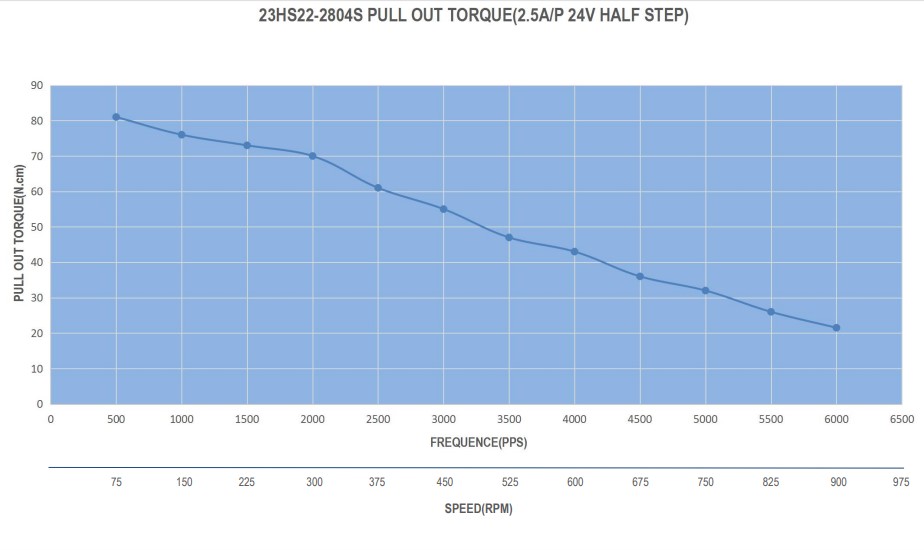 |
| Nema17 |
|---|
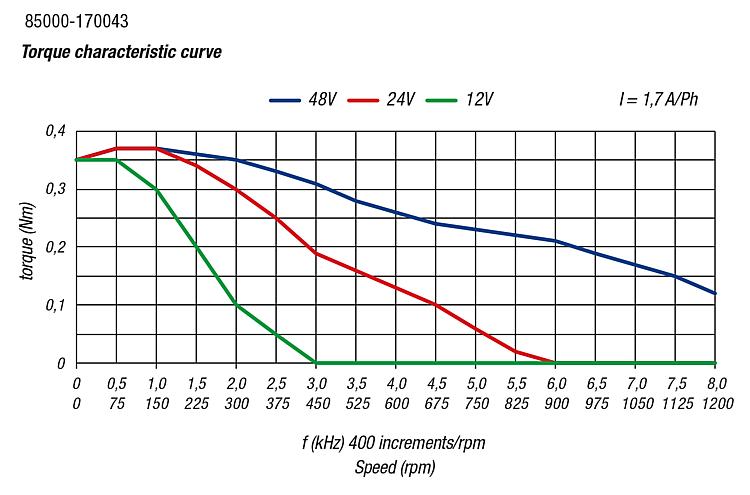 |
CAO
To include them in the project I’ve drawn those two motors during CAD Week
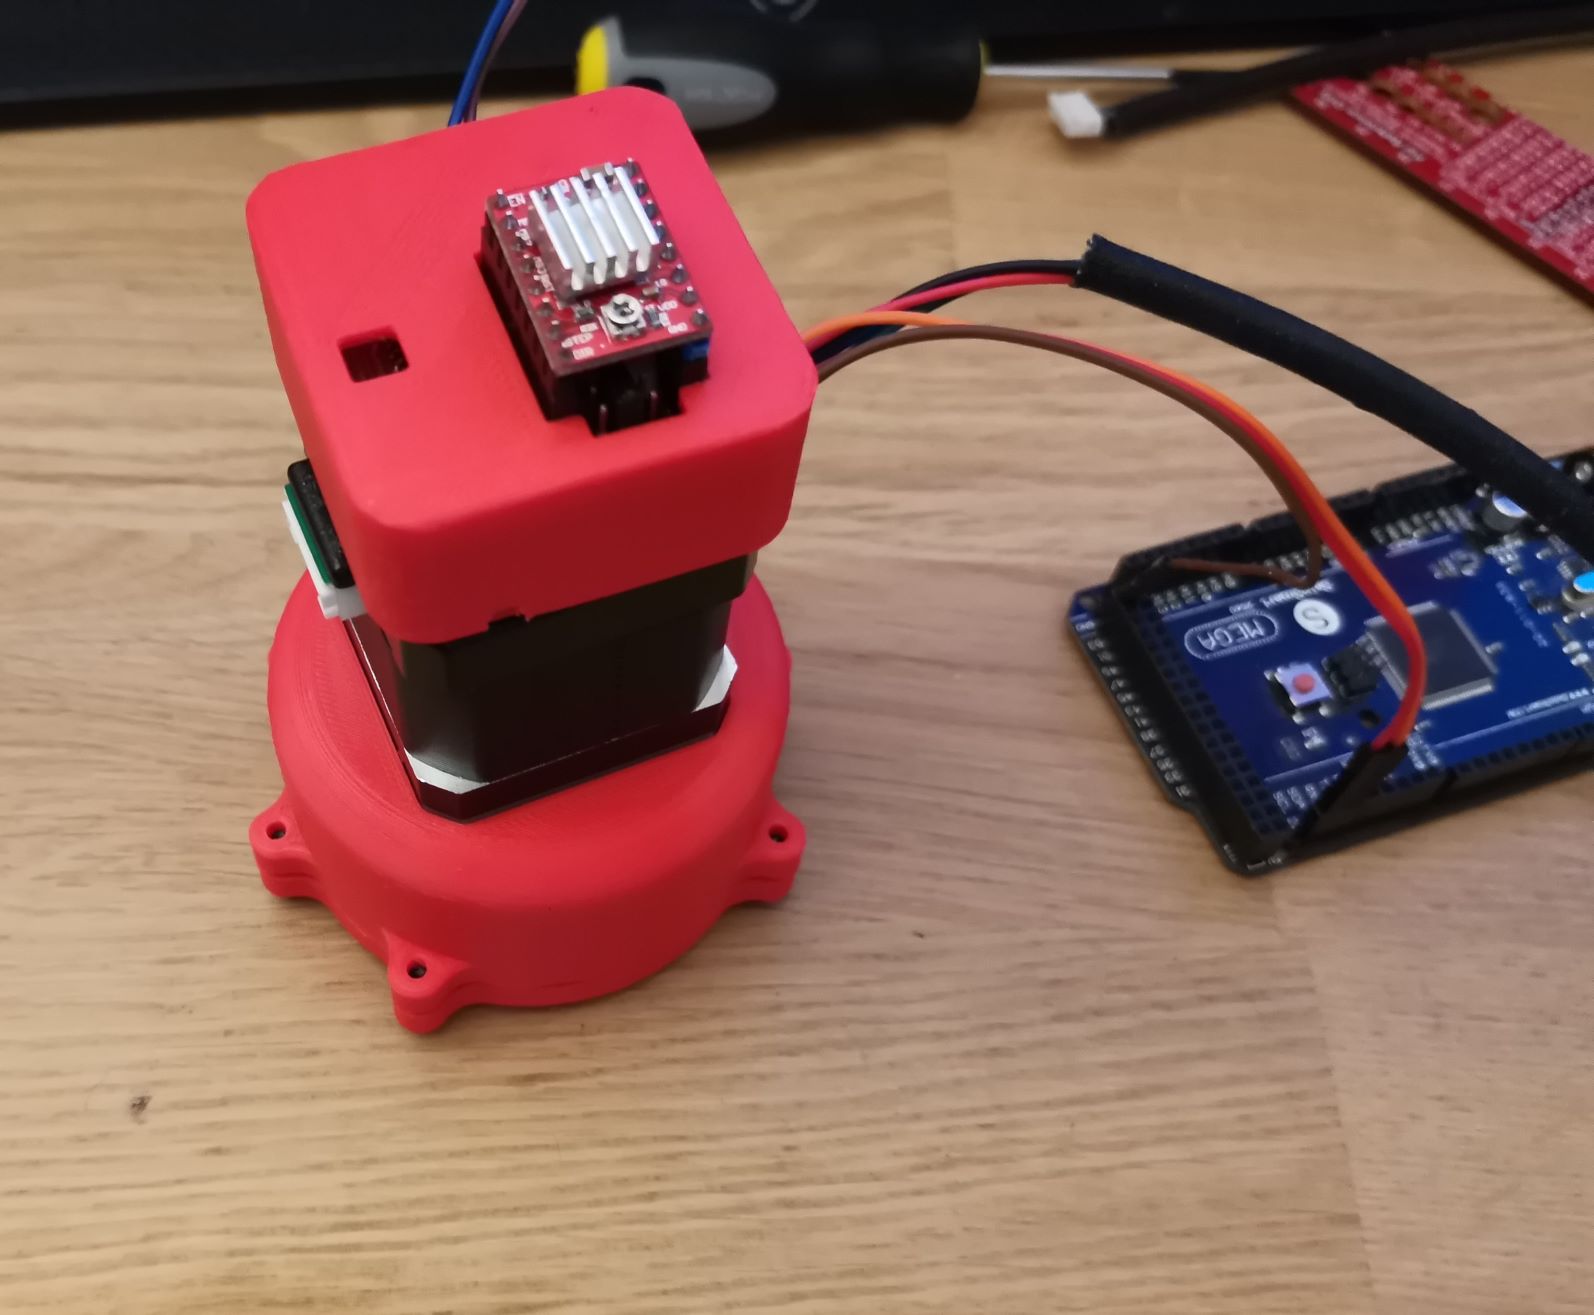
Stepper motor driver
Originnaly, I was planning to integrate this component directly onto my pcb board.
You can control stepper motors without drivers with a bunch of transistor array. Stepper motors are really straitgh forward. I did that once on an educationnal robot. But the problems is you need 4 outputs on you microcontroller to handle the control sequence. You need to power the coil in a defined controlled sequence to make the motor move.
Full step sequence
| Step | A | B | C | D |
|---|---|---|---|---|
| 1 | 1 | 0 | 0 | 1 |
| 2 | 1 | 1 | 0 | 0 |
| 3 | 0 | 1 | 1 | 0 |
| 4 | 0 | 0 | 1 | 1 |
Half-Step sequence
| Step | A | B | C | D |
|---|---|---|---|---|
| 1 | 1 | 0 | 0 | 1 |
| 2 | 1 | 0 | 0 | 0 |
| 3 | 1 | 1 | 0 | 0 |
| 4 | 0 | 1 | 0 | 0 |
| 1 | 0 | 1 | 1 | 0 |
| 2 | 0 | 0 | 1 | 0 |
| 3 | 0 | 0 | 1 | 1 |
| 4 | 0 | 0 | 0 | 1 |
I encountered two problems. First, When I designed the board, The driver chip wasn’t available on digikey or mouser. Also, I want my board to be compatible with different driver to ensure people can change the driver if he fry and use the driver alone if they don’t need my board anymore.
I had a lot of A4588 driver and Pololu DRV8825 at home. There is a way to create a board which is compatible with both of them. So I did. My board is compatible with both of those driver to handle the motor.
Using this driver save 1 output ont the microcontroller because I need :
- 1 pin for step
- 1 pin for direction
- 1 pin for enable
Each time you send a pulse on the step pin, the driver will increment to step according to the array above. As a result the motor will move by 1 step : 1.8 deg. The dir pin will change the direction in the step table. The enable pin power on and of the stepper motor. If the motor is idle and enabled, the output shaft is blocked. If you’re disabling the driver, the stepper will be free to move.
Bearings
For my reducer, I will need a few ball bearings. Bearings are in charge of the rotational joint and hanlde a bit of the structural force. Using bearing avoid damaging your stepper motor by loading directly the output shaft.
To handle all the mechanical loads inside and outside the reducer I choose three different bearings that I had to model.
The output of my reducer will use a big ball bearing to handle has radial force. If you plan to attach a robot arm to this reducer, No problem for this bearing ! This bearing can handle radial and axial load.
Inside the reducers, their is a little cameshaft oscilating to drive the planetary gear. This little bearing needs to be very compact and can handle radial big load.
This last bearing is special, It is a flat bearing. He can handle high axial load but no radial load. I will help the previous one inside the reducer.