FDM 3D printing
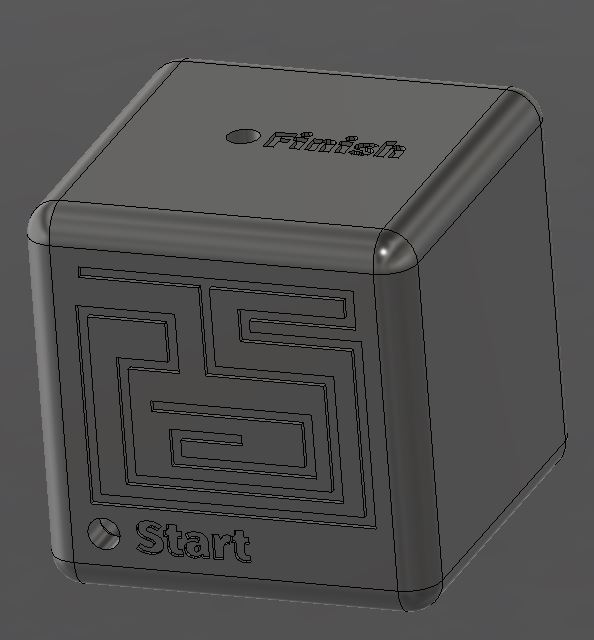
Kube, parametric 3D maze. Use only your finger to sense the metal mass moving inside the Kinetic cube (Kube).
How it works
In this part I will introduce you to FDM 3D printing
Fuse deposition modeling is the most common 3D printing technology available for hobbyist. It is cheap, convenient and safe (Compared to other hazardous manufacturing methods)
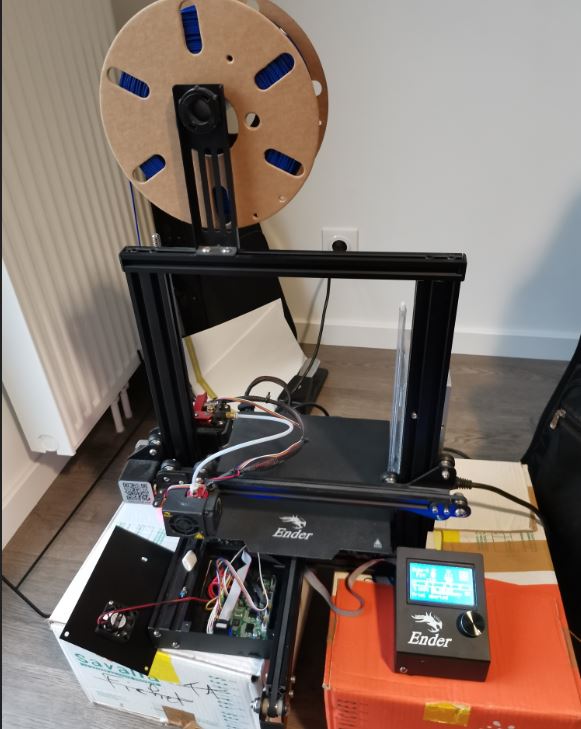
I have an Ender 3 from creality at home. My FDM 3D printer had several problems after a short time of service. The extruder broke and the buildplate wasn’t very flat… But before explaining what a build plate is and why a broken extruder isn’t a good thing, let’s jump into the main question how an FDM Printer is working ?
Well, 3D printing is very straightforward… it print in 3 dimensions. Unlike 2D printers, they can also build stuff vertically. To be able to build 3D parts, printers usually print layer by layer. In otherword Its stacks 2D layer to get a fully fonctionnal 3D parts. Does a 3D printer use Ink ? Well some Binder jetting printer does, but FDM printer use melted plastic to build part. The printer will deposit a melted plastic cord on the buildplate (hot or not adhesive flat plate). Each layer is composed of juxtaposed cord. When melted these plastic cord will merge to make a solid layer. However, the junction between two cords isn’t as strong as an injected part may be. Actually the parts have different mechanical property according to the orientation of the force applied to the part.
Info
Within a slice, the part has about 80% of the plastic elasticity, but verticaly the parts has only about 30% of its full elasticity. This is due to the adhesion between the layers. With that in mind, it is important to know that a printer isn’t magical and users has to print part wisely. Also note that different material can be used in a FDM printer if the printer is able to melt it and if the material is a sticking to the buildplate. For strong plastic parts you may use ABS which melt at about 230°C. We usually use PLA which instead, because it is easier to print and safer, PLA is also biodegradable (not 100%) . If you plan to use printer at home
Warning
3D printers are not 100% saf e ! Think about using the machine in a ventilated room to avoid toxic vapor from ABS or used PLA instead (not 100% safe but better). Low cost printer way burn into fire ! Watch out, don’t go away while there are running !
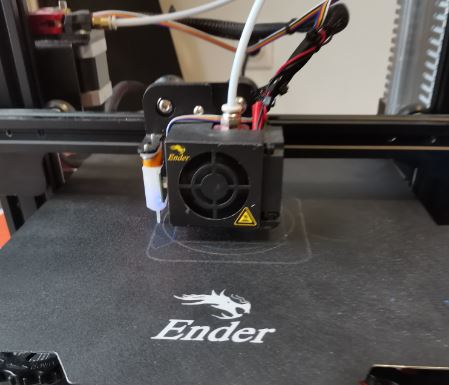
The machine
Here is a schematic of my 3D printer :
As I said before, the printer use melted plastic to build the desired parts. This plastic is contained in a filament spool store at the top of the printer. The cold platic filament is pulled out the spool by the extruder which push it into the hotend. As you can guess the hotend if very hot and the plastic will melt and go trough the Nozzle. The nozzle of the printer is where the melted plastic cords are formed. The nozzle move across the Build plate to depose the cord precisely. The build plate is heated to ensure good adhesion between the plastic and the plate, additionally, the build plate is usually covered with an adhesive material sur as painting tape, glue or even hairspray.
The nozzle isn’t moving across the plate alone. The whole printhead is moving from left to right (X Axis) and from bottom to the top (Z Axis). The build plate is moving back and forth (Y Axis). Here we have the 3 dimensions of the 3D printer. Even the printer have 3 axis, you have 4 Stepper motors on my printer (One for the extruder). But other printers may have 5 axis (two Z axis) or may have a not conventional kinematics.
As all my axis are perpendicular, my printer is known as a Cartesian 3D printer. But you can find other kinematics on the web such as Delta FDM 3D printer of Scara FDM 3D printer. 3D printer are in fact classical robot with a printhead. There kinematics, structure, program are pretty near of robots I’m using every day. Modifying those machines is more or less about robotics engineering ! (Sounds cool :D)
Repairs
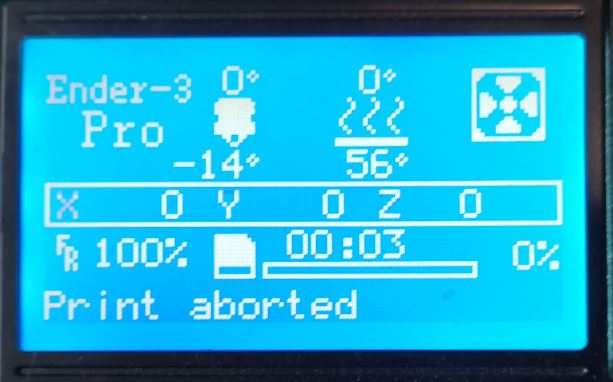
Before doing the assignment, I have to repair my ender3 which suffered from a moved house and from covid19 productions (masks). When I turn it on, I immediately saw that the temperature was faulty. Extruder was indicating -14° and bed was 56°…
I opened the motherboard cover and discover a mess of cable… In this mess I discover that the temperature sensor of the extruder was unplugged. The problem was easy to solve…


I plugged it back and closed everything. Problem solved let’s go ahead !
Changes
I have also installed a Bed leveling sensor (BL Touch) to raise print success rate. The major cause of 3D printing failure is due to adhesion problem. A bed levelling sensor ensures a perfectly stable adhesion by adjusting the height of the print in real time thanks to the 3D mapping of the plate at the beginning of the print. I can now start my prints without check if the print will succeed. It will in 95% of cases.
The other cause of failure in FDM printing is the extruder. I replace the plastic extruder originally on my ender3 by an aluminium one. The whole extruder is much more robust.
Characterization
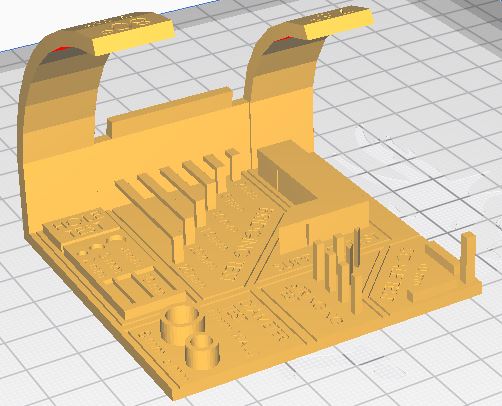
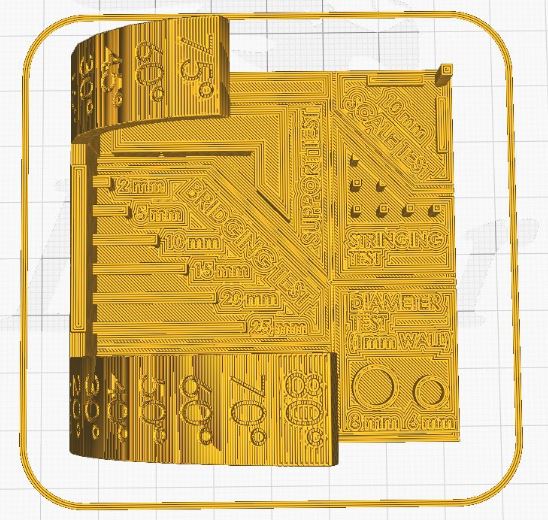
I started the assignment by printing a test file to see if my printer was doing well. Here is the result that I’ve got:
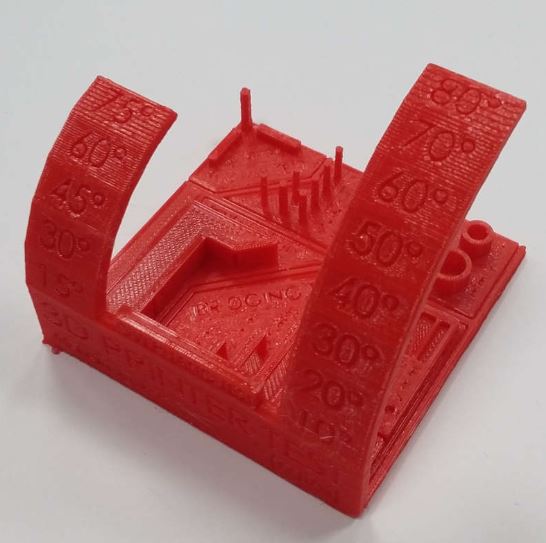
As you can see, the default parameters of cura give a pretty good result with PLA, but I tried the PETG profile with a PETG filament spool, and it does a lot of stringing. Stringing happend when the plastic flow out of the nozzle while in midair. The plastic will be pulled from one point to another and will cool down in place. As a result you may see a lot of thin plastic wire between vertical surface of your print.
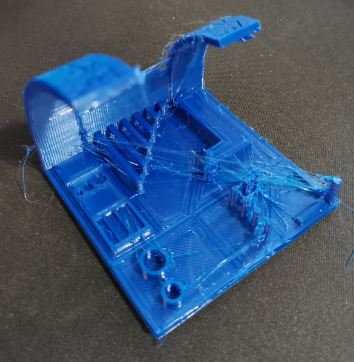
To correct that effect I tried to slightly raise to retract speed and length. After printing a line on the print, the extruder will reverse the filament to keep plastic flowing in midair. I also lower the nozzle temperature by 5 °C It actually did the trick.
There is a lot of parameters in Cura and you may be a bit lost at the beginning. First, you have to know that Cura Slicer hide lots of the accessible parameters. You can switch to advanced or expert mode to see them all.
To set up my printing profile I use this Website from Symplify3D. Symplify3D is another 3D slicer, Honestly, I never used it. But still their quality guide is pretty complete. You’ll find every problem you should have in your 3D printing journey. I used it a lot.
If your interested in the material used with FDM printer please check their material guide : Click !
Cura slicer
Let’s see how I configured my slicer for FDM.
First I installed Cura slicer from here. Cura is a great 3D slicer from Utlimaker. Even if Utilmaker is making great machines, their are very expensive compared to DIY ones available on the market.
Note
If you plan to print at home and don’t want to spend too much money, I suggest using an Ender3 from Creality. Buying a BLtouch (automatic bed leveling) and the silent step motherboard is a plus (Printer are noisy, this board cancel sound from steppers). If instead you plan to use this printer ina fablab or with lots of users, please think about investing in a more repeatable and durable model (Ultimaker 2 forever !)
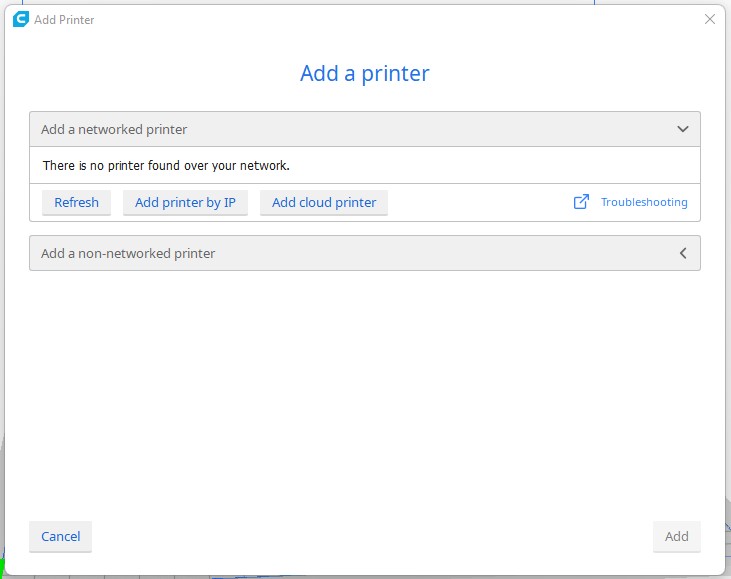
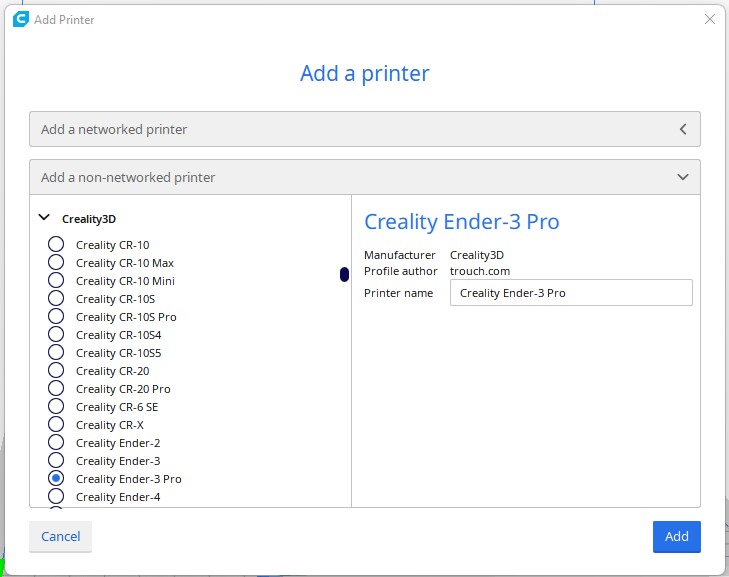
When you first open Cura, it will ask you to had a network printer. Don’t worry, if your printer (like mine) isn’t connected, you can add it manually. click on Add a non-networked printer and browse to your own model.
For me : under Creality category, I chose Creality Ender3 Pro because I have changed the motherboard from my Ender3. Press Add.
Then cura will prompt you to fill the machines settings. As the form is pre-filled you can skip or replace Start G-Code with this if you added a Bed leveling sensor to your printer :
; Ender 3 Custom Start G-code
G92 E0 ; Reset Extruder
G28 ; Home all axes
G29 ; Bed leveling
G1 Z2.0 F3000 ; Move Z Axis up little to prevent scratching of Heat Bed
G1 X0.1 Y20 Z0.3 F5000.0 ; Move to start position
G1 X0.1 Y200.0 Z0.3 F1500.0 E15 ; Draw the first line
G1 X0.4 Y200.0 Z0.3 F5000.0 ; Move to side a little
G1 X0.4 Y20 Z0.3 F1500.0 E30 ; Draw the second line
G92 E0 ; Reset Extruder
G1 Z2.0 F3000 ; Move Z Axis up little to prevent scratching of Heat Bed
G1 X5 Y20 Z0.3 F5000.0 ; Move over to prevent blob squish
When you are done, it is time to import your first model. Don’t know what to print ? You can browse on thingiverse to find a 3D model by clicking the button below :
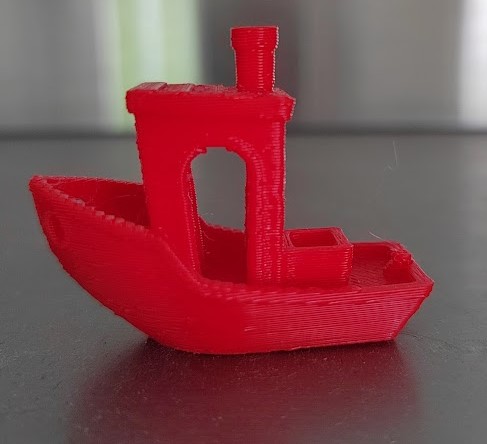
You can also download the very famous test boat “Benchy”
Most of 3D slicer use STL file as 3D model format. But Nowadays it is encouraged to switch to 3MF which is way more convenient. If you want to know more about the difference between 3MF and STL please watch the folowing video from Prusa :
To add your selected 3D model into Cura, just press the open button in the top left corner of the Cura workspace.

Browse to your 3MF file (or STL…) and press OK.
You should see something like that :
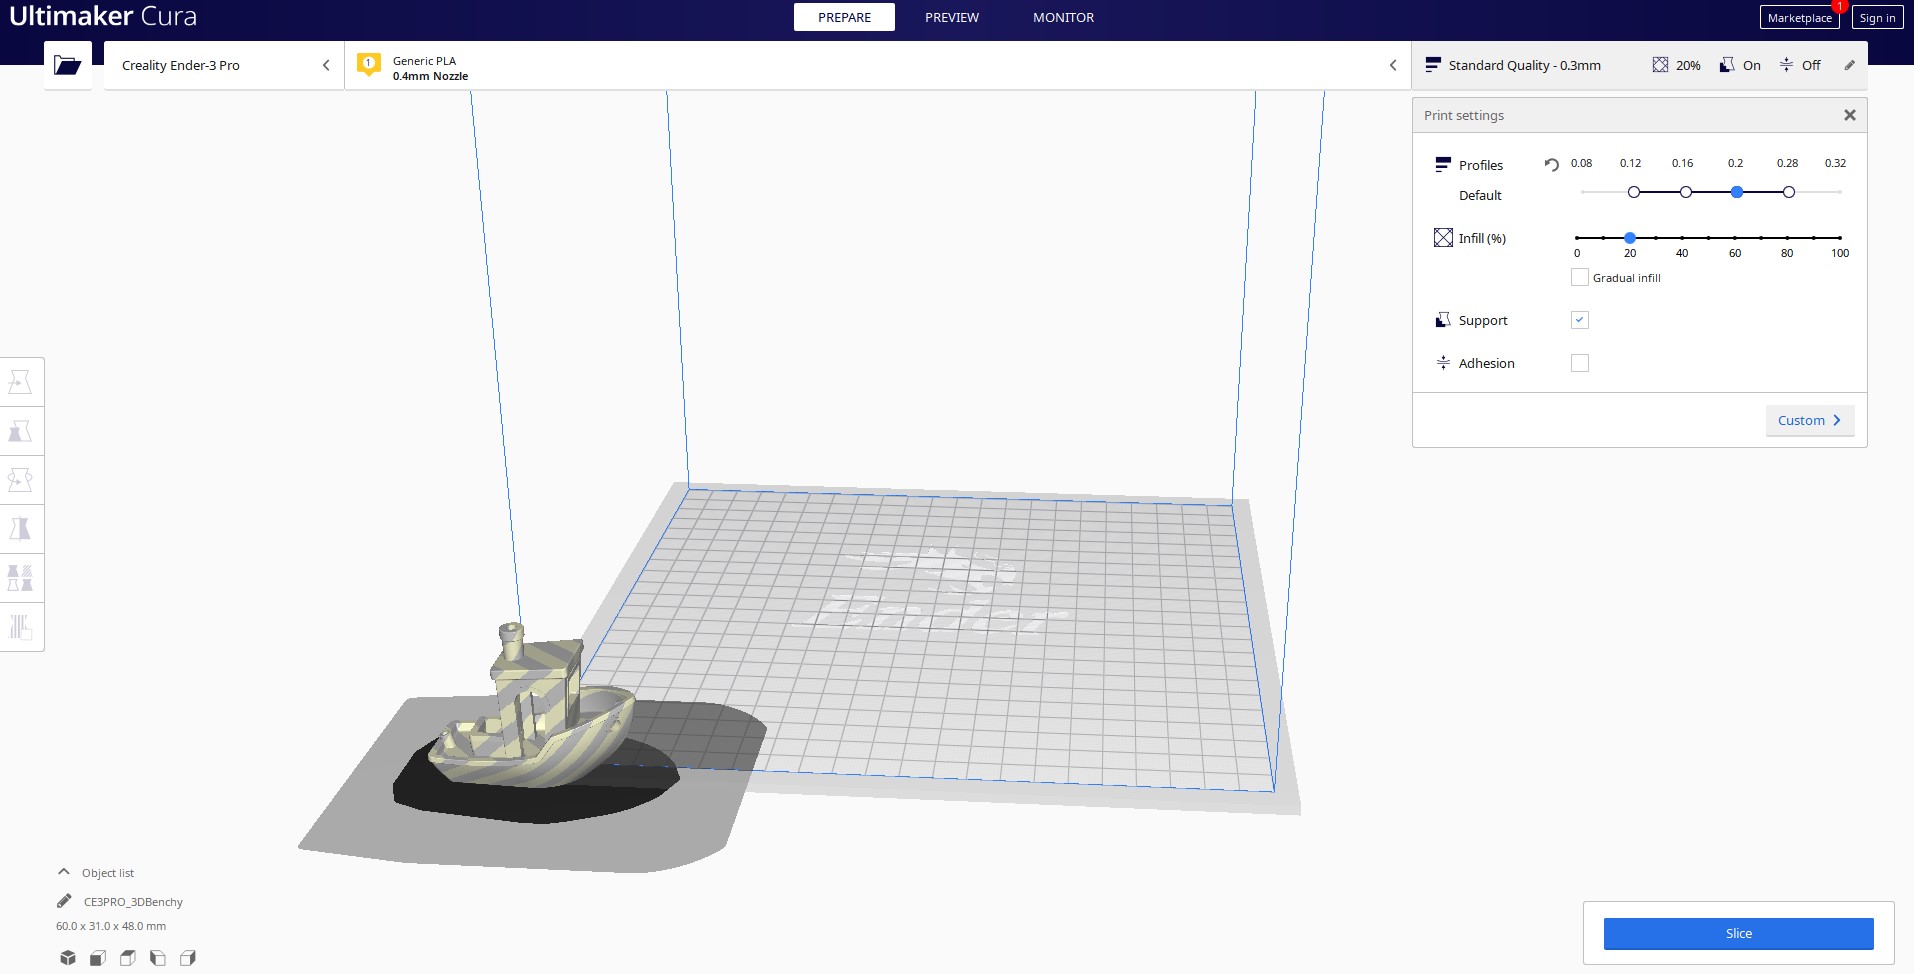
Cura is organized into three main tabs :
- Prepare
- Preview
- Monitor
As we have a non-networked printer the last tab is useless since it is made for real-time control of your printer. Personnaly, I prefere using an SD card or octoprint
The prepare tabs is composed of a few sections. The toolbar contained everthing to setup your printer including :
- Machine selection (If you have multiple machines)
- Material selection (and nozzle size)
- Print settings (By default : Standard Quality)
On the middle left you’ll find the model manipulation tools, and the file infos and camera mode just under it (Bottom left). On the top right corner of the workspace you’ll find the print settings menu.
Let’s configure cura for our 3D Benchy. You can start by moving the 3D model to the center of the buildplate. Use your mouse to drag and drop the file or use the moving tools from the left toolbar.
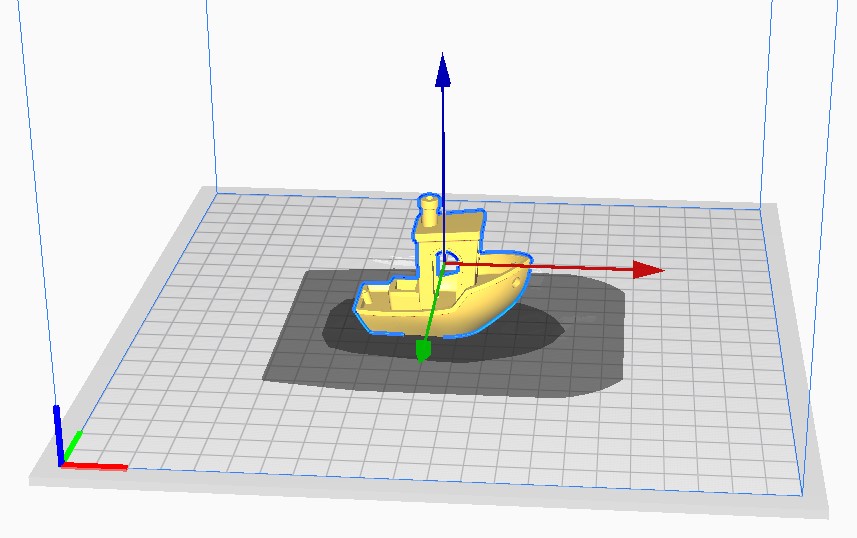
You can resize, rotate or mirror the model according to your needs. But be careful about the model orienation. Please consider to use a flat face as the bottom of the print to improve adhesion.
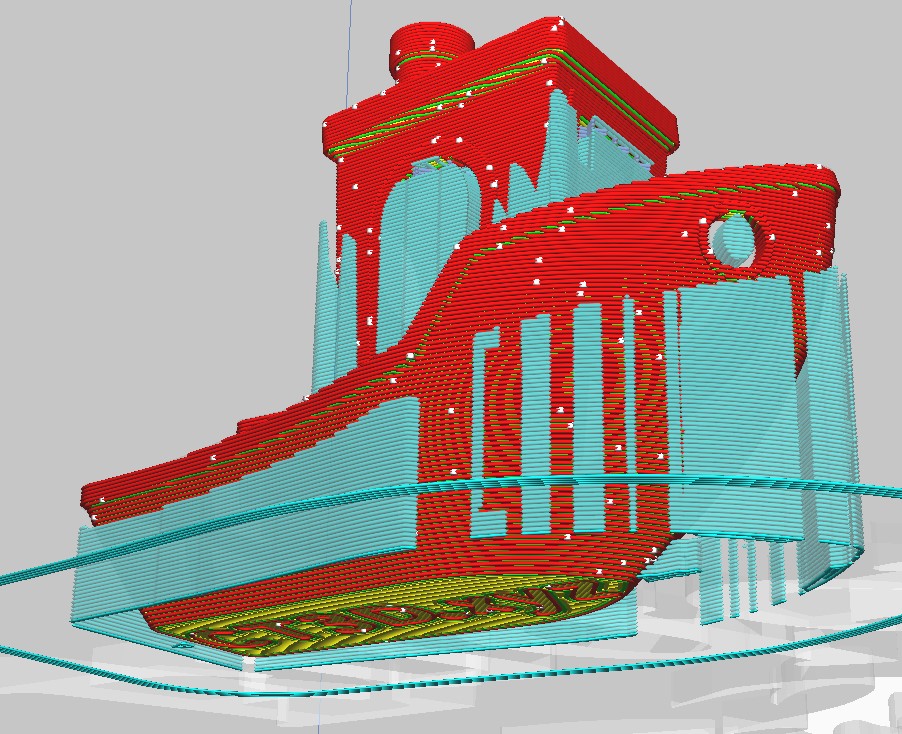
Dealing with orientation, we have to talk about support. As FDM printer build parts layer by layer, each layer require a ground to not collapse. If you try to print a layer in mid-air it will collapse. To avoid that, FDM 3D slicer build support under unsuported area. Support is a removable scafolding used to carry on the above layer. Unsuported area are displayed in red in Cura :
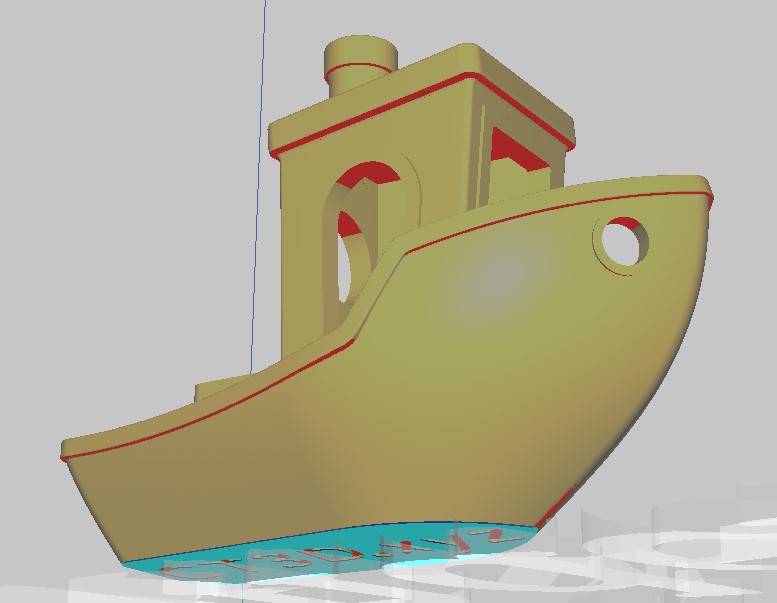
If you tried to slice this part with support activated, it will generate those scafolding automatically :
Support are great but to save both time and filament, please try to avoid them when designing a part. Even if support are higly customisable, they usualy make the unsupported area iregular.
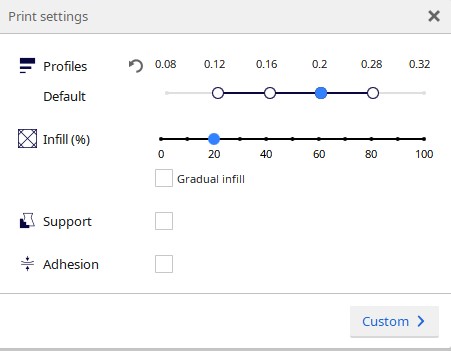
For this print let’s uncheck support in the print settings :
Press Slice and save the GCode file onto an SD card. Then start the print.
Here is the classical workflow of 3D printing : - Grab or design a 3D model (3MF or STL) - Import this file into your prefered 3D slicer (Cura Slicer here) - Adapt slicing parameters to your needs (Speed, details, material, printers) - Slice and save the programm (Gcode) - Send the Gcode to the machine (over network or SD card) - Clean & adjust the buildplate - Check and load filament - Clean the nozzle - Start the print - Wait for the bed and hotend to reach the melting temperature of your material - Watch out the first few layers to check any adhesion problem - Wait for the print to finish (Check the printer very often for fire or spool knot)
Here is the result from my Ender3 :
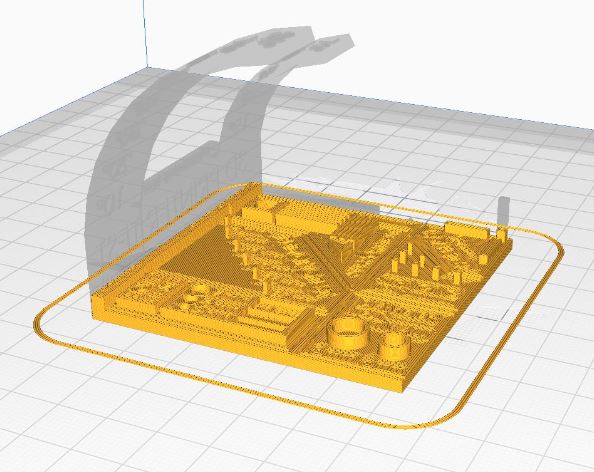
I also tested to print the characterization file I used on the fablab’s printer. Again, I imported the STL file, sliced it and start the print.
Personal assignement
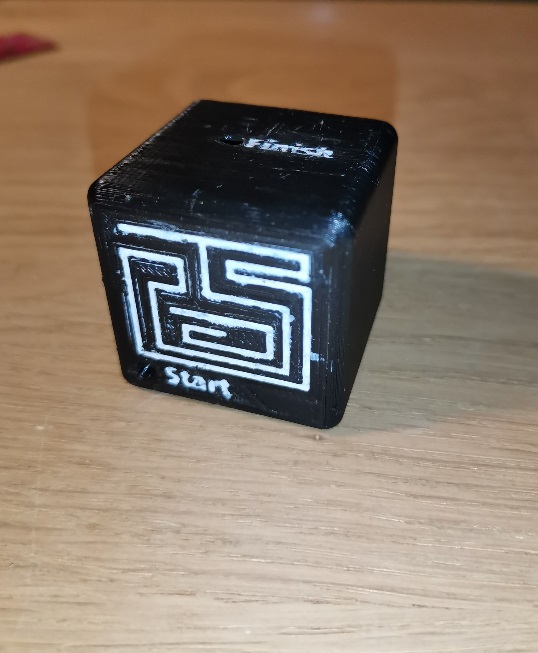
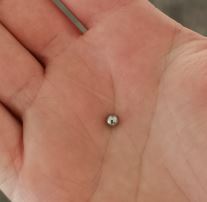
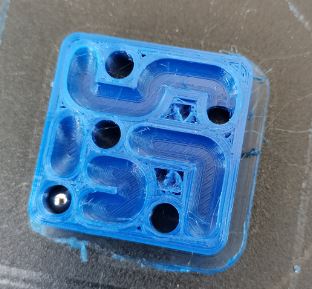
For my personal assignment, I decided to create a 3D maze. The idea is to create a 3D object made of plastics containing a small metal ball. The games’ goal is to move the ball from start to finish.
To realize this game, I have to design the whole part on Fusion 360 and print it using my both my FDM printer and my SLA printer.

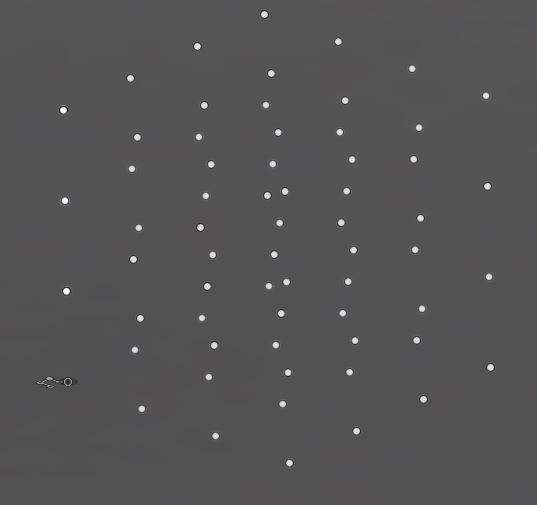
I began by creating a parametric sketch with only regularly spaced dots. These dots are arranged into a grid. I copy that grid vertically to obtain a 3D grid.
These dots are in fact nodes. I planned to linked them to generate the path of the 3D maze. To link the dots I created a 2D sketch and I activated the 3D sketch option in the constraint menu (right toolbar) in Fusion360. This I used a polyline to connect the nodes. Here is What I got :
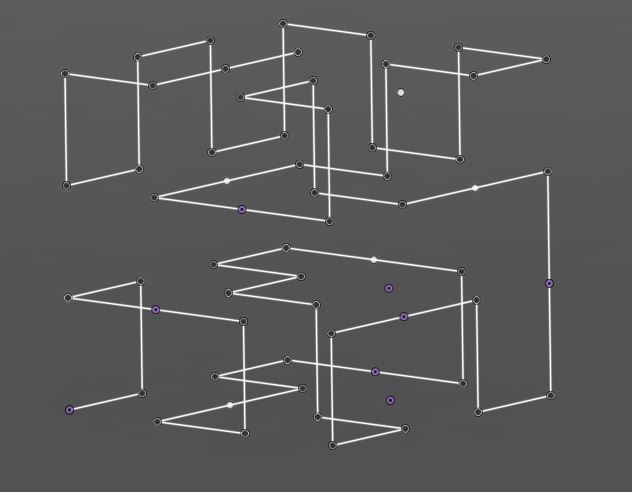
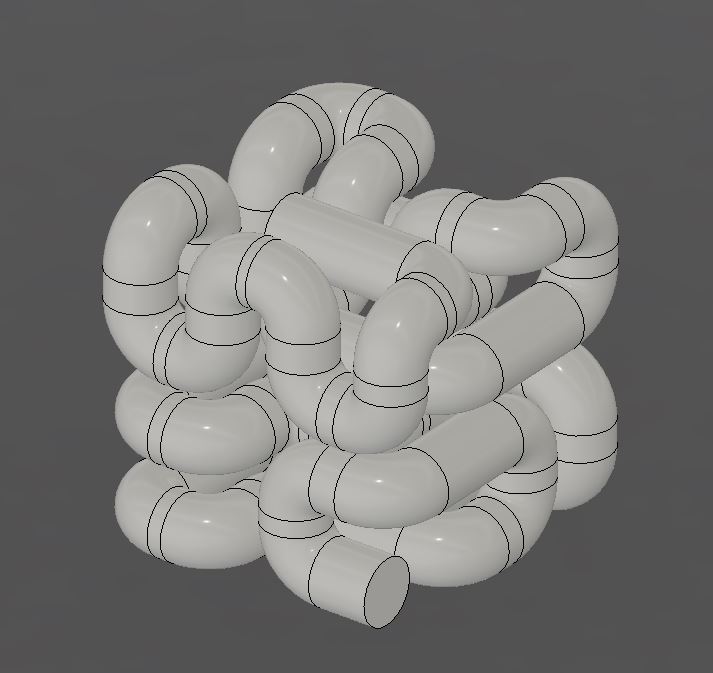
Using the sweep tool, I drew a circle at path start and extrude the circle along the maze path. I got this snake shaped model :
Then I designed the outside of the Kube (I named the game Kube :) and create a boolean operation between the Kube and my snake shaped body. I also added a hole at start and end to actually see the metal ball. There are also some checkpoint where you can see the ball.
Then I sliced this part and disabled support. I also used the petg profile because I haven’t any PLA left. As you may see, the Kube is hollow, and I can put the metal ball while printing to make an inclusion.
I paused the print at 20% and added the ball in a hole deep enough to let me insert the ball totally. I don’t want the printhead to it the metal ball while printing…
For some mysterious reason (cat included) this print failed… I never got the metal ball back !
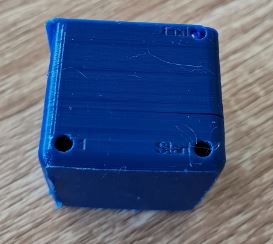
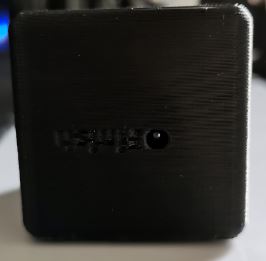
I started the print again using a small piece of black PLA I had left in a box. I included another ball and it worked ! Here is the result :
The game is actually very frustrating because the ball get stuck very often. But I manage to lead it to the end sometimes. :)
If you’re interested about SLA printing, please check the next page :)
Downloads
- Inside part of Kube : Kube-inside.f3z
- Kube : Kube.f3z
-
Kube STL : Kube.stl
-
Test no text : TestNoText.stl
- Test : TestNoText.stl