Module 08 – Computer-Controlled Machining
Class
In class:
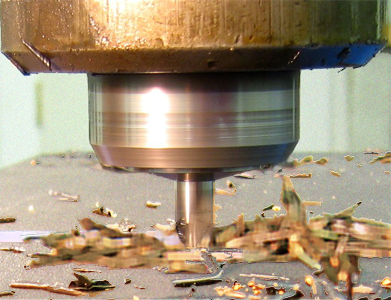
- we had a look at the different types of machines that are available to do heavy duty cutting and machining
- We saw what materials can be used with these different technologies.
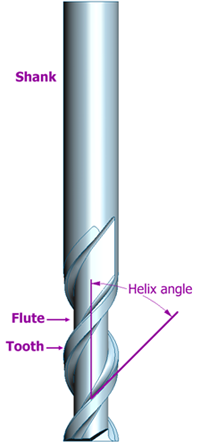
- we looked at the tools used on a drill or a milling machine, and the different ways in which they can be used
- fixtures
- flexures
- Tool paths
- T-bones

In Class Tutorial
The class tutorial was a hands on practice going from designing the file in Rhino (with slight tolerance adjustments to validate the ideal joint shape and width for OSB were about to use).
We went through the entire process with small sample joints playing with tolerance and a variety of T-bone alternatives.


The Assignment
- make something big
For this, we're provided with a 4'x6' slab of plywood... which translated into FabLab Barcelona terms turns into slab of 15mm OSB whose dimensions are 1250mm x 2500mm roughly the same dimensions as the announced plywood.
For all you readers who enjoy an euphemism here and now I'll just say: "I don't particularly love OSB for furniture design."

The thickness of the sheet was 15mm, which means we need to make sure that our design are sturdy enough as to not break to easily.

Drawing (...)
Design
Making the CAD drawing
My first intuition was to attempt to do my design in Rhino. But I quickly decided that I still had to much to learn in order to be effective with that software. And I resigned in order to go back to OpenSCAD, thinking that maybe I should give myself the time to investigate Kokopeli.
In the end, OpenSCAD did the trick, but I really think that it's ambitious to try to modelize sensuality with subroutines and mathematical formulas...
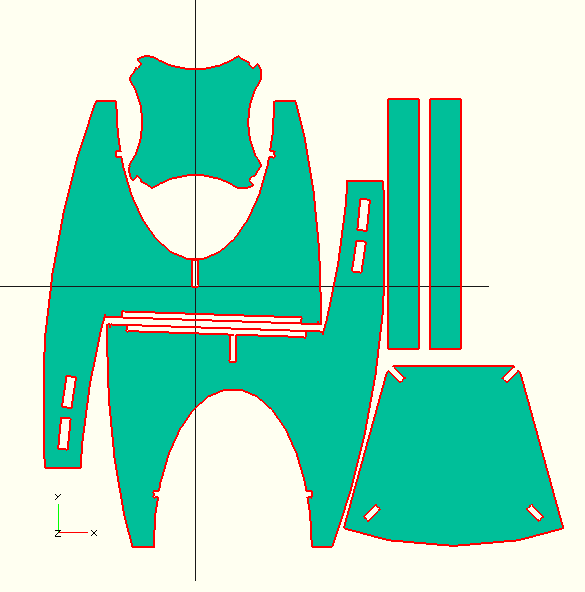
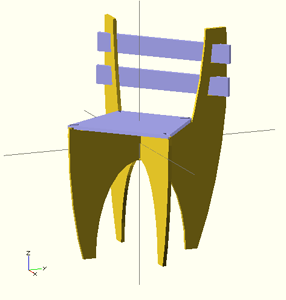
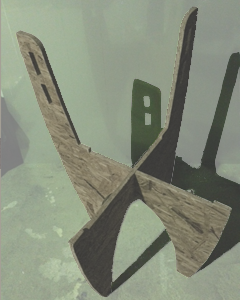
I tried to view the output in two different fashions as the cut layout for sending to the ShopBot, and a 3D assembled version to validate the design visually
Given the thinness of the material I thought I should strengthen the structure and added a "tray" between the legs to act as cross-bracing. I made it as a simple twist-and-snap "X" which means this chair is not meant to be dismounted too often.
Downloadables
[ download OpenSCAD file: "MatChair04.scad" ]
Cutting using the ShopBot
Once your design is ready to be machined on the ShopBot. Export it as a DXF file.
Note: the ShopBot id pretty strong, and the material you will ne machining must be firmly attached to the bed of the ShopBot in our case we our using wood sheets, so the best is to screw the sheet to the bed. You must however pay attention to where you place your screws if the tool hits a screw, it can brake the tool, and can be a hazard to anyone standing close; also screwing in the part that you will form part of your final object can alter the function or damage the aesthetics of the object.
It is a good practice to draw the screw location in your CAD drawing on a specific layer and have the ShopBot pre-drill these position so you are sure of where you have located the screws.
...
The making of...
I have a lot of respect for BauHaus design, but when I drew this chair on paper it came out with curves. I already stated that OpenSCAD code to produce sensual curves is not ideal.
The other way I though I could undulate this object was by bending wood (that was before I realized we were going to be served with OSB). I did not attempt making flexures with OSB, but I thought maybe I'd try and steam bend the back rest a bit.
Fab Lab Barcelona is not equipped with a steaming machine but there is a small kitchen where students can nook there meals; so brought a bathing towel, soaked it in water, and placed it in a bowl in the microwave oven for 5-6 minutes. When i got the steaming hot towel out of the oven I wrapped it around my back rest slab and tried to form it using heavy and contundent objects that were lying around.
I succeeded at giving a slight bend to the back-rest (something like a 2-3 meter radius) but eventually the slab broke
As of now I did not get a chance at trying OSB bending again as I had to move on to the next topics, but I believe it could work given at least 2 conditions:
- be patient and bend slowly (I was in a rush when I did it)
- Use a mold so that the force is spread out on the entire board.
- Proper steaming conditions are likely to improve the result...
___
…
.
I'm not too happy about the result: the aesthetics lacks air or some sort of unbearable lightness...

Plenty of margin to improve here: I might have to re-think the entire thing...
That's all.