Embedded Networking and communications
* Network and Application Programming
This week assigment we have write an application that interfaces with an input /or output device that we made, I decide to create an app that can talk together with the help of bluetooth.So first I will start to the phone app after that I will connect my board with bluetooth model via serial port.
The easiest way to create an app is MIT App inventor platform to connect the moblie ith my board I use bluetooth HC05.
1- INTRODUCING MIT APP INVENTOR
MIT App Inventor is an intuitive, visual programming environment that allows everyone – even children – to build fully functional apps for smartphones and tablets. I have follow thses steps
1- In the top website click on >> Create Apps! >> log in with your existing gmail account.

2-click on the Projects menu on the top left of the screen and select the “Start new project” and then give the name of your project.The progarming divied in two main parts (Designer Panel - Block Editor)
a- Designer Panel:
That represents the final interface of an application, and how the app will appear.
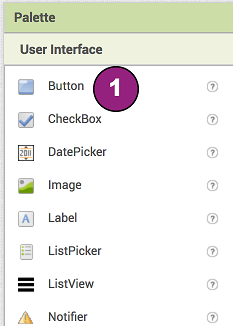
1 -Select components to design your app, The App Inventor Components are located on the left hand side of the Designer Window under the title Palette.
2 - From the User Interface palette, drag and drop the Button components to Screen1 and clock, ListPicker is the button, which displays the list of available bluetooth devices and handle the selection.
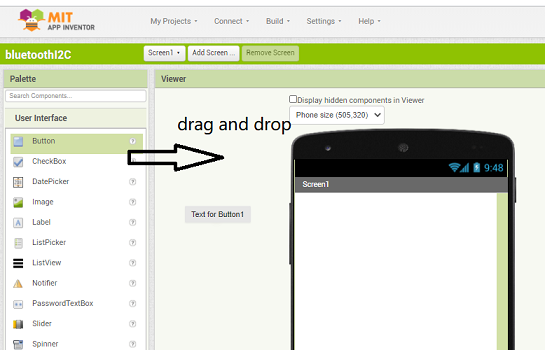
3- From Connectivity drug and drop bluetoothServer this component doesn't appear at screen1, Wherever you drop it, it will appear in the area at the bottom of the Viewer marked Non-visible components.
4- Click on the list picker and select ListPicker Before Picking and set the elements of list as available bluetooth devices.
b- Block Editor
Programming with the Blocks Editor that located in right top button, In the block editor drug and drop the code,note that you must put the button and any other component before writing code in the block becouse the command of button as exmple will not appear until you add it in designer panel.
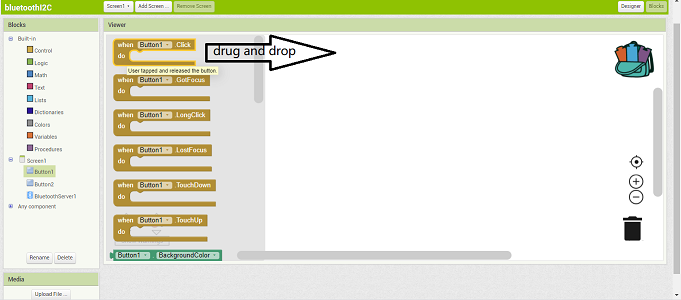
here I drog and drop all blocks like in figure below.


After completing the Program in MIT app inventor, go to Build and select App( save .apk to my computer).
Connect with My board
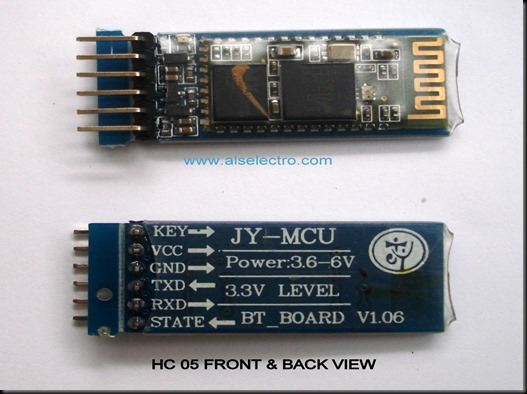
To connect my bord with phone App via blutooth,here i use arduino HC-05 model,
The HC-05 is a very cool module which can add two-way (full-duplex) wireless functionality to your projects. You can use this module to communicate between two microcontrollers like Arduino or communicate with any device with Bluetooth functionality like a Phone or Laptop.
HC05 is reciever and transmiter bluuetooth model unlike HC06 which transmiter only. HC05 have 2.4GHz ISM Band Frequency,Short Range, Low Power .

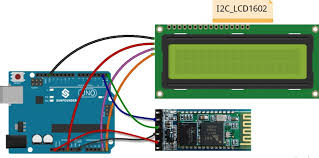
I have connected the arduino board with HC05 blutooth model and I2C LCD as shown in figure to test my arduino program and my app, after the program work successfully, I replace arduino with my board.
Arduino code
Here is the second code with describation
   /*
#include < Wire.h>
#include < LiquidCrystal_I2C.h>
LiquidCrystal_I2C lcd(0x27,20,4);       // set the LCD address to 0x27 for a 16 chars and 2 line display
char Incoming_value = 0;                //Variable for storing Incoming_value
void setup()
{
   lcd.init();                // initialize the lcd
  Serial.begin(9600);         //Sets the data rate in bits per second (baud) for serial data transmission
  pinMode(03, OUTPUT);        //Sets digital pin 13 as output pin
lcd.backlight();
  lcd.setCursor(3,0);
}
void loop()
{
  if(Serial.available() > 0)
  {
    Incoming_value = Serial.read();       //Read the incoming data and store it into variable Incoming_value
    Serial.print(Incoming_value);         //Print Value of Incoming_value in Serial monitor
    Serial.print("\n");                    //New line
    if(Incoming_value == '1') {            //Checks whether value of Incoming_value is equal to 1
      digitalWrite(3, HIGH);               //If value is 1 then LED turns ON
    lcd.clear();
   lcd.print("LED ON");}
    else if(Incoming_value == '0') {      //Checks whether value of Incoming_value is equal to 0
      digitalWrite(3, LOW);                //If value is 0 then LED turns OFF
  lcd.clear();
 lcd.print("LED OFF");
  }
 }
}
I test two arduino code one wiith out LCD for and second one for with LCD output, I use I2C LCD which use a few of pins connected that as shown in figure below