15. System Integration
Assignment:
Individual assignment:
- Design and document the system integration for your final project.
Your project should demonstrate how all the modules developed during the Fab Academy work together as a unified system, including:
- 2D and 3D design
- Additive and subtractive fabrication processes
- Electronics design and production
- Embedded microcontroller interfacing and programming
- System integration and packaging
Project Introduction
This week, the objective is to bring together all the components developed throughout the Fab Academy into a single, functional and integrated system.
My final project is an Interactive Physical Dashboard — Map of Côte d'Ivoire, designed for the UNDP Côte d'Ivoire office. This device visualizes the organization's regional actions in real time. It transforms complex development data into a tangible, light-coded experience: a custom PCB shaped like the map of Côte d'Ivoire, embedded in a laser-cut acrylic silhouette, with RGB LEDs positioned at key regional cities. A TFT screen and push buttons complete the interactive interface.
The integrated system includes:
- An ESP32 microcontroller (Wi-Fi enabled) as the central processing unit
- A custom PCB shaped like the map of Côte d'Ivoire with WS2812B RGB LEDs at key UNDP city positions
- A TFT LCD screen to display real-time clock, date, and region information
- Push buttons (green, black, yellow) for user interaction and mode switching
- A buzzer for audio feedback
- A 3D-printed enclosure housing the electronics and screen
- A laser-cut acrylic map frame to showcase the PCB map
- A web dashboard (via Wi-Fi) for remote data updates and LED control
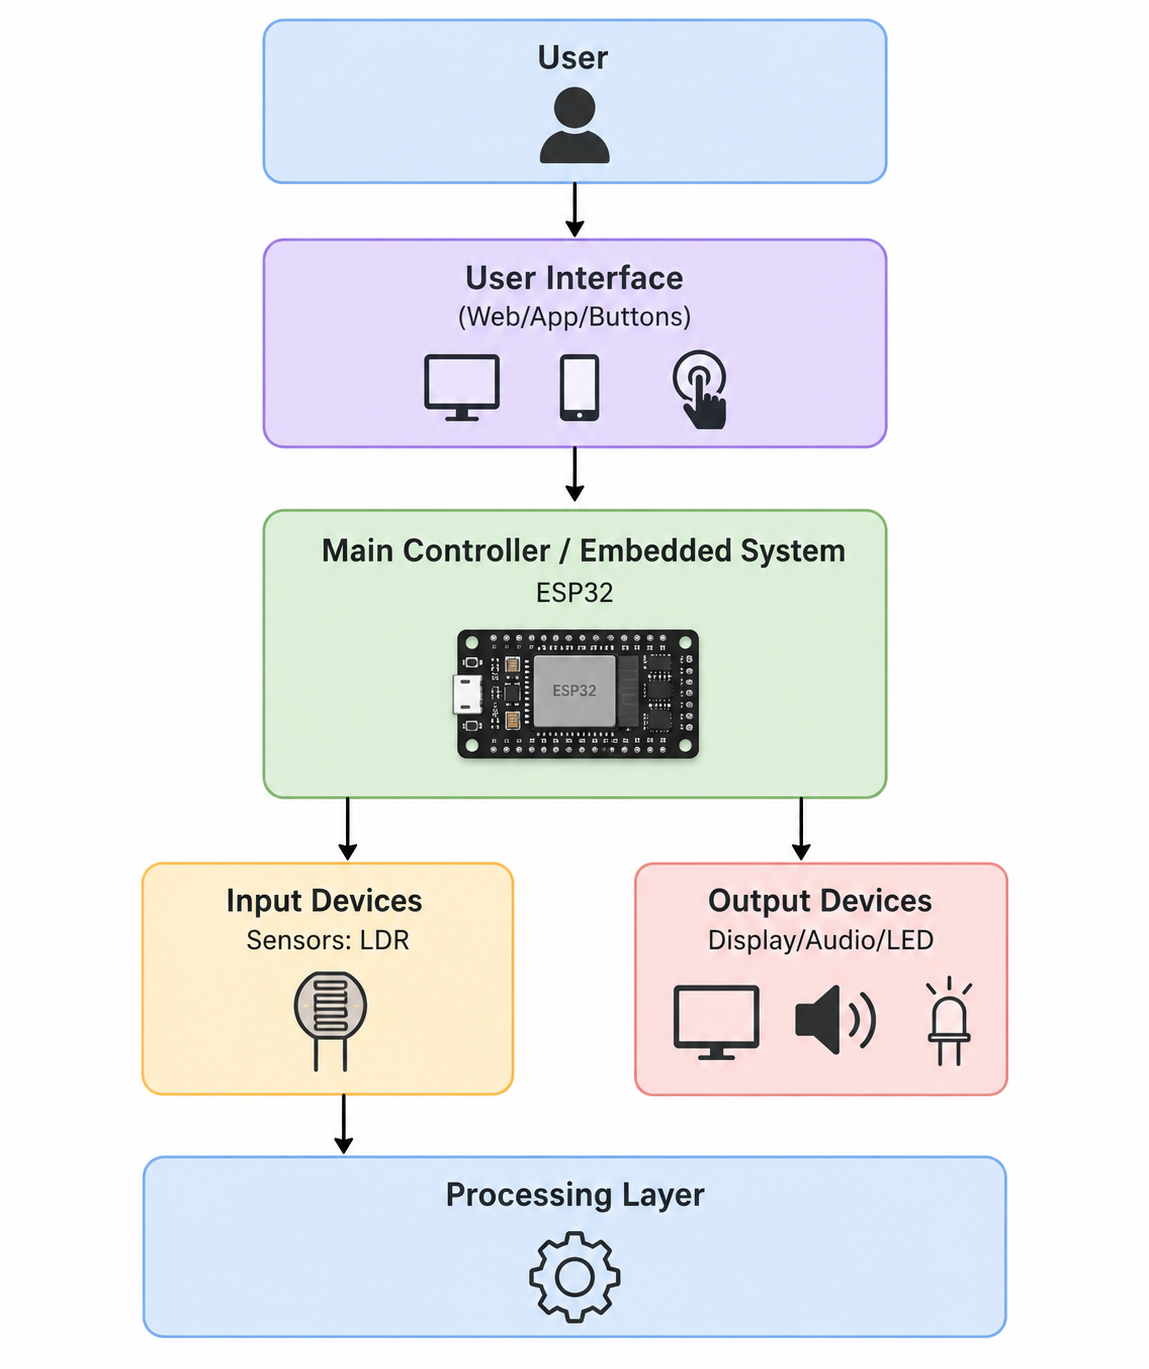
System Architecture
Global Architecture Diagram
┌──────────────────────────────────────────────────────────────┐
│                  WEB DASHBOARD (Wi-Fi / UNDP Data)           │
│          Regional data updates → LED color mapping           │
└─────────────────────────────┬────────────────────────────────┘
                              │ Wi-Fi / WebSocket
┌─────────────────────────────▼────────────────────────────────┐
│                       ESP32 (Main PCB)                       │
│  - Wi-Fi stack    - LED control    - Button handler          │
│  - TFT display    - Real-time clock - Buzzer feedback        │
└───┬──────────┬─────────────┬──────────────────┬─────────────┘
    │          │             │                  │
    ▼          ▼             ▼                  ▼
┌────────┐ ┌────────┐ ┌───────────┐  ┌──────────────────────┐
│  TFT   │ │WS2812B │ │  Buttons  │  │        Buzzer        │
│ Screen │ │ LEDs   │ │ (Green /  │  │   (Audio Feedback)   │
│(Clock /│ │(UNDP   │ │  Black /  │  └──────────────────────┘
│ Date)  │ │ Cities)│ │  Yellow)  │
└────────┘ └────────┘ └───────────┘
System Integration Steps
Step 1 — Electronics Integration
The custom PCB designed during Week 6 (Electronics Design) and produced during Week 8 (Electronics Production) is the heart of the project. It is shaped like the map of Côte d'Ivoire and carries WS2812B RGB LEDs positioned at the coordinates of key UNDP intervention cities.
All components are connected to the ESP32 through the PCB:
| Component | ESP32 GPIO | Protocol |
|---|---|---|
| WS2812B LEDs (data) | GPIO 13 | 1-Wire |
| TFT Screen (SDA/MOSI) | GPIO 21 | SPI |
| TFT Screen (SCL/CLK) | GPIO 22 | SPI |
| Button Green (Power/On-Off) | GPIO 34 | Digital |
| Button Black (Mode) | GPIO 35 | Digital |
| Button Yellow (Select/Next) | GPIO 32 | Digital |
| Buzzer | GPIO 27 | Digital |
The PCB was designed in KiCad (Week 6) and milled on the Roland SRM-20 (Week 8). It integrates:
- A 3.3V voltage regulator (SOT-223) for the ESP32 power supply
- JST connectors for the TFT screen and button harness
- A 330Ω series resistor on the WS2812B data line
- USB connector for firmware flashing

Step 2 — Mechanical Integration (Enclosure & Map Frame)
The mechanical assembly combines two fabrication processes:
3D-Printed Enclosure — designed with SolidWorks (Week 5), printed on the Prusa i4S:
- Houses the ESP32 PCB, TFT screen, and push buttons
- Front panel window for the TFT display
- Recessed openings for the three push buttons
- Top slot holds the PCB map vertically, backlit by the LEDs
Laser-Cut Acrylic Map Frame — drawn in Inkscape (Week 3), cut on the Epilog Laser:
- Translucent acrylic cut in the silhouette of Côte d'Ivoire
- Acts as a light diffuser: when LEDs activate, the acrylic glows and highlights active regions
- City and region labels engraved directly on the acrylic surface
- Snaps onto the top of the 3D-printed enclosure via friction-fit slots
Vinyl-cut label (Week 3): The "PRISCA BROU FAB26" label on the front panel was produced with the vinyl cutter.

Step 3 — Firmware Integration
The embedded firmware was developed using Arduino IDE / PlatformIO (Week 4 — Embedded Programming and Week 11 — Networking and Communications).
The firmware manages all subsystems simultaneously using a non-blocking architecture based on millis() timers.
Firmware Architecture
void loop() {

    // 1. Update real-time clock display on TFT
    updateClock();

    // 2. Check button states and handle mode changes
    handleButtons();

    // 3. Update LED colors based on active mode / Wi-Fi data
    updateLEDs();

    // 4. Handle Wi-Fi and WebSocket communication
    handleWebSocket();

    // 5. Trigger buzzer feedback if needed
    updateBuzzer();
}
LED Regional Mapping Logic
Each WS2812B LED on the PCB corresponds to a UNDP intervention city. The firmware maps city names to LED indices and colors:
- 🟢 Green → Active UNDP project in the region
- 🟠 Orange → Project in planning phase
- 🔴 Red → Region requiring attention / alert
- 🔵 Blue → Completed project
- ⚪ White pulse → Currently selected / highlighted region
When a button is pressed, the system cycles through regions; the selected region's LED pulses white and the TFT displays the city name and project status.
Complete Firmware Code
// undp_civ_dashboard.ino
#include <WiFi.h>
#include <WebSocketsServer.h>
#include <ArduinoJson.h>
#include <Adafruit_NeoPixel.h>
#include <TFT_eSPI.h>

// ========================== NETWORK CONFIGURATION ==========================
const char* SSID_WIFI = "YOUR_SSID";
const char* PASS_WIFI = "YOUR_PASSWORD";

// ========================== PIN CONFIGURATION ==========================
#define PIN_LEDS        13
#define PIN_BTN_GREEN   34
#define PIN_BTN_BLACK   35
#define PIN_BTN_YELLOW  32
#define PIN_BUZZER      27
#define NUM_LEDS        12   // One per key UNDP city

// ========================== GLOBAL OBJECTS ==========================
Adafruit_NeoPixel leds(NUM_LEDS, PIN_LEDS, NEO_GRB + NEO_KHZ800);
TFT_eSPI tft = TFT_eSPI();
WebSocketsServer webSocket = WebSocketsServer(81);

// ========================== CITY / LED MAPPING ==========================
struct City {
    String   name;
    String   status;  // "active", "planning", "alert", "done"
    uint32_t color;
};

City cities[12] = {
    {"Abidjan",      "active",   leds.Color(0,   200, 0)  },
    {"Yamoussoukro", "active",   leds.Color(0,   200, 0)  },
    {"Bouaké",       "planning", leds.Color(255, 140, 0)  },
    {"Daloa",        "active",   leds.Color(0,   200, 0)  },
    {"Korhogo",      "alert",    leds.Color(200, 0,   0)  },
    {"Man",          "planning", leds.Color(255, 140, 0)  },
    {"San-Pédro",    "done",     leds.Color(0,   0,   200)},
    {"Abengourou",   "active",   leds.Color(0,   200, 0)  },
    {"Bondoukou",    "alert",    leds.Color(200, 0,   0)  },
    {"Odienné",      "planning", leds.Color(255, 140, 0)  },
    {"Gagnoa",       "done",     leds.Color(0,   0,   200)},
    {"Divo",         "active",   leds.Color(0,   200, 0)  }
};

int  selectedCity = 0;
unsigned long lastBlink = 0;
bool blinkState = false;

// ========================== DISPLAY ==========================
void showClock() {
    tft.fillRect(0, 0, 240, 60, TFT_BLACK);
    tft.setTextColor(TFT_WHITE, TFT_BLACK);
    tft.setTextSize(3);
    tft.setCursor(10, 10);
    tft.print("18:15:34");
    tft.setTextSize(2);
    tft.setCursor(10, 42);
    tft.print("2026-05-07");
}

void showCity(int idx) {
    tft.fillRect(0, 70, 240, 100, TFT_BLACK);
    tft.setTextColor(TFT_CYAN, TFT_BLACK);
    tft.setTextSize(2);
    tft.setCursor(10, 75);
    tft.print(cities[idx].name);
    tft.setTextColor(TFT_YELLOW, TFT_BLACK);
    tft.setTextSize(1);
    tft.setCursor(10, 100);
    tft.print("Status: " + cities[idx].status);
}

// ========================== LEDS ==========================
void updateLEDs() {
    for (int i = 0; i < NUM_LEDS; i++) {
        if (i == selectedCity) {
            if (millis() - lastBlink > 400) {
                blinkState = !blinkState;
                lastBlink  = millis();
            }
            leds.setPixelColor(i, blinkState ? leds.Color(255, 255, 255) : 0);
        } else {
            leds.setPixelColor(i, cities[i].color);
        }
    }
    leds.show();
}

// ========================== BUTTONS ==========================
void handleButtons() {
    if (digitalRead(PIN_BTN_YELLOW) == LOW) {
        selectedCity = (selectedCity + 1) % NUM_LEDS;
        showCity(selectedCity);
        tone(PIN_BUZZER, 1000, 100);
        delay(200);
    }
    if (digitalRead(PIN_BTN_BLACK) == LOW) {
        selectedCity = (selectedCity - 1 + NUM_LEDS) % NUM_LEDS;
        showCity(selectedCity);
        tone(PIN_BUZZER, 800, 100);
        delay(200);
    }
}

// ========================== WEBSOCKET ==========================
void onWebSocketEvent(uint8_t num, WStype_t type,
                      uint8_t* payload, size_t length) {
    if (type == WStype_TEXT) {
        StaticJsonDocument<256> doc;
        deserializeJson(doc, payload);
        int    ledIdx = doc["led"];
        String stat   = doc["status"].as<String>();
        if (stat == "active")   cities[ledIdx].color = leds.Color(0,   200, 0);
        if (stat == "planning") cities[ledIdx].color = leds.Color(255, 140, 0);
        if (stat == "alert")    cities[ledIdx].color = leds.Color(200, 0,   0);
        if (stat == "done")     cities[ledIdx].color = leds.Color(0,   0, 200);
        cities[ledIdx].status = stat;
        webSocket.broadcastTXT("ok");
    }
}

// ========================== SETUP ==========================
void setup() {
    Serial.begin(115200);

    pinMode(PIN_BTN_GREEN,  INPUT_PULLUP);
    pinMode(PIN_BTN_BLACK,  INPUT_PULLUP);
    pinMode(PIN_BTN_YELLOW, INPUT_PULLUP);
    pinMode(PIN_BUZZER,     OUTPUT);

    leds.begin();
    leds.setBrightness(80);
    leds.show();

    tft.init();
    tft.setRotation(1);
    tft.fillScreen(TFT_BLACK);
    showClock();
    showCity(0);

    WiFi.begin(SSID_WIFI, PASS_WIFI);
    while (WiFi.status() != WL_CONNECTED) { delay(500); }
    Serial.println("[WIFI] IP: " + WiFi.localIP().toString());

    webSocket.begin();
    webSocket.onEvent(onWebSocketEvent);
}

// ========================== LOOP ==========================
void loop() {
    webSocket.loop();
    showClock();
    handleButtons();
    updateLEDs();
}
Step 4 — Software Integration (Web Dashboard)
The web management dashboard was built upon skills acquired during Week 14 (Interface and Application Programming).
It communicates with the ESP32 via WebSocket on port 81 and allows the UNDP team to:
- View the map of Côte d'Ivoire with live LED status colors for each region
- Update the status of any city/region (active, planning, alert, done) remotely
- See the list of UNDP projects per region with a click on the map
- Export a PDF status report of all regions
The interface is served as a single HTML file hosted on the ESP32 (SPIFFS), requiring no external server — the device is fully autonomous on the local Wi-Fi network.
Step 5 — System Testing
Once all modules were assembled and the firmware uploaded, a series of tests were performed to validate the complete system:
Functional Tests
| Test | Description | Result |
|---|---|---|
| LED startup sequence | All LEDs light up on boot in sequence | Full startup animation |
| Button navigation | Yellow / Black buttons cycle through cities | Cities cycle correctly, LED pulses white |
| TFT clock display | Time and date shown on screen | Clock displayed correctly (18:15:34 / 2026-05-07) |
| TFT city info display | Selected city name and status shown | City name and status update in real time |
| WebSocket status update | Send JSON via dashboard to update LED color | LED color changes instantly |
| Buzzer feedback | Button press triggers short beep | Audio feedback confirmed |
| Wi-Fi reconnection | Disconnect/reconnect router during operation | System reconnects automatically |
| Acrylic light diffusion | LEDs illuminate through the acrylic map frame | Regions glow clearly through the acrylic |
Bill of Materials (BOM)
| Component | Reference | Quantity | Origin | Price ($) |
|---|---|---|---|---|
| ESP32-WROOM-32D | U1 | 1 | Digikey | $4.08 |
| WS2812B RGB LED SMD (NeoPixel) | LED1–LED12 | 12 | Amazon | $0.30 x12 |
| TFT LCD Screen 2.4" (ILI9341) | TFT1 | 1 | Amazon | $8.00 |
| Push Button Green 12mm | BTN1 | 1 | Digikey | $0.80 |
| Push Button Black 12mm | BTN2 | 1 | Digikey | $0.80 |
| Push Button Yellow 12mm | BTN3 | 1 | Digikey | $0.80 |
| Buzzer 5V | BZ1 | 1 | Digikey | $0.61 |
| Voltage Regulator 3.3V SOT-223 | U2 | 1 | Digikey | $0.63 |
| PCB FR4 custom (map shape) | PCB1 | 1 | FabLab | $3.50 |
| 3D Printed Enclosure (PLA black) | — | 1 | FabLab | $4.50 |
| Laser-cut acrylic map (clear) | — | 1 | FabLab | $3.00 |
| Vinyl label "PRISCA BROU FAB26" | — | 1 | FabLab | $0.50 |
| Jumper wires & JST connectors | — | — | FabLab | $2.00 |
| TOTAL | ~$33.82 |
Fabrication Processes Summary
| Process | Tool Used | Week |
|---|---|---|
| 2D Map Design | Inkscape | Week 2 |
| Vinyl Label Cutting | Vinyl cutter | Week 3 |
| Acrylic Map Laser Cutting | Epilog Laser | Week 3 |
| Embedded Programming (ESP32) | Arduino IDE | Week 4 |
| 3D Enclosure Design | SolidWorks | Week 5 |
| 3D Printing (enclosure) | Prusa i4S | Week 5 |
| PCB Schematic & Layout Design | KiCad | Week 6 |
| PCB Milling | Roland SRM-20 | Week 8 |
| Network & WebSocket | PlatformIO | Week 11 |
| Web Dashboard Interface | HTML / JS / WebSocket | Week 14 |
Result
After full integration, the system operates as expected:
- The Côte d'Ivoire PCB map glows through the laser-cut acrylic frame, with each LED representing a UNDP city in the appropriate status color.
- The TFT screen displays the real-time clock and the name/status of the currently selected region.
- The three buttons allow physical navigation between cities and interaction modes.
- The web dashboard allows the UNDP team to update regional project statuses remotely via Wi-Fi, with LED colors updating instantly.
- The system is fully autonomous: it hosts its own web interface on the local Wi-Fi network with no external server required.
This project turns complex development data into a tangible, light-coded experience — making UNDP's impact across Côte d'Ivoire visible, interactive, and inspiring.
