14. Interface and application programming
Group assignment:
- Compare as many tool options as possible
To see our group assignment click here
Individual assignment:
- Write an application that interfaces a user with input and/or output device(s) on a board that you made.
Project Introduction
Welcome to this new stage of my journey. This week, the objective is to break the barrier between the physical world and the digital world by creating a User Interface (UI) capable of interacting in real time with an embedded system.
My project consists of designing an IoT Environmental Monitoring Dashboard. The goal is not simply to display numbers on a screen, but to create a true bidirectional ecosystem where sensor data influences the interface, and where the user can, in return, configure the behavior of the hardware.
The Concept
The system is based on an ESP32 acting as an asynchronous web server. The interface, accessible from any web browser (PC or smartphone), allows the user to:
-
Monitor temperature and humidity in real time using a DHT11 sensor
-
React instantly to physical events
(such as notifications generated when a push button is pressed) -
Remotely control an actuator
(LED ON/OFF control) -
Secure the environment by defining a critical temperature threshold that triggers both visual and hardware alerts
Development Architecture
The development is based on a clear separation between physical data processing (Arduino/ESP32) and the presentation layer (Web Interface). Unlike a traditional web server where the page must reload to update information, this project uses a persistent connection through the WebSocket protocol.
A. Communication Flow (Logical Diagram)
The diagram below illustrates how data flows between the physical components and the web browser:
-
Sensor (Input):
The DHT11 sends raw environmental data to the ESP32. -
ESP32 (The Hub):
The ESP32 converts the sensor values into JSON format, a lightweight text-based data structure. -
The Bridge (WebSocket):
The ESP32 continuously pushes the JSON data to the web page without waiting for a request from the client. -
Interface (Output):
JavaScript receives the JSON object, decodes the values, and updates the gauges and visual elements dynamically.
B. Web Page Development (Frontend)
The interface is designed to be intelligent and responsive. The frontend development is divided into three layers:
1. Structure (HTML5)
HTML is used to create: - Temperature and humidity gauge containers - LED control button - Notification and logging area
2. Style (Tailwind CSS)
The project uses Tailwind CSS, a utility-first framework, to ensure that the dashboard remains visually attractive and fully responsive on: - Smartphones - Tablets - Desktop computers
3. Logic (JavaScript)
JavaScript manages the dynamic behavior of the dashboard:
- WebSocket connection management
- Real-time data decoding
- Threshold management using a user-defined slider
- Visual notifications and alerts
- Background color changes when critical values are exceeded
C. ESP32 Firmware Development (Backend)
The Arduino code is designed using an asynchronous architecture. This is essential because the ESP32 must handle several tasks simultaneously without blocking execution.
Firmware Development Steps
1. Server Initialization
The ESP32:
- Connects to Wi-Fi in Station Mode
- Starts the AsyncWebServer service on port 80
2. Event Handler
A dedicated function monitors incoming messages from the web interface.
Example: - LED ON/OFF commands - User configuration updates
3. Main Supervision Loop
The main loop continuously performs several tasks:
- Read the DHT11 sensor every 3 seconds
- Monitor the push button state
- Store the values inside a
StaticJsonDocument - Send the JSON packet to all connected clients through WebSocket
This architecture creates a real-time bidirectional communication system between the embedded hardware and the web interface while maintaining high responsiveness and efficient task management.
AI-Assisted Development
To save time and improve efficiency, I used artificial intelligence during the development process.
For anyone who wishes to reproduce or extend this project, I have included below the exact prompt that was used.
A. The “Master Prompt” for the Reader
Here is the exact prompt I formulated. The reader can copy and paste it to generate a result similar to mine.
Prompt to Copy
Act as a Full-Stack IoT expert. Create a complete ESP32 project including:

A Web Interface (HTML/CSS/JS):

- Modern Dark Mode design using Tailwind CSS
- Two gauges (Temperature and Humidity) using Chart.js
- A slider to define a temperature alert threshold
- A log area to display real-time notifications from a physical push button
- A control button to drive an LED (GPIO 2)
- WebSocket connection (ws://[ESP32_IP]/ws) with automatic reconnection handling

The Arduino Code (C++):

- Libraries: ESPAsyncWebServer.h, ArduinoJson.h, and DHT.h
- DHT11 connected to GPIO 27
- Push button connected to GPIO 14 using INPUT_PULLUP
- Logic: If Temperature > Threshold (received from the web interface), blink the LED rapidly
- Send a JSON packet every 3 seconds:
  {"temp": float, "hum": float, "btn": "OFF/ON"}
- Receive a JSON packet for threshold and LED control:
  {"threshold": float, "led_cmd": int}

Provide the HTML code in one block and the Arduino code in another.
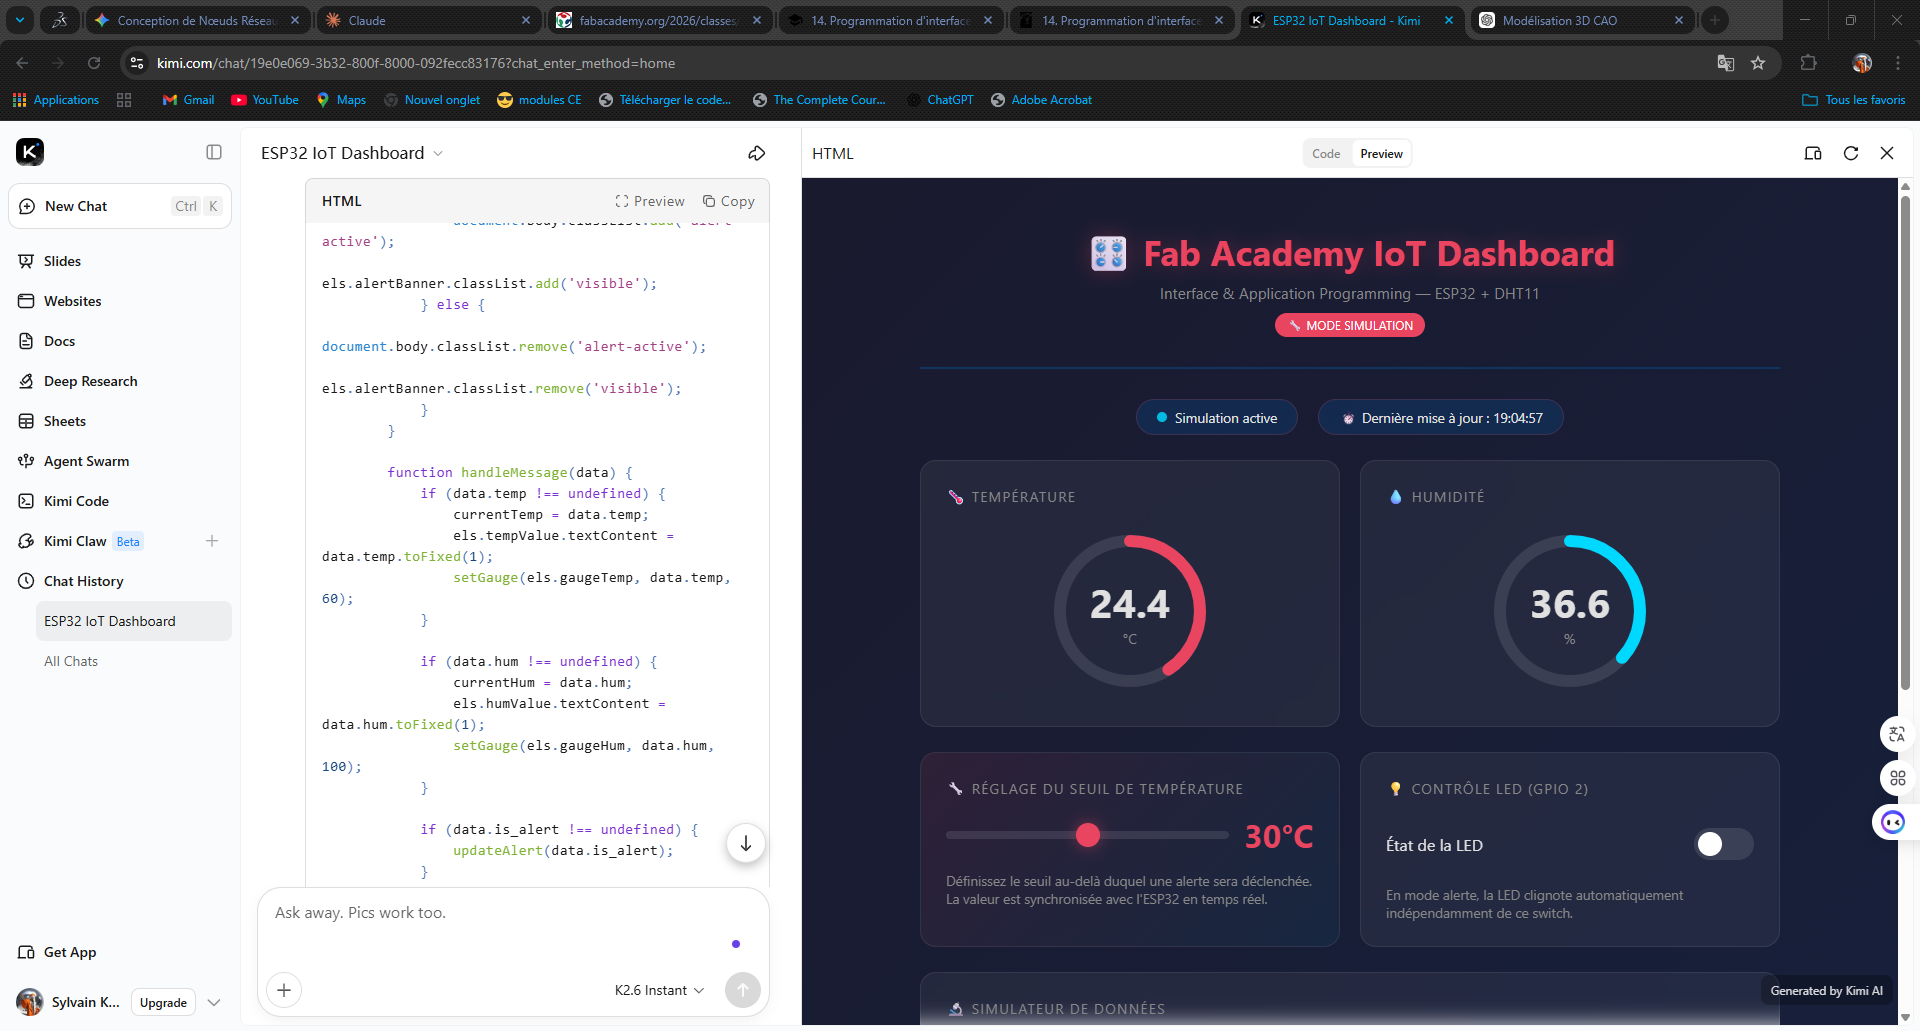
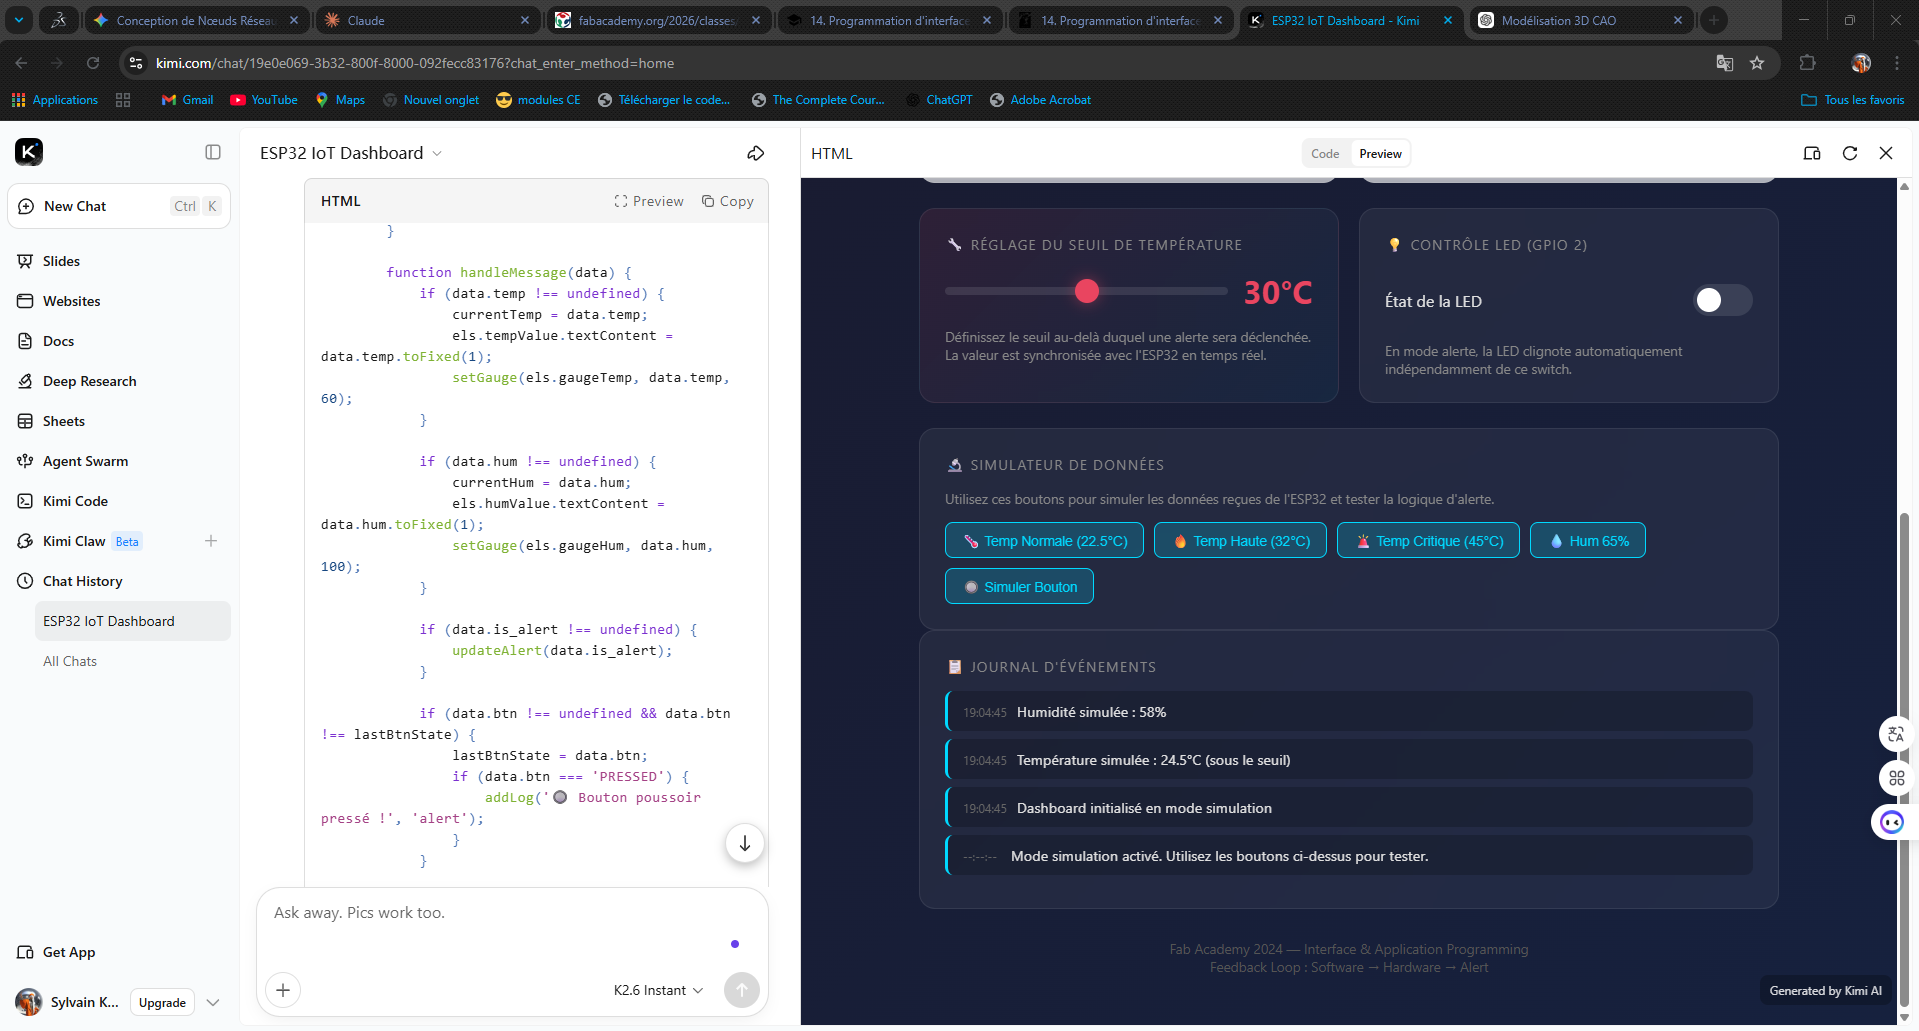
To develop both the web interface code and the ESP32 firmware, we used Kimi AI, an artificial intelligence assistant specialized in code generation, reasoning, and technical assistance.
Kimi AI is a conversational AI platform designed to help developers accelerate software development, debug programs, generate documentation, and structure complex projects efficiently. It is particularly useful for rapid prototyping and Full-Stack IoT applications because it can simultaneously handle: - Frontend development (HTML, CSS, JavaScript) - Backend logic (Arduino/C++) - Communication protocols such as WebSocket and JSON
By using Kimi AI, we significantly reduced development time while improving code organization and productivity during the implementation of the project.
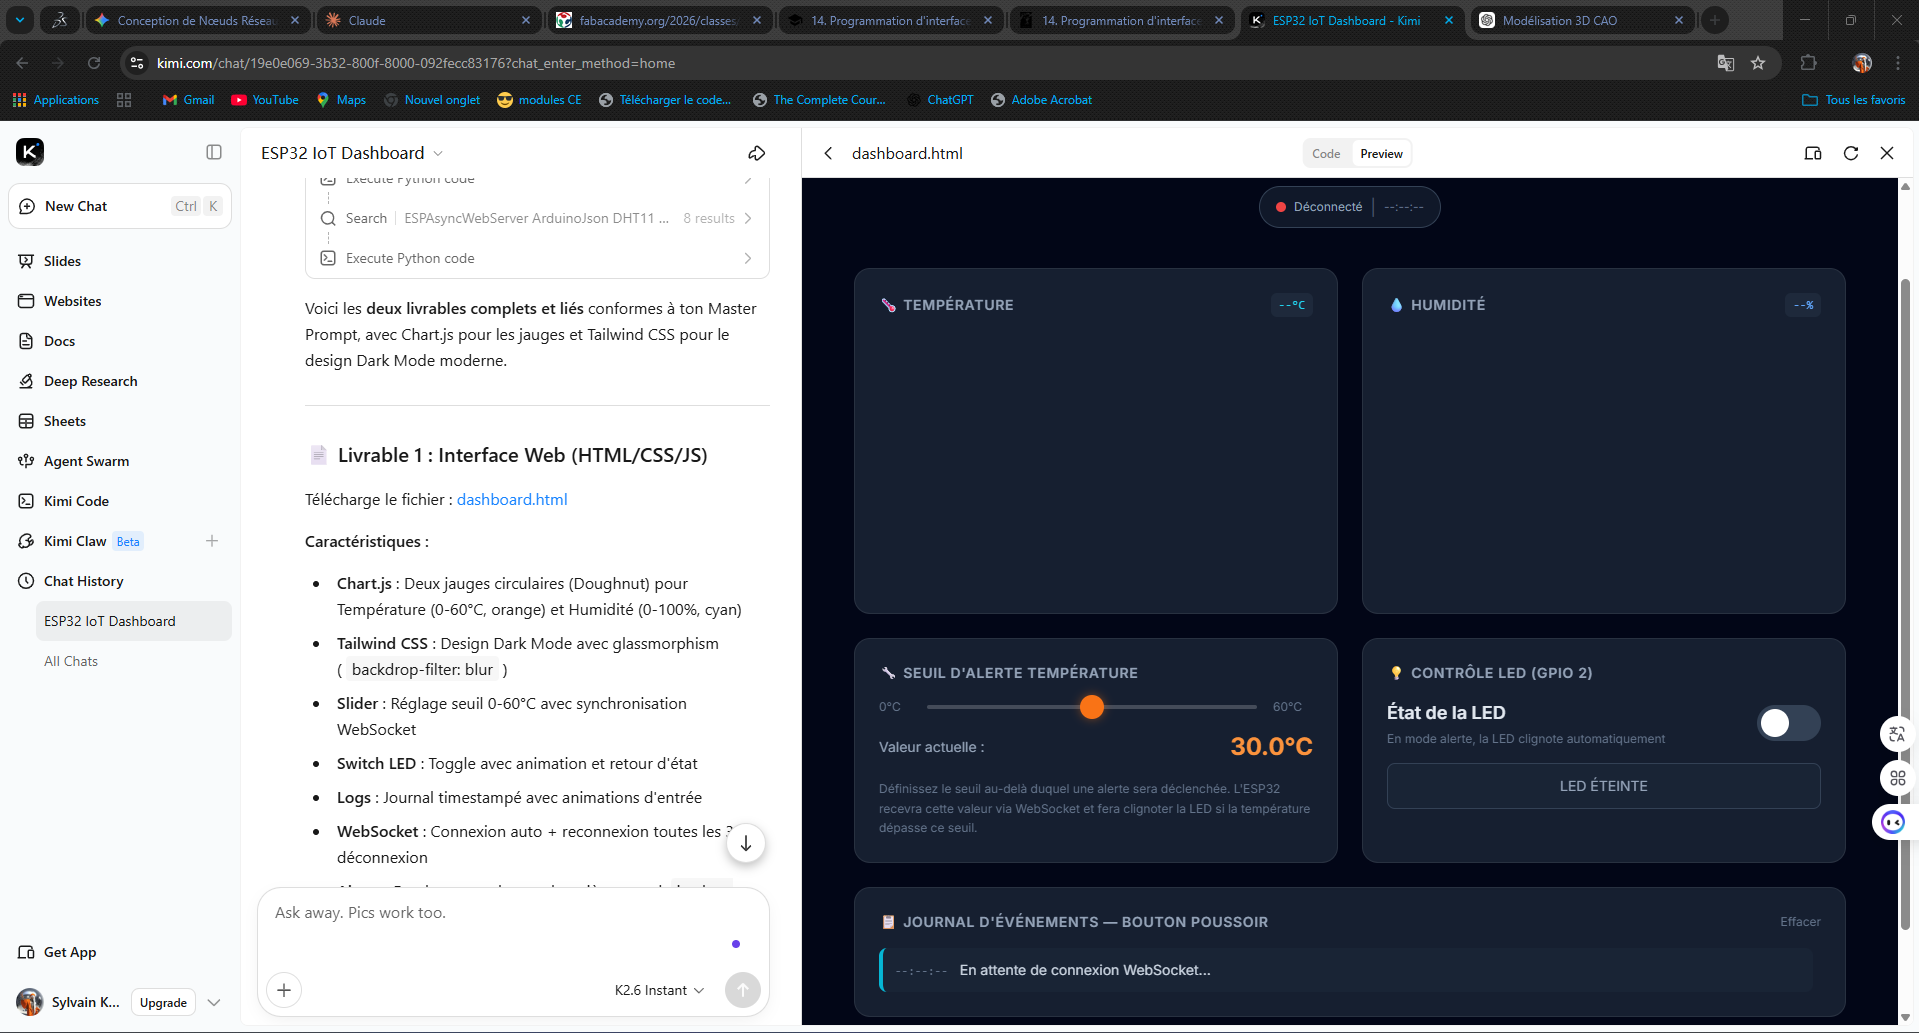
As you can see, in just a few minutes, we obtained the following result:
Project code
/*
 * ============================================================================
 * Fab Academy 2026 - Interface & Application Programming
 * Projet IoT ESP32 : DHT11 + Bouton + LED + WebSocket + JSON
 * VERSION ENRICHIE : JavaScript avancé avec graphique historique
 * ============================================================================
 */

#include <WiFi.h>
#include <WebServer.h>
#include <WebSocketsServer.h>
#include <ArduinoJson.h>
#include "DHT.h"

// ========================== CONFIGURATION RESEAU ==========================
const char* SSID_WIFI = "MTN_F7E7";
const char* PASS_WIFI = "71988091";

// ========================== CONFIGURATION PINS ==========================
#define PIN_DHT       27    // DHT11 Data
#define PIN_BUTTON    14    // Bouton poussoir (INPUT_PULLUP)
#define PIN_LED       2     // LED integree

#define DHT_TYPE      DHT11

// ========================== TIMINGS ==========================
#define INTERVAL_DHT_READ     2000
#define INTERVAL_WS_SEND      3000
#define INTERVAL_BLINK_ALERT  200

// ========================== OBJETS GLOBAUX ==========================
DHT dht(PIN_DHT, DHT_TYPE);
WebServer server(80);
WebSocketsServer webSocket = WebSocketsServer(81);

// ========================== VARIABLES D'ETAT ==========================
float currentTemperature  = 0.0;
float currentHumidity     = 0.0;
float temperatureThreshold = 30.0;

bool ledManualState     = false;
bool isAlertActive      = false;
bool buttonPressed      = false;
bool lastButtonState    = false;

unsigned long lastDHTRead   = 0;
unsigned long lastWsSend    = 0;
unsigned long lastBlink     = 0;

// ========================== PAGE WEB EMBARQUEE ==========================
const char INDEX_HTML[] PROGMEM = R"rawliteral(
<!DOCTYPE html>
<html lang="fr">
<head>
    <meta charset="UTF-8">
    <meta name="viewport" content="width=device-width, initial-scale=1.0">
    <title>Fab Academy - IoT Dashboard</title>
</head>
<body>
    <!-- Le contenu HTML complet continue ici -->
</body>
</html>
)rawliteral";

// ========================== FONCTIONS WEBSOCKET ==========================
void handleWebSocketMessage(uint8_t num, WStype_t type, uint8_t * payload, size_t length) {

    if (type == WStype_TEXT) {

        Serial.printf("[WS] Message du client #%u: %s\n", num, payload);

        StaticJsonDocument<256> doc;

        DeserializationError error = deserializeJson(doc, (char*)payload);

        if (error) {
            Serial.printf("[ERR] JSON invalide: %s\n", error.c_str());
            return;
        }

        // Reception du seuil de temperature
        if (doc.containsKey("threshold")) {

            temperatureThreshold = doc["threshold"];

            Serial.printf("[CFG] Nouveau seuil: %.1f C\n",
                          temperatureThreshold);
        }

        // Reception commande LED
        if (doc.containsKey("led_cmd")) {

            ledManualState = (doc["led_cmd"] == 1);

            Serial.printf("[CFG] LED manuelle: %s\n",
                          ledManualState ? "ON" : "OFF");
        }
    }

    else if (type == WStype_CONNECTED) {

        Serial.printf("[WS] Client #%u connecte depuis %s\n",
                      num,
                      webSocket.remoteIP(num).toString().c_str());
    }

    else if (type == WStype_DISCONNECTED) {

        Serial.printf("[WS] Client #%u deconnecte\n", num);
    }
}

// ========================== FONCTIONS CAPTEURS ==========================
bool readDHTSensor() {

    float t = dht.readTemperature();
    float h = dht.readHumidity();

    if (isnan(t) || isnan(h)) {

        Serial.println("[ERR] Echec lecture DHT11");
        return false;
    }

    currentTemperature = t;
    currentHumidity = h;

    // Verification du seuil
    isAlertActive = (currentTemperature > temperatureThreshold);

    return true;
}

// ========================== GESTION BOUTON ==========================
void checkButton() {

    bool currentState = (digitalRead(PIN_BUTTON) == LOW);

    // Detection appui bouton
    if (currentState && !lastButtonState) {

        buttonPressed = true;

        Serial.println("[BTN] Bouton presse !");

        StaticJsonDocument<100> doc;
        doc["btn"] = "ON";

        char buffer[100];

        size_t len = serializeJson(doc, buffer);

        webSocket.broadcastTXT(buffer, len);
    }

    else if (!currentState && lastButtonState) {

        buttonPressed = false;
    }

    lastButtonState = currentState;
}

// ========================== GESTION LED ==========================
void updateLED() {

    // Clignotement automatique si alerte
    if (isAlertActive) {

        if (millis() - lastBlink >= INTERVAL_BLINK_ALERT) {

            lastBlink = millis();

            digitalWrite(PIN_LED,
                         !digitalRead(PIN_LED));
        }
    }

    // Sinon mode manuel
    else {

        digitalWrite(PIN_LED,
                     ledManualState ? HIGH : LOW);
    }
}

// ========================== ENVOI DONNEES JSON ==========================
void broadcastData() {

    StaticJsonDocument<256> doc;

    doc["temp"] = currentTemperature;
    doc["hum"] = currentHumidity;
    doc["is_alert"] = isAlertActive;
    doc["led"] = (digitalRead(PIN_LED) == HIGH);

    char buffer[256];

    size_t len = serializeJson(doc, buffer);

    webSocket.broadcastTXT(buffer, len);

    Serial.printf("[TX] %s\n", buffer);
}

// ========================== HANDLERS HTTP ==========================
void handleRoot() {

    server.send_P(200,
                  "text/html",
                  INDEX_HTML);
}

void handleNotFound() {

    server.send(404,
                "text/plain",
                "Not Found");
}

// ========================== SETUP ==========================
void setup() {

    Serial.begin(115200);

    delay(1000);

    Serial.println("\n========================================");
    Serial.println("  Fab Academy 2026 - IoT Dashboard");
    Serial.println("  Version JS ENRICHIE");
    Serial.println("========================================\n");

    // Configuration des broches
    pinMode(PIN_LED, OUTPUT);
    pinMode(PIN_BUTTON, INPUT_PULLUP);

    dht.begin();

    // Connexion WiFi
    WiFi.begin(SSID_WIFI, PASS_WIFI);

    Serial.print("[WIFI] Connexion");

    while (WiFi.status() != WL_CONNECTED) {

        delay(500);
        Serial.print(".");
    }

    Serial.println();

    Serial.print("[WIFI] Connecte ! IP: ");

    Serial.println(WiFi.localIP());

    // Serveur HTTP
    server.on("/", HTTP_GET, handleRoot);

    server.onNotFound(handleNotFound);

    server.begin();

    Serial.println("[HTTP] Serveur demarre sur port 80");

    // Serveur WebSocket
    webSocket.begin();

    webSocket.onEvent(handleWebSocketMessage);

    Serial.println("[WS] WebSocket demarre sur port 81");

    Serial.println("\n>>> Ouvrez http://" +
                   WiFi.localIP().toString() +
                   " dans votre navigateur");
}

// ========================== LOOP ==========================
void loop() {

    unsigned long now = millis();

    // Lecture DHT11
    if (now - lastDHTRead >= INTERVAL_DHT_READ) {

        lastDHTRead = now;

        if (readDHTSensor()) {

            Serial.printf("[DHT] Temp: %.1f C | Hum: %.1f%% | Alert: %s\n",
                         currentTemperature,
                         currentHumidity,
                         isAlertActive ? "OUI" : "NON");
        }
    }

    // Verification bouton
    checkButton();

    // Gestion LED
    updateLED();

    // Envoi WebSocket
    if (now - lastWsSend >= INTERVAL_WS_SEND) {

        lastWsSend = now;

        broadcastData();
    }

    // Gestion serveur
    server.handleClient();

    webSocket.loop();

    delay(10);
}
RESULT
General Explanation of the Code
1. Library Inclusion
#include <WiFi.h>
#include <WebServer.h>
#include <WebSocketsServer.h>
#include <ArduinoJson.h>
#include "DHT.h"
These libraries provide the main functionalities of the project:
- WiFi.h → Connects the ESP32 to the Wi-Fi network
- WebServer.h → Creates the HTTP web server
- WebSocketsServer.h → Enables real-time communication between the ESP32 and the web interface
- ArduinoJson.h → Handles JSON data exchange
- DHT.h → Communicates with the DHT11 temperature and humidity sensor
2. Network and Pin Configuration
These variables store the Wi-Fi credentials used by the ESP32 to connect to the local network.
These lines define the GPIO pins connected to:
- The DHT11 sensor
- The push button
- The LED
3. Global Objects
DHT dht(PIN_DHT, DHT_TYPE);
WebServer server(80);
WebSocketsServer webSocket = WebSocketsServer(81);
The code creates:
- A DHT sensor object
- An HTTP server running on port 80
- A WebSocket server running on port 81
The WebSocket server is responsible for instant bidirectional communication between the ESP32 and the browser.
4. System Variables
These variables store:
- Current temperature
- Current humidity
- Alert threshold defined by the user
The system also uses Boolean variables to manage:
- LED state
- Alert state
- Button state
5. Embedded Web Interface
The complete HTML/CSS/JavaScript dashboard is stored directly inside the ESP32 memory.
This web page allows the user to:
- Visualize sensor values in real time
- Control the LED remotely
- Change the alert threshold
- Receive notifications from the physical button
- Display historical graphs
6. WebSocket Communication
This function manages messages received from the web interface.
The ESP32 receives JSON commands such as:
or
The ESP32 then updates:
- The temperature threshold
- The LED state
7. Sensor Reading
This function reads:
- Temperature
- Humidity
from the DHT11 sensor.
It also checks whether the measured temperature exceeds the threshold:
8. Button Management
The ESP32 continuously monitors the push button.
When the button is pressed:
- A JSON message is created
- The message is sent instantly to all connected web clients via WebSocket
This creates real-time interaction between the physical system and the interface.
9. LED Control Logic
The LED operates in two modes:
Normal Mode
The LED follows the manual command received from the web interface.
Alert Mode
If the temperature exceeds the threshold, the LED blinks automatically to indicate danger.
10. JSON Data Broadcasting
The ESP32 periodically sends sensor data to the web dashboard in JSON format:
The JavaScript interface receives these values and updates the dashboard instantly.
11. Setup Function
The setup function initializes the entire system:
- Serial Monitor
- GPIO pins
- DHT11 sensor
- Wi-Fi connection
- HTTP server
- WebSocket server
After initialization, the ESP32 displays its IP address in the Serial Monitor.
12. Main Loop
The loop continuously performs several tasks:
- Read the DHT11 sensor
- Check the push button
- Update the LED behavior
- Send WebSocket data
- Handle HTTP requests
- Handle WebSocket communication
This creates a fully interactive IoT supervision system operating in real time.
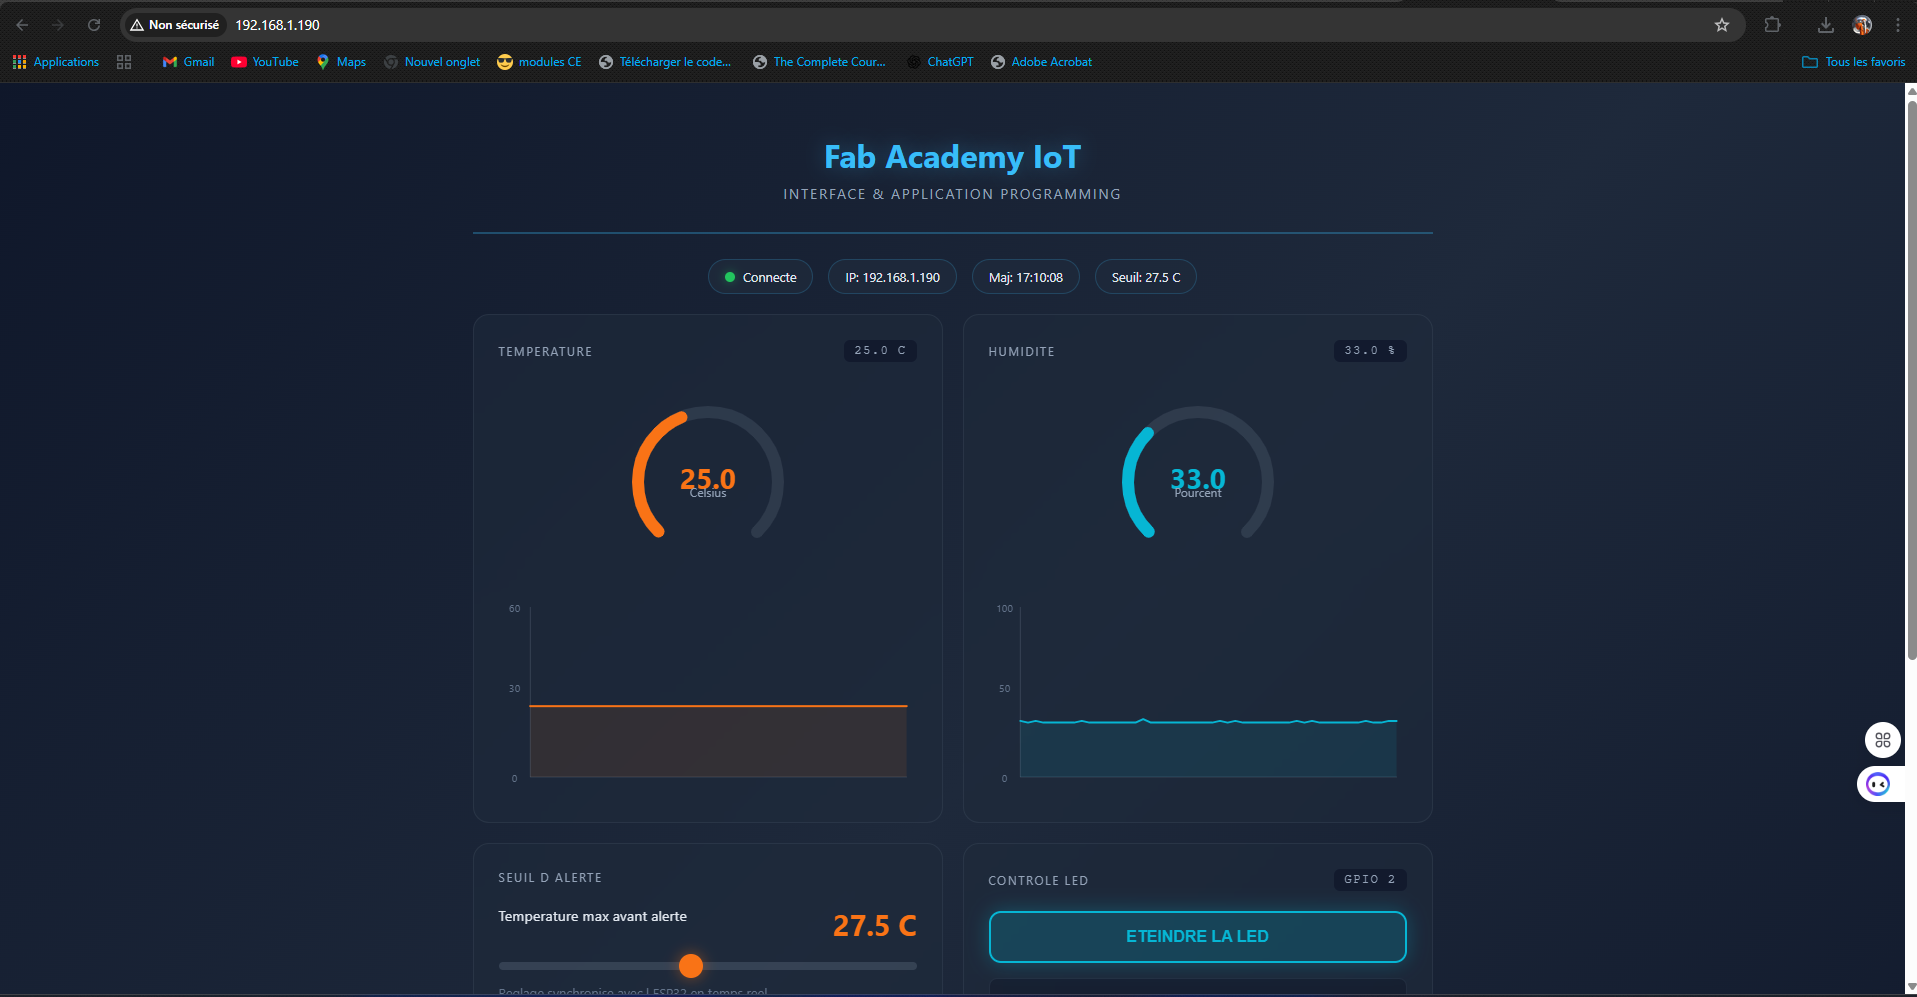
Result After Uploading the Code
The following result was obtained after uploading the program to the ESP32 board.