Final Project
My final project is Maker Assistant, a desktop status feedback device designed for AI programming workflows. It can convert the execution status of Claude Code, Codex CLI, or similar AI Agent tools in the terminal into lights, voice, and screen animations, allowing users to know whether the current task is running, waiting for confirmation, encountering an error, or has completed without constantly staring at the terminal.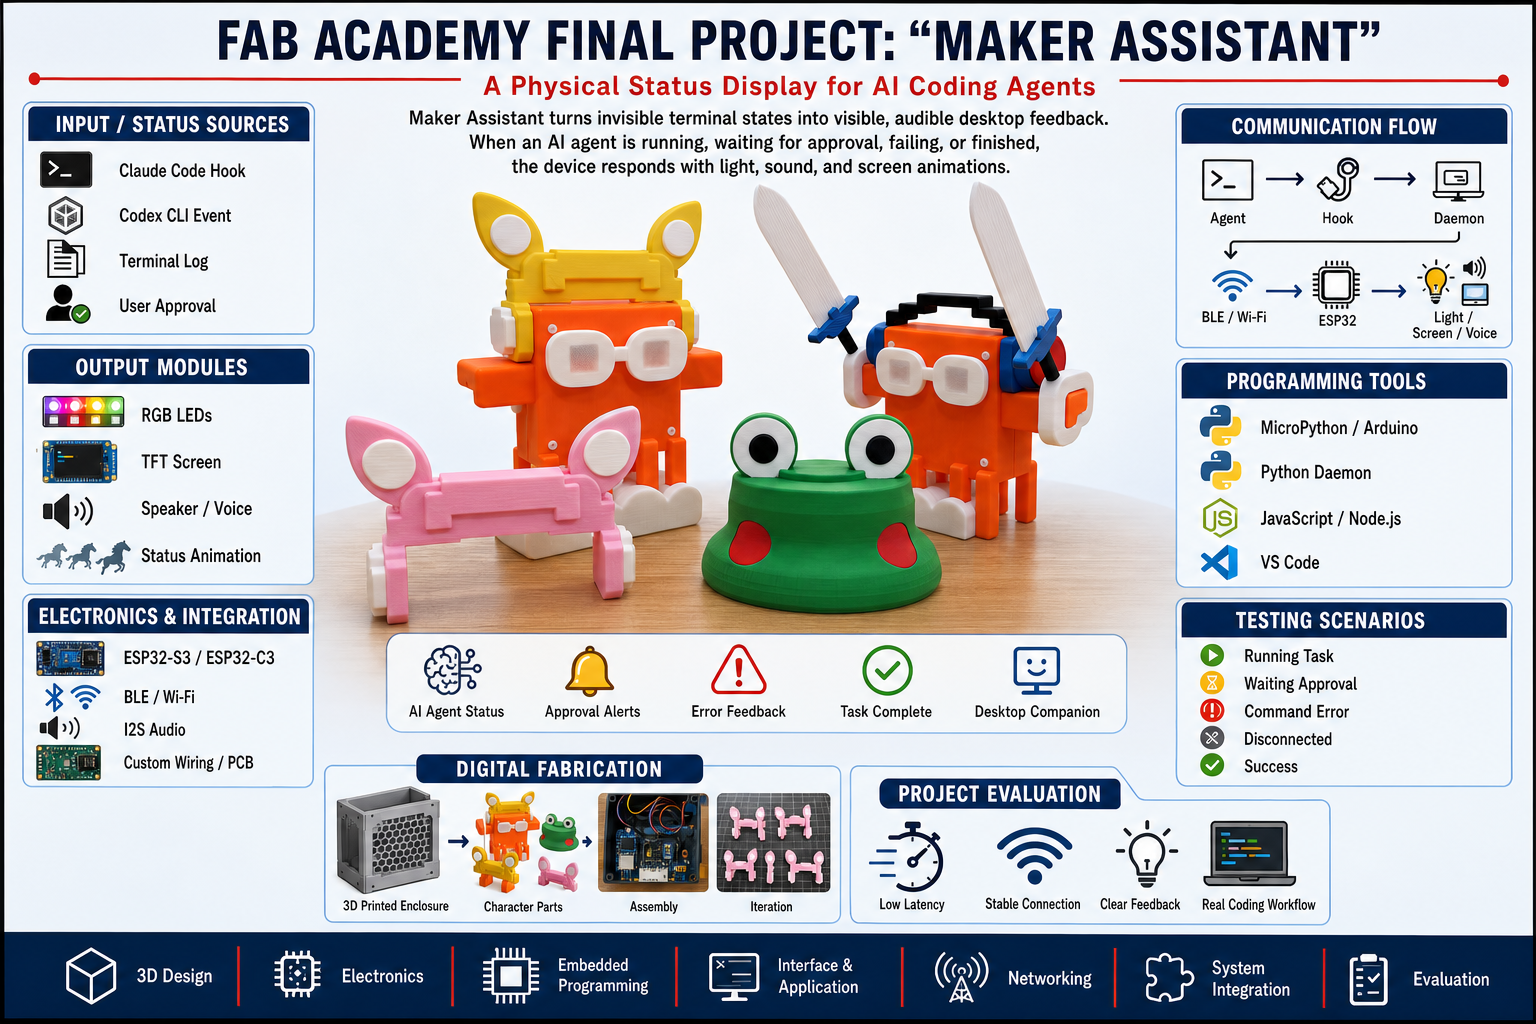
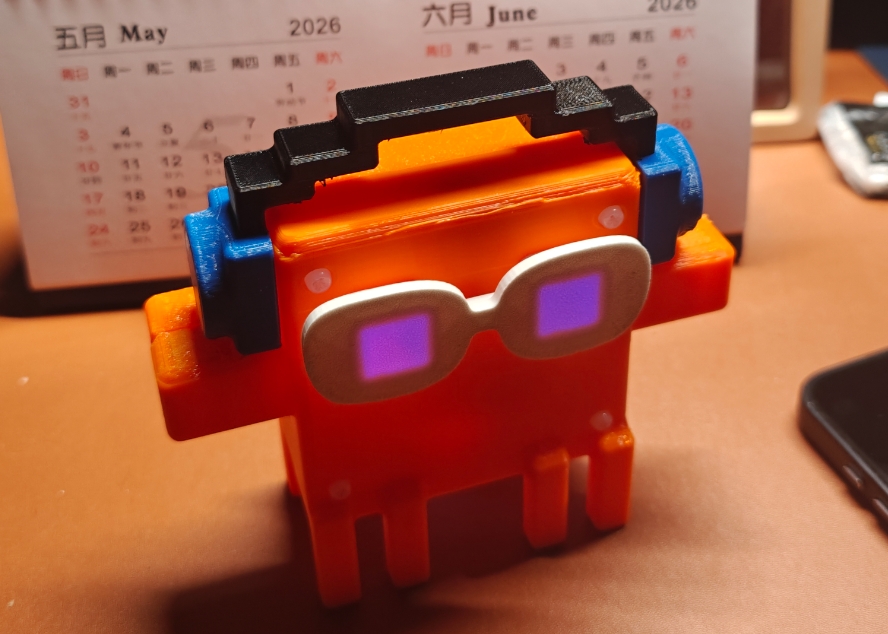
The core idea of this project is to transform the invisible and easily overlooked Agent states in software into feedback that can be seen, heard, and perceived in the physical world.
1. Background
When using AI programming tools, I discovered a very practical problem: Agents often execute long-running tasks in the terminal, such as modifying multiple files, installing dependencies, running tests, waiting for approval, or handling errors. If users keep staring at the terminal, their work rhythm will be interrupted; if they leave their seats, they may miss critical prompts.
Especially in tools like Claude Code and Codex CLI, many states are hidden in the terminal text. For example:
-
Agent is running a command;
-
Agent is waiting for user approval;
-
Command execution failed;
-
The test did not pass;
-
The task has been completed;
-
Multiple projects or multiple terminals running simultaneously make it difficult to quickly determine which task needs to be processed.
These questions made me wonder: could we create a small desktop device specifically designed to display the operating status of AI Agents?
This is the starting point of Maker Assistant.
2. What is Maker Assistant?
Maker Assistant is a desktop hardware device that can receive the status of AI Agents sent from the computer and provide feedback to users in different forms.
It can have two hardware forms:
- Alarm Clock Edition Clock: Uses ESP32-C3, mainly expressing status through WS2812 lighting and voice announcements.
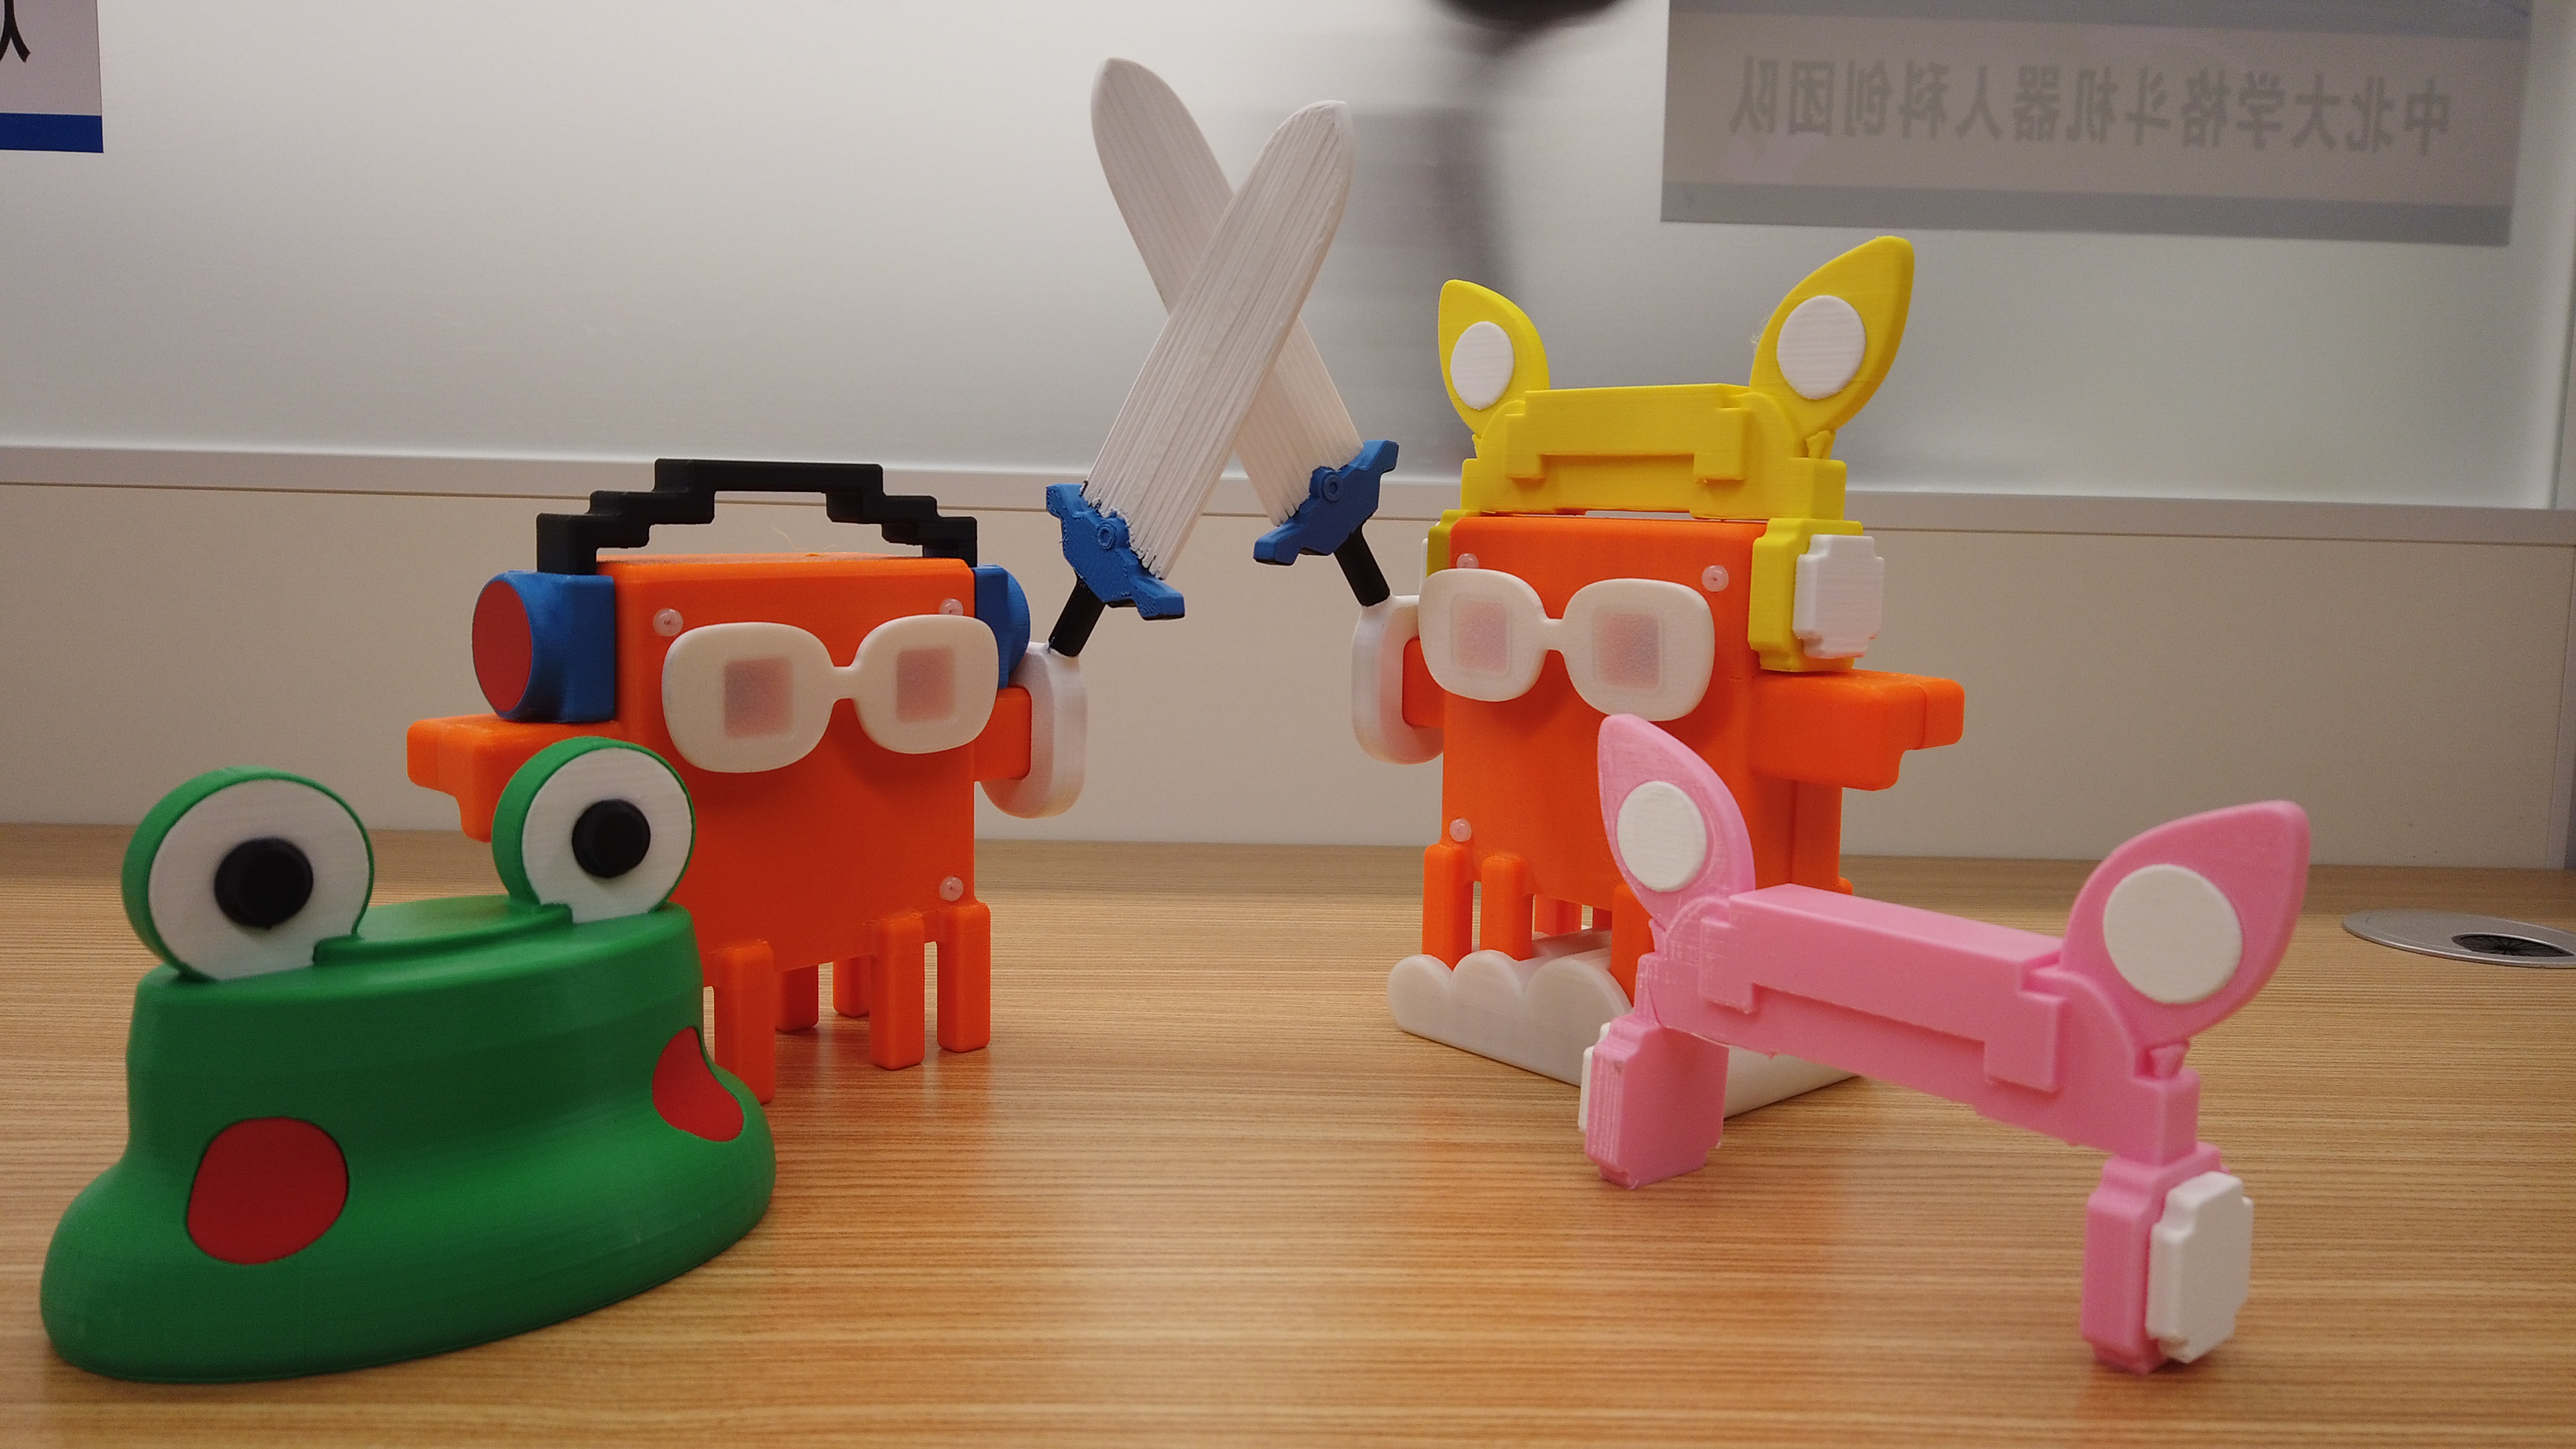
- Panel Panel: Uses ESP32-S3, with a 2.4-inch TFT screen, capable of displaying animated characters, status text, historical status, and broadcasting voice through a speaker.
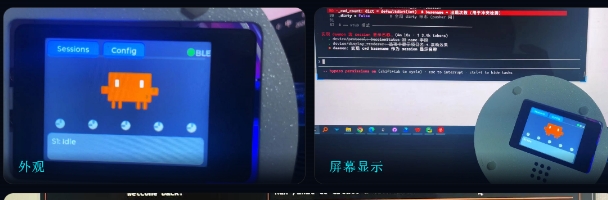
The logic behind the two forms is consistent: the computer captures the Agent state, processes it through the daemon process, and then sends it to the ESP32 device via BLE or other communication methods, and the device then renders the state into lighting, screen animations, and voice.
3.Previous Work and Fab Academy Scope
Before Fab Academy, I had already conducted some exploration on the visualization hardware for the state of AI programming, and also organized project introductions, demonstration pages, and code repositories. These preliminary works helped me verify the requirement: the running state of AI Agents does require more intuitive external feedback.
However, the final project of Fab Academy cannot simply be a showcase of an existing project. Therefore, in this final project, I will reorganize Maker Assistant into a complete digital manufacturing project and focus on documenting the following:
-
How do I define use cases and problems;
-
How do I design the device form factor and enclosure?
-
How do I choose electronic components such as main controllers, screens, lights, speakers, etc.;
-
How do I design or organize circuit connections;
-
How do I write ESP32 firmware;
-
How can I send the computer state to the hardware device?
-
How do I manufacture, assemble, and test the final device;
-
Which parts are based on existing foundations, and which parts were completed or remade in Fab Academy.
This section is very important because it can clearly explain the project source and my Scope of Work, avoiding directly submitting old projects as the final assignment.
4.Project Goal
The goal of this project is not to replace Claude Code or Codex, but to create an external state-aware device.
I hope the final device can achieve the following:
-
When the AI Agent is executing a task, the device displays a "Running" status.
-
When the Agent is waiting for user confirmation, the device alerts the user with obvious lights, animations, or voice.
-
When a task fails or a command reports an error, the device indicates an error status.
-
When the task is completed, the device indicates the completion status.
-
Users can perceive the operating status of the Agent without constantly looking at the terminal.
5.System Architecture
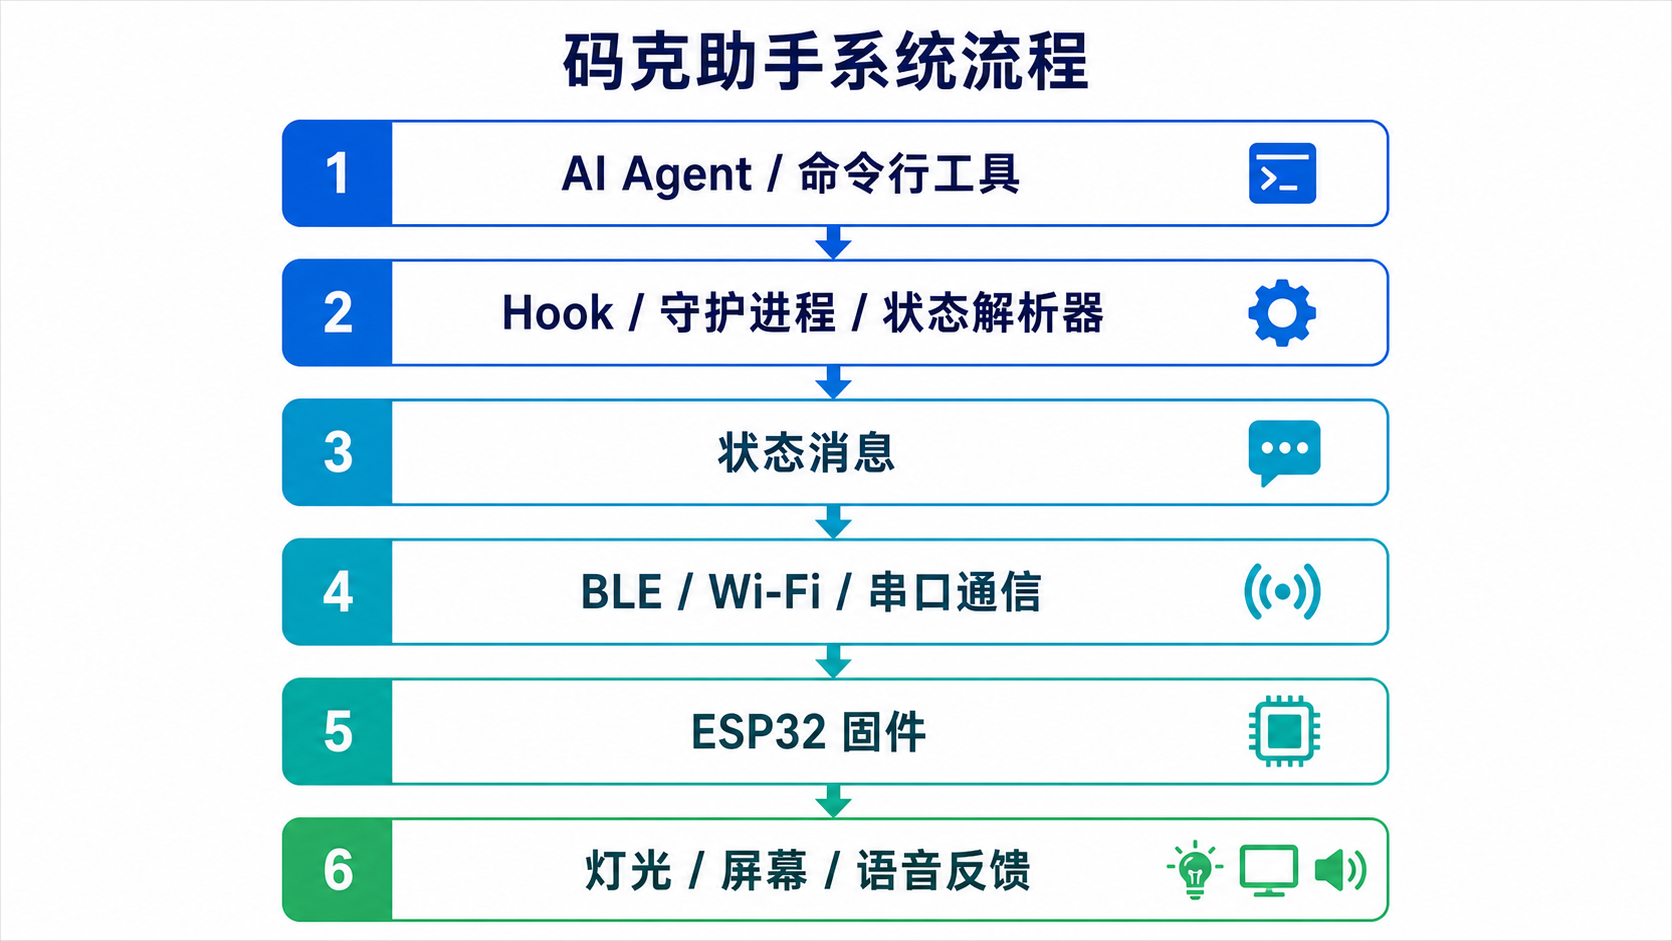
The entire system can be divided into four layers:
-
Agent Status Source:Claude Code, Codex CLI, or similar tools will generate status changes during runtime, such as executing commands, waiting for approval, completing tasks, or encountering errors.
-
Computer-side state capture and forwarding: The computer side captures these states through Hook, logs, daemon processes, or intermediate scripts, and organizes them into a unified data format.
-
Communication Layer: The computer sends the status to the ESP32 device. In the current project, BLE can be used, and it can also be changed to Wi-Fi, WebSocket, or serial communication based on subsequent implementation.
-
Hardware Feedback Layer: After the ESP32 device receives the status, it controls the lighting, screen animation, and voice broadcast.
can be represented by the following process:
6.Interaction Design
The key focus of the interaction of Maker Assistant is not complex operations, but rather "status at a glance".
The states are divided into the following categories:
| Status | Meaning | Feedback Method |
|---|---|---|
| Idle | Idle | Soft lighting or standby animation |
| Running | is being executed | Breathing light, running animation |
| Waiting Approval | Waiting for approval | Visible blinking, voice alert |
| Success | Task completed | Success sound effect, green light, completion animation |
| Error | An error occurred | Red light, error beep |
| Disconnected | Connection Disconnected | Gray state, disconnection prompt |
The purpose of this mapping is to allow users to quickly determine the status through color, rhythm, and sound without having to read the terminal text.
7.Final Project Questions
7.1 What does it do?
The Maker Assistant can display the running status of AI programming tools. It converts the Agent status in the terminal into lights, screen animations, and voice reminders on physical devices, making it easier for users to perceive task progress, approval requests, errors, and completion status.
7.2 Who has done what beforehand?
Before this project, many relevant technologies and tools already existed:
-
AI programming tools such as Claude Code, Codex CLI, etc.;
-
ESP32 Development Board;
-
Communication methods such as BLE, Wi-Fi, WebSocket, etc.;
-
Embedded development tools such as MicroPython, Arduino, LVGL, etc.;
-
Hardware modules such as WS2812 LED strips, TFT screens, and I2S power amplifiers;
-
Various desktop reminder devices and status lights.
My job is not to invent these basic technologies, but to combine them into a desktop state feedback device tailored for the AI Agent programming scenario, and complete the integration of hardware form, embedded programs, state protocols, computer-side forwarding, and interactive feedback.
7.3 What did you design?
The content I designed or organized includes:
-
Overall usage scenario of the device;
-
State feedback logic;
-
Appearance and structure of desktop devices;
-
Screen interface or light feedback method;
-
Electronic component connection solution;
-
ESP32 end firmware;
-
Computer-side status forwarding process;
-
Mapping relationship from Agent state to hardware feedback;
-
Final display and testing process.
7.4 What materials and components were used?
This project finally takes ** Clock Alarm Edition ** as the main manufacturable version, while retaining the Panel / D-Shell Panel Edition as an extended form of the same system. The Clock version has a simpler structure and is more suitable for completing the closed loop of design, manufacturing, soldering, assembly, and testing in a Fab Lab; the Panel / D-Shell version is used to demonstrate how the same software architecture can be extended to screen animation and multi-session display.
The main materials and components are as follows:
| Category | Component or Material | Usage |
|---|---|---|
| Master Control | ESP32-C3 Development Board | Clock version master controller, responsible for BLE communication, lighting control, and I2S audio output |
| Extended Master | ESP32-S3 Development Board / D-Shell Board | Panel / D-Shell version main controller, responsible for screen, touch, light strip, and audio |
| Lighting | WS2812B RGB LED | Displays idle, in progress, awaiting approval, completed, and error statuses |
| Audio | MAX98357A I2S Digital Power Amplifier Module | Drive the speaker to play TTS voice prompts |
| Sound Output | Small 4Ω / 3W Speaker | Play voices for startup, connection, disconnection, completion, error, waiting for approval, etc. |
| Vibration Feedback | Micro Vibration Motor / Vibration Sensor | Additional haptic feedback and tap trigger for the Clock version |
| Display Screen | 2.4-inch ST7789 TFT Screen | Role animation and status display for Panel / D-Shell version |
| Touch | CST816S / GT911 Touch Module | Human-computer interaction for Panel / D-Shell version |
| Structure | PLA / PETG 3D Printing Materials | Print shells, character bodies, glasses, ears, hats, and accessories |
| circuit | Self-made PCB / Pin Header / Dupont Wire | Connect modules such as ESP32, LED, power amplifier, speaker, and vibration motor |
| Fixed | M2 / M3 Screws, Nuts, Heat-set Copper Nuts | Fix the housing, PCB, speaker, and decorative parts |
| Software | MicroPython、Python、Claude Code Hooks | Device firmware, computer-side daemon process, and status capture |
| Tool | SolidWorks、Bambu Studio、嘉立创 EDA、Photoshop、VS Code | Modeling, slicing, circuit design, 2D design, and code development |
7.5 Where did they come from?
The sources of project materials are as follows:
| Materials / Components | Source | Description |
|---|---|---|
| ESP32-C3 / ESP32-S3 Development Board | Taobao | Suitable for rapid development and verification, convenient for domestic procurement, and abundant in materials |
| WS2812B RGB LED | Lichuang Mall | Common programmable RGB LED beads, suitable for status lights |
| MAX98357A I2S Power Amplifier Module | Lichuang Mall | Common digital power amplifier module, suitable for direct audio output from ESP32 |
| Speaker, vibration motor, pin header, DuPont wire | Taobao | Low-cost universal parts, easy for quick replacement |
| PCB Prototype | JLC | The schematic diagram and PCB were designed in JLCPCB EDA, and the prototyping was completed by JLCPCB |
| SMD/THT Components | Lichuang Mall | General components such as resistors, capacitors, interfaces, and pin headers |
| PLA / PETG Printing Consumables | Taobao | For the printing of Tuozhu P1S shells and accessories |
| Screws, Nuts, Hot Melt Copper Nuts | Taobao | For assembly and maintainable structures |
| TTS Voice Resources | Doubao TTS Generation | Use a script to generate an 8kHz mono PCM file and burn it to the device |
7.6 How much did they cost?
Below is a rough cost estimate for a single prototype of the Maker Assistant Alarm Clock Edition. The prices are estimated based on common domestic platforms such as Taobao, LCSC Mall, and JLCPCB's small-batch prototyping services, and will actually vary with the quantity purchased, shipping fees, and inventory.
| Name | Quantity | Unit Price Estimation | Total Price Estimation | Source | ReMakers |
|---|---|---|---|---|---|
| ESP32-C3 Development Board | 1 | ¥18 | ¥18 | Taobao / Lichuang Mall | Clock Master Control |
| WS2812B RGB LED | 2 | ¥1 | ¥2 | Taobao / Lichuang Mall | Status Light |
| MAX98357A I2S Power Amplifier Module | 1 | ¥8 | ¥8 | Taobao / LCSC | Voice Output |
| Small Speaker | 1 | ¥6 | ¥6 | Taobao | Around 4Ω / 3W |
| vibration motor | 1 | ¥3 | ¥3 | Taobao | Optional haptic feedback |
| Vibration Sensor | 1 | ¥2 | ¥2 | Taobao | Optional tapping input |
| USB Cable / Interface / Pin Header | 1 batch | ¥8 | ¥8 | Taobao / Lab Inventory | Power Supply and Connection |
| PCB Prototype | 1 | ¥20 | ¥20 | JLCPCB | Estimated by small batch averaging |
| Resistors and Capacitors, Pin Headers, Connectors | 1 batch | ¥8 | ¥8 | Lichuang Mall | PCB Periphery |
| PLA / PETG Printing Materials | Approximately 120g | ¥0.15/g | ¥18 | Fab Lab / Taobao | Shells and Accessories |
| Screws, nuts, hot-melt copper nuts | 1 batch | ¥5 | ¥5 | Taobao / Lab Inventory | Assembly Fixation |
| Total | — | — | Approximately ¥98 | — | Estimation of a Single Clock Prototype |
7.7 What parts and systems were made?
This project consists of the following parts:
-
Shell structure;
-
Electronic circuit;
-
ESP32 Firmware;
-
Status Protocol;
-
Computer-side daemon process;
-
BLE or other communication modules;
-
Lighting feedback system;
-
Screen Display System;
-
Voice reminder system;
-
Final Assembly and Test System.
7.8 What processes were used?
The project will involve the following Fab Academy technical processes:
-
3D Modeling;
-
3D Printing;
-
2D Design;
-
Laser cutting or sticker production;
-
Electronic Design;
-
PCB fabrication or soldering;
-
Embedded programming;
-
Input/Output Devices;
-
Communication and Network;
-
Interface and Application Programming;
-
System Integration;
-
Testing and Debugging.
7.9 What questions were answered?
This project attempts to answer the following questions:
-
Can the terminal state of an AI Agent be effectively expressed by physical devices?
-
Which type of feedback, lighting, screen, or voice, is most suitable for different states?
-
Can users understand the task status without looking at the terminal?
-
Is the latency of BLE or other communication methods low enough?
-
Can the device still remain clear under multi-state and multi-task conditions?
-
Can this device truly reduce the burden on users of frequently checking the terminal?
7.10 What worked? What did not?
Effective part:
-
*Hooking into the device's status link can work. *Claude Code's
UserPromptSubmit,PreToolUse,PostToolUse,Notification,Stop,StopFailureand other events can enter the computer-side daemon through the hook bridge and then be pushed to the ESP32 via BLE. -
**The status light is very intuitive. ** The mapping of blue for idle, cyan for working, yellow for waiting for approval, green for completed, and red for error is easy to understand and does not require reading the screen text.
-
Voice reminders are most valuable for waiting for approval. When Claude Code pauses at approval or selection prompts, users can easily miss terminal information; the voice prompt "Please check the terminal" is more effective than just a light.
-
The manufacturing difficulty of the Clock version is appropriate. The combination of ESP32-C3, dual WS2812B, MAX98357A, and speaker is simple enough to serve as reproducible hardware.
-
**The software architecture is extensible. ** The same set of state protocols can support three types of hardware, namely Clock, Panel, and D-Shell, indicating that the system is not a single demonstration but has extensibility.
-
**The GUI burning tool lowers the deployment threshold. **
Claude_Assistant_Setup.exe/setup_toolcan select hardware, generate voice, burn firmware, and pair devices.
Parts that have not been fully resolved or need improvement:
-
BLE connections still require stronger exception handling. BLE is suitable for short-range desktop connections, but in the Windows Bluetooth environment, issues such as pairing failures, disconnections, or device occupation occasionally occur.
-
Multiple session information will be compressed. The device can aggregate multiple Claude Code sessions, but the Clock version only has lighting and voice capabilities and cannot display the full project name and history list.
-
**Voice frequency needs to be controlled. ** If every tool event is announced, it will disturb the user; therefore, the minimum/maximum intervals for announcements during operation and idle periods are set in the firmware.
-
**The enclosure can still be further optimized. ** Multi-color 3D printing has a great decorative effect, but assembly tolerances, screw positions, speaker openings, and wire space still need iteration.
-
Panel / D-Shell has more features but higher manufacturing complexity. When the screen, touch, light strip, and audio work simultaneously, they require higher stability for the PCB, housing, and firmware.
7.11 How was it evaluated?
I evaluate the project from five aspects: functionality, latency, stability, readability, and real-world usage scenarios.
| Test Item | Test Method | Result |
|---|---|---|
| State Capture | Trigger the prompt, tool use, notification, stop, and failure events of Claude Code | The daemon can recognize events and convert them into states |
| state protocol | Usetests/test_protocol.py,device/tests/test_protocol.py, and simulated payload for testing |
The status message can be parsed into the device-side SessionStatus |
| finite-state machine | Use tests/test_daemon_state.py to test the state transitions of W/P/C/E/I |
Error priority, waiting for approval priority, and completion celebration state meet expectations |
| BLE Push | The daemon process pushes the wire status to the device at a frequency of approximately 5Hz | State changes can be promptly displayed on desktop devices |
| Light feedback | Simulate idle, working, pending, completed, error, and disconnected respectively | Colors and blinking rhythms can distinguish the main states |
| Voice Feedback | 播放 startup、connect、disconnect、done、error、pending、working PCM 文件 | The speaker can broadcast normally, and waiting for approval and completion prompts are the most useful |
| Disconnection Recovery | Close the daemon process or reconnect the device after disconnecting it | The device can return to the disconnection/reconnection process, but optimization is still needed in the Windows BLE environment |
| Real Scenario | Run a long task with Claude Code and leave the terminal window | The device can reduce the number of times of frequently switching back to the terminal to check the status |
The evaluation conclusion is that Maker Assistant has already demonstrated that "the state of AI Agent can be perceived through physical devices". The most mature version currently is the Clock version, which has achieved status lights, voice reminders, and BLE communication with low hardware complexity; the Panel / D-Shell version showcases the direction of future expansion towards screen animations and multi-session panels.
7.12 What are the implications?
This project demonstrates that AI programming tools do not necessarily exist only on screens and in terminals. As AI Agents work longer hours and tasks become increasingly automated, users need new ways to understand what the Agents are doing.
MaKe Assistant brings the Agent state into the physical space, turning AI tools into a perceptible desktop companion. It can also be extended to other scenarios, such as:
-
CI/CD Build Status Reminder;
-
Server task monitoring;
-
Multi-Agent Status Dashboard;
-
Laboratory equipment operation reminder;
-
Remote task completion reminder.
8.Fabrication
8.1 3D Design
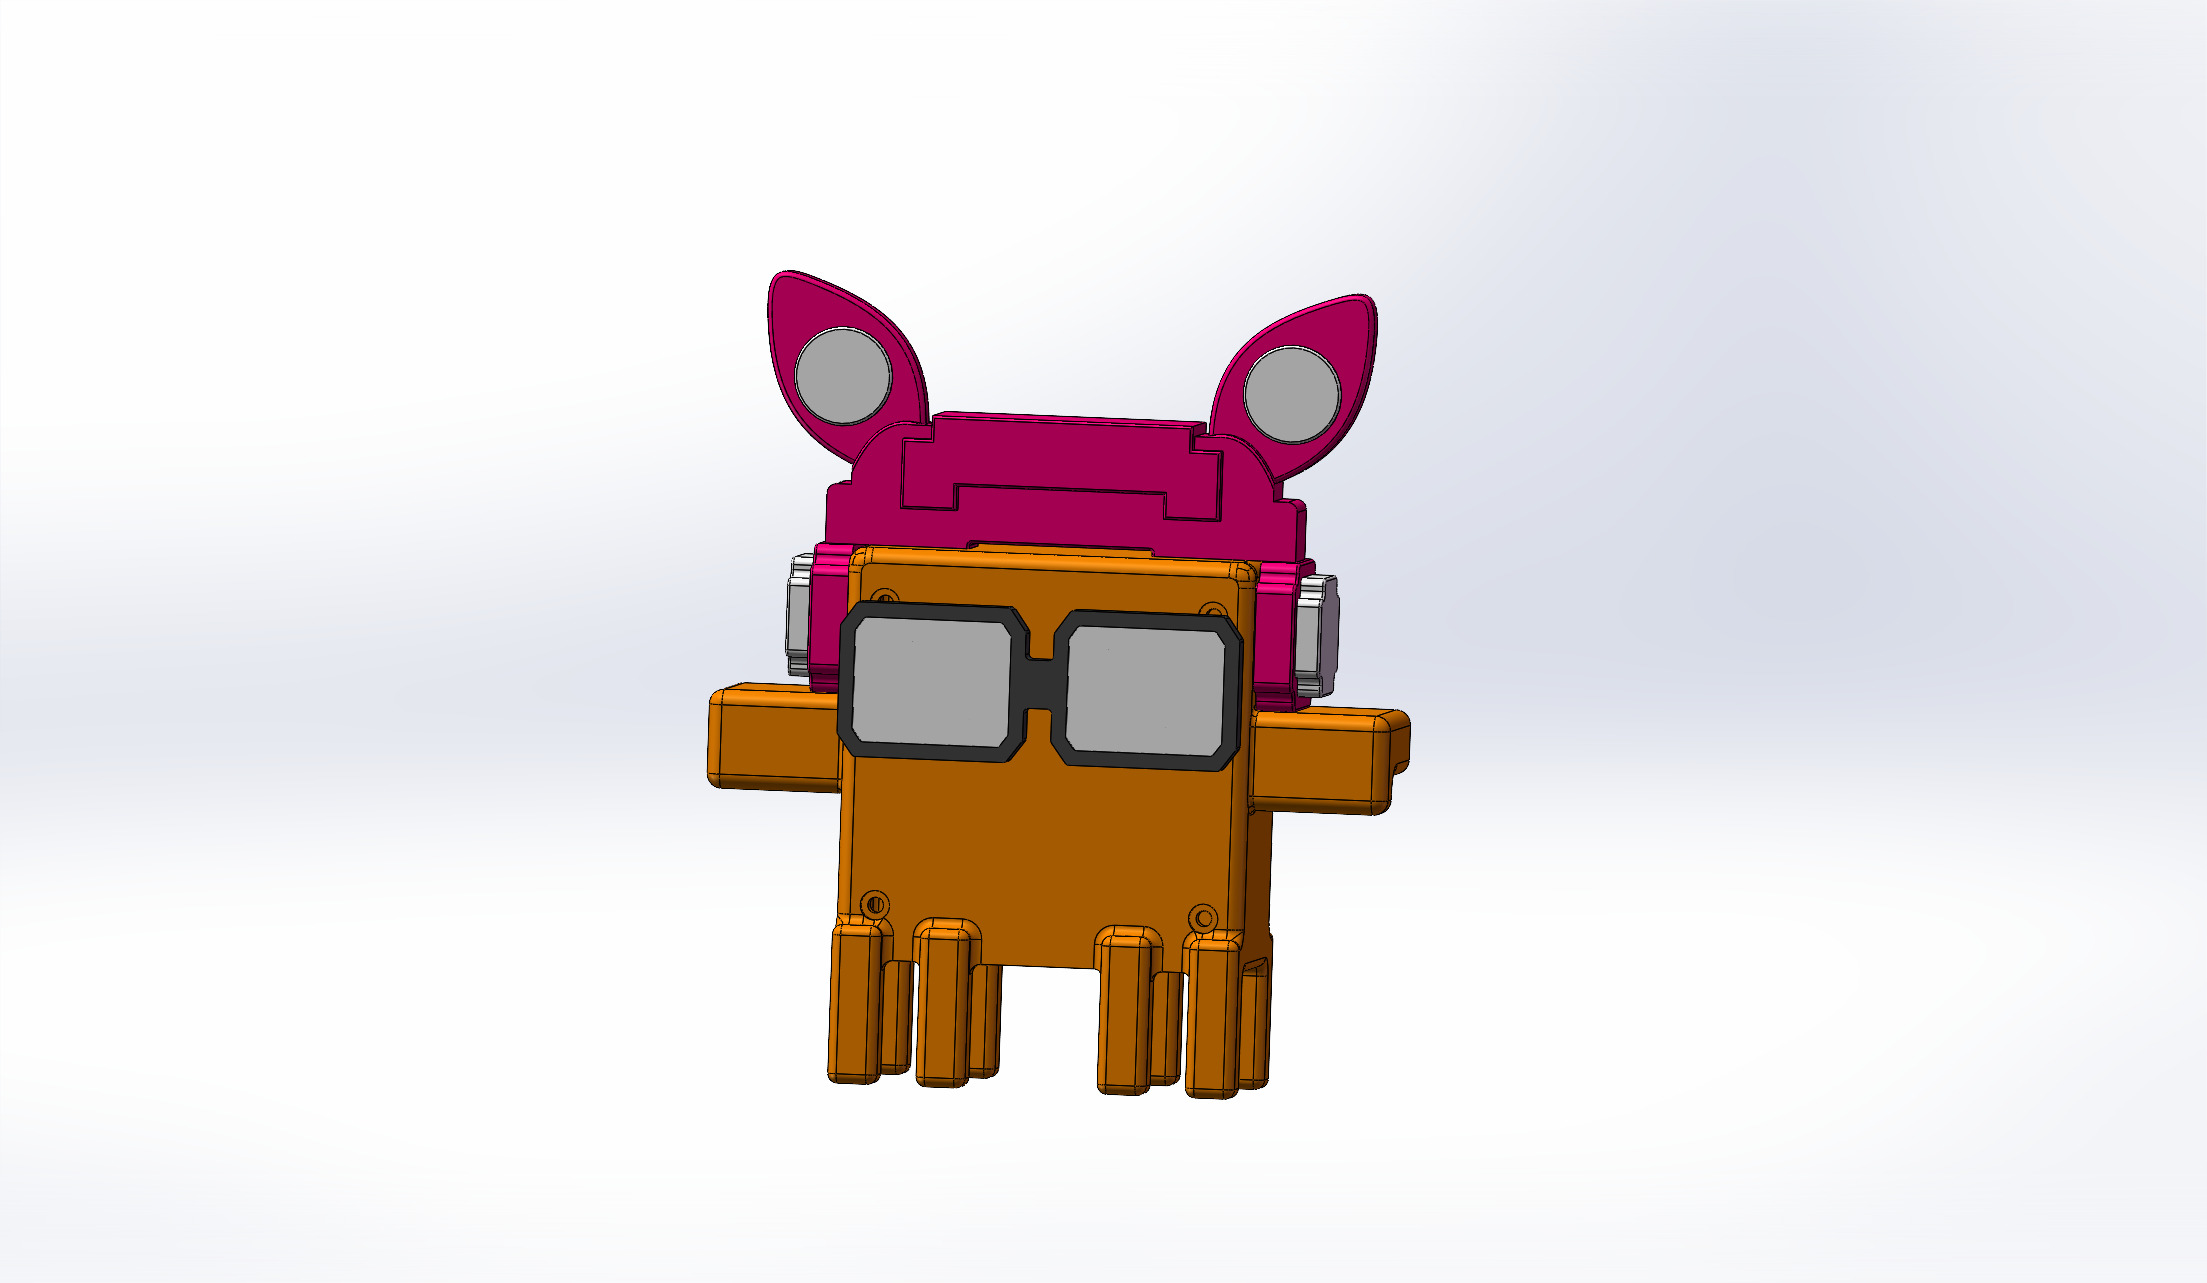
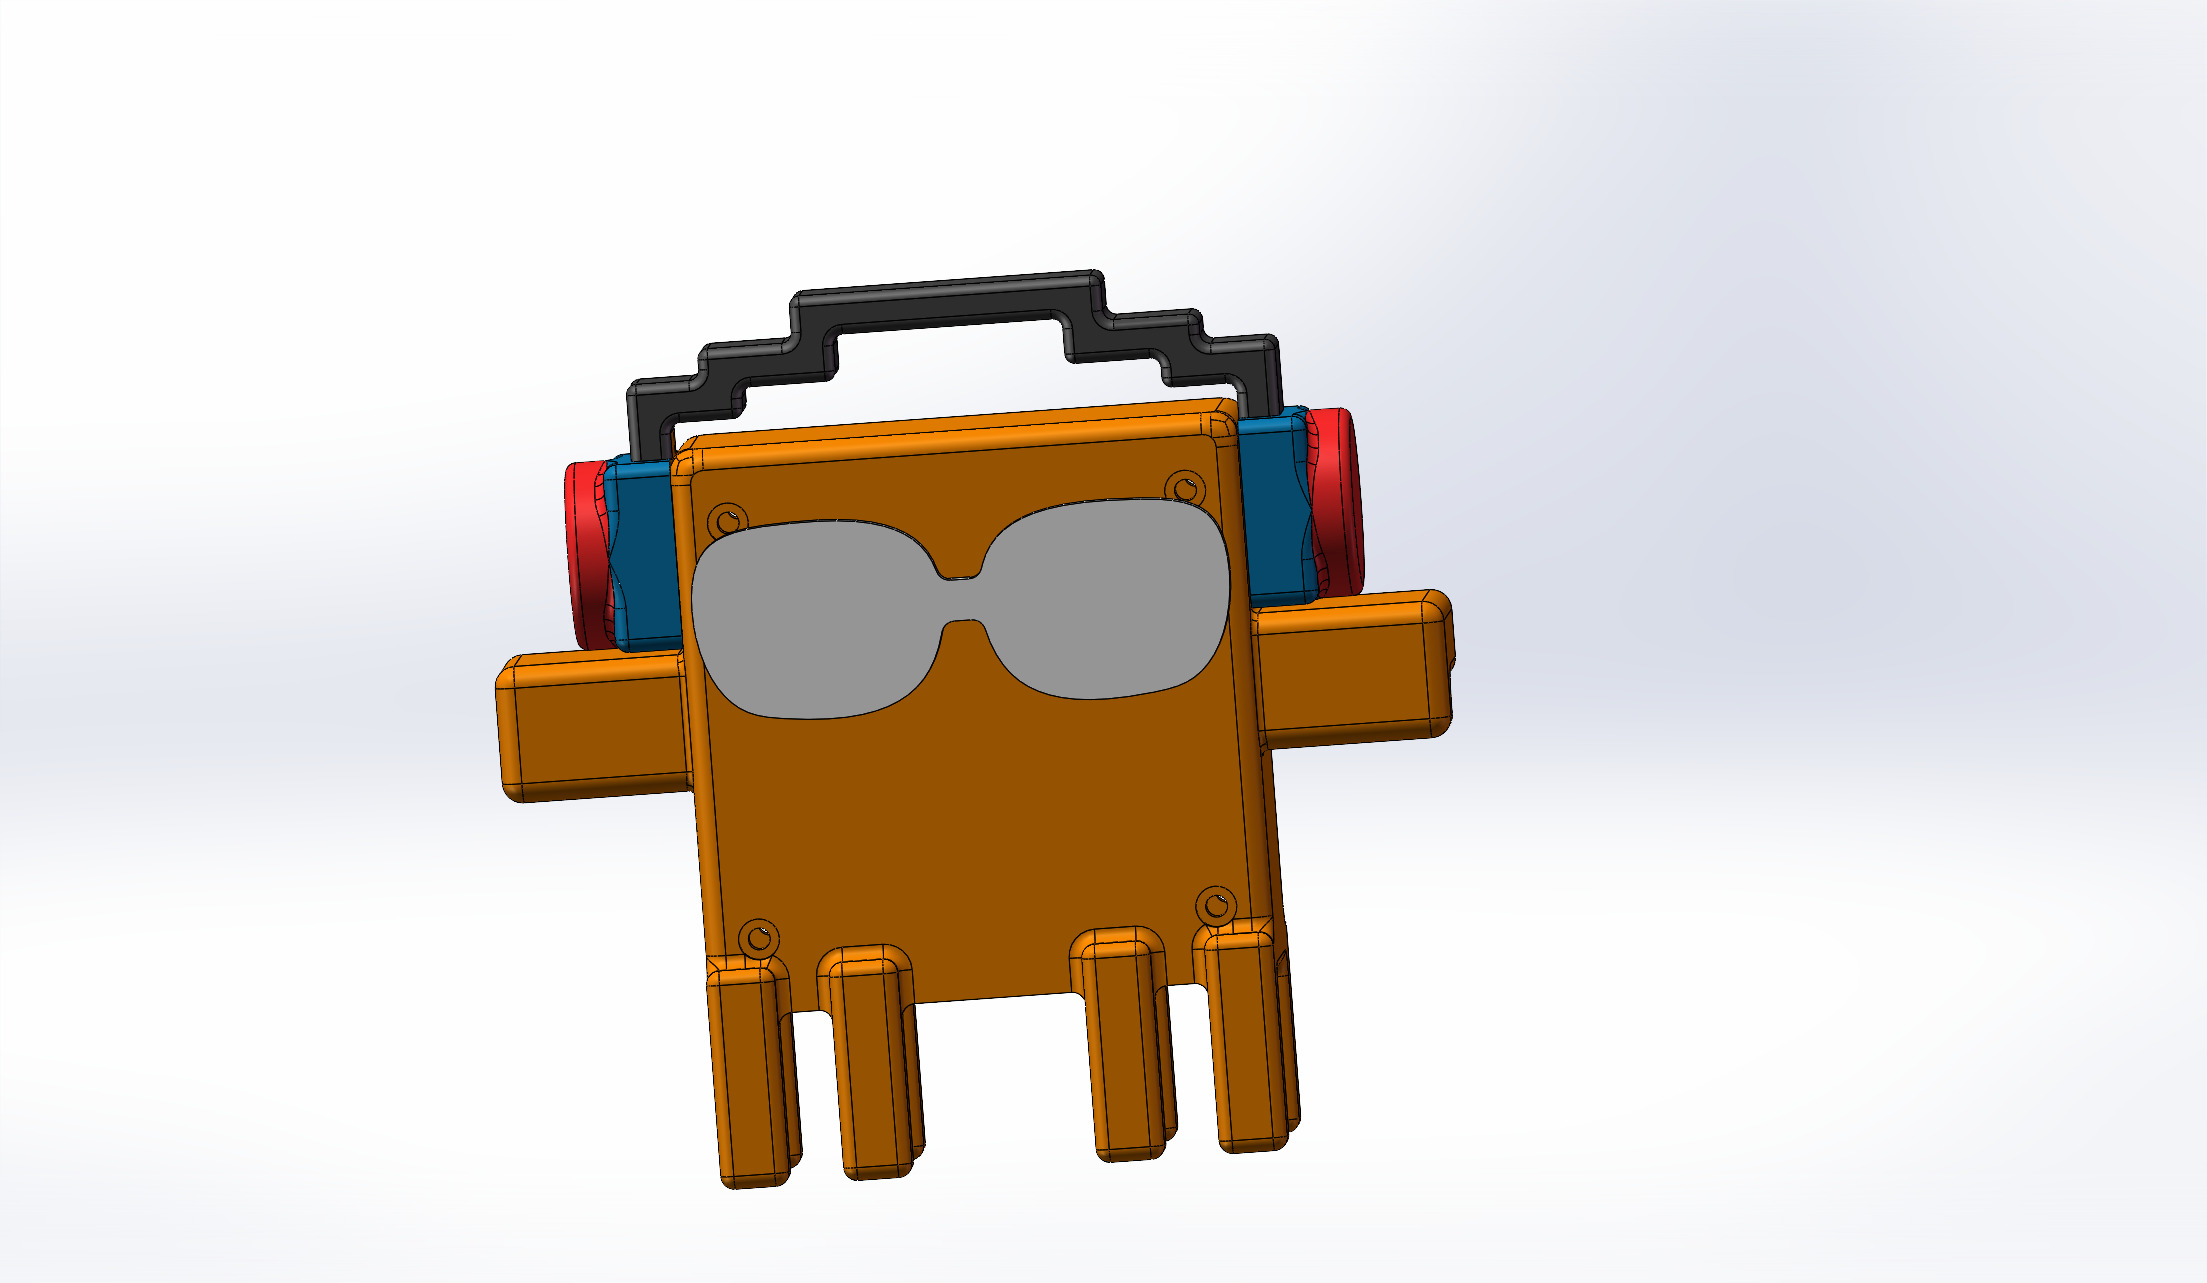
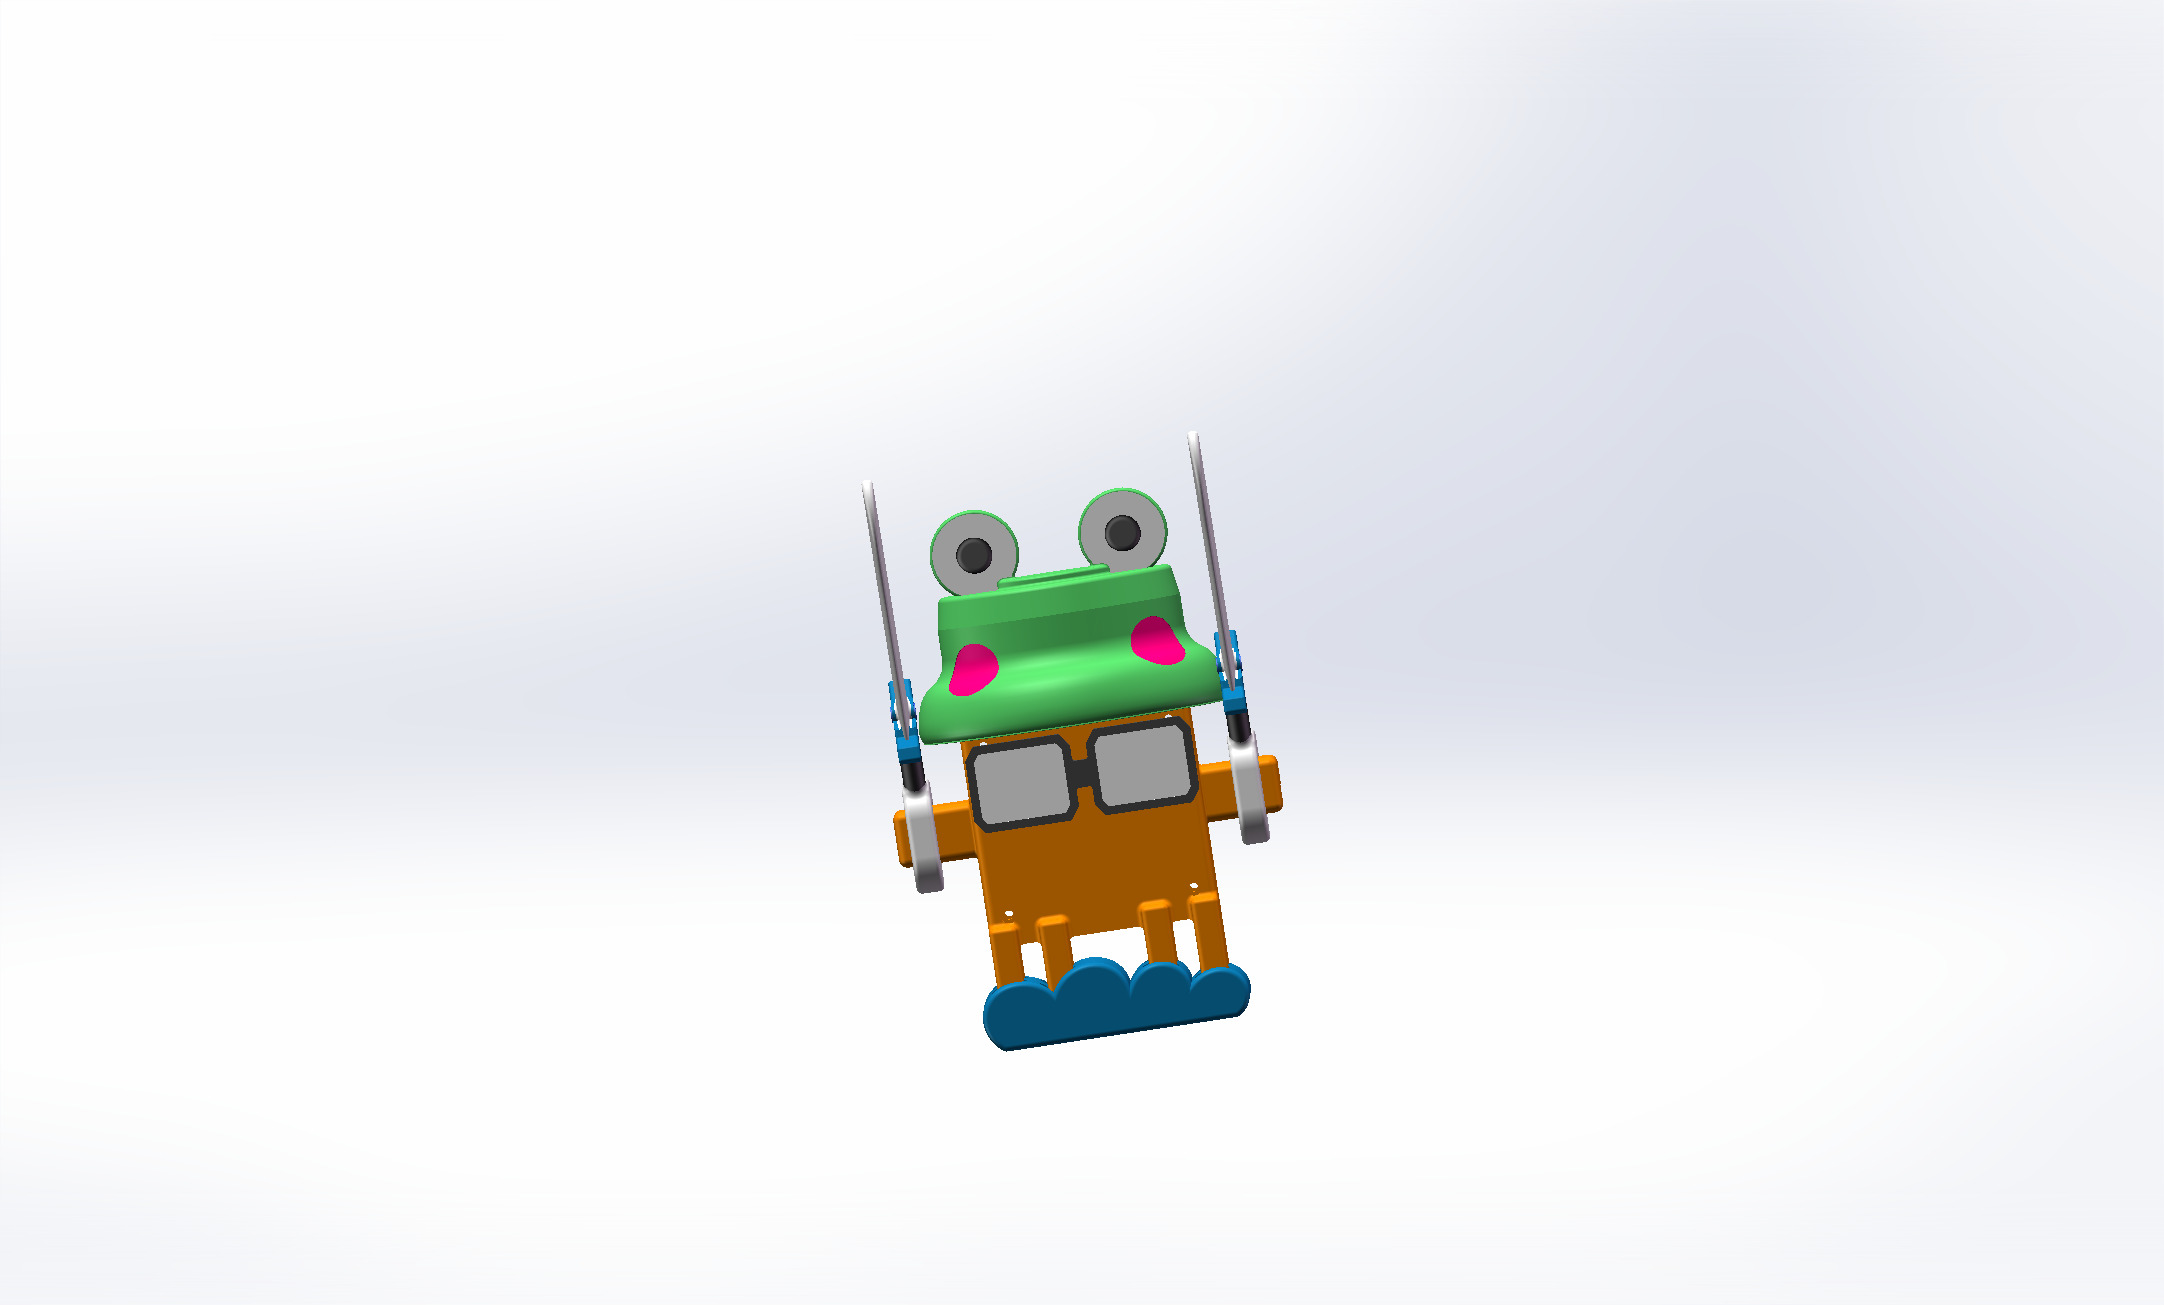
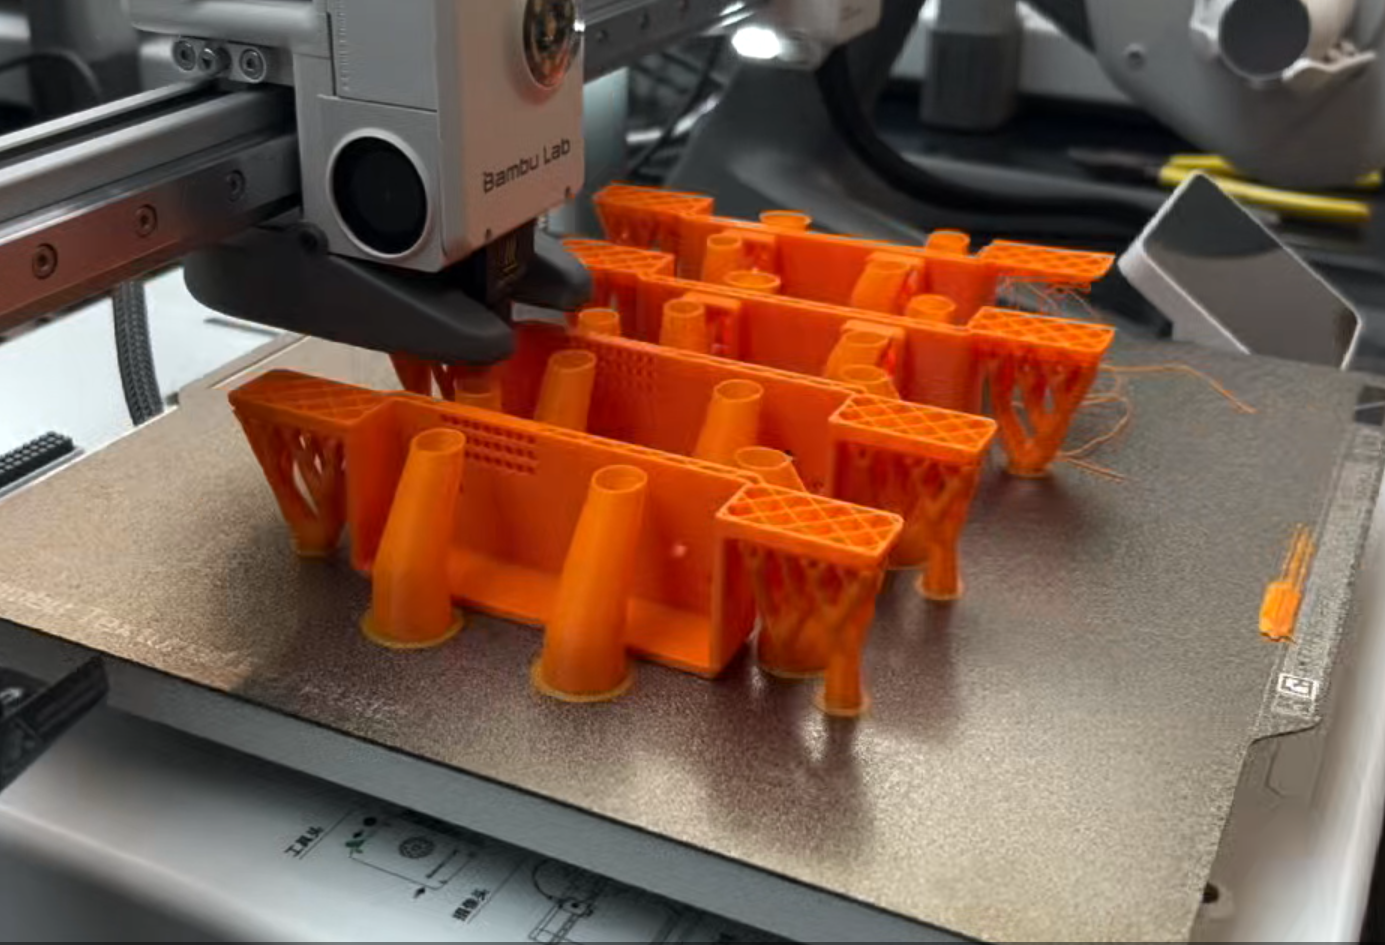
Both the shell and character accessories were modeled using SolidWorks and 3D printed via FDM on a TuoZhu P1S. The reason for choosing 3D printing is that the appearance of this project is not a simple box but a desktop character device, which requires repeated adjustments to proportions, expressions, accessories, and assembly space. FDM printing allows for rapid iteration and also facilitates the use of different colors of PLA/PETG to create a stronger sense of character.
Structural design mainly considers the following points:
-
Stability: The device needs to be placed on a desktop for a long time, with a sufficiently wide base to prevent it from easily falling over due to USB cables or collisions.
-
*Assemblability *: The main control board, speaker, LED, PCB, and wires need to fit inside the housing while leaving maintenance space.
-
Printability: Minimize overhangs and supports, disassemble accessories into individual parts for printing, and reduce the failure rate.
-
Scalability: Accessories such as glasses, ears, hats, swords, feet, etc., use independent parts, allowing for subsequent replacement of character styles.
-
*Recognizability *: The device itself should be like a desktop companion rather than an ordinary electronic box, so that users can more easily establish a state-aware relationship with it.
The printing material mainly uses colored PLA, and some connectors that require higher toughness can use PETG. The slicing software is Bambu Studio, and the printer is the Tuozhu P1S. Printing parameters are adjusted according to the size of the parts, with common settings being a 0.2 mm layer height, 15%–20% infill, and local support.
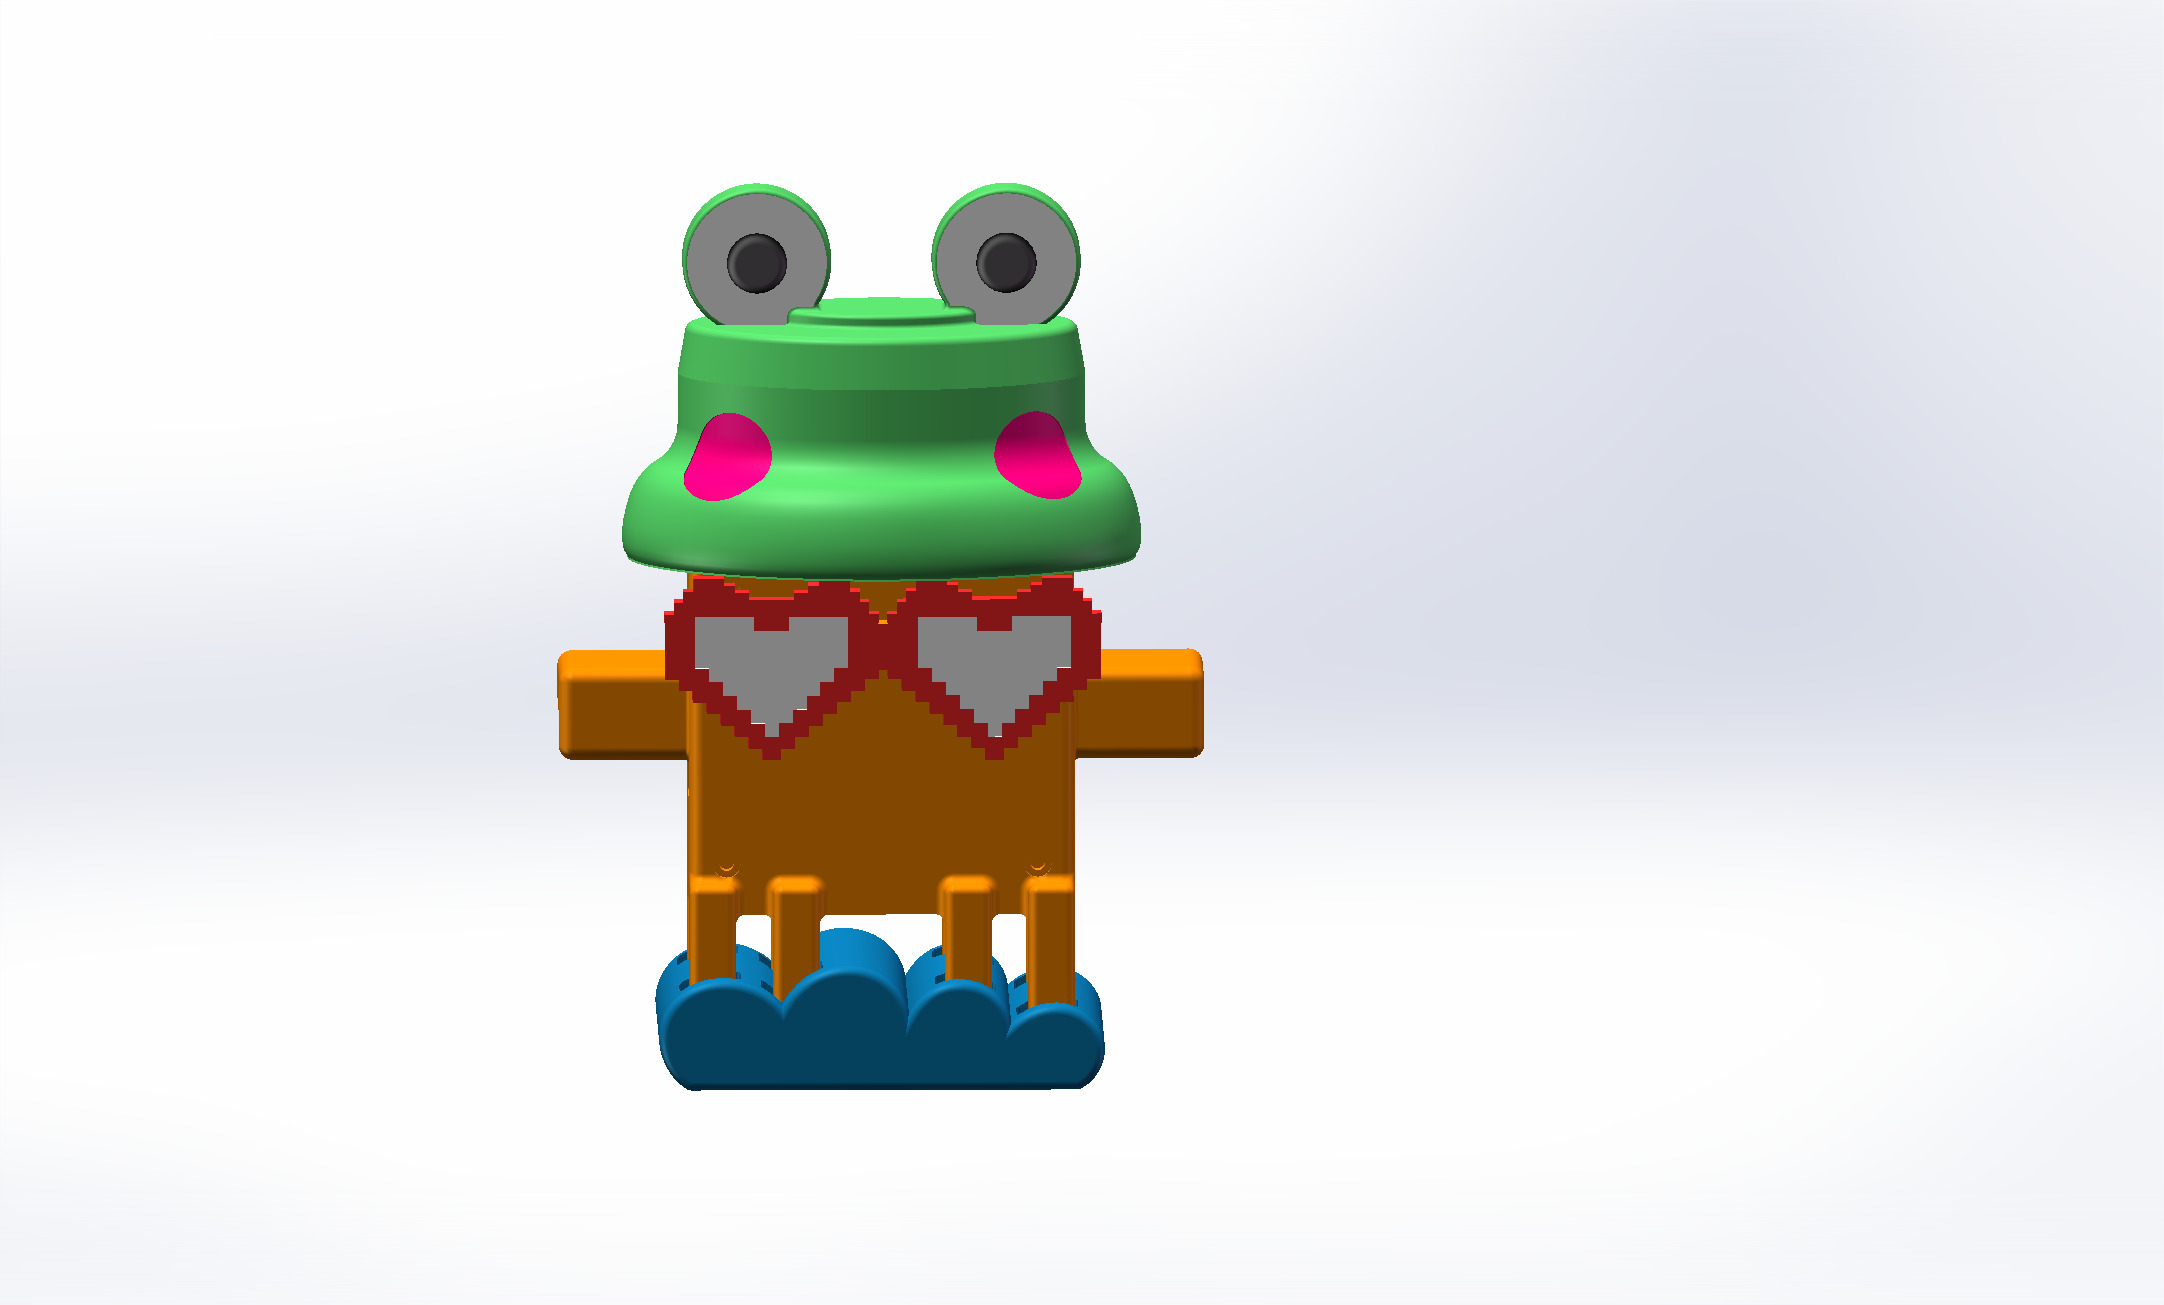
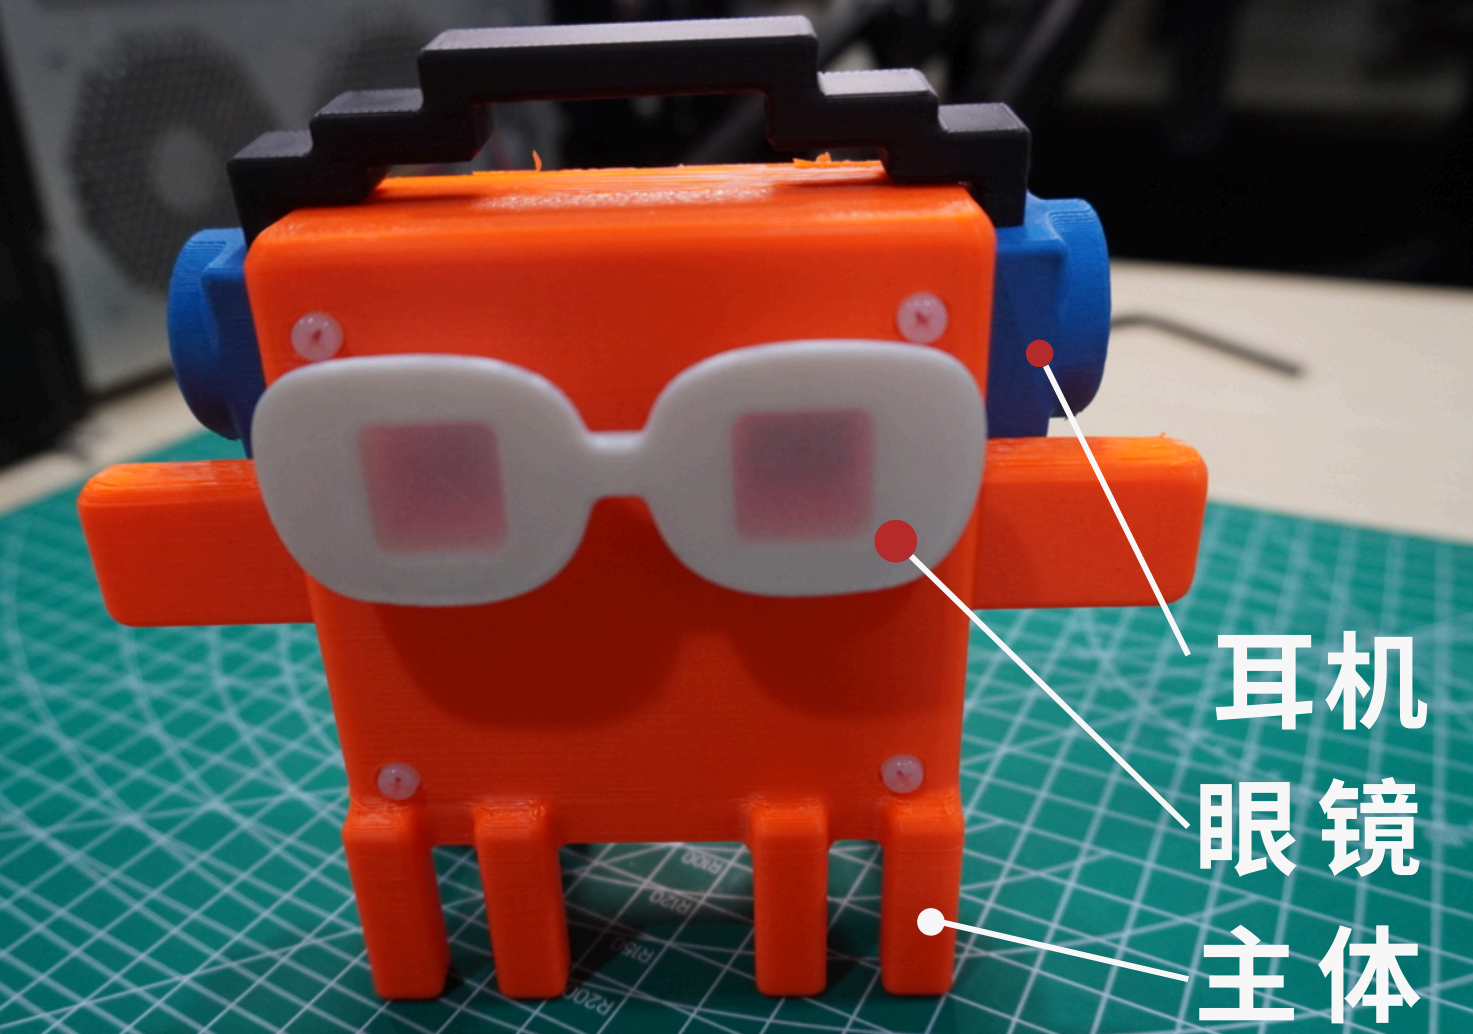
8.1.1 Standard Configuration Main Body
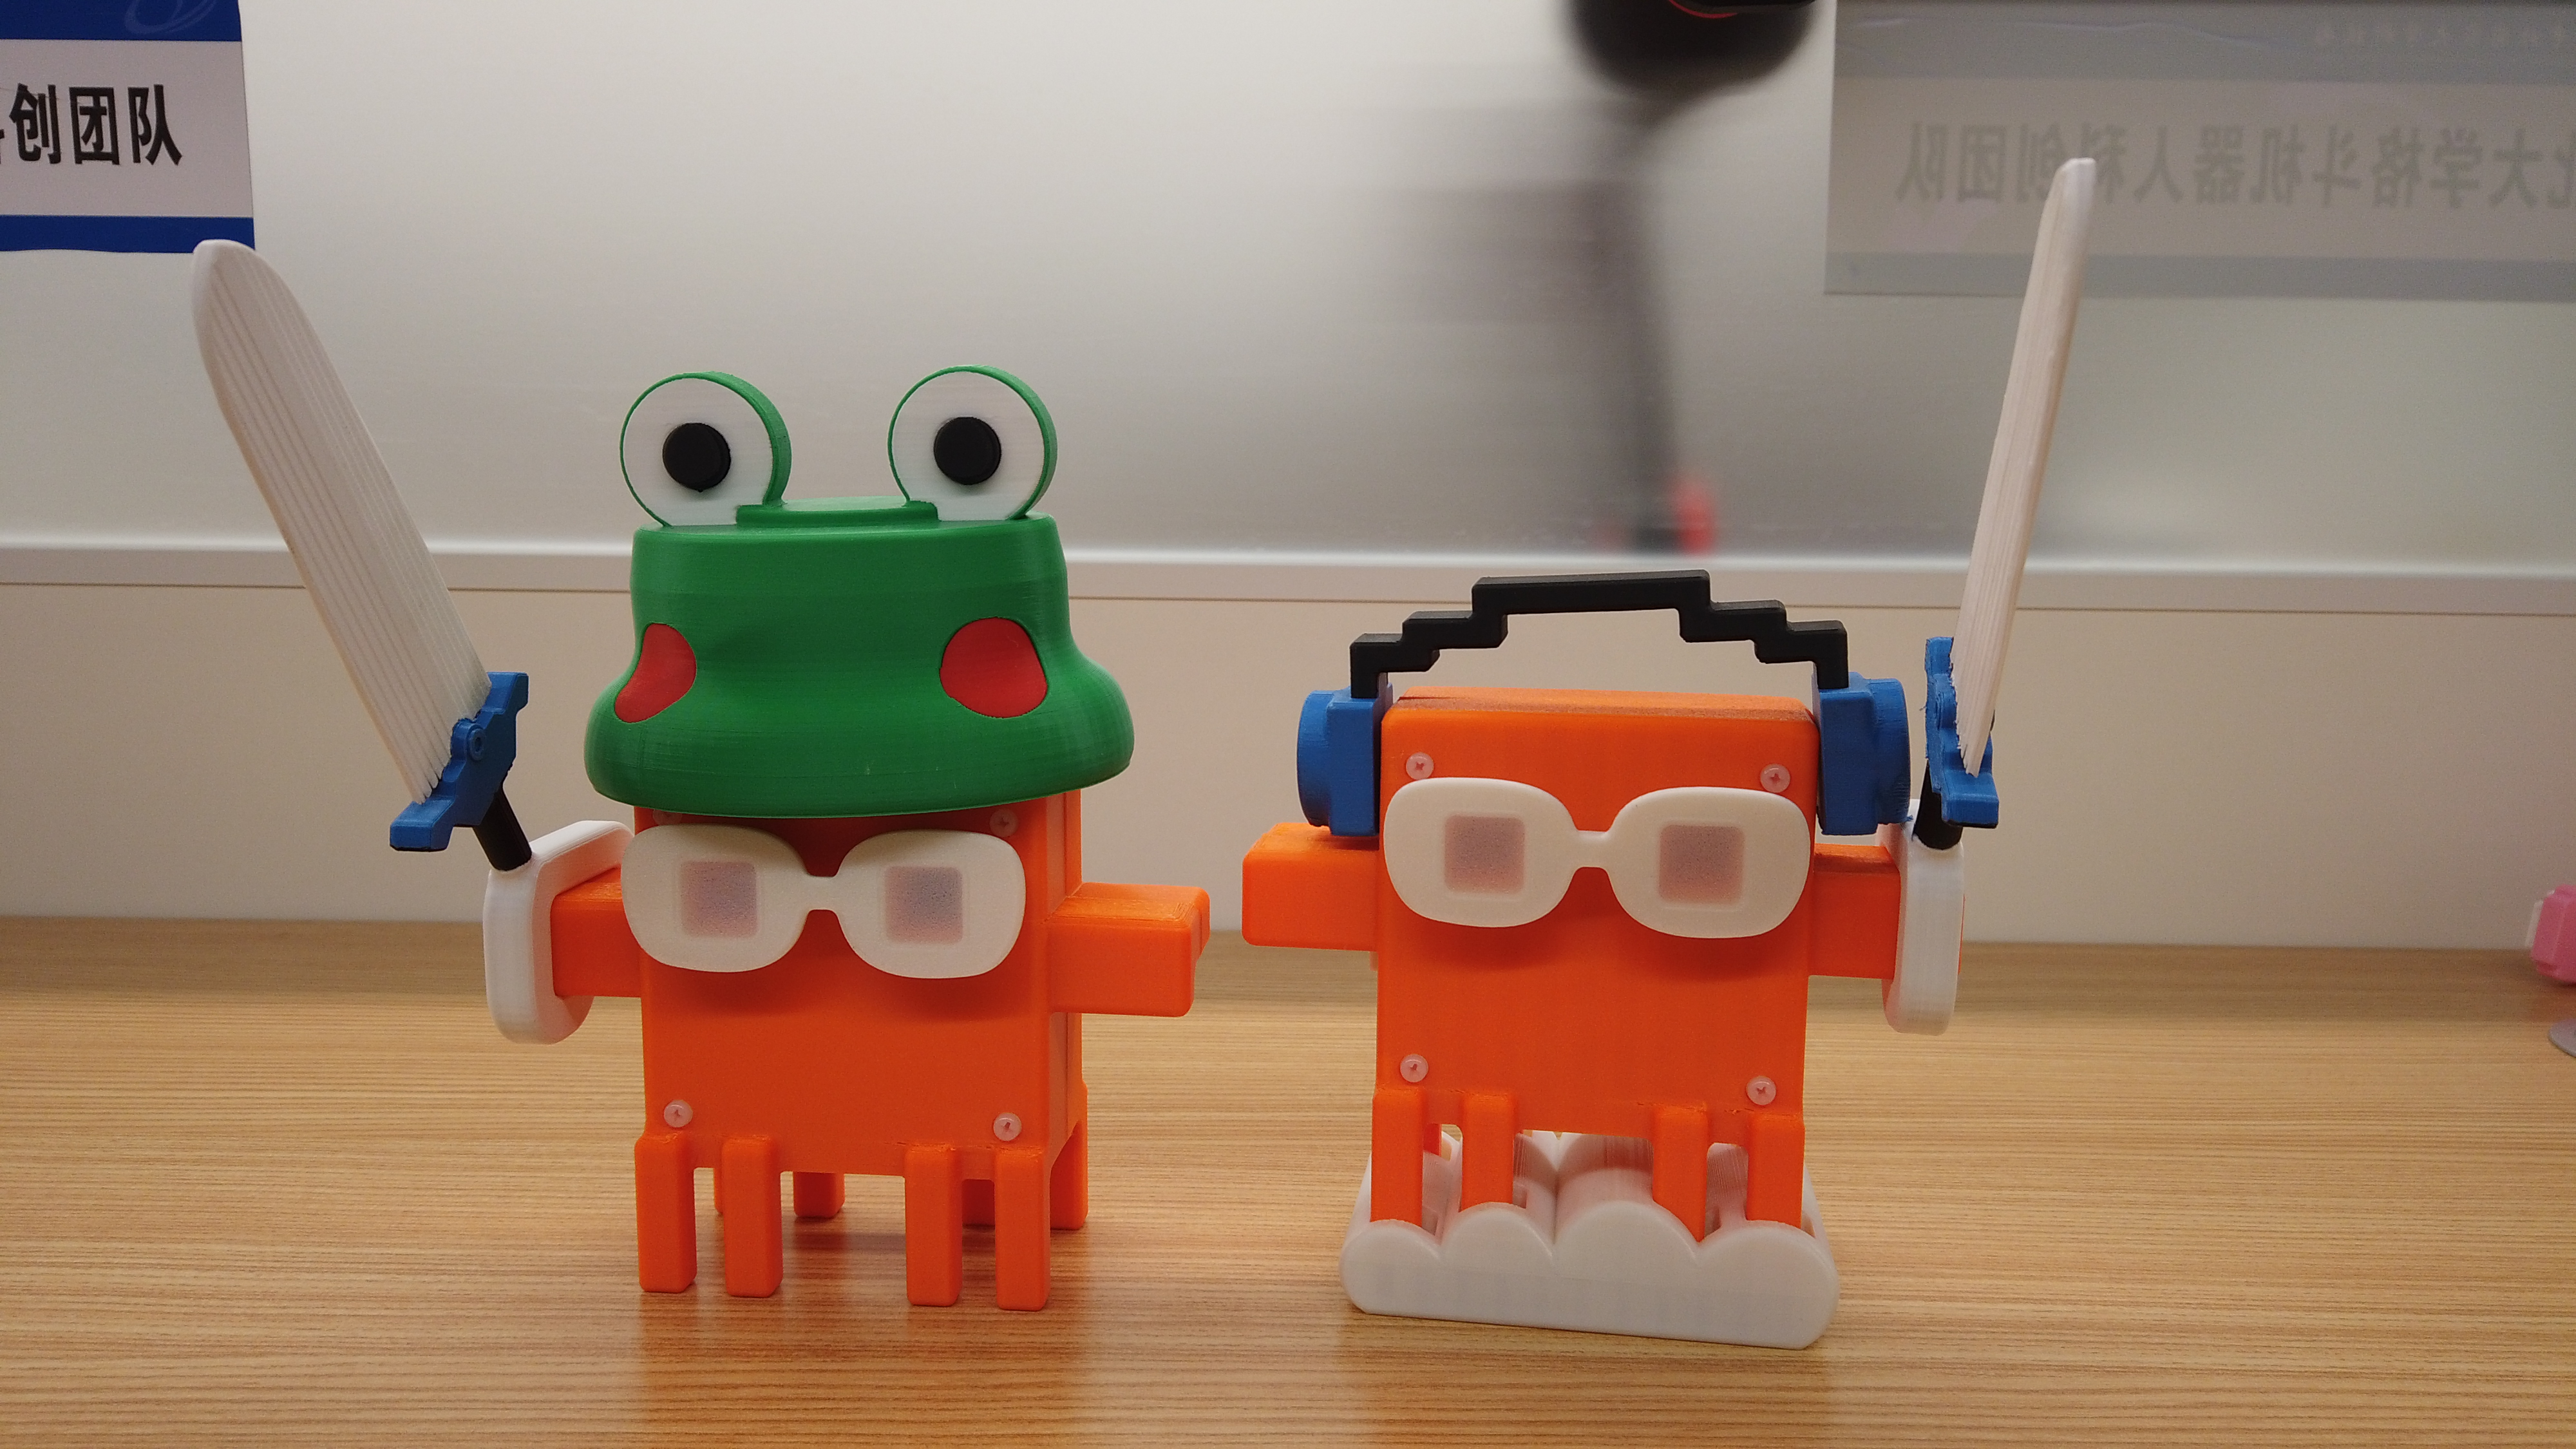
The standard body is the core structure of the entire device, which needs to accommodate the PCB, ESP32, speaker, and wires inside, while externally carrying the glasses and other character components. The body adopts the form of a small octopus in a square box, because it has high internal space utilization and is suitable for placing electronic modules; at the same time, it forms a character-based appearance through accessories externally.
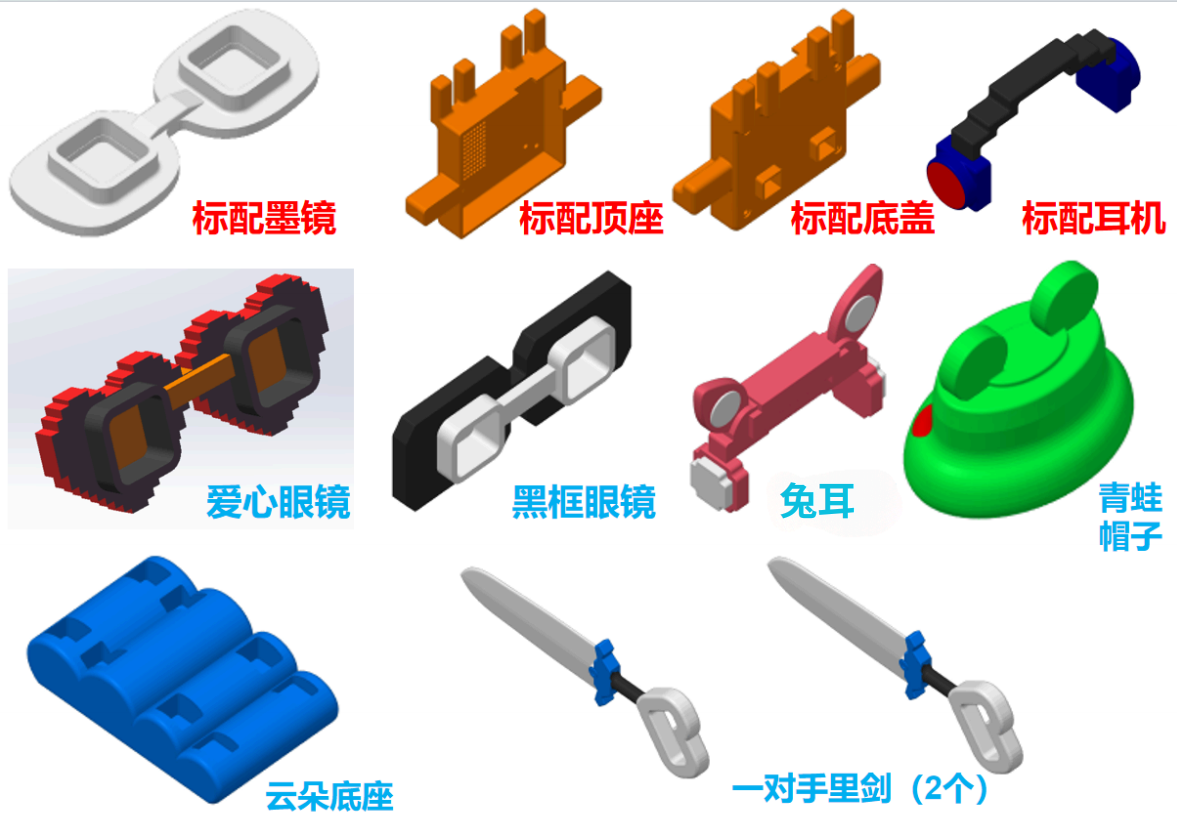
8.1.2 Accessories
Accessories include glasses, ears, hats, arms, swords, feet, and other character parts. These parts are produced through separate printing and post-assembly, rather than being molded with the main body in one go. This approach offers three advantages: first, different colored materials can be used; second, only small parts need to be reprinted in case of printing failure; third, different character appearances can be replaced for the same set of electronic hardware in the future.
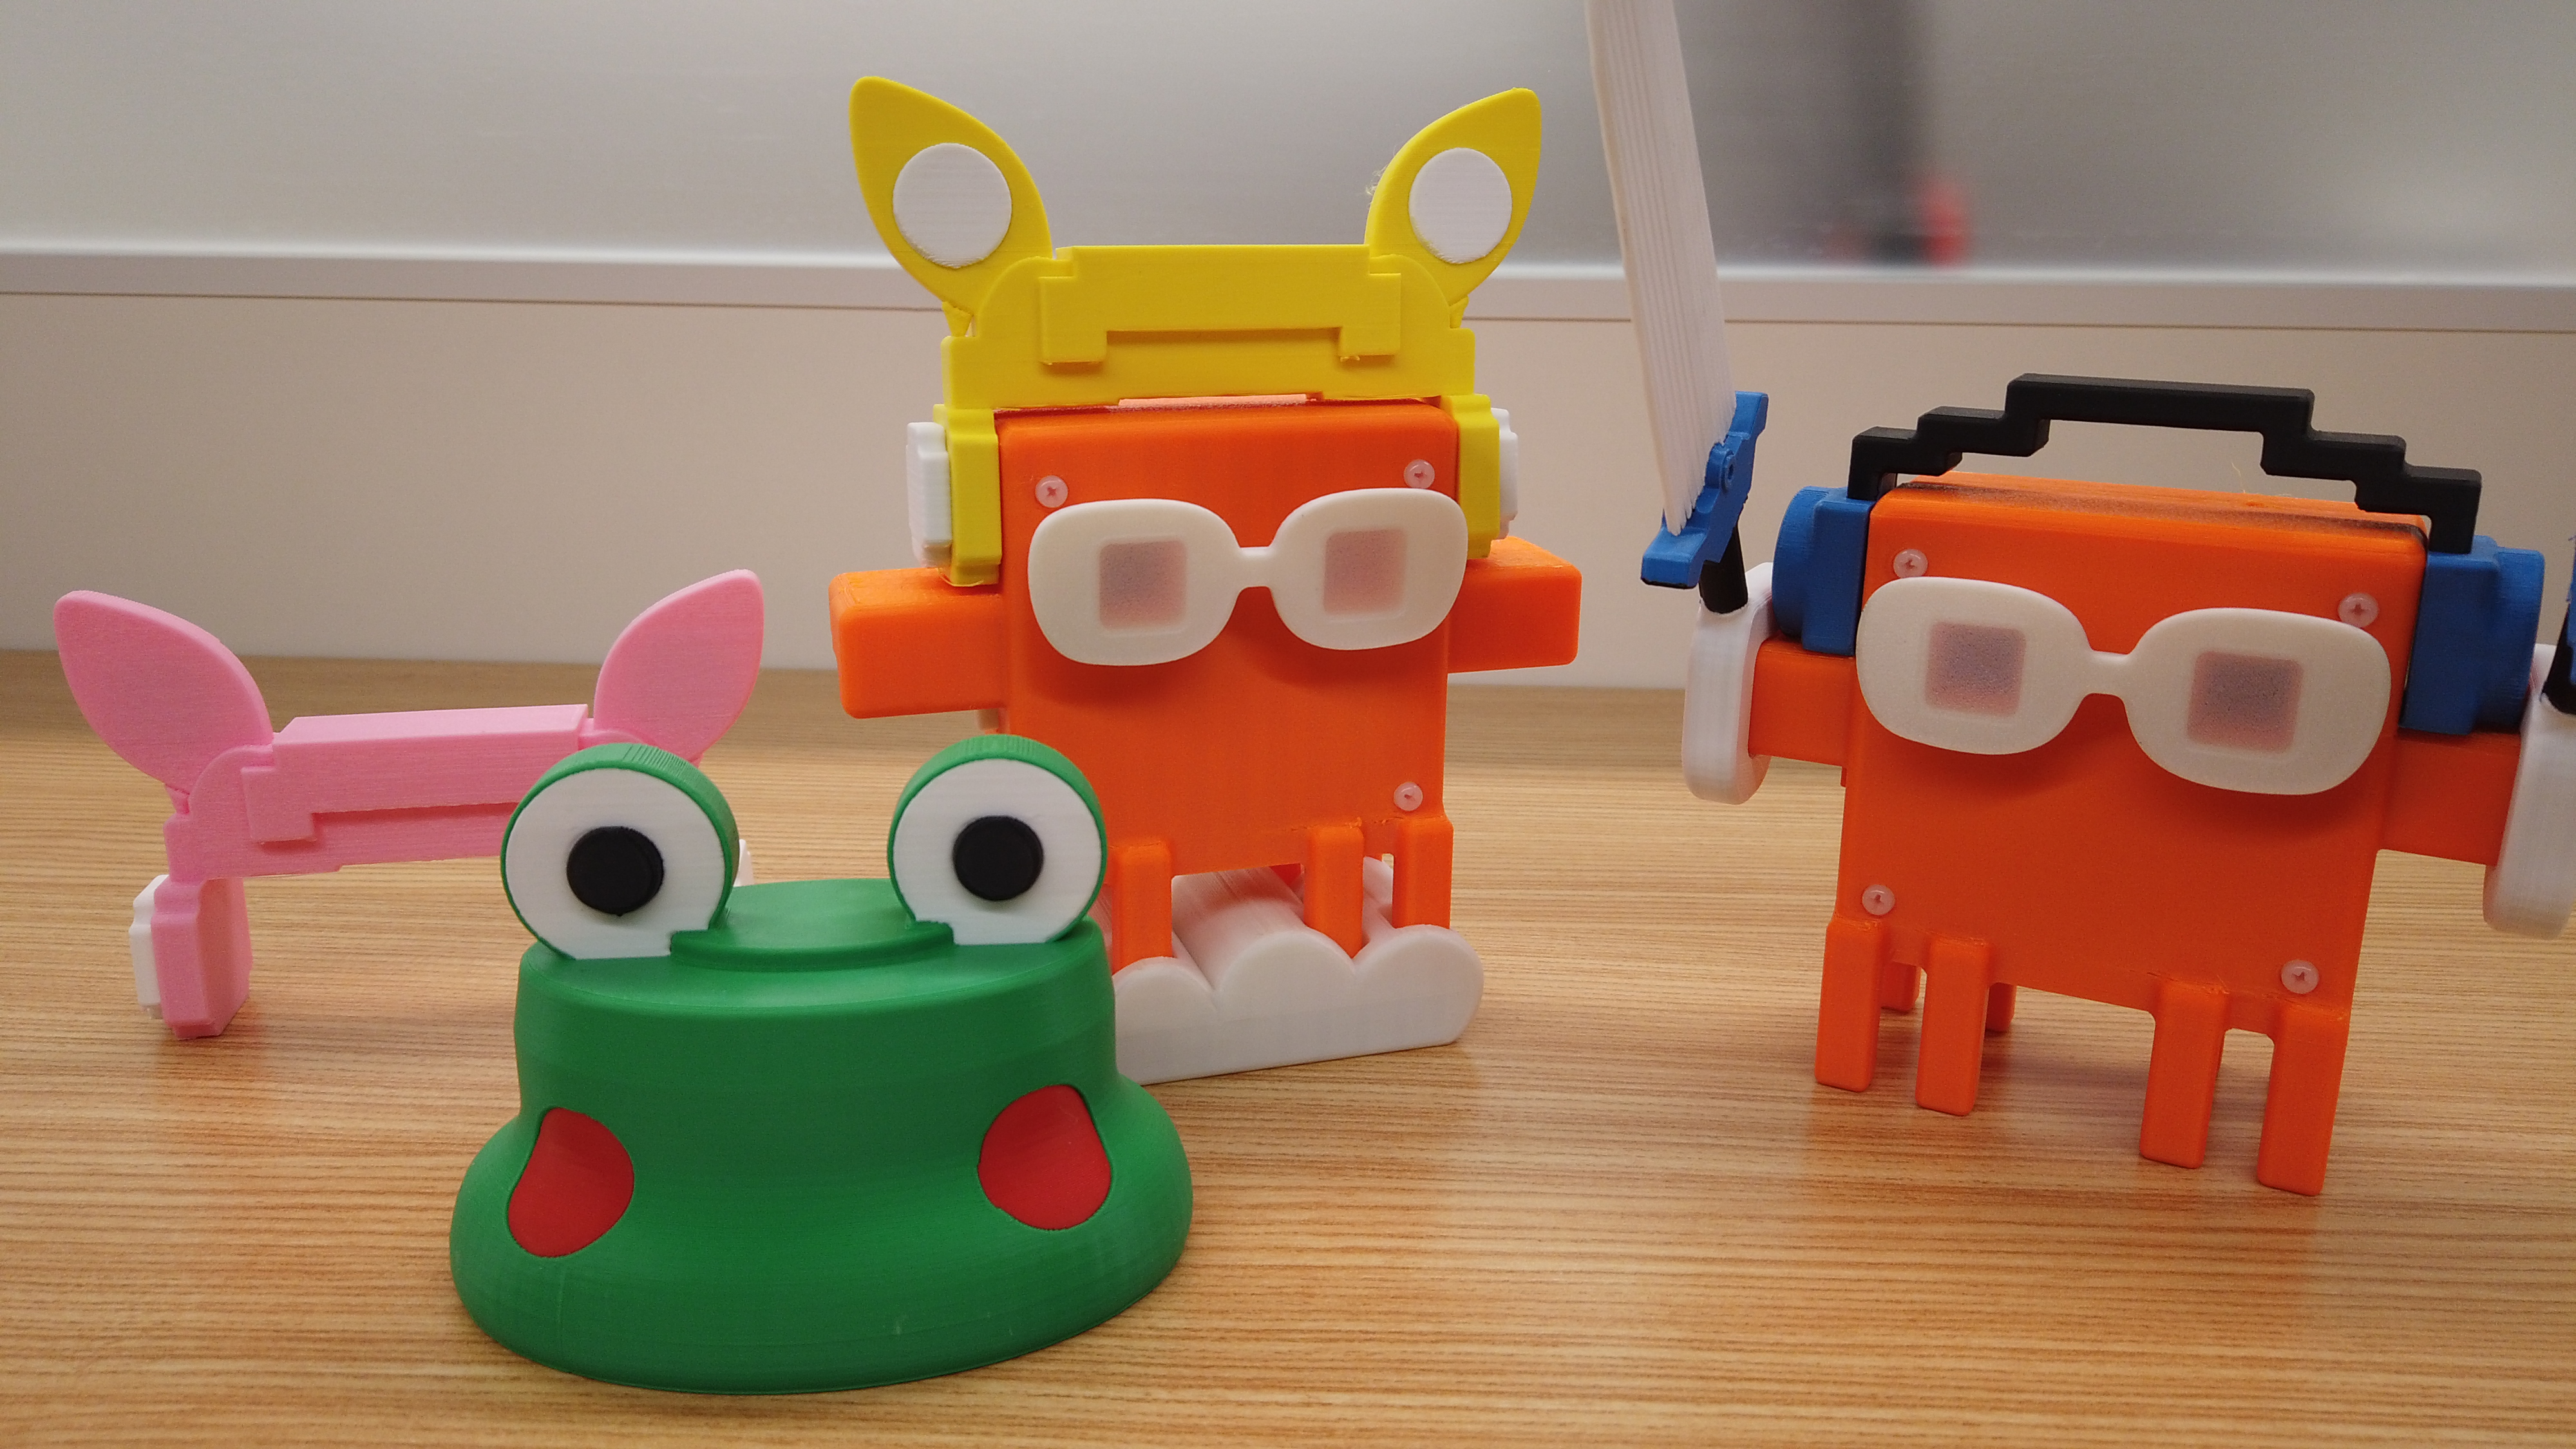
8.1.3 3D Printed Samples
Printed samples are used to check appearance proportions, part tolerances, screw hole positions, and assembly sequences. In actual testing, multi-color accessories enhance the project's recognizability but also introduce assembly complexity. Subsequent versions can further reduce the number of screws and instead use snap-fit or magnetic structures to make maintenance more convenient.
8.2 2D Design
2D design is completed using Photoshop and is mainly used for project presentations, logos, stickers, page creatives, and demonstration diagrams. The purpose of 2D design is not to create standalone graphic posters, but to enable hardware, documents, and presentation materials to form a unified visual language.
The 2D design of this project includes:
-
Project name and display image layout;
-
Character stickers and icon creatives;
-
Final Project presentation overview diagram;
-
Status description and functional module diagram;
-
Decorative patterns that can be used for laser cutting or sticker production in the future.
The focus of 2D design is to enable reviewers to quickly understand that this is a physical device related to the state of AI programming agents, rather than an ordinary desktop ornament.
8.3 PCB Design
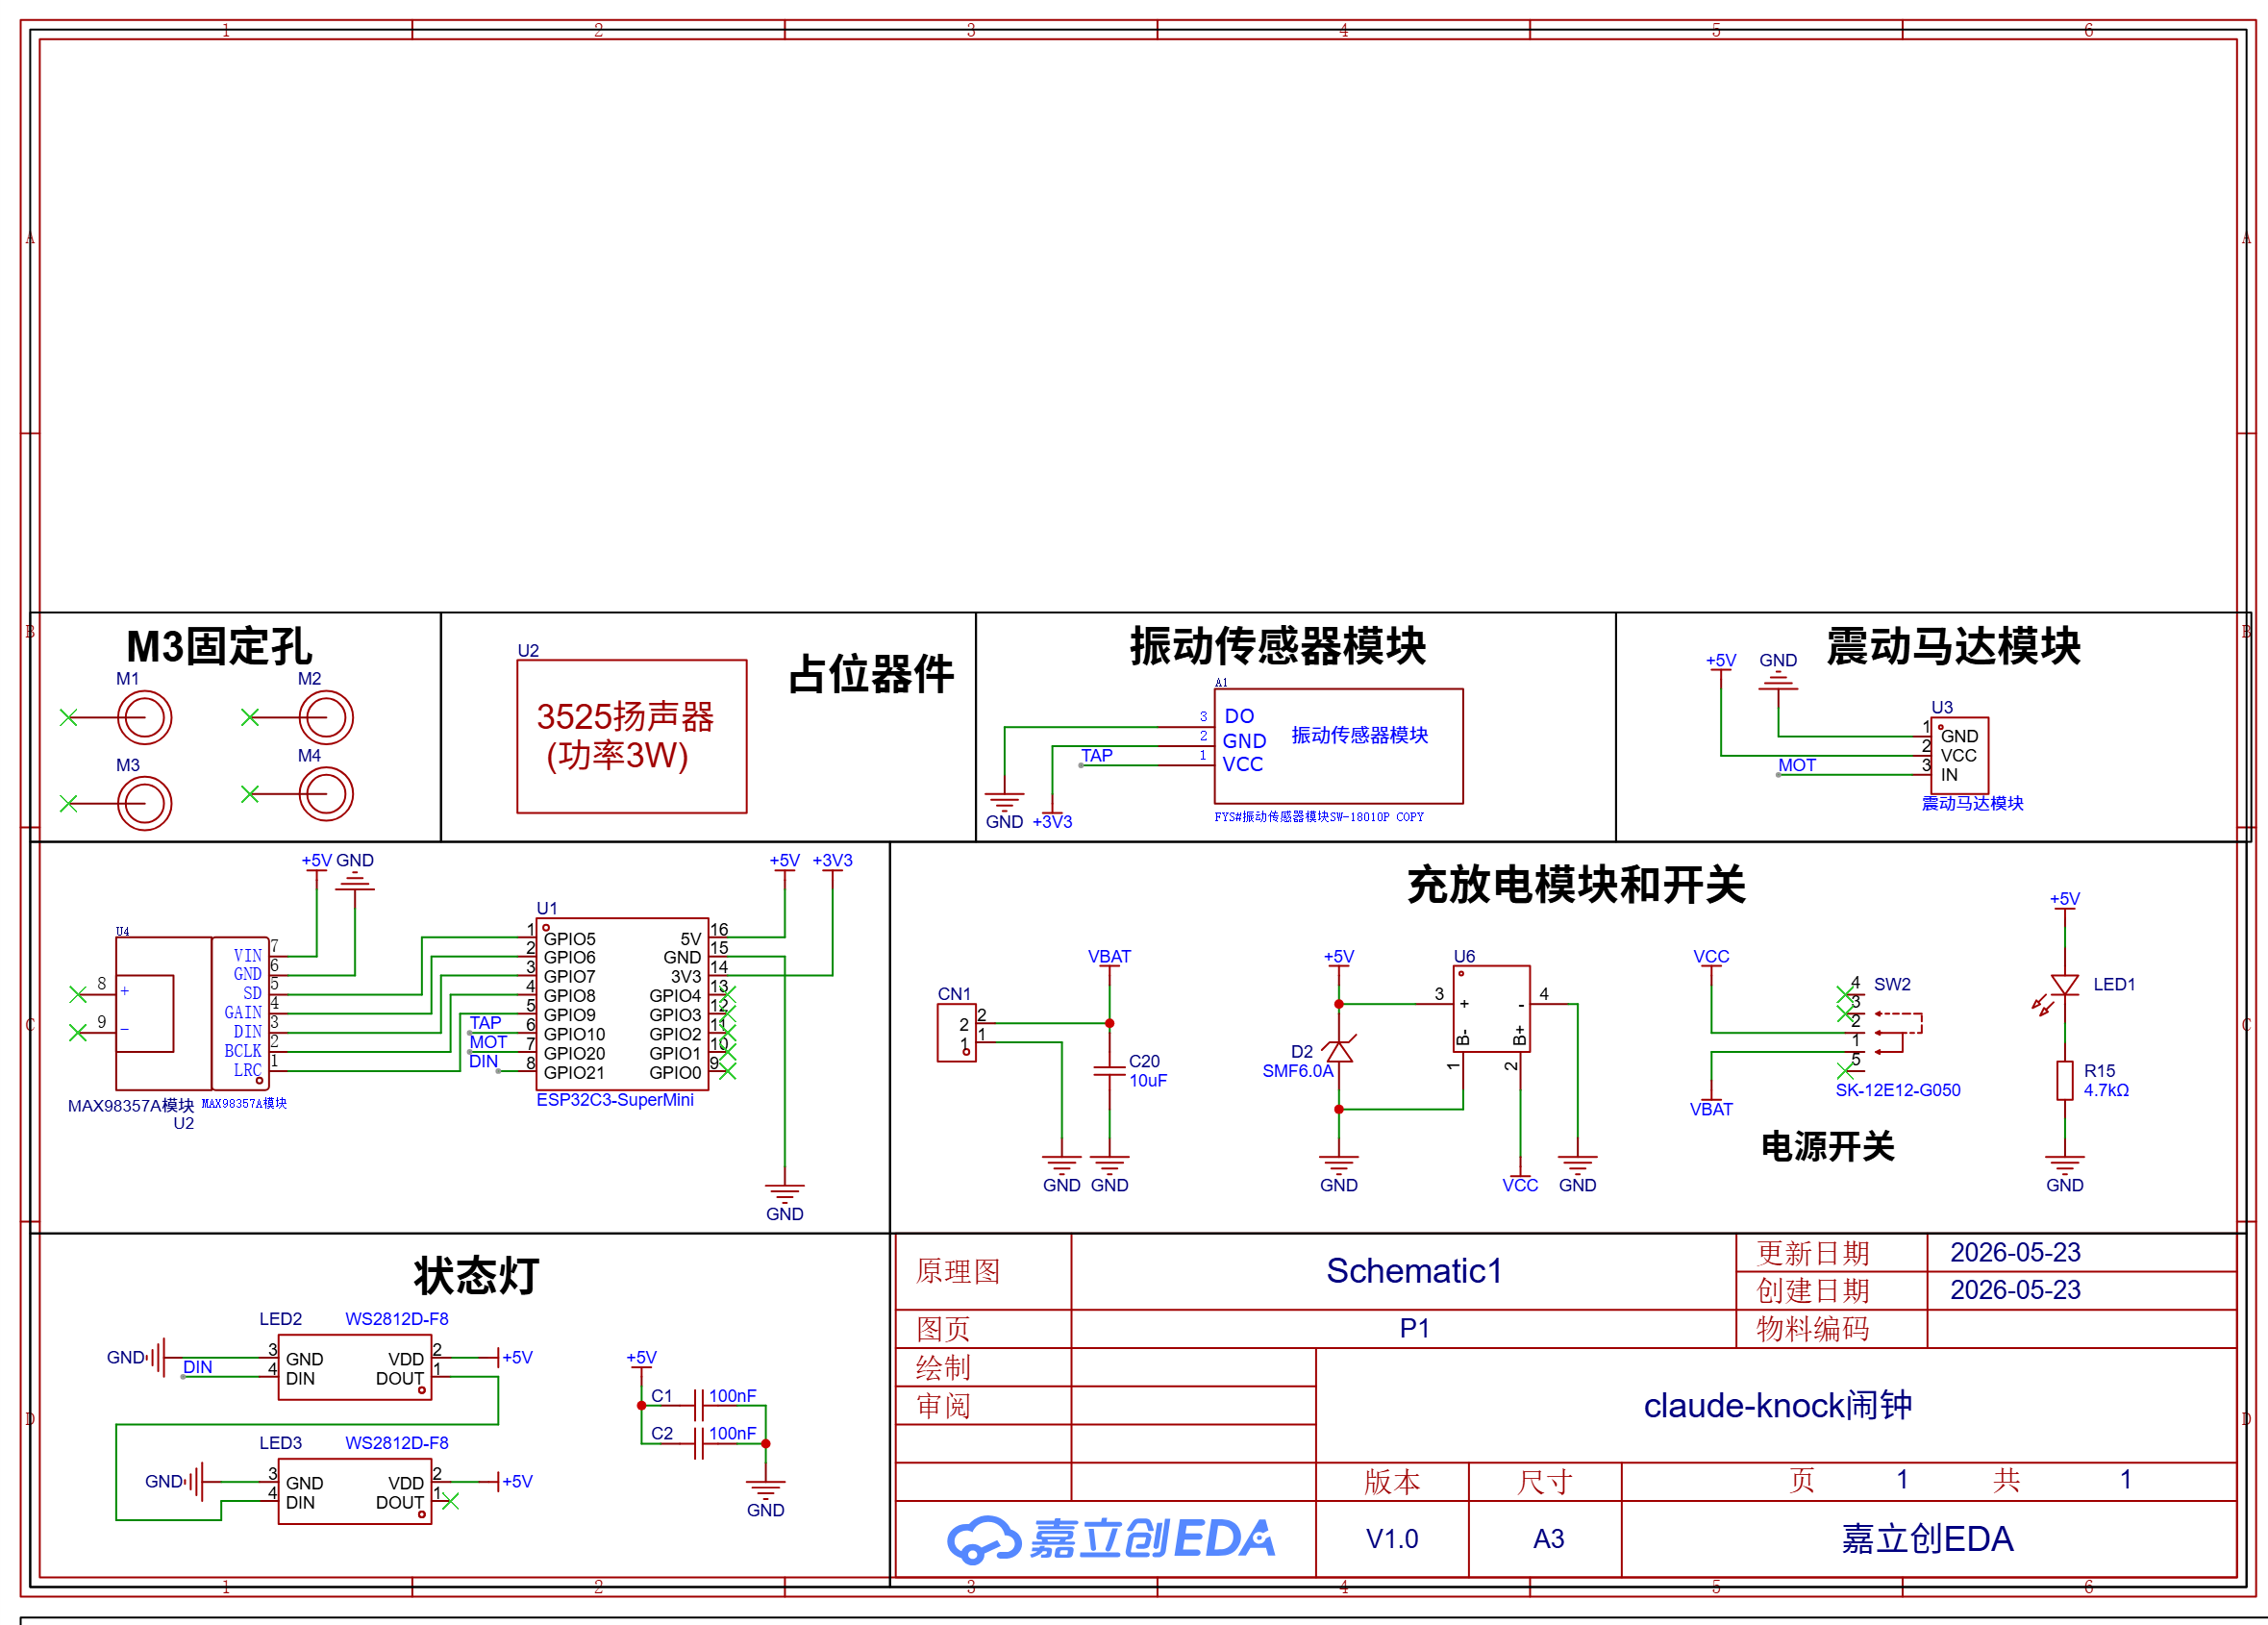
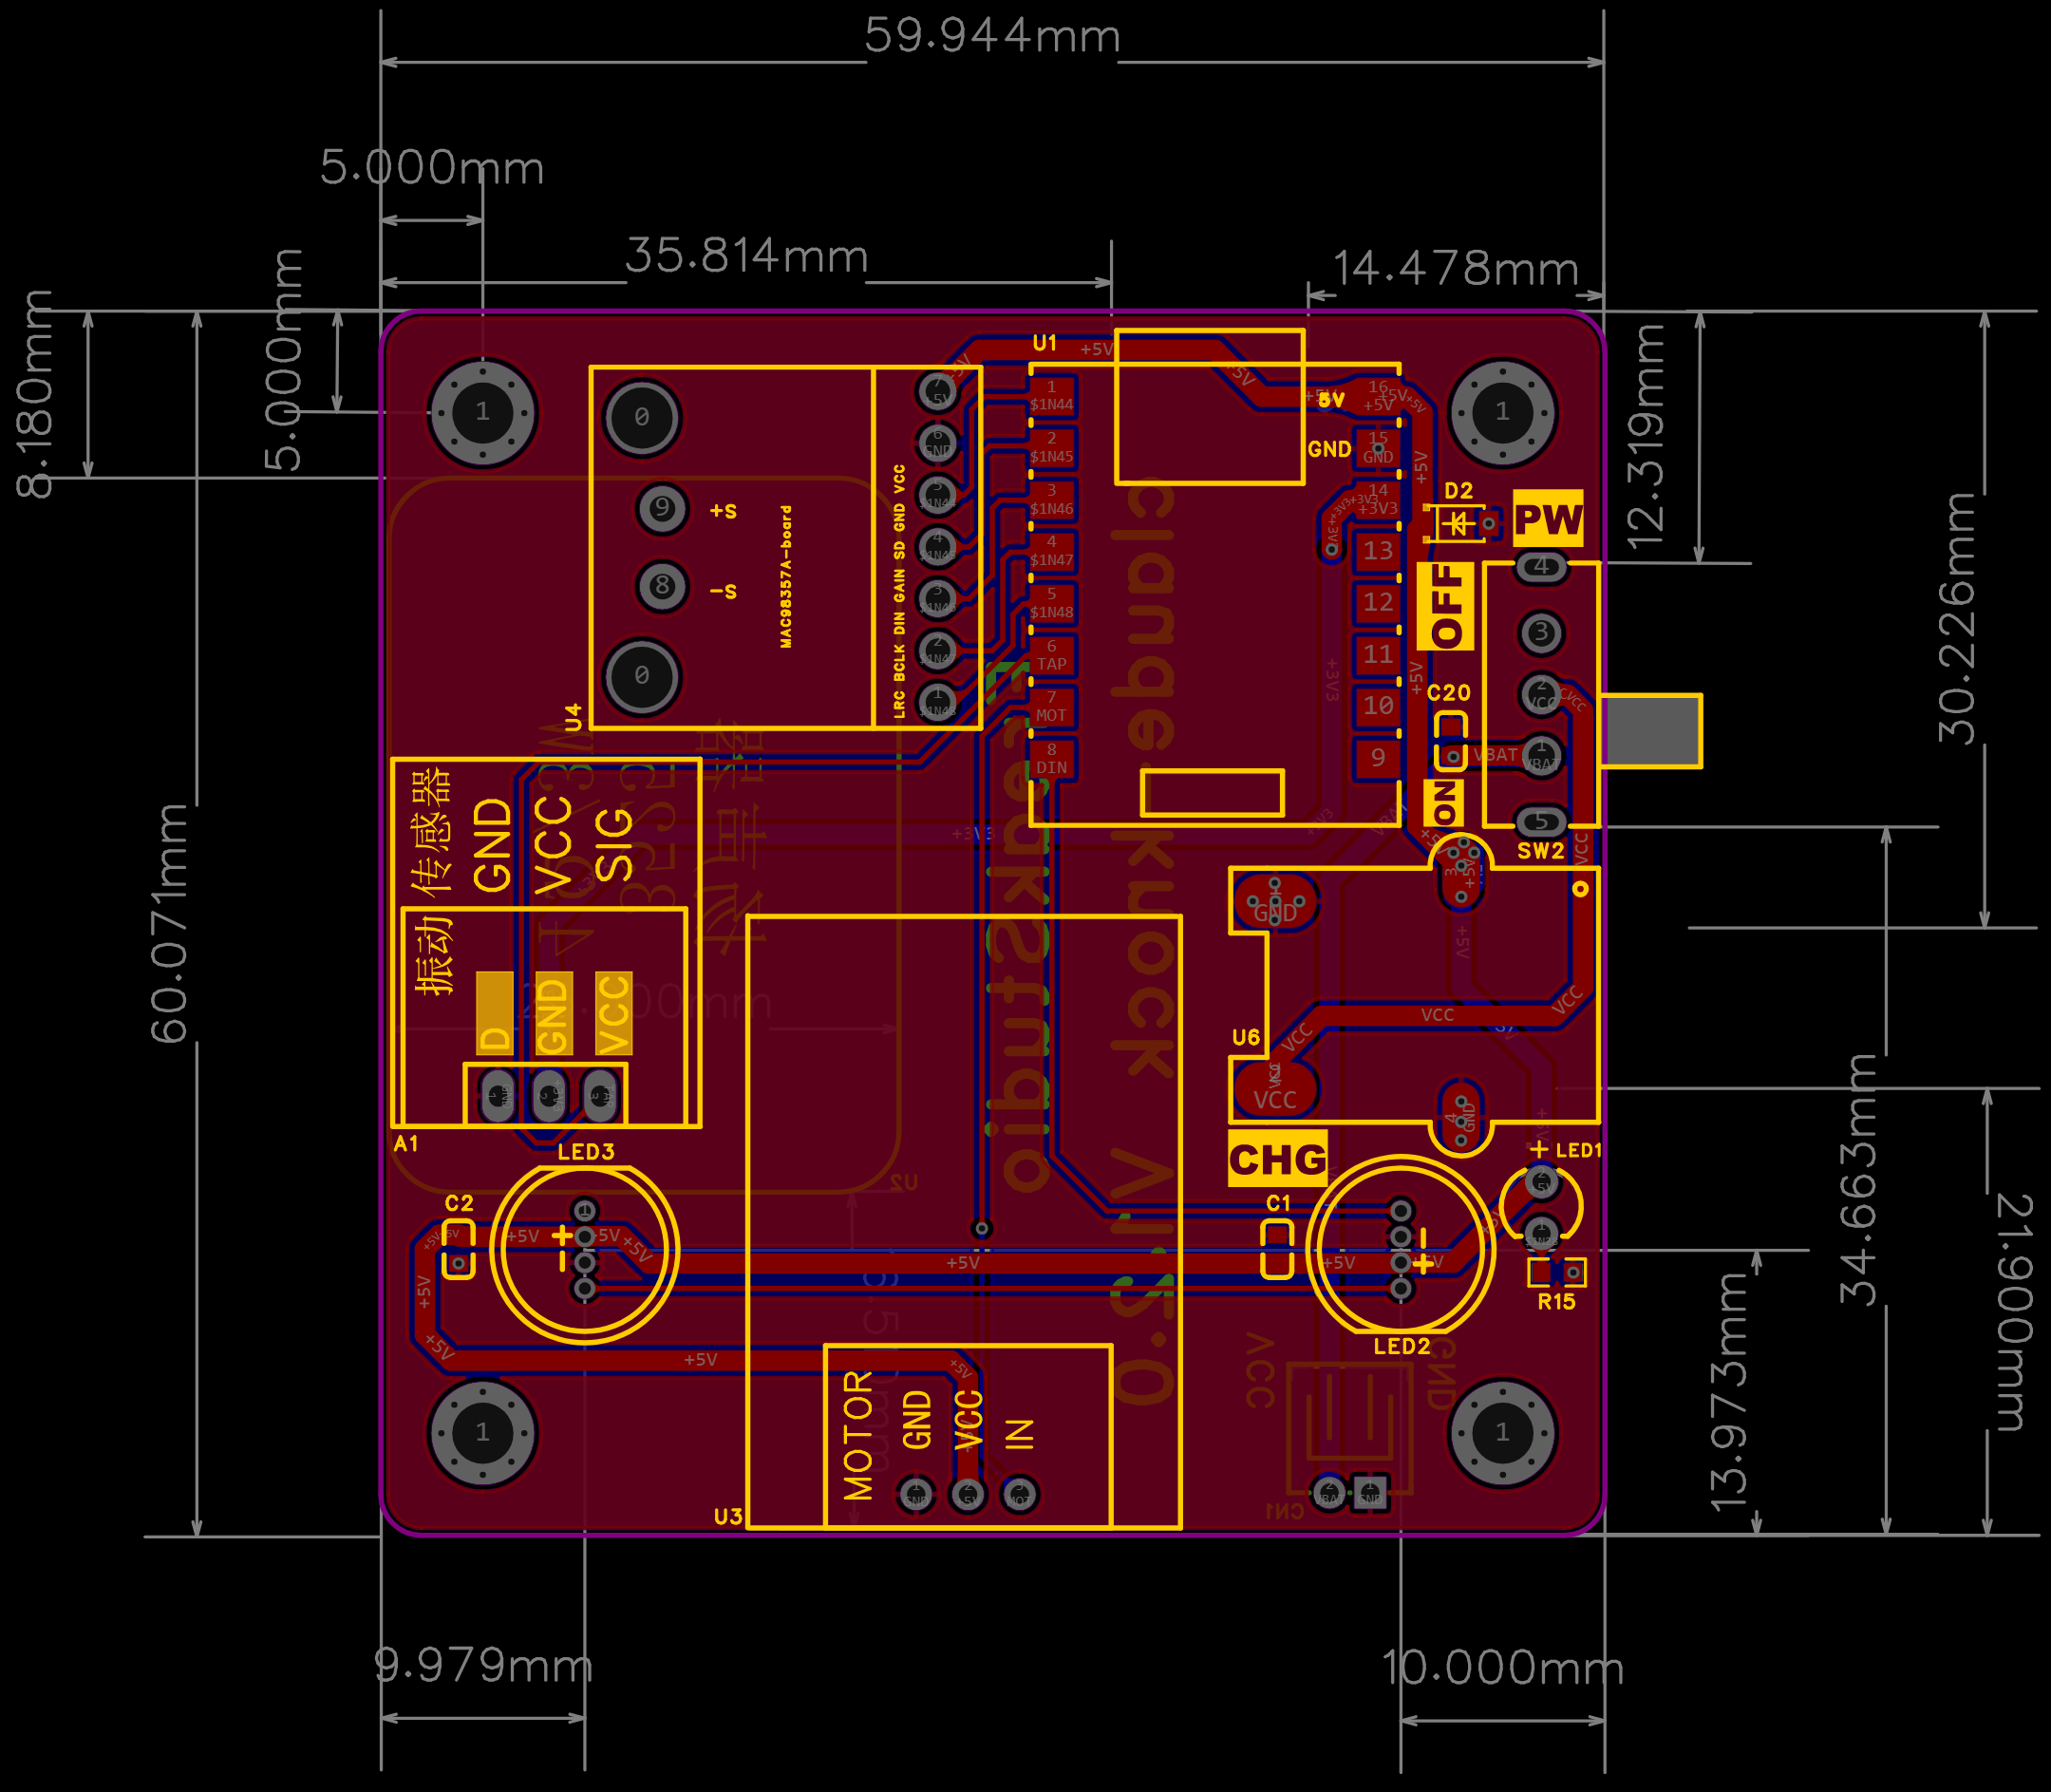
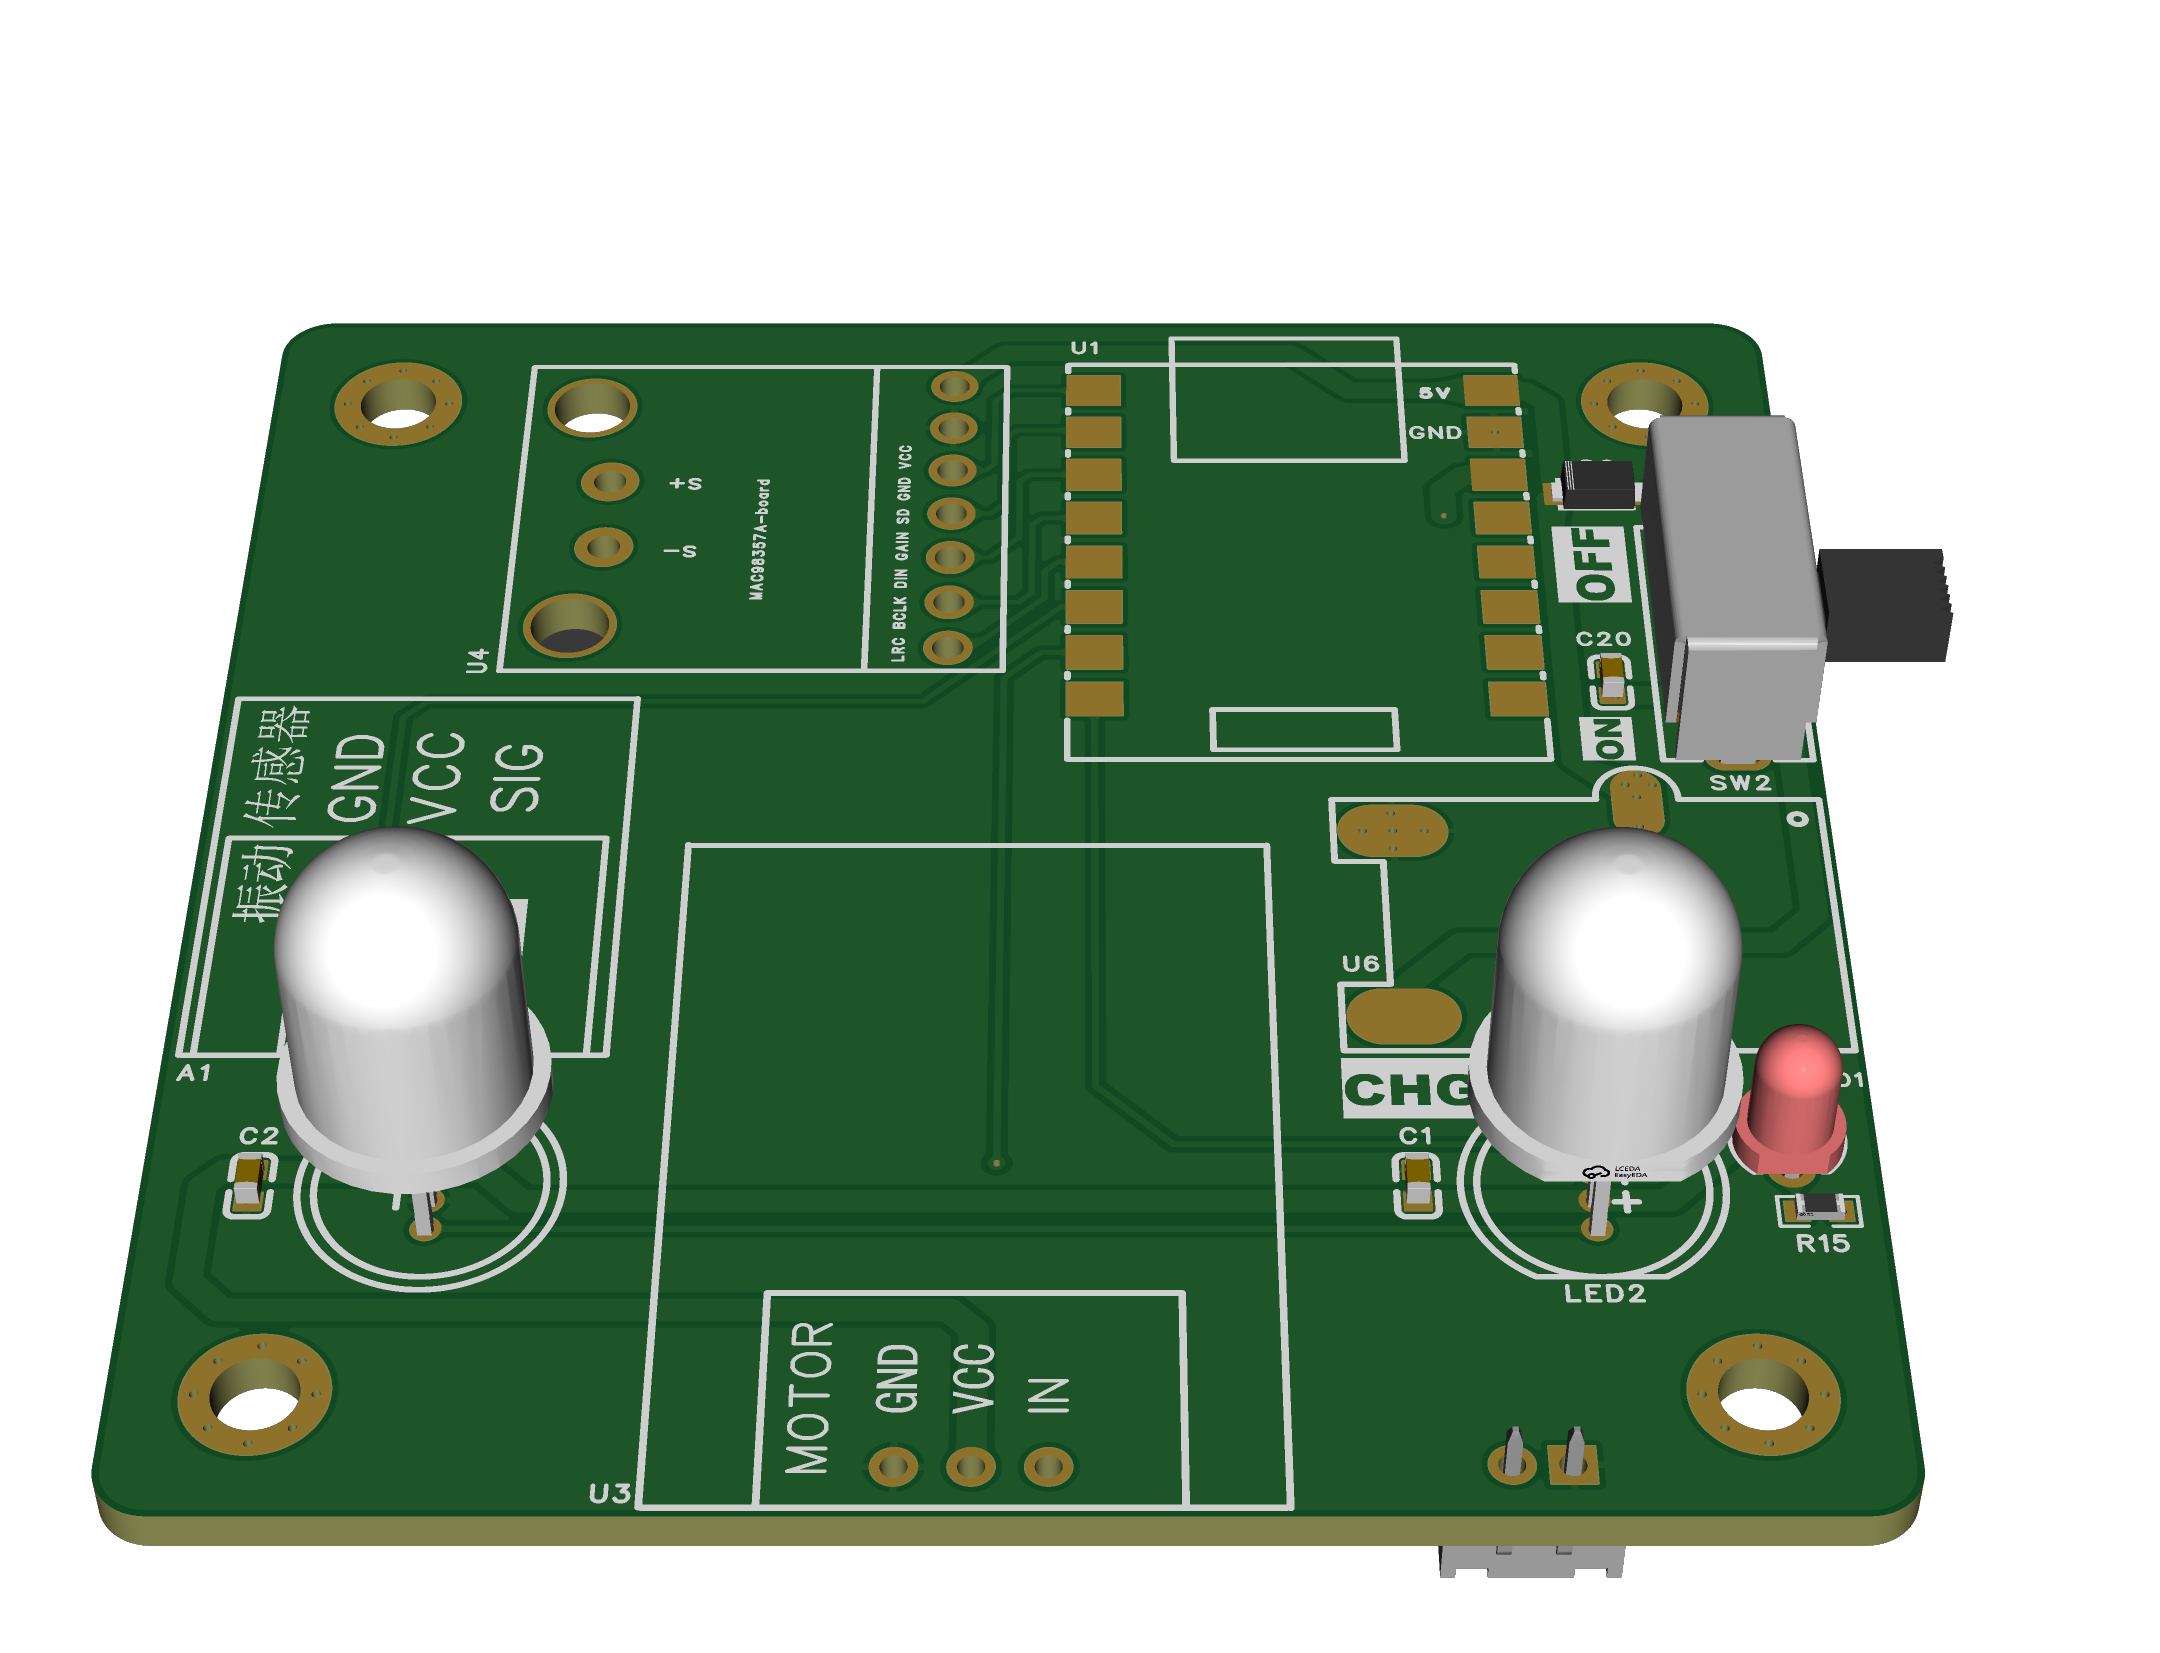
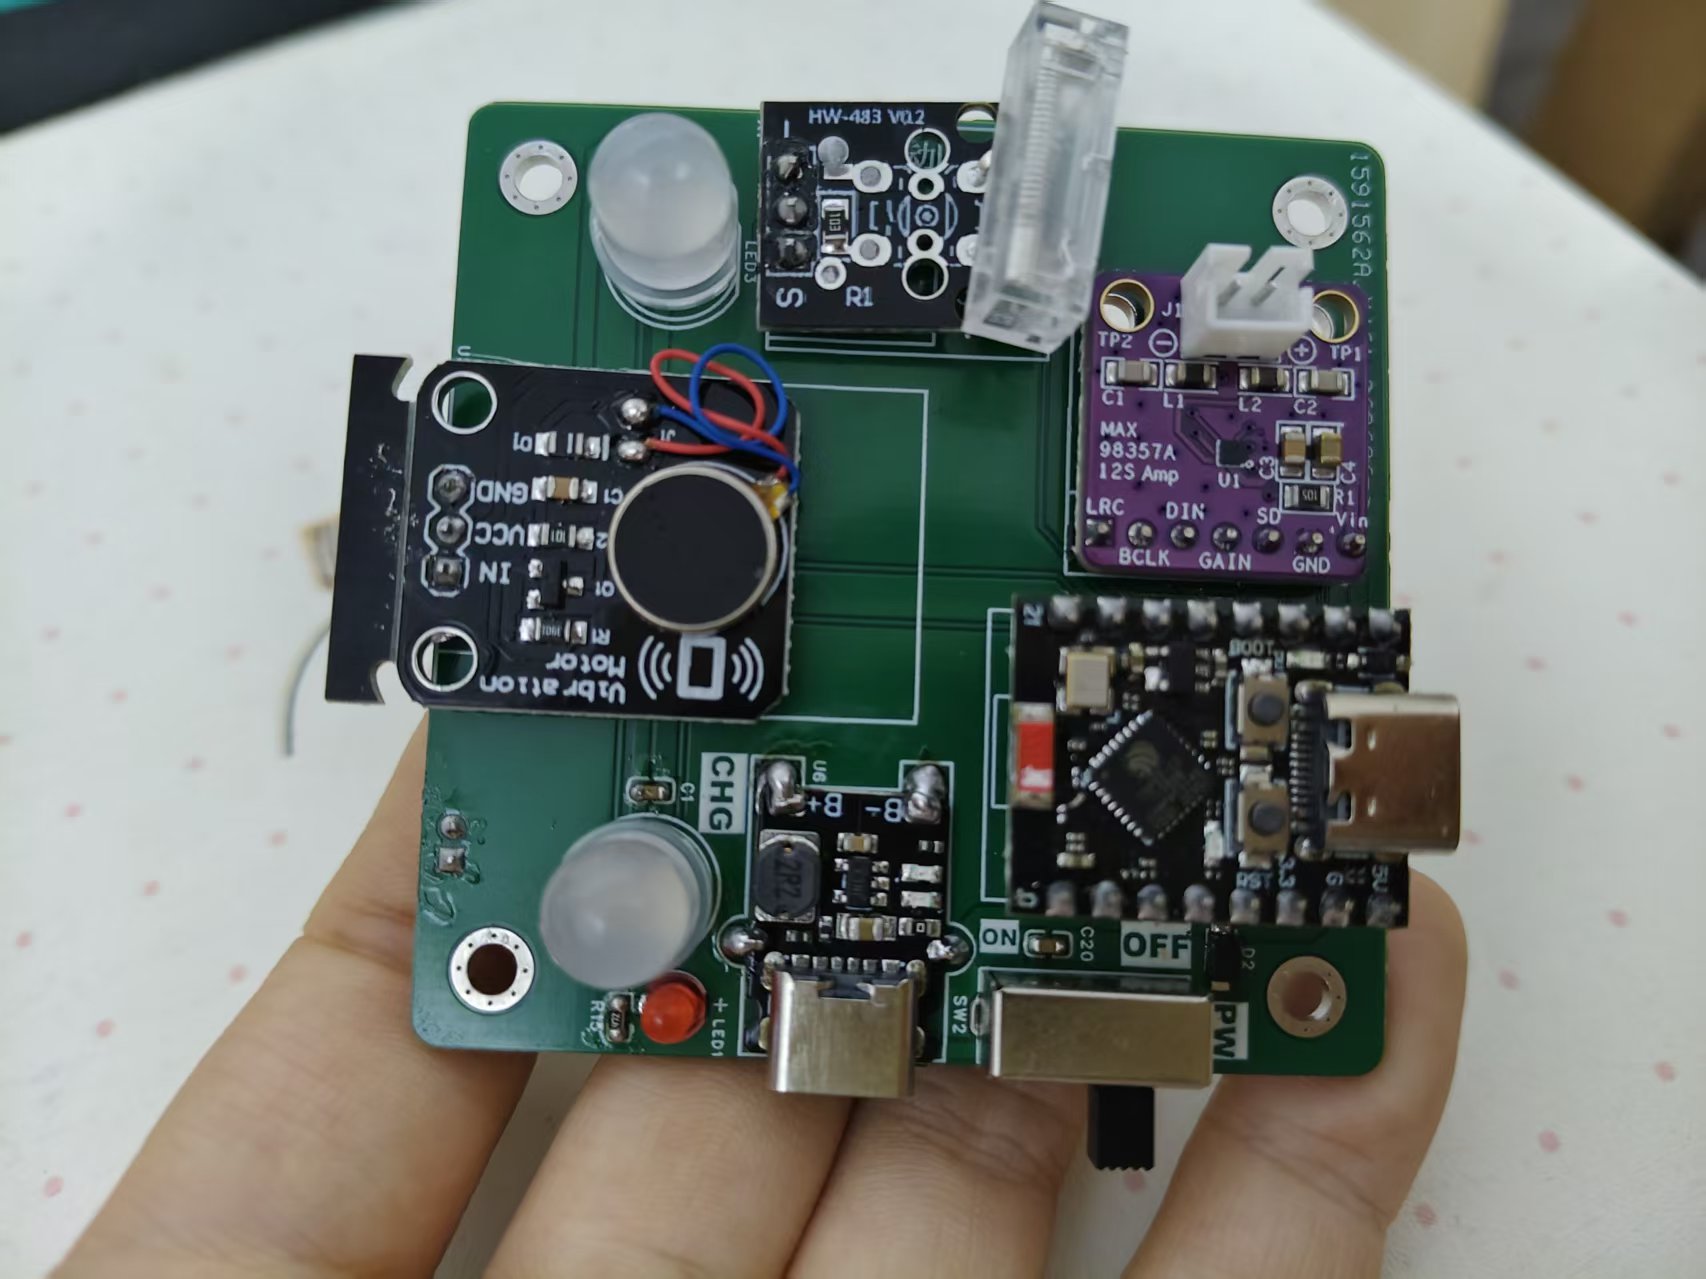
The PCB was designed using JLCPCB EDA. The reason for choosing JLCPCB EDA is that it is closely integrated with the LCSC component library and JLCPCB prototyping process, making it suitable for quickly completing schematic design, PCB layout, DRC checks, and order placement in China.
The role of the PCB is to organize ESP32, WS2812B, MAX98357A, speakers, vibration motors, power supplies, and interfaces into a more stable connection method. Early prototypes can use DuPont wires to verify functionality, but the final project requires more reliable wiring and assembly, so designing a PCB is necessary.
Key design points include:
-
Provide stable power supply to ESP32;
-
Reserve data lines and power supply for WS2812B;
-
Reserved for I2S signal connection of MAX98357A;
-
Reserved interfaces for speakers and vibration motors;
-
Retain the interfaces required for debugging and programming;
-
Adjust the size of the control board so that it can fit into the 3D printed enclosure.
After the PCB is completed, export Gerber, BOM, and coordinate files, and conduct prototyping through JLCPCB. After soldering is completed, perform short-circuit inspection, power supply inspection, LED output testing, and audio playback testing.
8.4 Embedded Programming
The ESP32 firmware is written in MicroPython and distinguishes between clock, panel, and dshell through the VARIANT field in device/config.py based on the hardware form. This allows the same set of projects to support different hardware without the need to maintain completely independent code for each version.
The firmware has completed the following tasks:
-
Initialize the screen, lights, and audio;
-
Receive status messages from the computer;
-
Parsing status;
-
Switch lights, animations, and voices based on the state;
-
Handle disconnection and reconnection;
-
Keep the main loop of the device running stably;
-
Record device-side rotation logs to facilitate troubleshooting of BLE, state parsing, and rendering issues.
The state processing logic is as follows:
```Plain Text 收到状态消息 ↓ 解析状态类型 ↓ 更新内部状态机 ↓ 刷新灯光 / 屏幕 / 语音
The key code files are as follows:

| **document**                 | **Function**                                                 |
| ---------------------------- | ------------------------------------------------------------ |
| `device/main.py`             | Device main entry, responsible for BLE reception and rendering scheduling |
| `device/config.py`           | Hardware pins, VARIANT, BLE name, audio and lighting parameters |
| `device/protocol.py`         | Parse the wire protocol sent from the computer               |
| `device/state.py`            | Define device states and state transitions                   |
| `device/transport.py`        | BLE NUS Transmission, Handling 20B MTU Packet Segmentation and Reassembly |
| `device/light_renderer.py`   | Clock Version WS2812 Lighting Rendering                      |
| `device/display_renderer.py` | Panel / D\-Shell Version LVGL Screen Rendering               |
| `device/voice_task.py`       | I2S Voice Playback Queue                                     |
| `device/vibration.py`        | Vibration motor and vibration sensor processing              |
| `device/session_manager.py`  | Multi\-session state management                              |
| `device/rotating_logger.py`  | Device\-side loop log                                        |

The wire state received by the device uses a compact JSON format, for example:

```Plain Text
{"ss":[{"n":"project","s":"P","m":"Approval required","slot":"ab12"}]}
Among them, s represents the status: I is idle, W is working, P is waiting for approval, C is completed, E is error. After the firmware receives the status, it selects different light colors, blinking rhythms, screen animations, and voice announcements based on the status.
8.5 Interface and Application Programming
The computer program is responsible for forwarding the state of Claude Code / Codex-like Agents to the hardware. In this project, the computer side mainly consists of a Python daemon process and a hook bridge, and the code is located in daemon/ directory.
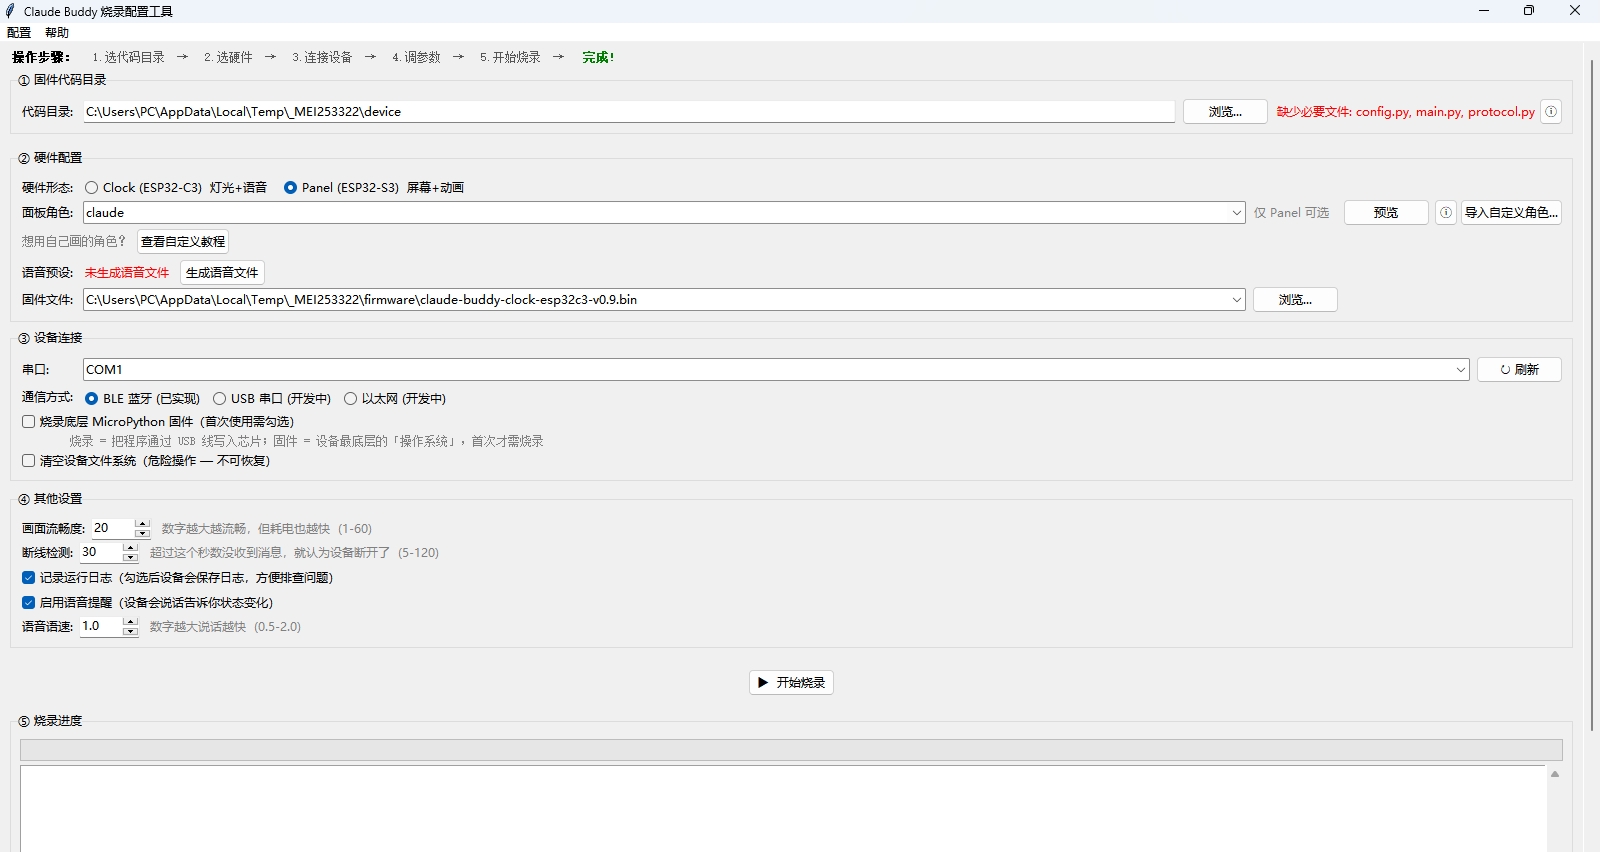
It performs the following tasks:
-
Obtain status from Claude Code / Codex / Hook;
-
Unify the states from different sources into a single format;
-
Send to ESP32;
-
Handle connection failure;
-
Provide debugging logs;
-
Aggregate multiple Claude Code sessions and select the most important status to display to the device;
-
Provide pairing, smoke testing, and post-installation inspection tools.
The core documents are as follows:
| document | Function |
|---|---|
daemon/hook_bridge.py |
Receive Claude Code Hook payload and standardize it into an internal event |
daemon/ble_daemon.py |
Core daemon, maintains the finite-state machine and pushes to the device at approximately 5Hz |
daemon/transport.py |
BLE Connection Management and Automatic Reconnection Based on Bleak |
daemon/pair_device.py |
Scan and pair the Claude-Buddy device |
daemon/smoke.py |
After installation, conduct a smoke test to verify that the daemon TCP port is reachable |
hooks/hooks.json |
Claude Code Plugin Hook Registration Configuration |
setup_tool/ |
Graphical programming, configuration, and pairing tool |
The computer-side dependencies are written in pyproject.toml, mainly including bleak, esptool, mpremote, pyserial, Pillow, websockets, and volcengine-tts-v1-ws. These dependencies are used for BLE, flashing, serial port, image preview, communication, and Doubao TTS voice generation, respectively.
Example of actual status message:
This format is shorter than the full natural language state, more suitable for BLE packetized transmission, and also convenient for ESP32 end parsing.
8.6 Communication
The communication layer is the key to this project because it determines whether the computer-side state can be stably transmitted to the device.
Several methods can be compared:
| Communication Mode | Advantages | Disadvantages |
|---|---|---|
| BLE | Does not require Wi-Fi, suitable for desktop devices | Complex debugging, possible disconnection |
| Wi-Fi | High bandwidth, suitable for WebSocket | Needs network configuration |
| Serial Port | Stable and Simple | The device must be wired |
This project ultimately chose BLE as the primary communication method. The reason is that the device is positioned as a desktop companion, and cables should be minimized; BLE allows the device to be powered only via USB, with the data link completed through Bluetooth. For the Clock version, the amount of data transmitted is very small, only requiring status, project name, and short messages, and the BLE bandwidth is already sufficient.
BLE uses UUIDs in the style of Nordic UART Service:
| Project | UUID |
|---|---|
| Service | 6e400001-b5a3-f393-e0a9-e50e24dcca9e |
| RX | 6e400002-b5a3-f393-e0a9-e50e24dcca9e |
| TX | 6e400003-b5a3-f393-e0a9-e50e24dcca9e |
Due to the small MTU of a single BLE packet, the device-side transport.py reorganizes 20B sub-packets. The computer-side daemon is responsible for maintaining the connection, automatically reconnecting, and continuously pushing the current status. This ensures that the device can maintain its current status even if the hook events from Claude Code do not arrive continuously.
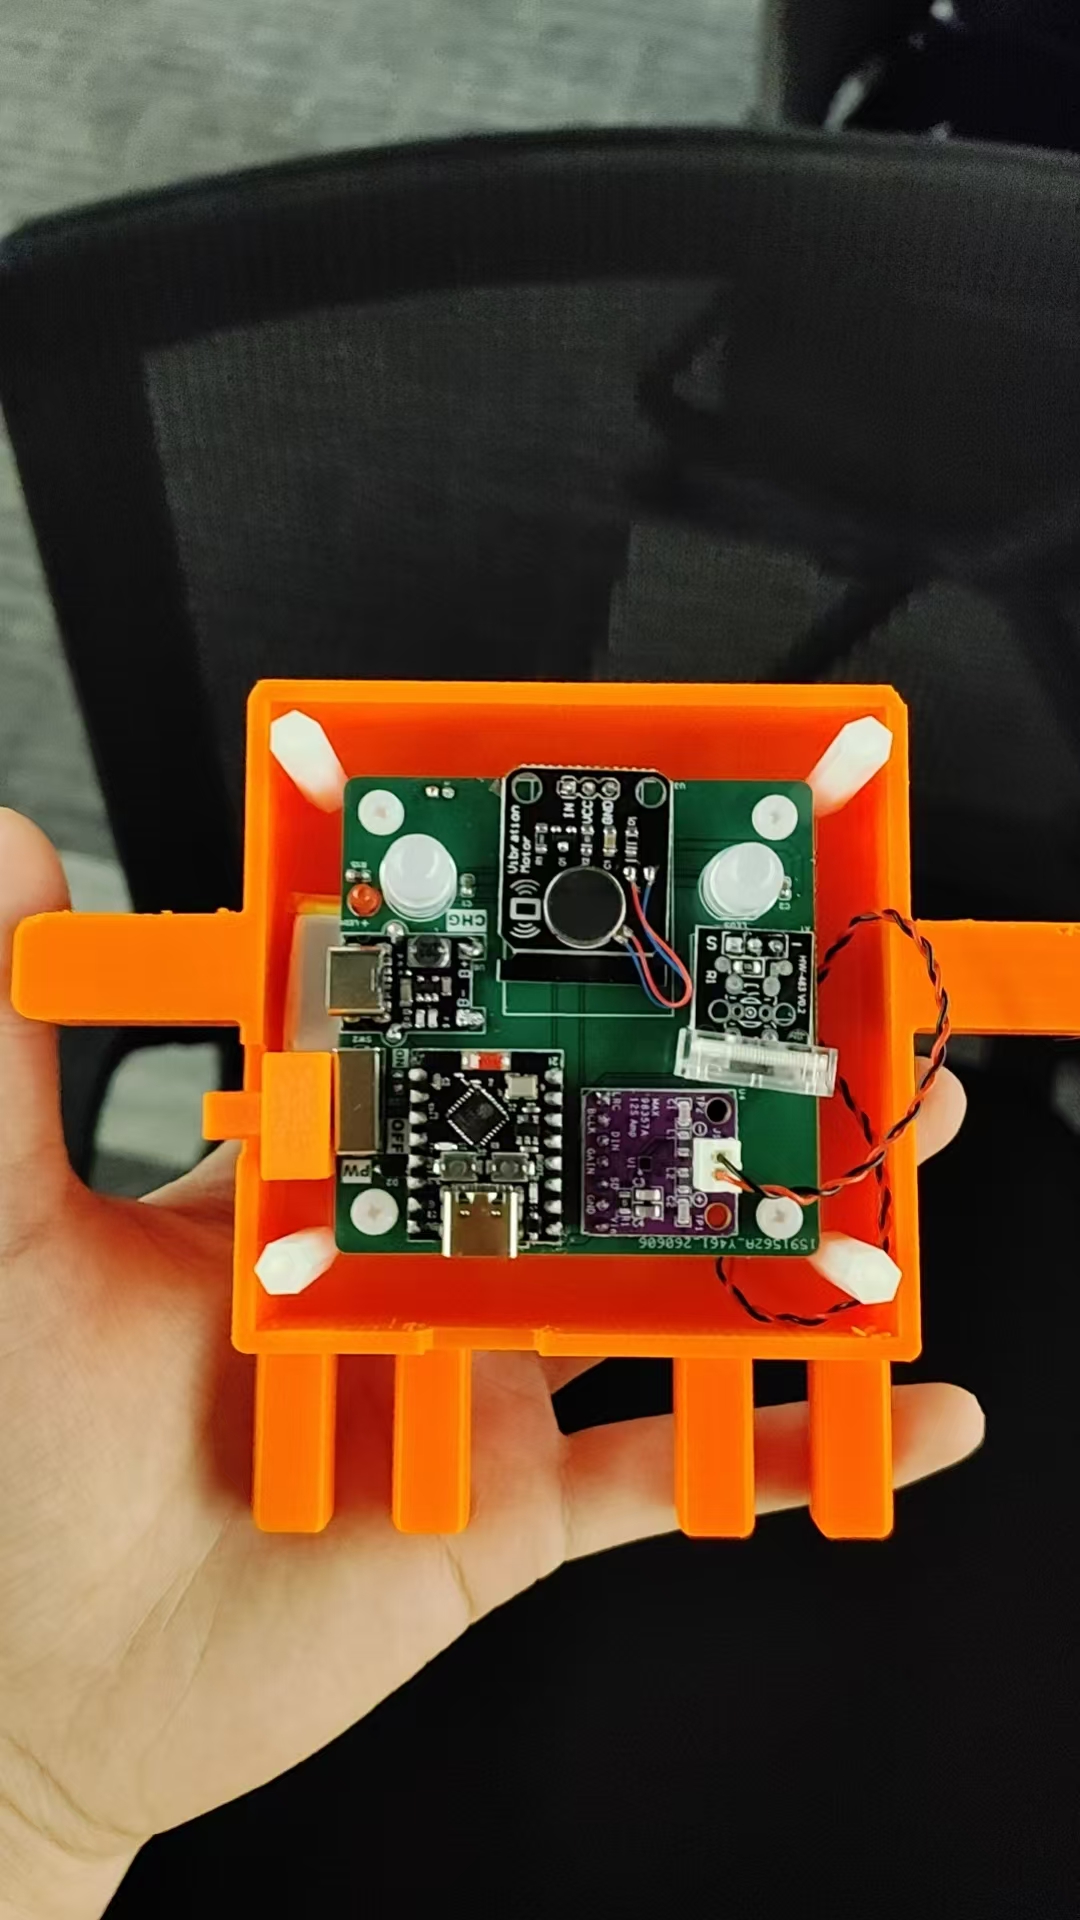
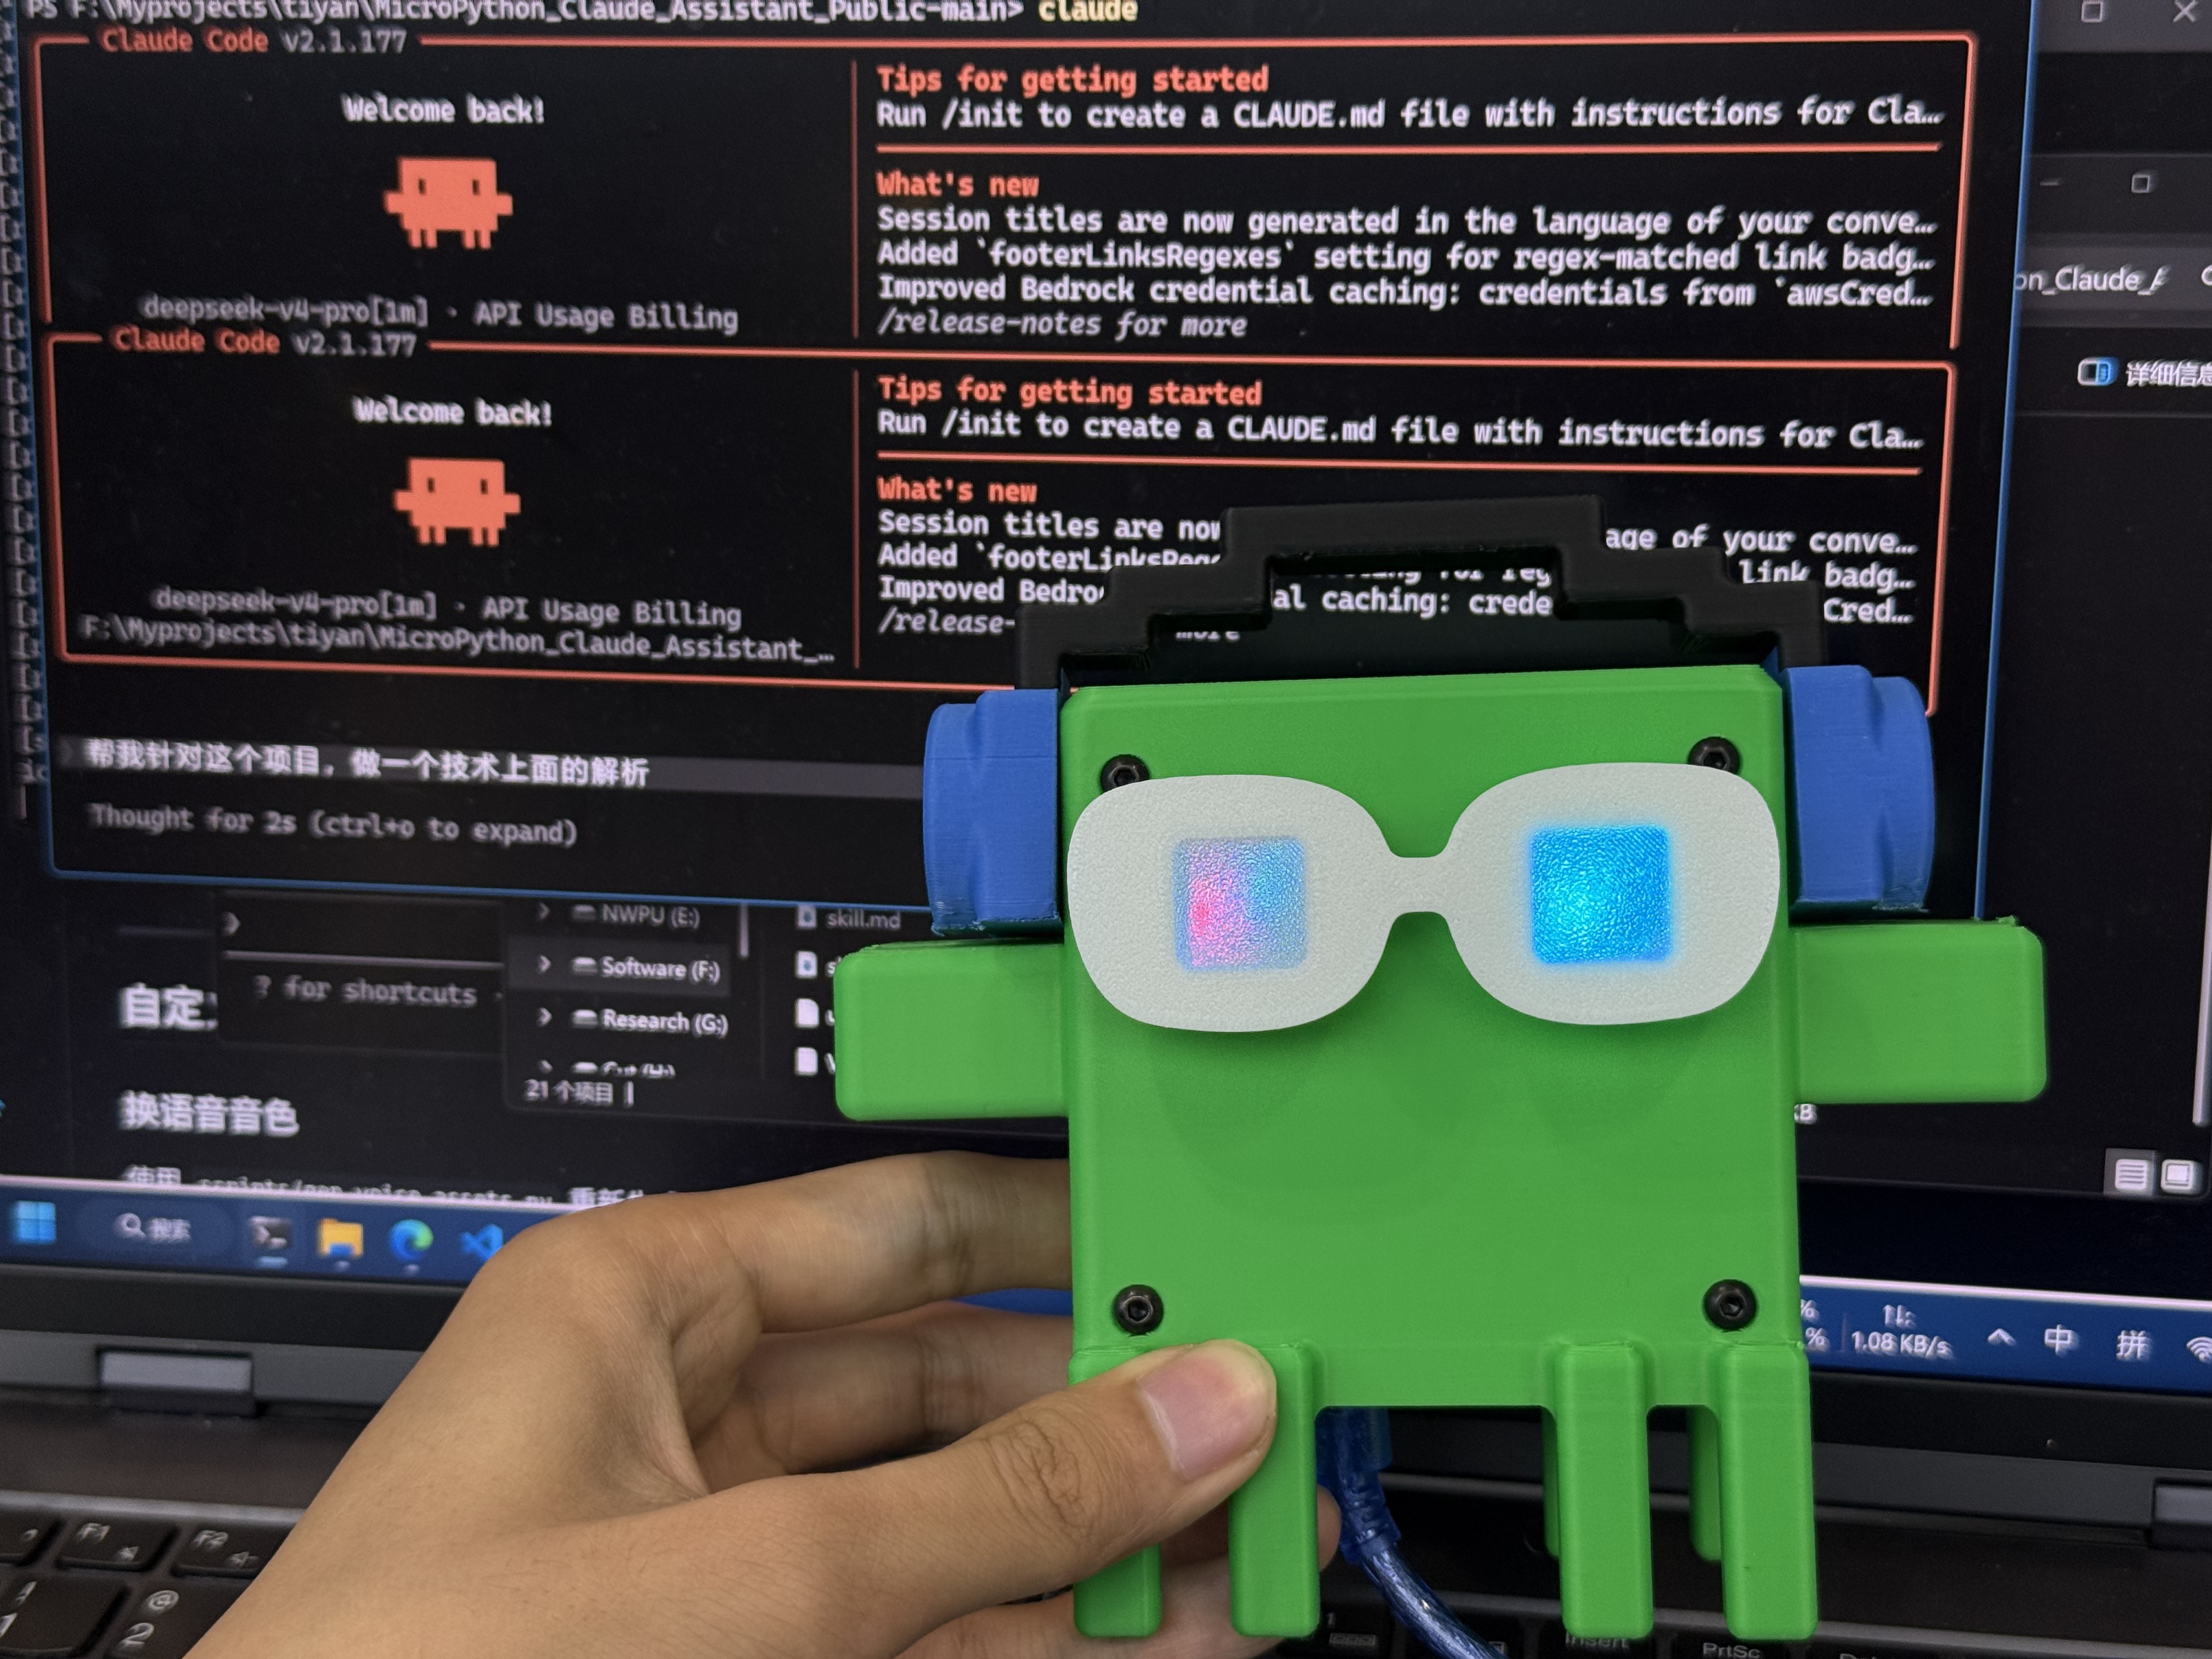
8.7 Assembly
The assembly process is as follows:
- Print or process the housing;
- Install the speaker;
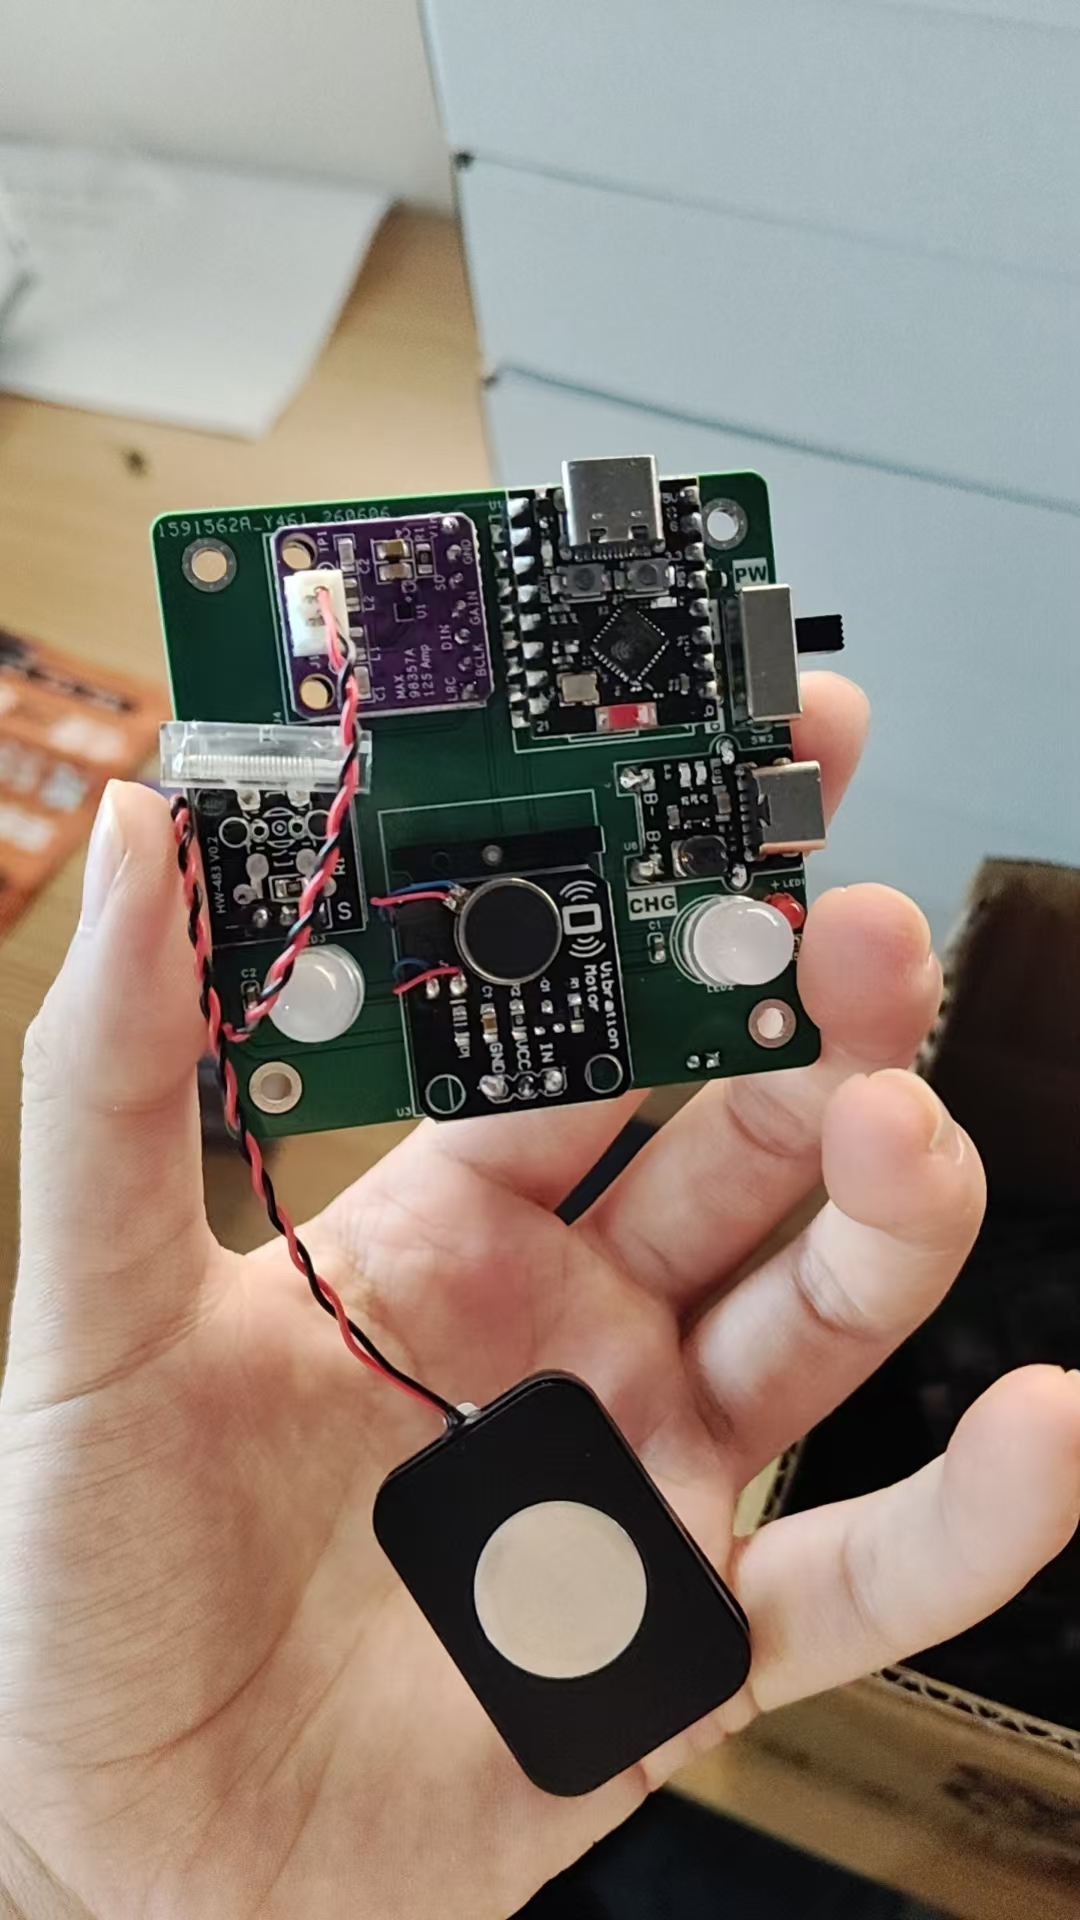
- Secure the main control board and organize the wires;
- Close the housing and secure it with screws;
- Burn the firmware and power it on for testing, and the test shows that the sound and light blinking are normal.
9.Testing and Evaluation
In addition to the answers to the above questions, I have also separately compiled the test methods to facilitate reproduction.
| Testing Phase | Tools / Methods | Objective | Result |
|---|---|---|---|
| Code unit test | tests/test_protocol.py、tests/test_daemon_state.py、tests/test_hook_normalize.py |
Verification of protocol, finite-state machine, and hook standardization | Verify the main logic through local testing |
| Device-side testing | device/tests/test_state.py、device/tests/test_protocol.py |
Verify the state of the MicroPython end and protocol parsing | Can be run on a device or in a simulated environment |
| Simulated device test | scripts/sim_device/ |
Simulate the receiving state of the device when not connected to ESP32 | Facilitates debugging the daemon on the computer |
| Hook Simulation | scripts/sim_hooks_v5.py |
Simulate Claude Code event sequence | Verify W/P/C/E/I Switching |
| BLE Test | scripts/ble_test_send.py |
Send a BLE message directly to the device | Verify Bluetooth link and device reception |
| burn-in test | setup_tool / scripts/flash_device.py |
Flash MicroPython firmware and device files | Confirm that the device can start and run |
| Voice Test | scripts/gen_voice_assets.py、scripts/test_tts_voices.py |
Generate and play PCM voice | Confirm that the speaker and TTS resources are functioning properly |
| Real-world scenario testing | Run long tasks in Claude Code, wait for approval, and handle failed commands | Verify whether the device can alert the user in the desktop scenario | Light and voice can effectively indicate critical status |
The most important conclusion from the test is that for AI programming tools, ** waiting for approval ** and ** task completion ** are the two states that most require external reminders. During work, status can be indicated by lights; error status requires red lights and voice; waiting for approval requires slow yellow flashing and clear voice, as this is the point where tasks are most likely to stall.
10.Future Development
Future improvements can continue:
-
Supports more Agent tools such as Codex, Claude Code, Gemini CLI, etc.;
-
Supports multiple project statuses and displays session history on the screen version;
-
Add a web page configuration interface;
-
Add battery power supply;
-
Optimize the industrial design of the housing;
-
Design a more stable and easier-to-assemble PCB;
-
Add more characters and animations;
-
Supports remote task notifications;
-
Add volume adjustment and Do Not Disturb Mode to the Clock version;
-
Add touch menu and status details page for Panel / D-Shell version;
-
Further encapsulate the installation process to reduce the cost for ordinary users to configure Claude Code Hook.
11.Files
Downloadable files:
-
3D Model File: 闹钟3D外壳设计(终版).7z
-
2D Design Documents: Maker Assistant.psd
-
PCB Fabrication Files; 码克助手制板文件.zip
-
Source code and firmware files: https://github.com/FreakStudioCN/MicroPython_Claude_Assistant_Public
-
BOM Table: BOM_ESP32C3-插件版本_PCB1_2026-06-23.xlsx
12.License
The project code is released under MIT License, making it easy for others to learn, modify, and reproduce.
It should be noted that the project uses multiple third-party open-source tools and libraries, such as MicroPython, aioble, bleak, LVGL, esptool, mpremote, Pillow, websockets, etc. These third-party libraries retain their original licenses. The voice resources are generated by Doubao TTS, and users need to comply with the terms of service of the Doubao Open Platform when using them.
For 3D shells, character appearances, and presentation documents, use CC BY-SA 4.0 for sharing: allow others to learn and modify, but require attribution to be retained and derivative designs to be shared in the same manner.
13. Acknowledgments
Thank Fab Academy, lab instructors, and classmates for their assistance during the project design, production, debugging, and documentation process.
We also thank Claude Code, Codex, ESP32, MicroPython, LVGL, BLE, JLCPCB EDA, LCSC, Doubao TTS, and related open-source communities for providing tools and reference materials.
Finally, I would like to express my gratitude for the preliminary exploration accumulated during the development of the FreakStudio project. This final project of Fab Academy has allowed me to re-disassemble my original product idea into a complete digital manufacturing project: from problem definition, enclosure design, electronic connections, embedded firmware, host computer program, communication protocol, to final assembly and testing, each part needs to be able to explain why it is done this way, how to make it, and how to verify it.
AI Assistance:
During the preparation of this documentation, ChatGPT \(GPT\-4\) was used as a language assistance tool.
It helped with sentence polishing and translation from Chinese to English to improve readability and clarity.