Week 15 Interface and Application Programming
Group assignment
Week 15 Chaihuo group assignment.
The link to our group work:
https://fabacademy.org/2026/labs/chaihuo/docs/week15/chaihuo/week15_group_assignment
Individual assignment
Based on my final project, I used Cursor for the ASR development.
Voice-to-text ASR (Automated Speech Recognition)
Connect device to Wi-Fi
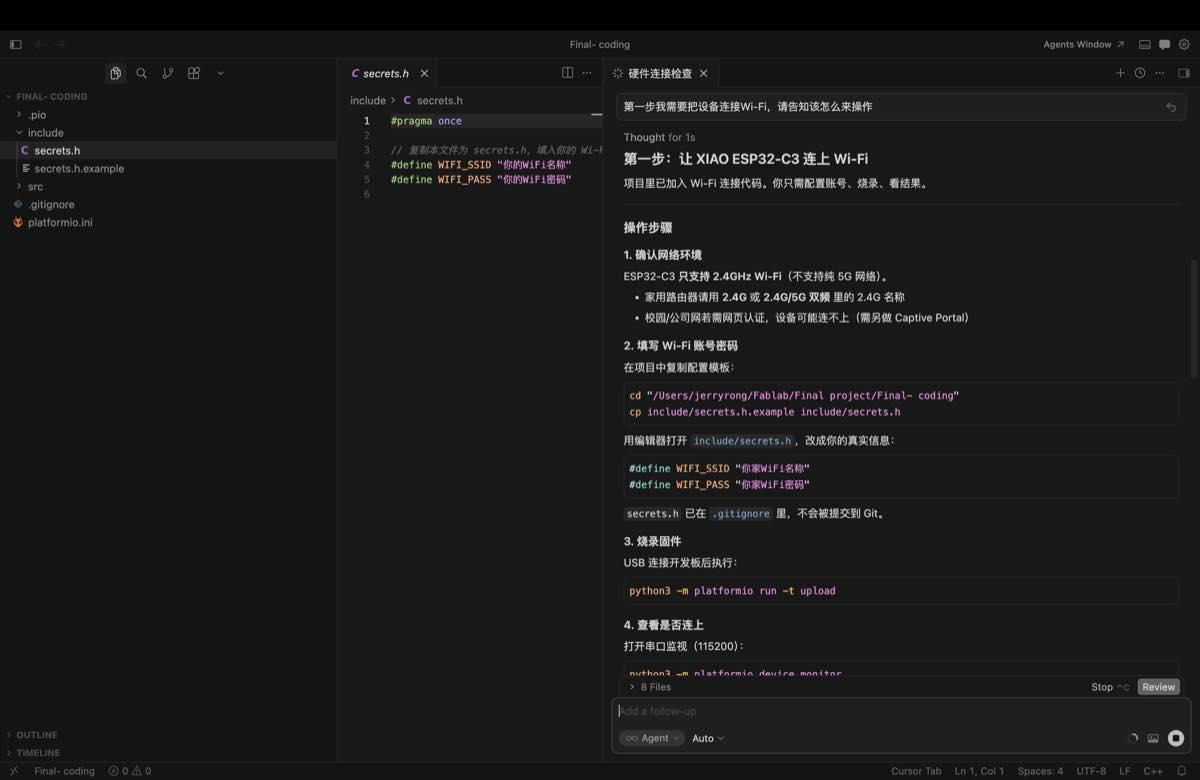
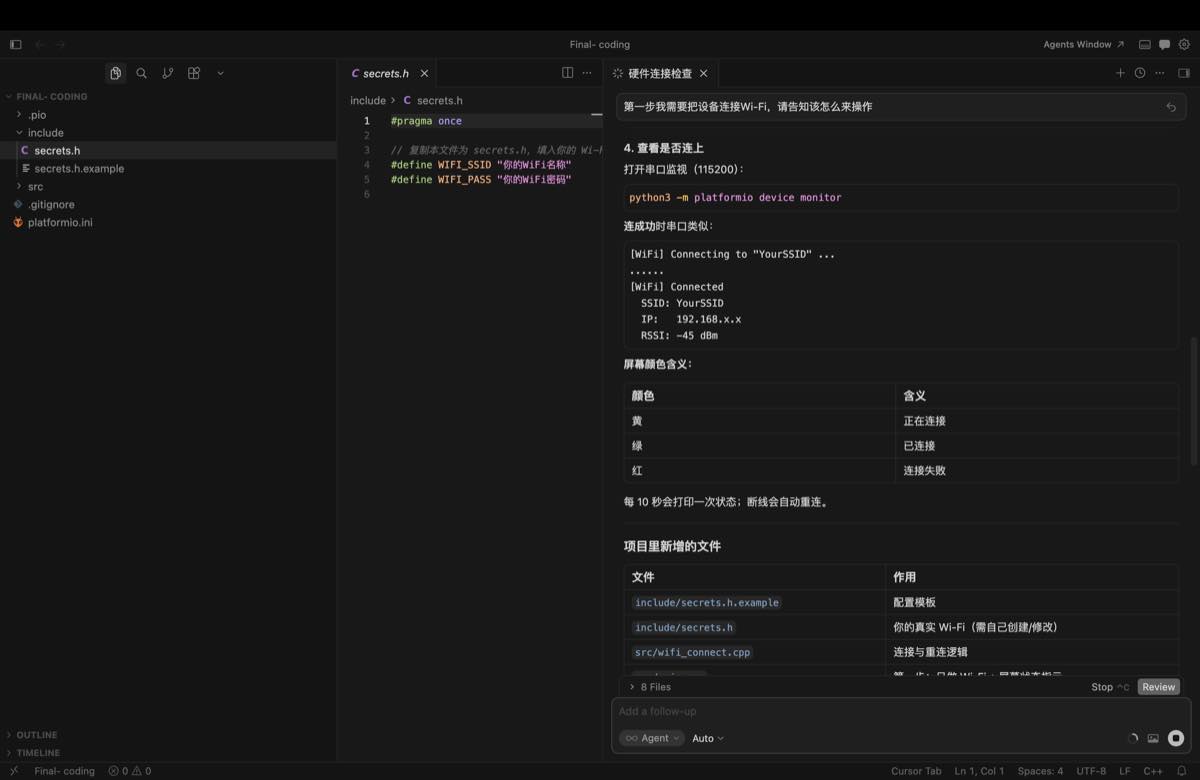
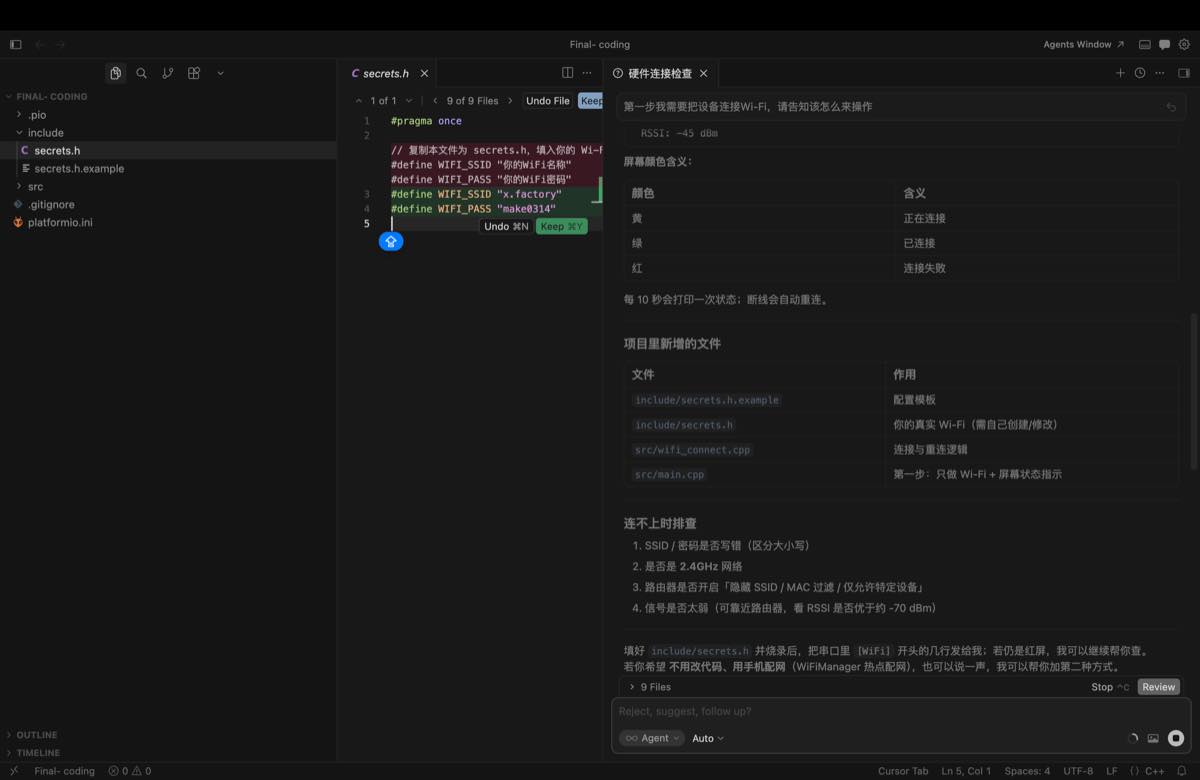
Provide the Wi-Fi account and password to generate the firmware, and burn the firmware.
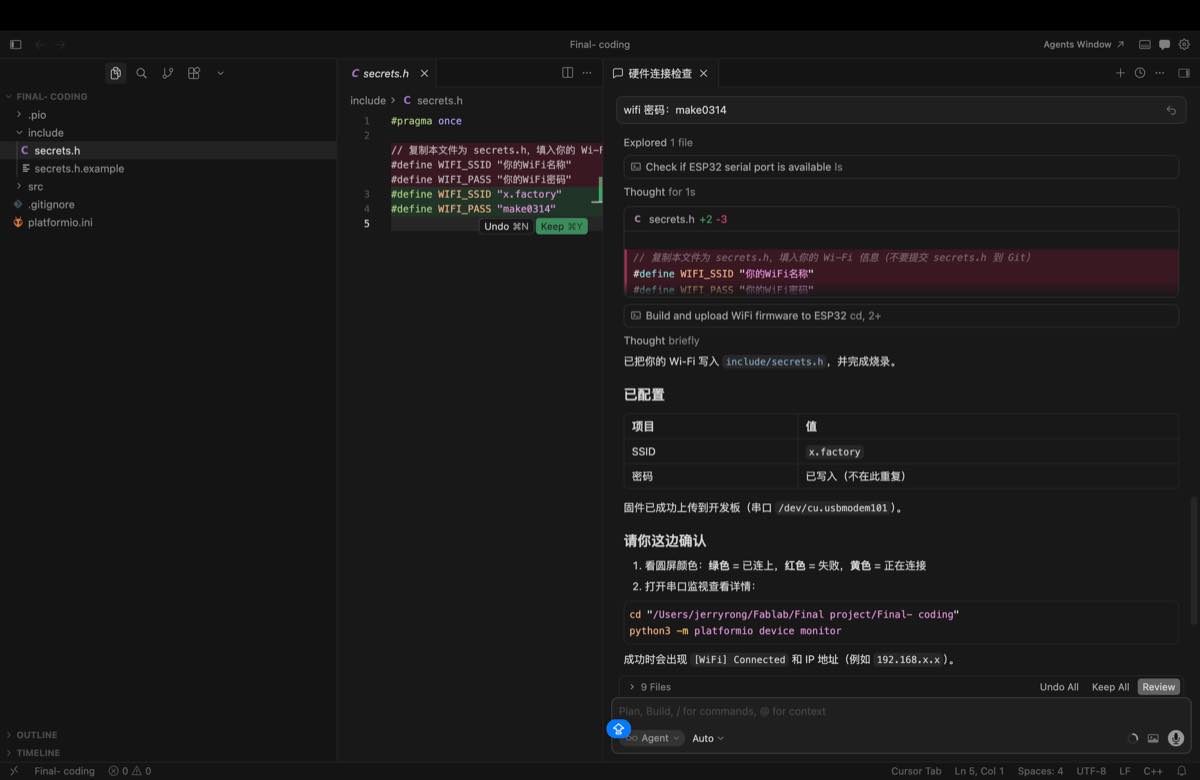
Testing
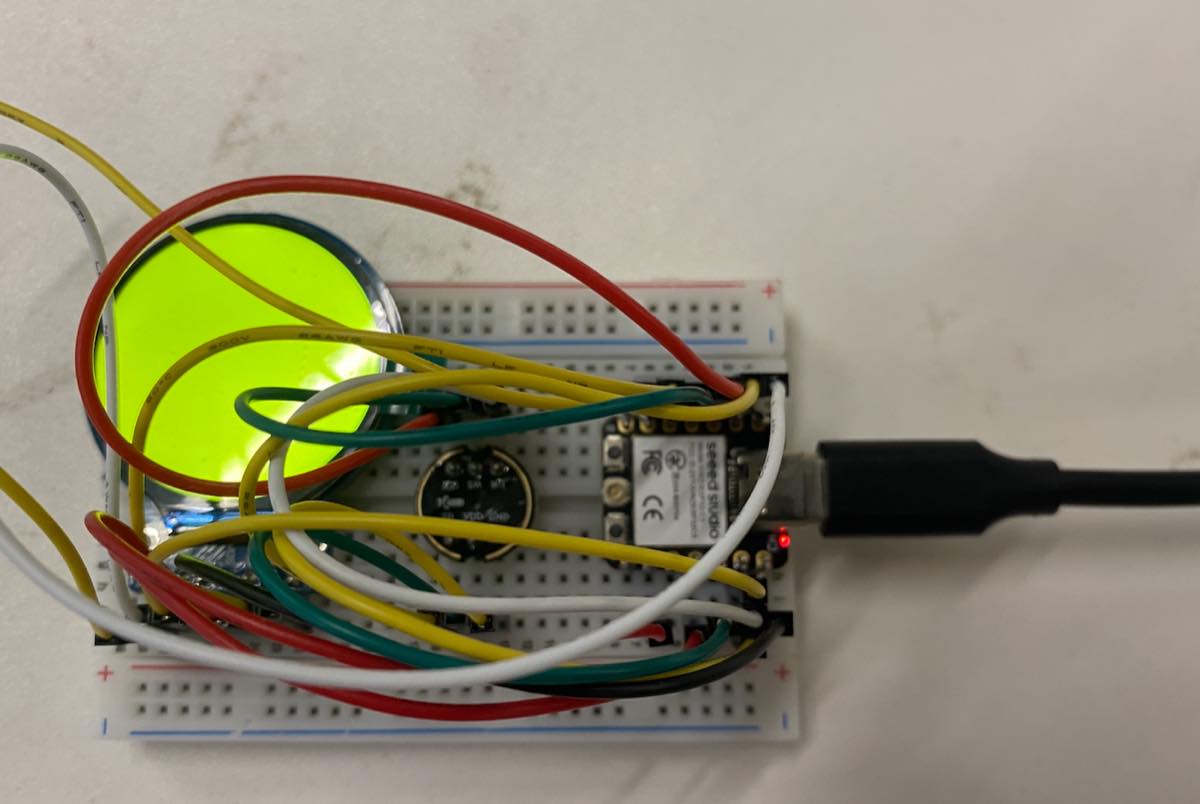
Testing: when the display shows green, it means the device is connected to Wi-Fi.
- Green: connected
- Red: disconnected
- Yellow: connecting
Key source code — WiFi connect + WiFi test (GC9A01 round LCD)
Early Wi-Fi hardware test on Seeed Xiao ESP32-C3 + GC9A01: round screen shows connection state by colour, Serial prints RSSI, auto-reconnect on disconnect.
The same wifi_connect module is reused in the full Lucky Bot firmware (main.cpp).
Project files: include/secrets.h, src/wifi_connect.cpp, src/gc9a01_hsd.cpp, src/main.cpp
| Screen colour | Meaning |
|---|---|
| Yellow | Connecting to Wi-Fi |
| Green | Connected (got IP) |
| Red | Disconnected / connect failed |
1. Wi-Fi credentials (include/secrets.h.example → copy to secrets.h):
#pragma once

#define WIFI_SSID "your_wifi_name"
#define WIFI_PASS "your_wifi_password"

// Mac LAN IP (terminal: ipconfig getifaddr en0)
#define ASR_SERVER_HOST "192.168.0.100"
#define ASR_SERVER_PORT 8765
2. Wi-Fi driver API (src/wifi_connect.h):
struct WiFiConnectResult {
  bool ok;
  int8_t rssi;
  IPAddress ip;
  const char* message;
};

void wifiInitSta();
bool wifiIsLinked();   // WL_CONNECTED + valid IP

WiFiConnectResult connectWiFi(const char* ssid, const char* password,
                              uint32_t timeoutMs = 45000);
void printWiFiStatus();  // SSID, IP, RSSI dBm
3. Wi-Fi connect function (src/wifi_connect.cpp):
#include "wifi_connect.h"
#include <WiFi.h>
#include <esp_wifi.h>

void wifiInitSta() {
  WiFi.onEvent(onWiFiEvent);
  WiFi.mode(WIFI_STA);
  WiFi.setAutoReconnect(false);
  WiFi.setSleep(false);
  esp_wifi_set_ps(WIFI_PS_NONE);
}

bool wifiIsLinked() {
  return WiFi.status() == WL_CONNECTED &&
         WiFi.localIP() != IPAddress(0, 0, 0, 0);
}

WiFiConnectResult connectWiFi(const char* ssid, const char* password,
                              uint32_t timeoutMs) {
  WiFiConnectResult result = {false, 0, IPAddress(), "timeout"};
  if (!ssid || !ssid[0]) {
    result.message = "SSID empty — edit include/secrets.h";
    return result;
  }

  wifiInitSta();
  Serial.printf("[WiFi] Connecting to \"%s\" ...\n", ssid);

  // Scan hotspot first (helps iPhone hotspot — find channel + RSSI)
  int targetChannel = 0;
  const int found = WiFi.scanNetworks(false, true);
  for (int i = 0; i < found; i++) {
    if (WiFi.SSID(i) == ssid) {
      targetChannel = WiFi.channel(i);
      Serial.printf("[WiFi] Found \"%s\" ch=%d rssi=%d\n",
                      ssid, targetChannel, WiFi.RSSI(i));
      break;
    }
  }
  WiFi.scanDelete();

  WiFi.disconnect(false);
  delay(400);
  if (targetChannel > 0)
    WiFi.begin(ssid, password, targetChannel);
  else
    WiFi.begin(ssid, password);

  const uint32_t start = millis();
  while (!wifiIsLinked()) {
    if (WiFi.status() == WL_CONNECT_FAILED ||
        WiFi.status() == WL_NO_SSID_AVAIL) {
      result.message = "auth failed or SSID not found";
      return result;
    }
    if (millis() - start > timeoutMs) {
      result.message = "connection timeout";
      return result;
    }
    delay(400);
    Serial.print('.');
  }
  Serial.println();

  result.ok = true;
  result.rssi = WiFi.RSSI();
  result.ip = WiFi.localIP();
  result.message = "connected";
  Serial.printf("[WiFi] OK IP=%s rssi=%d\n",
                result.ip.toString().c_str(), (int)result.rssi);
  return result;
}

void printWiFiStatus() {
  if (!wifiIsLinked()) {
    Serial.printf("[WiFi] Status=%d (not ready)\n", WiFi.status());
    return;
  }
  Serial.println("[WiFi] Connected (stable)");
  Serial.printf("  SSID: %s\n", WiFi.SSID().c_str());
  Serial.printf("  IP:   %s\n", WiFi.localIP().toString().c_str());
  Serial.printf("  RSSI: %d dBm\n", WiFi.RSSI());
}
4. Wi-Fi test — colour screen + periodic status (early test main.cpp, reconstructed from hardware-check logic):
#include "gc9a01_hsd.h"
#include "wifi_connect.h"
#include "secrets.h"

GC9A01_HSD lcd;

constexpr uint32_t kStatusPrintMs = 10000;   // print RSSI every 10 s
constexpr uint32_t kReconnectMs   = 10000;   // retry if link lost

void showWifiColour(uint16_t color) {
  lcd.fillScreen(color);
}

void setup() {
  Serial.begin(115200);
  delay(500);
  Serial.println("=== WiFi test — GC9A01 colour status ===");

  lcd.begin();

  showWifiColour(COLOR_YELLOW);              // Yellow = connecting
  WiFiConnectResult r = connectWiFi(WIFI_SSID, WIFI_PASS);

  if (r.ok) {
    showWifiColour(COLOR_GREEN);            // Green = connected
    printWiFiStatus();
  } else {
    showWifiColour(COLOR_RED);              // Red = failed
    Serial.printf("[WiFi] FAIL: %s\n", r.message);
  }
}

void loop() {
  static uint32_t lastPrint = 0;
  static uint32_t lastReconnect = 0;
  const uint32_t now = millis();

  if (wifiIsLinked()) {
    showWifiColour(COLOR_GREEN);
    if (now - lastPrint >= kStatusPrintMs) {
      lastPrint = now;
      printWiFiStatus();                    // e.g. RSSI: -45 dBm
    }
  } else {
    showWifiColour(COLOR_RED);              // Red = disconnected
    if (now - lastReconnect >= kReconnectMs) {
      lastReconnect = now;
      Serial.println("[WiFi] Link lost — reconnecting...");
      showWifiColour(COLOR_YELLOW);
      connectWiFi(WIFI_SSID, WIFI_PASS);
      if (wifiIsLinked()) {
        showWifiColour(COLOR_GREEN);
        printWiFiStatus();
      }
    }
  }
  delay(300);
}
LCD colour constants (src/gc9a01_hsd.h):
constexpr uint16_t COLOR_RED    = 0xF800;
constexpr uint16_t COLOR_GREEN  = 0x07E0;
constexpr uint16_t COLOR_YELLOW = 0xFFE0;
5. Merged into full Lucky Bot (src/main.cpp — same connectWiFi, UI upgraded to photos):
void setup() {
  lcd.begin();
  ui.show(LuckyScreen::kOffline);
  wifiInitSta();
  connectWiFi(WIFI_SSID, WIFI_PASS);
}

void loop() {
  if (!wifiIsLinked()) {
    ui.show(LuckyScreen::kOffline);
    if (now - lastReconnect >= 8000)
      connectWiFi(WIFI_SSID, WIFI_PASS);
    return;
  }
  if (!printedStable) {
    printWiFiStatus();
    ui.show(LuckyScreen::kWakeListen);
  }
  deviceStatusTick(ASR_SERVER_HOST, ASR_SERVER_PORT, WIFI_SSID);
}
Expected behaviour: power on → yellow → green + RSSI: -45 dBm → every 10 s status print → link lost → red → auto-reconnect.
How to change the Wi-Fi configuration
Step 1
Revise the Wi-Fi information in include/secrets.h.
Step 2
Burn the firmware again.
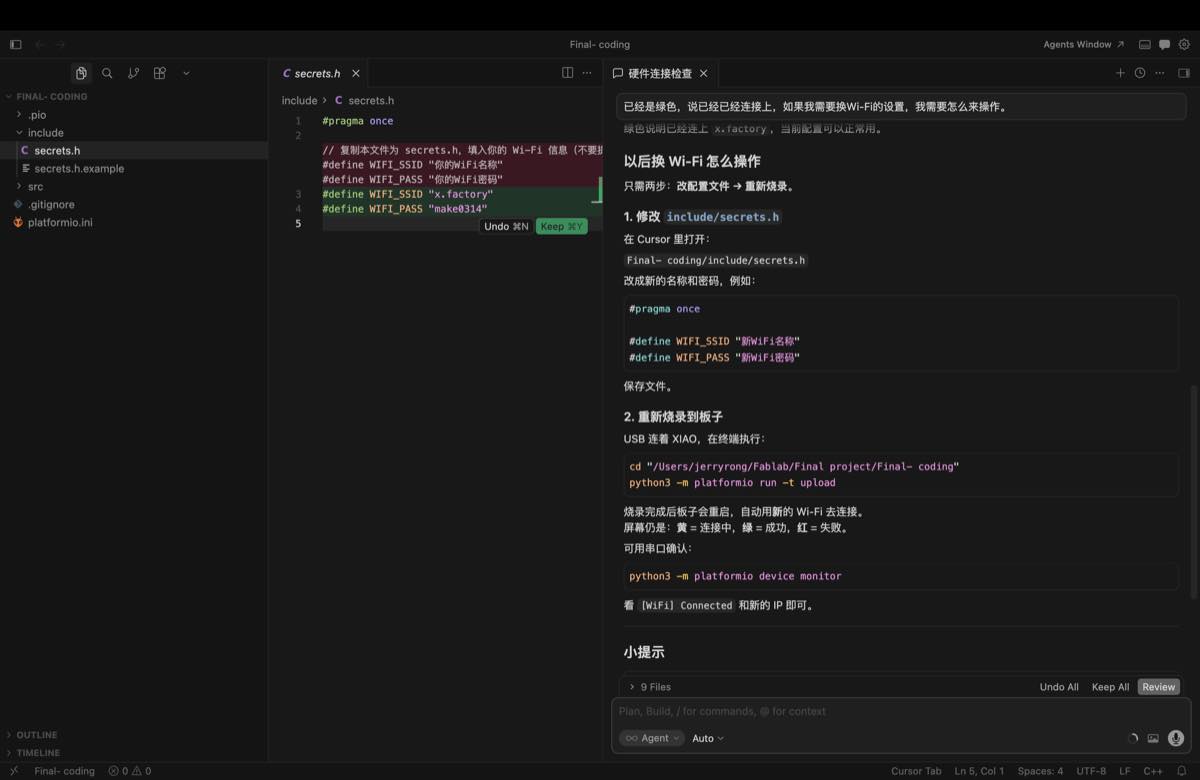
Edit Wi-Fi credentials (include/secrets.h — copy from secrets.h.example if needed):
#pragma once

#define WIFI_SSID "your_wifi_name"
#define WIFI_PASS "your_wifi_password"

// Mac LAN IP (terminal: ipconfig getifaddr en0)
#define ASR_SERVER_HOST "192.168.0.100"
#define ASR_SERVER_PORT 8765
Build, upload, and monitor (connect Xiao ESP32-C3 via USB first):
cd "/Users/jerryrong/Fablab/Final project/Final- coding"
python3 -m platformio run -t upload
python3 -m platformio device monitor
After re-flashing, check the round display: yellow = connecting, green = connected, red = failed.
Serial monitor prints the new IP and RSSI, for example:
[WiFi] Connected (stable)
  SSID: your_wifi_name
  IP:   192.168.x.x
  RSSI: -45 dBm
Record voice and recognize with FunASR
The mic collects audio and converts it to text with FunASR in the cloud, and saves the data to the database.
Steps:
2.1 Find the IP address of the Mac.
ipconfig getifaddr en0
Put the result into ASR_SERVER_HOST in include/secrets.h (same file as the Wi-Fi credentials above).
2.2 Install ASR on the Mac and start the service.
cd "/Users/jerryrong/Fablab/Final project/Final- coding/server"
./start.sh
Health check in browser: http://127.0.0.1:8765/health
2.3 Use ESP32-C3 to record voice and recognize.
The mic (INMP441) records about 3 seconds of audio → ESP32 POSTs audio/wav to the Mac at :8765/asr → Whisper returns text → result is saved to the database.
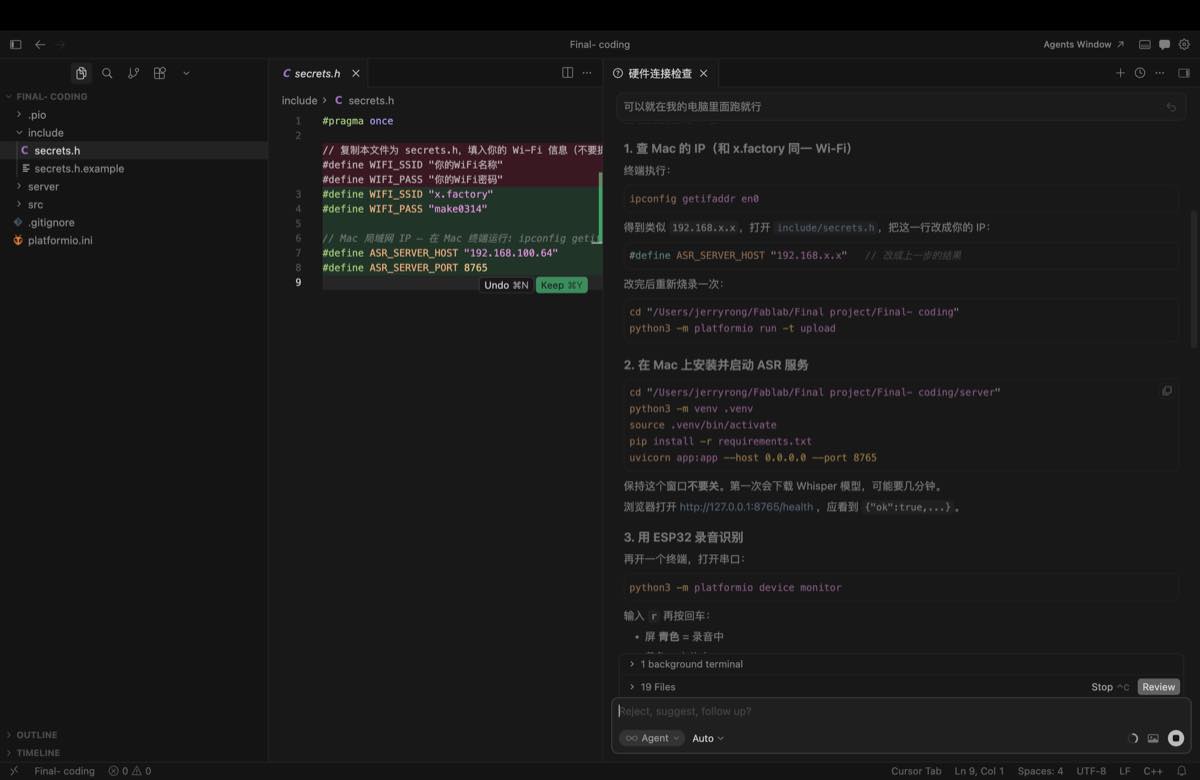
Key source code — ASR
1. ESP32 uploads WAV to Mac server (src/asr_client.cpp):
// POST WAV to http://<Mac-IP>:8765/asr (ASR-only test)
static char respBuf[2048];
char userBuf[256] = {};

Serial.printf("[ASR] POST http://%s:%u/asr...\n", host, port);
int code = postWavToPath("/asr", host, port, wav, len, respBuf, sizeof(respBuf));
if (code != 200) {
  Serial.printf("[ASR] HTTP error %d\n", code);
  return;
}

extractJsonString(respBuf, "text", userBuf, sizeof(userBuf));
Serial.printf("[ASR] Text: %s\n", userBuf);
2. Mac server — Whisper ASR (server/asr.py):
def transcribe_wav(data: bytes, *, language: str | None = "zh") -> tuple[str, str | None]:
    """Convert WAV bytes to text using OpenAI Whisper API or local faster-whisper."""
    use_openai = ASR_PROVIDER == "openai" and bool(ASR_API_KEY)
    if use_openai:
        return _transcribe_openai(data, language=language)
    return _transcribe_local(data, language=language)
3. Mac server — ASR API endpoint (server/app.py):
@app.post("/asr")
async def transcribe_only(request: Request) -> dict:
    """ASR only (no LLM). ESP32 sends WAV, Mac returns text."""
    data = await read_audio_bytes(request)
    user_text, language = await asyncio.to_thread(transcribe_wav, data)
    return {"text": user_text, "language": language}
Flow: ESP32 records audio (INMP441) → sends WAV via Wi-Fi → Mac runs Whisper → text returned to serial monitor.
Testing
Run the command in the terminal:
cd "/Users/jerryrong/Fablab/Final project/Final- coding"
python3 -m platformio device monitor
When the display shows green, the Wi-Fi connection is good.
In the terminal, type r to start testing.
| Indicator | Terminal output |
|---|---|
| Light blue | [REC] Recording 3s... |
| yellow | [ASR] POST http://192.168.0.100:8765/asr... |
| Green | [ASR] Text: the content I said |
Example serial output:
[REC] Recording 3s...
[ASR] POST http://192.168.0.100:8765/asr...
[ASR] Text: the content I said
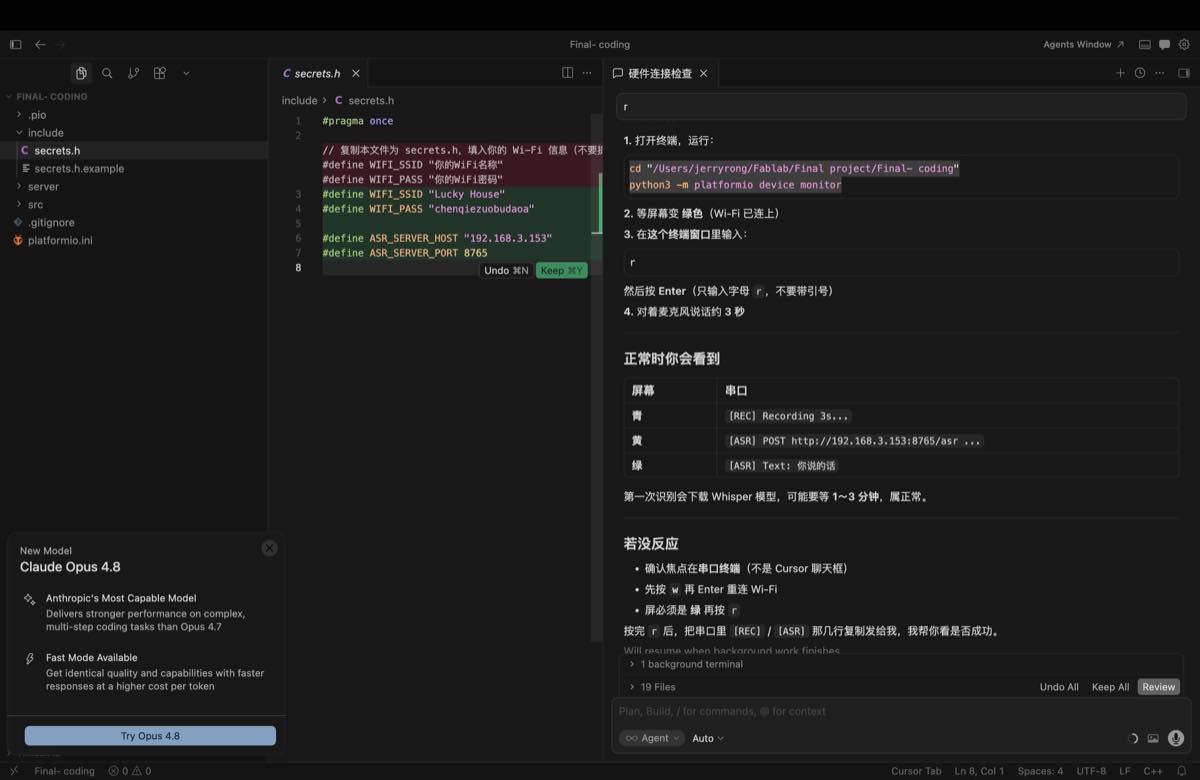
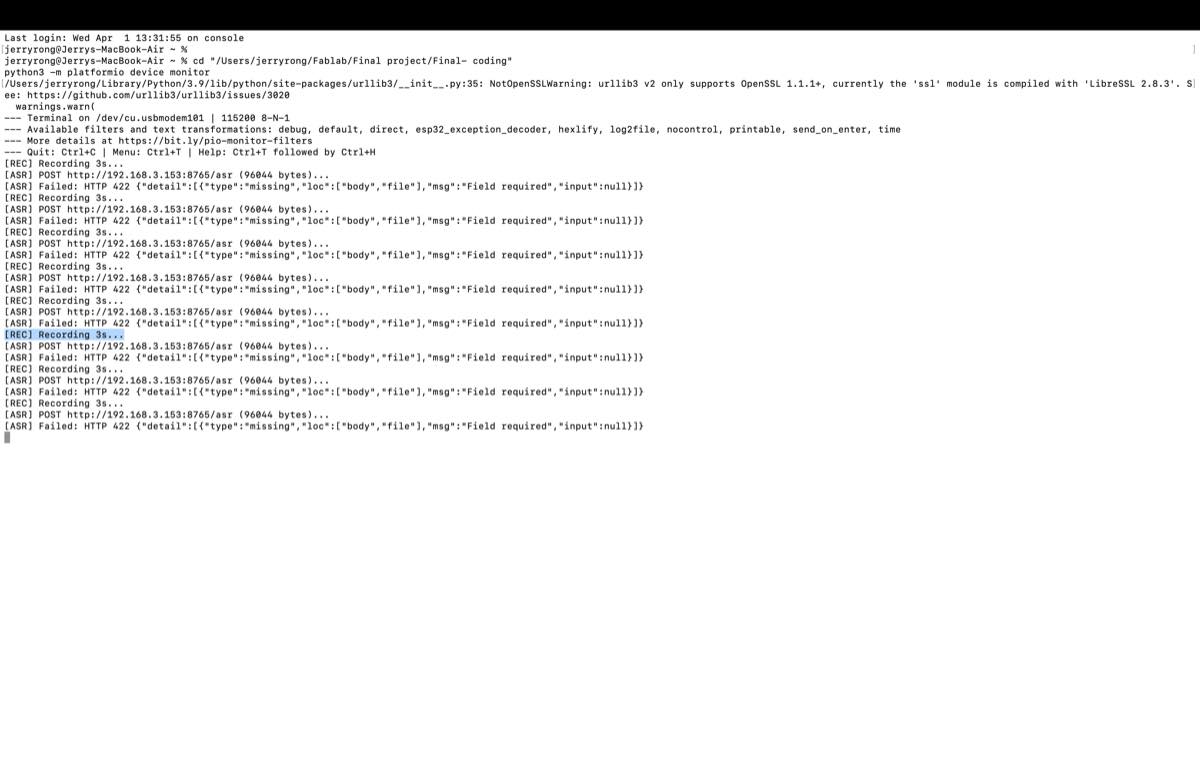
There was an error — it did not return the content I said, so I sent the screenshot above to Cursor to debug.
It recovered, but a new problem came up: "Malloc failed".
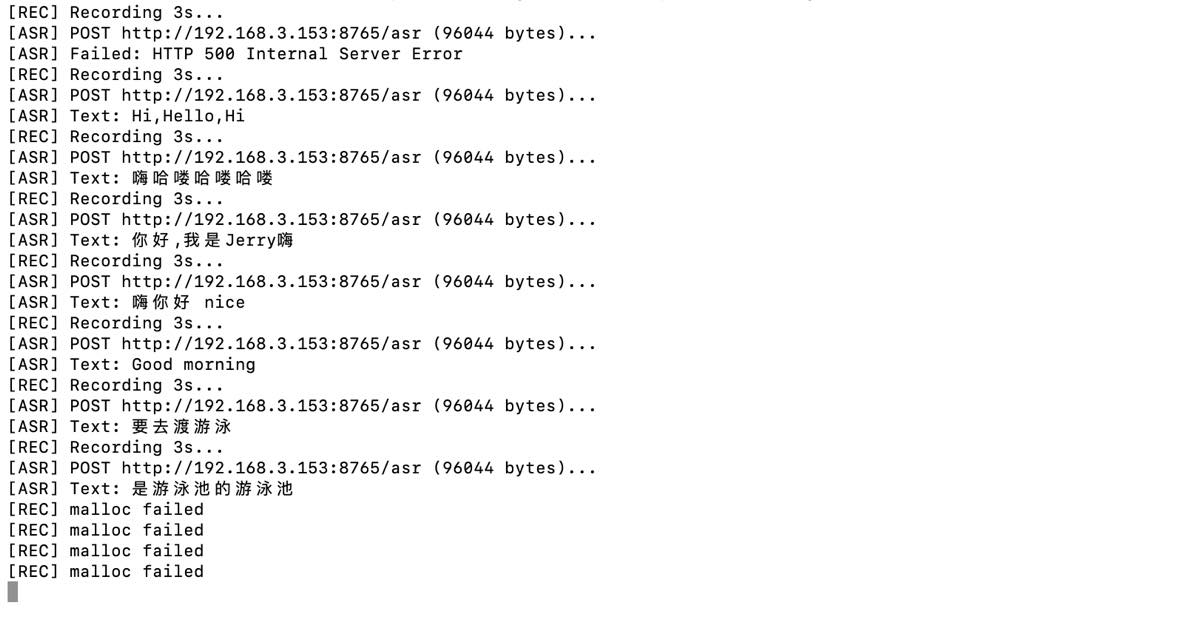
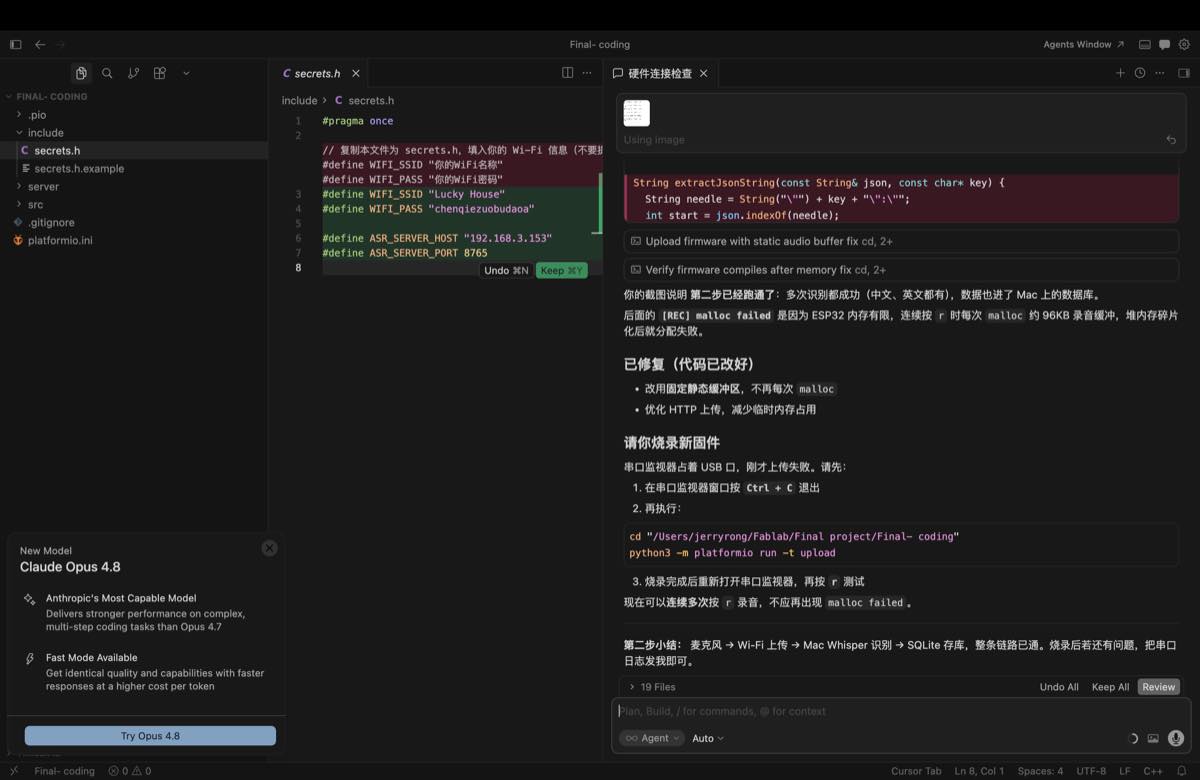
I sent it to Cursor to debug again. I learned that "Malloc failed" means there is no more storage. Cursor sent me new firmware and I ran it again.
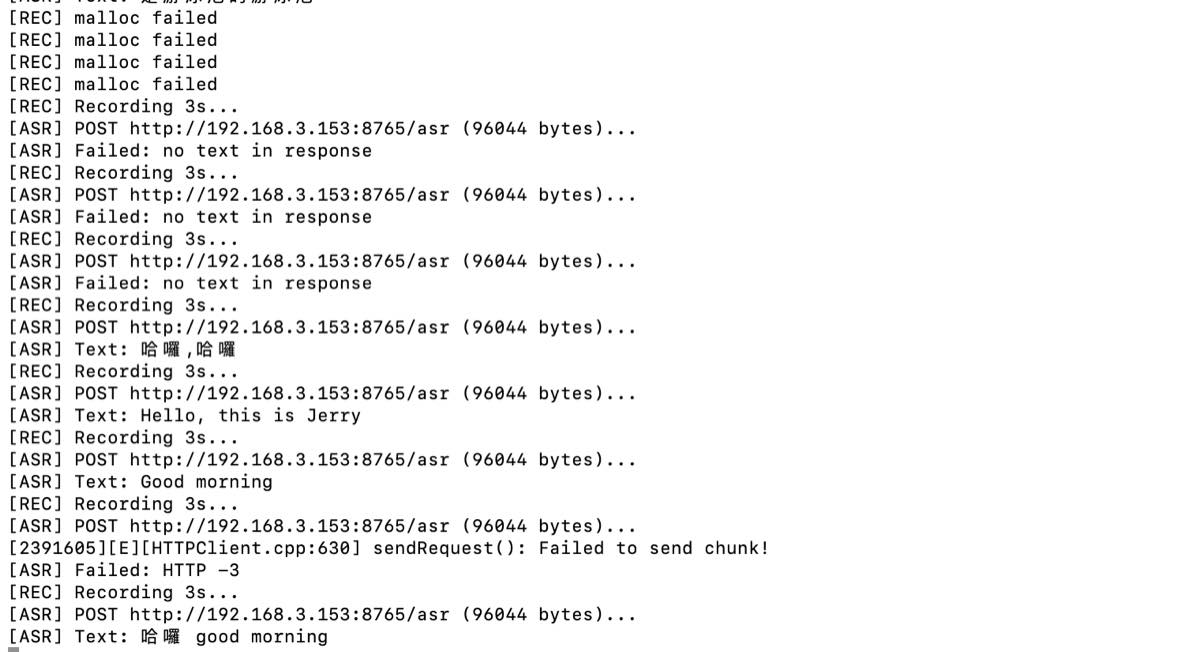
It works again. Attach with video "ASR Testing":
Updates on 27th, Jun.
Group Assignment
For this week's group assignment, I explored three commonly used development environments for embedded systems and interface programming:
- Arduino IDE
- Visual Studio Code (VS Code)
- OpenAI Codex
I don't have any background in coding software. I evaluated them from the perspective of ease of use, debugging, code organization, AI assistance, and suitability for rapid prototyping. To be honest, the more AI support a tool offers, the more I prefer it.
Arduino IDE
Arduino IDE is a simple programming environment mainly used for microcontroller development. It combines a code editor, compiler, board manager, library manager, upload function, and serial monitor in one application. For small embedded projects, Arduino IDE is very convenient. A user can quickly write code, select a board, choose a port, and upload the program to the microcontroller.
Main Features
- Simple interface
- Easy board and port selection
- Built-in library manager
- Built-in serial monitor
- One-click upload
- Large community and examples
Arduino IDE is best for
- First-time board testing
- Simple sensor reading
- LED, buzzer, motor, or display tests
- Quick prototype verification
- Small programs with limited structure
Example: programming the LED
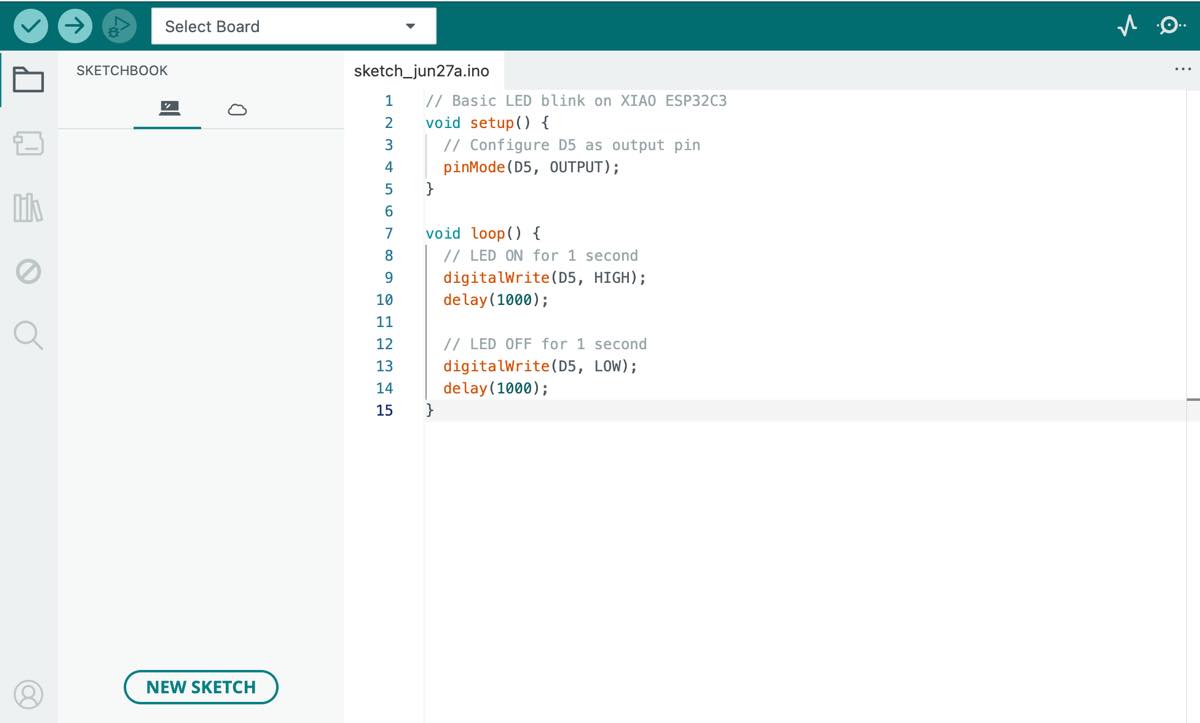
// Basic LED blink on XIAO ESP32C3
void setup() {
  // Configure D5 as output pin
  pinMode(D5, OUTPUT);
}

void loop() {
  // LED ON for 1 second
  digitalWrite(D5, HIGH);
  delay(1000);

  // LED OFF for 1 second
  digitalWrite(D5, LOW);
  delay(1000);
}
As video:
VS Code
Visual Studio Code is a more advanced code editor. It is not only used for embedded programming, but also for web development, Python scripts, documentation, and many other programming tasks.
With extensions such as PlatformIO, VS Code can become a powerful environment for microcontroller projects. It provides better code navigation, auto-completion, project structure, terminal access, and Git integration.
Main Features
- Modern code editor
- Extension system
- Integrated terminal
- Git support
- Better file management
- Support for multiple programming languages
- PlatformIO support for embedded development
VS Code is best for
- Medium or large projects
- Projects with multiple source files
- Firmware combined with web or Python tools
- Version control with Git
- More structured development
- Long-term project maintenance
I used VS Code before to edit, commit with Git, and push the Week 1 assignment. In my experience, it is a good tool for web work, and the coding rules are not too complex.
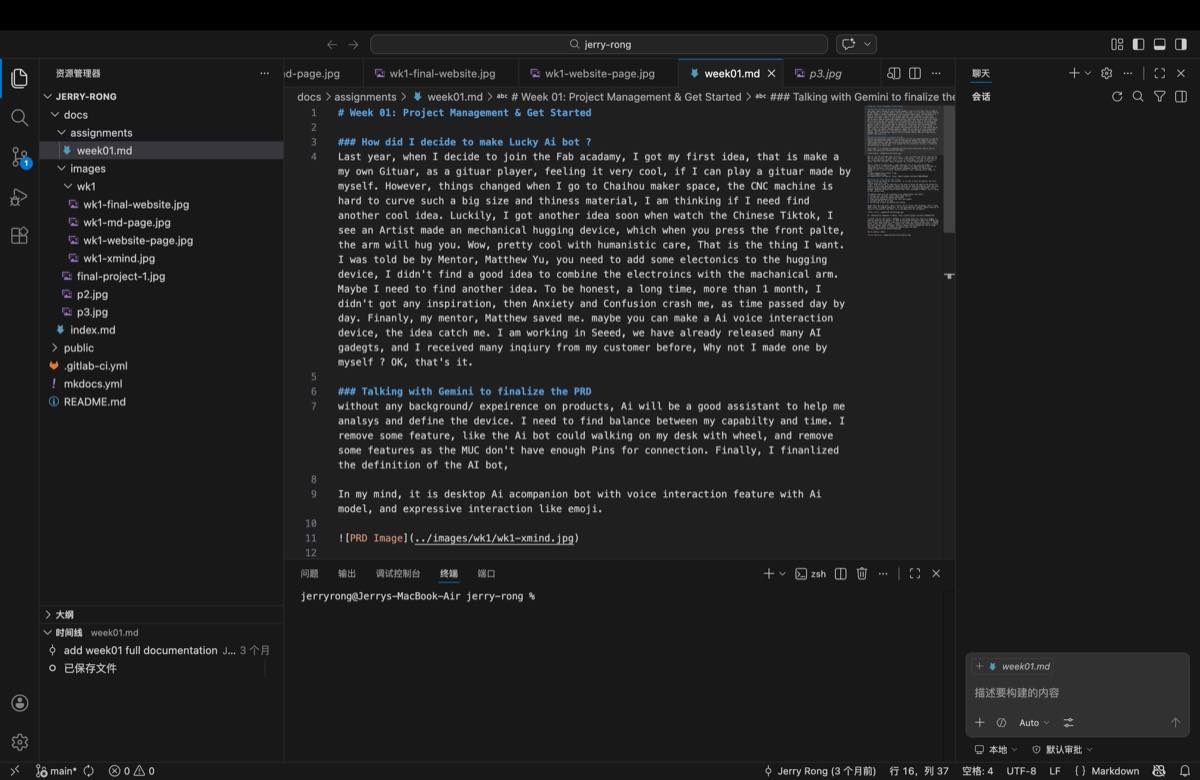
Codex
Codex is different from a traditional code editor. It is an AI coding assistant that can help generate, explain, review, and modify code based on natural language instructions.
Instead of writing everything manually, the user can describe what the program should do. Codex can then suggest code, explain errors, or help improve an existing program.
Codex breaks the boundary of traditional software tools. It is a future approach for coding — vibe coding — and everyone can do some software work.
Main Features
- Code generation from natural language
- Code explanation
- Error analysis
- Refactoring suggestions
- Documentation support
- Fast idea testing
Codex is best for
- Generating a first draft of code
- Understanding error messages
- Learning how a library works
- Improving code structure
- Writing documentation
- Comparing different programming approaches
Overall Comparison Table
| Dimension | Arduino IDE | VS Code | Codex |
|---|---|---|---|
| Main Purpose | Simple microcontroller programming | Professional code development environment | AI-assisted coding and explanation |
| Ease of Use | Very easy to start | Medium, requires setup | Easy to interact with, but needs verification |
| Setup Complexity | Low | Medium | Low |
| Beginner Friendliness | Excellent | Good after basic setup | Good for learning and asking questions |
| Code Editor | Basic editor | Powerful editor with auto-completion and extensions | Generates and modifies code through prompts |
| Project Management | Limited | Strong folder and file management | Can suggest structure, but does not manage files directly |
| Library Management | Built-in Library Manager | Managed through extensions such as PlatformIO | Can recommend libraries, but user must check compatibility |
| Debugging | Basic Serial Monitor | Better terminal, debugging tools, and extensions | Can explain errors, but cannot directly test hardware |
| Hardware Testing | Direct upload and test | Direct upload and test with proper configuration | Not direct; generated code must be tested on hardware |
| Code Scalability | Better for small sketches | Suitable for medium and large projects | Helpful for scaling ideas, but requires human control |
| Documentation Support | Limited | Medium | Strong, can help explain code and write documentation |
| Learning Support | Good through examples | Good through extensions and documentation | Very strong for explaining concepts and code |
| Productivity | Fast for simple tests | Efficient for long-term development | Fast for generating drafts and solving coding problems |
| Best Use Stage | Early hardware testing | Main development stage | Assistance during coding, debugging, and documentation |
| Main Strength | Simple and fast | Organized and professional | Speeds up learning and code generation |
| Main Limitation | Not ideal for large projects | Requires more setup and learning | May generate incorrect code if not verified |
| Best Role in a Project | Quick prototype tool | Main development environment | Coding assistant |