Week 12 – Mechanical & Machine Design
Weekly Overview
This week was different from the previous assignments because the goal was not only to make an individual object. We had to work as a team to design, build, actuate, automate, test, and document a functional machine.
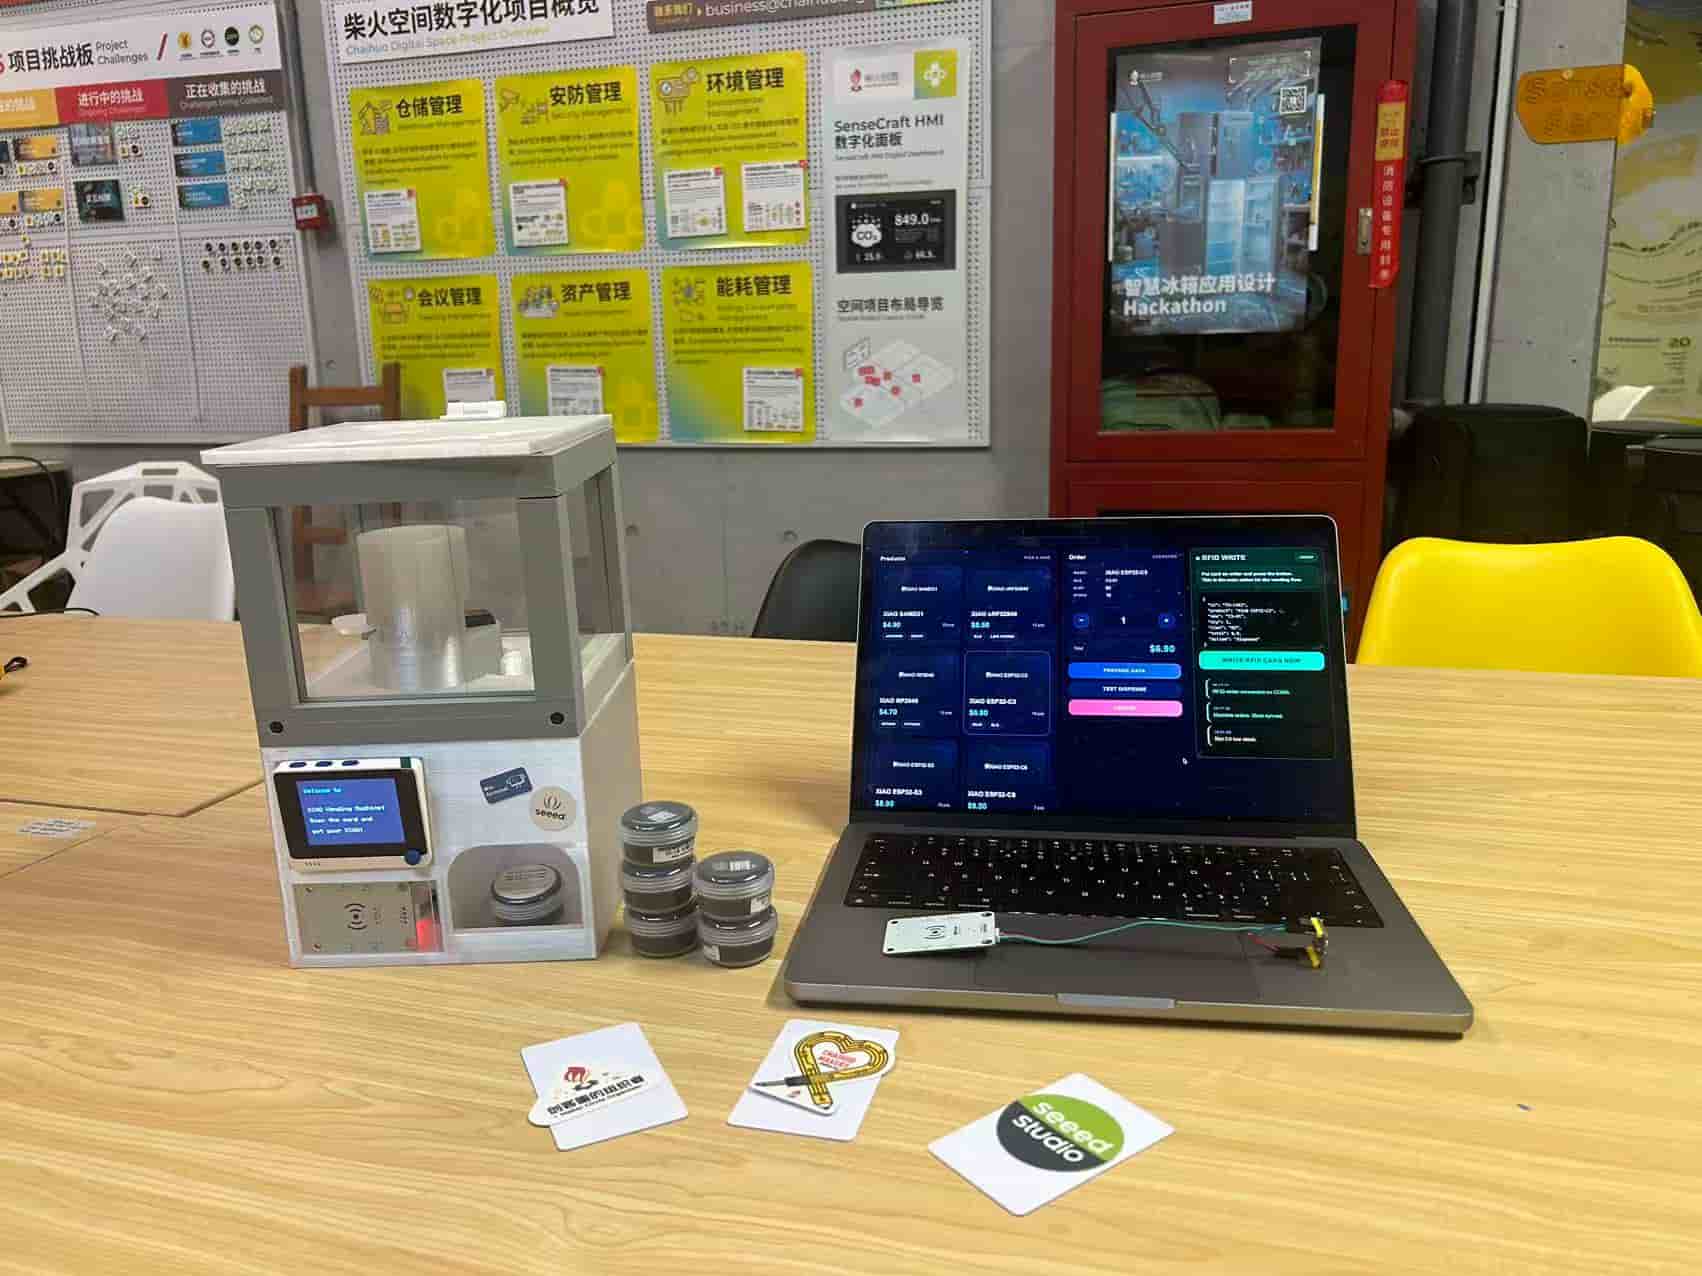
Our team built the XIAO Vending Machine: a lightweight, low-cost dispenser that lets someone in a makerspace get a XIAO development board by tapping an RFID card.
The full group documentation is here: Week 12 — XIAO Vending Machine Group Assignment.
My individual contribution focused on video production and project storytelling. I helped turn the technical work into a clear demo story: confirming the concept, understanding the mechanism, preparing the shooting materials, writing and refining the script, filming the machine, and editing the final demo video.
Key learning moment: This week reminded me that a machine is not only the physical structure. A good machine also needs a clear use case, a reliable motion, readable feedback, and a way to explain the whole experience to someone who has never seen it before.
Assignment Context
For Fab Academy Mechanical Design and Machine Design, the group assignment was to:
- Design a machine that includes mechanism + actuation + automation + application
- Build the mechanical parts and operate the machine manually
- Actuate and automate the machine
- Document the group project and each person's individual contribution
For our project, the four machine elements were:
| Machine element | Our implementation |
|---|---|
| Mechanism | Gravity-fed XIAO storage column with a servo-controlled gate |
| Actuation | STS3215 serial bus servos |
| Automation | Wio Terminal reads RFID card and controls the servo motion |
| Application | A makerspace vending machine for XIAO development boards |
Why This Machine?
In many makerspaces, managing small but essential hardware like XIAO boards is more complicated than it needs to be. People borrow them, forget to return them, or simply do not know how to access them. Space managers spend extra time tracking inventory, handling requests, or manually distributing devices.
So we started asking:
What if getting a XIAO could be as simple as buying a snack from a vending machine?
That question became the starting point of the project. A lightweight, low-cost, easy-to-deploy system could make the experience faster for makers and easier to manage for the lab. The user taps an RFID card, the machine verifies the card, and the mechanism releases one XIAO board.
For makers, the interaction is simple: tap, authenticate, get your XIAO. For space managers, it creates the possibility of better inventory control and less manual distribution. The dream is simple: every lab could make one.
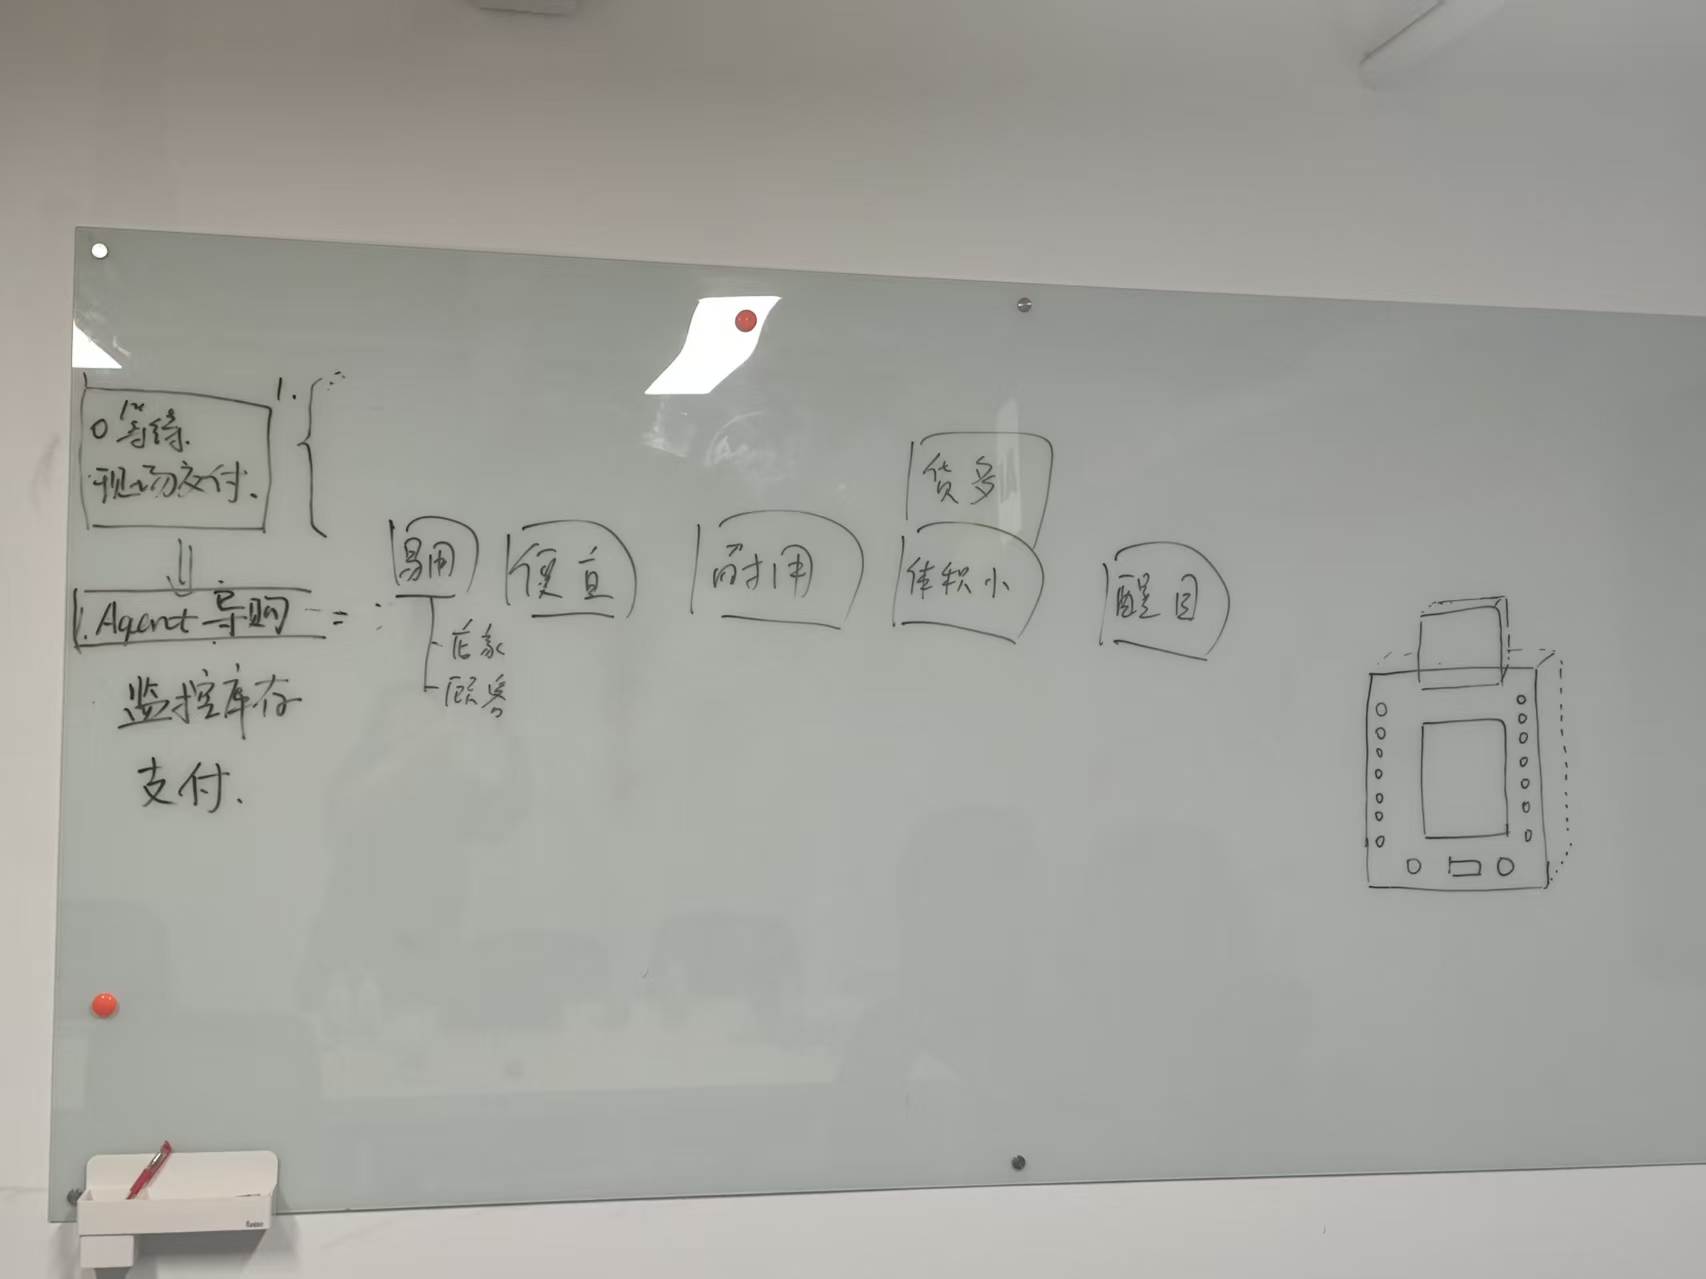
Team Collaboration Process
Because this was a group machine, the work had to happen in parallel. Different team members worked on the mechanical structure, electronics, firmware, assembly, testing, documentation, and video. My role was connected to all of these parts because the video needed to show the whole machine clearly, not only one subsystem.
Before filming, I needed to understand what each teammate had built and what story the machine should tell. I checked the workflow with the team:
- What problem are we solving?
- What should the viewer understand in the first few seconds?
- Which parts of the machine are visually important?
- Which technical details should be shown close-up?
- What final action proves the machine works?
This helped me avoid making a video that was only "a machine moving." Instead, the video needed to explain the context, the user interaction, the mechanism, and the final result.
Overall System Workflow
The machine follows this basic flow:
- The user taps a pre-programmed RFID card on the Grove RFID Reader.
- The Wio Terminal reads the card over I2C.
- The program checks whether the card contains the TRUE authentication token.
- If the card is accepted, the STS3215 serial bus servos rotate and open the gate.
- One XIAO board drops through the output chute.
- The Wio Terminal LCD updates the system status during the process.
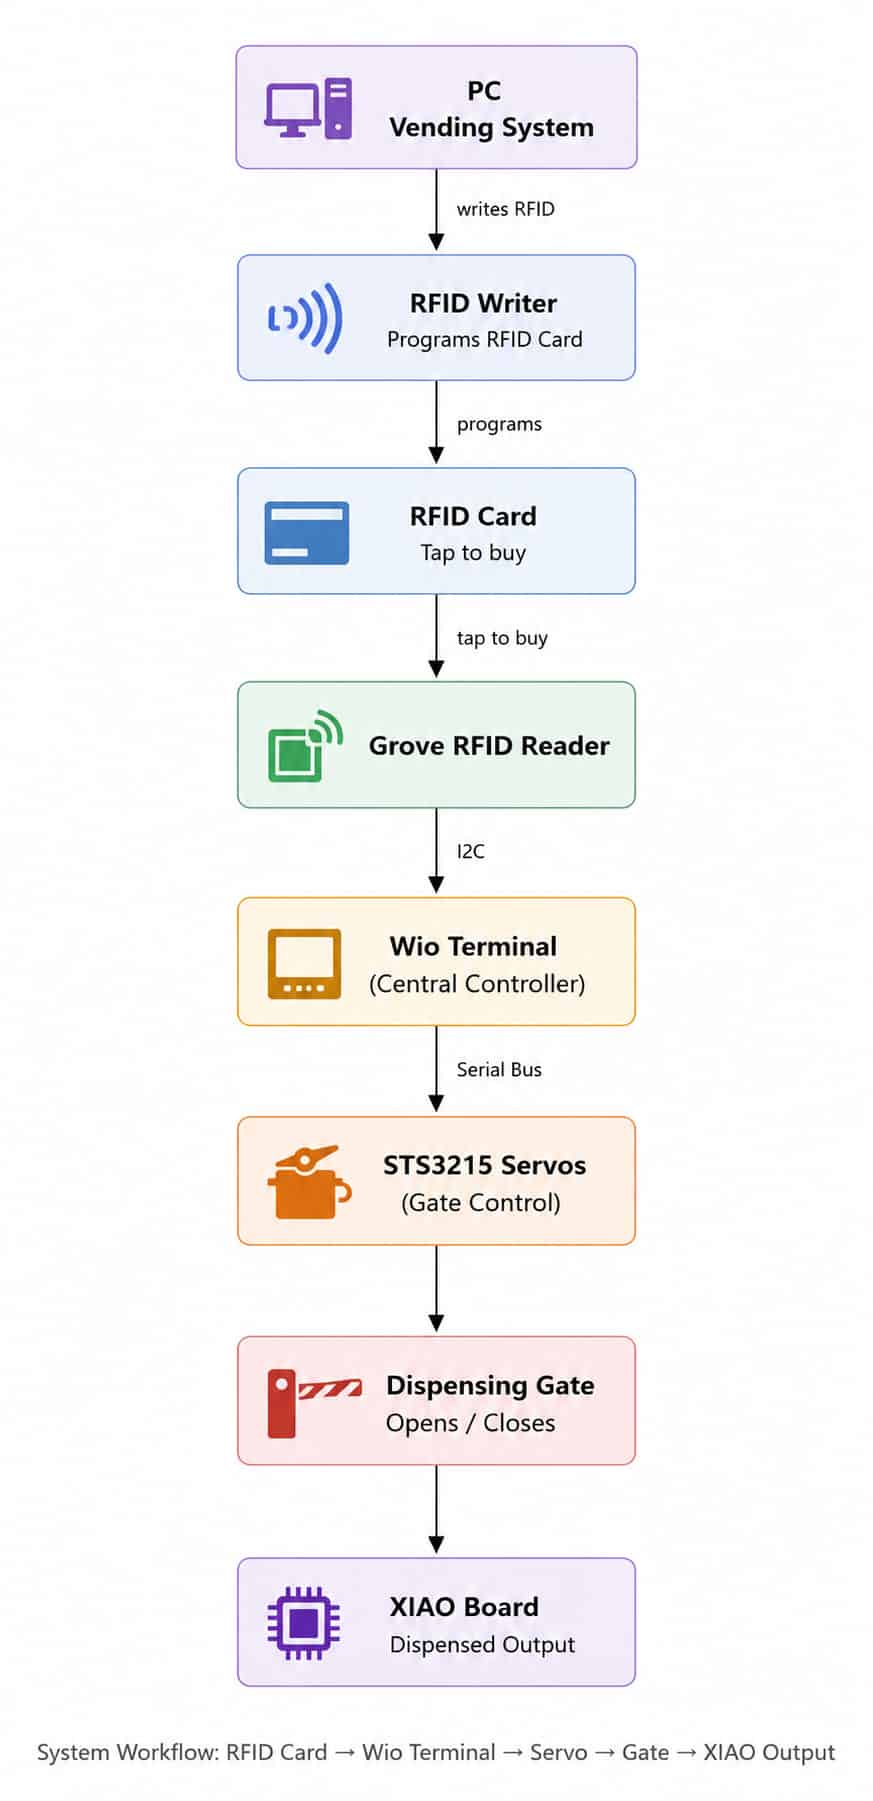
This workflow became the backbone of the demo video. Every shot had to support one part of this chain.
Design Process
From Problem to Concept
At the beginning, the idea was not just to build a random moving machine. We wanted something that could be useful in a makerspace. A XIAO vending machine made sense because XIAO boards are small, valuable, and often needed quickly during prototyping.
The concept also had a nice balance for this week:
- It had a real mechanical challenge: dispensing only one board at a time.
- It had electronics and automation: RFID, Wio Terminal, and servo control.
- It had a clear user interaction: tap a card and receive a board.
- It could be explained visually in a short demo video.
Design Requirements
From the group discussion, the machine needed to be:
| Requirement | Why it mattered |
|---|---|
| Easy to use | A maker should understand the interaction without instruction |
| Affordable | The machine should be realistic for a Fab Lab or makerspace to reproduce |
| Durable | The dispensing structure should survive repeated use |
| Compact | The prototype should fit on a desk or counter |
| Eye-catching | The transparent structure should make the product and mechanism visible |
Important Design Decisions
One key decision was switching from the original idea of using a reTerminal to using a Wio Terminal. The reTerminal was too large and heavy for the form factor we wanted. The Wio Terminal was a better fit because it has a built-in 2.4" screen, Grove connectors, programmable buttons, and a more compact body.
Another important decision was using a gravity-fed column instead of a more complicated arm or conveyor. The column design keeps the mechanism simple: the boards are stacked vertically, gravity helps move them down, and the servo gate controls when one board is released.
This simplicity was useful for the prototype, but it also created design questions:
- How tight should the tunnel be so the XIAO boards do not rotate or jam?
- How strong should the printed wall be?
- How far does the servo gate need to move?
- How do we make sure only one board comes out?
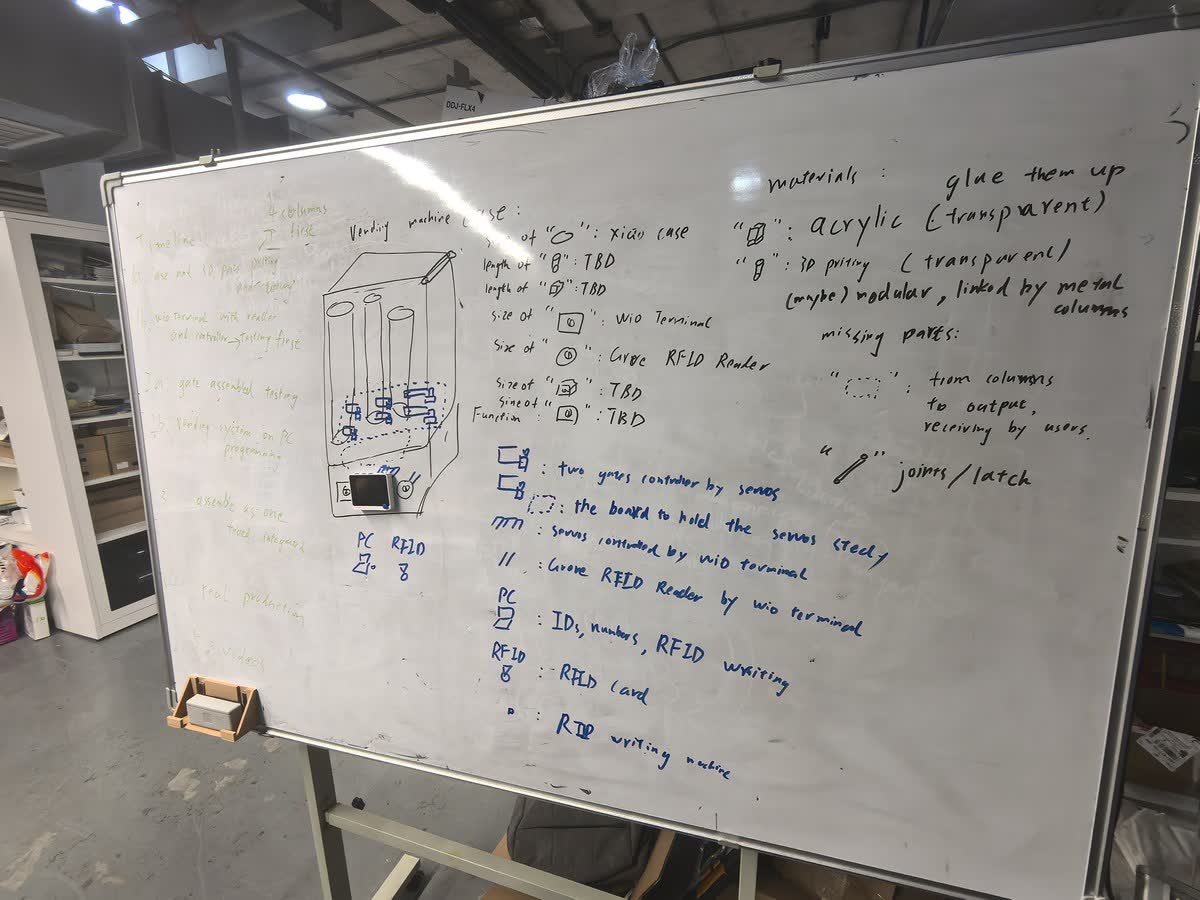
Mechanical Structure Explanation
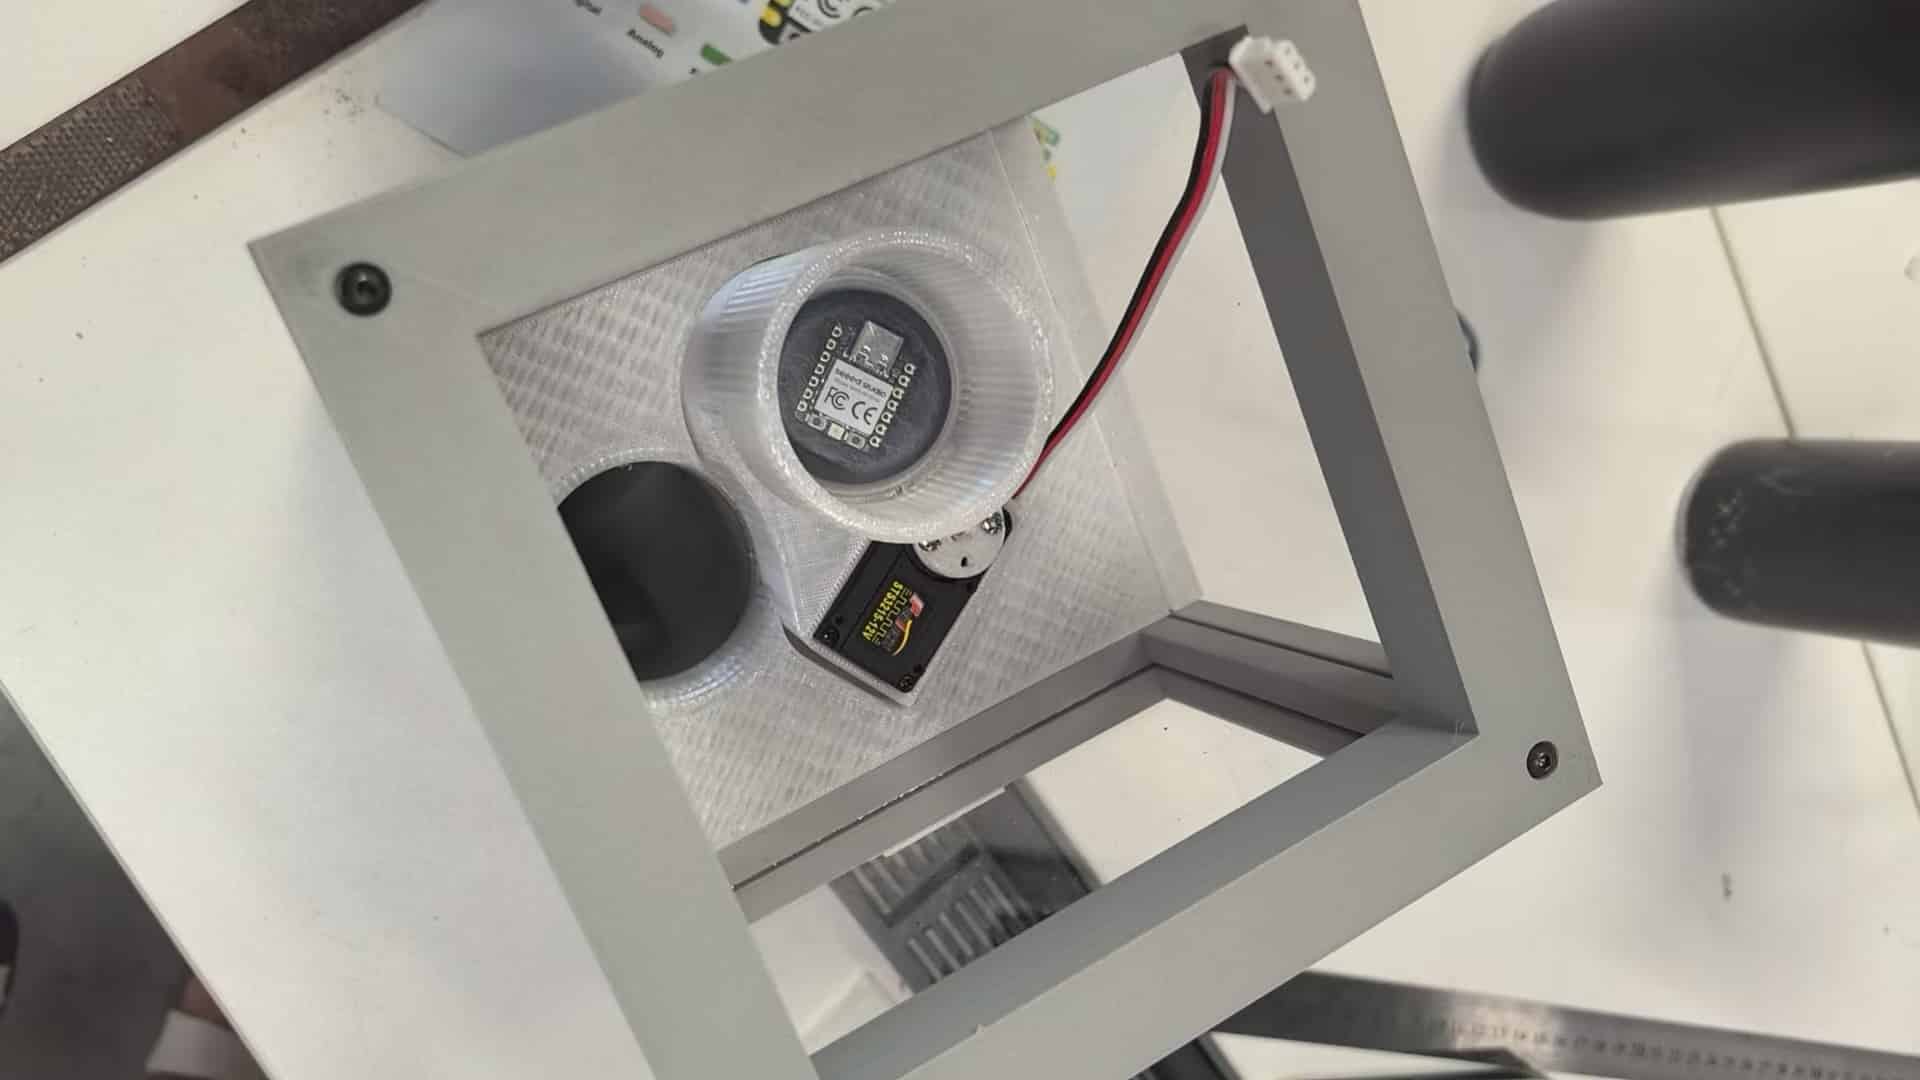
The main mechanical structure is a 3D-printed tunnel / warehouse column. XIAO boards are stacked vertically inside the column. At the bottom, a servo-controlled gate opens and closes to release the lowest board into the output chute.
The structure works because of gravity:
- The column stores the boards in a vertical stack.
- The lowest board waits at the gate.
- When the servo moves the gate, the board is released.
- The next board slides down and waits for the next cycle.
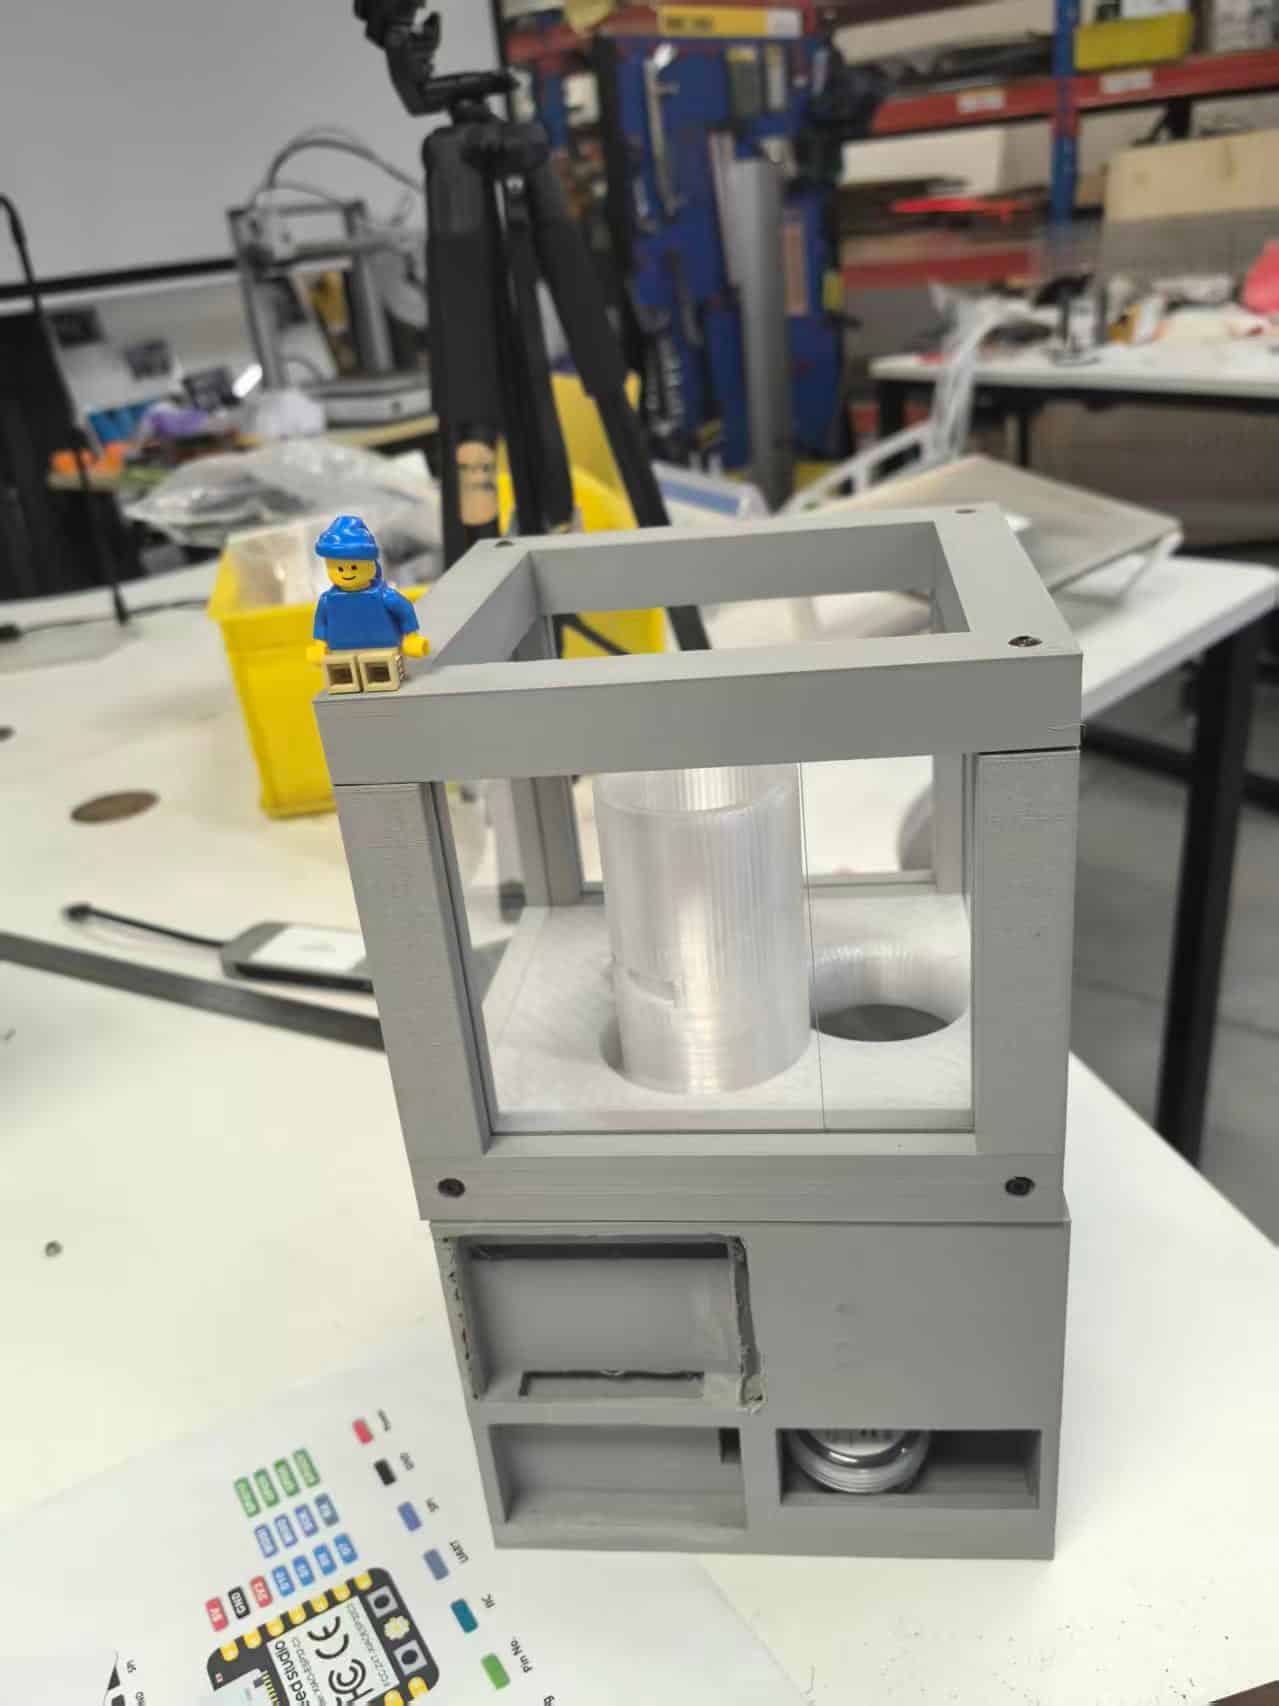
The prototype also uses aluminum supports and a transparent acrylic outer frame. The transparent frame is important because it makes the machine easier to understand at a glance: users can see the remaining stock and can also see that the product is physically inside the machine.
Servo Gate
The STS3215 serial bus servos control the gate movement. In the final demo, the servo motion runs two cycles to improve the chance that the board fully exits the column. This is a very practical detail: in a real mechanism, one perfect movement on paper is not always enough. Friction, alignment, and small tolerance differences can affect the output.
Key learning moment: For machine design, "it works once" is not the same as "it works reliably." Small mechanical details like wall thickness, friction, and clearance decide whether the automation feels smooth or frustrating.
Iteration and Failed Attempts
One real issue we found was that the first version of the tunnel was too thin and easy to break. The team iterated to a stronger, thicker version before the final demo. This was a small but important mechanical improvement because the dispensing column needs to hold its shape while boards are loaded and while the servo gate moves.
The project also changed direction when the reTerminal was replaced by the Wio Terminal. This was not a failure exactly, but it was a design correction. The original controller choice did not match the size and weight of the machine as well as we expected.
Current documented iterations:
| Issue / decision | What happened | Result |
|---|---|---|
| Tunnel wall too thin | First printed version was fragile | Team made a thicker and stronger version |
| reTerminal too large | Original controller did not fit the desired compact design | Switched to Wio Terminal |
| Dispensing reliability | One motion may not always push the board out cleanly | Servo runs two cycles in the final demo |
My Individual Contribution: Video Production
As the community manager this week, my main job was to plan and produce the demo video. This covered the full pipeline:
- Feature confirmation
- Material preparation
- Script confirmation
- Principle confirmation
- Footage shooting
- Video editing and production
Step 1 – Feature Confirmation
Before picking up a camera, I needed to understand exactly what the machine does and what story we wanted to tell. I sat with the team to walk through the full system: the RFID authentication flow, the Wio Terminal interface, the STS3215 servo gate mechanism, and the 3D-printed tunnel structure.
A good demo video cannot just show a machine working. It needs to make viewers feel why the machine exists. So the first question I asked was: what pain point are we solving, and can we show it visually?
From this discussion, I knew the video needed to show both the problem and the solution:
- Problem: accessing and managing small hardware manually is inconvenient.
- Solution: tap an RFID card and let the vending machine dispense the board automatically.
Step 2 – Material Preparation
Thanks to Emily, Tim, and Matthew, I was able to gather more materials than I originally planned. It gave the footage a clean, focused look that made the machine stand out.
Shooting materials used:
- Phone for filming
- The assembled XIAO Vending Machine prototype
- RFID card
- XIAO sample boards for close-up shots
Step 3 – Script Confirmation
The script went through a few rounds before we locked it in. The core idea was a two-act structure:
Act 1 — The Problem: Show someone trying to use a regular vending machine / manual access situation. This using Seedance to generate it.
Act 2 — The Solution: Introduce our XIAO Vending Machine. Tap. Authenticate. Dispense.
Act 3 — The Future: In the future, the delivery person could arrange XIAO to the vending machine. This also can using Seedance to generate it.
This contrast was important because we did not want to just show a cool build. We wanted viewers to immediately understand why it matters. The script was designed to first make the viewer feel the friction, then show the relief of a simple automated flow.
Step 4 – Principle Confirmation
Before shooting the final demo, I confirmed the working principle with the team so I could capture the right moments on camera:
- User taps RFID card on the Grove RFID Reader
- Wio Terminal reads and verifies the card over I2C
- If authenticated (TRUE token confirmed), the STS3215 servo moves and opens the gate at the bottom of the tunnel
- One XIAO board drops out into the output chute
- The Wio Terminal LCD updates to show the transaction status
The mechanical structure is a gravity-fed column design. XIAO boards are stacked vertically in a 3D-printed tunnel, and a servo-controlled gate releases one at a time. The tunnel is modular too, so its size could be adjusted to fit different hardware in the future.
This confirmation step was very useful for filming. It told me where to point the camera: RFID interaction, Wio Terminal screen, servo movement, output chute, and final board delivery.
Fabrication and Assembly Process
Most of my direct contribution was not fabrication, but the final video needed to show the build process in a believable way. From the group documentation, the machine fabrication included:
- 3D-printed tunnel / warehouse column parts
- Servo arm and gate parts
- Transparent acrylic outer case
- Metal columns / supports
- Wio Terminal mounting
- RFID reader integration
- Wiring and final assembly
The most important fabrication story for this page is the tunnel iteration. The first version was too thin, so the team improved the printed structure before the final demo. This is worth documenting because it shows real mechanical design thinking: the part did not only need to look correct in CAD, it needed to survive handling and repeated movement.
Testing and Debugging
The group tested the machine in stages instead of waiting until the full machine was assembled. This made the debugging easier because each subsystem could be checked separately.
| Test stage | What was checked | Why it mattered |
|---|---|---|
| RFID + Wio Terminal | Whether the card could be read and verified | Confirms the user input and authentication step |
| Servo movement | Whether the STS3215 servos could move to the required positions | Confirms the actuator can drive the gate |
| Manual structure test | Whether a board could move through the column | Confirms the mechanism before automation |
| Full integration | RFID triggers Wio Terminal, Wio Terminal triggers servo, board is dispensed | Confirms the complete machine loop |
For the video, the full integration test was the most important moment. The final demo needed to clearly show the chain: card → reader → Wio Terminal → servo → XIAO output.
Footage Shooting
With the script confirmed and the machine assembled, it was time to shoot. The goal was to capture:
- Problem framing shot — a person struggling with a regular vending machine / manual hardware access, to set up the contrast
- Machine overview — wide and close-up shots of the assembled XIAO Vending Machine
- Component details — RFID card, Grove reader, Wio Terminal screen, servo gate, output chute
- Hero shot — the full end-to-end demo: card tap → authentication → servo actuation → XIAO delivered
- Behind-the-scenes — the team at work, the build process, and the iteration moments
The spotlight made a real difference here. It was compact and affordable, but it worked well for product demo shots. The XIAO boards and the transparent structure looked clearer under focused light.
Video Editing and Production
The editing focused on keeping the pacing tight and the story clear:
- Open with the "problem" scene so the viewer understands the need.
- Cut to the reveal of the XIAO Vending Machine.
- Briefly show the key components.
- Land on the full hero shot: tap, authenticate, dispense.
- Close with the future possibility of making hardware access easier in makerspaces.
The final demo video shows the complete workflow: RFID card tap, Wio Terminal verification, servo gate opening, and a XIAO board being dispensed cleanly into the output chute.
Final Result
The XIAO Vending Machine works end-to-end as a standalone prototype:
- User taps a pre-programmed RFID card on the Grove RFID Reader.
- The Wio Terminal reads the card via I2C and checks for the TRUE authentication token.
- On a successful match, the STS3215 serial bus servos rotate to open the tunnel gate.
- A single XIAO board slides out through the output chute.
- The servo runs two cycles to improve dispensing reliability.
- The Wio Terminal LCD updates throughout, showing the current system status.
The final structure is built around a 3D-printed, gravity-fed tunnel, with aluminum supports for rigidity and a transparent acrylic outer frame so users can see the remaining stock at a glance.
For me, the strongest part of the final result is that the interaction is easy to understand. Even without explaining the code, the user can see the input, the action, and the output.
Looking Ahead
The prototype proves the full loop works: card → reader → servo → dispense. But the bigger vision is even more exciting.
The tunnel could become modular so it can be resized for other standard-form hardware, not only XIAO boards. A serial bus chain of servos could support multiple dispensing channels. A PC-side backend dashboard could support inventory tracking and digital payment. In the future, the machine could become part of a small hardware access system for makerspaces.
Every lab could have one. That was the dream we started with, and this week we took the first real step toward it.
Reflection and Learning Outcomes
This week taught me that documentation for a machine has to explain more than the final object. It needs to show the reason for the machine, the structure, the motion, the control flow, the failures, and the final proof that it works.
What Went Well
The final concept was easy to understand and easy to explain visually. The RFID interaction gave the machine a clear starting point, and the dispensing action gave the video a satisfying ending. The spotlight also helped the final video feel more polished than a normal lab recording.
What Was Difficult
The hardest part for me was turning a group technical project into a simple story. Many things were happening at the same time: mechanical design, servo testing, RFID testing, assembly, and filming. I had to understand enough of each part so the final video would be accurate, but still simple enough for viewers to follow.
Another challenge was capturing enough process evidence. When people are busy building and debugging, it is easy to forget to take photos of the failed versions, wiring steps, or test screens. But those moments are exactly what make the documentation complete.
Downloadable Files
Team: Dolphin Liu, Alison Yang, Emily Nathania Noor, Guannan He, Maggie Zhang, Ning Zhang, Lu Zhao, Timothy Mintargo, Xin Ruili, Jerry Rong, Henry Yu, Join Yu, Meia Alsup