Week 15 — Interface and Application Programming
v2.0 updated This page now documents my Interactive Signage Hub: a three-layer interface (touch OLED, web dashboard, color ePaper) coordinated through a local Node.js server. An earlier draft about the round-display experiment is preserved at the bottom of this page for reference.
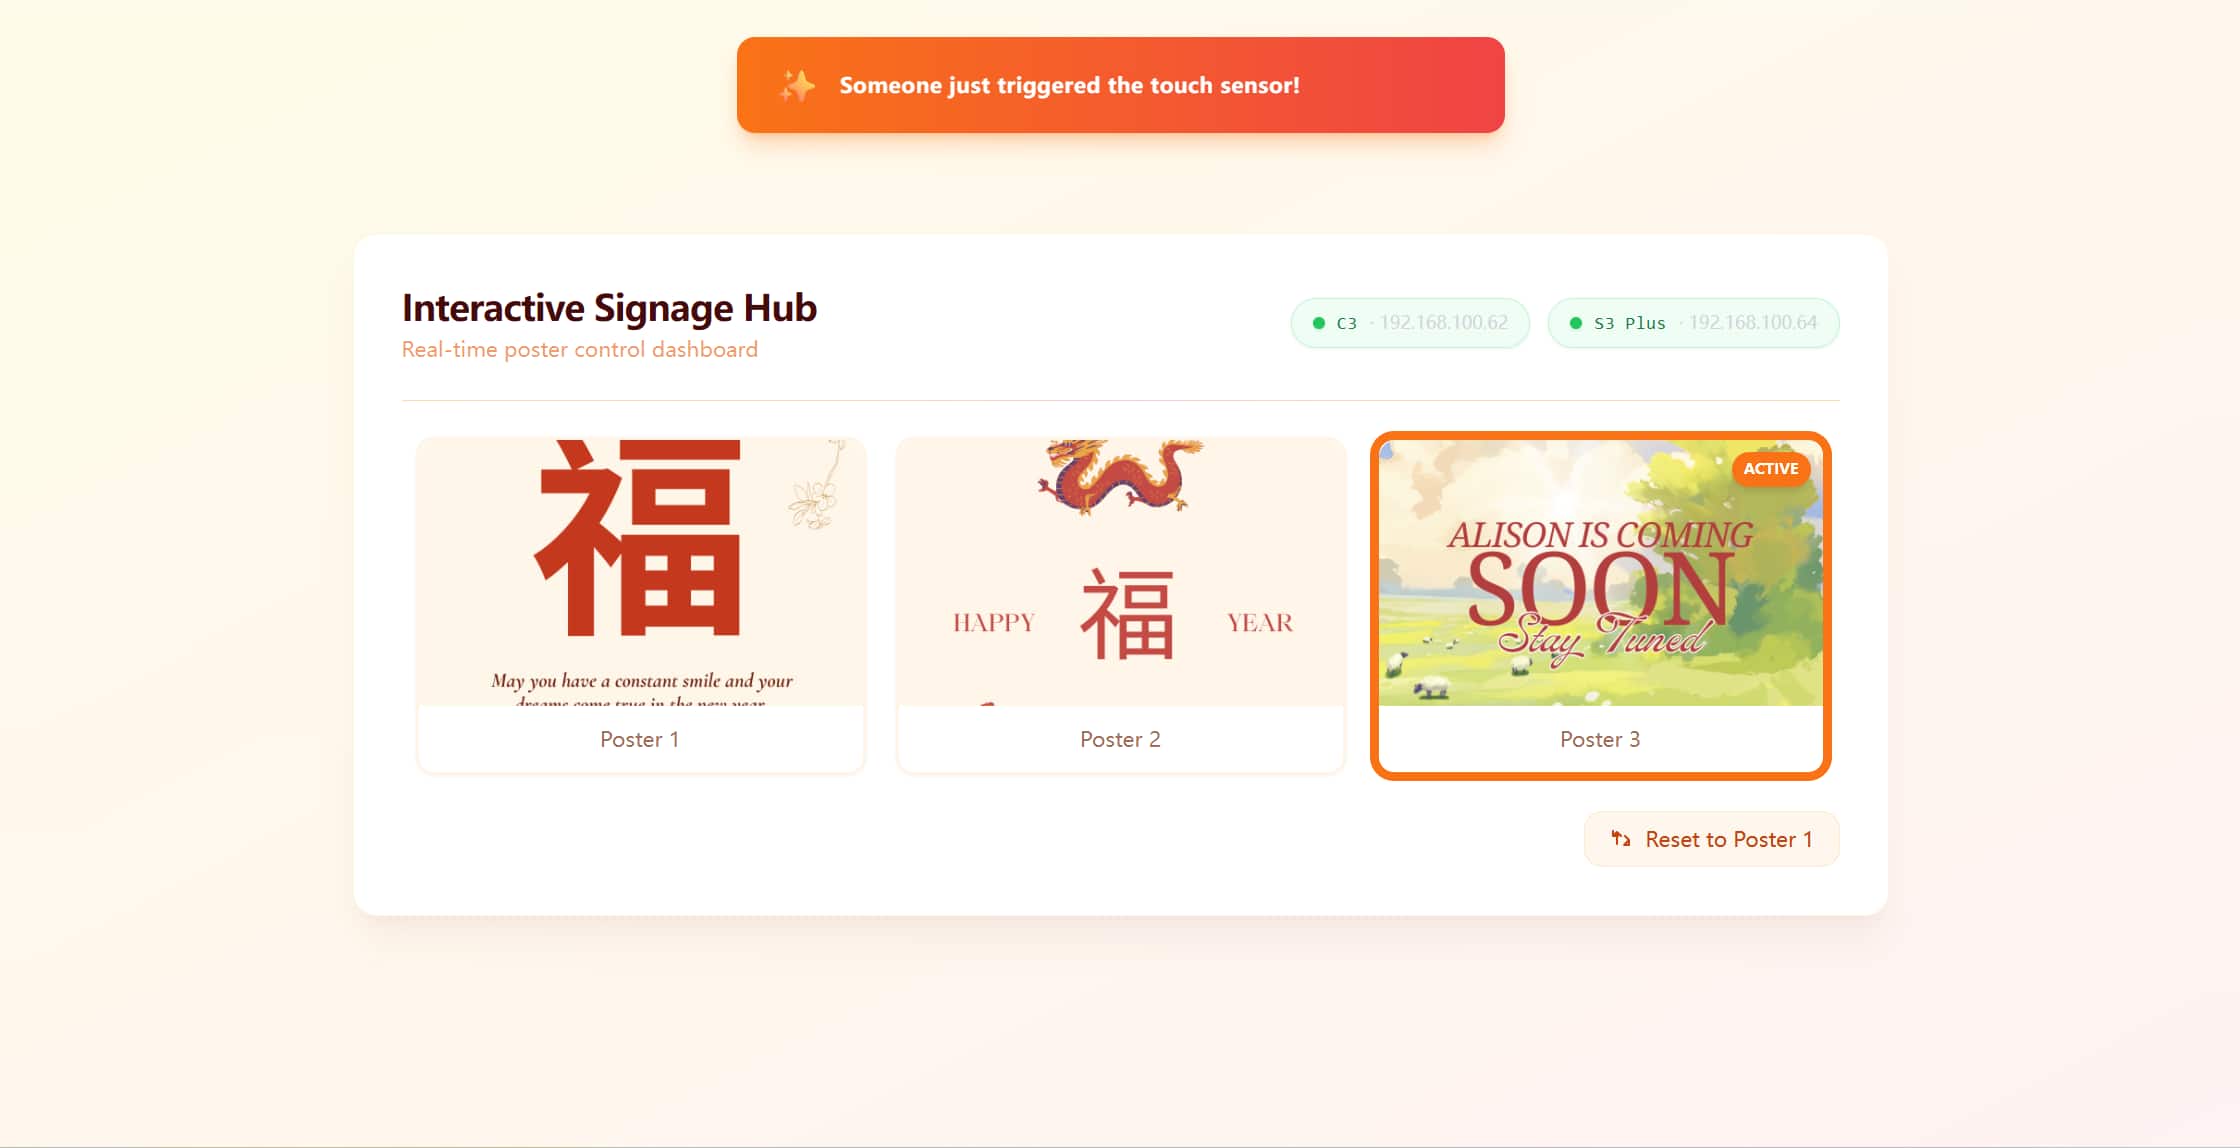
This week I moved from a single-board web experiment to a full interface system three separate UIs that share one backend. A visitor touches a sensor at the door; a small OLED greets them; a laptop dashboard flashes an alert; and a 7.3 inch color ePaper poster indoors switches within about five seconds. I built it step by step in OpenCode, logging each iteration in static/img/interface/. The hardest part was not drawing pixels, but making reliable state flow across WiFi between two ESP32 boards and a browser.
My earlier attempt (documented below as v1.0) put a simple HTTP server directly on one XIAO ESP32-C3 with a round display. That proved the idea of browser-to-device control, but the web UI was unstable and everything lived on one chip. This v2.0 version separates concerns: the PC is the hub, each board has a focused job, and the dashboard is a real application page — not raw HTML strings baked into firmware.

Why I designed this interface
I wanted an interface that felt like a product, not a demo sketch. The use case is a visitor-notification object inspired by traditional Chinese Fu (福) door decorations: most of the time a calm poster shows on a large indoor screen; when someone touches the entrance sensor, the household gets a clear, multi-channel signal.
That meant designing three surfaces at once:
| Surface | Hardware | Role |
|---|---|---|
| Entrance greeting | XIAO ESP32-C3 + 128×128 OLED + touch on D2 | Idle: WELCOME / >> TOUCH ME. On touch: Hello / My Friend for 2 s, then POST to server |
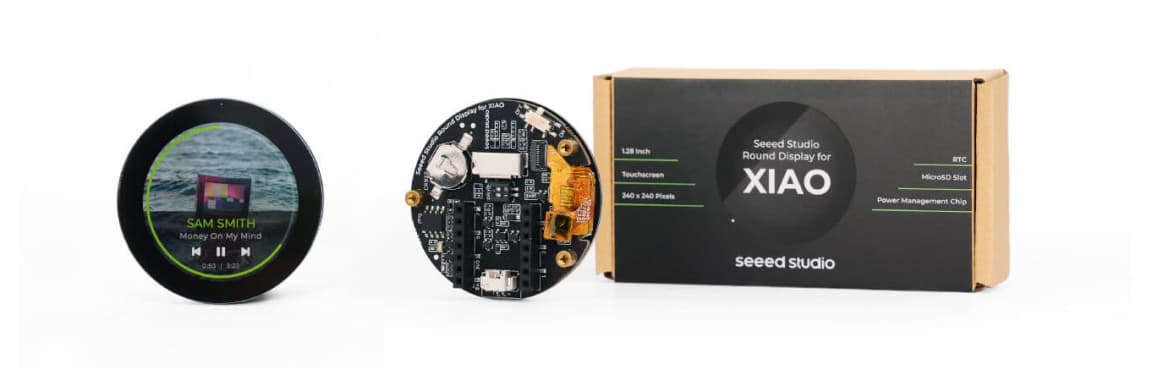
| Indoor display | XIAO ESP32-S3 Plus + EE04 driver + 7.3" Spectra6 ePaper (800×480, ED2208) | Shows one of three Fu-themed posters; refreshes only when poster ID changes |
| Control dashboard | PC running node server.js + index.html | Poster gallery, device online badges, orange toast on touch, reset button |
The PC at 192.168.100.18 runs Express on port 3000. All devices share the X.factory2.4G network (2.4 GHz — ESP32 cannot use the lab's 5 GHz-only SSID).
System architecture
┌─────────────────────────────┐
│   PC (192.168.100.18)       │
│   node server.js :3000      │
│   GET/POST /api/status      │
│   POST /api/reset           │
│   index.html + poster*.png  │
└──────────────┬──────────────┘
               │ WiFi (X.factory2.4G)
       ┌───────┴────────┐
       │                │
┌──────┴──────┐  ┌──────┴───────────────┐
│ XIAO C3     │  │ XIAO S3 Plus         │
│ OLED 128×128│  │ EE04 + 7.3" Spectra6 │
│ Touch D2    │  │ 800×480, 6-color     │
│ POST touch  │  │ GET poll every 5 s   │
└─────────────┘  └──────────────────────┘
Interaction flow (from my development log):
- Touch C3 sensor → OLED shows
Hello / My Friend→POST /api/statuswithstatus=coming→ server setscurrentPoster = 3,lastEvent = "touch"→ dashboard toast fires once → S3 detects ID change on next poll → ePaper switches to poster 3. - Click poster on web →
POST poster=1|2|3→ S3 switches within ~5 s. - Reset →
POST /api/reset→ everything returns to poster 1.
Server logs confirmed the full loop working: S3 polling from 192.168.100.64, C3 touch events from 192.168.100.62, and web poster selections logged with timestamps.
How I built it — step by step
1. ePaper bring-up (Hello World)
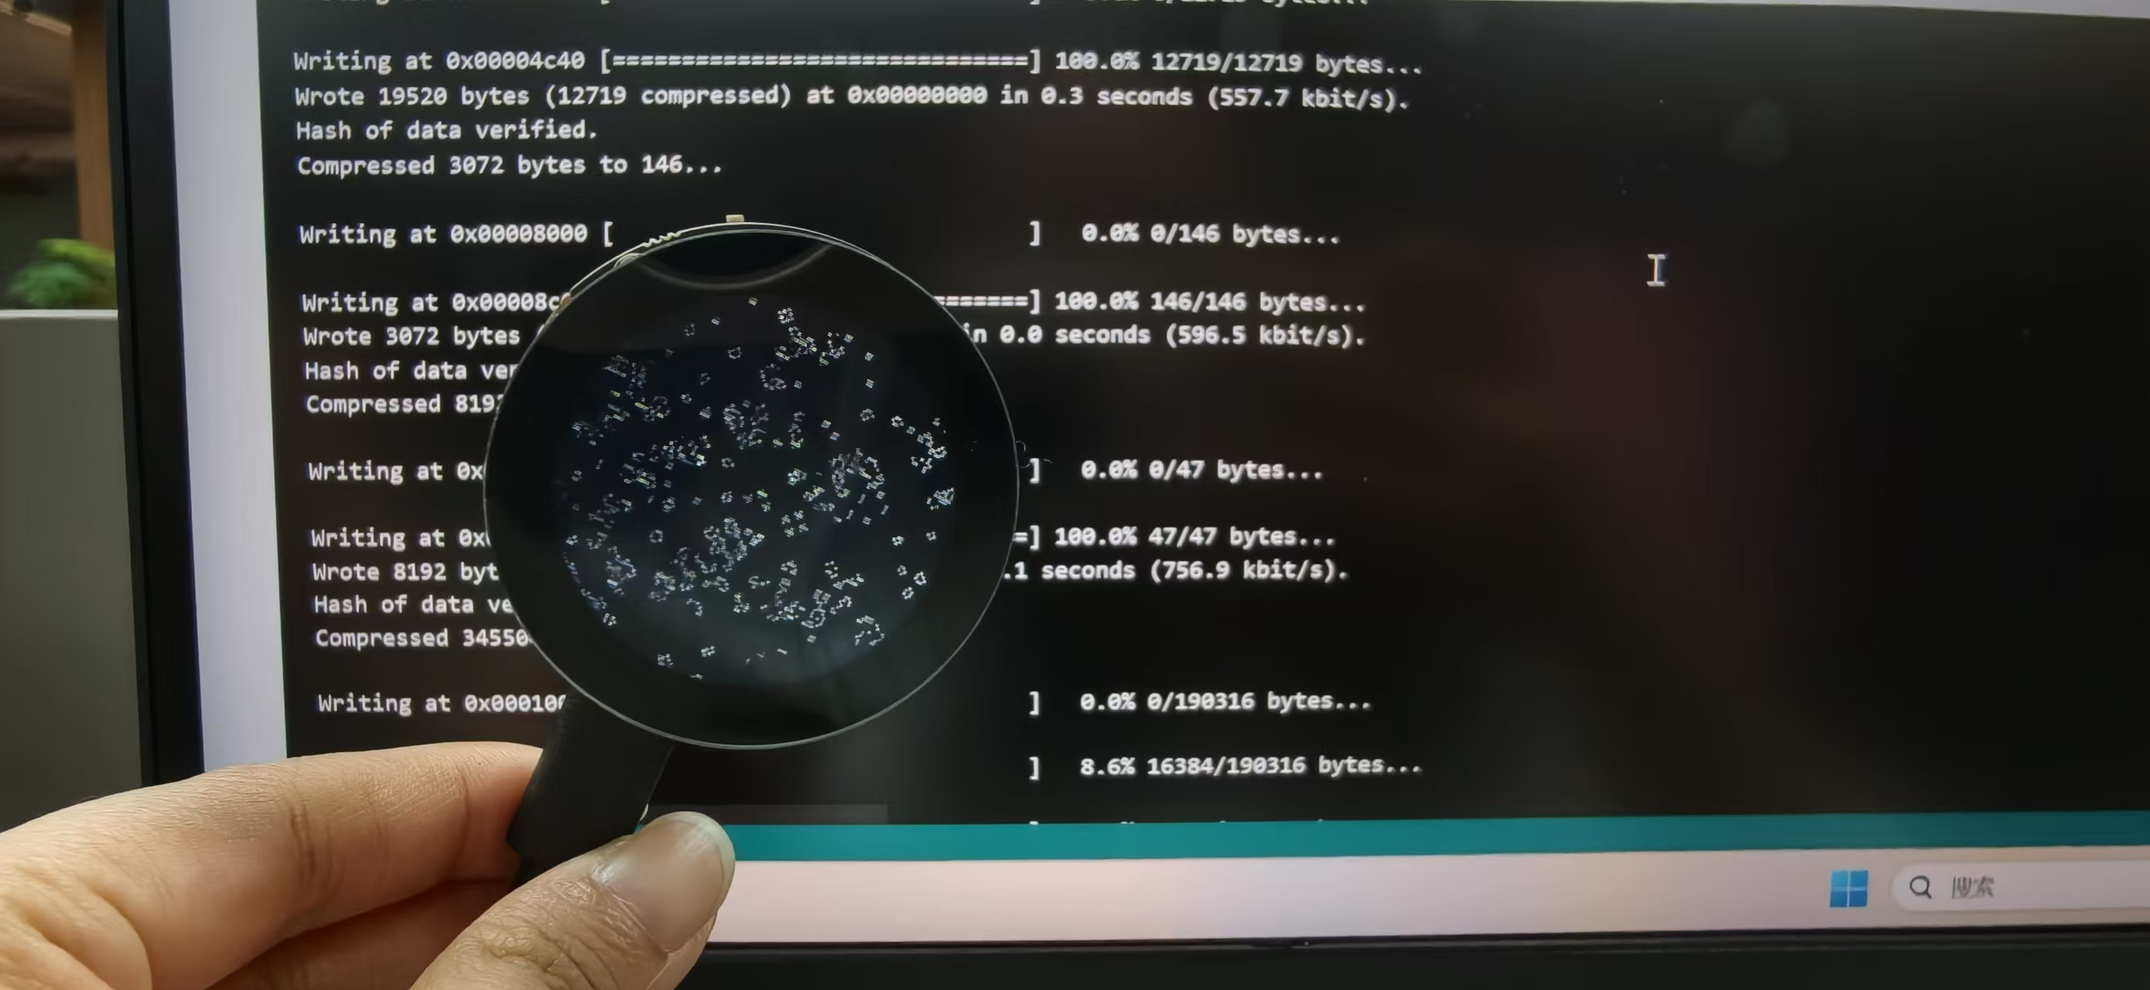
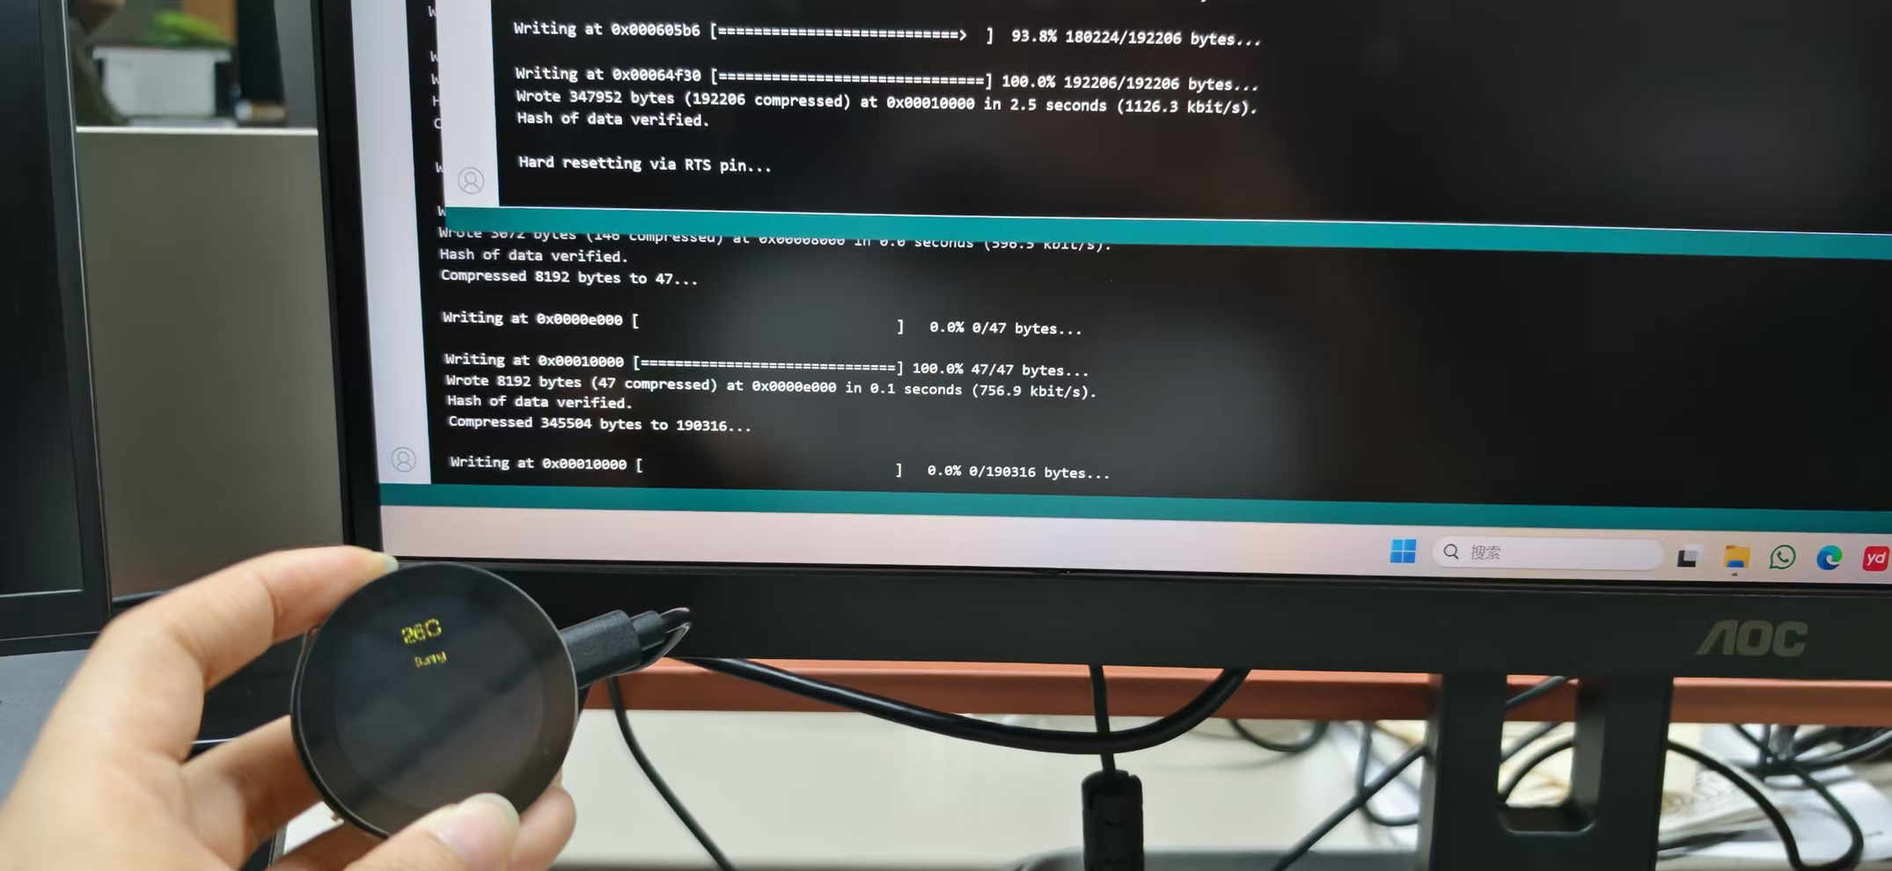
I started with the EE04 development kit and the Seeed wiki combo 509 (7.3" Spectra6, ED2208 controller). The first successful upload displayed red Hello World on white — but only after I removed the standard TFT_eSPI library from Documents\Arduino\libraries. The compiler was picking the generic TFT_eSPI (v2.5.43) over Seeed_Arduino_LCD, which meant the ED2208 driver and EPaper class were never linked. After deletion, the binary grew from 298 KB to 367 KB and the display responded.
2. Poster assets and image pipeline
I prepared three Fu-themed posters as PNG files (poster1.png–poster3.png). They are portrait 480×800 source images meant for an 800×480 landscape panel.


I wrote convert.py to map each pixel to the panel's six Spectra6 colors, pack two 4-bit nibbles per byte, and emit C arrays into images.h (~192 KB per poster). The first conversion squashed images horizontally because I resized without rotating. The fix was a 90° clockwise rotation before resize:
if img.width < img.height:
    img = img.rotate(90, expand=True)
img = img.resize((WIDTH, HEIGHT), Image.LANCZOS)
Three arrays (gImage_poster1/2/3) compile into the S3 firmware. Total flash use: ~2.2 MB of 16 MB (13.6%).
3. Node.js hub and first web UI
server.js holds shared state (currentPoster, lastEvent, devices) and exposes REST endpoints. index.html started as a simple poster picker and evolved into the Interactive Signage Hub dashboard — warm gradient background, Tailwind CSS, hover-lift poster cards with ACTIVE badges, device status pills (green/red dot + IP), and an orange toast: "Someone just triggered the touch sensor!"
4. C3 touch sender
c3_touch_sender.ino connects to WiFi, draws a static idle screen, and listens on touch pin D2 with debounce (1.5 s) and cooldown (3 s). On touch it shows Hello / My Friend, POSTs status=coming to the server, waits 2 s, then returns to idle. The OLED only redraws when WiFi state changes — not every loop — to avoid flicker.
5. S3 poster poller
EE04_S3_Poster.ino boots to poster 1, connects WiFi, and polls GET /api/status?device=s3 every 5 seconds. It refreshes the ePaper only when currentPoster changes. The S3 identifies itself via the ?device=s3 query so the server can track its IP and last-seen time.
6. Dashboard polish and device tracking
Later iterations added:
devicesobject inserver.jswith 15 s offline timeoutlastKnownEventinindex.htmlso the toast fires once per touch, not on every 2 s pollPOST /api/resetto return all clients to poster 1- Font size fixes on the C3 OLED (
logisoso22for WELCOME,logisoso18for TOUCH ME — the 32 px font clipped the last letter on 128 px width)
Key problems and how I fixed them
| Problem | Symptom | Fix |
|---|---|---|
| Library conflict | ePaper compiles but panel dead | Delete standard TFT_eSPI; keep only Seeed_Arduino_LCD |
| Wrong WiFi band | Boards stuck "connecting" | Switch from X.factory (5 GHz) to X.factory2.4G |
| Portrait PNGs | Posters squashed horizontally | convert.py: rotate 90° before resize |
| ED2208 deep sleep | Second ePaper refresh hangs forever; watchdog resets | Bypass epaper.update() / sleep() / wake(). Manual SPI: 0x04(PON) → 0x10(data + COLOR_GET map) → 0x12(refresh). Disconnect WiFi during refresh to avoid SPI conflict, then reconnect |
| Toast spam | Orange alert every 2 s after one touch | Track lastKnownEvent; fire toast only on transition to "touch" |
| OLED font overflow | Last letter of WELCOME cut off | Reduce font sizes (32→22, 24→18) |
| C3 firmware not uploaded | Touch and web seemed broken; server never received events | Re-upload c3_touch_sender.ino to COM11 — the code existed but was never flashed |
The ED2208 sleep issue was the deepest rabbit hole. epaper.update() sends a deep-sleep command (0x02); the next wake() (0x04 PON) could not reliably restart the ED2208, so CHECK_BUSY() waited forever. I tried changing EPD_WAKEUP() to EPD_INIT() in ED2208_Defines.h — including editing the wrong library copy first — but the real fix was to never sleep and drive refresh manually:
void pushDisplay() {
  epaper.writecommand(0x04);  // PON
  // ... push 800×480 data with COLOR_GET nibble mapping ...
  epaper.writecommand(0x12);  // refresh
  // wait for BUSY — no sleep
}
During showPoster(), WiFi disconnects before SPI push and reconnects after, preventing radio/SPI contention.
What I learned compared to v1.0
| v1.0 (round display) | v2.0 (Interactive Signage Hub) |
|---|---|
| HTTP server on the MCU | Dedicated Node.js hub on PC |
| One display, three text buttons | Three UIs: OLED greeting, web dashboard, ePaper posters |
| HTML baked into Arduino strings | Tailwind dashboard with polling, toasts, device badges |
| Flaky after UI polish | Stable once sleep bug, WiFi band, and upload issues were resolved |
| Chinese text failed on round TFT | Full-color bitmap posters on Spectra6 ePaper |
The biggest lesson: interface programming is state management across clients, not just drawing. Polling intervals (S3: 5 s, web: 2 s), event deduplication, and knowing which library copy the compiler actually uses mattered as much as layout. Debugging also taught me to verify the obvious — twice I thought the system was broken when the C3 sketch simply had not been uploaded.
Reliability became part of the UX: the entrance OLED responds immediately; the indoor ePaper updates within one poll cycle; the dashboard confirms the event without nagging. That layered feedback is what makes the interface feel intentional rather than a chain of independent demos.
Files and how to run
All project files live in static/img/interface/ in this repository:
| File | Purpose |
|---|---|
server.js | Express backend + REST API + static hosting |
index.html | Interactive Signage Hub dashboard (in static/img/interface/; run via node server.js) |
convert.py | PNG → 6-color C array converter |
images.h | Compiled poster bitmaps (also in S3 folder) |
c3_touch_sender/c3_touch_sender.ino | C3: OLED + touch + WiFi POST |
EE04_S3_Poster/EE04_S3_Poster.ino | S3: WiFi poll + manual SPI ePaper refresh |
EE04_S3_Poster/driver.h | Board combo 509 + EE04 pin config |
project_summary.txt | Architecture summary (development log) |
conversation_log.txt | Full OpenCode session notes |
Startup sequence (from project_summary.txt):
cd static/img/interface→node server.js- Browser →
http://192.168.100.18:3000 - Power S3 → auto-connects → shows poster 1
- Power C3 → OLED shows WELCOME
- Touch C3 or click a poster on the web → full chain runs
Earlier draft (v1.0 — Round Display)
The sections below are my first write-up from the XIAO ESP32-C3 + Round Display experiment. They remain here as a baseline showing where I started before building the Interactive Signage Hub above.
This week I connected a graphical interface to a small microcontroller board, iterated on both the on-device UI and a web control panel, and ran into the kinds of limits that are normal on embedded hardware. Below is how I set things up, what broke, how I fixed or worked around it, and what I would do next.
Hardware setup
Board: Seeed Studio XIAO ESP32C3
Display: XIAO Round Display (SKU 104030087)
Luckily, I prepared two displays, and one seems broken, didn't show any light at all. The another one works good after some testing.
I tried the way that GPT recommend me to do at the first time, download the TFT_eSPI library and adjust some data, it didn't works. (AI sometimes not very reliable)
Then I followed the official getting-started guide of Seeed Studio for the round display to install the environment and the libraries the wiki lists as required:
Seeed Wiki — Getting Started with the Round Display
The wiki looks very neat, when follow the steps carefully, walks through IDE setup, board support, and adding the libraries that talk to the display driver and graphics layer.
After wiring the round display to the XIAO ESP32C3 and flashing a first sketch, I tried the example sketch from the Seeed_GFX library: File > Seeed_GFX > Examples > Round Display > Arduino_Life, it flashed a second then turned black.
While debugging, I found I had not included a required header:
#include <driver.h>
Once I added it, the display started behaving successfully:
Why a “missing library” can look like a dead display (short explanation)
On embedded displays, drawing usually goes through several layers: your sketch → a graphics library → a chip-specific driver → the physical panel. If a piece of that chain is missing or not linked correctly, the code may compile (or fail in subtle ways) but the driver never finishes the setup sequence the panel needs timings, power/config registers, or SPI/I²C initialization may never run.
So the symptom is not always a loud error message; it can be no output, a brief flicker, or garbled pixels. Including the right driver header ensures the build pulls in the symbols and setup path the round display examples expect. If something similar happens to you, compare your includes and library list line-by-line with the official working example from the wiki.
UI design
Before coding, I planned the on-screen layout using design tools starting in Figma for structure, and also trying a round-screen mockup to check proportions on a 240×240 circle.
- A Chinese “福” (blessing / good fortune) character in the center
- Temperature shown toward the top
- Humidity toward the bottom
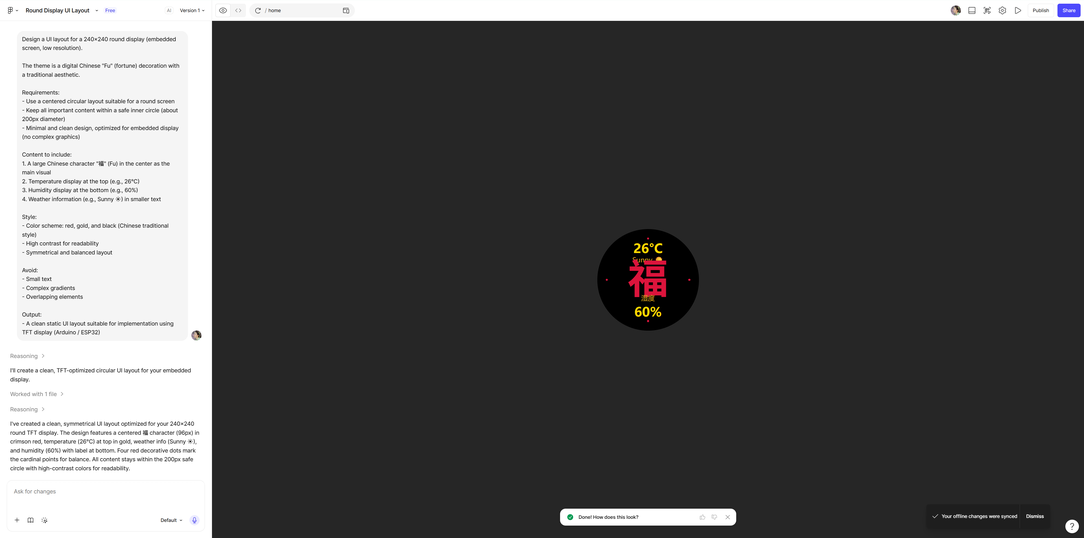
Since the Figma also provide the AI feature, so I provide my prompt to generate the UI Design:
Design a UI layout for a 240x240 round display (embedded screen, low resolution).

The theme is a digital Chinese "Fu" (fortune) decoration with a traditional aesthetic.

Requirements:
- Use a centered circular layout suitable for a round screen
- Keep all important content within a safe inner circle (about 200px diameter)
- Minimal and clean design, optimized for embedded display (no complex graphics)

Content to include:
1. A large Chinese character "福" (Fu) in the center as the main visual
2. Temperature display at the top (e.g., 26°C)
3. Humidity display at the bottom (e.g., 60%)
4. Weather information (e.g., Sunny ☀) in smaller text

Style:
- Color scheme: red, gold, and black (Chinese traditional style)
- High contrast for readability
- Symmetrical and balanced layout

Avoid:
- Small text
- Complex gradients
- Overlapping elements

Output:
- A clean static UI layout suitable for implementation using TFT display (Arduino / ESP32)
The mockup below is the “target look”: red 福, gold/yellow for temperature and humidity, all kept inside a safe inner circle so the edges of the physical round LCD are not clipped.
The visual direction was inspired by traditional Chinese culture: a calm, symbolic centerpiece with practical sensor information around it.
Why I chose this design
I am interested in projects where culture and electronics meet. A round screen already feels like a coin, a moon, or a seal — shapes that show up a lot in traditional art. Putting 福 in the middle grounds the project emotionally (it reads as intentional and personal, not only technical), while the sensor labels make the device useful in daily life. Working in Figma (and the round preview) helped me decide spacing and hierarchy before I spent time fighting font and layout limits in code.
Process: A working display
Firstly, I thought using the simple code the round display will work like what I designed:
#include <driver.h> // Hardware-specific library
#include <TFT_eSPI.h>
TFT_eSPI tft = TFT_eSPI();
void setup() {tft.init();tft.setRotation(e);tft.fil1Screen(TFT_BLACK);
void drawUI(float temp, int hum) {
ft.fil1Screen(TFT_BLACK);
ft.setTextDatum(MC_DATUM);//居中对齐
//温度
tft.setTextColor(TFT_YELLOW);
tft.drawString(String(temp,0) + "C", 120, 40, 4);
//天气(可选)
tft.setTextColor(TFT_YELLOW);
tft.drawString("Sunny", 120, 70, 2);
福字(重点)tft.setTextColor(TFT_RED);
ft.drawString("FU",120,120,7);// 后面换成中文或bitmap
//湿度
tft.setTextColor(TFT_YELLOW);
tft.drawString(String(hum) + "%", 120, 190, 5);
}
void loop() {
drawUI(26, 60);delay(2eee);
}
But the display only shows the temp data:
I realized maybe it refreshed to fast, then I changed; but it still didn't work, the problem maybe the font to large, then I adjust the size from 7 to 4. Finally it works:
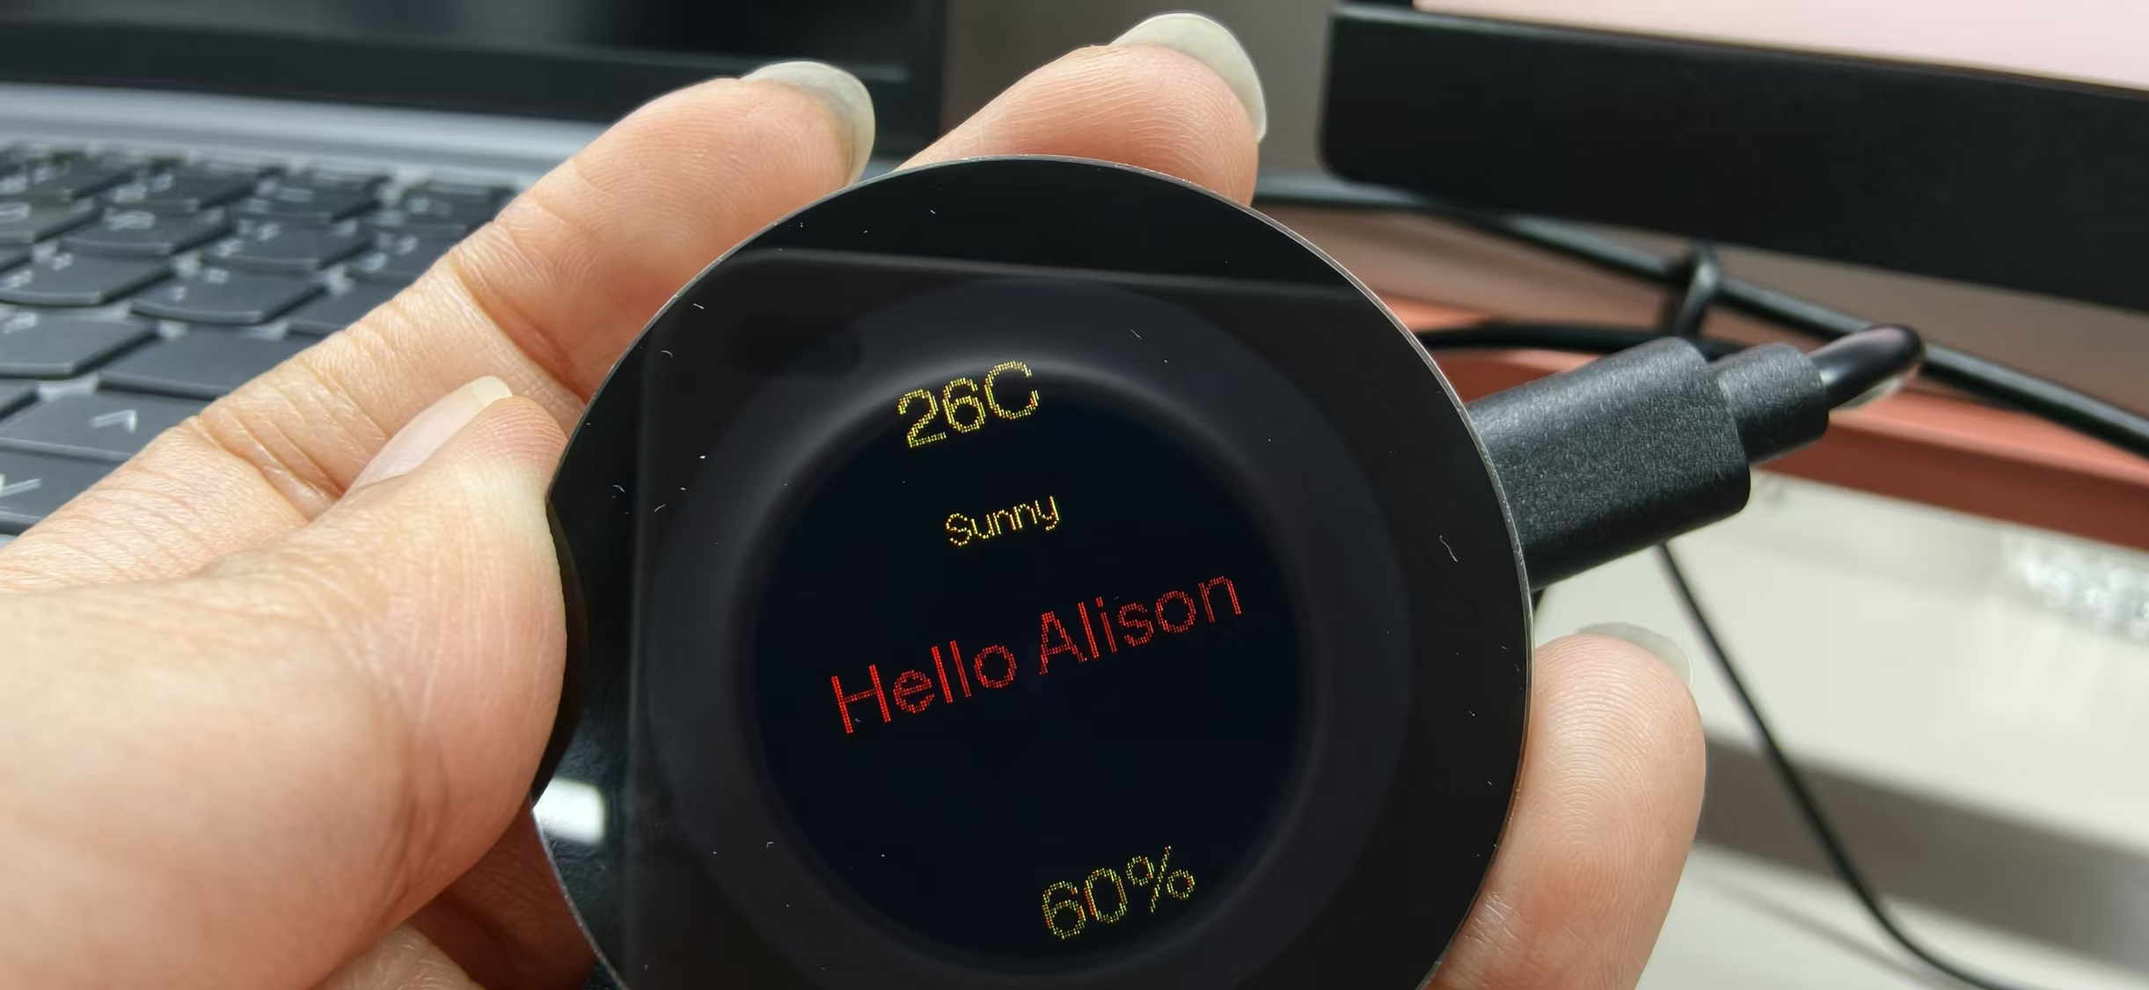
When I moved from the mockup to the actual round display, Chinese characters did not render properly with my first approach. To keep the week moving and verify the pipeline end-to-end, I simplified the UI and used English text instead, for example “Hello Alison” which I could display reliably on the round screen.
And this is the final code:
#include <driver.h> // Hardware-specific library
#include <TFT_eSPI.h>
TFT_eSPI tft = TFT_eSPI();
void setup() {
tft.init();
tft.setRotation(e);
drawUI(26,60);//只画一次
}
void loop() {//暂时不要反复刷新
}
void drawUI(float temp, int hum) {
ft.fil1Screen(TFT_BLACK);
tft.setTextDatum(MC_DATUM);
//温度(上)
tft.setTextColor(TFT_YELLOW);
tft.drawString(String(temp,0) + "C",120, 40,4);
(稍微下移)tft.drawString("Sunny", 120, 75, 2);
tft.setTextColor(TFT_RED);
//福字(缩小一点
tft.drawString("Hello Alison", 120, 120, 4);
//湿度(下)tft.setTextColor(TFT_YELLOW);
tft.drawString(String(hum) + "%", 120, 200, 4);
}
WiFi and web control (ESP32C3)
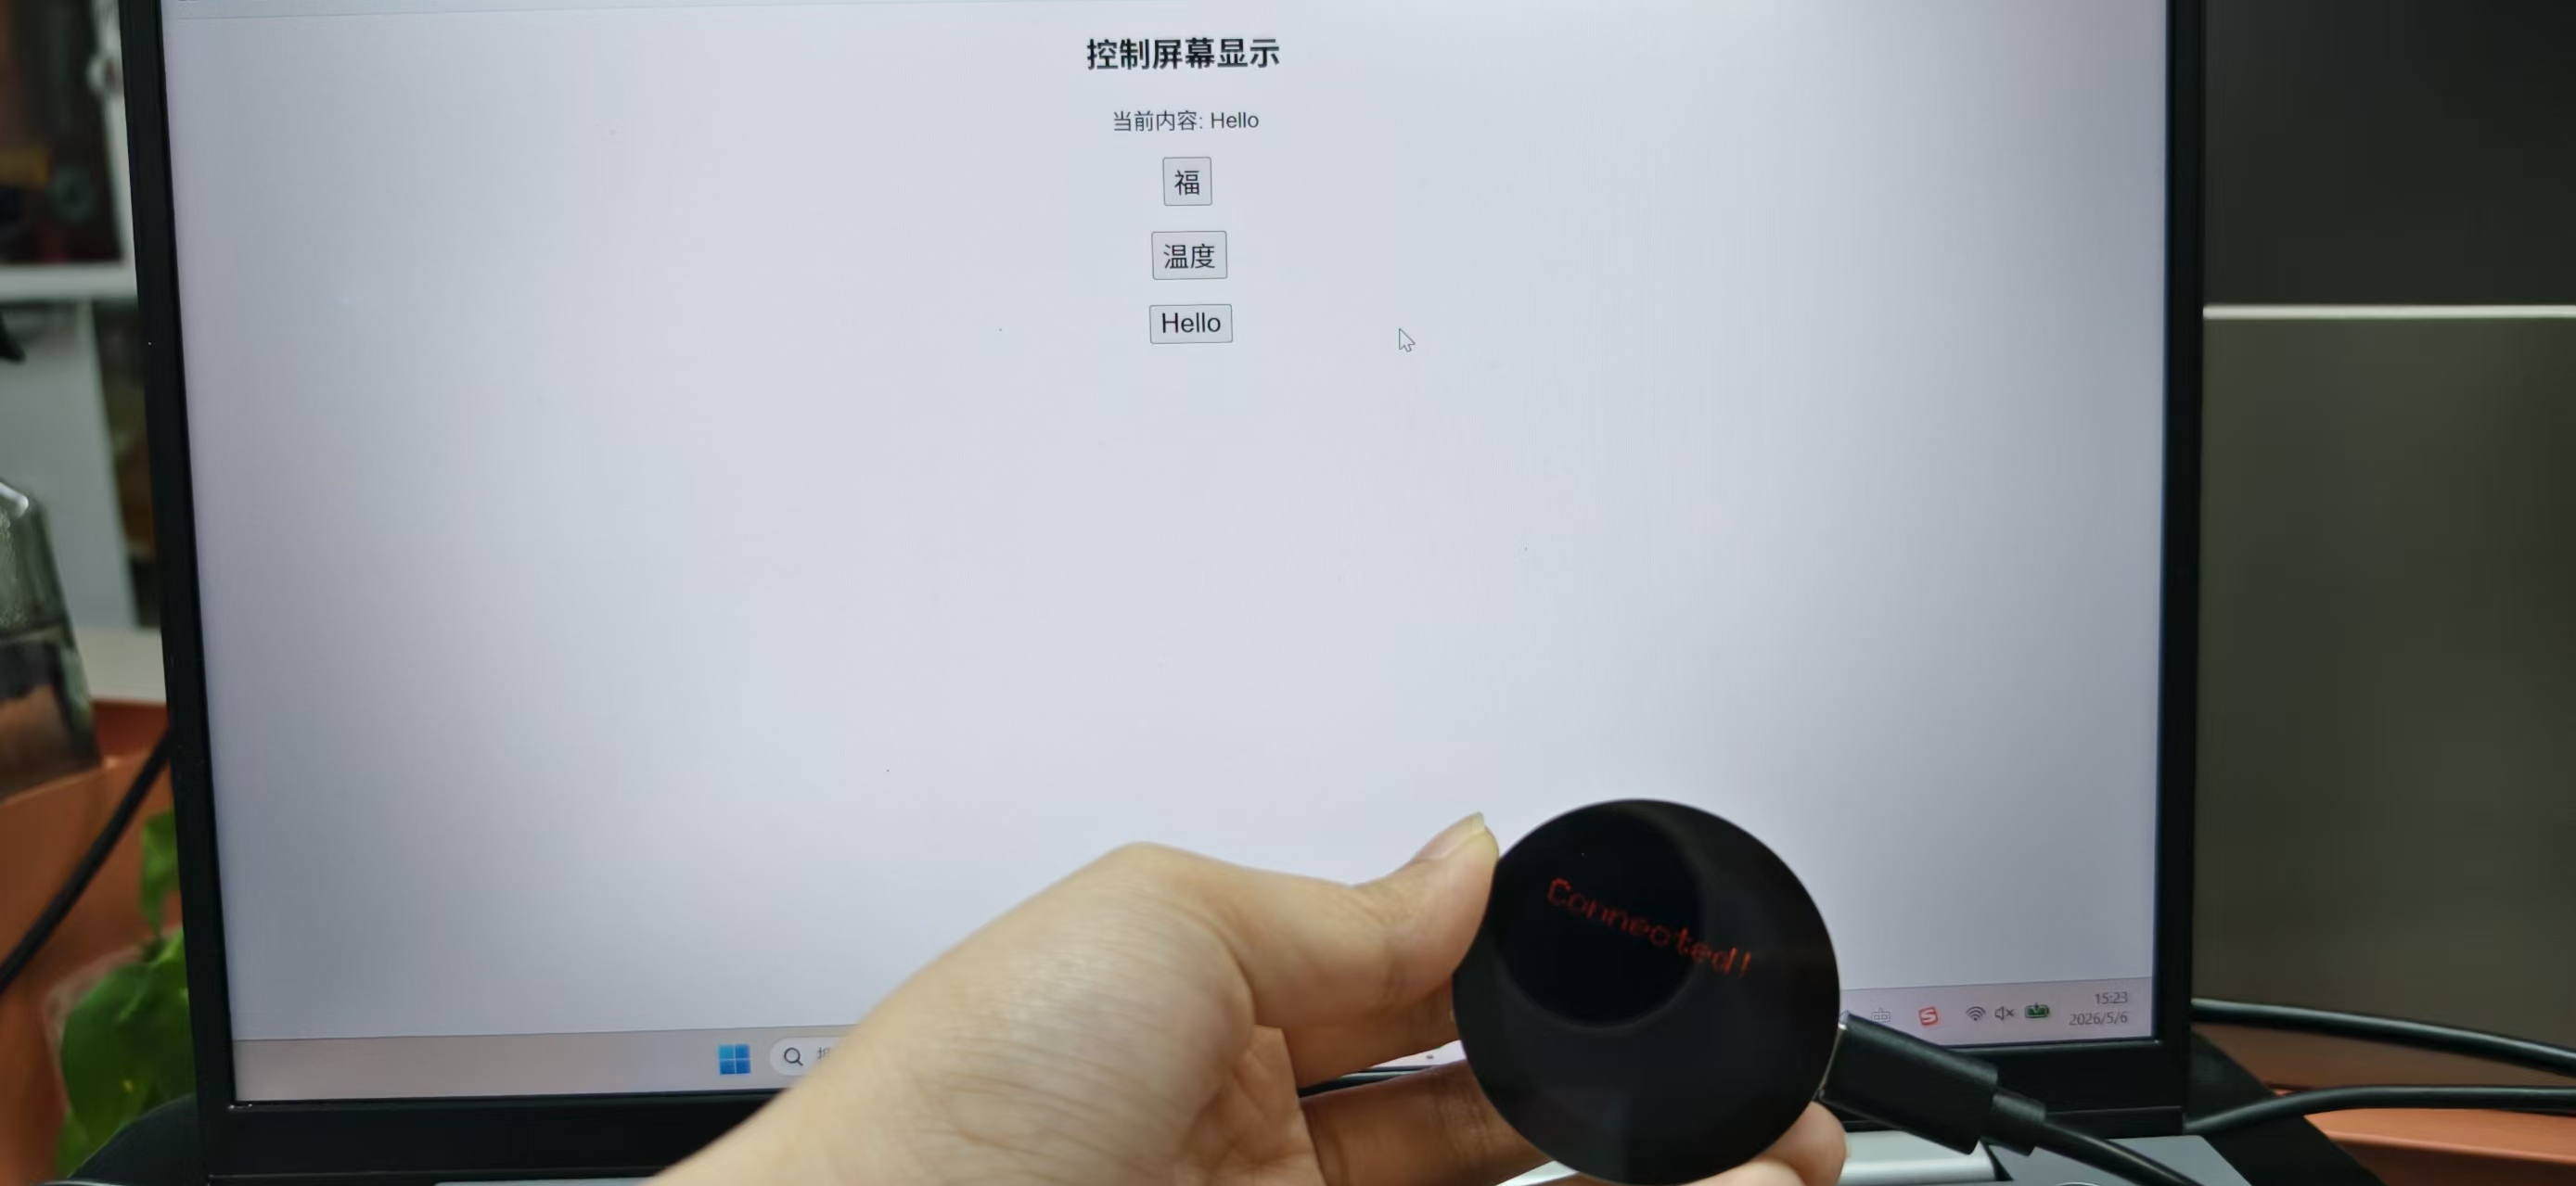
The ESP32C3 includes WiFi, so I built a simple HTTP server on the board and a small web page with buttons. The idea: change what appears on the round display from a browser on the same network.
First version:
The basic flow worked: I could trigger updates on the screen from the web UI. That was an exciting moment because it connects physical UI ↔ network UI in one stack.
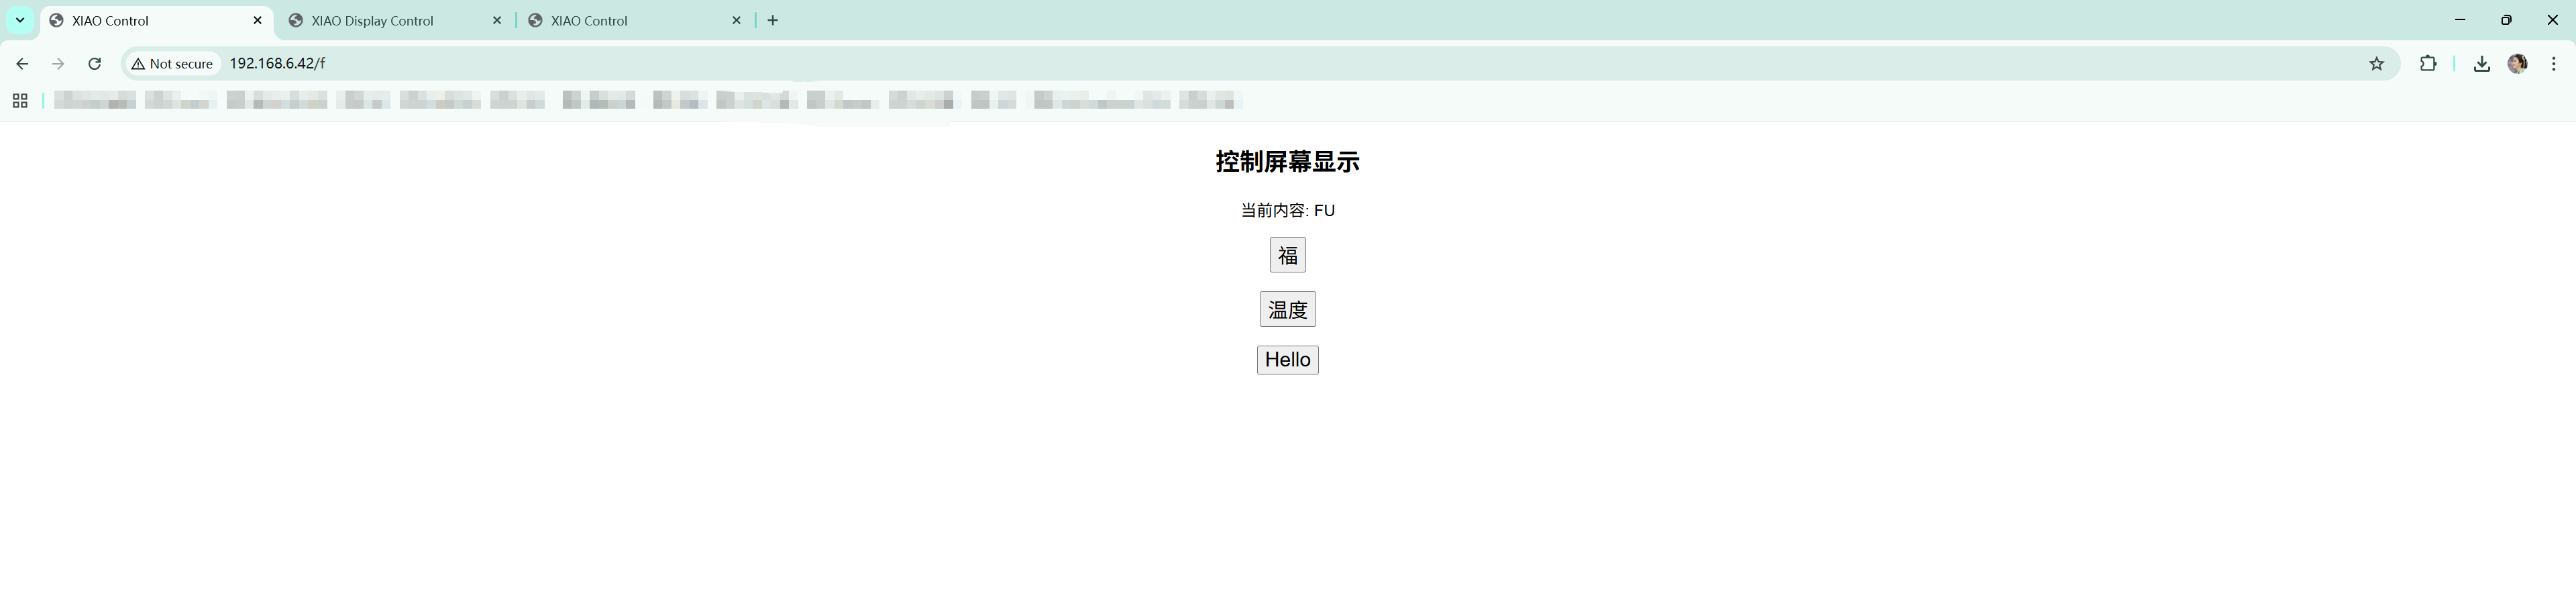
The first browser UI was intentionally simple: a white page with three actions (福 / temperature / Hello) so I could prove routing and state before styling.
Handheld check of the same path: the page on the laptop and the round display showing Connected! in red once the link was live.
Screen recording of the WiFi control loop (browser → ESP32 HTTP server → round display). The file is compressed for the site (H.264, 256×144, 10 fps, no audio, faststart, under 200 KB) so the page stays light while the interaction is still visible.
#include <WiFi.h>
#include <WebServer.h>
#include <TFT_eSPI.h>  // 你之前已经装好的屏幕库


// ====== WiFi 信息 ======
const char* ssid = "YOUR_WIFI_SSID";
const char* password = "YOUR_WIFI_PASSWORD";

// ====== 创建对象 ======
WebServer server(80);
TFT_eSPI tft = TFT_eSPI();

// ====== 当前显示内容 ======
String currentText = "Hello";

// ====== 网页内容 ======
String getHTML() {
  String html = "<!DOCTYPE html><html>";
  html += "<head><meta charset='utf-8'><title>XIAO Control</title></head>";
  html += "<body style='text-align:center;font-family:sans-serif;'>";
  html += "<h2>控制屏幕显示</h2>";

  html += "<p>当前内容: " + currentText + "</p>";

  html += "<a href='/f'><button style='font-size:20px;'>福</button></a><br><br>";
  html += "<a href='/temp'><button style='font-size:20px;'>温度</button></a><br><br>";
  html += "<a href='/hello'><button style='font-size:20px;'>Hello</button></a>";

  html += "</body></html>";
  return html;
}

// ====== 屏幕显示函数 ======
void drawText(String text) {
  tft.fillScreen(TFT_BLACK);
  tft.setTextColor(TFT_RED, TFT_BLACK);
  tft.setTextSize(3);
  tft.setCursor(20, 60);
  tft.println(text);
}

// ====== 路由 ======
void handleRoot() {
  server.send(200, "text/html", getHTML());
}

void handleFu() {
  currentText = "FU";
  drawText("FU");  // 中文可能不显示,先用FU测试
  server.send(200, "text/html", getHTML());
}

void handleTemp() {
  currentText = "Temp:25C";
  drawText("Temp:25C");
  server.send(200, "text/html", getHTML());
}

void handleHello() {
  currentText = "Hello";
  drawText("Hello");
  server.send(200, "text/html", getHTML());
}

// ====== 初始化 ======
void setup() {
  Serial.begin(115200);

  // 屏幕初始化
  tft.init();
  tft.setRotation(0);
  drawText("Starting...");

  // WiFi连接
  WiFi.begin(ssid, password);
  Serial.print("Connecting");

  while (WiFi.status() != WL_CONNECTED) {
    delay(500);
    Serial.print(".");
  }

  Serial.println("\nConnected!");
  Serial.println(WiFi.localIP());

  drawText("Connected!");

  // 路由绑定
  server.on("/", handleRoot);
  server.on("/f", handleFu);
  server.on("/temp", handleTemp);
  server.on("/hello", handleHello);

  server.begin();
}

// ====== 主循环 ======
void loop() {
  server.handleClient();
}
Iterations on the web interface (and current instability)
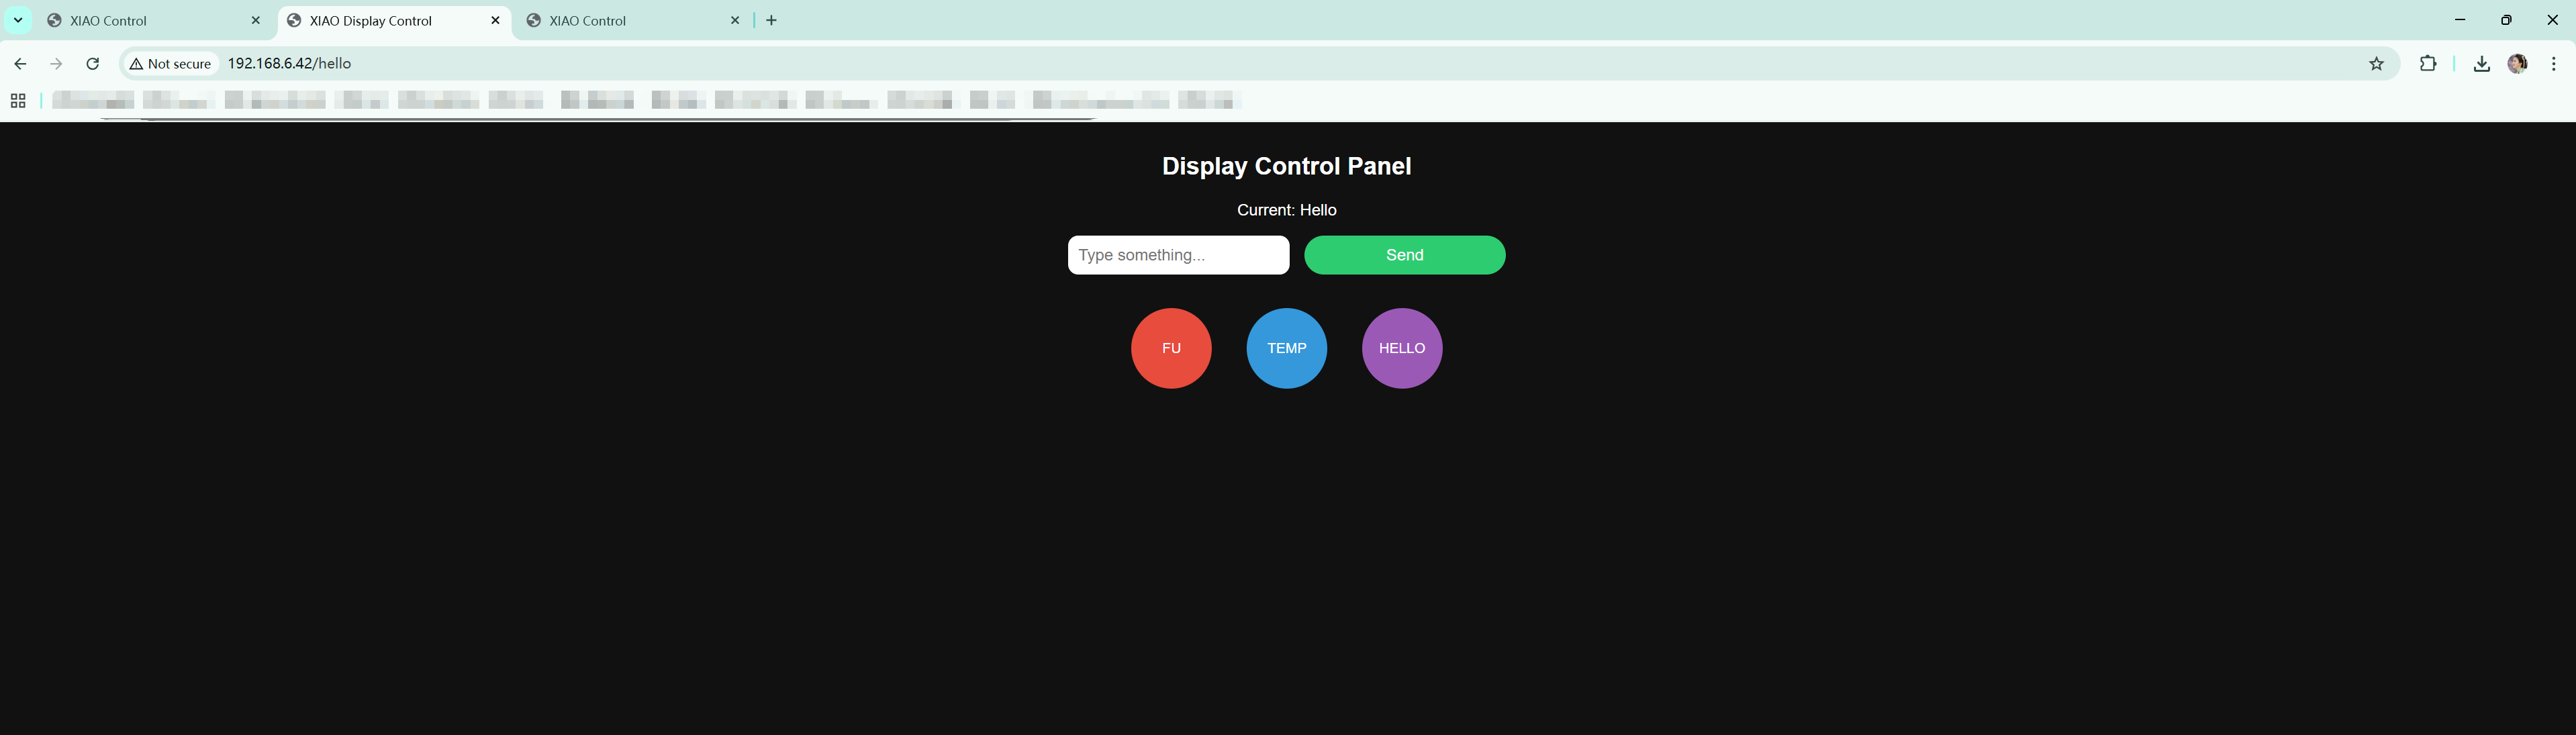
I tried to make the web side more visual: clearer layout, nicer buttons, and a stronger “product” feeling. Below is a later pass: dark theme, circular preset buttons (FU / TEMP / HELLO), optional text field, and a line that echoes the current string on the display — closer to how I imagined the final product.
As I iterated further:
- Later versions became unstable
- Control felt inconsistent sometimes the screen updated as expected, sometimes not
I am still debugging this part, hopefully I could update more beautiful pages soon.
Problems & debugging (summary)
| Symptom | What I checked | Outcome |
|---|---|---|
| Black screen after brief flash | Includes vs wiki example; library setup | Added #include <driver.h>; display OK |
| Chinese text not showing well | Font / encoding / memory realities | Simplified to English to validate pipeline |
| Web control flaky after UI polish | Server logic, memory, timing | Still investigating; hypotheses above |
Debugging habit that helped me: reduce the system confirm hardware with the smallest official example, then add one feature at a time (text only → sensors → WiFi → web).
What I would improve next
- More stable web control — smaller HTML responses, clearer request handler, avoid blocking the main loop during long draws, and test with repeated clicks / multiple browser tabs.
- Better font rendering — a planned subset or bitmap “福” so the design mockup survives on hardware without needing a full desktop font engine.
What I found interesting
Bridging UI design (Figma and mockups) and a physical round display makes the project feel tangible: the same circle is a layout on a laptop and then an object on my desk. The browser as a remote control adds another layer — three UIs in one story: design tool, web panel, and the device itself. Even the frustrating flaky WiFi phase taught me that reliability is part of the interface, not an afterthought.
Downloadable Files
Paths below are repository-relative (same style as my other weekly pages). In GitLab, open the file and use Download or Raw, or clone the repo to get everything.
Interactive Signage Hub (v2.0 — touch OLED + web dashboard + ePaper)
- Node.js server
- Web dashboard —
static/img/interface/index.html(served bynode server.js) - PNG → C array converter
- Poster bitmaps (
images.h) - C3 touch sender firmware
- S3 ePaper poster firmware
- S3 board + panel config (
driver.h) - Poster 1 (PNG)
- Poster 2 (PNG)
- Poster 3 (PNG)
- Architecture summary (txt)
- Development log (txt)
Sketches (v1.0 — XIAO ESP32C3 + Round Display)
- First “Fu / Hello” UI +
driver.h— plus driver.h for this folder - First full layout test (temperature / Hello / humidity)
- Conway Arduino_Life example snapshot (round display)
- WiFi web server + HTML buttons (later experiment; still debugging stability)
Libraries (ZIP archives in this repo)
Screen recording