Appearance
Week 17 - Wildcard Week
Assignments of the Week
Design and produce something with a digital process (incorporating computer-aided design and manufacturing) not covered in another assignment, documenting the requirements that your assignment meets, and including everything necessary to reproduce it.
The Concept page provides a brief overview of data input and output. The Design page includes the schematic, wiring diagram, code, and other technical details. The Assemble & Test page features a video demonstrating the assembly process and how the system is used.
Project Background
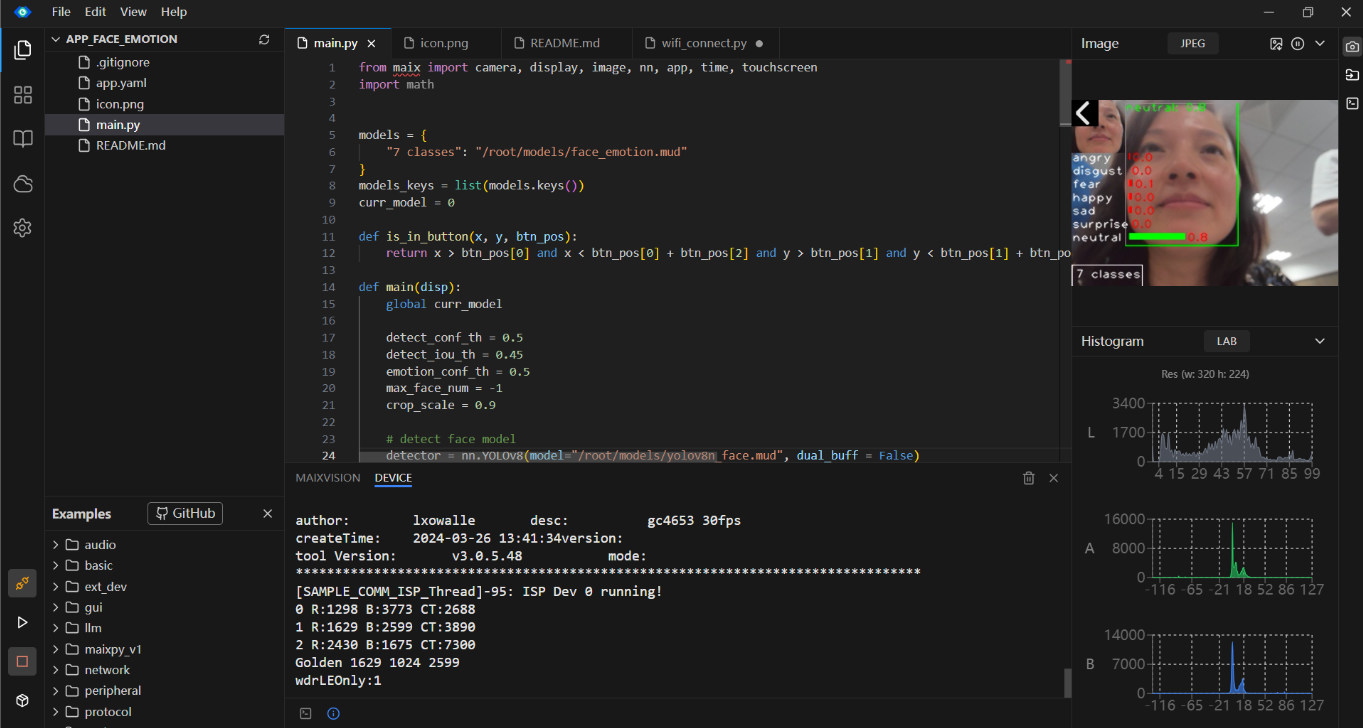
This week's work constitutes a core component of my Fab Academy 2025 final project: the implementation of facial emotion recognition. Using the MAIXCAM camera for real-time detection, the system is able to recognize seven fundamental facial expressions: angry, disgust, fear, happy, sad, surprise, and neutral. These emotional states are then mapped to dynamic lighting effects via a WS2812 LED strip, establishing a synchronized feedback loop between the user's emotions and the visual output.
Below are the recognition results:

Environment Construction
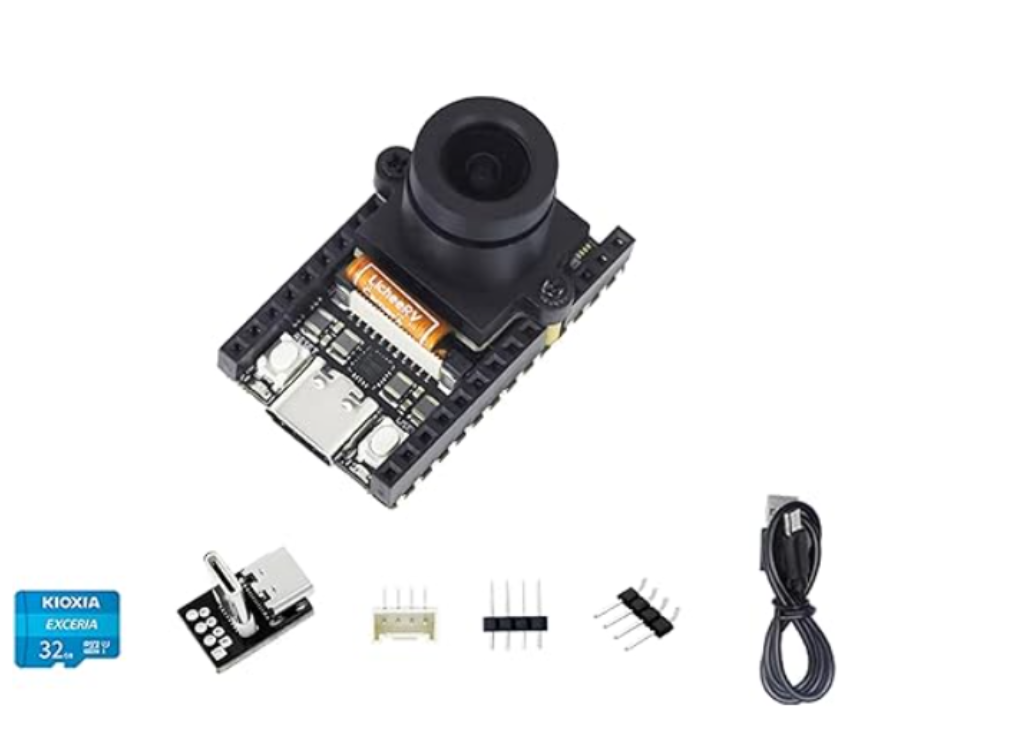
The following are the hardware and software equipment required for this experiment: MaixCAM Lite camera and the software platform MaixVision provided by its manufacturer.

The camera supports programming in Python, and the official MaixPy library is provided for development. In addition, the official also provides some use cases of MaixPy for developers to refer to and learn. At the same time, the official also operates a community platform called MaixHub, which introduces how to train models and provides multiple model resources that can be used directly.


Challenges and Solutions
Initially, I planned to use the official training platform MaixHub to train my own emotion recognition model. I initially tried to train with about 20 to 30 images per emotion, but the results were not satisfactory - the model could not reliably identify specific emotional states. After consulting the relevant documentation, I found that at least 200 images per emotion are usually required to achieve acceptable accuracy, but calibration will consume a lot of time, so I decided to temporarily use the official pre-trained emotion recognition model for facial analysis. I will continue to develop and train my own models in the future. Polishing and Translation
The dataset was downloaded from Kaggle
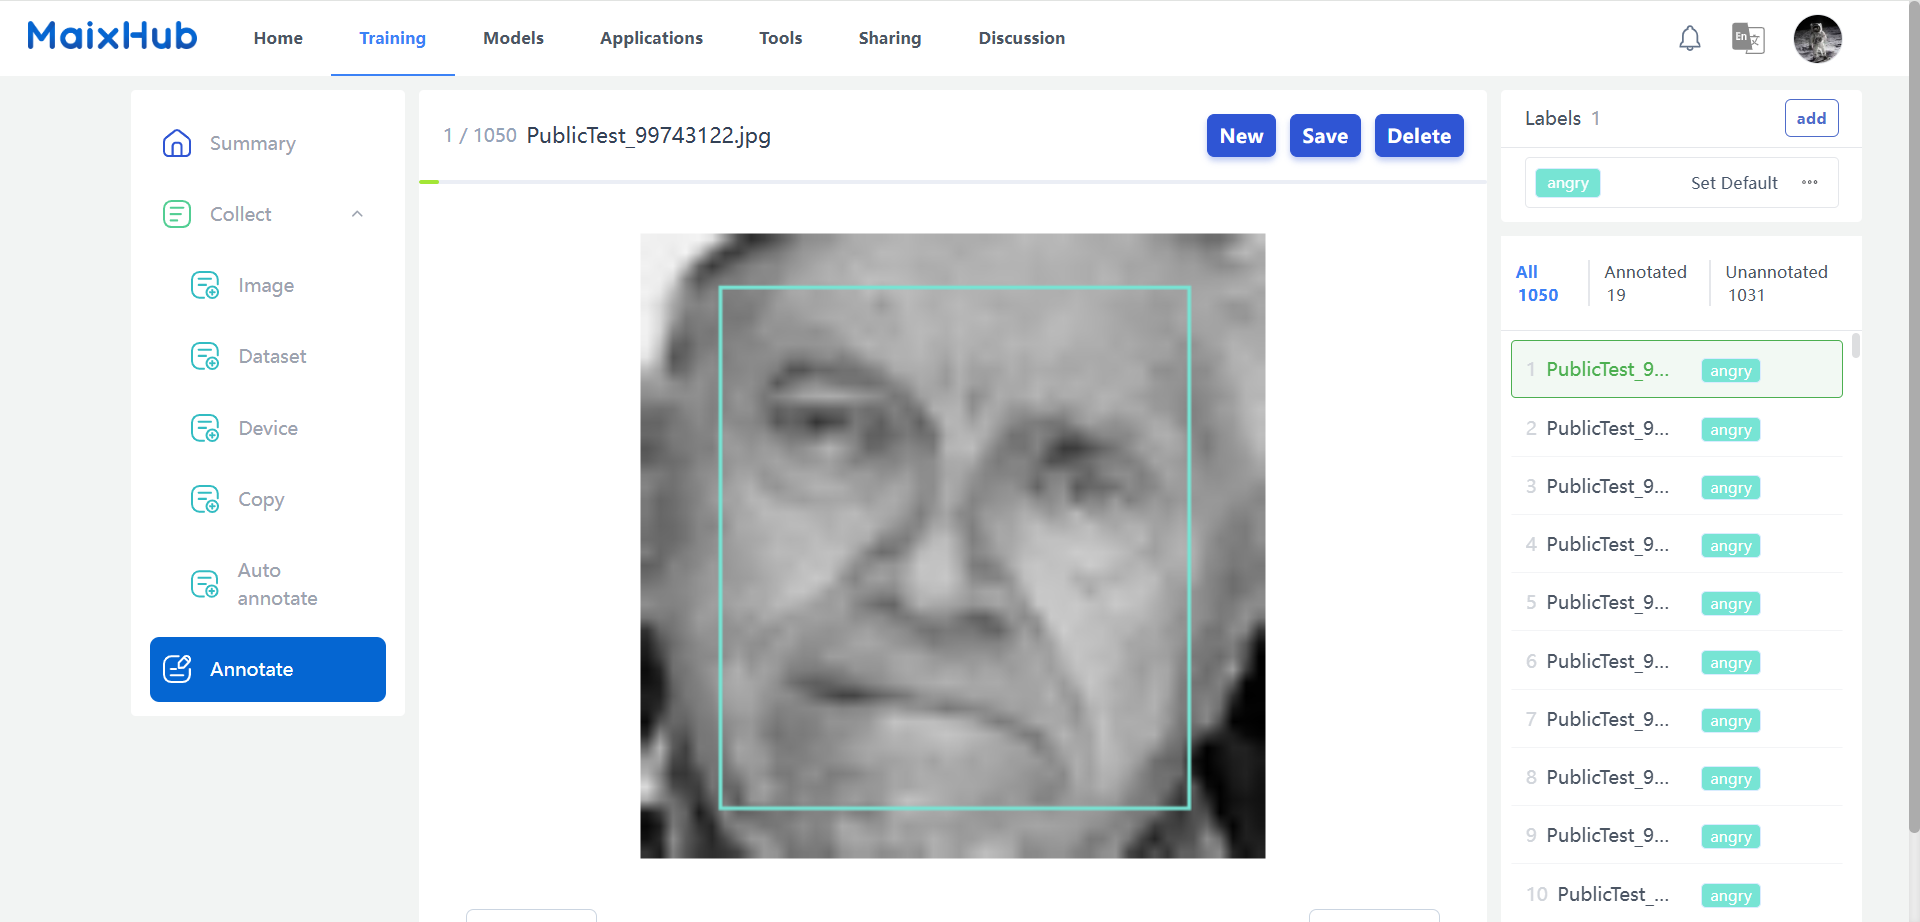
 The data was annotated and used for training. Training a model to recognize seven different emotions typically requires labeling over a thousand images. After training is complete, a .mud model file is generated. However, since data annotation is time-consuming, the official pre-trained emotion recognition model was used instead to save time.The data was annotated and used for training. Training a model to recognize seven different emotions typically requires labeling over a thousand images. After training is complete, a .mud model file is generated. However, since data annotation is time-consuming, the official pre-trained emotion recognition model was used instead to save time. The dataset was then uploaded to the MaixHub platform.

The data was annotated and used for training. Training a model to recognize seven different emotions typically requires labeling over a thousand images. After training is complete, a .mud model file is generated. However, since data annotation is time-consuming, the official pre-trained emotion recognition model was used instead to save time.
Code Implementation
The recognized emotion is transmitted via serial communication to the XIAO ESP32-C3, which then controls a WS2812 LED strip to display different lighting effects corresponding to different emotional states.
Next, we will introduce how to use the official emotion recognition model.
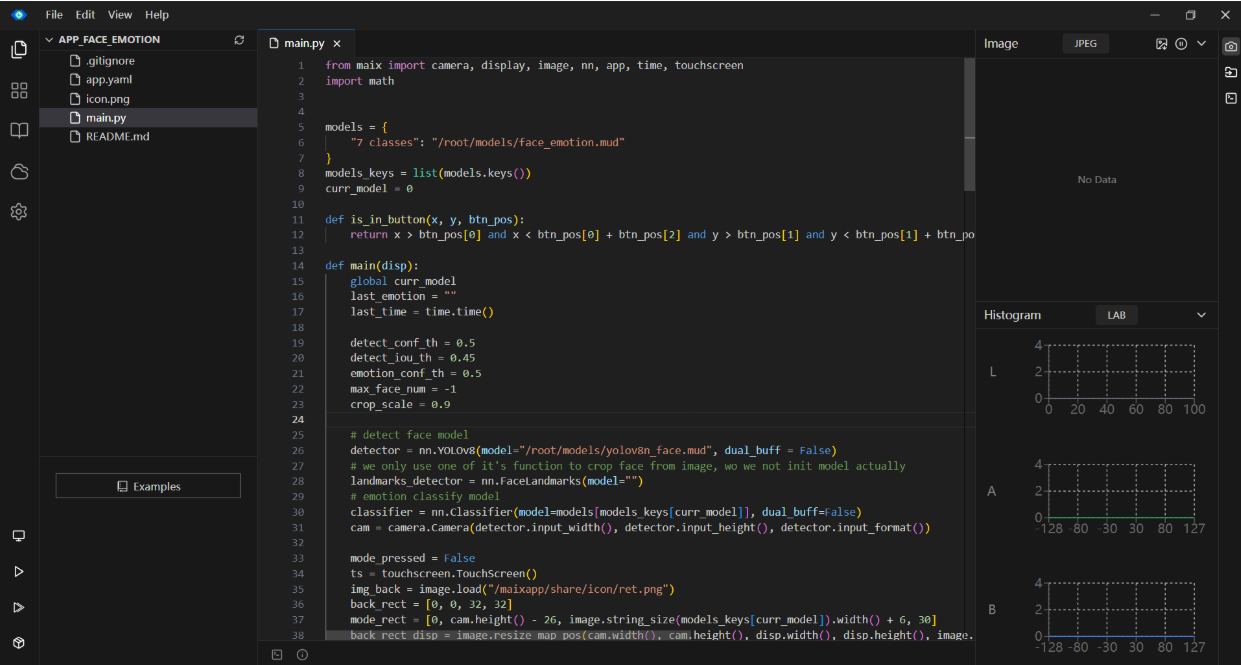
First, visit the official MAIXCAM GitHub repository to download the code related to emotion recognition, and open the project using MaixVision.
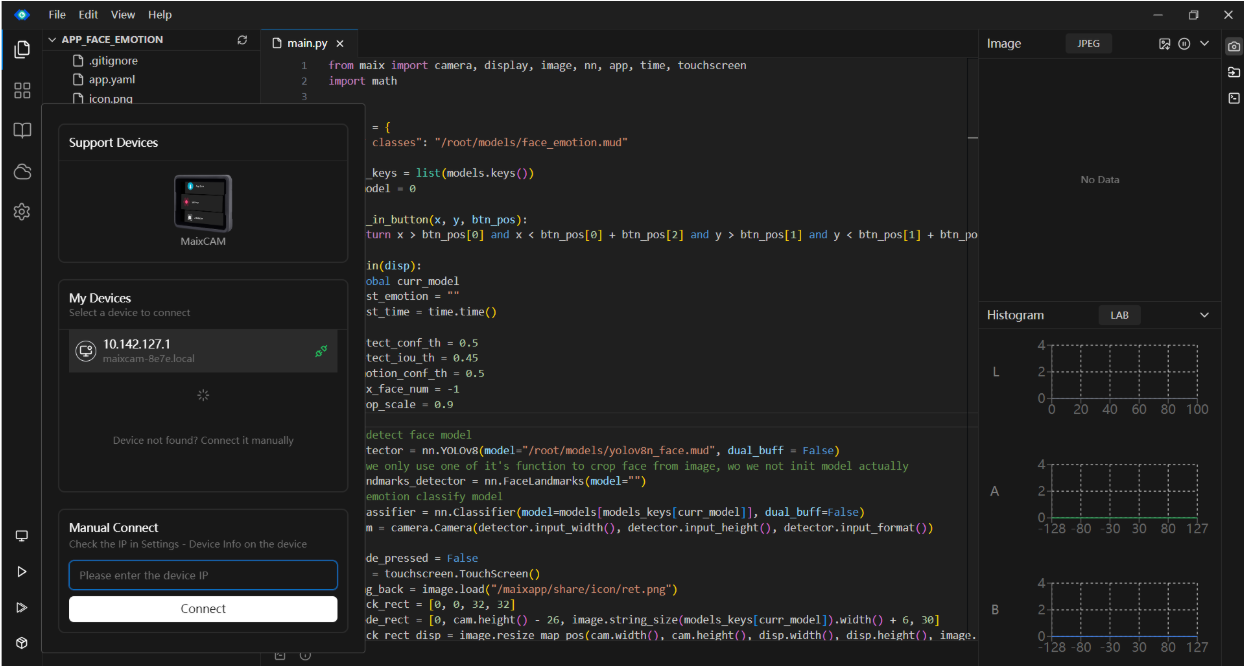
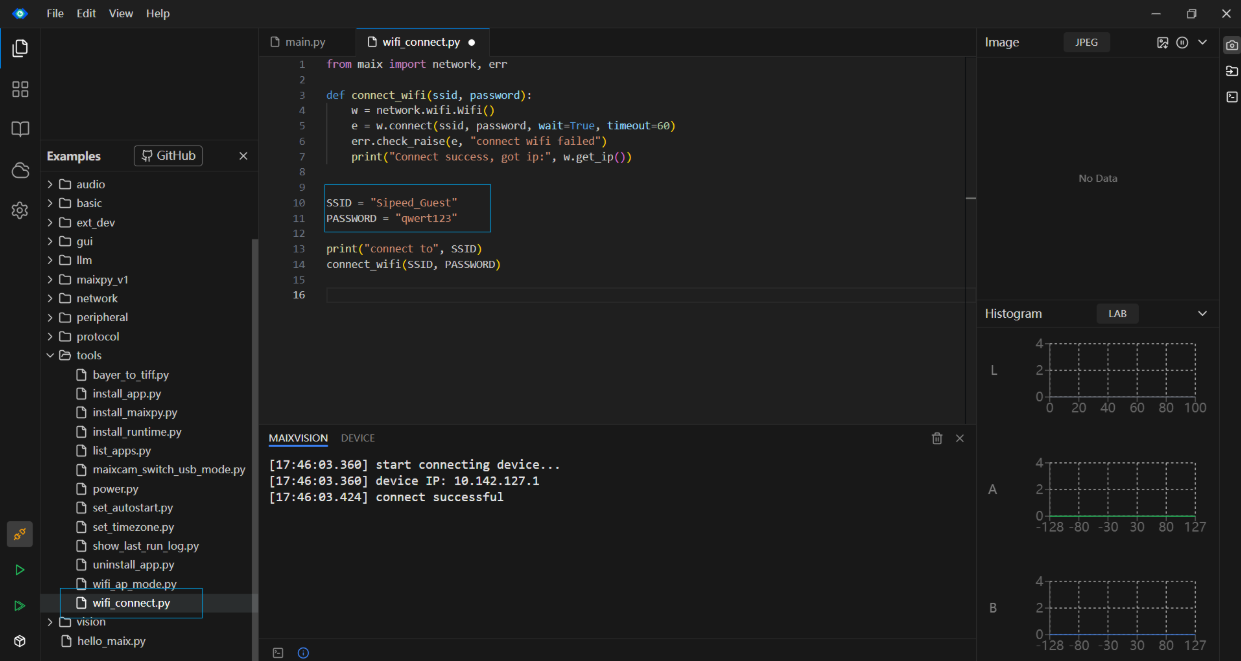
 Connect the camera to the computer using a data cable, and use the MaixVision software to connect to the device. Next, connect to the internet to update the firmware. Open the Wi-Fi connection section in the example code, modify the Wi-Fi name and password, and then run the code. After execution, the camera should successfully connect to the network.
 Select Run Entire Project,Select Run the entire project, the effect is as follows

Next, some modifications are needed in the code to print the emotion with the highest confidence and send it via the serial port.
First, use the built-in serial port API provided by Maix to open the serial port and set the baud rate to 115200.
python
ser = uart.UART("/dev/ttyS0", 115200)Next, add the following content to print the recognized emotions
If the confidence score of the recognition result exceeds the threshold emotion_conf_th, the corresponding emotion label is retrieved. Then, it checks whether the current emotion differs from the last one or if more than one second has passed since the last transmission. If either condition is met, it sends the emotion label through the serial port and prints it to the console. It also updates the last recorded emotion and timestamp.
python
if res[0][1] >= emotion_conf_th:
                emotion_label = classifier.labels[res[0][0]]
                now = time.time()
                if emotion_label != last_emotion or (now - last_time) > 1:  # 每秒发送一次或变更时发送
                    ser.write((emotion_label + "\n").encode())
                    print(f"emotion_label: {emotion_label}\n")
                    last_emotion = emotion_label
                    last_time = now
The complete code is as follows:
python
from maix import camera, display, image, nn, app, time, touchscreen
import math
from maix import uart
models = {
"7 classes": "/root/models/face_emotion.mud"
}
models_keys = list(models.keys())
curr_model = 0
def is_in_button(x, y, btn_pos):
return x > btn_pos[0] and x < btn_pos[0] + btn_pos[2] and y > btn_pos[1] and y < btn_pos[1] + btn_pos[3]
def main(disp):
global curr_model
last_emotion = ""
last_time = time.time()
detect_conf_th = 0.5
detect_iou_th = 0.45
emotion_conf_th = 0.5
max_face_num = -1
crop_scale = 0.9
# ser = serial.Serial("/dev/ttyS1", 115200, timeout=1)
ser = uart.UART("/dev/ttyS0", 115200)
# detect face model
detector = nn.YOLOv8(model="/root/models/yolov8n_face.mud", dual_buff = False)
# we only use one of it's function to crop face from image, wo we not init model actually
landmarks_detector = nn.FaceLandmarks(model="")
# emotion classify model
classifier = nn.Classifier(model=models[models_keys[curr_model]], dual_buff=False)
cam = camera.Camera(detector.input_width(), detector.input_height(), detector.input_format())
mode_pressed = False
ts = touchscreen.TouchScreen()
img_back = image.load("/maixapp/share/icon/ret.png")
back_rect = [0, 0, 32, 32]
mode_rect = [0, cam.height() - 26, image.string_size(models_keys[curr_model]).width() + 6, 30]
back_rect_disp = image.resize_map_pos(cam.width(), cam.height(), disp.width(), disp.height(), image.Fit.FIT_CONTAIN, back_rect[0], back_rect[1], back_rect[2], back_rect[3])
mode_rect_disp = image.resize_map_pos(cam.width(), cam.height(), disp.width(), disp.height(), image.Fit.FIT_CONTAIN, mode_rect[0], mode_rect[1], mode_rect[2], mode_rect[3])
# for draw result info
max_labels_length = 0
for label in classifier.labels:
size = image.string_size(label)
if size.width() > max_labels_length:
max_labels_length = size.width()
max_score_length = cam.width() / 4
while not app.need_exit():
img = cam.read()
results = []
objs = detector.detect(img, conf_th = detect_conf_th, iou_th = detect_iou_th, sort = 1)
count = 0
idxes = []
img_std_first : image.Image = None
for i, obj in enumerate(objs):
img_std = landmarks_detector.crop_image(img, obj.x, obj.y, obj.w, obj.h, obj.points,
classifier.input_width(), classifier.input_height(), crop_scale)
if img_std:
img_std_gray = img_std.to_format(image.Format.FMT_GRAYSCALE)
res = classifier.classify(img_std_gray, softmax=True)
results.append(res)
idxes.append(i)
if i == 0:
img_std_first = img_std
count += 1
if max_face_num > 0 and count >= max_face_num:
break
for i, res in enumerate(results):
# draw fisrt face detailed info
if i == 0:
img.draw_image(0, 0, img_std_first)
for j in range(len(classifier.labels)):
idx = res[j][0]
score = res[j][1]
img.draw_string(0, img_std_first.height() + idx * 16, classifier.labels[idx], image.COLOR_WHITE)
img.draw_rect(max_labels_length, int(img_std_first.height() + idx * 16), int(score * max_score_length), 8, image.COLOR_GREEN if score >= emotion_conf_th else image.COLOR_RED, -1)
img.draw_string(int(max_labels_length + score * max_score_length + 2), int(img_std_first.height() + idx * 16), f"{score:.1f}", image.COLOR_RED)
# draw on all face
color = image.COLOR_GREEN if res[0][1] >= emotion_conf_th else image.COLOR_RED
obj = objs[idxes[i]]
img.draw_rect(obj.x, obj.y, obj.w, obj.h, color, 1)
img.draw_string(obj.x, obj.y, f"{classifier.labels[res[0][0]]}: {res[0][1]:.1f}", color)
# 在发送前判断
if res[0][1] >= emotion_conf_th:
emotion_label = classifier.labels[res[0][0]]
now = time.time()
if emotion_label != last_emotion or (now - last_time) > 1: # 每秒发送一次或变更时发送
ser.write((emotion_label + "\n").encode())
print(f"emotion_label: {emotion_label}\n")
last_emotion = emotion_label
last_time = now
img.draw_image(0, 0, img_back)
img.draw_rect(mode_rect[0], mode_rect[1], mode_rect[2], mode_rect[3], image.COLOR_WHITE)
img.draw_string(4, img.height() - 20, f"{models_keys[curr_model]}")
disp.show(img)
x, y, preesed = ts.read()
if preesed:
mode_pressed = True
elif mode_pressed:
mode_pressed = False
if is_in_button(x, y, back_rect_disp):
app.set_exit_flag(True)
if is_in_button(x, y, mode_rect_disp):
curr_model = (curr_model + 1) % len(models_keys)
msg = "switching model ..."
size = image.string_size(msg, scale=1.3)
img.draw_string((img.width() - size.width()) // 2, (img.height() - size.height())//2, msg, image.COLOR_RED, scale=1.3, thickness=-3)
img.draw_string((img.width() - size.width()) // 2, (img.height() - size.height())//2, msg, image.COLOR_WHITE, scale=1.3)
disp.show(img)
del detector
del landmarks_detector
break
disp = display.Display()
try:
while not app.need_exit():
main(disp)
except Exception:
import traceback
msg = traceback.format_exc()
img = image.Image(disp.width(), disp.height())
img.draw_string(0, 0, msg, image.COLOR_WHITE)
disp.show(img)
while not app.need_exit():
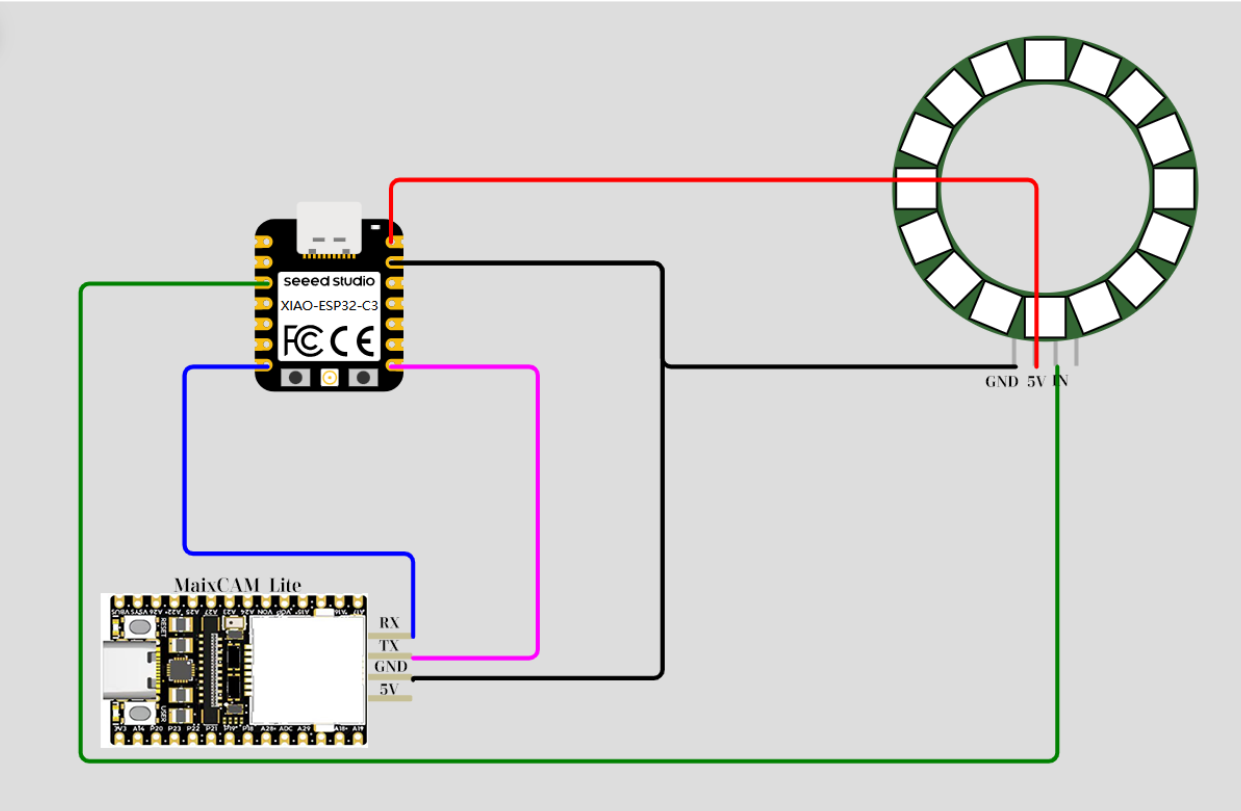
time.sleep_ms(100)Cross-connect the TX and RX pins of the MaixCAM camera with the RX and TX pins of the XIAO ESP32-C3, and make sure that both are grounded (GND is connected together). Then, connect the WS2812 light strip to the designated control pins of the XIAO ESP32-C3, and connect the power and ground wires.
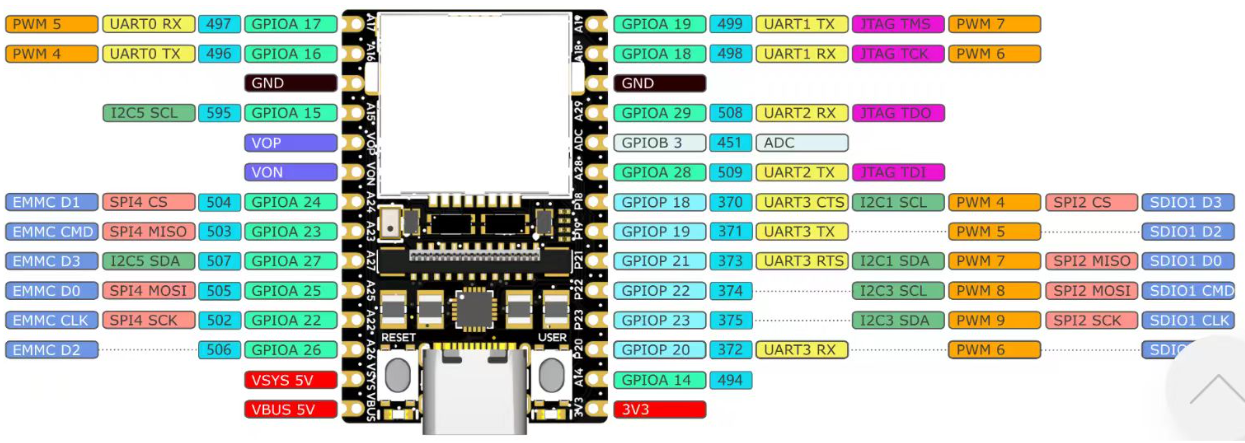
The following is the pin definition diagram of the MaixCAM camera:
 Wiring Diagram:
 Esp32 code:
c
#include "FastLED.h"
#define NUM_LEDS 36
#define LED_DT 2
#define LED_TYPE WS2812B
#define COLOR_ORDER GRB
uint8_t max_bright = 50;
CRGB leds[NUM_LEDS];
String received = "";
void setup() {
Serial.begin(115200);
Serial1.begin(115200, SERIAL_8N1, 20, 21); // RX=20, TX=21, keep consistent with your wiring
FastLED.addLeds<LED_TYPE, LED_DT, COLOR_ORDER>(leds, NUM_LEDS);
FastLED.setBrightness(max_bright);
}
void loop() {
while (Serial1.available()) {
char c = Serial1.read();
if (c == '\n') {
received.trim();
if (received.length() > 0) {
Serial.print("Received emotion: ");
Serial.println(received);
setColorByEmotion(received);
}
received = "";
} else {
received += c;
}
}
}
void setColorByEmotion(String emotion) {
CRGB color;
if (emotion == "angry") {
color = CRGB::Red; // Angry → Red
} else if (emotion == "happy") {
color = CRGB::Yellow; // Happy → Yellow
} else if (emotion == "sad") {
color = CRGB::Blue; // Sad → Blue
} else if (emotion == "surprise") {
color = CRGB::Orange; // Surprise → Orange
} else if (emotion == "fear") {
color = CRGB::Purple; // Fear → Purple
} else if (emotion == "disgust") {
color = CRGB::Green; // Disgust → Green
} else if (emotion == "neutral") {
color = CRGB::White; // Neutral → White
} else {
color = CRGB::Black; // Unknown → Off
}
fill_solid(leds, NUM_LEDS, color);
FastLED.show();
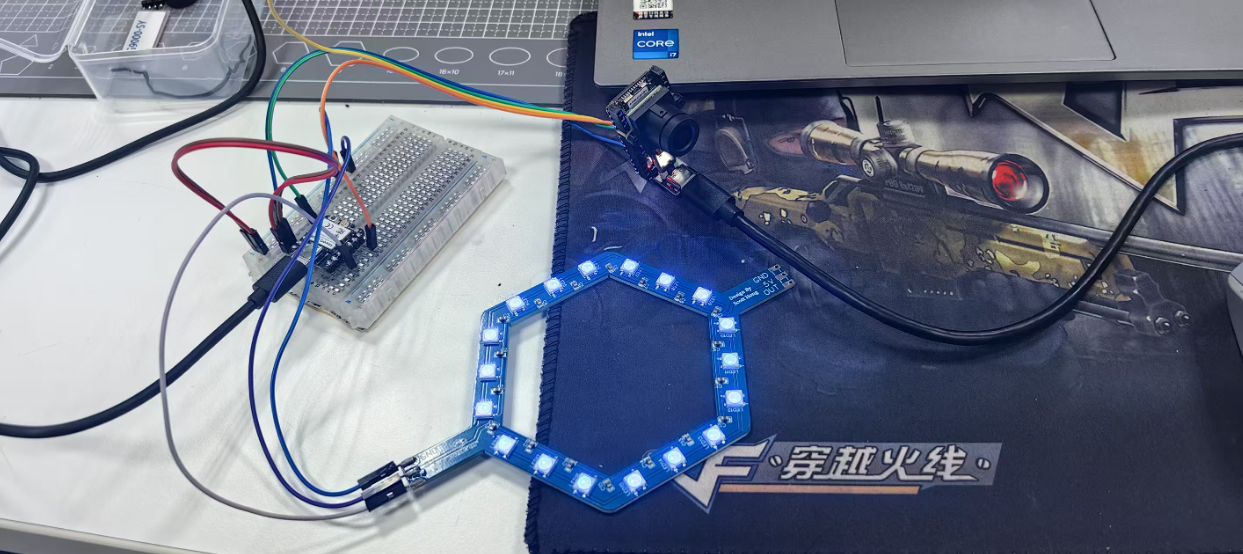
}Final result:
Test with designed PCB
I have redesigned a PCB to further demonstrate this setup can be miniaturized and applied to my final project. Schematic PCB design: 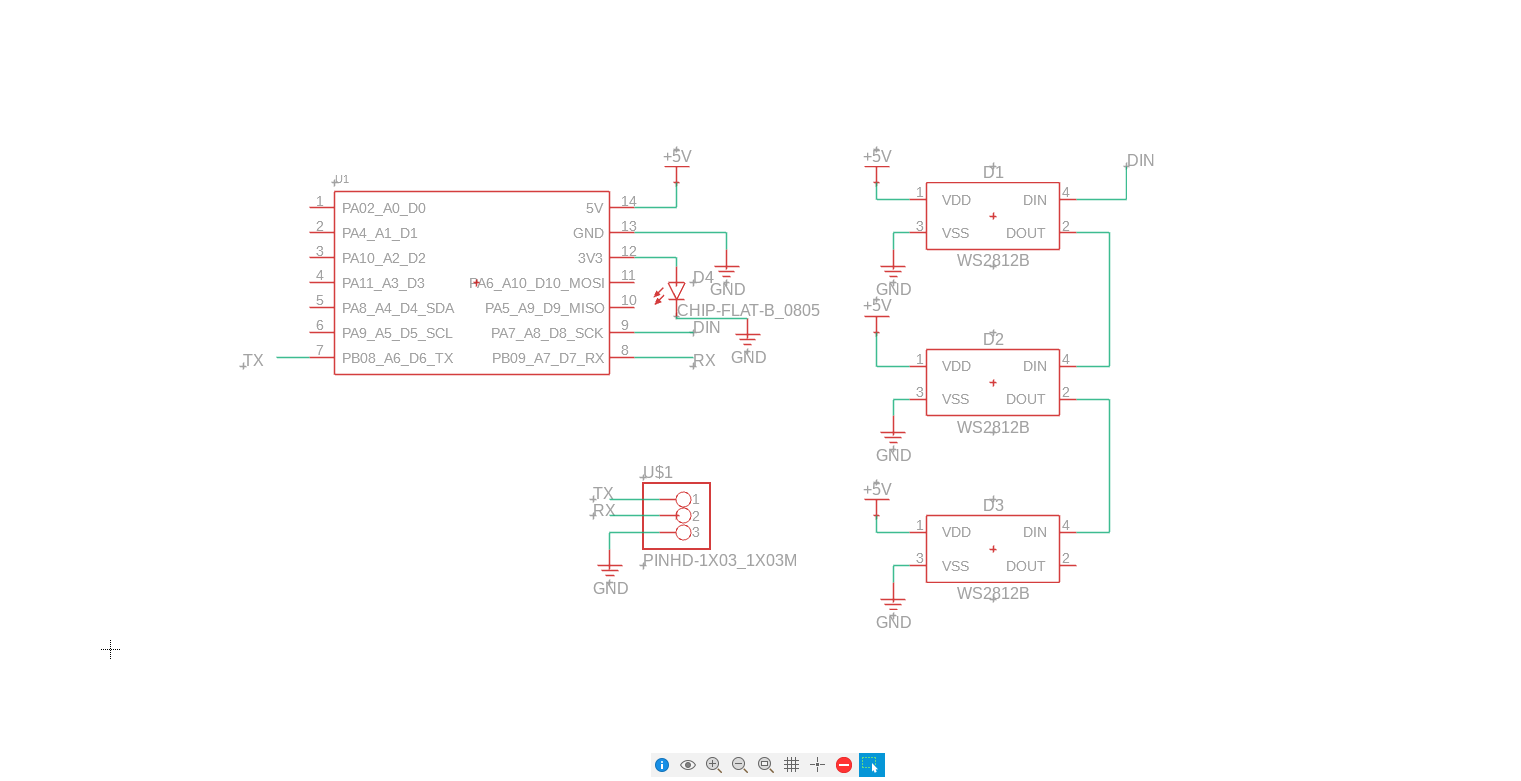 Routing of the PCB design.
 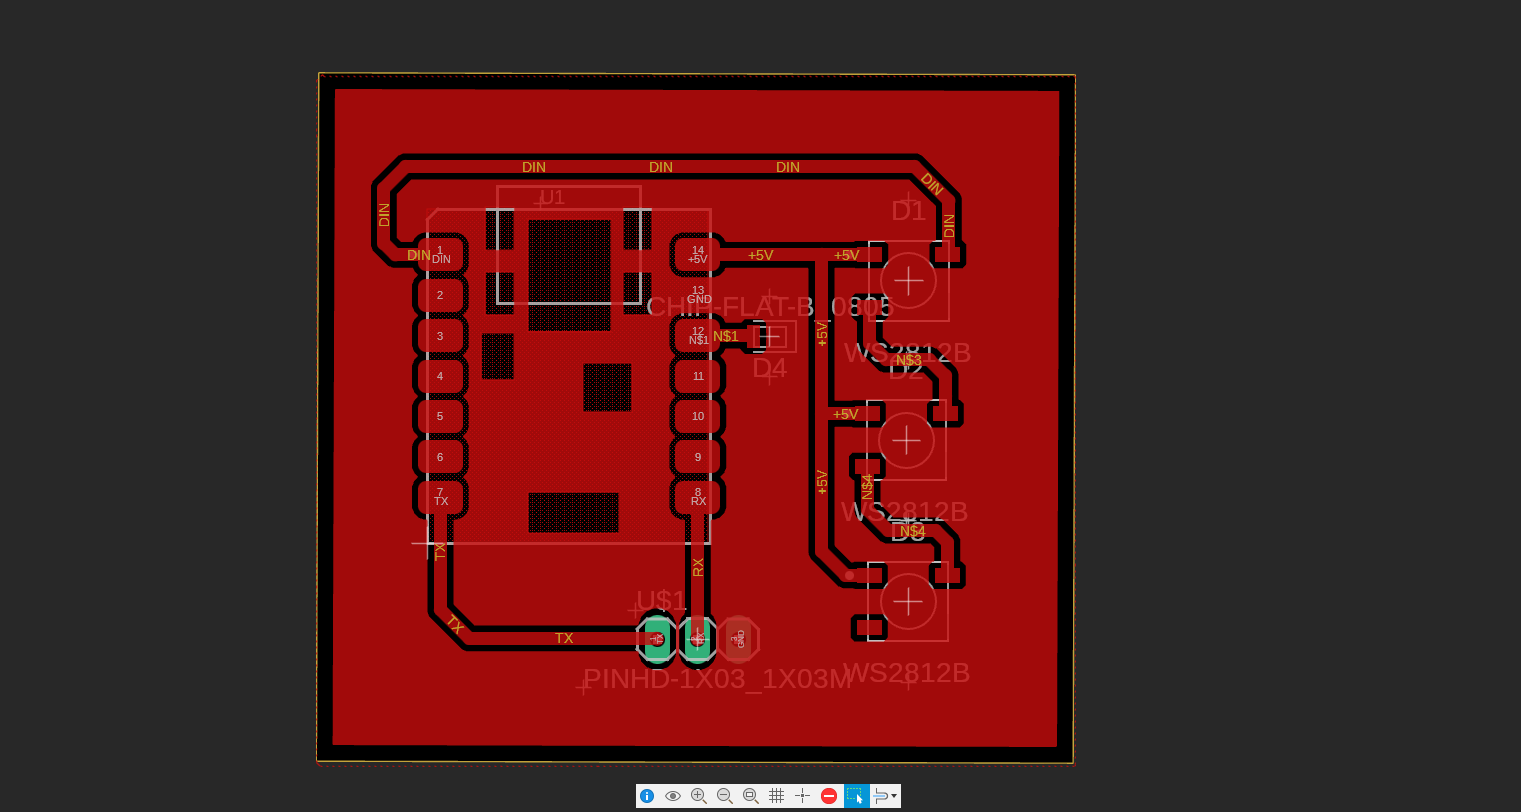 Push to 3D PCB:
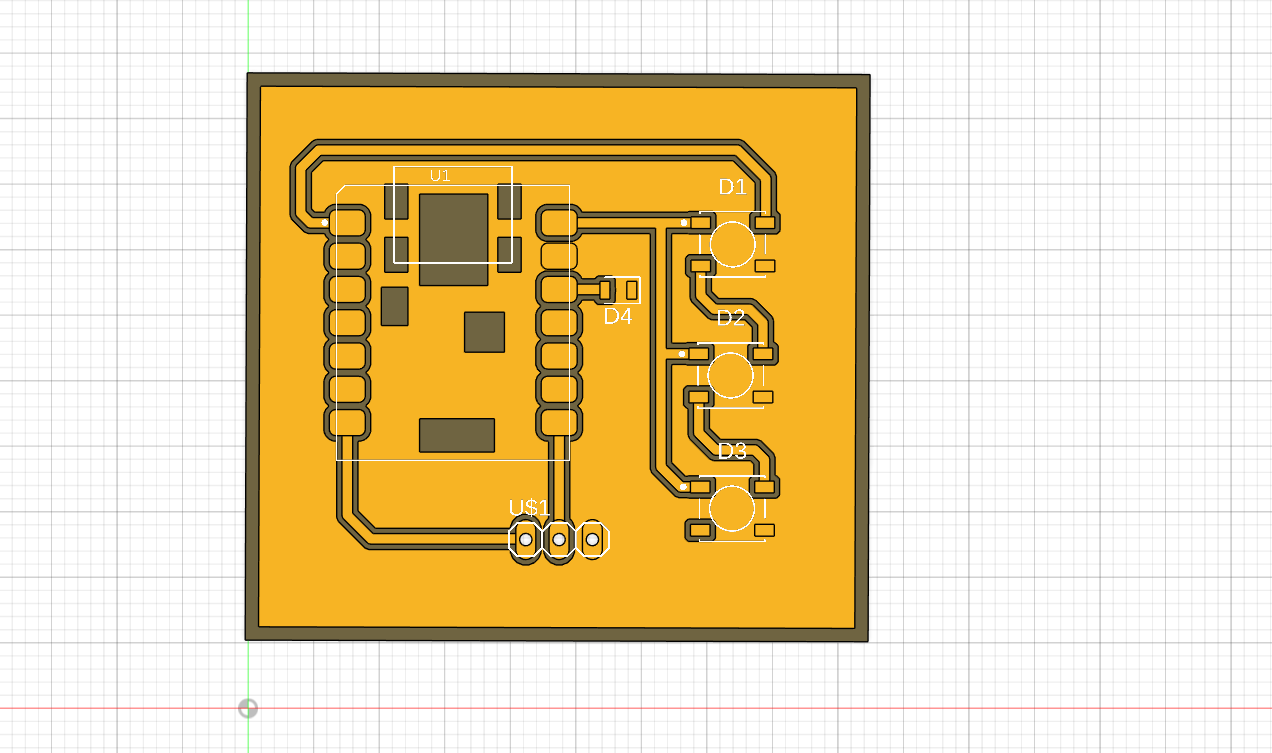
Then the design was send to our Roland MDX-40A for prduction. The result after soldering is shown as: 
Besides, I have designed a holder for my emotion recognition camera. 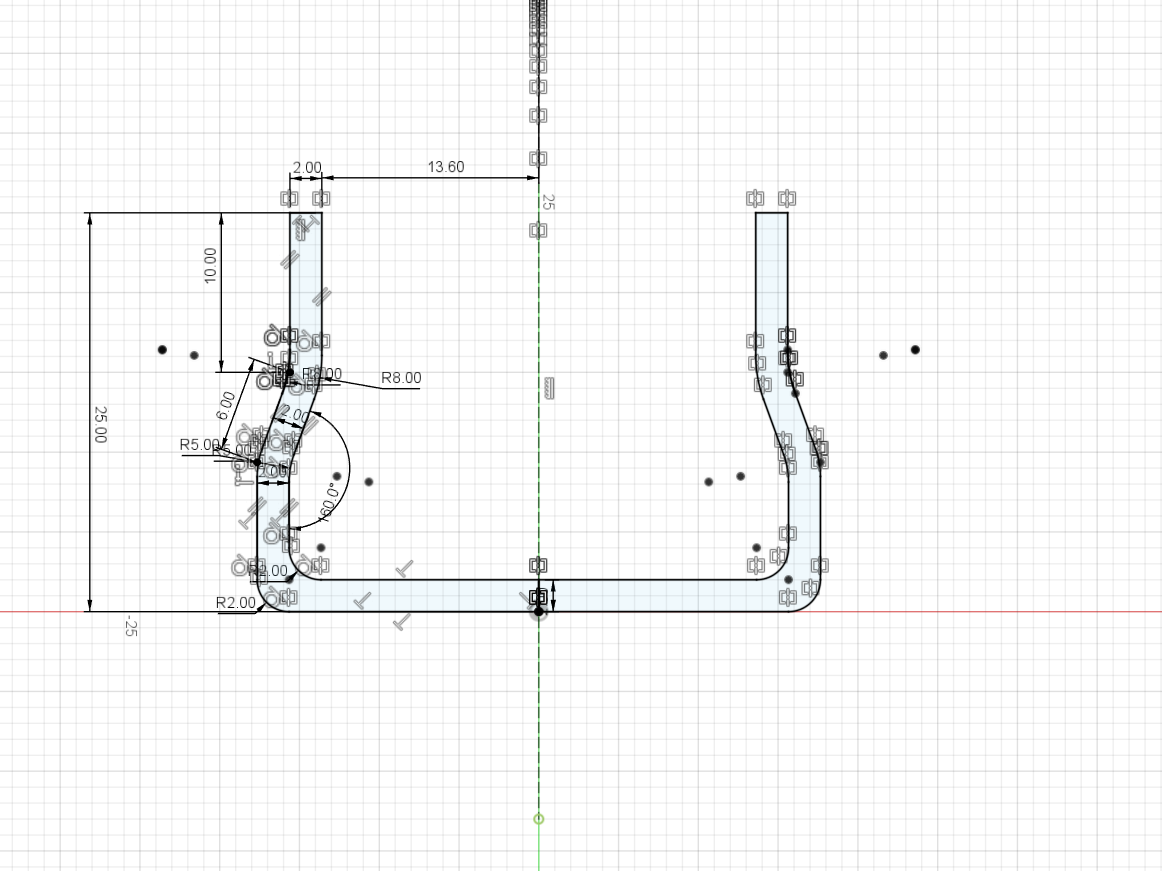
The final structure is shown as below. 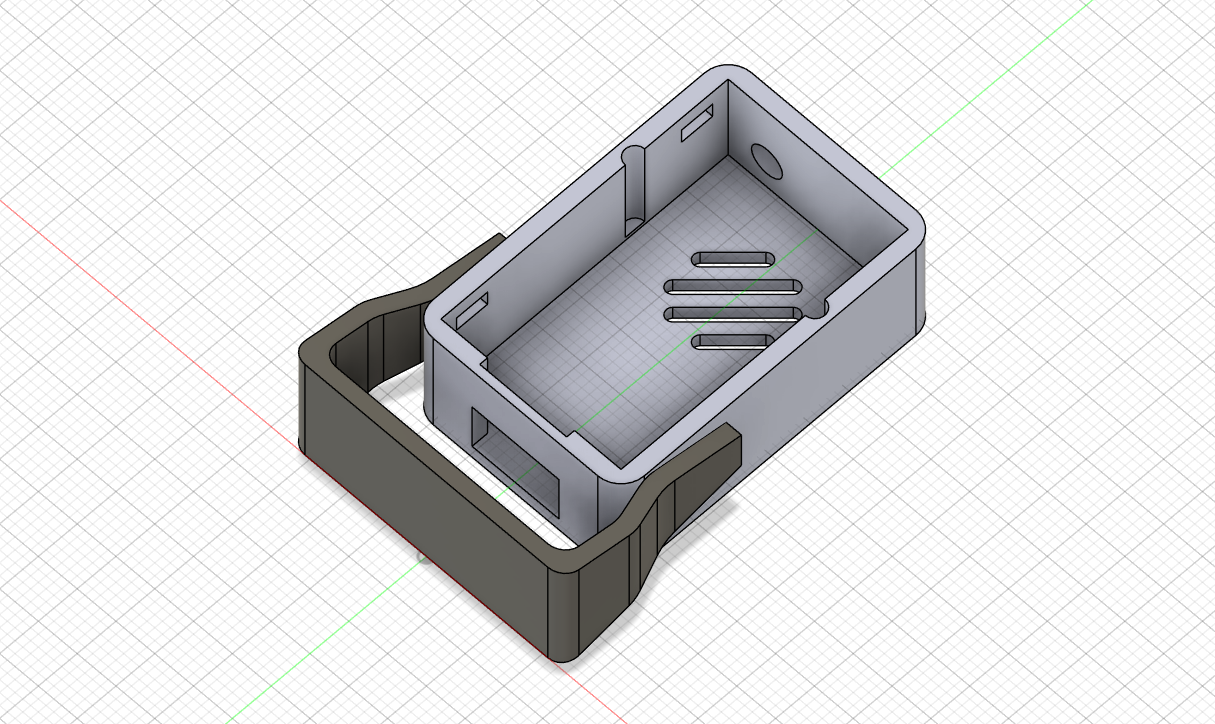
Slicing with Bamboo 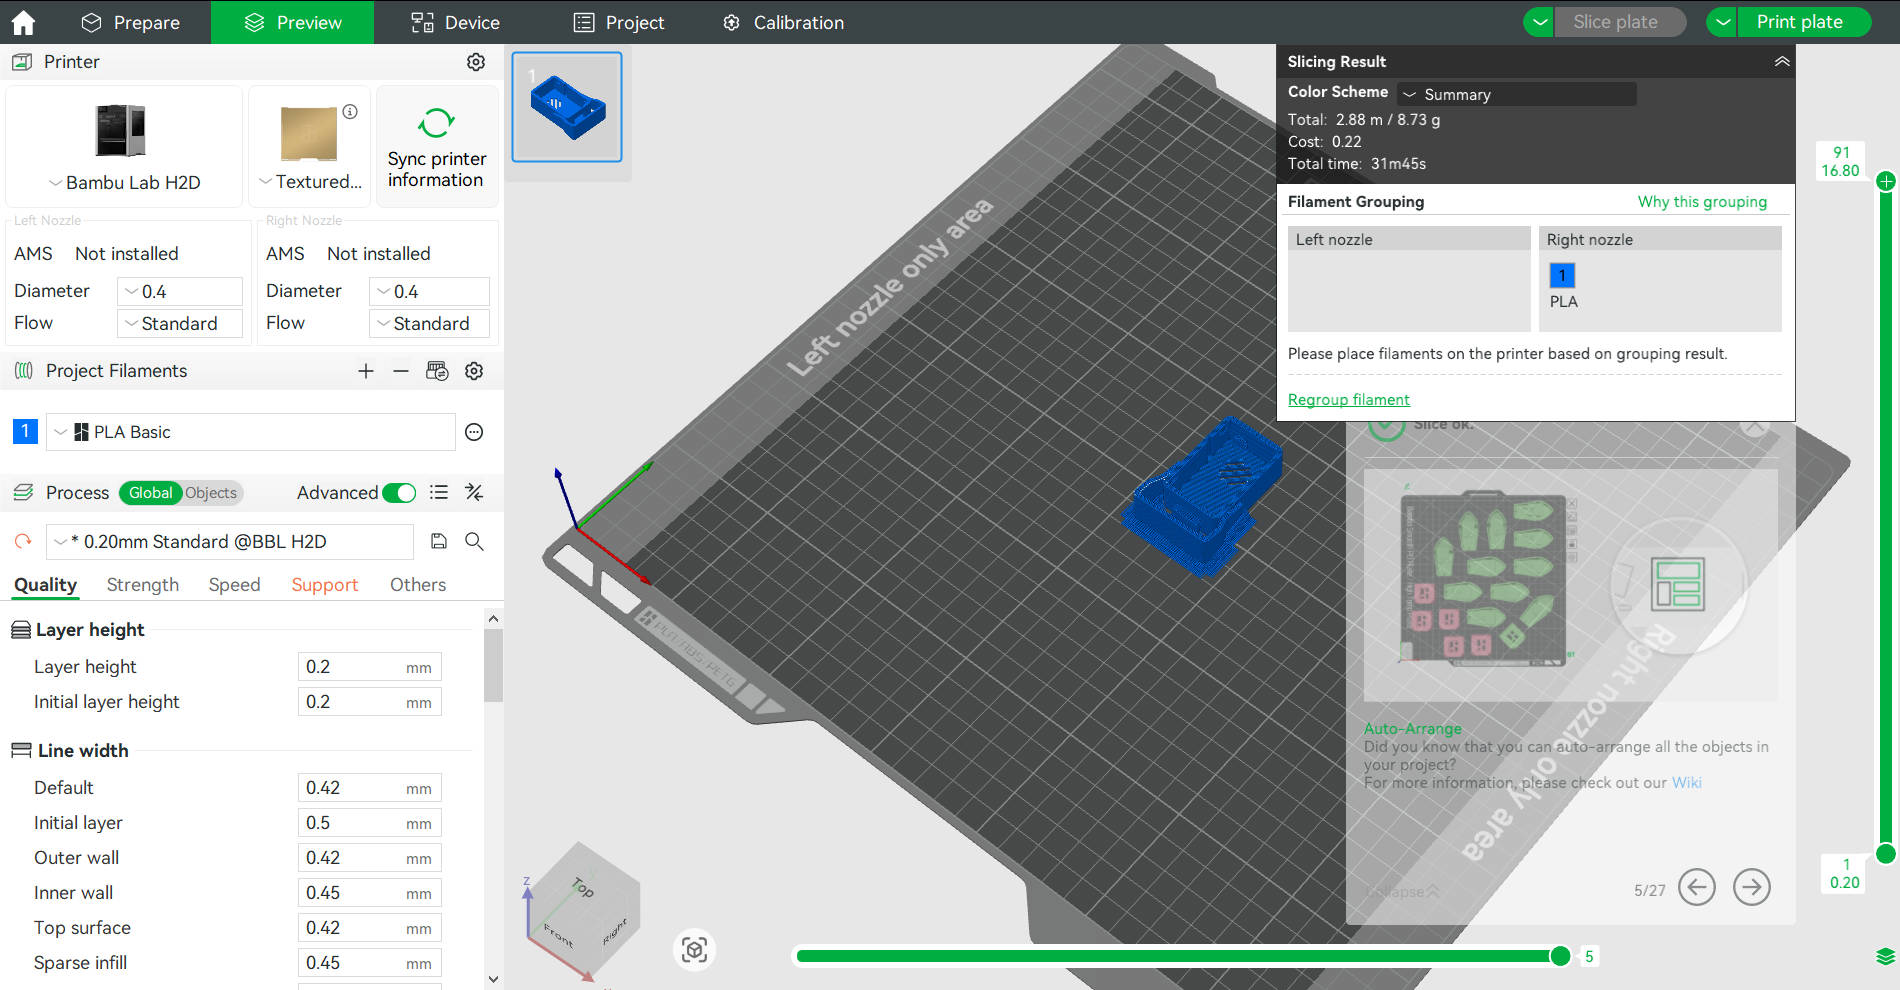
This design was 3D printed using our Bamboo studio. 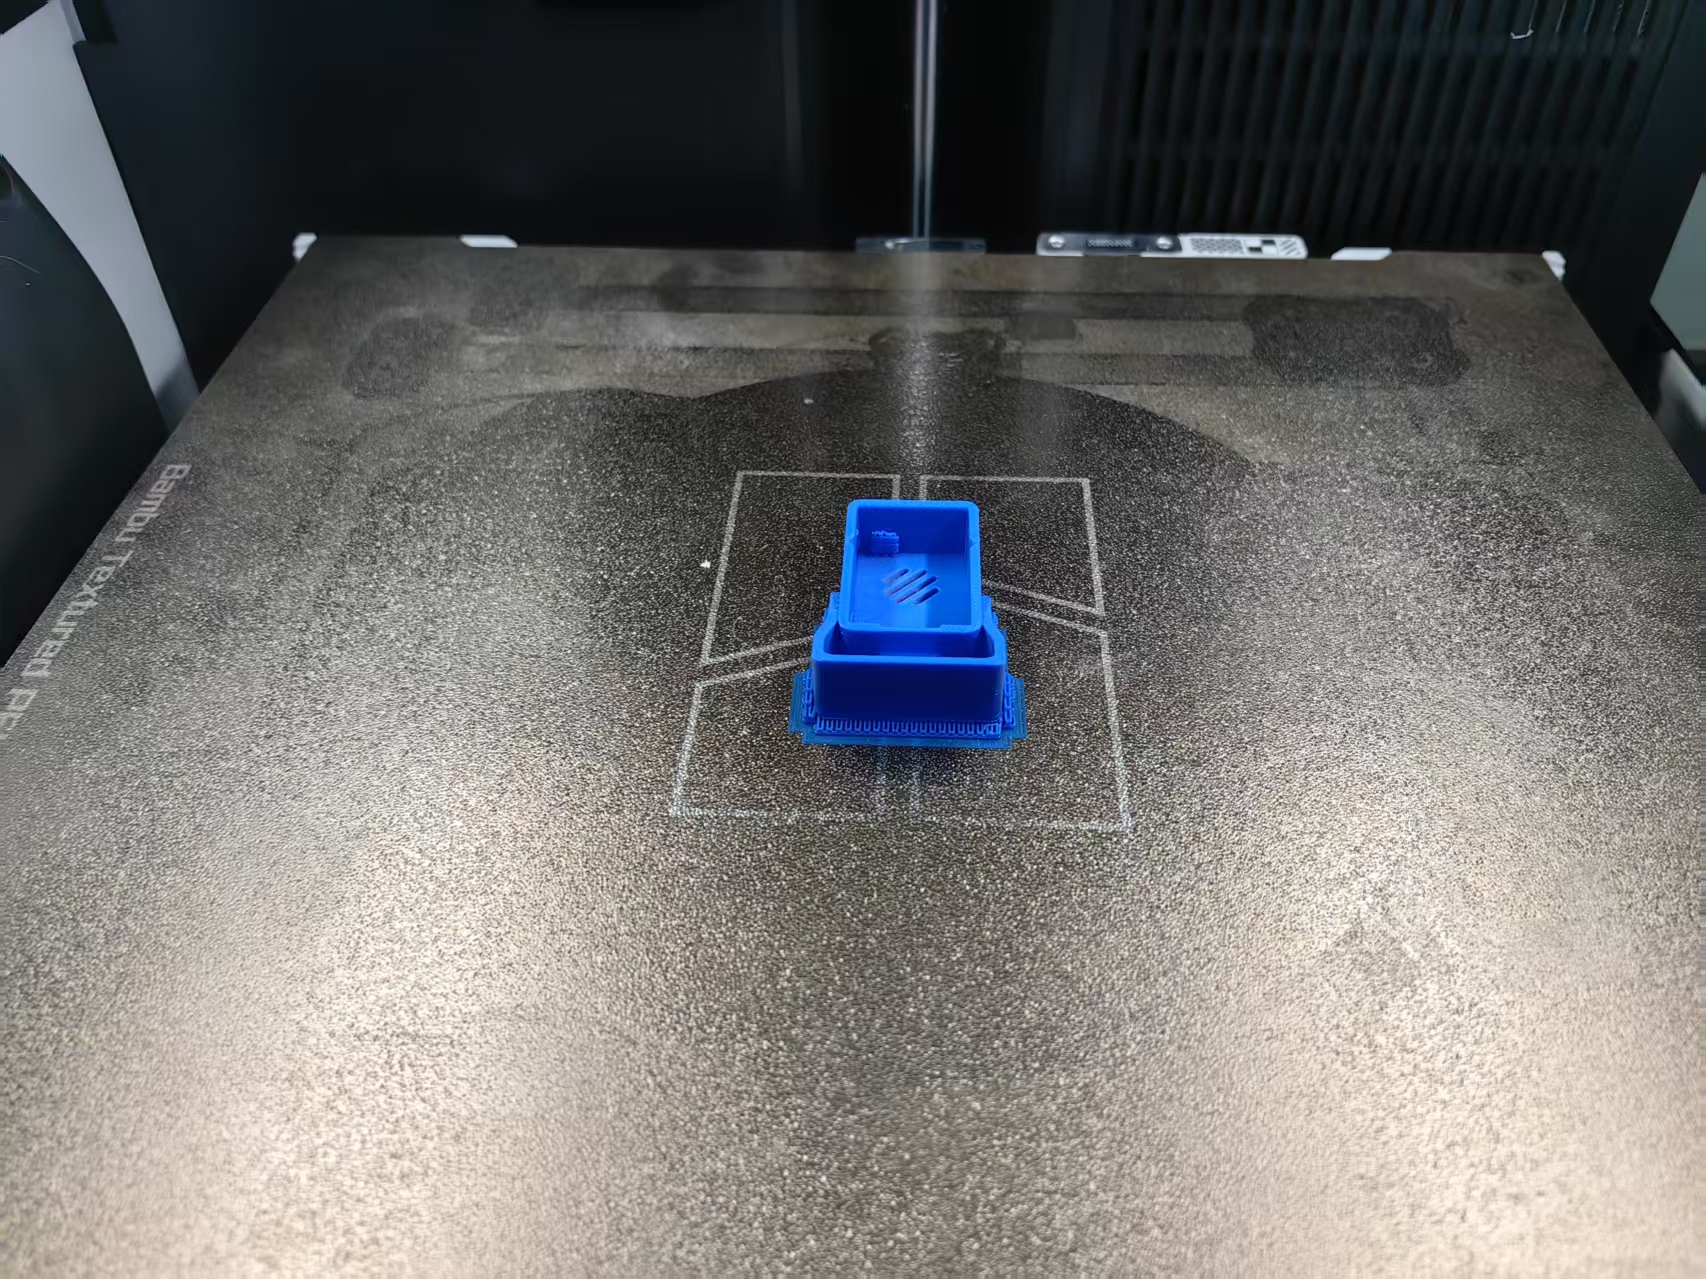
Code used for test
c
#include "FastLED.h"

#define NUM_LEDS 36
#define LED_DT D0
#define LED_TYPE WS2812B
#define COLOR_ORDER GRB

uint8_t max_bright = 50;
CRGB leds[NUM_LEDS];

String received = "";

void setup() {
  Serial.begin(115200);
  Serial1.begin(115200, SERIAL_8N1, 20, 21);  // RX=20, TX=21, keep consistent with your wiring
  FastLED.addLeds<LED_TYPE, LED_DT, COLOR_ORDER>(leds, NUM_LEDS);
  FastLED.setBrightness(max_bright);
}

void loop() {
  while (Serial1.available()) {
    char c = Serial1.read();

    if (c == '\n') {
      received.trim();
      if (received.length() > 0) {
        Serial.print("Received emotion: ");
        Serial.println(received);
        setColorByEmotion(received);
      }
      received = "";
    } else {
      received += c;
    }
  }
}

void setColorByEmotion(String emotion) {
  CRGB color;

  if (emotion == "angry") {
    color = CRGB::Yellow;           // Angry → Yellow
  } else if (emotion == "happy") {
    color = CRGB::Red;        // Happy → Red
  } else if (emotion == "sad") {
    color = CRGB::Blue;          // Sad → Blue
  } else if (emotion == "surprise") {
    color = CRGB::Orange;        // Surprise → Orange
  }

  fill_solid(leds, NUM_LEDS, color);
  FastLED.show();
}
The final result is shown in figure below, when a happy face is recognised, the LED light will turn red. 
Reference:
The reference and design files are listed below:
The .py file of MaixcamDemo can be found in my repository:https://gitlab.fabcloud.org/academany/fabacademy/2025/labs/unnc/students/xu-sun/-/blob/main/docs/assignments/week17/resource/MaixcamDemo.py?ref_type=heads
The .ino file of WS2812Demo can be found in my repository:https://gitlab.fabcloud.org/academany/fabacademy/2025/labs/unnc/students/xu-sun/-/blob/main/docs/assignments/week17/resource/WS2812Demo.ino?ref_type=heads