5. 3D Scanning and Printing

Learning outcomes
- Identify the advantages and limitations of 3D printing
- Apply design methods and production processes to show your understanding of 3D printing.
- Demonstrate how scanning technology can be used to digitize object(s)
This week we get to play with the 3D printers, something i'm unfamiliar with and have never tried, so looking forward to learning about how we can put these machines to use. 3D printers are related to additive manufacturing. 3D printers use computer-aided design to understand a design. When a design is ready, a material that can be dispensed through a hot nozzle or precision tool is printed layer by layer to create a three-dimensional object from scratch.
Materials
I wanted to understand a little more about the materials used in 3D printing, their toxicity and use. Below are some of the most commonly used materials and their properties.
PLA (Polylactic Acid): - Non-toxic and biodegradable. - Derived from renewable resources such as corn starch or sugarcane. - Generally considered safe for home use and food-safe when printed objects don't come into contact with hot liquids or food for extended periods.
PETG (Polyethylene Terephthalate Glycol): - Generally considered non-toxic. - Offers durability, strength, and ease of use. - Often used for food containers and medical devices.
TPE (Thermoplastic Elastomer) / TPU (Thermoplastic Polyurethane): - Generally considered non-toxic. - Flexible and elastic properties. - Used in applications such as phone cases, shoe soles, and medical devices.
ABS (Acrylonitrile Butadiene Styrene): - Generally considered safe when properly ventilated during printing. - Can emit fumes that may irritate the respiratory system and cause headaches if not ventilated adequately. - Commonly used for functional prototypes and automotive parts.
Nylon (Polyamide): -Generally considered safe but may emit fumes during printing. -High strength and flexibility. -Used in engineering applications and for producing durable parts.
ASA (Acrylonitrile Styrene Acrylate): - Similar to ABS but offers better resistance to weathering and UV exposure. - May emit fumes during printing similar to ABS.
Polycarbonate (PC): - May emit toxic fumes when heated. - Requires a well-ventilated area or enclosure. - Known for its strength, durability, and high-temperature resistance. - Commonly used in aerospace, automotive, and engineering applications.
Resin (SLA, DLP, or LCD): - Resin-based 3D printing materials typically contain photopolymer resins, which can be toxic if mishandled. - Resin should be handled with gloves and in a well-ventilated area. - SLA, DLP, and LCD resin printers produce high-resolution prints and are commonly used in dental, jewelry, and medical applications.
Printer Types
Resin Printing
Resin printing is a broader term that encompasses various technologies, including SLA, DLP (Digital Light Processing), and LCD (Liquid Crystal Display) printing. Resin printing involves using a liquid resin that is cured, typically by UV light, to create solid 3D objects layer by layer.
SLA (Stereolithography): SLA is a specific type of resin printing technology. It uses a laser to cure liquid resin into solid layers, with each layer being cured by tracing the shape of the cross-section of the object onto the surface of the resin. SLA printers typically have higher precision and resolution compared to other resin printing technologies.
PLA
PLA is a thermoplastic filament used in Fused Deposition Modeling (FDM) 3D printers. FDM printers extrude PLA filament through a heated nozzle, which deposits and fuses layers of material to build up the desired object. While some FDM printers may use UV light for post-processing or curing purposes, the primary printing material in FDM printing is PLA filament.
Software and code for printing
Slicers
Slicers in 3D printing are software tools that prepare 3D models for printing by slicing them into thin layers. They allow users to customize print settings and generate G-code, which instructs the printer how to create each layer. Slicers also provide previews and simulations of the print process, ensuring optimal print quality and identifying potential issues before printing.
G-code
G-code is a language that humans use to tell a machine how to do something. With 3D printing, G-code contains commands to move parts within the printer. G-code consists of G- and M-commands that have an assigned movement or action.
Machines at Waag
Prusa
The Prusa printer, developed by Prusa Research, is a highly regarded line of open-source 3D printers known for their reliability, quality, and affordability. Prusa also have their own slicer, you can download here.
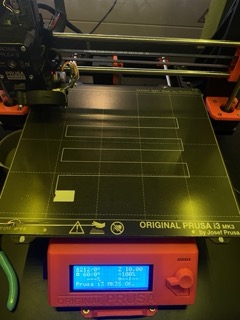
This is the line test calibration I conducted before starting my print. If the base plate and nozzle are calibrated correctly, you should see sharp edges when the machine turns. This test went quite well.
Elegoo UV Printer
The Elegoo resin printer is a highly regarded option in the realm of resin-based 3D printing. Produced by Elegoo, a company known for its affordable yet high-quality 3D printing products, the Elegoo resin printer offers users a cost-effective entry into the world of resin printing with impressive results.
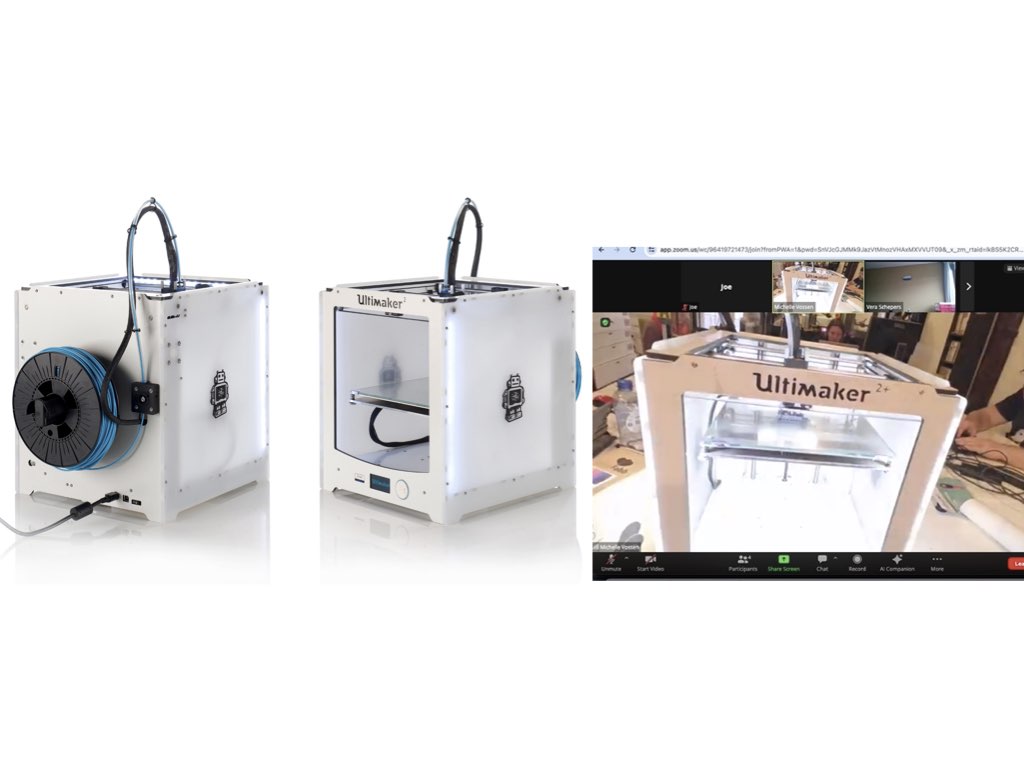
Ultimaker
The Ultimaker is a leading brand in the field of 3D printing, known for its precision, reliability, and versatility. Developed by Ultimaker, a Netherlands-based company.
Key features include:
- High-Quality Construction
- Precision Printing: With advanced technology and precise calibration systems, Ultimaker printers are capable of producing detailed, high-resolution prints with smooth surfaces and intricate geometries.
- Wide Range of Materials: Ultimaker printers support a variety of filament materials, including PLA, ABS, PETG, nylon, and composite materials, offering users flexibility in choosing the right material for their specific applications.
- Dual Extrusion Options: Some Ultimaker models offer dual extrusion capabilities, allowing you to print with multiple materials or colors.
- User-Friendly Software: Ultimaker printers come with intuitive slicing software called Cura, which offers a user-friendly interface and powerful features for optimizing print settings and preparing models for printing.
Pronterface & Biomaterials
We were given a nice demonstration of the bio-printer at Waag by Laura, who has developed a bio-material using egg boxes, please look through her documentation to see what Bio-materials she created and the subsequent results.
The printer has its own operating system called pronterface, which is open source software, you can download here. The software allows you to send G-codes directly to the printer. It is also possible to use a slicer and send the code that way, but having their own software allows you to make real time edits instead of running back and forth from computer to printer with your usb or sd.
Group assignment:
- Test the design rules for your 3D printer(s)
- Document your work on the group work page and reflect on your individual page what you learned about characteristics of your printer(s)
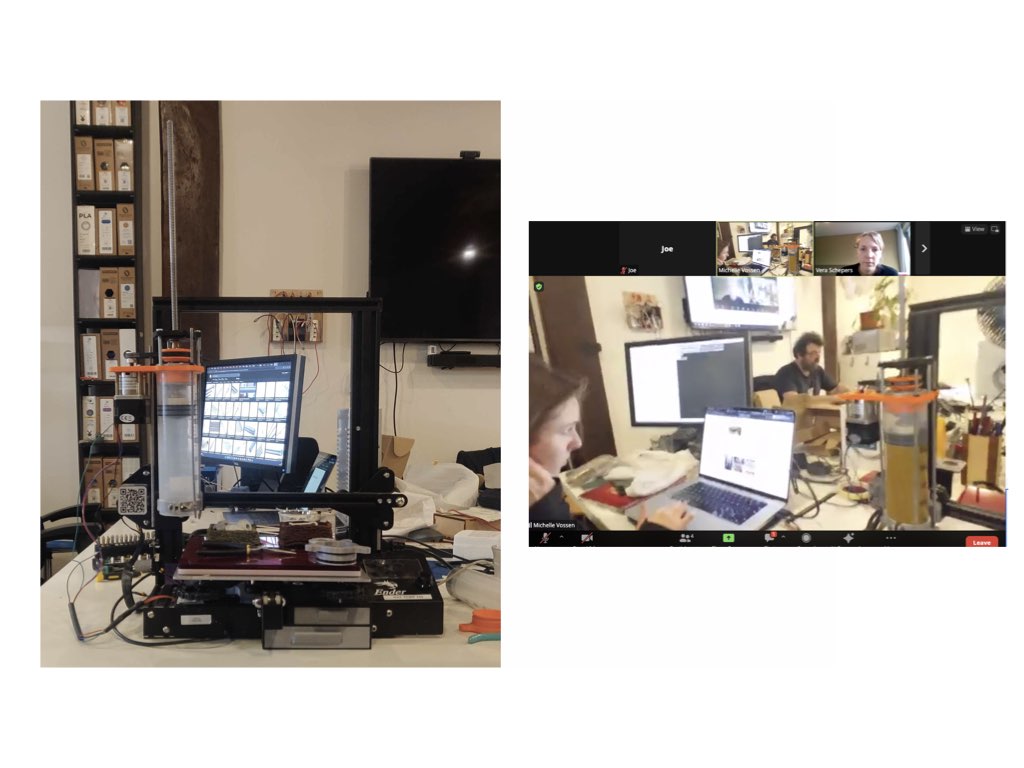
I watched via video link, while the guys at Waag tested out each printer using the same design. Our goal was to print the Bengine in various materials with as little changes to the default profile as possible. Stock settings first, maybe adapt a little bit if required.
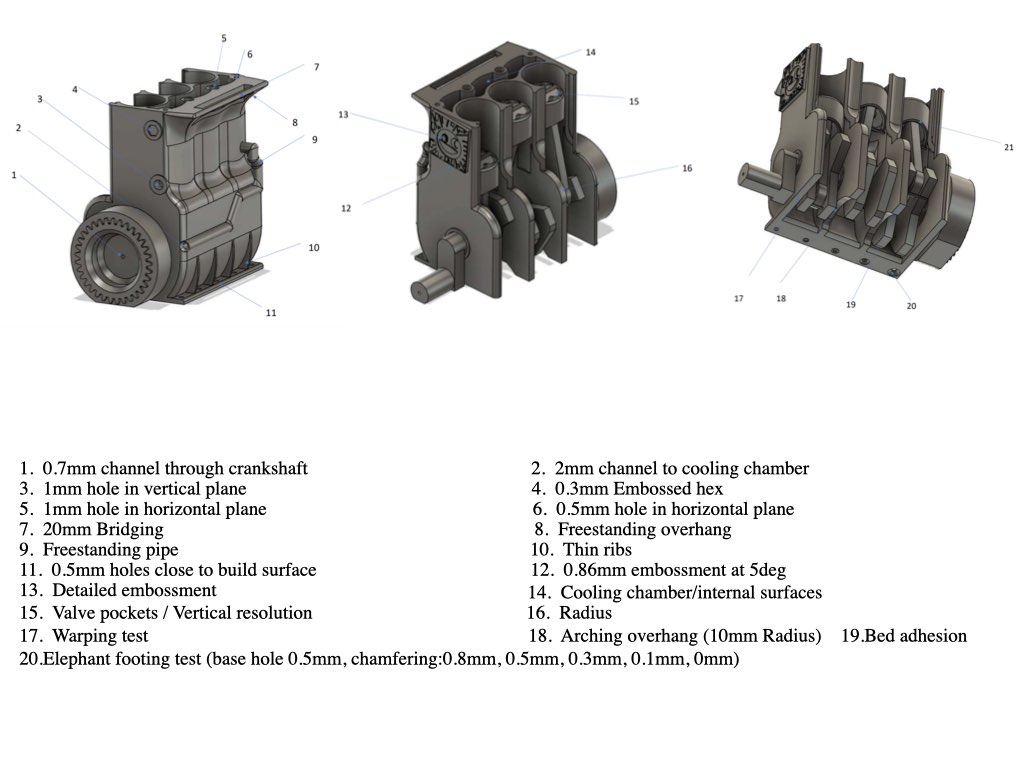
Use slicer of manufacturer of the 3D printer Stock 0.4mm nozzle 0.15mm layer height print speed 60mm/s no support First try without *brim (only when needed add a brim). Infill pattern grid Infill density 20% 2 wall lines, 5 top & bottom lines (meaning 0.8mm wall thickness, 0.75mm top-bottom thickness)
Brim - Is a small layer of extra material printed around the base of an object at the start of the print, it extends outwards like a skirt and is used to offer additional support to the design.
Results:

Top Left: PETG filament on the Pulsa machine. As you can see, quite stringy and some quite bad printing at the base. Not able to move the parts of the Bengine, I would consider this a fail.
Top Right: These three prints were made on Edwin's Ultimaker using wood, copper and glitter PLA.
Bottom left: some more PLA tests from Erwin, alongside the skin coloured resin Bengine made in Waag.
Surprisingly there is one "working" Bengine and that was one of the 5 made from resin at Waag.

So to conclude, if you want to build a Bengine, cook 5 at the same time in a resin based printer and cross your fingers, maybe one will work.
Individual assignment:
- Design and 3D print an object (small, few cm3, limited by printer time) that could not be easily made subtractively.
- 3D scan an object (and optionally print it)
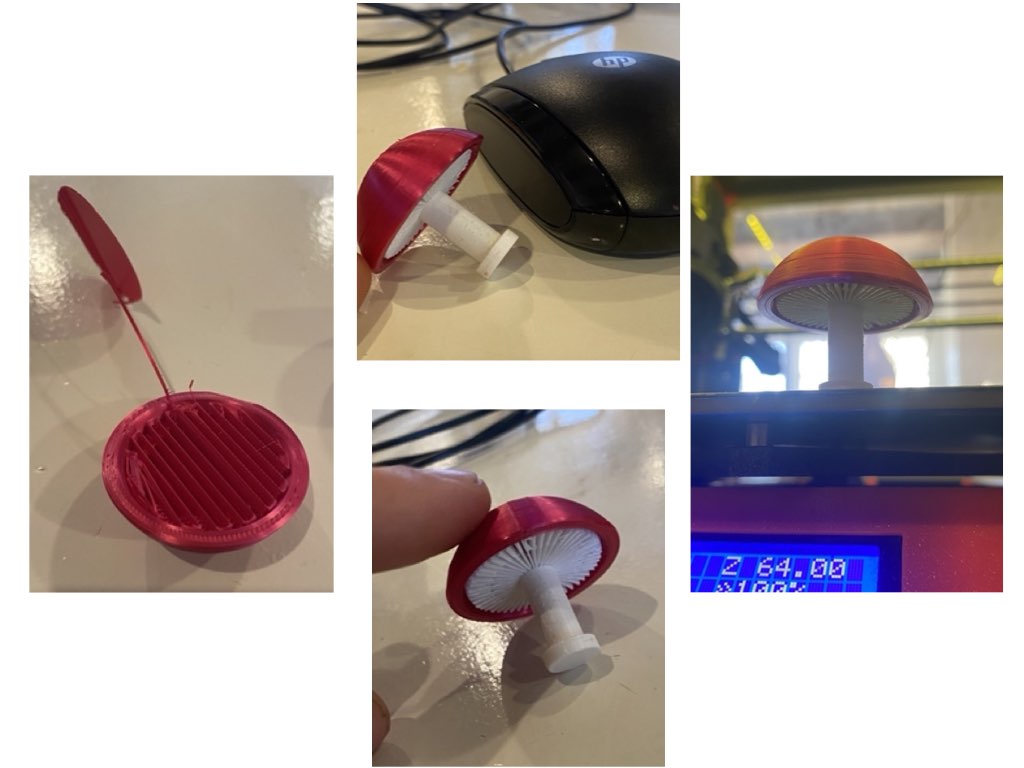
So the design element for me was always going to be the biggest challenge. I flirted with the idea of making something using blender, but that last a couple of hours until my patients and time was up. I opted instead, to continue using my trusty ol friend ,fusion 360, to build a mushroom. In my head it would be in three parts that could be placed together and taken apart like a kinder egg toy, but apparently that would not have met the subtractive requirements. So I opted for a two part mushroom instead where Gills and stipe would be printed together and the cap placed on-top. There was some short discussion about color changing during the print, but due to how the parts fit together this wouldn't have worked out.
| This was the original idea that had to be edited before printing | The fusion design |
|---|---|
 |
 |
From this design I separated the parts into two and set up the Prusa. Unfortunately there wasn't much color PLA to choose from in the lab, so instead of white and red, I have quite a garish looking pink.
Print parameters:
Prusa slicer
- Generic PLA.
- Stock 0.4mm nozzle.
- 0.20mm layer height.
- Print speed 20mm/s.
- Support build plate only.
- No brim.
- Infill pattern grid.
- Infill density 20%.
Results

Quite happy with the results, didn't take too much effort to de-weed and it's structurally sound. I would point out the mess it left behind due to supports, almost 40% of the design was support. After making such a mess I though i could get away with not using the supports for the cap as each layer would be somewhat supported by the layer beneath. It was actually going well to about a third of the way, but then it started sliding all over the place.
Failed cap attempt

soo.. back to using the correct parameters and applying the fill and the cap printed ok. I say that because for some reason it stopped mid print asking for a filament change. I think this was maybe due to trying to previously set up the printer so that we could have two colors, but I printed the gills and stipe before the cap so I didn't think I enabled that setting. At least it something to keep in mind and check before future prints.
Results after fill and assembly
 Could it have been built subtractively? I think if the Egyptians could make a sarcophagus out of gold, then this could probably be made without a 3D printer, but I would pose the question; why would you?
...Because you're a fun-guy, doesn't count!
3D Scanning
At Waag we have the Creality CR-Scan Ferret 3D Scanner and while tunning in from portugal I watched the guys 3D scanning our classmate, Leo. When I got back to Waag I tried to scan my mushroom, but maybe due to the shine of the garish pink, the scanner didn't pick up anything, so I copied the guys, sitting myself in an office chair and putting the setting for 'turn table' to on. I was able to spin (very slowly) while Henk scanned a 3D-ME.

Apparently the scanner struggles with hair and has hollowed me out, so you can see my face from the inside in the middle image. Pretty cool, not sure what I could use it for, but fun to play with at least.
Design files
Have you answered these questions?
- Linked to the group assignment page. [x]
- Explained what you learned from testing the 3D printers. [x]
- Documented how you designed and 3D printed your object and explained why it could not be easily made subtractively. [x]
- Documented how you scanned an object. [x]
- Included your original design files for 3D printing. [x]
- Included your hero shots. [x]