Final Project
Micro Mushroom Farm
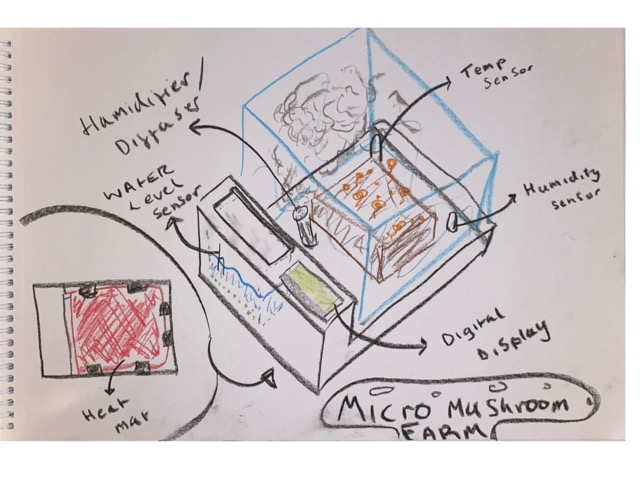
For my final project I would like to attempt to create a 'Micro mushroom farm'.
Growing mushrooms successfully comes with it's own unique set of challenges. These fun-guys are quite particular about their growing environment, any slight change in temperature, moisture, light and ventilation, can spell disaster for your harvest.
With a Micro Mushroom farm I hope to create the perfect, self sufficient environment for mushrooms to thrive, just pick a dark room, add water and then sit back and watch them grow. The self monitoring environment will alert you when it needs a water top up, Thus alleviating the hassle of regularly monitoring and enabling anybody to harvest mushrooms at home.
Just leaving your substrate in a dark room at home won't give you the optimal growing conditions, especially where I'm from in the northern hemisphere, where 22°C feels like peak summer. As you know, temperature fluctuates during the day so by incorporating a heat mat into the design I hope to regulate the perfect growing temperature range of 18-23°C. I plan to do this with a temperature sensor that will initiate the heat mat sub 18°C and turn off above 23°C. I will then look at providing the perfect air moisture content, the optimal humidity for mushrooms is a range of 80-95%. Like the on/off system with the heat mat, I plan to build a small water tank that feeds a humidifier. The humidifier will be controlled by the input of the humidity sensor, should the range drop below 80% the signal is sent to start the humidifier and vice versa should humidity surpass 95%. I will provide ventilation through a fan mounted in the underside of the board. Air will be pulled in through side holes and a filter pad will mitigate particle pollution that could cause micro biological spoilage.
AI
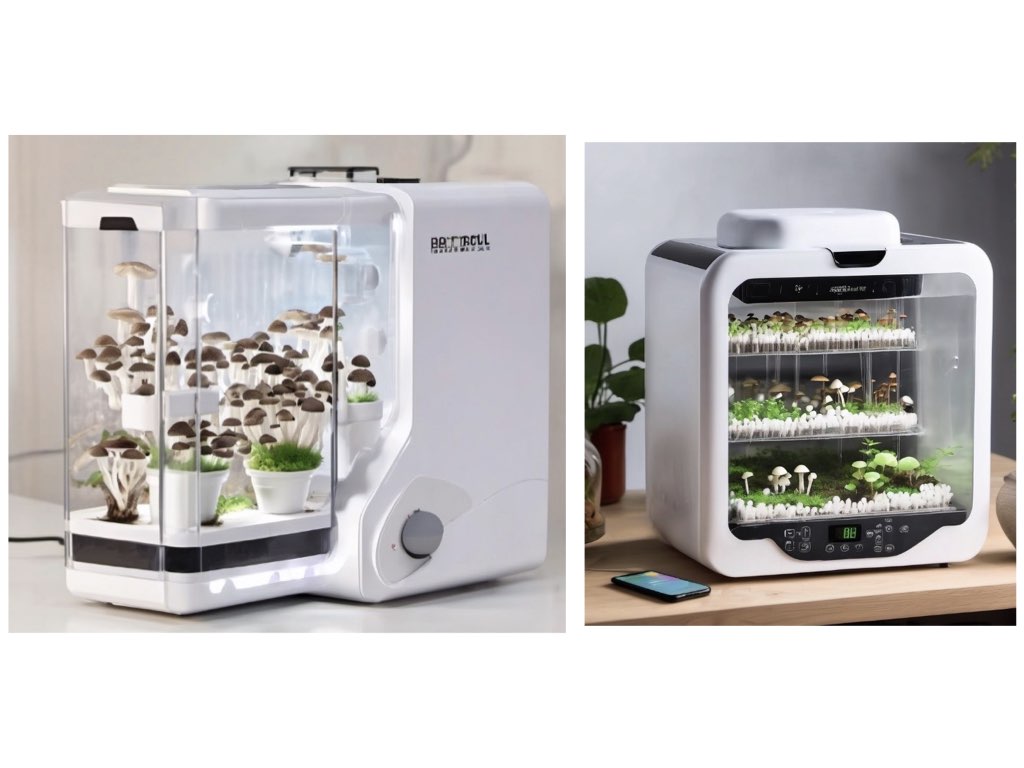
To see what AI would make of my idea, I uploaded my sketch to Pixlr along with the description "Micro mushroom farm with diffuser, temperature sensor, fan and screen",
Inspiration
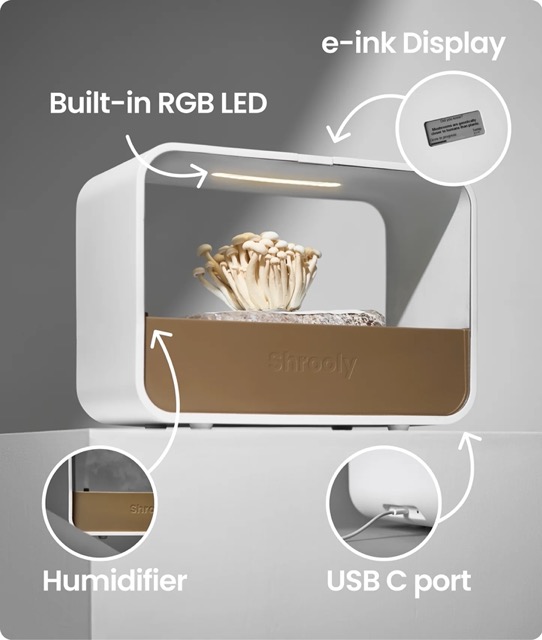
I have cultivates some mushrooms in the past and it was maybe for that reason that one day a company popped up in my instagram feed. Shrooly are already a company producing a similar product and have been part of what inspired me to chose this as my final project. The company also produce the bags of mycelium that are patent pending. They want to make it a fool proof system for anybody to be able to grow mushrooms at home.
Coffee Grinds
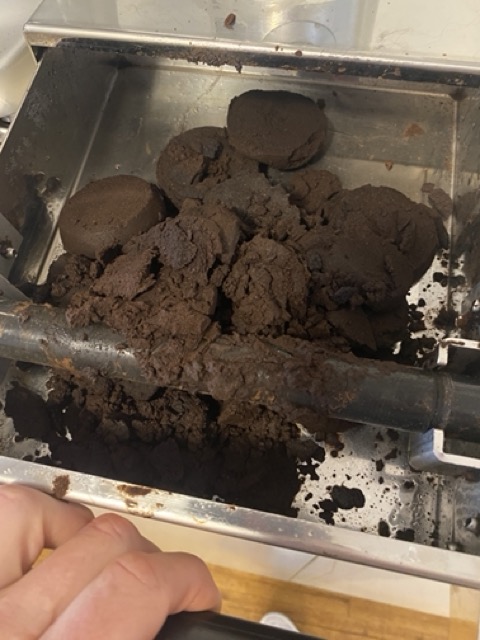
I see lots of coffee grind going to waste, here at Waag also, and Intend to do something about it. Coffee grind can make the perfect substrate for mycelium due to it being sterile, nutrient rich, alkalinity and moisture retention. Here at Waag we have the Bio hacking facility, so with some help turn our waste into perfectly sterile fun-guy growing soil. If successful I believe there is scope in this project and hopefully a small change can be made in the amount of waste we produce and where it eventually ends up.
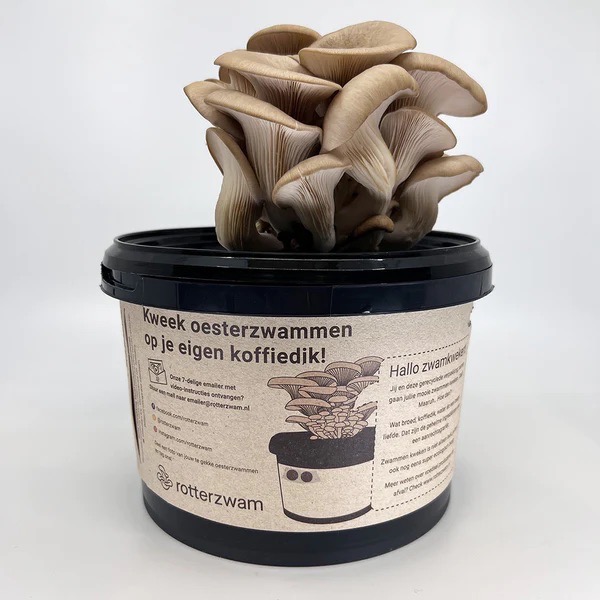
There is also a company doing this already in the Netherlands, Rotterzwam are based in the city of Haarlem, they have been collecting spent coffee grinds from local coffee houses and turning that free waste into a usable soil that then goes in to their own range of products. The sell grow kits as well as mushroom sausage rolls and of course the famous bitter ballen.
week 1
For part of the week 1 assignment I drew a basic sketch of what i would like my final project to look like. I have some sort of an idea of how it will function, but I'm still undecided on the design. I think its important that it's practical, easy to use and clean and requires minimal effort to operate. If it could also look like the AI images, that would be great.
Week 2
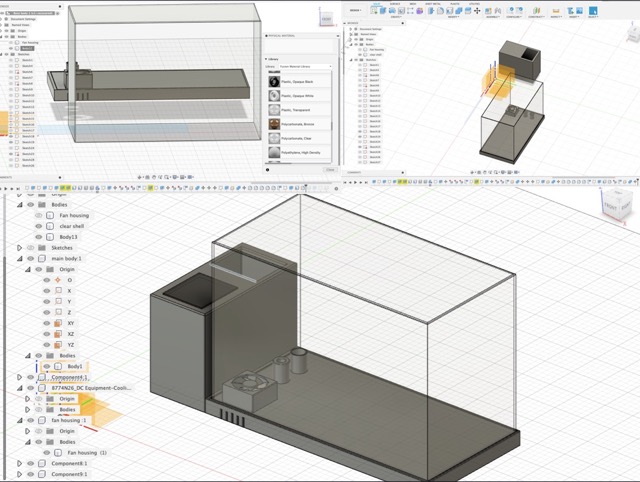
I used fusion 360 to start modelling a 3D final project design. As I had no previous experience it was a challenge as the software tools are all new me. I have a lot to learnt a lot and there is more work needed to generate a design I am happy with. I'm not sure how i got this to render, If I look back at the files they are full of sketches on different planes.
Week 5
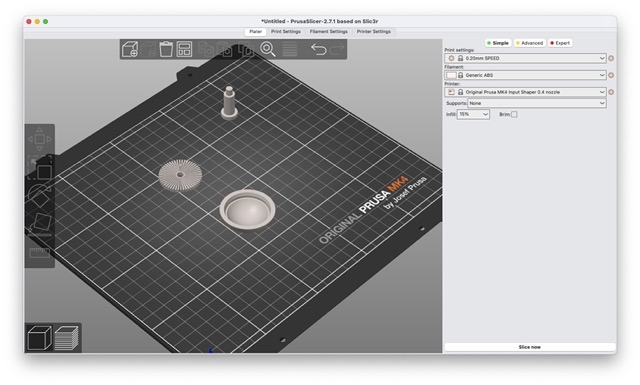
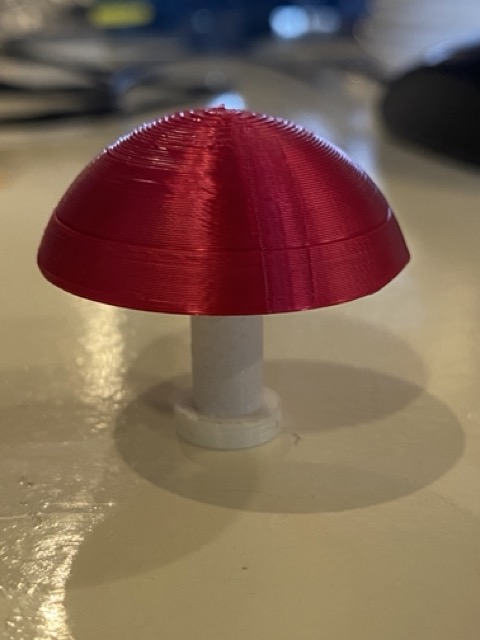
Keeping in line with my final project, I designed and 3D printed a mushroom. It was a fun process, I wish I had more time to go a bit further with the design. I also found some cool mushroom shelves and i have the code files, I hope to print them and see how they look. Below are the results so far.
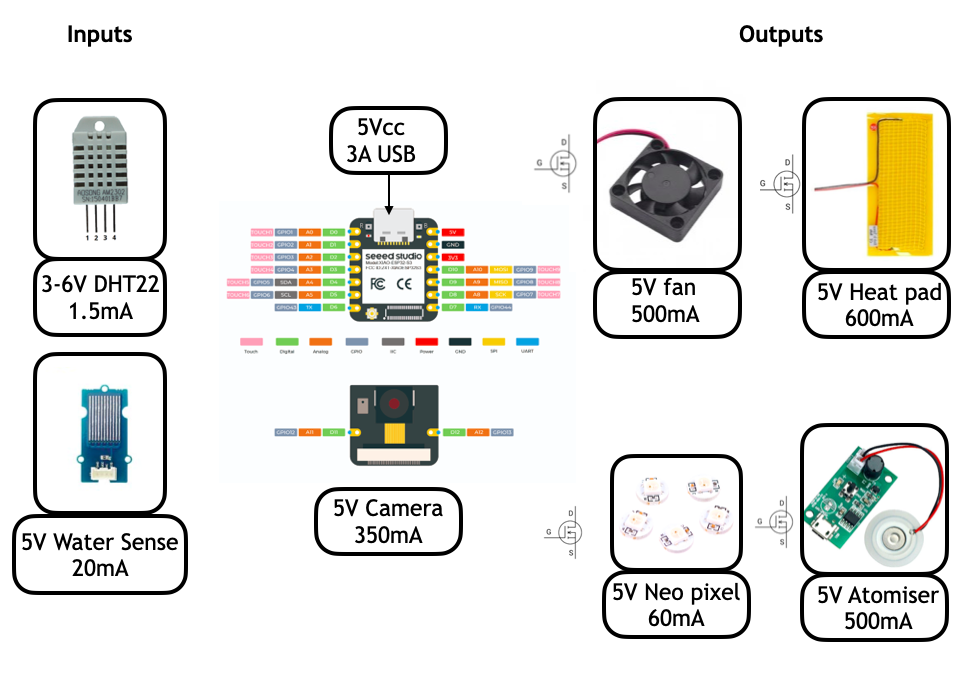
Electronics
Final project requirements:
- Temperature sensor
- Humidity sensor
- Heat matt
- Humidifier
- Notification (I would like to be notified and have some sort of communication with the device. I'm not yet sure if this will be an app, email or sms)
- Camera, not essential, but could be an optional extra.
### DHT11 & DHT22
After a quick search I stumbled across the DHT11 (RIGHT) and DHT22 (LEFT) sensors that both measure temperature and humidity, great! They vary slightly in their capabilities.
| DHT11 | DHT22 | |
|---|---|---|
| Temperature range | 0 to 50 ºC +/-2 ºC | -40 to 80 ºC +/-0.5ºC |
| Humidity range | 20 to 90% +/-5% | 0 to 100% +/-2% |
| Resolution | Humidity: 1% | Humidity: 0.1% |
| Temperature: 1ºC | Temperature: 0.1ºC | |
| Operating voltage | 3 – 5.5 V DC | 3 – 6 V DC |
| Current supply | 0.5 – 2.5 mA | 1 – 1.5 mA |
| Sampling period | 1 second | 2 seconds |
| Price | $1 to $5 | $4 to $10 |
For my project I need a higher humidity range as some mushrooms like up to 95%, so I would opt for the DHT22, which doesn't seem to be in the fabacademy inventory.
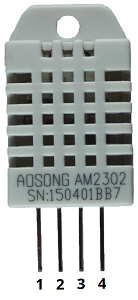
| DHT PIN | CONNECTED TO |
|---|---|
| 1 | 3.3V |
| 2 | Any digital GPIO; also connect a 10k Ohm pull-up resistor |
| 3 | Not connected |
| 4 | Ground |
This sensor requires a 10K ohm pull up resistor connected to pin 2.
### 5V Heat Pad
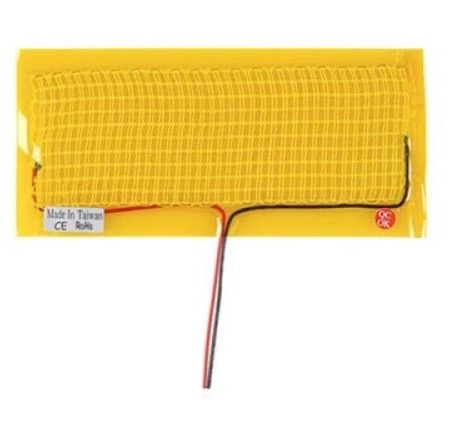
Again I couldn't find a heat pad in the fab inventory, so after a quick google a came across this one from robotshop. As I will be using the usb connection for power I looked for something in the 5V range.
- Operating Voltage: 5V DC
- Operating Current: ~600mA (~8.3Ω)
- Dimensions: 5 x 15 cm
This will be an output device that will only turn on should the input temperature value drop below 18^C. I want to place this under the substrate to heat that area, so I will need to connect via pins and have wires that extend to the pad.
Humidifier
GRV O2 ATOMIZ V1
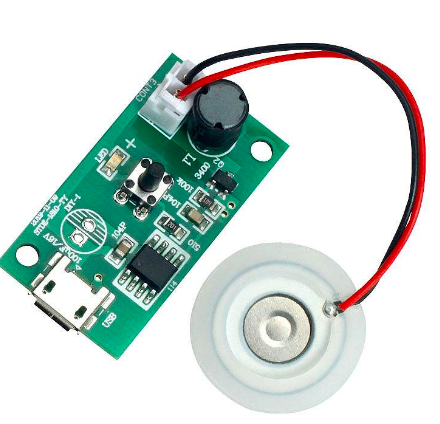
Again after a quick google I found an atomizer that would work well for my project. The Grove - Water Atomization Module is ideal for projects that require a atomizer. A prototype can be assembled here with a few simple steps. The module has a Grove interface, so it can be easily integrated into many different applications. A device that can be built very easily is a humidifier
| Technical data | |
|---|---|
| Operating voltage | 5.0 V (DC) |
| Ripple voltage (at max. power) | 100 mV |
| Maximum power | 2 W |
| Max. Output voltage | +65 V (+/-5 V) |
| Operating frequency | 105 ± 5 kHz |
| Chip | ETA1617 NE555 |
| Plug connector | JST-VH |
| Cost | €10.88 |
Planning
| Week | Task | Status | comments |
|---|---|---|---|
| 11 | Humidity control | Ongoing | New board built, implementing code to start testing tomorrow 16/04 |
| 12 | Design | Ongoing | Aim to get the case design done asap so I can start printing |
| 13 | Networking | Not Started | Communicate with the esp32, get photos and data sent to your phone. |
| 14 | Design/Print | Ongoing | is design ready? no = design / yes = print |
| 15 | Design/Print | Ongoing | is design ready? no = shit, hurry up and design! / yes = print |
| 15 | Electronics/mycelium | Not started | If not already prepared, make mycelium. Also final checks on electronics and code |
| 16 | Assembly | Not started | Start putting it all together |
| 17 | Finalization | Not started | fault finding and running the machine |
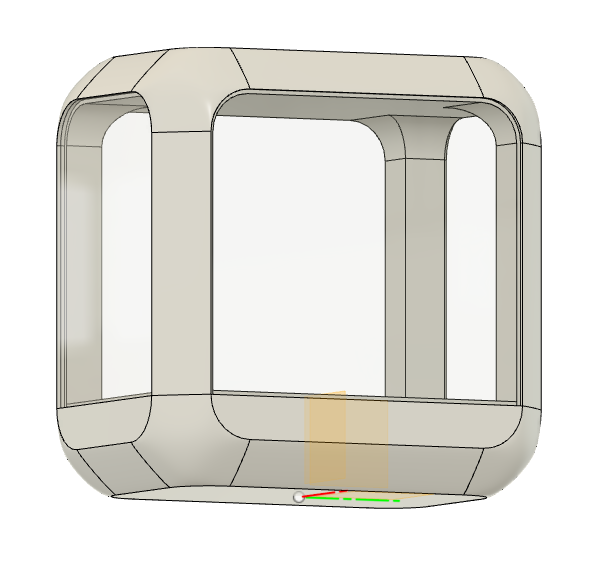
Design update
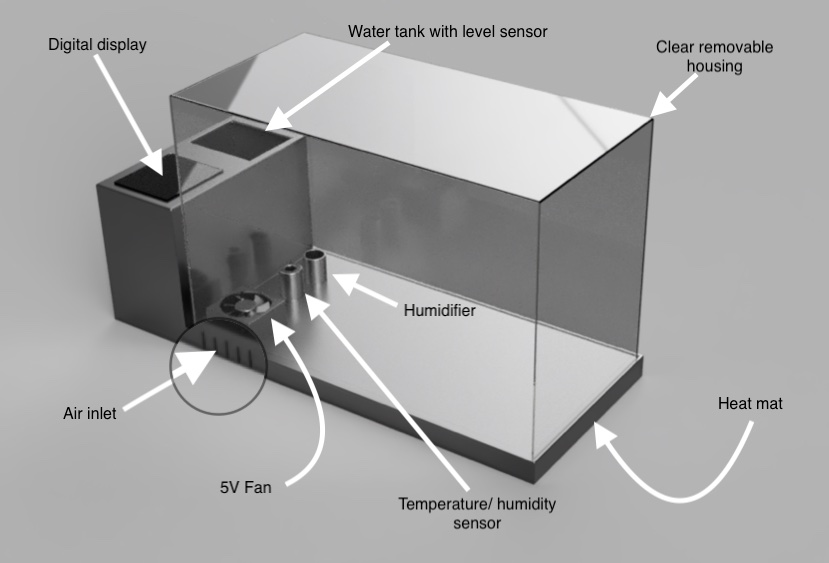
I have what I would like to build, but it't in one solid piece with added windows. The aim is to bullion sections apart and start manipulating the components to have male/female endings to slot together. Still need to figure out where the electronics will go, but there are two sections with space that I think suit the job.
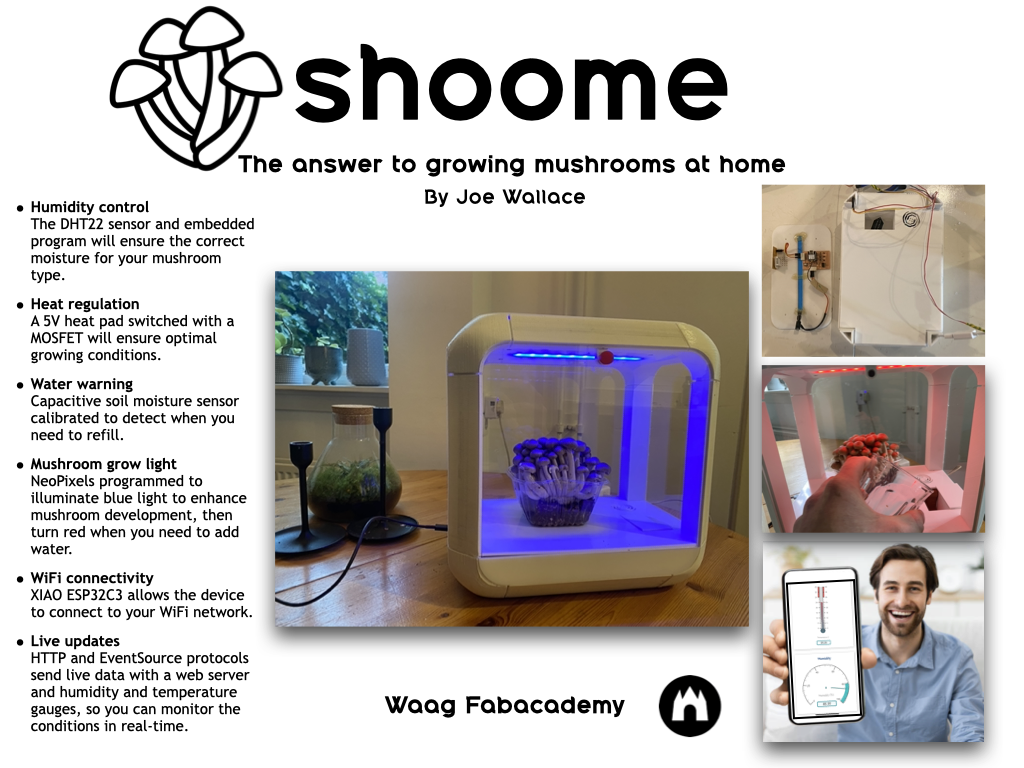
What will it do?
My final project will create the perfect environment for mushroom growth; regulating heat, moisture, ventilation and light.
Who has done what beforehand?
Open Ecotron , from Fab Lab Barcelona 2017, by Esteban Martín Gimenez
A device capable of generating a range of physical and chemical conditions applied to terrestrial or aquatic ecosystems. Its principle is to confine a biological system (natural or artificial, complex or simplified one) in a enclosure sealed in matter but not in energy, and simultaneously measure and control flows of matter and energy. For this purpose, the enclosures are equiped with many sensors to obtain precise real-time measurements and different actuators to control and modify the enclosure environmental conditions.
H.E.R.M.E.T, from Fab lab Ecostudio 2018, by Mathew Hotsko
A climate controlled chamber for something to be incubated. It has DHT11 Temperature and Humidity and Relay contolled switches for Light and Heat.
Cogus Home , from Fab Lab Aldeias do Xisto 2018, by João Milheiro
A microwatering system for Cogus Kits, a system that gives autonomy to the mushroom growth, considering environment variables (humidity, sunlight, C02, etc.).
What will you design?
I have designed the case, humidifying system and the electronics.
What materials and components will be used?
B.O.M
| Part | Fab inventor y/n | Other Locations | Quantity | Cost |
|---|---|---|---|---|
| 5V heat pad | No | robotshop.com | 1 | €5.75 |
| 5V Fan | Yes | Aliexpress | 1 | €0.34 |
| Water sensor | Yes | Aliexpress | 1 | €1.05 |
| DHT22 | Yes | Aliexpress | 1 | €1 |
| Esp32c3 | Yes | Digikey.nl | 1 | €5.65 |
| Neo pixel LED's | Yes | ledstripkoning.nl | 10 | €2.20 |
| N-type mosfet | Yes | rs-online.nl | 2 | €0.70 |
| Led | Yes | Digikey.nl | 1 | €0.30 |
| Resistor | Yes | Digikey.nl | 6 | €0.30 |
| Capacitor | Yes | Digikey.nl | 1 | €0.60 |
| USBC-Plug | Yes | Digikey.nl | 1 | €2.50 |
| PLA | Yes | ec3d.nl | 1kg | €19.99 |
| TOTAL | €40.38 |
Part and Process
| Process | Software | Machine |
|---|---|---|
| Electronics Design | Ki-Cad | N/A |
| CNC Milling PCB | Mods, UGS | Lunyee 3018, Roland modela |
| 3D Printing | Prusa, Cura | Prusa MK3S, Ender 3, SainSmart INFI 20 |
| Laser cutter | Fusion 360, Lightburn | Brm 90130 |
How will it be evaluated?
To be successful my project must do the following:
- Regulate temperature, giving heat when temperature drops below 18 degrees
- Regulate humidity, giving optimal growing conditions of between 75-95% humidity
- Warn user of low water level
- Have a controllable light source
- Circulate air
- Have a user interface, where inside conditions can be read by the user
- Grows mushrooms
Code
#include <Arduino.h>
#include <WiFi.h>
#include <AsyncTCP.h>
#include <ESPAsyncWebServer.h>
#include "SPIFFS.h"
#include <Arduino_JSON.h>
#include <DHT.h> // Include the DHT sensor library
#include <FastLED.h>

// Replace with your network credentials
const char* ssid = "iPhone pepe";
const char* password = "01212021";

// Define the number of LEDs
#define NUM_LEDS 10

// Define the data pin for NeoPixel
#define DATA_PIN 5

// Define the array of LEDs
CRGB leds[NUM_LEDS];

// Stores LED state
String ledState = "OFF";

const int dry = 3620; // value for dry sensor
const int wet = 1610; // value for wet sensor

// Create AsyncWebServer object on port 80
AsyncWebServer server(80);

// Create an Event Source on /events
AsyncEventSource events("/events");

// Json Variable to Hold Sensor Readings
JSONVar readings;

// Timer variables
unsigned long lastTime = 0;
unsigned long timerDelay = 10000;

// Create a DHT object
#define DHT_PIN 10 // Pin connected to the DHT22 sensor
#define DHT_TYPE DHT22
DHT dht(DHT_PIN, DHT_TYPE);

// Init DHT sensor
void initDHT() {
  dht.begin();
}

String getTemperature() {
  float temperature = dht.readTemperature();
  Serial.println(temperature);
  return String(temperature);
}

String getHumidity() {
  float humidity = dht.readHumidity();
  Serial.println(humidity);
  return String(humidity);
}

String getWaterPercentage() {
  int sensorVal = analogRead(A2);
  int percentageHumidity = map(sensorVal, wet, dry, 100, 0);
  Serial.println(percentageHumidity);
  return String(percentageHumidity);
}

// Replaces placeholder with sensor values
String processor(const String& var) {
  Serial.println(var);
  if (var == "STATE") {
    return ledState;
  } else if (var == "TEMPERATURE") {
    return getTemperature();
  } else if (var == "HUMIDITY") {
    return getHumidity();
  } else if (var == "WATER_PERCENTAGE") {
    return getWaterPercentage();
  }
  return String();
}

void setup() {
  // Serial port for debugging purposes
  Serial.begin(115200);
  initDHT();

  // Initialize SPIFFS
  if (!SPIFFS.begin()) {
    Serial.println("An Error has occurred while mounting SPIFFS");
    return;
  }

  // Initialize FastLED
  FastLED.addLeds<NEOPIXEL, DATA_PIN>(leds, NUM_LEDS);
  FastLED.setBrightness(100);  // Adjust the brightness value (0-255) as needed

  // Connect to Wi-Fi
  WiFi.begin(ssid, password);
  while (WiFi.status() != WL_CONNECTED) {
    delay(1000);
    Serial.println("Connecting to WiFi..");
  }

  // Print ESP32 Local IP Address
  Serial.println(WiFi.localIP());

  // Route for root / web page
  server.on("/", HTTP_GET, [](AsyncWebServerRequest *request) {
    request->send(SPIFFS, "/index.html", String(), false, processor);
  });

  // Route to load style.css file
  server.on("/style.css", HTTP_GET, [](AsyncWebServerRequest *request) {
    request->send(SPIFFS, "/style.css", "text/css");
  });

  // Route to set LED state to ON
  server.on("/on", HTTP_GET, [](AsyncWebServerRequest *request) {
    for (int i = 0; i < NUM_LEDS; i++) {
      leds[i] = CRGB::White;
    }
    FastLED.show();
    ledState = "ON";
    request->send(SPIFFS, "/index.html", String(), false, processor);
  });

  // Route to set LED state to OFF
  server.on("/off", HTTP_GET, [](AsyncWebServerRequest *request) {
    for (int i = 0; i < NUM_LEDS; i++) {
      leds[i] = CRGB::Black;
    }
    FastLED.show();
    ledState = "OFF";
    request->send(SPIFFS, "/index.html", String(), false, processor);
  });

  // Route to get temperature
  server.on("/temperature", HTTP_GET, [](AsyncWebServerRequest *request) {
    request->send_P(200, "text/plain", getTemperature().c_str());
  });

  // Route to get water percentage
  server.on("/water_percentage", HTTP_GET, [](AsyncWebServerRequest *request) {
    request->send_P(200, "text/plain", getWaterPercentage().c_str());
  });

  // Start server
  server.begin();
}

void loop() {
  // Read the sensor value
  int sensorVal = analogRead(A2);

  // Map the sensor value to a percentage (assuming wet and dry are defined appropriately)
  int percentageHumidity = map(sensorVal, wet, dry, 100, 0);

  // Check if the water percentage is below 10%
  if (percentageHumidity < 10) {
    // Set LEDs to red
    for (int i = 0; i < NUM_LEDS; i++) {
      leds[i] = CRGB::Red;
    }
  } else if (ledState == "ON") {
    // Set LEDs to white if ledState is ON
    for (int i = 0; i < NUM_LEDS; i++) {
      leds[i] = CRGB::White;
    }
  } else {
    // Turn off LEDs if ledState is OFF
    for (int i = 0; i < NUM_LEDS; i++) {
      leds[i] = CRGB::Black;
    }
  }

  // Update the LEDs
  FastLED.show();
}