14. Interface and application programming
Group assignment:
- Compare as many tool options as possible.
- Document your work on the group work page and reflect on your individual page what you learned.
Processing (programme)
Processing was created to promote software literacy within the visual arts and visual literacy within technology. It simplifies the process of creating visual arts and interactive applications.
Processing tips - order in the code is very important e.g putting the background at the end of the code will hide anything that goes before it.
P5.JS.ORG
- Online ide running in the browser
- Can be embedded in webpages
- Can embed into documentation
- The coding train - youtube tutorial
- vs code - live p5 (f1) open panel
- DOM - For interacting with the web page, like UI elements- sliders, buttons etc.
Caniuse.com shows what web serial supported by browsers
Web socket
-
WebSockets enable a two-way communication channel over a single TCP connection, allowing both client and server to send and receive data simultaneously.
-
Real-Time Data: Ideal for applications requiring real-time updates because they reduce latency compared to traditional HTTP requests.
-
Persistent Connection: Unlike HTTP, which is stateless and requires opening a new connection for each request/response, WebSockets maintain a persistent connection, reducing overhead.
-
Protocol Upgrade: WebSockets start with an HTTP handshake to establish the connection, then upgrade to the WebSocket protocol, which operates over the same port (typically 80 for HTTP or 443 for HTTPS).
-
Event-Driven: WebSocket communication is event-driven, using events like onopen, onmessage, onerror, and onclose to handle different states and data transmission.
NGROCK
Ngrok is a popular tool for developers that provides secure tunnels to localhost, enabling the sharing of local development environments over the internet.
After a morning lecture with Bas, we worked individually playing around with some of the tools like p5.j. I was still trying to figure out why telegram doesn't work with my esp32.
Individual assignment
- Write an application that interfaces a user with an input and/or output device(s) on a board that you made.
This week I tried to fix the issues I created in the last week, which meant creating a new PCB with some added parts and making sure to orientate the mosfet's correctly. The board also has a 100uf capacitor placed before the outputs that trigger from the mosfet's, the reason for that is that if i want to use neo pixels, there is an initial surge current drawn, it is advised to use a capacitor when wiring neo pixel led's. I would have liked to use a 1000uf capacitor, but after designing the pcb and then milling it, I realized that the footprint was completely different for a 1000uf, I don't think it's a massive issue as i'm only using a few LED'S, not an array that would warrant something bigger.

I have used 10kohm pull down resistors between output pins D0,D1 to ground and a gate resistor of 470ohms between mosfet gate and output pin, this has finally worked out. I attached a small 5V fan an ran simple code to turn ON/OFF in a loop.
ESP32 Web Server
With the esp32 wifi you can launch a local web server to control I/O'S on the the micro controller. I did this editing code I found here.Once I had the had the page running, I connected a fan to output one and a small dc motor to output 2 and the both react when pressing the buttons on screen.
Install ESP32 Filesystem Uploader (SPIFFS) in Arduino IDE
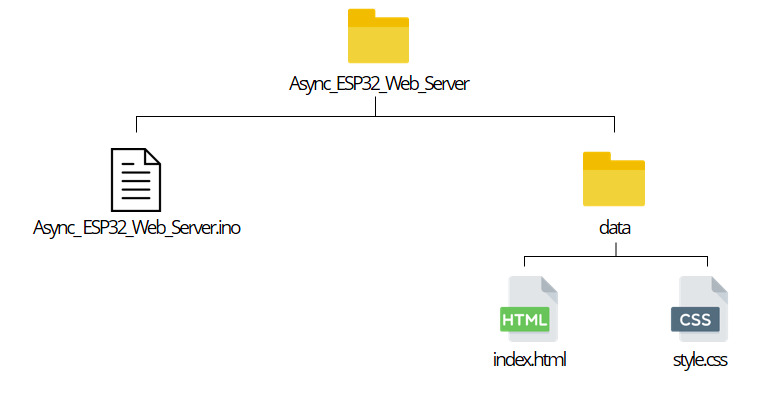
To build the web server you need three different files. The Arduino sketch, the HTML file and the CSS file. The HTML and CSS files should be saved inside a folder called data inside the Arduino sketch folder, as shown above. Instead of writing the code to include HTML and CSS we can separate the code into files and use spiffs on the esp, for that you need to download the SPIFFS library. I created a text file on my mac and the code bellow should serial print the content.
 /*********
  Rui Santos
  Complete project details at https://randomnerdtutorials.com
*********/

#include "SPIFFS.h"

void setup() {
  Serial.begin(115200);

  if(!SPIFFS.begin(true)){
    Serial.println("An Error has occurred while mounting SPIFFS");
    return;
  }

  File file = SPIFFS.open("/exampletext.txt");
  if(!file){
    Serial.println("Failed to open file for reading");
    return;
  }

  Serial.println("File Content:");
  while(file.available()){
    Serial.write(file.read());
  }
  file.close();
}

void loop() {

}
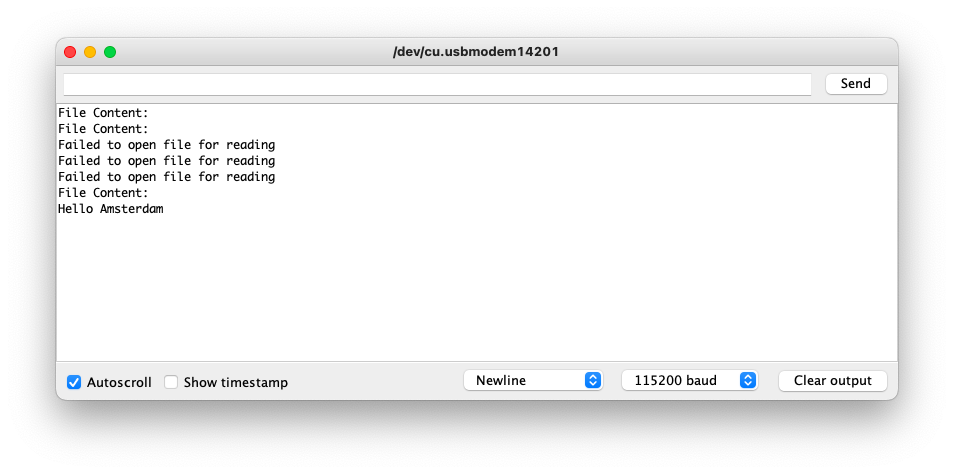
Using the code above I was able to check if I had correctly installed the file uploader and could have my text file displayed in the serial monitor. It was very important to have the correct file format, my mac does not include the .txt at the end of the text file so I had to add that. I then failed to upload because File file = SPIFFS.open("/exampletext.txt"); this line, in between the brackets needs to be changed to match your file name with an all important back slash / before the file name. Then you can open the monitor, press the reset button on the board and there you have it, Hello Amsterdam!
Temperature and Humidity Gauges
The next step was to use SPIFFS to publish a web server with icons displaying temperature and humidity, for this I followed a very helpful tutorial for creating an app with temperature and humidity gauges, you can find it here
Libraries:
- AsyncTCP
- ESPAsyncWebserver
- Arduino_Json
- DHT
The tutorial uses a BME sensor, so to change the code I copied and pasted it into chat GPT and prompted it to change the sensor type, this worked quite well and the new code worked first time, I just needed to change a few things like my WIFI credentials at home and the Pin of the DHT. With the following code and the data folder containing HTML, CSS and JS I could then open the serial monitor, once the board connected to wifi it prints an IP address. Now my ESP32 is serving a local website with humidity and temperature gauges. They have some delay, but they are working fine.
Here are the files for the gauges:
#include <Arduino.h>
#include <WiFi.h>
#include <AsyncTCP.h>
#include <ESPAsyncWebServer.h>
#include "SPIFFS.h"
#include <Arduino_JSON.h>
#include <DHT.h> // Include the DHT sensor library

// Replace with your network credentials
const char* ssid = "Tyranosaurus";
const char* password = "boxingyou";

// Create AsyncWebServer object on port 80
AsyncWebServer server(80);

// Create an Event Source on /events
AsyncEventSource events("/events");

// Json Variable to Hold Sensor Readings
JSONVar readings;

// Timer variables
unsigned long lastTime = 0;
unsigned long timerDelay = 10000;

// Create a DHT object
#define DHT_PIN 10 // Pin connected to the DHT22 sensor
#define DHT_TYPE DHT22
DHT dht(DHT_PIN, DHT_TYPE);

// Init DHT sensor
void initDHT(){
  dht.begin();
}

// Get Sensor Readings and return JSON object
String getSensorReadings(){
  float temperature = dht.readTemperature();
  float humidity = dht.readHumidity();

  // Check if any readings failed
  if (isnan(temperature) || isnan(humidity)) {
    return ""; // Return empty string if readings failed
  }

  readings["temperature"] = String(temperature);
  readings["humidity"] =  String(humidity);
  String jsonString = JSON.stringify(readings);
  return jsonString;
}

// Initialize SPIFFS
void initSPIFFS() {
  if (!SPIFFS.begin()) {
    Serial.println("An error has occurred while mounting SPIFFS");
  }
  Serial.println("SPIFFS mounted successfully");
}

// Initialize WiFi
void initWiFi() {
  WiFi.mode(WIFI_STA);
  WiFi.begin(ssid, password);
  Serial.print("Connecting to WiFi ..");
  while (WiFi.status() != WL_CONNECTED) {
    Serial.print('.');
    delay(1000);
  }
  Serial.println(WiFi.localIP());
}

void setup() {
  // Serial port for debugging purposes
  Serial.begin(115200);
  initDHT(); // Initialize DHT sensor instead of BME280
  initWiFi();
  initSPIFFS();

  // Web Server Root URL
  server.on("/", HTTP_GET, [](AsyncWebServerRequest *request){
    request->send(SPIFFS, "/index.html", "text/html");
  });

  server.serveStatic("/", SPIFFS, "/");

  // Request for the latest sensor readings
  server.on("/readings", HTTP_GET, [](AsyncWebServerRequest *request){
    String json = getSensorReadings();
    request->send(200, "application/json", json);
    json = String();
  });

  events.onConnect([](AsyncEventSourceClient *client){
    if(client->lastId()){
      Serial.printf("Client reconnected! Last message ID that it got is: %u\n", client->lastId());
    }
    // send event with message "hello!", id current millis
    // and set reconnect delay to 1 second
    client->send("hello!", NULL, millis(), 10000);
  });
  server.addHandler(&events);

  // Start server
  server.begin();
}

void loop() {
  if ((millis() - lastTime) > timerDelay) {
    // Send Events to the client with the Sensor Readings Every 10 seconds
    events.send("ping",NULL,millis());
    events.send(getSensorReadings().c_str(),"new_readings" ,millis());
    lastTime = millis();
  }
}
In this screen recording I am accessing the network on my phone via the IP address, I can then see the gauges and when I blow on the sensor the humidity reading goes up.
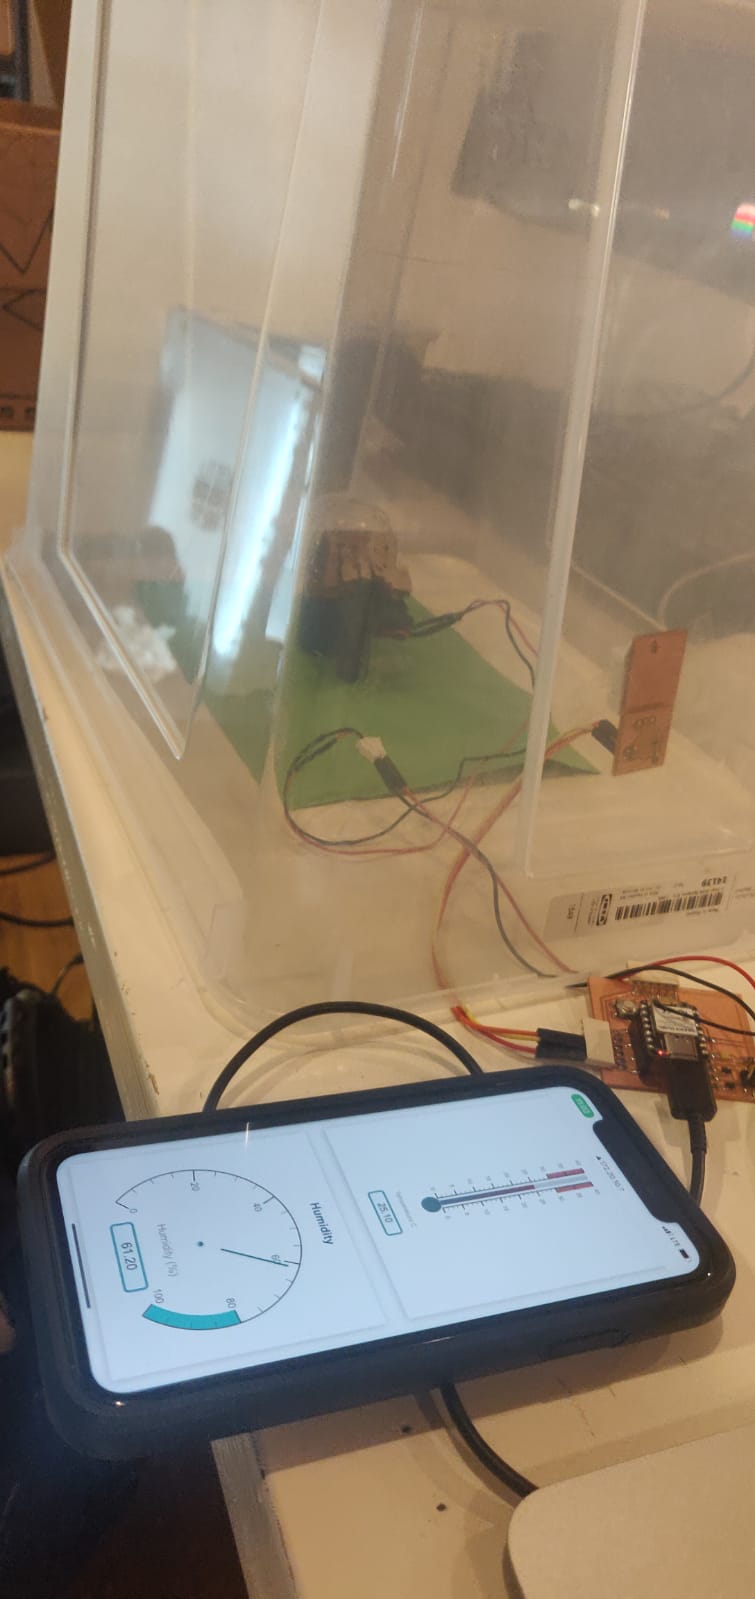
I was also able to use the app to start testing the humidifier, in the photo below I have my esp32-c3 connected to my pcb with a DHT22 sensor. I then have a fan blowing moisture from a piece of card. Using the web server i could monitor the moisture content inside the box.