13. Embedded Networking and Communications
It involves networking capabilities into embedded systems, enable them to connect to networks
or other devices for exchanging information or data for monitoring and control.
There are different communication protocols where the most common are: I2C, SPI and UART, but if
you want a wider range there are higher level networking protocols as: Ethernet, Wi-Fi, BT, etc.
Group Page
UART
Universal Asynchronous Receiver-Transmitter
UART is a serial communication for asynchronous data between TWO Devices using a transmiter (Tx) and a receiver (Rx).
For the communication it sends one bit at a time in a single data line with the use of start/stop bits for the data frame.
It is used for point to point communication between devices in short distances and connecting peripherals (GPS, Bt, sensors).
SPI
Serial Peripheral Interface
Is a synchronous serial communication that enables duplex communication between a master device and slaves.
It require:
- MISO: Master Out Slave In
- MOSI: Master In Slave Out
- SCK: Serial Clock
- SS: Slave Select
It is used for peripherals with embedded systems as memory devices, displays, sensors, etc.
I2C
Inter-Integrated Circuit
Its a multi-master/slave communication protocol that enables communication between circuits using two wires: SDA
(Serial Data Line) and SCL (Serial Clock Line).
In this type of communication the master controls the bus and communication with the slaves, it supports bidirectional data
transfer and share the bus with others.
Used for low speed peripherals as: sensors, EEPROM, I/O, etc. The main advantage are the simplicity, low pins and multiple device on the same bus.
Code
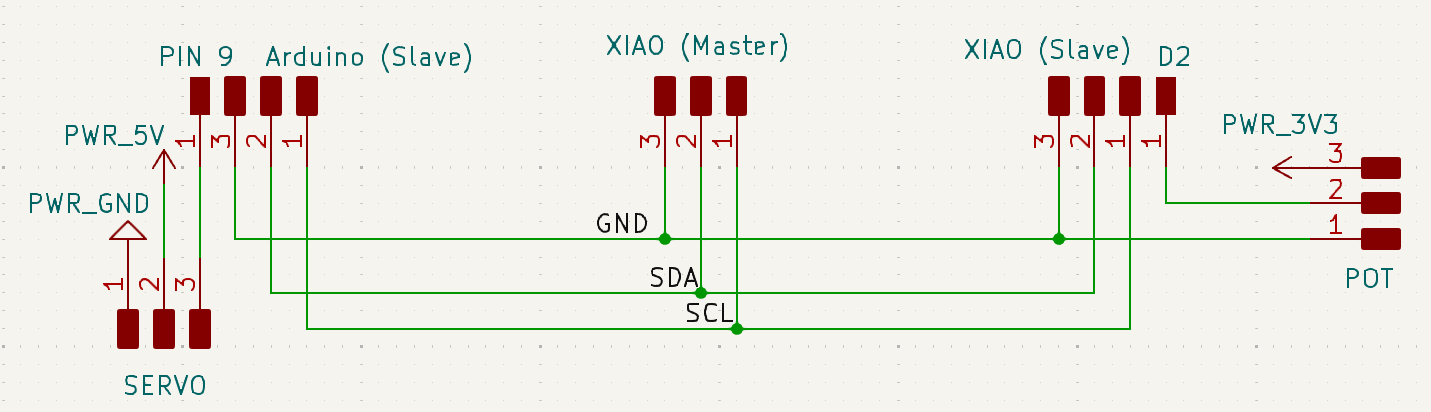
For this assignement I will use 2 Xiao RP2040 and an Arduino, they will be connected by I2C communication.
For this I will have a Master device (Xiao) and 2 slaves (Xiao and Arduino), the Master will ask the first slave (Xiao)
for the value of a potenciometer, this slave will send de value to the master and the other slave. The master will print in the
Serial Monitor the value and finally the tird Slave (Arduino) will use this value to move a servomotor.
This is the schematics of connections for the different components and controllers.
Master Code
On this code we request 1 byte of a slave by I2C with adress 9, after that we print the data on the serial monitor with a text "Pos:"
						#include Wire.h // Include the Wire library for I2C communication

						void setup() {
							Serial.begin(9600); // Initialize serial communication
							Wire.begin(); // Initialize the I2C communication
						}

						void loop() {
							Wire.requestFrom(9, 1);  // Request 1 byte from the slave device with address 9
							while (Wire.available()) {
							int data = Wire.read();  // Read the byte received from the slave
							Serial.print("Pos:");    // Print "Pos:" to serial monitor
							Serial.println(data);    // Print the received data to serial monitor
							}
							delay(500);               // Delay
						}
Slave (Xiao) Code
Use the Xiao as an slave with adress 9, it reads a potenciometer value and map it for a servo (0-180), finally it send it by I2C communication with "sendData()".
						#include Wire.h // Include the Wire library for I2C communication

						int potPin = D2; //Analog pin connected to the potentiometer
						int potVal; //Store potentiometer value

						void setup() {
							Serial.begin(9600); // Initialize serial communication
							Wire.begin(9); //Slave with address 9
							Wire.onRequest(sendData); // Define the function to be called
							//when data is requested
						}

						void loop() {
							potVal = analogRead(potPin); // Read the value from the potentiometer
							delay(500);
						}

						void sendData() {
							int servoVal = map(potVal, 0, 1023, 0, 180); // Map potentiometer value
							//to servo range (0-180)
							Serial.println(servoVal); // Print servo value to serial monitor
							Wire.write(servoVal); // Send servo value to the master device over I2C
						}
Slave (Arduino Code)
We use 1 byte from slave (9), wich contains data, later on we use this value to move a servo on a certain position, conected to pin 9.
						#include Wire.h // Include the Wire library for I2C communication
						#include Servo.h // Include the Servo library for servo motor control

						Servo myServo; // Create a Servo object

						void setup() {
							Wire.begin(10); // Initialize I2C communication as master with address 10
							myServo.attach(9); // Attach the servo to pin 9
							myServo.write(0); // Set the initial position of the servo to 0 degrees
							Serial.begin(9600); // Initialize serial communication
						}

						void loop() {
							Wire.requestFrom(9, 1); // Request 1 byte from the slave device with address 9
							while (Wire.available()) {
							int data = Wire.read(); // Read the byte received from the slave
							Serial.print("Data:"); // Print "Data:"
							Serial.println(data); // Print the data to serial monitor
							myServo.write(data); // Set the servo position based on the received data
							}
							delay(500); // Delay
						}
Results
As we can see as I move the potenciometer it changes the value on the serial monitor of the master device and the Arduino controls
the servomotor, moving it to a certain angle (you can see the movement on the servo gear).
Files