6. Embedded programming
Group assignment:
- Browse your microcontroller’s datasheet
- Compare performance and development workflows with other architectures of a multimeter and oscilloscope
To see our group assignment click here
Individual assignment:
- Write a program for a microcontroller development board you’ve made, to interact (with local input and/or output devices) and communicate (with remote wired or wireless devices)
- Extra credit: use different languages and/or development environments
- Extra credit: connect external components to the board
I.Xiao rp2040
The image below shows the different pins on the Xiao rp2040.
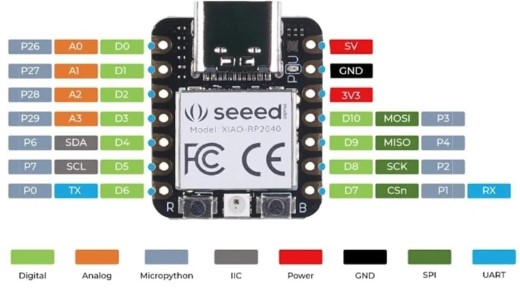
The Xiao RP2040 refers to a microcontroller module based on the Raspberry Pi RP2040, which is produced by Seeed Studio. This compact module offers a similar feature set to the RP2040, including dual ARM Cortex-M0+ cores, high-speed I/O interfaces, integrated memory and more. However, it is designed to be smaller and more easily integrated into electronic projects and embedded systems. The “Xiao RP2040” is particularly appreciated by hobbyists and manufacturers for its performance and versatility in a compact format.
Power supply
The Seeeduino XIAO RP2040 can be powered in a variety of ways. Here are some common options:
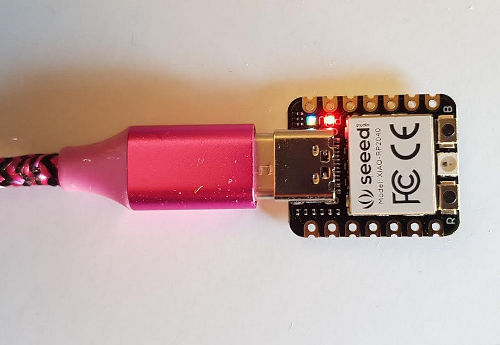
USB
The XIAO features a USB Type-C connector that can be used to power it. It can be plugged into a computer, USB charger or USB power source to provide the necessary power.
Power pins
The XIAO also features power pins (VCC and GND) on the edge of the module. You can supply power directly to these pins from an external power source, such as a battery or AC adapter. Be sure to observe the voltage specifications recommended by Seeed Studio.
Vin (Voltage In)
If you’re using an external power supply, you can apply it to the Vin pin, which is also available on the edge of the module. Make sure that the voltage supplied is within the range specified by Seeed Studio.
II. Xiao’s rp2040 programming
For more information on this microcontroller, please attach this site. It will give you everything you need to learn how to use your xiao.
Step 1. Launch Arduino IDE software
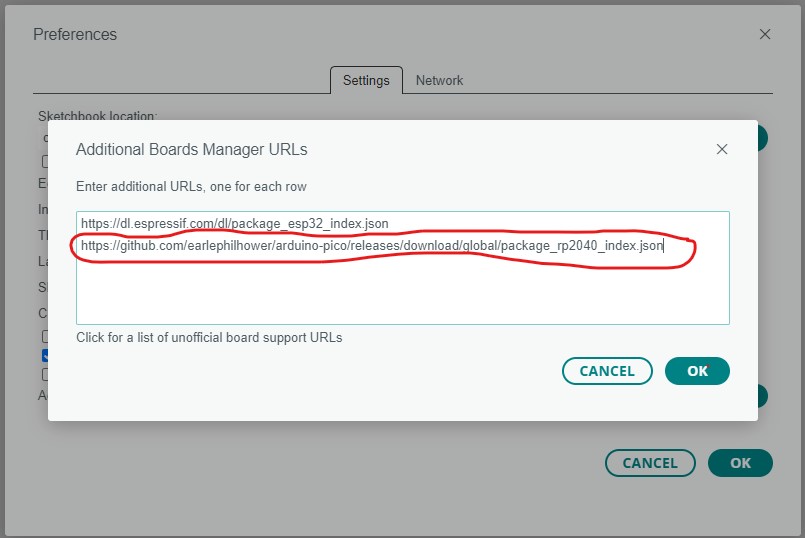
Step 2. Add the Seeed Studio XIAO RP2040 board package to your Arduino IDE
Go to File > Preferences and fill in the additional board manager URLs with the URL below:
https://github.com/earlephilhower/arduino-pico/releases/download/global/package_rp2040_index.json
Step 3. Go to Tools > Map > Map Manager… enter the keyword RP2040 in the search field. Select the latest version of Raspberry Pi Pico/RP2040 and install it.

Step 4. Go in Tools > Board > Raspberry PI Pico/ RP2040 > Seeed XIAO RP2040S

III.Codes
III.1 First code
Using python and the Arduino IDE, we’re going to create a graphical interface to turn on and/or off an LED with the circuit we’ve designed 🤗🤗.
🤔🤔 Is that possible you ask!!!
Don’t worry, I’ll show you how!
We’ve put together the Arduino code below 👇👇👇
Code_Test
/**********************************************************/
/************Variable declaration**********************/

char SerialData;
int pinLED = D10;


/**********************************************************/
/*     Iniatization
/**********************************************************/
void setup() {
  // put your setup code here, to run once:
pinMode(pinLED, OUTPUT);
Serial.begin(9600);
}


/*********************************************************/
/*    Infinite loop
/*********************************************************/

void loop() {
  // put your main code here, to run repeatedly:
  if(Serial.available()>0) { // If data arrives on the serial port
    SerialData = Serial.read(); // Reading on the port

    Serial.print(SerialData); // displays the data read from the “SerialData” variable
  }

    if(SerialData == '1')
    {
      digitalWrite(pinLED, HIGH); //  the LED lights up
    }

    else if (SerialData == '0')
    {
      digitalWrite(pinLED, LOW); // turn off the LED
    }
}
Open your python editor (we’ll use VS code Studio) and create a (.Py) file.

Enter the following python code in your python editor. Remember, here our board is on the Com9 and we have set a communication speed of 9600 bauds in the Arduino code. Set your own Com and the communication speed you have chosen.
#coding : utf-8

import serial  # import the python library
import tkinter # graphic interface creation

arduino_Data = serial.Serial('com9', 9600) # we define the port where the Arduino is connected and
                                           #the communication speed

def led_on(): # function to light the led
    arduino_Data.write(b'1') #b pour byte

def led_off(): # function to light the led
    arduino_Data.write(b'0')

# Creating the graphical interface

led_controle_windows =tkinter.Tk()
Button =tkinter.Button # create a button using tkinter's built-in functions

btn1 = Button(led_controle_windows, text ="ON", command= led_on)

btn2 = Button(led_controle_windows, text ="OFF", command= led_off)

btn1.grid(row=0, column=1) # position button1 on 1st row 1st column
btn2.grid(row=1, column=1) # position button2 on 2nd line
1st column

led_controle_windows.mainloop

input("presse Entrée pour Quitter")
For more information, use this link which will take you to a youtube video for python code
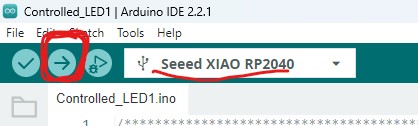
In the Arduino Editor, upload the code by clicking on the button circled in Red.
In VsCode, click on the button circled in Red and your graphical interface will appear.

This video shows an overview of the project
III.2 Second code
For the second program, we will use an ultrasonic sensor and LED. We are going to write a miropython program under the Thonny software for the xiao rp2040 development board.

To install Seeed Studio Xiao rp2040 with micropython, please refer to the following site : Seeed studio
III.2.1 Programming with MicroPython + Thonny
MicroPython is an implementation of Python 3 optimized to run on microcontrollers and microprocessors with limited resources. It provides a lightweight version of Python that can be run on low-power devices such as microcontrollers, while offering much of the power and flexibility of standard Python syntax. With MicroPython, users can write and run Python code directly on microcontrollers, enabling rapid development of automation, IoT (Internet of Things), sensor and embedded device projects. MicroPython is often used on development boards such as the Raspberry Pi Pico, ESP32, ESP8266, STM32 and others.
Installing
Download Thonny

As I said above, the website Seeed Xiao gives you all the information you need to install micropython.
Functioning
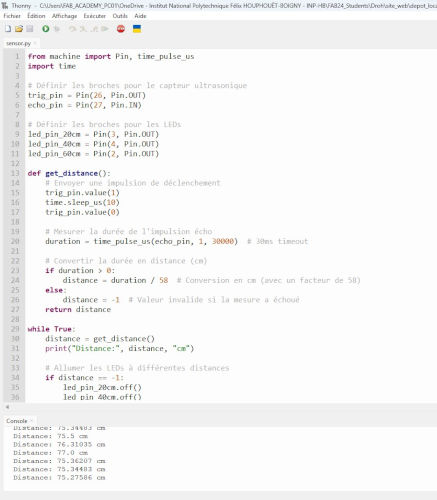
This MicroPython code uses an ultrasonic sensor connected to GPIO pins 26 and 27 of a Seeeduino Xiao to measure the distance to an object. Then, depending on the distance measured, three LEDs connected to pins 13, 14 and 15 are switched on or off.
Code_Test
from machine import Pin, time_pulse_us
import time

# Define pins for ultrasonic sensor
trig_pin = Pin(26, Pin.OUT)
echo_pin = Pin(27, Pin.IN)

#  Define LED pins
led_pin_20cm = Pin(3, Pin.OUT)
led_pin_40cm = Pin(4, Pin.OUT)
led_pin_60cm = Pin(2, Pin.OUT)

def get_distance():
    # Send a trigger pulse
    trig_pin.value(1)
    time.sleep_us(10)
    trig_pin.value(0)

    # Mesurer la durée de l'impulsion écho
    duration = time_pulse_us(echo_pin, 1, 30000)  # 30ms timeout

    # Convert time to distance (cm)
    if duration > 0:
        distance = duration / 58  # Conversion to cm (with a factor of 58)
    else:
        distance = -1  # Invalid value if measurement failed
    return distance
while True:
    distance = get_distance()
    print("Distance:", distance, "cm")

    # Light up LEDs at different distances
    if distance == -1:
        led_pin_20cm.off()
        led_pin_40cm.off()
        led_pin_60cm.off()
    elif distance <= 20:
        led_pin_20cm.on()
        led_pin_40cm.off()
        led_pin_60cm.off()
    elif distance <= 40:
        led_pin_20cm.on()
        led_pin_40cm.on()
        led_pin_60cm.off()
    elif distance <= 60:
        led_pin_20cm.on()
        led_pin_40cm.on()
        led_pin_60cm.on()
    else:
        led_pin_20cm.off()
        led_pin_40cm.off()
        led_pin_60cm.off()

    time.sleep(1)  # Wait one second before the next measurement
Project files
Links that may help you :
- Kone Zié Souleymane
- Jean-Nicaise AKAFFOU
- Kouassi Amany Williams
- Moulo Kraidy Salomon
- https://wiki.seeedstudio.com/XIAO-RP2040-with-MicroPython/
- https://wiki.seeedstudio.com/XIAO_ESP32C3_Getting_Started/
End