4. Embedded programming
Group assignment:
- Compare the performance and development workflows for other architectures.
To see our group assignment click here
Individual assignments:
-
Browse through the data sheet for your microcontroller
-
Program a microcontroller development board to interact and communicate
-
Extra credit: use different languages &/or development environments
For the individual assignments of this week. We have chosen the Seeed Studio XIAO RP2040 development board.
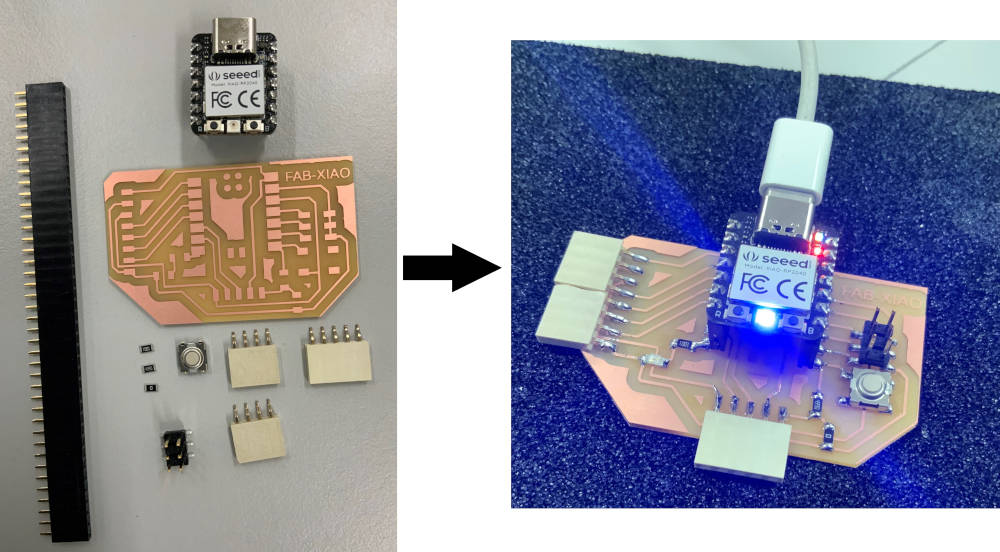
Reproduction of the Fab-Xiao electronic card
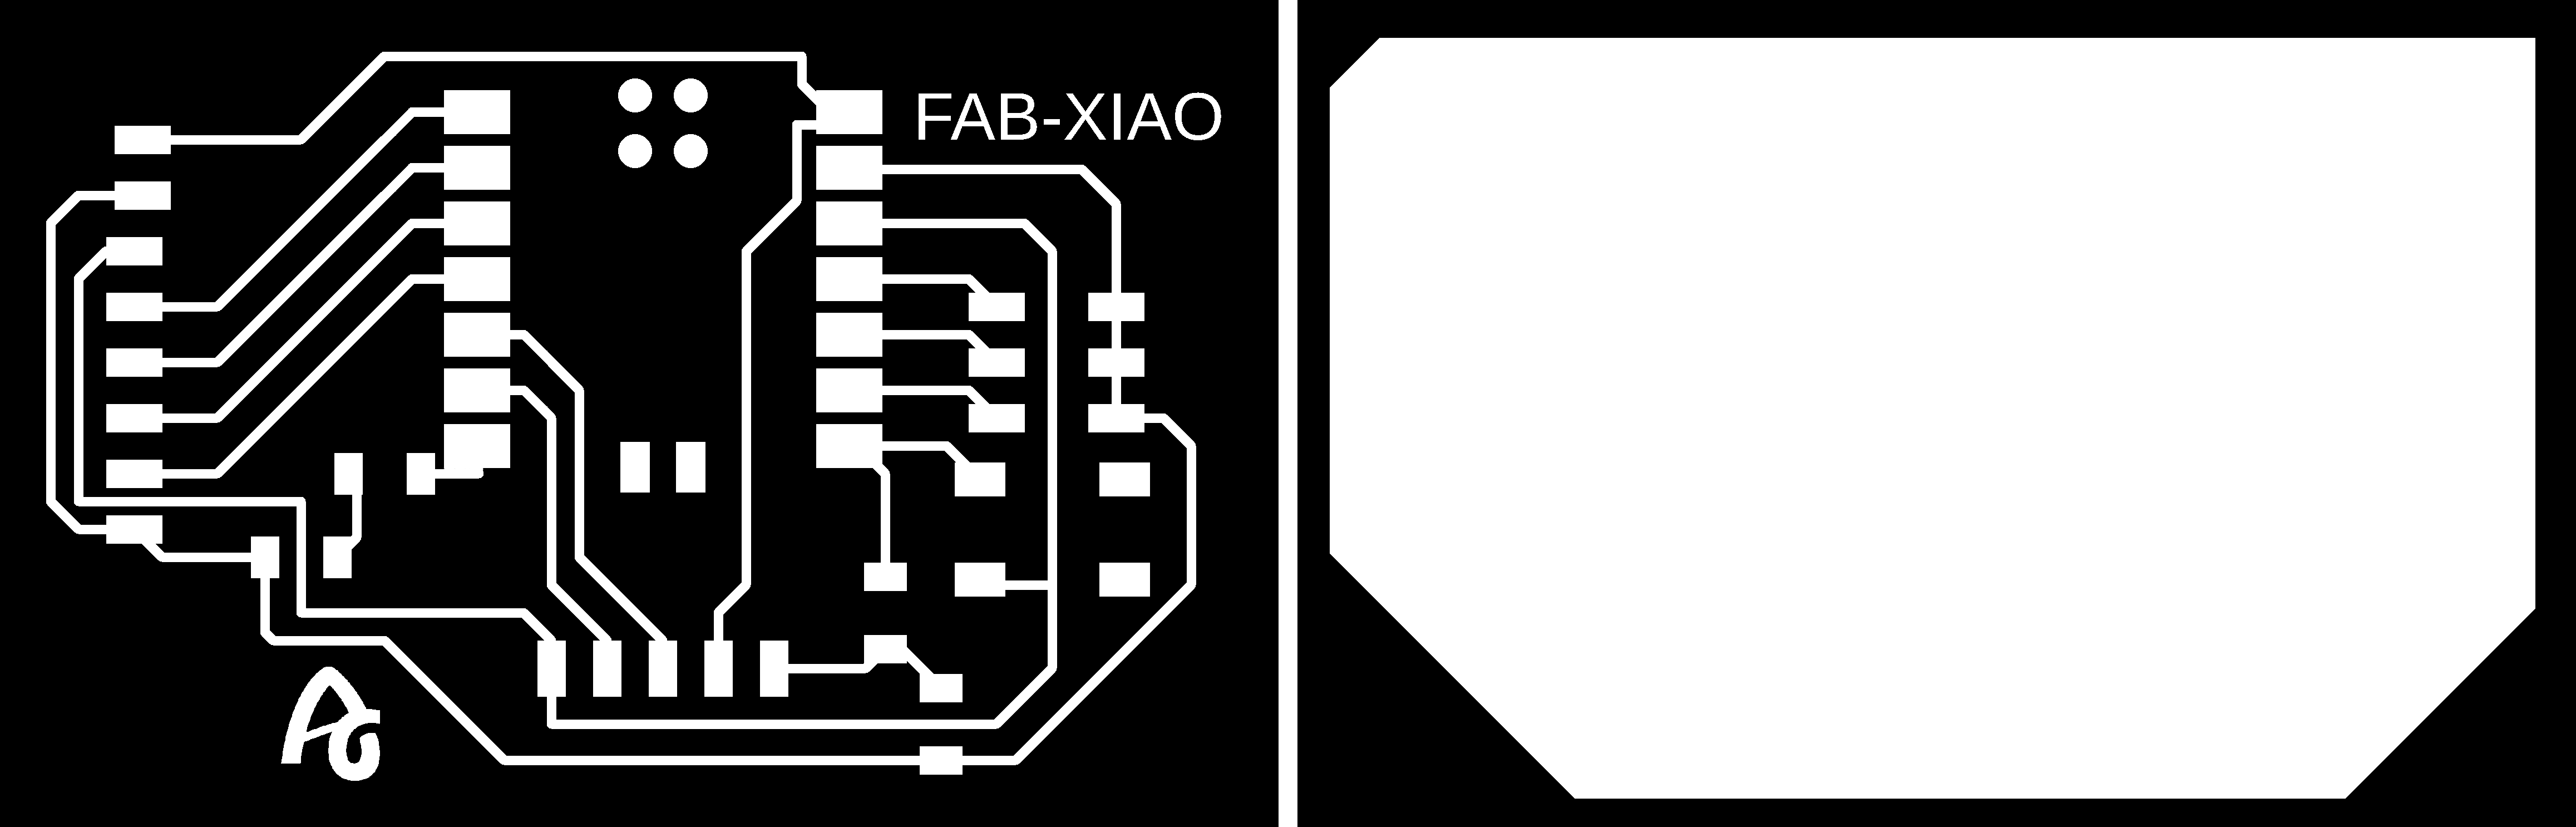
For the realization of the individual assignments of this week. We have first reproduced the electronic board Fab-Xiao designed by ADRIAN TORRES.
- We downloaded the traces of the electronic circuit as shown below
- For the realization of the tool path file we used the Roland SRM-20 mill cut pcb program from mods CE as shown below.
For more details on the use of mods CE click here
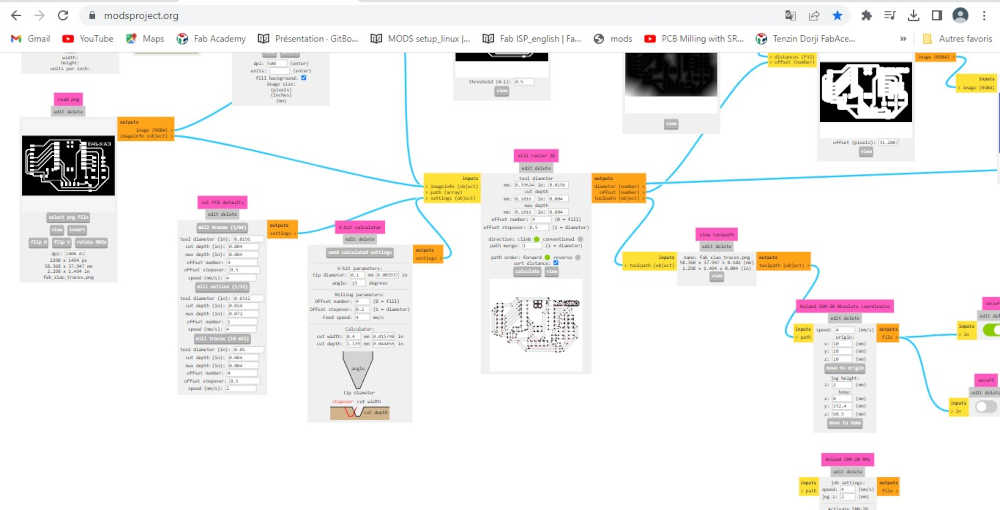
Info
We used the program Roland SRM-20 mill cut pcb in mods CE because we have a monofab SRM-20 in our fablab
- After generating the toolpath with mods CE we followed the SMR20 for PCB tutorial for the machining of our PCB we obtained the results below.
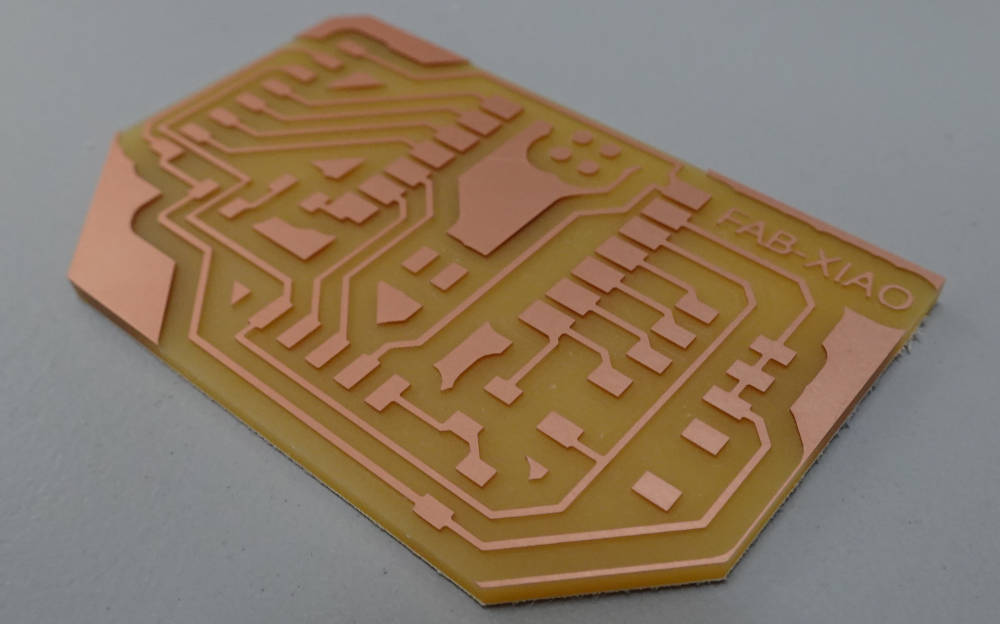
- once our printed circuit is finished we proceeded to the soldering of the different components as shown below
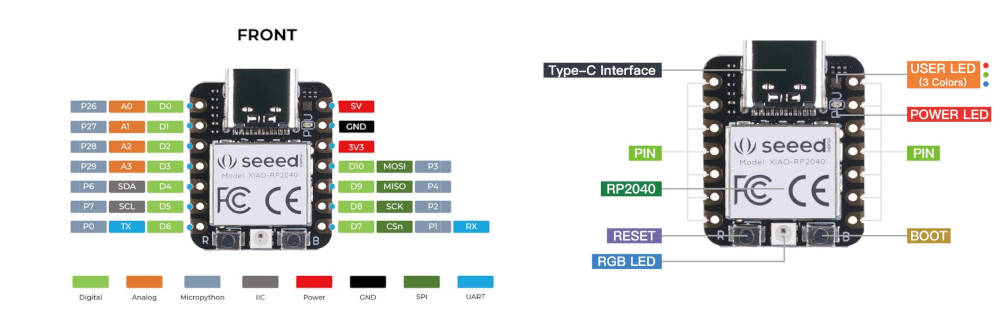
Data sheet : Seeed Studio XIAO RP2040
Presentation
The Seeed Studio XIAO RP2040 is a development board for microcontrollers. It is equipped with a dual core RP2040 processor with a size of 20 x 17.5 mm suitable for small projects and and portable thanks to its low power consumption. It supports several languages, including C/MicroPython/CircuitPython.
Specification
| Item | Value |
|---|---|
| CPU | Dual-core ARM Cortex M0+ processor up to 133MHz |
| Flash Memory | 2MB |
| SRAM | 264KB |
| Digital I/O Pins | 11 |
| Analog I/O Pins | 4 |
| PWM Pins | 11 |
| I2C interface | 1 |
| SPI interface | 1 |
| UART interface | 1 |
| Power supply and downloading interface | Type-C |
| Power | 3.3V/5V DC |
| Dimensions | 20×17.5×3.5mm |
More information in this link. Here the Seeed Studio XIAO RP2040 pinout sheet.
Seeed Studio XIAO RP2040 Schematic
click here to download the diagram.

Programming
For the programming of the Seeed Studio XIAO RP2040 card we have used several components, namely :
-
LED (Light-Emitting Diode)
-
Button
-
resistance
For software and programming languages we have chosen the Arduino IDE with C++ and Thonny with MicroPython.
Arduino IDE
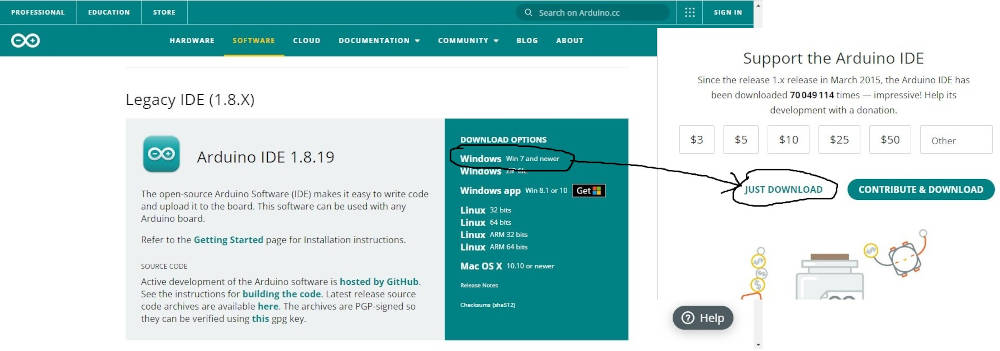
Installation
The Arduino software is an open source Integrated Development Environment (IDE) and free, downloadable from the official Arduino website choose version 1.8.19 as indicated below.
For the installation you just have to click on next. If all goes well you should have the display below.

The Arduino IDE allows you to edit a program, compile this program in the machine language, upload the program in the memory of various microcontrollers. The uploading is done via the USB port of the computer.
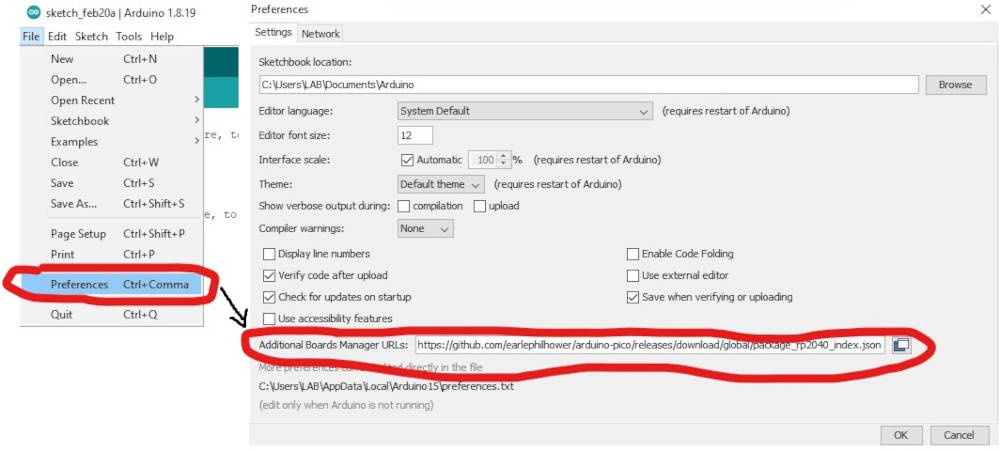
Once Arduino IDE is installed we will move on to adding the Seeed Studio XIAO RP2040 board package to Arduino IDE.
- Launch Arduino IDE, go to File > Preferences, and fill Additional Boards Manager URLs with the url below:
https://github.com/earlephilhower/arduino-pico/releases/download/global/package_rp2040_index.json
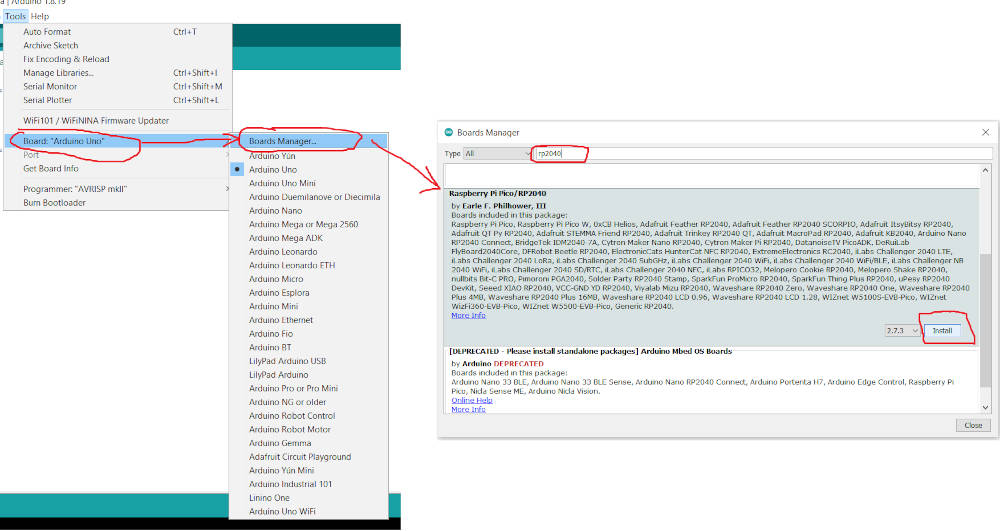
Navigate to Tools-> Board-> Boards Manager…, type the keyword RP2040 in the searching blank. Select the lastest version of Raspberry Pi Pico/RP2040 and install it.
Program
For the programming of the Seeed Studio XIAO RP2040 board we have chosen to turn on or off a led with a push button or the Arduino IDE serial monitor.
Wiring diagram
For the wiring of our led and our push button we have chosen what are already soldered on the FAB-XIAO board as shown below.
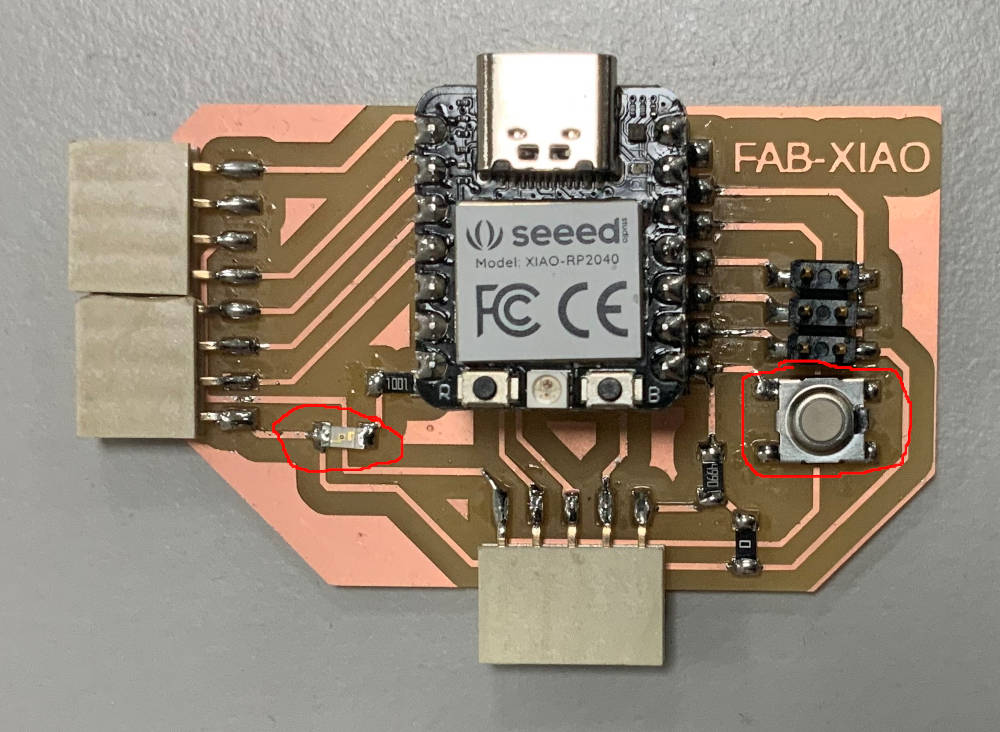
Note
- the led is connected to pin D6
- the button is connected to pin D7
Arduino code
- Arduino code 1: “Turn on or off a led with a button”
You can copy the code or download it at the end of the page.
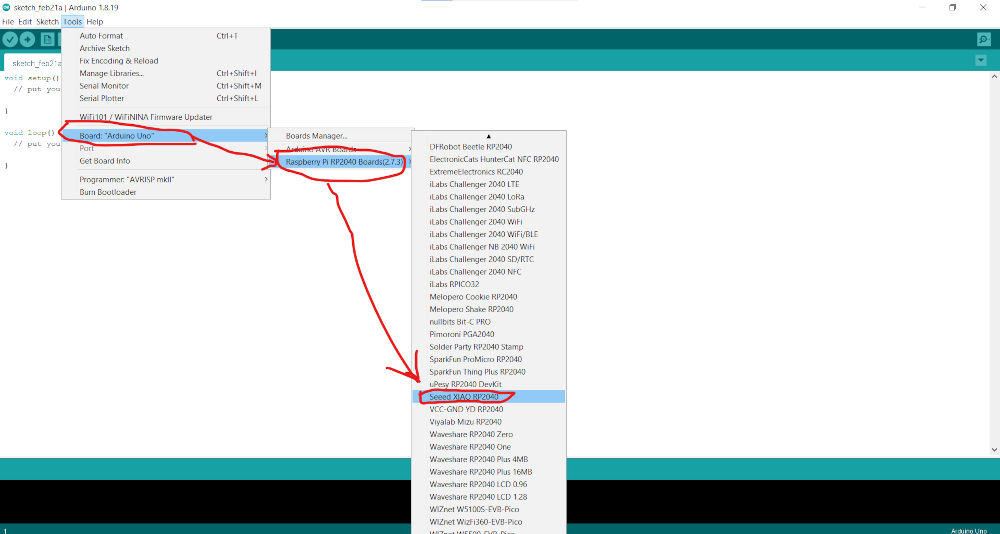
- Once you have the code in your Arduino IDE go to Tools-> Board, search for “Seeed Studio XIAO RP2040” and select it.
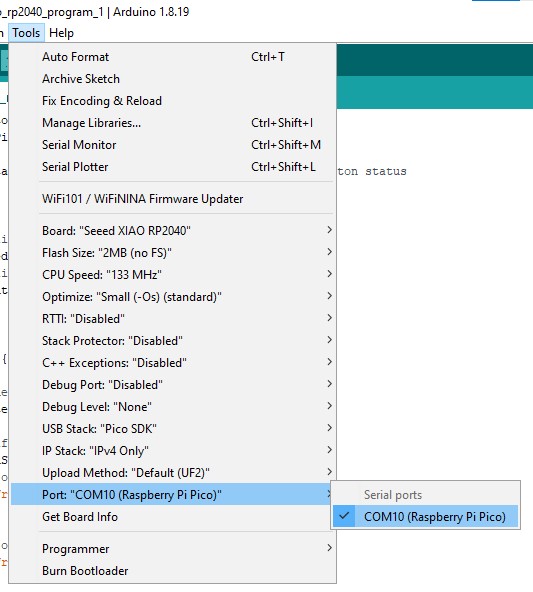
- Connect your card to your PC with a USB type C cable, go to Tools > Port and select the name of the serial port of the connected Seeed Studio XIAO RP2040 as shown below.
Tip
Some USB cables can only supply power and cannot transfer data. If you don’t have a usb cable or don’t know if your usb cable can transmit data, you can check seeed USB type C support USB 3.1.
- Click on the Upload button to upload the code to the card as shown below. If the upload was successful you should have the message circled in red.
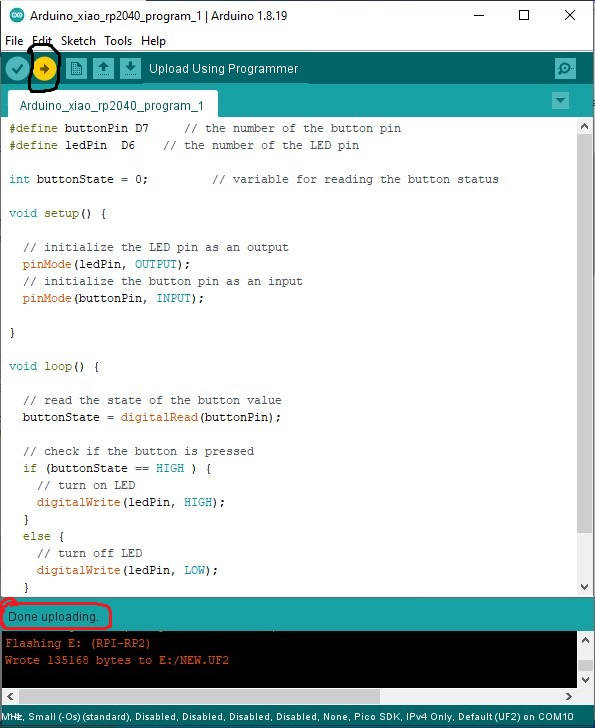
Note
If uploading the Arduino program fails, try holding down the “BOOT” button and then clicking the “RUN” button. At this point, Seeed Studio XIAO RP2040 will enter boot mode (your computer will load a removable disk), and you will be able to upload the Arduino program again.
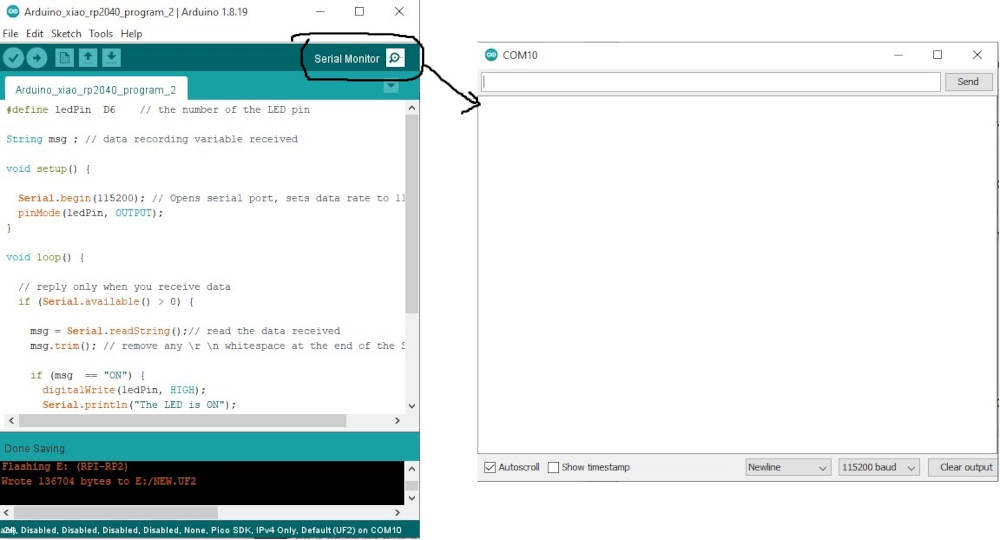
- Arduino code 2: “Turn on or off a led with the Arduino IDE serial monitor”
To download the program to the Seeed Studio XIAO RP2040 card, please refer to the previous program procedure.
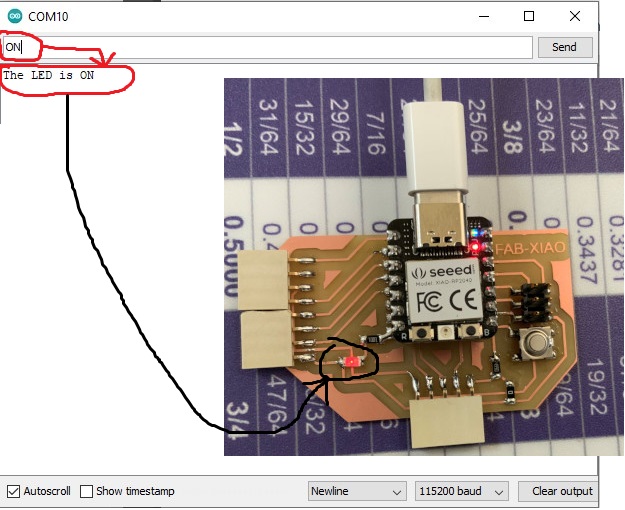
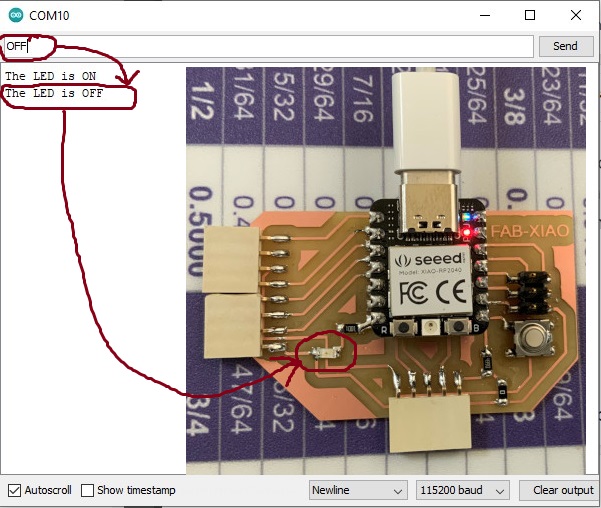
- Click on the Serial Monitor button as shown below and enter ON or OFF to turn the LED on or off.
MicroPython + Thonny
MicroPython is an interpreter for the Python 3 programming language, it includes a small subset of the standard Python library and is optimized to run on microcontrollers.
For more information click here
To run MicroPython we used the SeeedStudio XIAO RP2040 board with the Thonny python IDE.
Installation
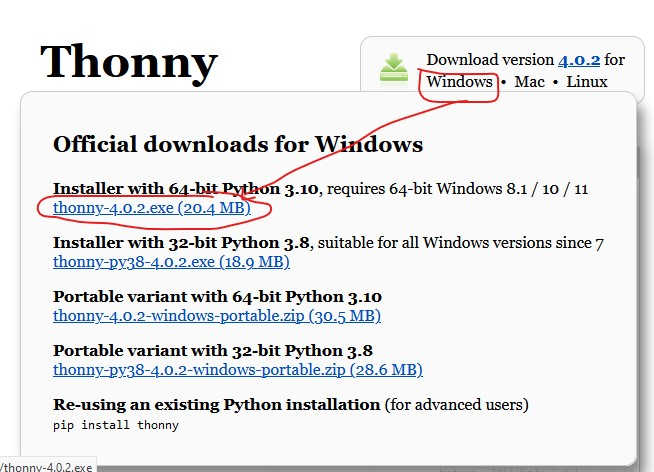
The installation of Thonny is very simple go to https://thonny.org/ and download the version corresponding to your operating system as shown below (Windows in our case)
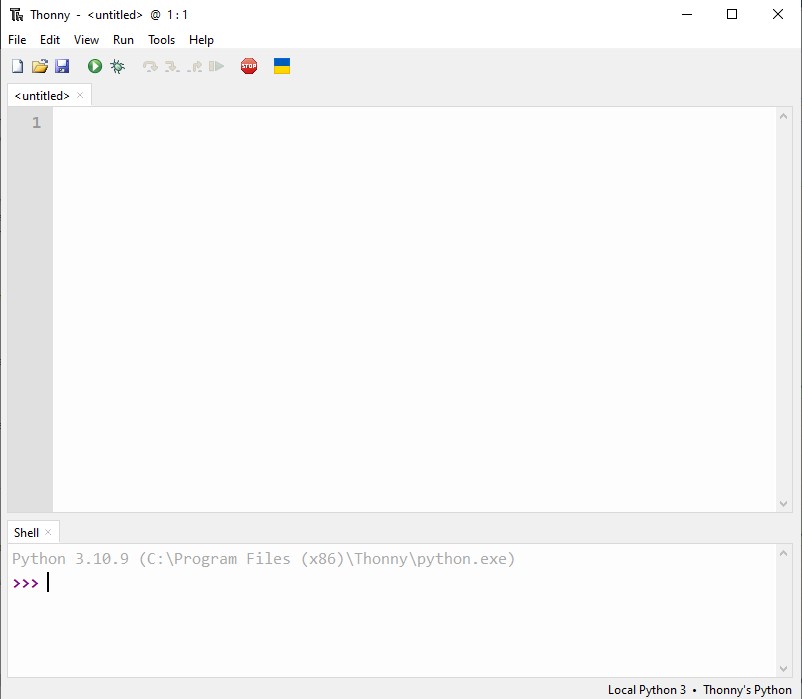
- Once you have downloaded the Thonny installation file, open it and you just have to click on next to install it
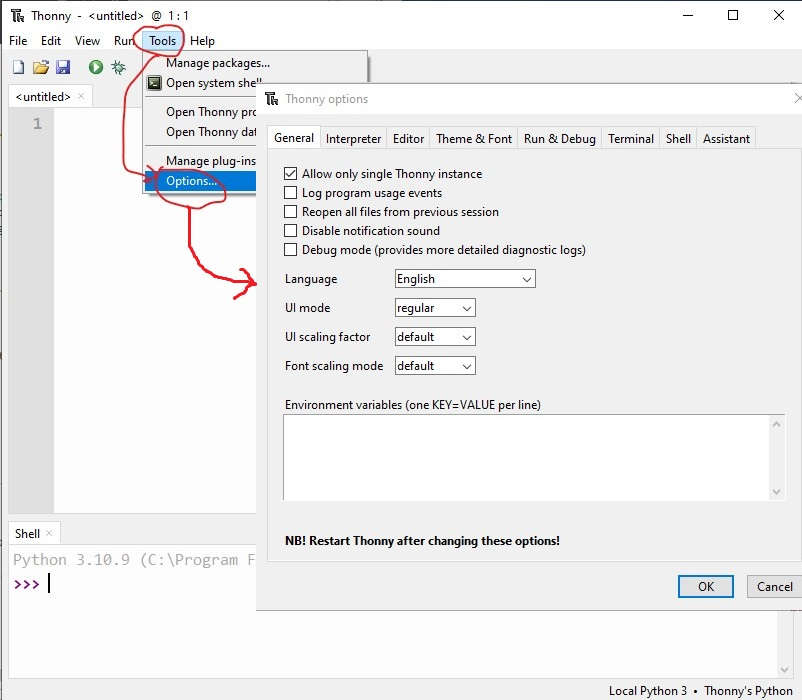
- Launch the Thonny, click on “Tools → Options” to open the settings. as shown below
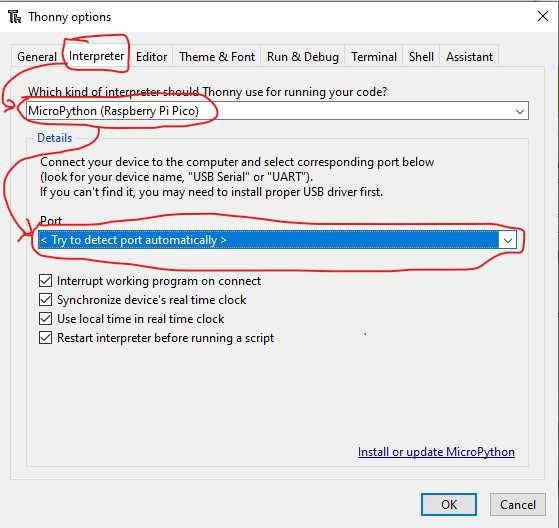
- Chose the Interpreter interface and select the device as MicroPython(Raspberry Pi Pico) and the port as Try to detect prot automatically.
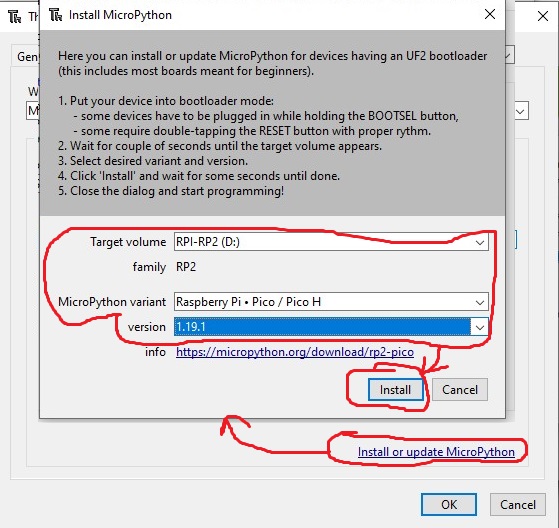
- Press and hold the BOOT button and connect the Seeed Studio XIAO RP2040 to your PC via the Type-C cable and click on Install or Update MicroPython a window will open and click on Install
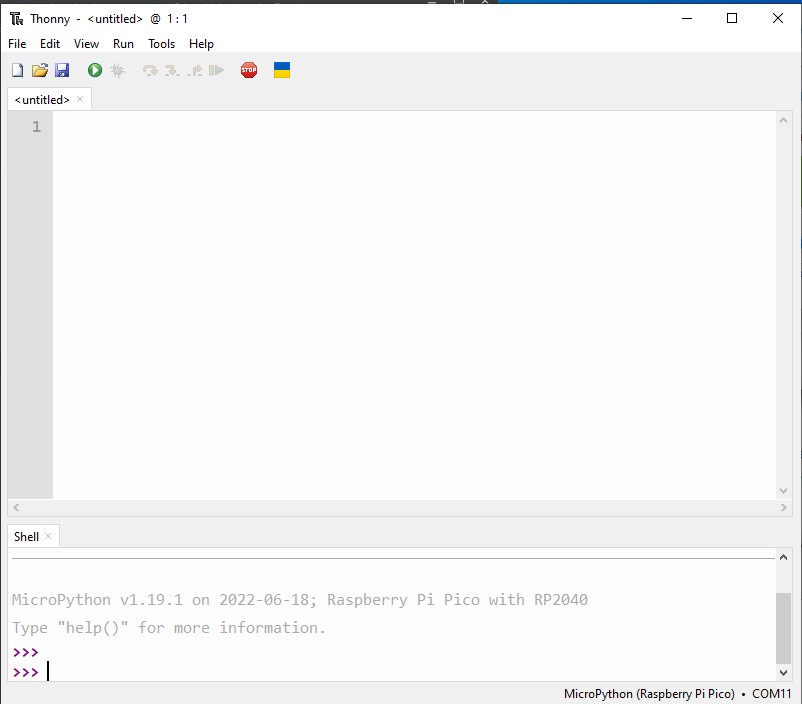
- Once the installation is finished, click on “Close”. If everything is OK, you should have the following window.
Program
- MicroPython code 1: “Turn on or off a led with a button”
| MicroPython_xiao_rp2040_program_1.py | |
|---|---|
You can copy the code or download it at the end of the page.
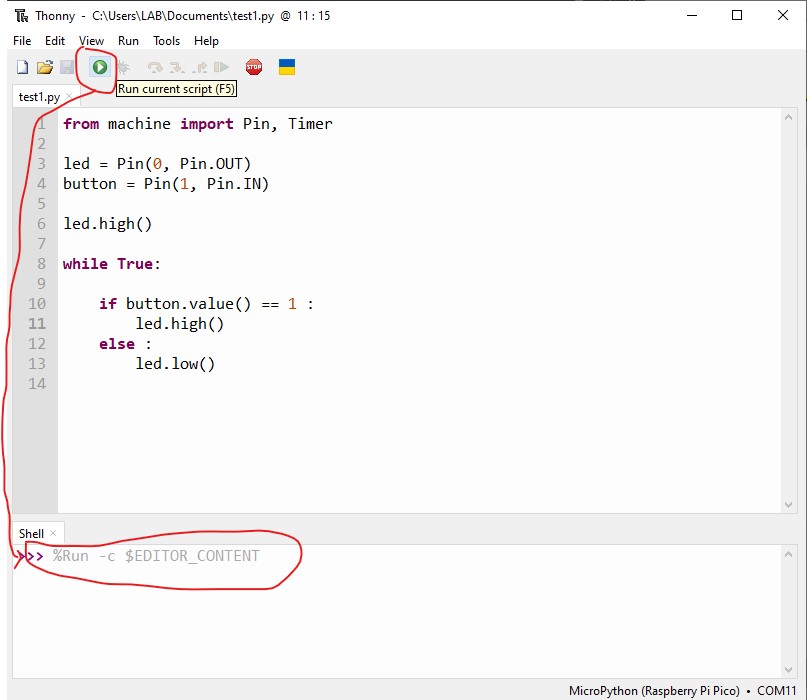
- Once you have copied the code into Thonny click on the run button as shown below.