13. Networking and communications
Group assignment:
- Send a message between two projects
To see our group assignment click here
Individual assignment:
- Design, build, and connect wired or wireless node(s) with network or bus addresses
For this week’s assignment, we have chosen to communicate the electronic board we developed in Week 8 (Electronics production) based on an ESP32 MCU with a board using the ESP8266 MCU. These two electronic boards will use WiFi as a means of communication with the MQTT protocol. This work is related to our final project.
To carry out our assignment this week we have broken it down into 4 steps: the manufacture of an electronic board for the ESP8266, the implementation of an MQTT server with a Raspberry pi 3, the programming of electronic boards and the test of message exchange.
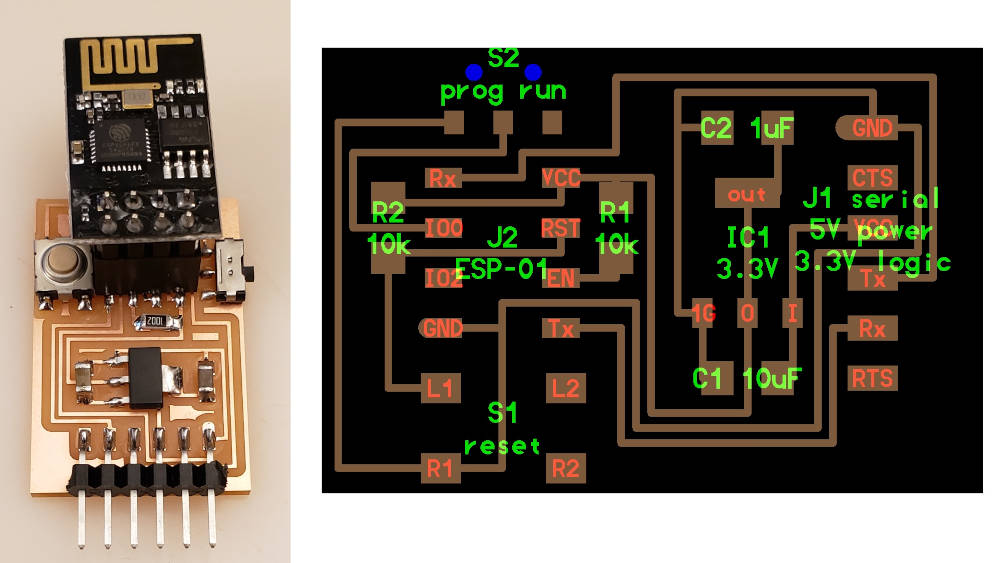
The manufacture of an electronic board for the ESP8266 (ESP-01)
To build the electronic board of the ESP8266 (ESP-01), we have been inspired by the hello.ESP-01 PCB on the fab academy website as shown below.
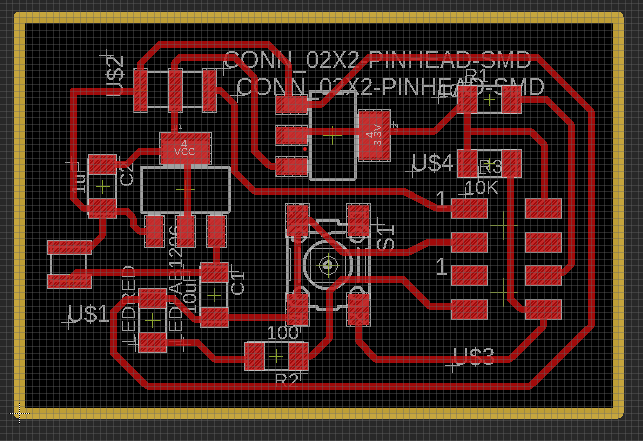
For the design of our PCB we used Eagle, here are the results below. for more details on the use of Eagle software refer to Week 6 (Electronics design).
After having generated the png files of the traces and the outline of our printed circuit as indicated below. we proceeded to the generation of the toolpaths with Mods CE and the machining with the Roland SRM-20. For more details on the process refer Week 8 (Electronics production).
for the download of the source files go to the bottom of the web page in the Files section.

Here are the results we obtained.
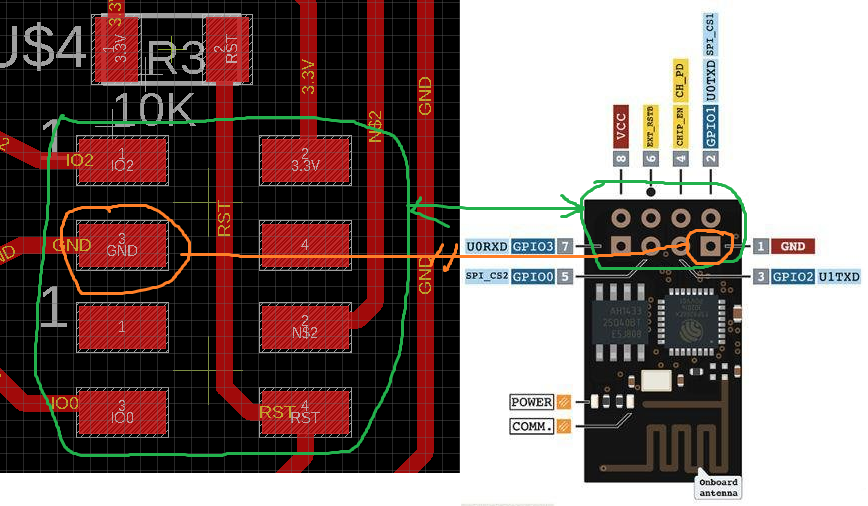
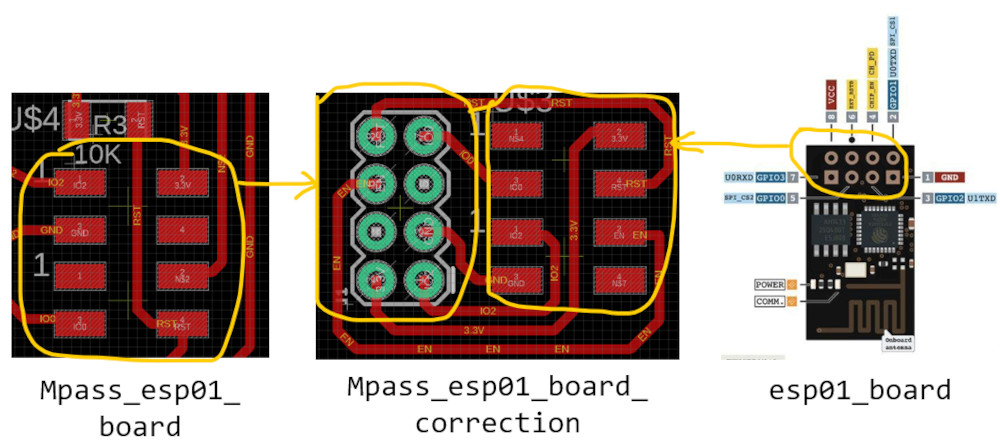
After having soldered the different electronic components we realized during the verification of the continuity of the electronic circuit that we had made a mistake in the design on the positioning of the pins of the ESP01 as shown below.
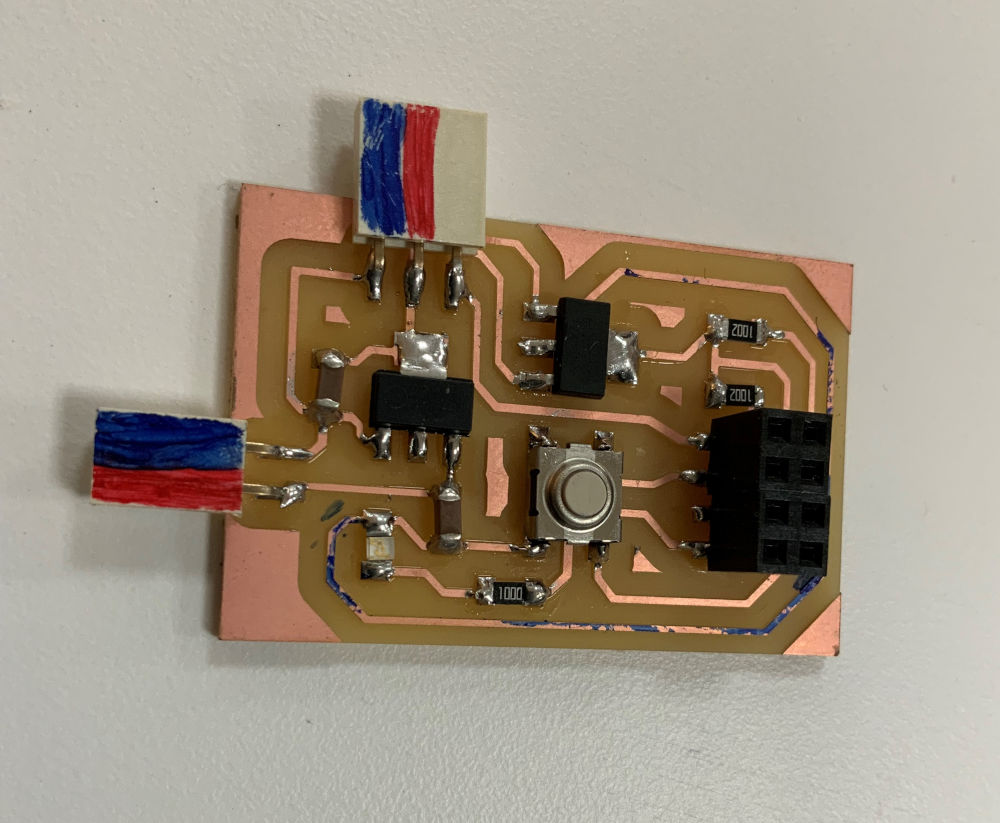
it was probably tiredness, I drank a big glass of water and I went to bed. the next day we designed another electronic board to reorganize the pin order as shown below.
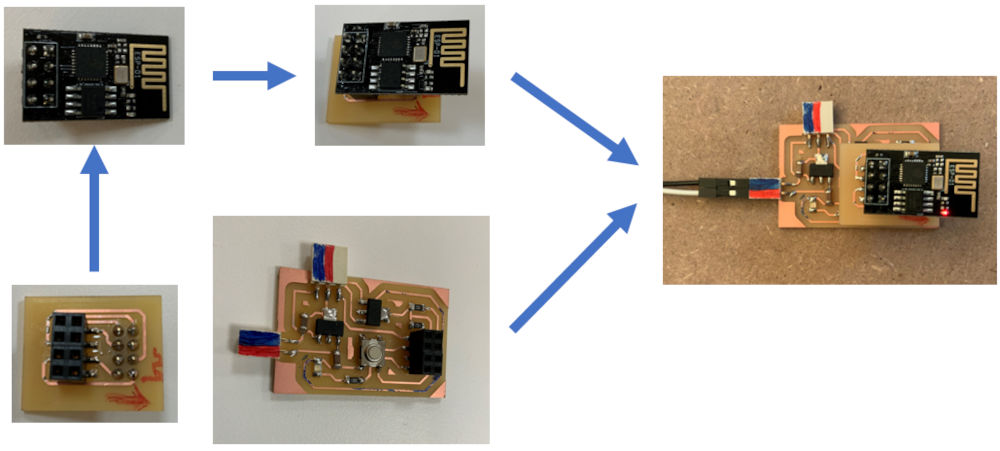
after making this new electronic board we proceeded to the test as shown below
The implementation of an MQTT server with a Raspberry pi 3
MQTT is an OASIS standard messaging protocol for the Internet of Things (IoT). It is designed as an extremely lightweight publish/subscribe messaging transport, ideal for connecting remote devices with a small code footprint and minimal network bandwidth. for more details click here
Before moving on to the implementation of the MQTT server, here is a graphic that summarizes the communication topology.
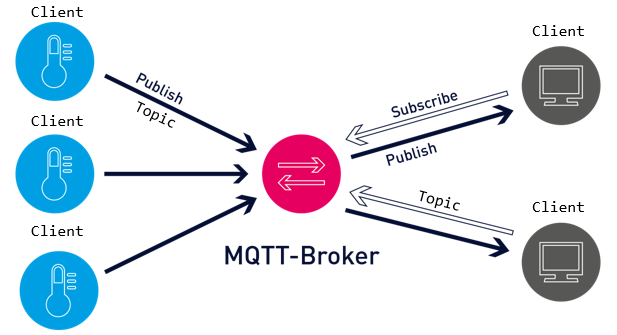
For the creation of a communication network based on the MQTT protocol we need 4 main elements:
- the MQTT server = mosquitto
- the MQTT clients = ESP01 && ESP32
- the means of communication = WiFi
- the Topic = cmd_mpass
For the MQTT server we chose the open source option mosquitto. The server will be hosted on a rapberry pi 3.
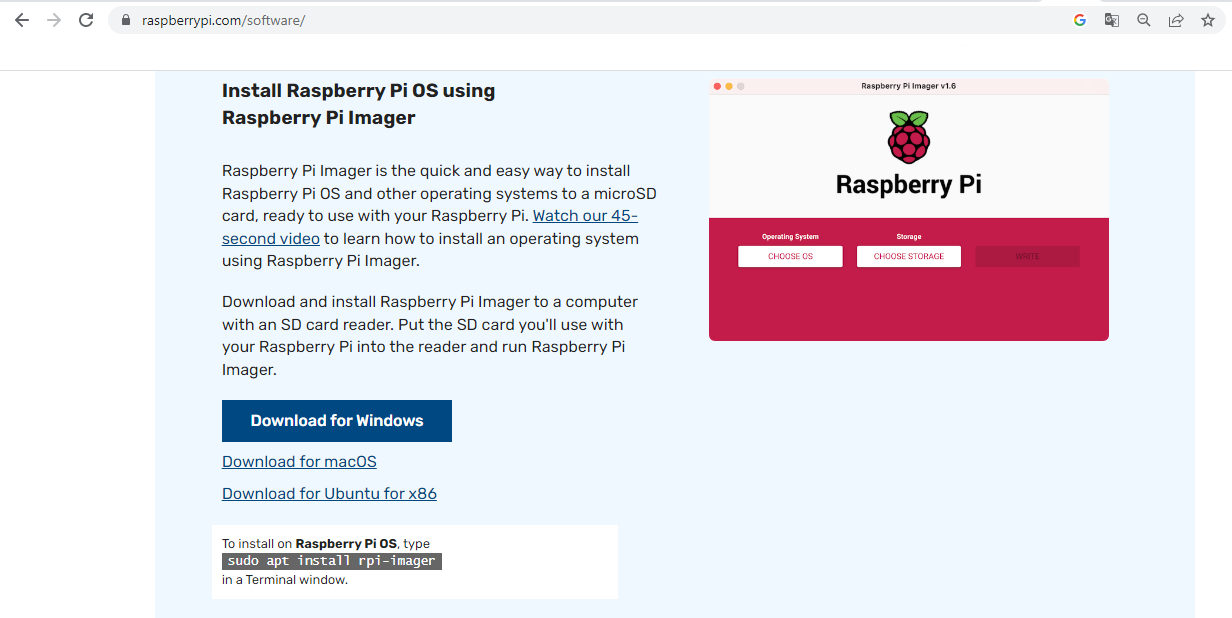
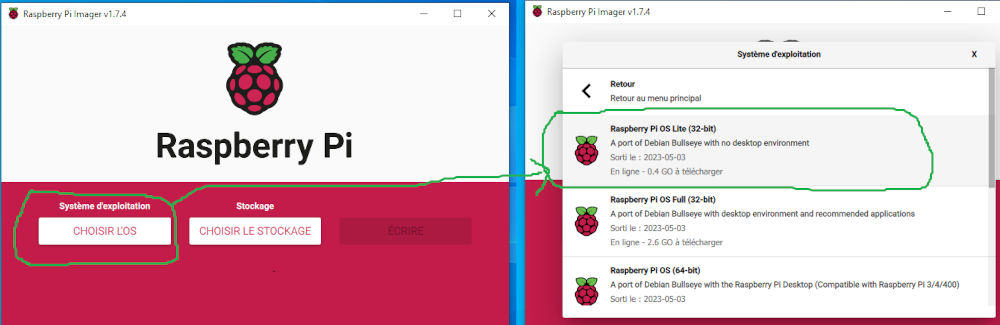
For the installation of the server we first proceeded to the installation of the operating system raspberry pi OS.
We downloaded and installed Raspberry Pi OS.
Then we inserted the SD card of the Raspberry Pi in our computer and proceeded to the installation of the operating system as shown below.
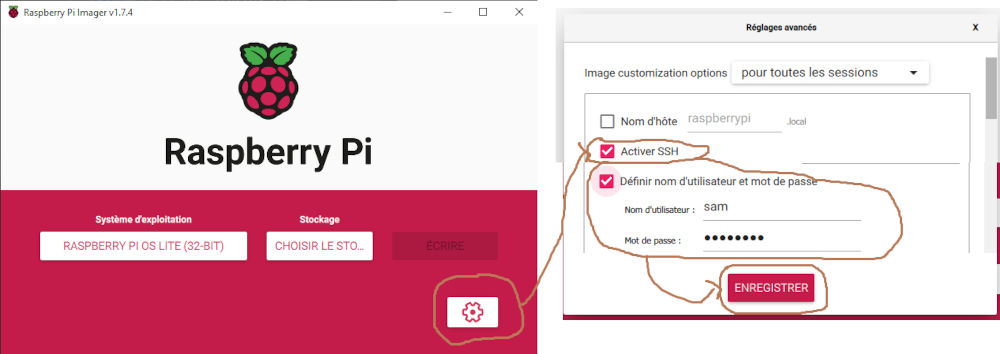
Sorry for the interface of the application in French my operating system is in French.😉
Since we used the lite version of raspebrry pi os, we need to communicate with the pi using the ssh protocol from where we configured the ssh connection settings as shown below.
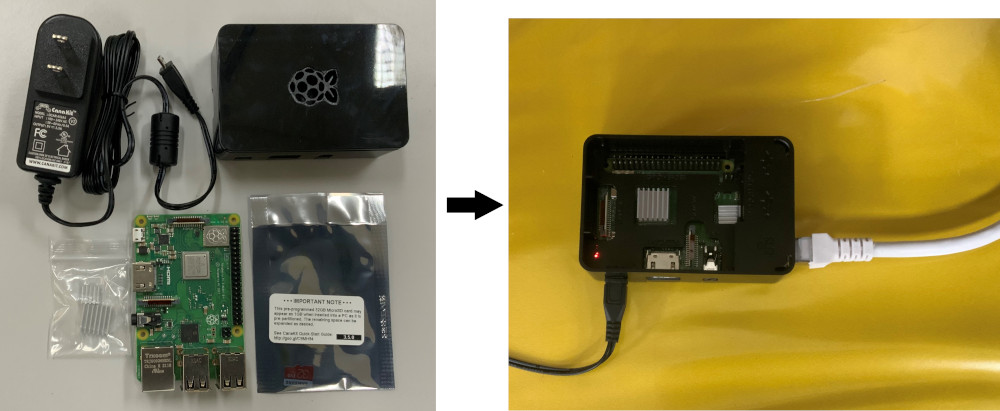
To finish the installation we inserted the SD card in the raspberry pi 3, we connected it to the network of our Fablab thanks to an Ethernet RJ45 cable and we powered it as indicated below.
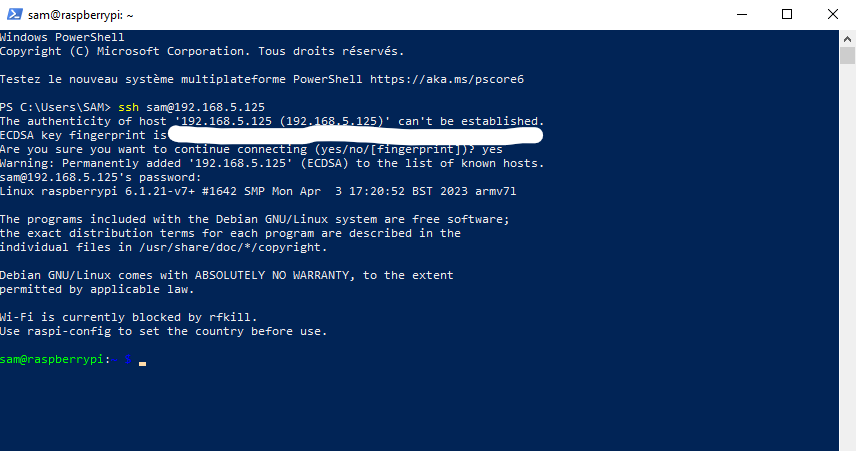
To connect to the raspberry pi with ssh we used windows powershell.
- connection to the Raspberry pi
- now that we are connected to the raspberry pi we will update the pi before any other command.
- Installation of mosquitto
- Run the following command, but replace “YOUR_USERNAME” with the username you want to use

- Run the following command to edit the configuration file
- Add the following line at the top of the file (make sure it is at the top of the file, otherwise it won’t work)
- Add the following three lines to allow connection for authenticated users and tell Mosquitto where the username/password file is located
- Your configuration file will look as follows :
-
Press CTRL-X, then Y, and finally press Enter to exit and save the changes.
-
Restart Mosquitto for the changes to take effect.
Now that we are done we will check if our server works as shown below
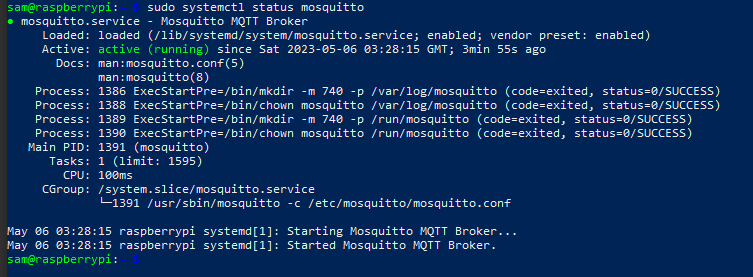
the commissioning of our mqtt server is finished we move to the programming of our MCU (mqtt clients).
MCU(Microcontroller) programming
For programming our MCU, we will use Arduino IDE with the PubSubClient library. The PubSubClient library provides a client to perform simple publishing and subscription operations with a server that supports MQTT.
For the operation, we will write two programs, one for the ESP01 and the other for the ESP32. The ESP32 will send messages to the ESP01 through a topic.
For the different codes, you have to modify the code with your own SSID, password and Raspberry Pi IP address.
Programs
- The first step in the program is to connect to the Wifi network and to the mqtt server with the lines below by specifying the ssid, the password of the Wifi network and the IP address of the Mqtt server.
- We need to specify the connection parameters to the Mqtt server in the reconnect() function as shown below.
- We need to subscribe to MQTT topics by specifying the topic name in the reconnect() function, as shown below.
- to read the messages published on the topic to which we have subscribed we use the callback() function as shown below.
Test
For the test it would be a question of visualizing the messages sent by the ESP32 and received by ESP01.