Week13-Networking and Communications
Group assignment:
- Send a message between two projects
- Document your work to the group work page and reflect on your individual page what you learned
Individual assignment:
- design, build and connect wired or wireless node(s) with network or bus addresses and a local interface
Checklist
- inked to the group assignment page
- Documented your project and what you have learned from implementing networking and/or communication protocols
- Explained the programming process(es) you used.
- Dutlined problems and how you fixed them.
- Included design fles or inked to where they are located ifyou are using a board you have designed and fabricated earier and original source code
- Included a ‘hero shot of your network and/or communications setup
Group assignment
For this assignment, my project was completed in collaboration with Ziyi Zhu’s final project.
Summary:
- dynamic-synth (Ziyi Zhu’s project name)
- Emotion transmitter (my final project name)
- Both of our final projects used ESP32.
I divided it into three parts:
- First, dynamic-synth links to the Emotion transmitter’s hotspot.
- If the link is successful, the Emotion transmitter will display “Connected.”
- I click on the Emotion transmitter’s screen, and the screen will display “Play,” causing the Emotion transmitter to emit a sound.
dynamic-synth links to the Emotion transmitter’s hotspot
Emotion transmitter
#include "xiao_display.h"
#include "WiFi.h"

xiao_display d;
NetworkServer server(80);
NetworkClient client;

void setup() {
  Serial.begin(115200);
  Serial.println();

  if (!xiao_display_init(&d)) {
    Serial.println("Failed to start display");
    while (1)
      ;
  }
  Serial.println("display started");

  if (!WiFi.softAP("esp_server")) {
    log_e("Soft AP creation failed.");
    while (1)
      ;
  }
  IPAddress myIP = WiFi.softAPIP();
  Serial.print("AP IP address: ");
  Serial.println(myIP);
dynamic-synth
#include "xiao_display.h"
#include "WiFi.h"

xiao_display d;
NetworkServer server(80);
NetworkClient client;

void setup() {
  Serial.begin(115200);
  Serial.println();

  if (!xiao_display_init(&d)) {
    Serial.println("Failed to start display");
    while (1)
      ;
  }
  Serial.println("display started");

  if (!WiFi.softAP("esp_server")) {
    log_e("Soft AP creation failed.");
    while (1)
      ;
  }
  IPAddress myIP = WiFi.softAPIP();
  Serial.print("AP IP address: ");
  Serial.println(myIP);
Check the serial monitor. If dynamic-synth sends the word “hello,” it means the connection was successful.
Success!I saw the “hello” sent by the other side!
Add the “Connection Successful” message to the screen.

 After linking, my project alternates sending either 0 or 440 every 3 seconds. The other board, upon receiving the corresponding number, emits a sound at the appropriate frequency.
Emotion transmitter
    static unsigned long last_time = 0;
    if (millis() > last_time + 3000) {
      client.print(play ? "0\n" : "440\n");
      play = !play;
      last_time = millis();
dynamic-synth
  if (client) {
    if (client.available()) {
      String msg = client.readStringUntil('\n');
      my_mixer.frequency = msg.toFloat();
      Serial.println(msg);
    }
Test it
Success! (The sound might be hard to hear in the video, as the buzzer is quite quiet. You can check the original file I provided at the bottom of the page for more details.)
What did I learn?
In this project, I learned how to implement wireless communication between devices using the ESP32. My project, “Emotion transmitter,” works in tandem with Ziyi Zhu’s “dynamic-synth,” transmitting data successfully via Wi-Fi. Once the connection is established, “Emotion transmitter” displays “Connected” and alternates between different sound frequencies every 3 seconds based on the received signal. This process helped me understand how to use the ESP32 in soft AP mode, serial communication, and audio signal transmission, while also learning how to dynamically display the connection status on a screen.
Individual assignment
Because my final project involves two devices communicating with each other, this week I will use two ESP32s to send and receive messages within the same local network.
I divided this week’s task into two parts. First, I will establish the WiFi connection for the ESP32s. Then, I will proceed with setting up communication between them.
server part
I wrote the program and successfully connected to the WiFi.
#include <WiFi.h>
const char* ssid = "P30P";     //wifi id
const char* password = "siyuanff11";  //wifi key

void setup() {
  Serial.begin(9600);
  WiFi.begin(ssid, password);
}

void loop() {
}
Oh, I found the IP address of my ESP32.
To make it easier for me to view the IP address, I made the following improvements.
#include <WiFi.h>
const char* ssid = "P30P";            //wifi id
const char* password = "siyuanff11";  //wifi key

void setup() {
  Serial.begin(9600);
  WiFi.begin(ssid, password);
  delay(5000);
  Serial.println(WiFi.localIP());
}

void loop() {
}
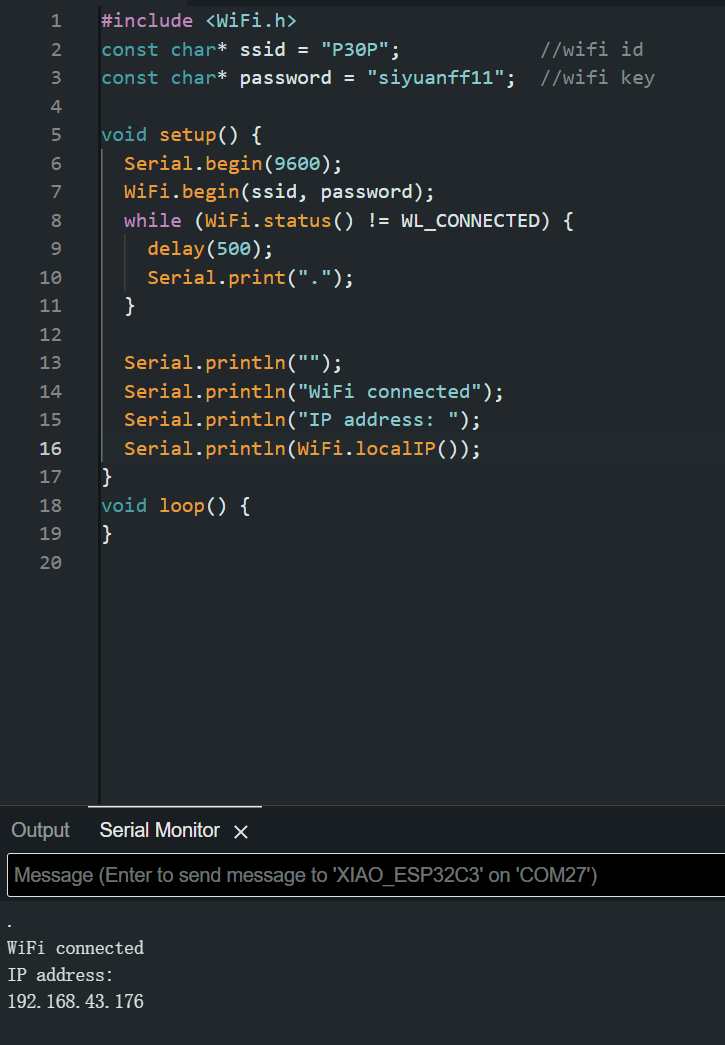
I added the display of WiFi status and IP address, but unfortunately, the serial monitor didn’t show any messages. I checked the example code provided by Arduino and found that I could add the following code.
    while (WiFi.status() != WL_CONNECTED) {
        delay(500);
        Serial.print(".");
    }

    Serial.println("");
    Serial.println("WiFi connected");
    Serial.println("IP address: ");
    Serial.println(WiFi.localIP());
I successfully modified my code and achieved the desired outcome.
sorce file:
server
client
synth
Emotion_transmitter


