9. Output Devices
Group Assignment
Our group assignment for this week can be found here
FreeRouting
Last week, doing my tracks in KiCad was a difficult task for me. Neil talked about a software called FreeRouting that automatically routes your board for you. I decided I wanted to try it for my output design this week. I started by following the tutorial on their website that shows you how to install and use FreeRouting.
The first thing I did was install the LayerEditor package which included FreeRouting. The download can be found on their website.
I then found the file and went into the .bin folder where the FreeRouting.jar file can be found. This file requires Java to run. So if you do not have java, you need to download it.
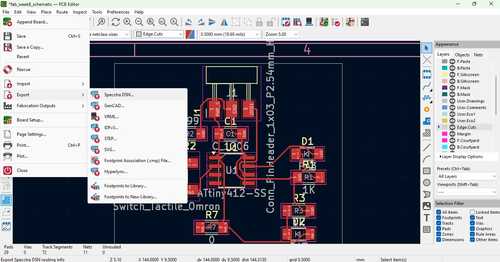
Once this was finished, you need to go into your PCB editor and export the Spectra DSN file into wherever you wish to export it.
Then you need to import this file into the FreeRouting software by opening the FreeRouting.jar file and selecting the DSN file you just exported. This will open the software.
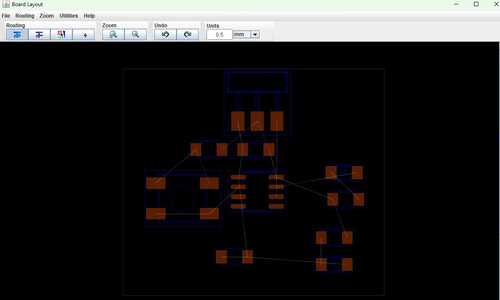
Then you need to go under the Routing tab and select Autorouting. This will autoroute your board.


You then need to export this as a Spectra Session File.
Go back into KiCad and then import the .ses file by going into File --> Import --> Spectra Session... and then select the .ses file. This will automatically route the board on KiCad

KiCad Schematics
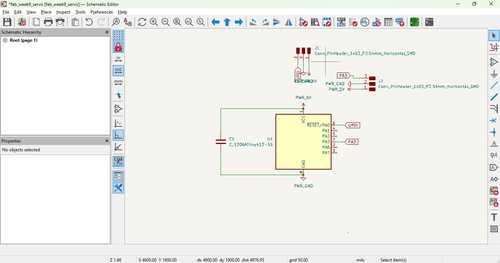
I wanted my board to be able to control an servo motor. This meant I needed a new PCB board that could control these components. I already understood how to program an attiny412 so I decided on that to be my microcontroller. I looked up the servo motor I had and saw that it required at least 4.8 volts for operating, a ground, and an IO pin. I also needed the UPDI, 5V, and ground pins connected to the attiny412. I also wanted a power-ground 970 uf capacitor to smooth the signal.
I went into KiCad and started to design a schematic that had all of these restrictions.
I then went into my board editor and added the tracks using the FreeRouting software utilizing the same process as above. Some of the tracks had to be tweaked a little because they overlapped with the footprints. I then added a rectangular edge cut and this is what the file looked like when that was finished.

I then exported this as a gerber file to mill
Board Production
I used the Othermill to mill out my board. The file milled without any problems. I then soldered a 970 uf capacitor, two 1x03 2.54mm Conn Headers, and an Attiny412.

Programming
I used by Quenntorres to program my ATtiny412 to run the servo motor so that it rotating 180 degrees one way and then 180 degrees the other way. I used Richard Shan’s code this week that he wrote for a servo motor. His code includes good notes so once I looked over the code before hand, I understand the basics of coding a servo motor. I changed the code a little bit so that it would turn a little faster by changing the amount of steps it took for each servo.write() command. This was my code for this week.
#include <Servo.h>

Servo servo;

void setup() {
  servo.attach(1);  // attaches the servo on pin 1 to the servo object
}

void loop() {
  for (int pos = 0; pos <= 180; pos += 2) {
    // goes from 0 degrees to 180 degrees in steps of 1 degree
    servo.write(pos);              // tell servo to go to position in variable 'pos'
    delay(15);                       // waits 15ms for the servo to reach the position
  }
  for (int pos = 180; pos >= 0; pos -= 2) {
    // goes from 180 degrees to 0 degrees
    servo.write(pos);              // tell servo to go to position in variable 'pos'
    delay(15);                       // waits 15ms for the servo to reach the position
  }
}
Group Project
Our group project can be found here
Downloads
Download the board I made for this week here
Reflection
This week showed me how to create a board for a specific output that I wanted. I was planning originally to use a DC motor but upon research, I wasn’t sure if I was able to apply an H-brdige to my board so that i could turn it both ways. But coding a type of motor is still a step towards my final project.