1. Principles and practices
This week I worked on defining my final project idea and started to getting used to the documentation process.
SSH Key Setup
To start, I paired my SSH key that I generated from my laptop to my GitHub account to secure a connection between my computer and GitLab. I used a public key because my private SSH key is confidential and should not be shared due to privacy reasons. For directions to find my public key and pair it to my GitHub account, I went to the GitLab docs (docs.gitlab.com) then typed ‘pairing SSH key to account’ and it sent me to this GitLab Docs page. I then generated the key from the command prompt on windows by using these directions on the docs.

I then went to the directory that I saved the key into on Step 3 and opened it using my notepad to obtain the key.
After I had obtained the key, I went into my user settings and then selected SSH keys on the left menu, added a key and was given this menu
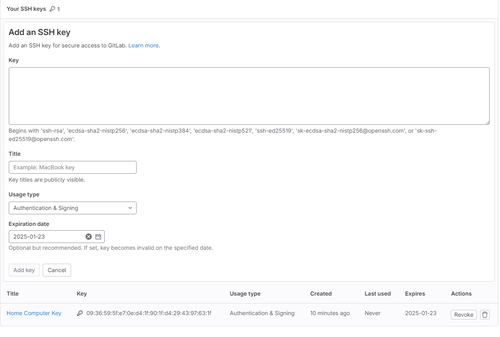
I pasted my key into the ‘Key’ section, titled it ‘Evan’s Laptop’’, selected ‘Authentication and Signing’ for my ‘Usage type’ then selected ‘Add key.’ Once that was finished I had added my SSH key for my home computer and now had a secure connection between my computer and GitLab.
Setting Up MkDocs
I now started to work on creating a template for my site. To start I downloaded MkDocs. But to do this, I needed Python and Pip to be downloaded onto my computer. I followed the instructions on the MkDocs page called MkDocs Installation. I downloaded Python making sure that I selected that I installed it to PATH and added it to environmental variables in the configurations of the installer. I then went into my PowerShell and out in the command python.exe -m pip install – upgrade pip and it stalled the new version of pip onto my computer. I then put in the command pip install mkdocs and it installed mkdocs.
Cloning my Repo and the Student Template Repo
Now that MkDocs is downloaded, I cloned my repo into a local repository.
I first went to my GitLab repo, then copied the https in the clone tab.

I then used the command prompt, specified where I wanted the folder using the cd <repository> and typed in
git clone <your-https-repository>
I then cloned the https from the student template using the same process as my GitLab repo into the same folder.
Running MkDocs Locally
Now that I had installed everything I needed to install, I went to install a template for my site that I will be using for the near future. There were many problems when trying to install and view my site using the mkdocs serve command which allows me to host my site locally. The first problem comes from organization from my folders. Before, I would save all my things to my downloads folder which made them hard to find and confusing when using commands. David Vaughn recommended that I create a new folder called “fab” and clone my repository from GitLab into that folder as i did above. This helped a lot with organization of my files. The second error that I was having was the error, “Config file ‘mkdocs.yml’ does not exist. I fixed this by specifying where I was looking in my files by using the cd <reposiroy> command to make it look inside my evan-park repository. Although when I tried running the “mkdocs serve” command again, I got a new error.

I fixed the first issue by editing the mkdocs.yml file in my source-code editor of choice, Visual Studio Code , then changing the theme name to “readthedocs’’ as instructed in the error. Finding a fix for the second issue took me to a page on GitHub called mkdocs-git-revision-date-localized-plugin by timvink on GitHub. This gave me the command I needed to install the plugin “git-revision-date-localized-plugin” by running the command pip3 install mkdocs-git-revision-date-localized-plugin. Now that I had installed everything, it allowed me to run the mkdocs serve command which allowed me to host my site locally.

Editing My Site Using Markdown
Now that I can run my Mkdocs locally, I can now observe the edits I create in my site. First, I used the markdown cheatsheet to understand basic markdown syntax. The second thing I needed to do was resizing my images so that they don’t take up a lot of space in my GitLab repo. To do this, I used Adam Stone’s image resizer which I found the download and how to use on his documentation. Although, there was a problem trying to run the image resizer. when I tried running the command from the folder, it crashed the command prompt. With help from Adam Stone and Collin Kanofsky, I leanred that I needed to change the version in the requirements.txt file to 10.2.0

This allowed me to resize my images so that they wouldn’t take up that much space in my GitLab repo.
Pushing Files into GitLab
Now that I have set up my files into a local repository, I wanted to try and push these files onto GitLab. First I ran the command git config user.email “<insert email>” then ran the command git config user.name “<insert name>”. Then I found these instructions created by Cameron McKenzie. These instructions gave me the step-by-step instructions to push my local repository into GitLab.
Before doing anything, make sure you are in your local repository you want to commit to GitLab in your command line by using the cd <repository> command.
git init
git add .
git commit -m "Push existing project into GitLab"
The text in the “Push existing project to GitLab” can be any name that describes your commit
git remote add source https://gitlab.com/cameronmcnz/example-website.git
Instead of the https provided, use the https clone link you get from clicking code on the top right of your repository in GitLab.
git push -u -f source master
The last part
masterhas to be changed to the branch you wish to save your repository in. For me, I pushed it straight to mymainbranch so I put ‘main’ instead ofmaster.
When doing all of this for the first time, the command prompt will tell you that you are missing an OAuth Authenitcation and a pop up shows up.

To obtain OAuth Authentication, I havd to create an acesss token by going to ‘Edit Profile’ on GitLab and selecting ‘Access Tokens’ on the left. I was met with this page.
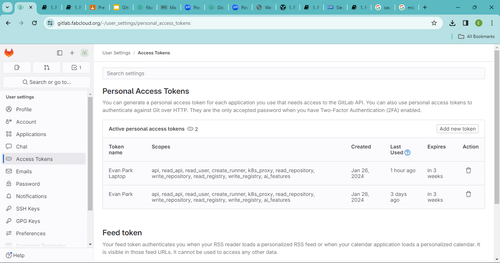
I selected add new token and allow all permission on the token. Then copied the token once it’s created an when prompted with missing OAuth Authentication, I inputted my email and recently copied Access Token. This will allowed me to push my local repo to my GitLab repo.
Now I had my local reposity in my GitLab repository.
Final Project Drafting
After thinking over my final project, I figured out that I wanted to do a project based around plants. I first decided on a flower pot that maintained the flower by itself. I then learned (after little research), that this idea was not ultimately new.
I decided to modify my original idea and make it so that the flower pot seemed like an ordinary flower pot, but secretly hid all components that would make it look like it was enhanced. It solves the problem of being too lazy to take care of a plant while making sure nobody knows your too lazy to take care of a plant.
Research
When looking through last years Final Projects for my school, I found the Modular Gardening System a project by Nicholas Niles which had the same core idea of a self-maintaining flower pot but taken in a different direction. His focused on a more pratical approach with designs intended to maintain plants that had pratical uses, while mine focused on maintaining a small number decorative plants while hiding the electronics for aesthetic reasons. I used information from his project to create my inital draft.
First I wanted to find a plant that I would use to test my flower pot. I wanted the to find a plant that could be grown inside and didn’t need much soil depth to grow. I found this site about the best flowers to grow inside by Arricca Sansone which showed me to the Begonia flower. The Begonia flower didn’t need much soil depth, and upon further research I found this site which told me that the Begonia flower was a shade flower, a type of flower that pefered areas which shade which was perfect for my room due to my rooms not gaining that much sunlight in general. This site also gave me other general information about the plant that would come in handy later.
Drawing
With the help drafting from looking at the documentation for the Modular Gardening System, and the knowledge I gained from researching the Begonia plant, I felt ready to draw my first ever sketch of my Final Project.
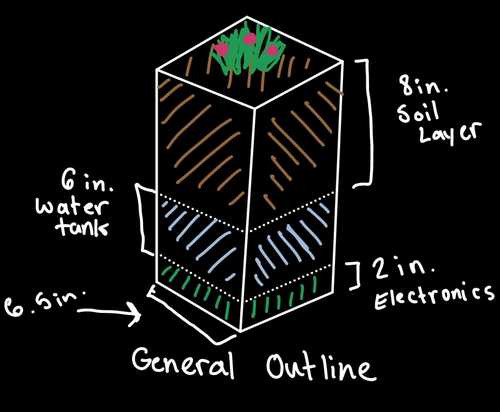
One thing not included in the drawing is that I want the Water Tank to open up so that you can easily access the water to fill it up and that I want the electronics compartment to be able to be popped off so that it is easy to access the electronics. Though, right now I am unsure how I would design it to accomplish these tasks and will come up with solutions later into the Final Project.
Project Management
Now that I know what my project would be and what I needed for it, I can start making a plan for myself so that I can complete parts of my project as I go through the week.
- Week 2, CAD: General Outline
- Week 4, Microcontrollers: Controlling Water Output
- Week 5, 3D Printing: Cable Mounts
- Week 9, Outputs: Water Pipes
- Week 12, Inputs: Soil Moisture and Water Temperature
- Week 15, Interface and Apllication Programming: User Interface with Unity
Reflection
This week was a lot of trial and error. Most the week I was trying different things to solve the problems that I was experiencing (mainly with GitLab). This week I learned the inner workings of GitLab and how to operate it and how to edit markdown files using Visual Studio Code. Now with this knowledge, I believe I can do the things that took me days of work before this week in only a few hours.