6. Embedded Programming
This week, I was tasked to program a microcontroller devolpment board that we made.
Devolopment Board
We are supposed to create one this week but the board that I made on week 4 also works as a development board. If you are wondering how my devolpment board was made and how it works, go to my week 4 documentation.
This a video of my board blinking on a click of a button.
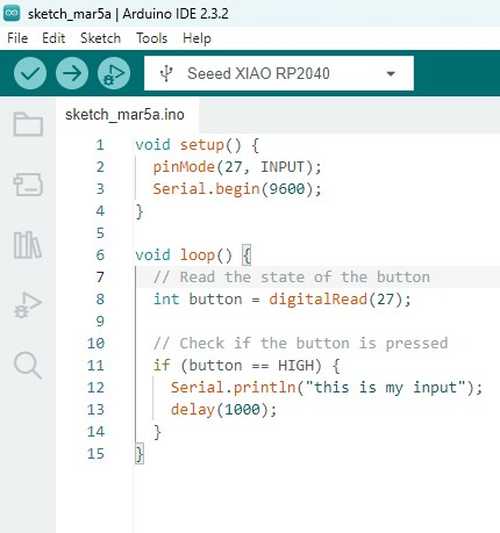
Communicating With My Board
Now I wanted to communicate with my board. I decided that since by board already had a button on it, I wanted to make it so I could get a message sent to my computer using Arduino’s Serial Monitor. To open the serial monitor in Arduino, I went under Tools –> Serial Monitor and it opened it up by clicking on it. I then set the board that the Serial Monitor to communicate with to my Seeed XIAO RP2040. The code that I used was simple. I combined code that I had used previously to read from a Water Turbidity seneor which was the Serial.begin and Serial.println part to send the output to the Serial Monitor and the code that checked for the button is pull from the code that I used to blink my LEDs on the press of a button on my week 4 documentation.
This is the code in action
Group Project
Me and Colin Kanofsky’s group project where we worked on milling the board and soldering the components onto it can be found here.
Arduino Programming
I wanted to test if I could get by board programmed using an Arduino. I did this so that I can make sure if I had any errors that I can narrow it down to my devolopment board or my ATtiny412 board. For programming using Arduino, we used jtagupdi made by El Tangas on GitHub to program a Attiny412 using an Arduino.
To start, go into File –> Examples –> jtagupdi.

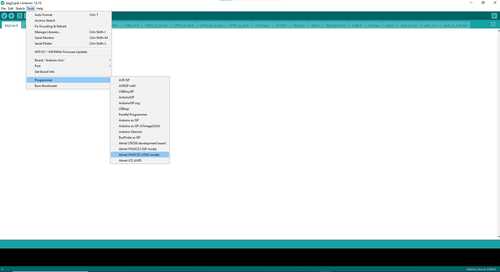
Then go into Tools –> Programmer –> Atmel JTAGICE3 (JTAG mode)
Now you can program using the Arduino. For my test, I just decided to use the blink example that you find in File –> Examples –> 01.Basics –> Blink.
When trying to upload to my Arduino, the code didn’t work initally, my instructor Mr.Dubik gave me a pre-soldered board that worked with a breadboard so I can test to make sure that I had everything correct. I realized that I had my pinout wrong for the Attiny412.
I was using the port pin as the pin I was using for my program when I should’ve been using the Analog|Digital pin instead. Once I switched the pin to the correct one for the LED (pin 0) in Arduino IDE and uploaded it, my code worked.
Programming Attiny412
Now that our board was soldered and I knew the attiny412 board was working, it was time to make the development board a programmer. For setting up the programming for my board, I followed the Quentorres Documentation that our devolopment board schematics were taken from.
Setup
The first thing that we need to do is setup our board to install the firmware on our computer. I found the firmware on the Quentorres documentation. Once you have it installed, plug your board onto your computer. Hold boot and then click reset and the flash memory should be exposed as a hard drive. Put the uf2 file into that hard drive then your board is ready as a programmer.
I then needed the board URL for megaTinycore made by which allows you to program attiny412. I found the megaTinycore on Spence Konde GitHub for megaTinycore I then went to Board Manager, typed megaTinycore into it and installed it

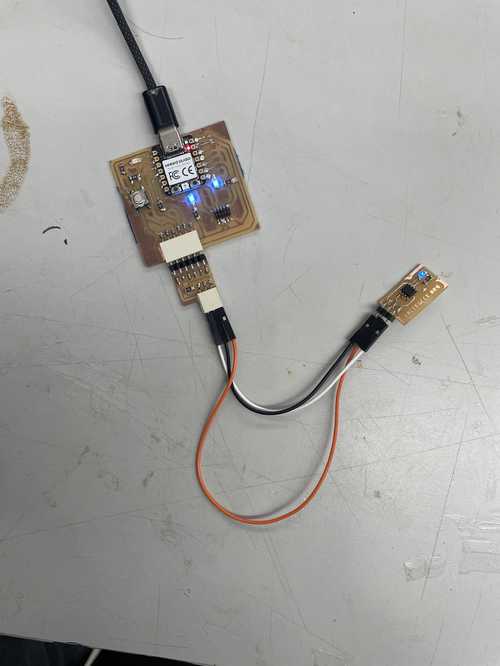
I was given an adapter that Kabir Nawaz created using the files given in the serial UPDi-3 pin in this weeks assignment. This was used because it was made for this board and its more sturdy.
I used these schematics that are also found on this weeks assignment to make sure I plug in my attiny412 board correctly into it.

This is the adapter connected into the development board and attiny412 board.
I then plugged in my board into my computer, selected the correct COM port and selected the attiny412 board in the board selection under tools.
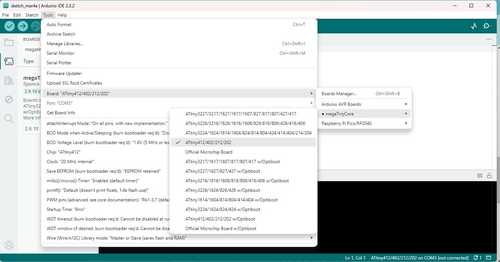
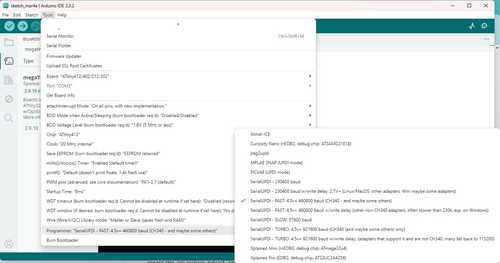
Then I selected this programmer with the checkmark to the left of it.
I then used the blink example again and edited the code so that the LED was on pin 0 and it blinked every .1 second.

I then uploaded the code, but I got an error.

Colin Kanofsky gave me a tip that if I had this error that I can easily fix it by going under Sketch –> Upload Using Programmer. This fixed the error and my code uploaded to my attiny412 board.
Sam D
Now I attempted to program the Sam D. I used the same RP2040 devoloper board as I used to program my attiny412. To program it, I used the Quenntorres Documentation again. The specific part of the documentation I used was from the “How to use as a programmer.” I also used some of my classmates Landon Broadwell’s documentation as cross reference if I ran into any problems because they went through programming the Sam D before I did.
Group Project
The work for milling and setting up our board can be found here
Setup
The first thing I did was expose the flash drive by plugging it into my computer and pressing the boot and reset button simultaneously. I then dropped the uf2 file I got off of the Quenntorres Documentation. The Sam D board that me and my partner made was already (EDG) flashed, meaning that it was already set up to be programmed. Good documentation for getting the (EDG) flashed can be found on Richard Shan’s documentation.
I then went into Arduino IDE and added this link to my Board Manager URLs that I also got off the Quenntorres Documentation.
https://raw.githubusercontent.com/qbolsee/ArduinoCore-fab-sam/master/json/package_Fab_SAM_index.json
I then went into my board’s manager and installed FAB SAM and looked up a pinout for the SAM D so that I knew what pin the LED was running off of.

I then used this pin in a simple blink code. This is what I had for my settings for my blink code

Then ran the blink code and this was the result
Relfection
This week I learned a deeper understanding of development boards, how to code a programmer in Arduino IDE, understanding pinouts, and coding in Arduino IDE. This week could not have been completed without help of my peers. Things like Kabir Nawaz’s adapter and working with my group partner made this week much easier for me while still allowing me to understand the things I need.