14. Interface & Application Programming
This week I started to work on interface and application programming that includes creating an application that interfaces with a user with an input &/or output device that I have made. As for the group assignement, we are suppose to compare as many tool options as possible.
You can access the group assignment HERE.
Application with BLYNK
Today I start to work ony my application programming using the same PCB that I have created. As I have no prior knowledge on any application software, I thought it will be good that I start with something simple and manageble otherwise it will be tough to complete the assignment. I initially wanted to play with MIT Inventor App for my application programming assignment however, it does not work for Apple IOS! Therefore, I have to rely on BLYNK IOT App to help me do the job. Why I have chosen Blynk is because Blynk is a platform that allows you to build mobile applications for the Internet of Things (IoT) using a drag-and-drop interface easily. With Blynk, you can simply create apps to control and monitor devices such as Arduino boards, Raspberry Pi, ESP8266, ESP32, and other microcontrollers. Blynk also provides a library of pre-built widgets, such as buttons, sliders, graphs, and gauges, that you can add to your app and customize to suit your needs.
Then the next question would be how do we use Blynk? If you read the explanatory document of Blynk, it is actually quite straight forward if you were to follow the steps as stated in the document. To use Blynk, you will first need to create an account, download the Blynk App to your mobile device, and then create a project. Each project consists of a mobile app and a hardware component. Blynk provides a range of libraries and APIs that allow you to connect your hardware to the Blynk Cloud and create a two-way communication channel between your app and your device. You can then use the Widgets in your app to control your device, receive sensor data, and send alerts or notifications. Blynk also allows you to share your project with others, so that you can collaborate and build IoT solutions together. Last but not least, Blynk is Apple FRIENDLY so no worries that it will not work for iphone users.
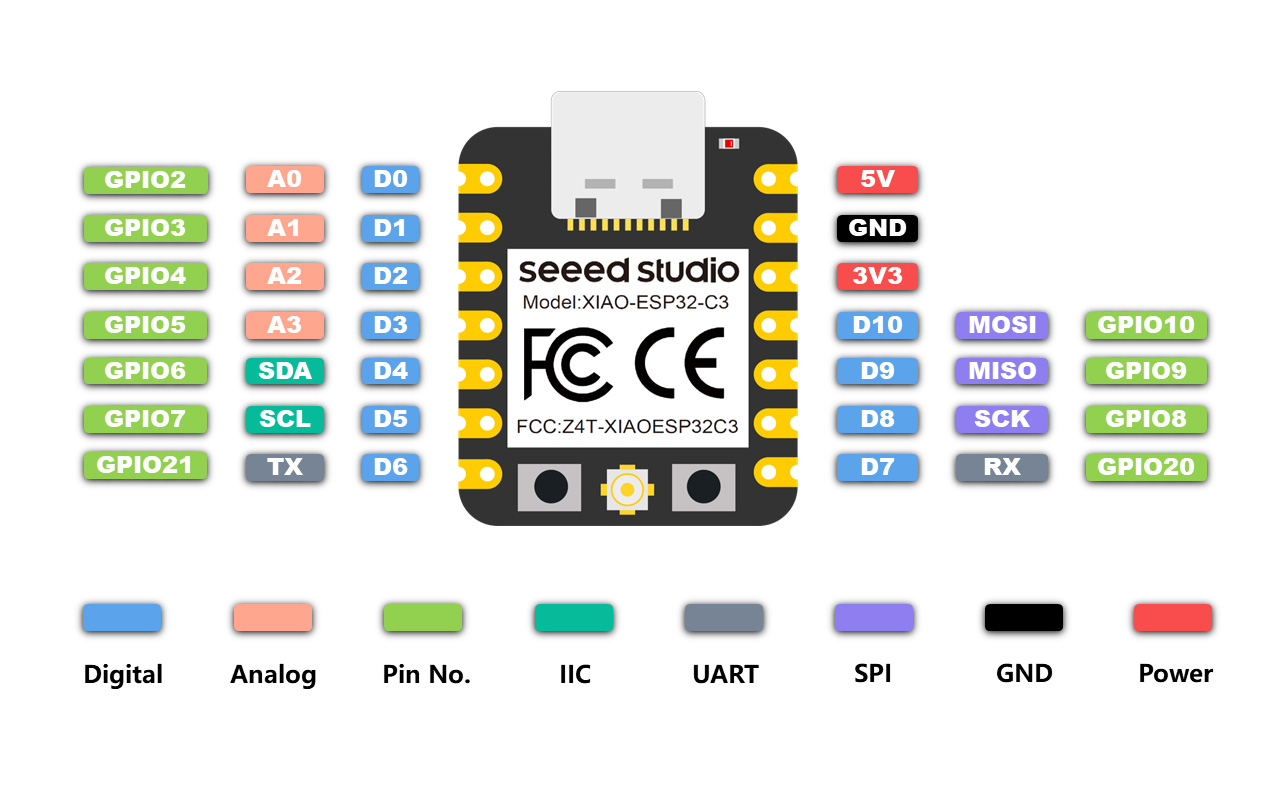
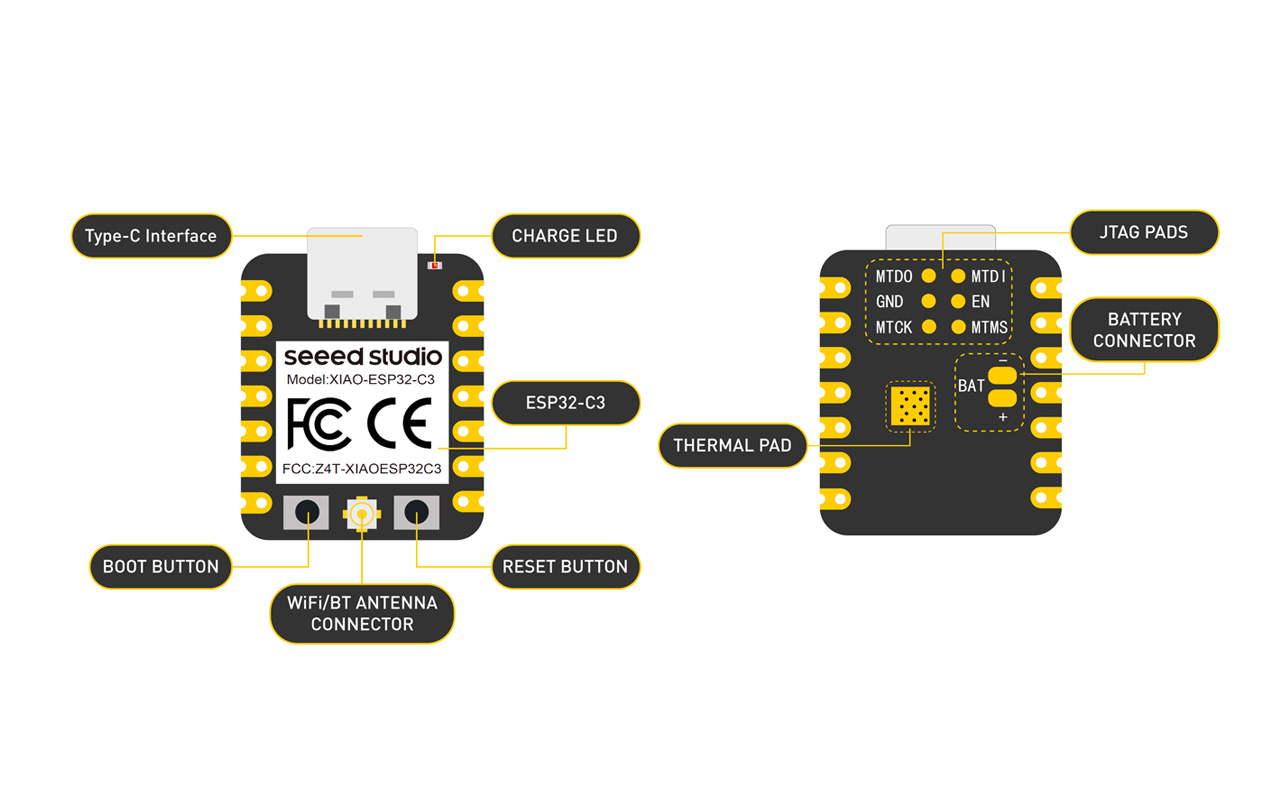
Then the next step is to choose the correct micro-controller. I cannot use back the Xiao RP2040 micro-controller as it does not have WiFi capability. So in this case, I need to swap my micro-controller to a Xiao ESP32C3 instead as this micro-controller comes with WiFi/Bluetooth dual-mode chip that allows me to communicate with my device remotely. Below are the hardware overview images of Xiao ESP32C3:
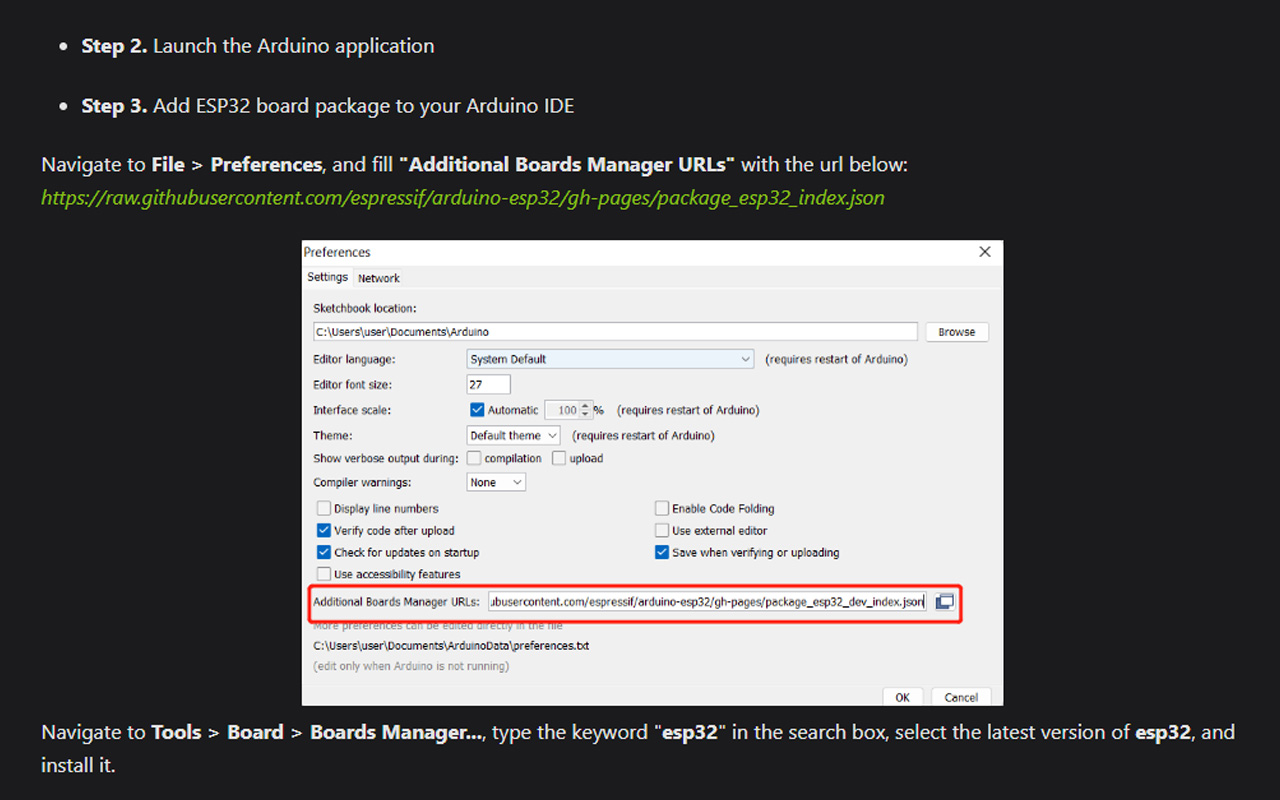
First thing we need to do is to do a software setup and download the additional board manager json file to our Arduino IDE program as shown in the image below:
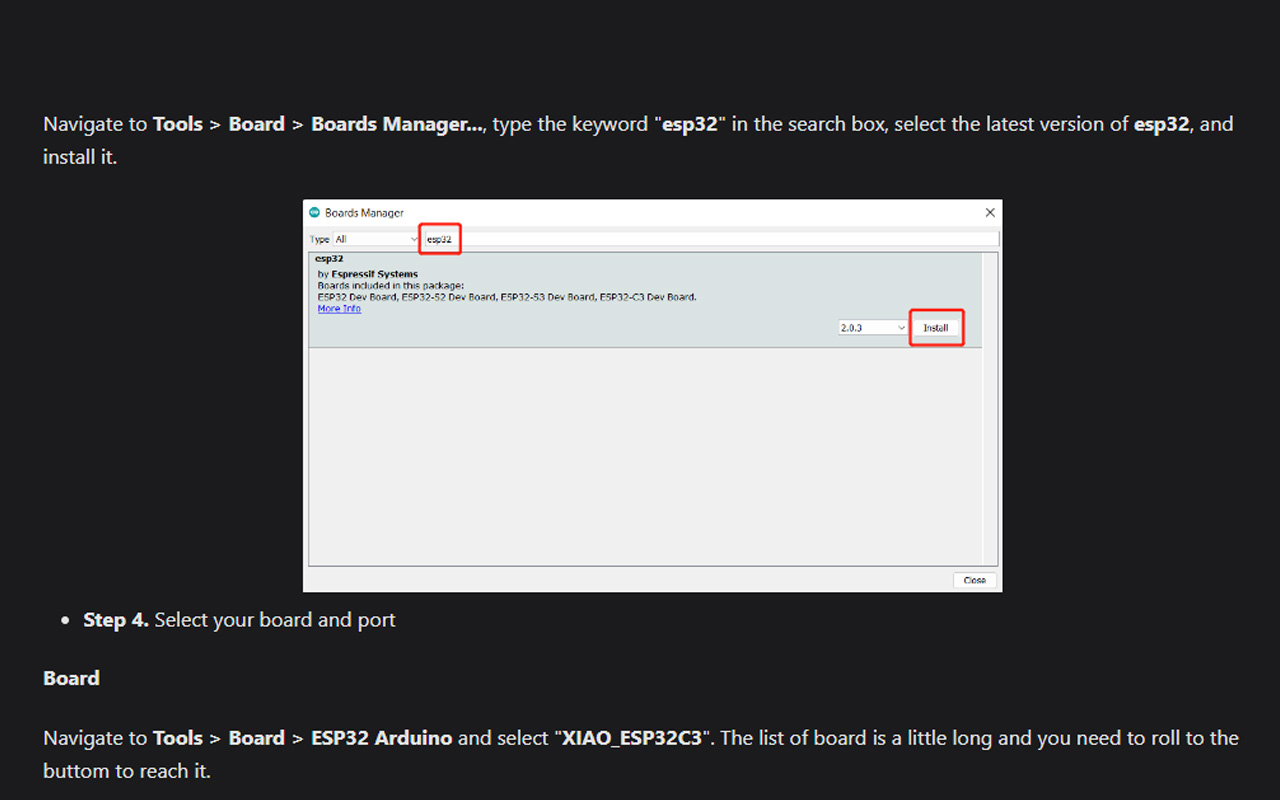
After the software setup, we will then need to install the ESP32 Board, otherwise we will not be able to upload the code to our Xiao ESP32C3 micro-controller. After installing the board, we should be able to choose Xiao ESP32C3 under the board library.
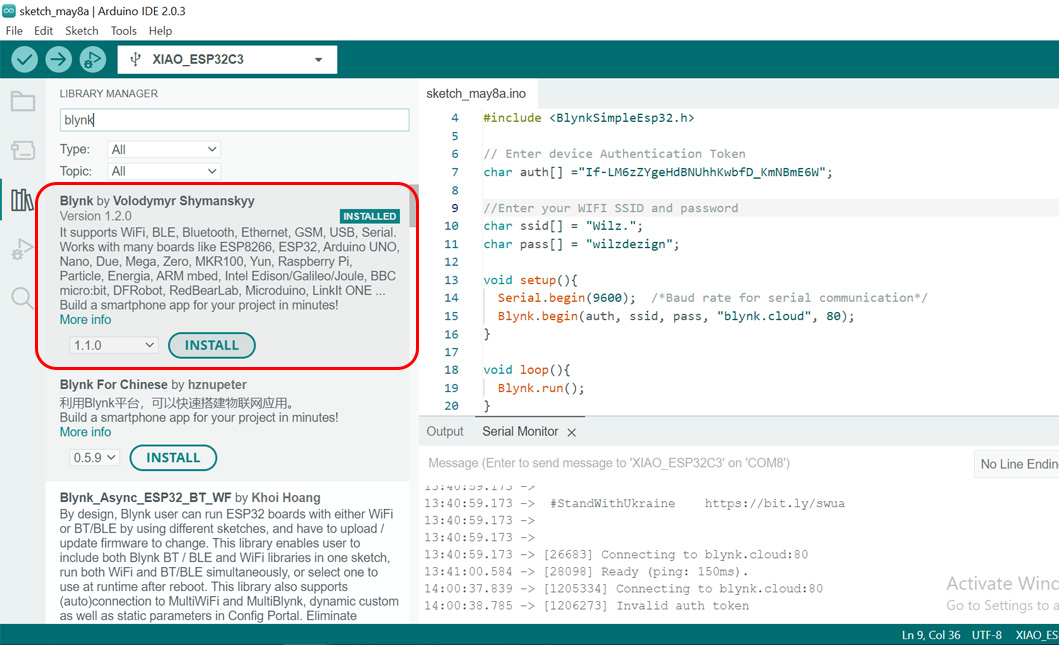
Once we are done with the board, the next step is to download the library of Blynk. Similarly, we will look for Blynk under the library manager and install it into our IDE program.
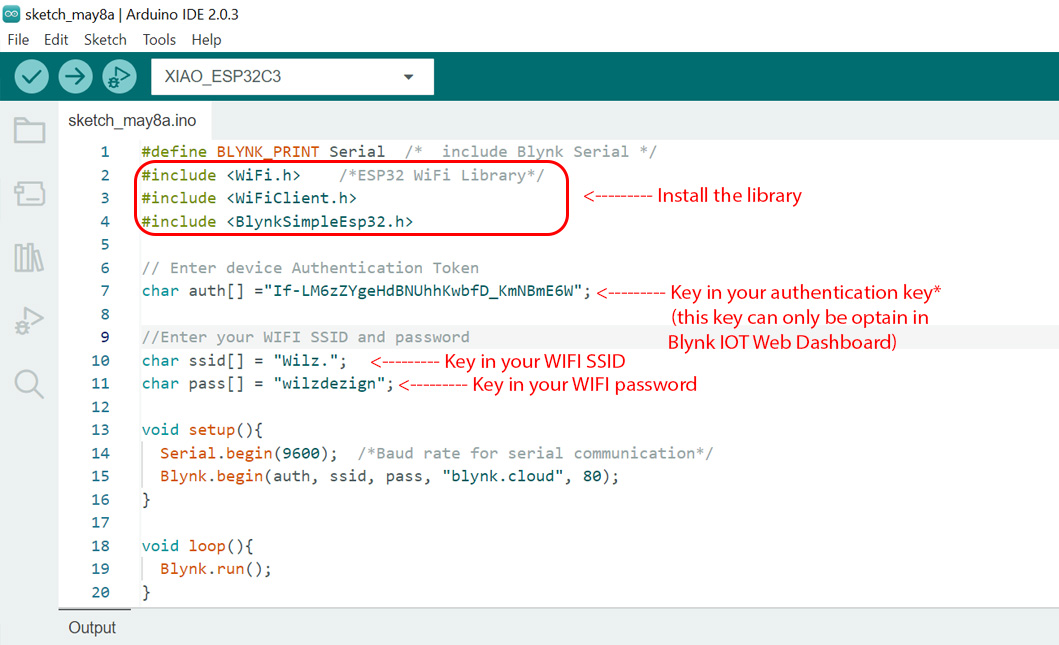
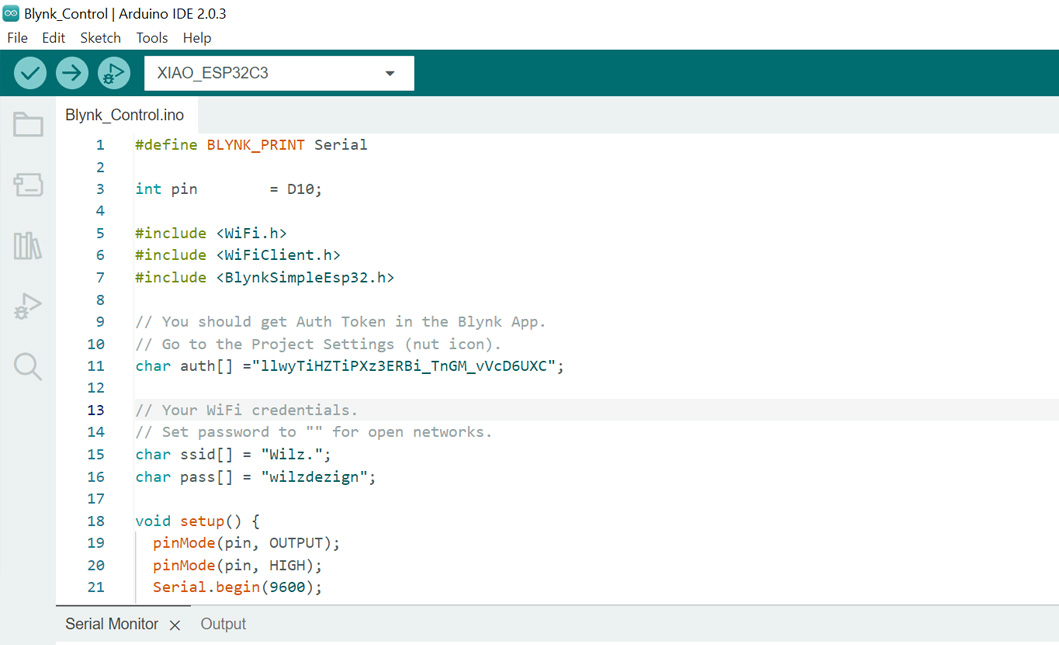
After installing the library, we will do a test run of a code which I received from Blynk after registering an account. This code was given so that we are able to connect to the Blynk Cloud Server. This step is very important as without getting this done correctly, we will not be able to link our device and app. We will also need to know our wifi SSID and password (if any) and key in as show in the image below. The next step is to get the authentication key. This key can only be obtain in Blynk Web Dashboard after registration which I will elaborate later.
You may download the code HERE.
As mention earlier, we will need to create an account with Blynk. It is free so anyone can register with a valid email address.

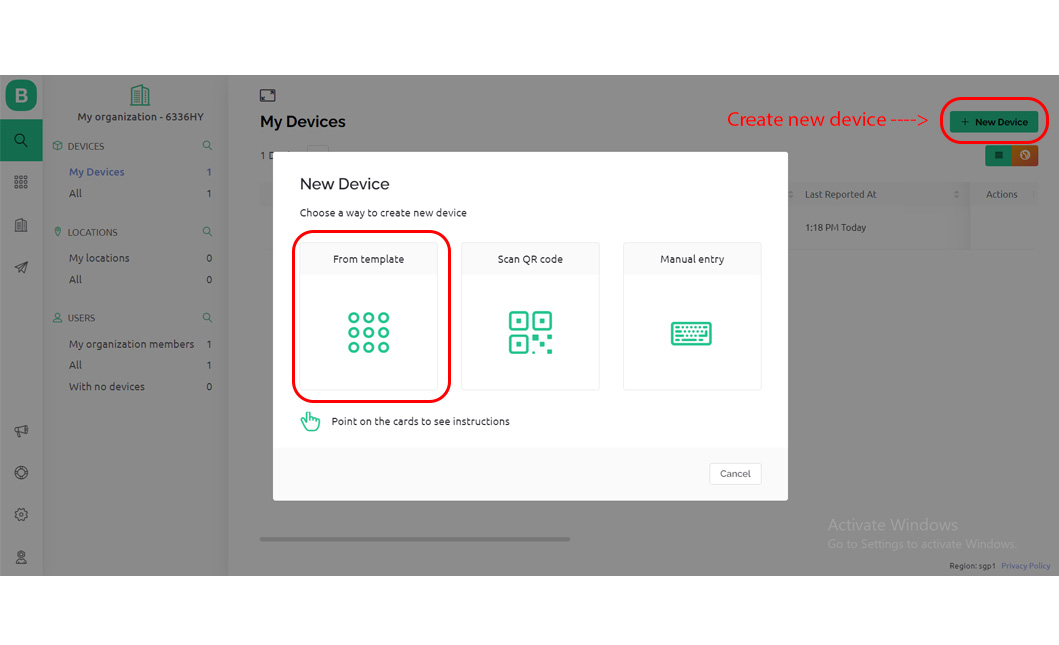
Once the account is created, you will be promted to create a New Device which you will then choose From Template to kick start the application creation journey.
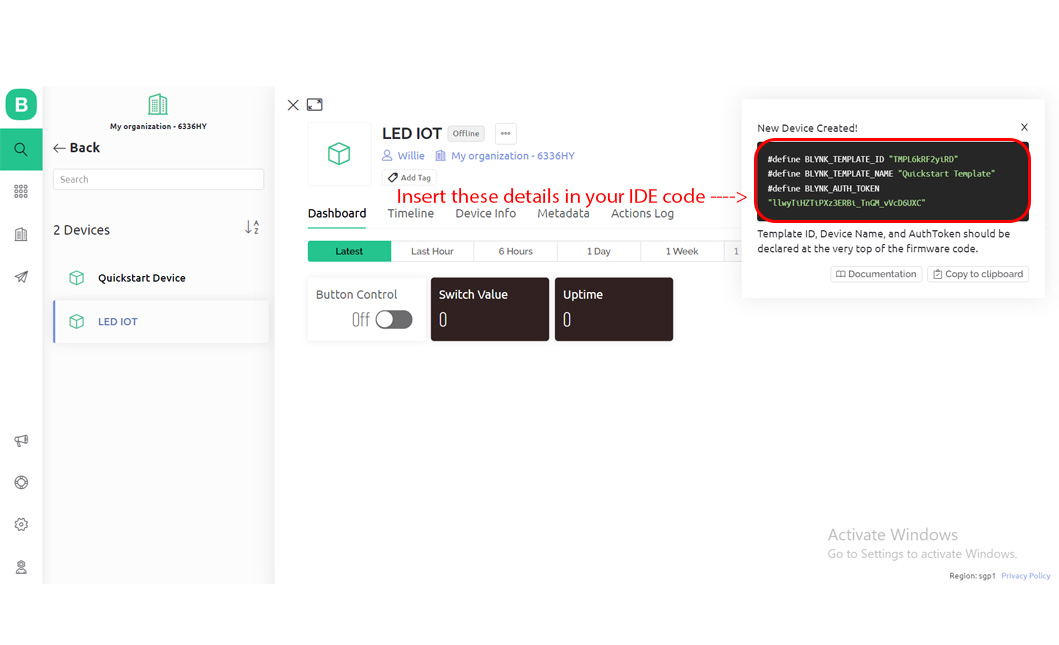
After the creation of your first device (I name it as LED IOT), you will be prompted to a new interface that shows you the information of your device which you will then access Device Info to get your Authentication Key. You will be require to copy the details and paste it in the IDE code.
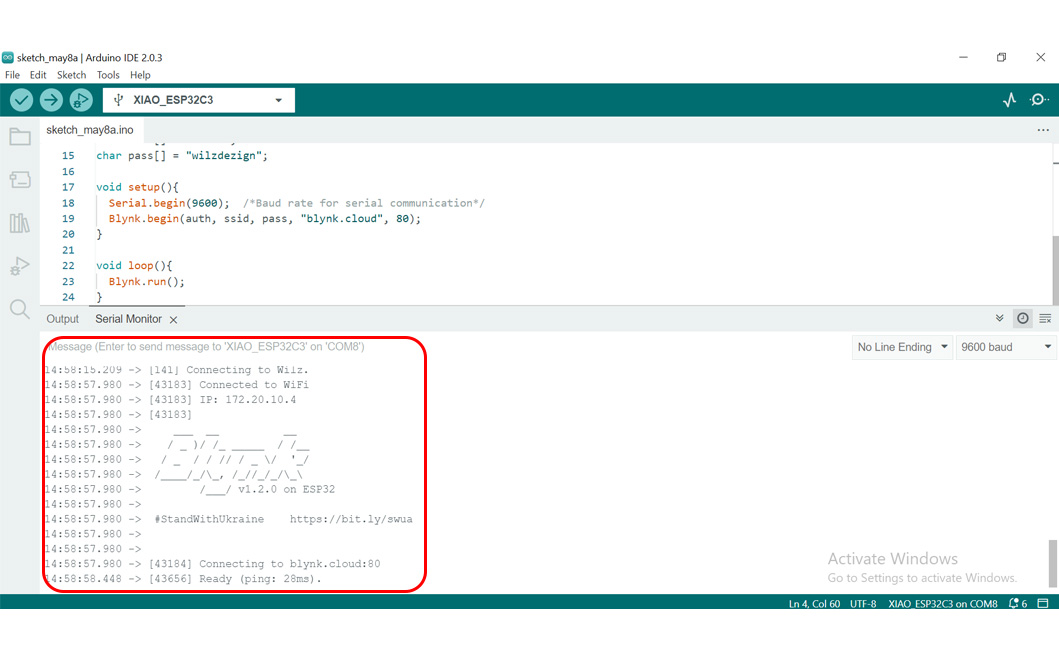
Once you have done with the code, it is time to do a test run on connecting to the Wifi with my Xiao ESp32C3 micro-controller. After compiling and uploading the code, you should see a list of details and information under the serial monitor that shows the wifi connection, IP address, connection to Blynk Cloud as well as the logo design
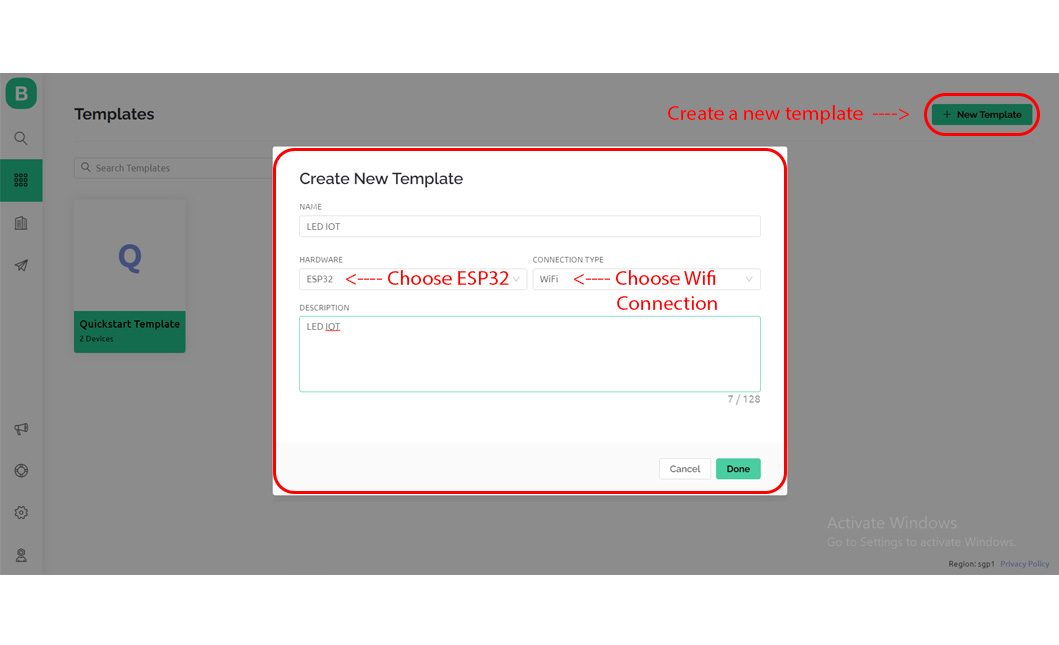
After establishing the connection, we will return to our Blynk IOT Web Dashboard to create a New Template as shown in the image below. We will need to choose ESP32 as our hardware and Wifi as our connection type.
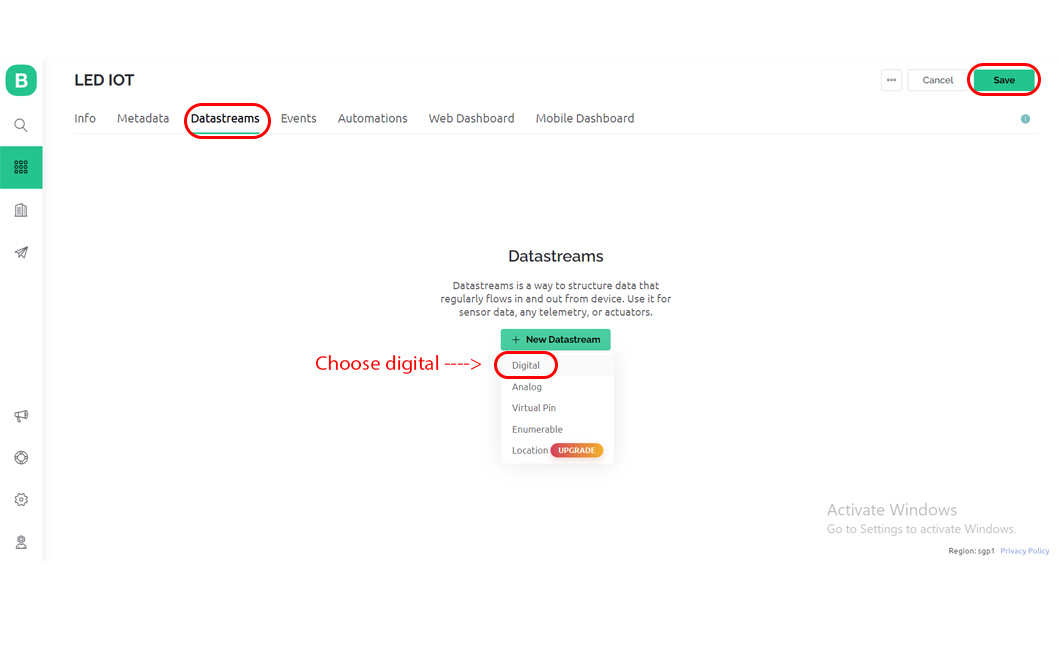
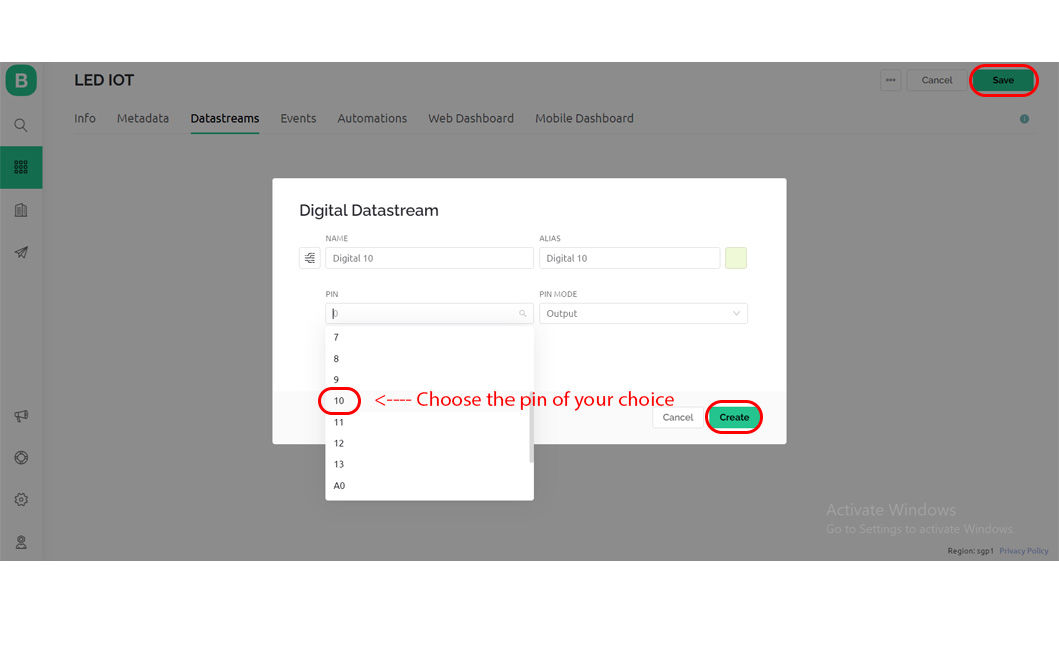
Then the next step is to create Datastreams for our app. This is where we will create the components i.e digital/analog pins etc. For my application programming assignment, I am going to do a simple LED On/Off App through Blynk so what I need is just a LED and a digital pin being assign to it. So under the New Datastream, we will select Digital.
After selecting Digital, you will be prompted to a new interface that allows you to choose the Pin Number. I then choose Pin 10 as per how I use it for the testing of my sound sensor during input & output devices. Last but not least, remember to select the Save (at the top right hand corner) after you select the Create button.
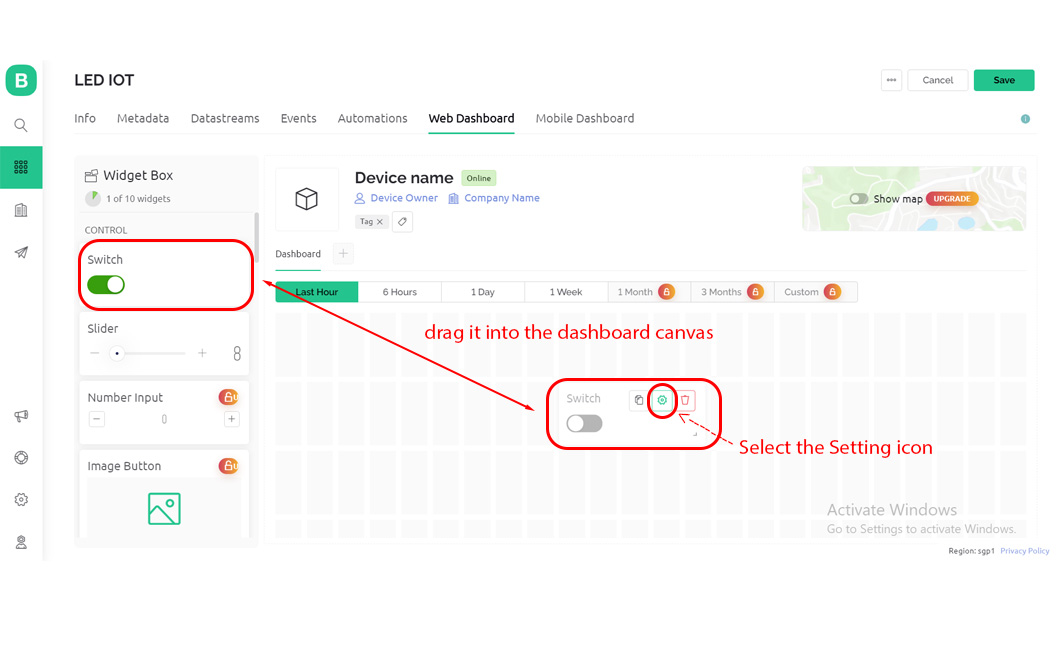
Once we are done with Datastreams creation, we will then proceed to Web Dashboard to design our interface controller. As you can see from the image below, there is a Widget Box whereby you can choose the type of controls and component you need for your app design. So in my case, I will only need a Switch Control for On and Off of the LED device. What I can do is to select the Switch Control located at the left column box and drag it into the dashboard canvas. After that I will need to select the Setting Icon in green.
After selecting the Setting Icon, you will be prompted to a new interface that shows Switch Setting whereby you will need to assign the correct Pin to the switch which is 10. Once we select the correct Pin, we will just select Create and then follow by selecting Save.

Lastly, we will return to our IDE program in Arduino and upload the code.
You may download the LED On/Off IDE code HERE.
The last step will be to see if our application is working. We will proceed to our Blynk IOT Web Dashboard to select the switch by switching On and Off, to see whether the LED flashes according to our application. Also I forgotten to mention that we will need to prepare the hardware components as well. Below are the images of the hardware components needed as well as the wire-up configuration. We basically just need a LED, a Resistor (330Ω), Breadboard, Jumper Cables and PCB & Micro-controller for the simple application test.

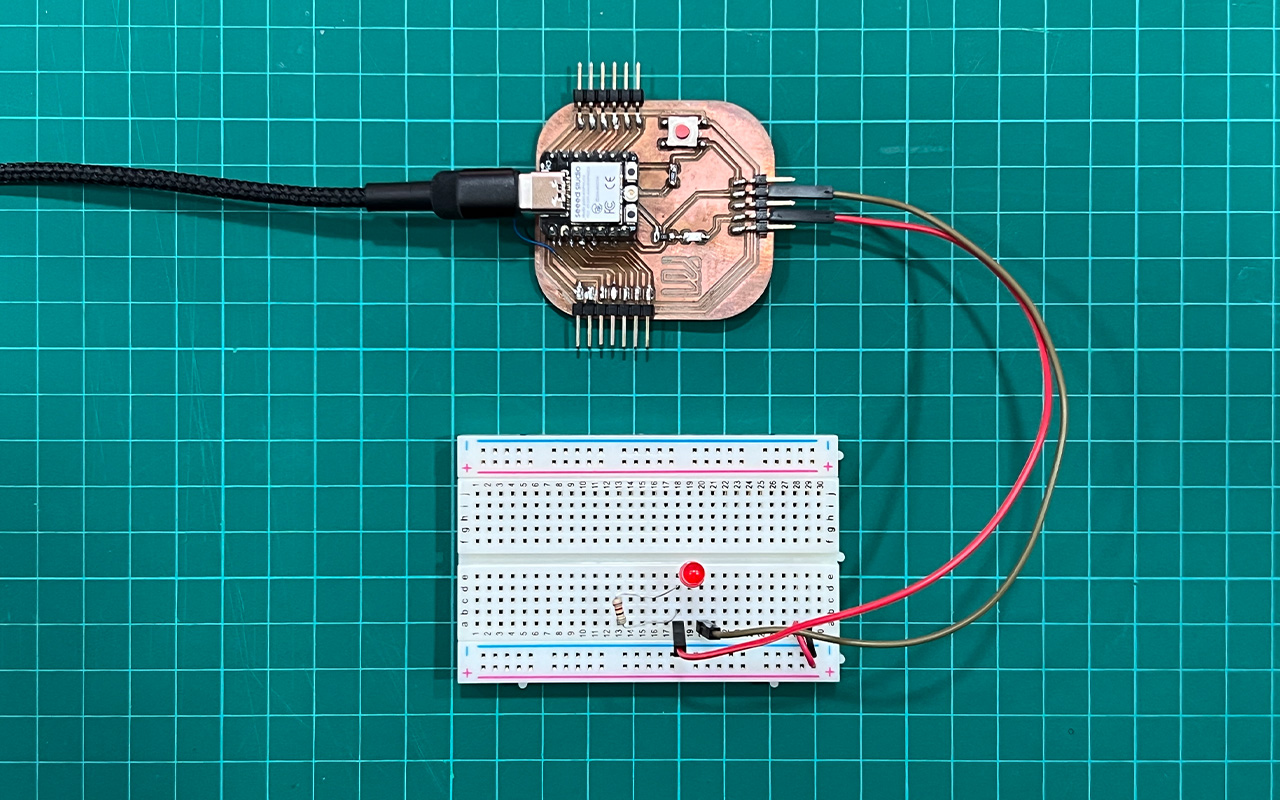
Basically, we will just wire-up and connect using the Pin D10 of the PCB & Xiao ESP32C3 Micro-controller and then the GND Pin (ground pin). We will also need to place a Resistor in-between the LED and Digital Pin otherwise the LED may blew-off. Below is the video of the test:
The first test works perfectly! Now the next thing we can do is to bring it into our phone. We will then start to install the Blynk App which can be downloaded in Apple Store or Play Store for free. After installing you will need to do a set-up and will be prompted to do a Quick Start on choosing your Hardware & Connection. So likewise previously on how we did it for our Blynk IOT Web Dashboard, we will choose ESP32 & WIFI.

Next, you will be prompted to Add New Device and make sure that you are connected to the Wifi as well. This is to link up your app with the internet. Once this step is done, you will see a Congratulations! box appear in the interface and that is all for the set-up. You will then need to start with a New Template creation. It is actually the same steps that I did previously in Blynk IOT Web Dashboard so I will not elaborate further here.
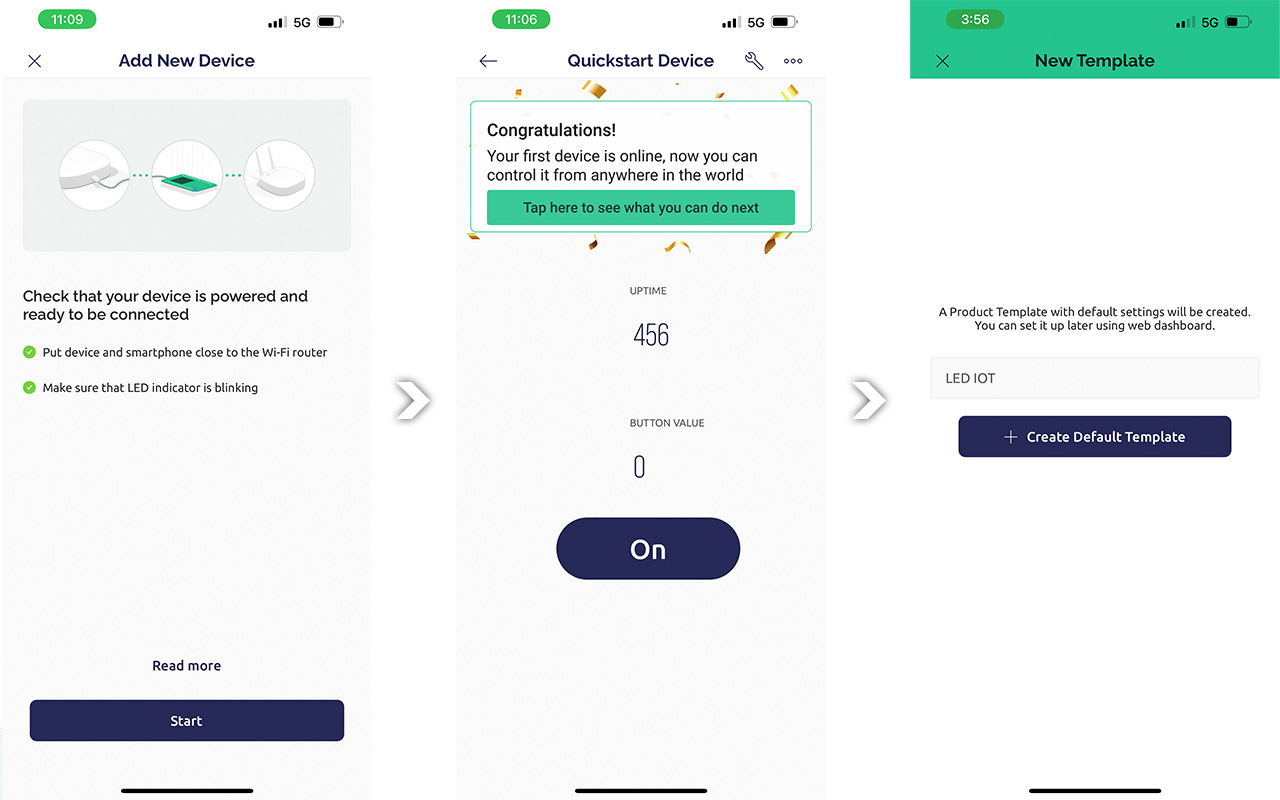
After the creation of your first template (I name it as LED IOT), you should see a box template with the title - LED IOT. Then the next step is to select the little Spanner Icon located at the top right hand corner to enter into Developer Mode. THis is where we start to play around with all the features and function of Blynk. Once you enter the Developer Mode, you should see an empty canvas page with grid. You will then need to select the little + icon on the top right hand corner as well to enter into Widget Box. This is where you will drag & drop the control components for your app design.
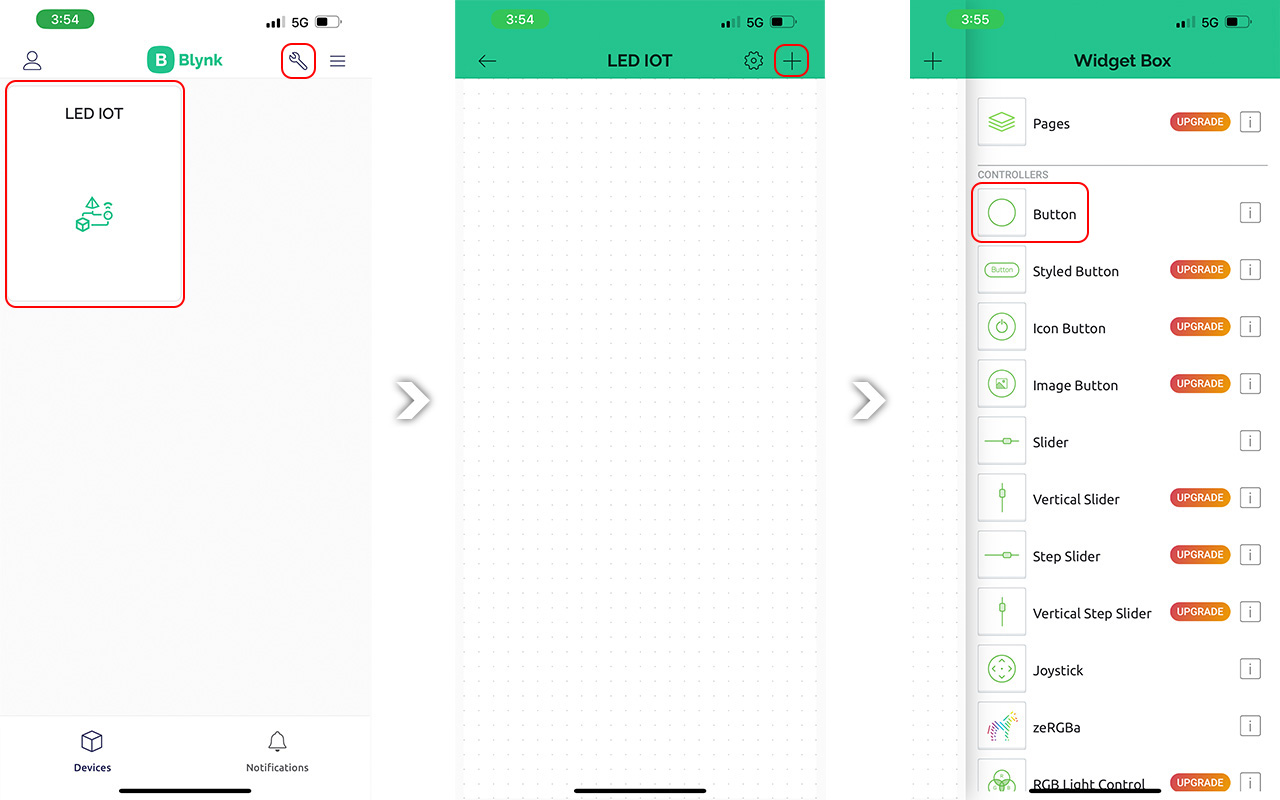
As menton earlier, for my application, I will only need to have a Switch to On and Off my LED so naturally, I will just select the Button control and drag it into my working canvas. After placing the Button control into the working canvas, the next step is to select the Button and you will be prompted into a new interface that shows you the Data & Setting. This is where you will assign the designated Digital Pin (D10) under Datastream which we have already created earlier on in the Blynk IOT Web Dashboard.

Once you are done with the Digital Pin assignment, you will exit the Developer Mode and you can start to test the application now as shown in my second test video below:
So my LED On/Off app works! It was really a hard work pays off as initially I could not get it to work in my handphone app but strangely it works in the Blynk IOT Web Dashboard. It took me sometime to rectify this issue and I am glad that I am able to solve it on my own.
Reflection
This week assignment is relatively difficult for me as I really fine it hard to understand how the system works. Just alone reading on Blynk IOT took me 2 days to understand how it work. Also, I face difficulties in getting my device running which can be very frustrating. Nonetheless, with some perserverance, I manage to get my simple LED On/OFF App created. After creating this app, I somehow feel that I am now able to do something more complex by utilizing this newly acquire knowledge i.e to create a Smart System for my home appliances to control Lightings and fans etc.