Week 14: Interface and Application programming
Group Assignment
- Compare as many tool options as possible.
- DDocument your work on the group work page and reflect on your individual page what you learned.
chech group assignment page
Individual Assignment
- Write an application that interfaces a user with input and/or output device(s) on a board that you made.
WEEK 14 WORK ORGANIZATION
Group Assignments
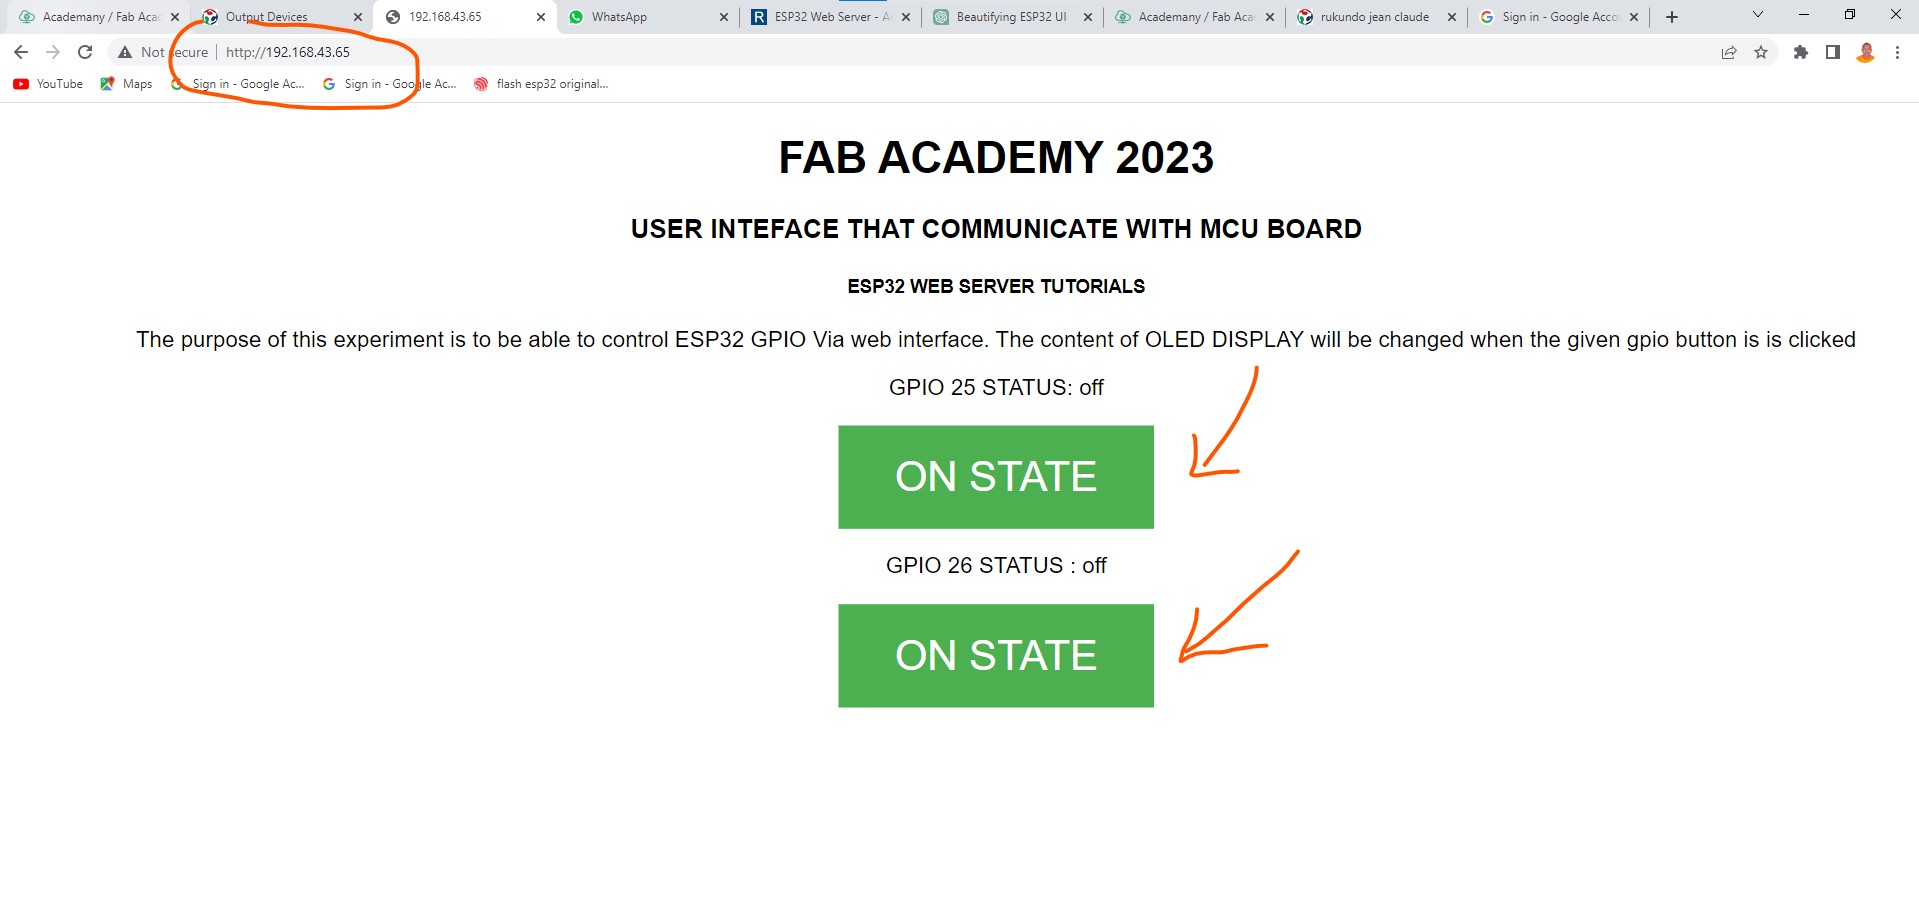
USING ESP32 AS WEB SERVER TO BE ACCESSIBLE VIA THE BROWSER
In this week assignment was to make user interface where the board we have can communicate with it and be able to control an input or output via GUI whever web based or any other GUI application.
for the simplicity of the work , i prefered to use esp32 on the board i have Previously designed on the week of output and be able to make it work as a web server using http protocol because my final project will be having things related to web server. it was advantages for me to start doing practice about web server and http protocol on embedded device
To be able to start , i have done little research about a web server and how a low memory MCU like esp32 can act as a web server and i explained the concept in the following paragraphs.
what is a web server?
A web server is a software application that serves web pages and other content over the internet or a private network. When a user types a website's URL into a web browser, the browser sends a request to the web server, which then processes the request, retrieves the requested web page or content, and sends it back to the user's browser for display.
Web servers can be configured to support different types of content, such as HTML, images, videos, and scripts, and can also handle various types of requests, including GET requests for retrieving content and POST requests for submitting data to a web application
Web servers can be configured to support different types of content, such as HTML, images, videos, and scripts, and can also handle various types of requests, including GET requests for retrieving content and POST requests for submitting data to a web application. Examples of popular web servers include Apache , Nginx ,. Web servers are a fundamental component of the World Wide Web, and they play a critical role in delivering web content to users around the globe.
Apache and nginx are all open source and can be used freely in your application. this video helped me to undestand how they works
Normaly web servers runs on normal servers that are powerful which has a huge memory and high processing power to be able to handle multiple clients requests. now the problem now is that i want to use esp32 which low memory device and less powerfull!!!!!
How low memory like esp32 device can run a web server and repluy to clients request?
According to the research i did on several tipics regarding this matter , i found that It is possible for low-memory devices like the ESP32 to run a web server and reply to client requests, although the performance and capabilities of the server may be limited compared to a more powerful server.
To run a web server on an ESP32, you would typically use a lightweight HTTP server library that is designed to work with microcontrollers and low-memory devices. Examples of such libraries include ESPAsyncWebServer , AsyncTCP , and WebSockets .
These libraries provide an API for handling incoming HTTP requests and generating responses. You would typically write code to handle specific HTTP requests, such as serving up a webpage or processing a form submission, and then use the library's API to send the appropriate response back to the client.
When running a web server on a low-memory device, it is important to be mindful of memory usage and to avoid allocating too much memory at once. This may involve using techniques like dynamic memory allocation or avoiding large static data structures. It may also involve tuning the web server's configuration to limit the number of concurrent connections or reduce the size of incoming requests.
Working principle of the esp32 based web server
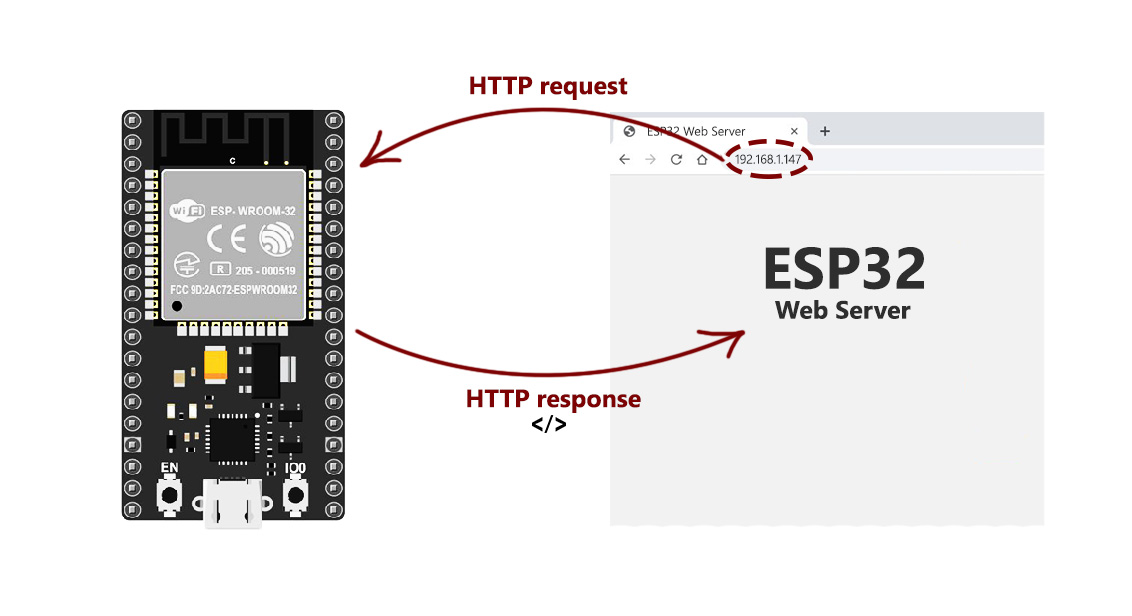
When a request is sent to this server (for example, its address is searched in the browser), the server returns a code as a response (for example, code 200, which means the connection is established correctly, or code 404, which indicates that the address is not correct).
the server respond normaly with html response of what client need . the client (here it is the browser) sends request to the server (esp32 ) to obtain interface to control devices connected to the server (esp32) .the inputs and outputs ports can be controlled remotely via web requests.
My Use Case for this week
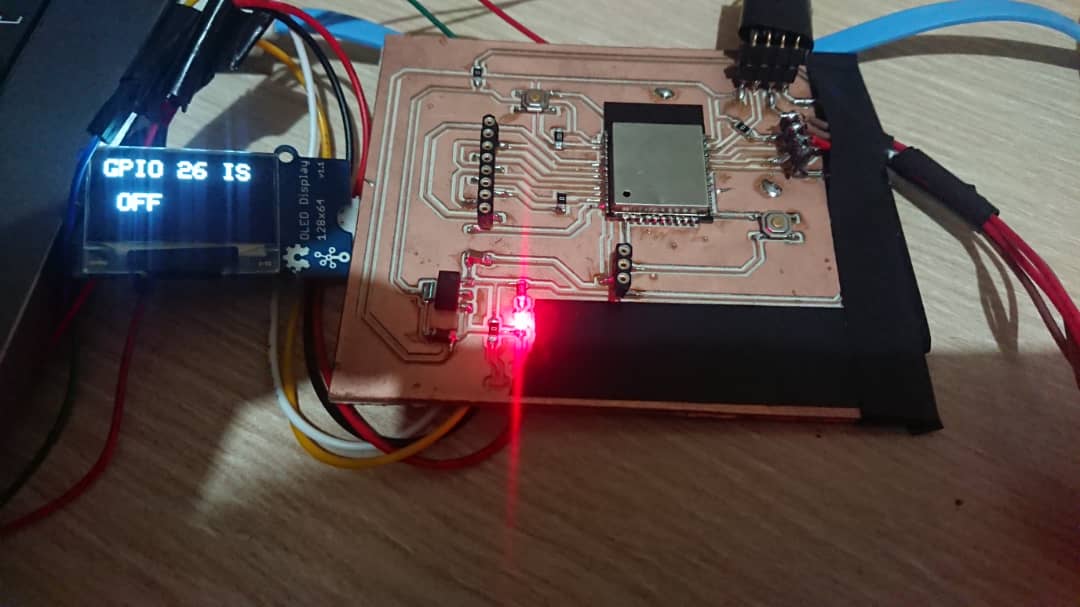
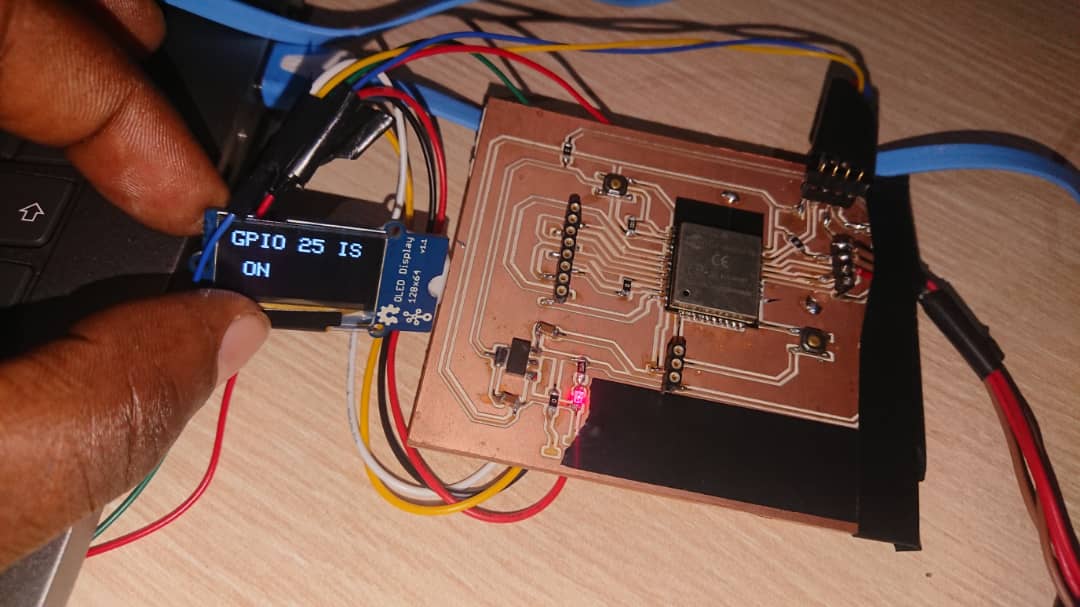
What i did in this week is to make a web interface within esp32 and access it through wifi and be able to change the content of the dipslay (oled Display by clicking on the user inteface ) meaning i have two buttons which changes the content of oled display when clicked .
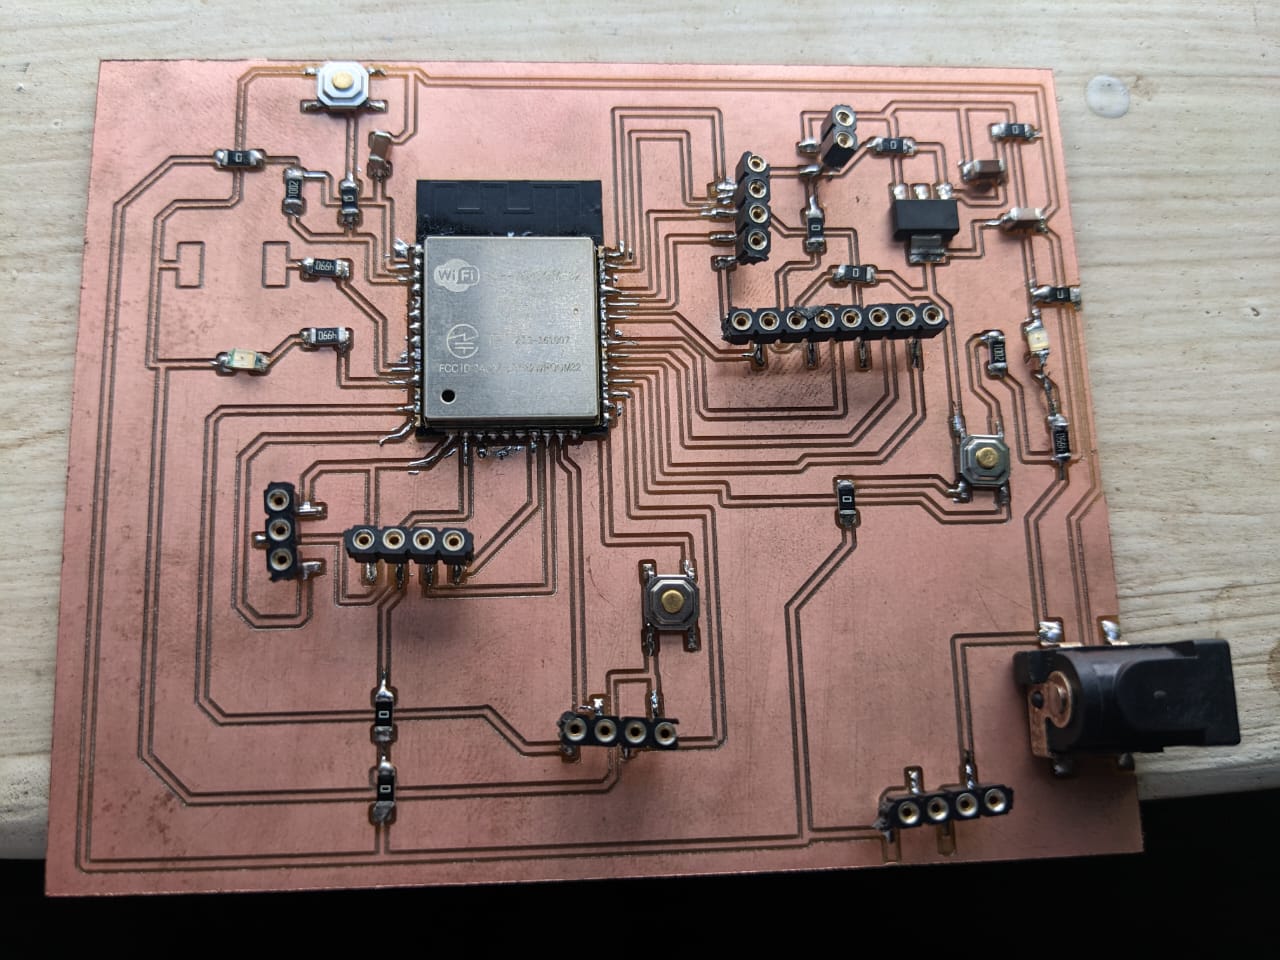
Board used
i have used the esp32 baord desinged in week of output
CODE i have used inside esp32
// Load Wi-Fi library
#include < WiFi.h >
#include < Wire.h >
#include < Adafruit_SSD1306.h >
#define SCREEN_WIDTH 128
#define SCREEN_HEIGHT 64
Adafruit_SSD1306 display(SCREEN_WIDTH, SCREEN_HEIGHT, &Wire, -1);
// Replace with your network credentials
const char* ssid = "Xperia";
const char* password = "505050jr@@";
// Set web server port number to 80
WiFiServer server(80);
// Variable to store the HTTP request
String header;
// Auxiliar variables to store the current output state
String output25State = "off";
String output26State = "off";
// Assign output variables to GPIO pins
const int output25 = 25;
const int output26 = 26;
// Current time
unsigned long currentTime = millis();
// Previous time
unsigned long previousTime = 0;
// Define timeout time in milliseconds (example: 2000ms = 2s)
const long timeoutTime = 2000;
void setup() {
Serial.begin(115200);
// Initialize the output variables as outputs
pinMode(output25, OUTPUT);
pinMode(output26, OUTPUT);
// Set outputs to LOW
digitalWrite(output25, LOW);
digitalWrite(output26, LOW);
if(!display.begin(SSD1306_SWITCHCAPVCC, 0x3C)) {
Serial.println(F("SSD1306 allocation failed"));
for(;;);
}
// Connect to Wi-Fi network with SSID and password
Serial.print("Connecting to ");
Serial.println(ssid);
WiFi.begin(ssid, password);
while (WiFi.status() != WL_CONNECTED) {
delay(500);
Serial.print(".");
display.clearDisplay();
display.setTextSize(2);
display.setTextColor(WHITE);
display.setCursor(0,0);
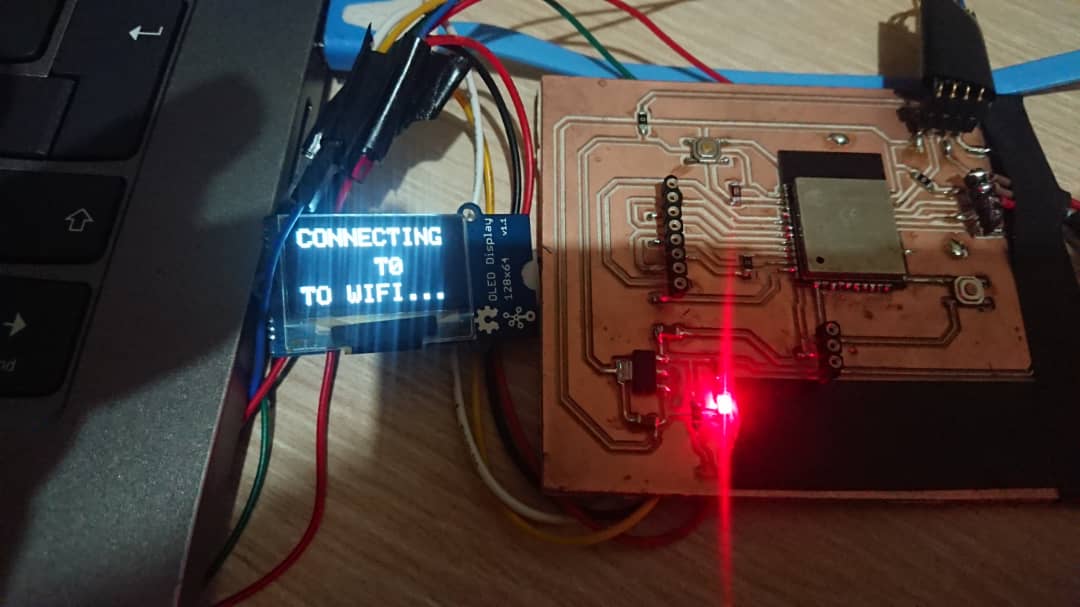
display.println(F("CONNECTING "));
display.setCursor(0,25);
display.println(" T0");
display.setCursor(0,47);
display.println("TO WIFI....");
display.display();
delay(3000);
}
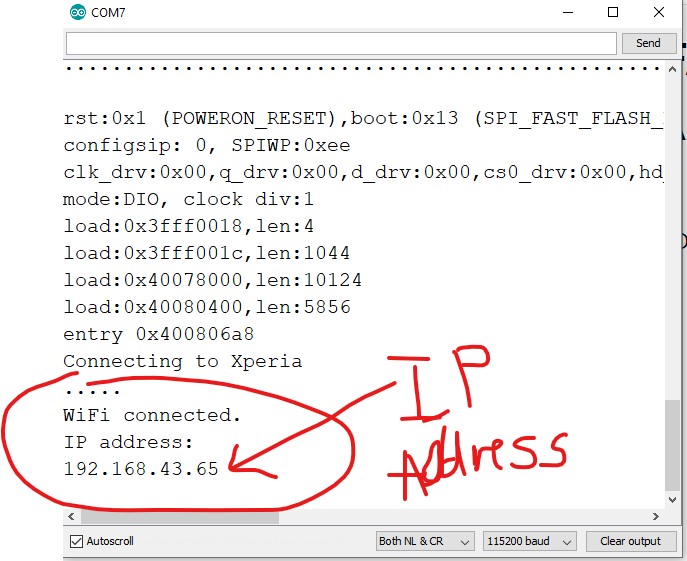
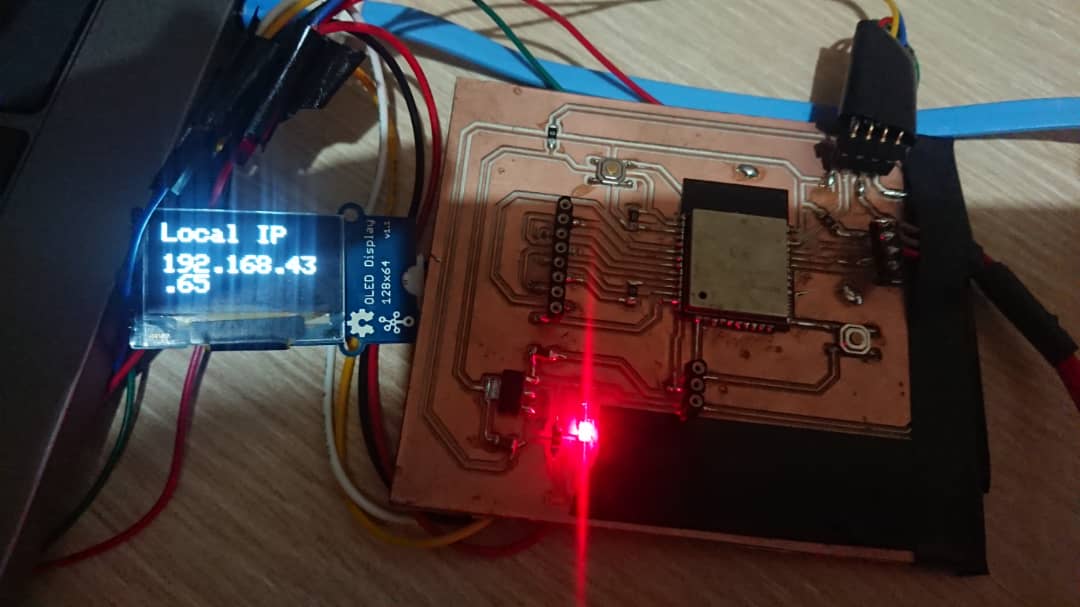
// Print local IP address and start web server
delay(2000);
Serial.println("");
Serial.println("WiFi connected.");
Serial.println("IP address: ");
Serial.println(WiFi.localIP());
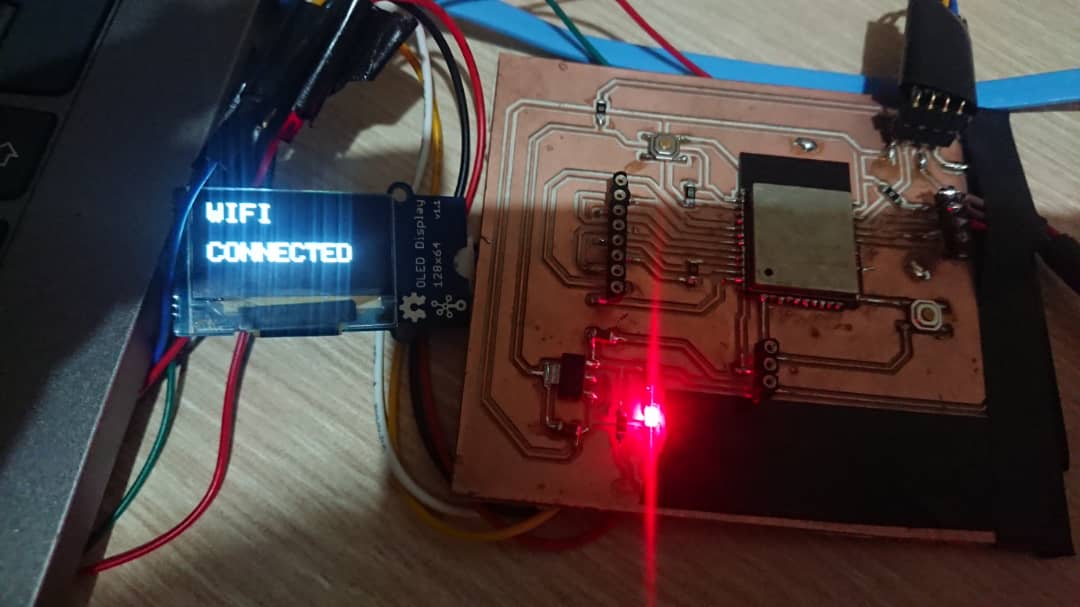
display.clearDisplay();
display.setTextSize(2);
display.setTextColor(WHITE);
display.setCursor(0,0);
display.println(F("WIFI "));
display.setCursor(0,30);
display.println("CONNECTED");
display.display();
display.display();
delay(3000);
display.clearDisplay();
display.setTextSize(2);
display.setTextColor(WHITE);
display.setCursor(0,0);
display.println(F("Local IP"));
display.setCursor(0,25);
display.println(WiFi.localIP());
display.display();
delay(3000);
server.begin();
}
void loop(){
WiFiClient client = server.available(); // Listen for incoming clients
if (client) { // If a new client connects,
currentTime = millis();
previousTime = currentTime;
Serial.println("New Client."); // print a message out in the serial port
String currentLine = ""; // make a String to hold incoming data from the client
while (client.connected() && currentTime - previousTime <= timeoutTime) { // loop while the client's connected
currentTime = millis();
if (client.available()) { // if there's bytes to read from the client,
char c = client.read(); // read a byte, then
Serial.write(c); // print it out the serial monitor
header += c;
if (c == '\n') { // if the byte is a newline character
// if the current line is blank, you got two newline characters in a row.
// that's the end of the client HTTP request, so send a response:
if (currentLine.length() == 0) {
// HTTP headers always start with a response code (e.g. HTTP/1.1 200 OK)
// and a content-type so the client knows what's coming, then a blank line:
client.println("HTTP/1.1 200 OK");
client.println("Content-type:text/html");
client.println("Connection: close");
client.println();
// turns the GPIOs on and off
if (header.indexOf("GET /25/on") >= 0) {
Serial.println("GPIO 25 on");
output25State = "on";
digitalWrite(output25, HIGH);
display.clearDisplay();
display.setTextSize(2);
display.setTextColor(WHITE);
display.setCursor(0,0);
display.println(F("GPIO 25 IS "));
display.setCursor(0,30);
display.println(" ON ");
display.display();
delay(3000);
} else if (header.indexOf("GET /25/off") >= 0) {
Serial.println("GPIO 25 off");
output25State = "off";
digitalWrite(output25, LOW);
display.clearDisplay();
display.setTextSize(2);
display.setTextColor(WHITE);
display.setCursor(0,0);
display.println(F("GPIO 25 IS"));
display.setCursor(0,30);
display.println(" OFF ");
display.display();
delay(3000);
} else if (header.indexOf("GET /26/on") >= 0) {
Serial.println("GPIO 26 on");
output26State = "on";
digitalWrite(output26, HIGH);
display.clearDisplay();
display.setTextSize(2);
display.setTextColor(WHITE);
display.setCursor(0,0);
display.println(F("GPIO 26 IS "));
display.setCursor(0,30);
display.println(" ON ");
display.display();
delay(3000);
} else if (header.indexOf("GET /26/off") >= 0) {
Serial.println("GPIO 26 off");
output26State = "off";
digitalWrite(output26, LOW);
display.clearDisplay();
display.setTextSize(2);
display.setTextColor(WHITE);
display.setCursor(0,0);
display.println(F("GPIO 26 IS"));
display.setCursor(0,30);
display.println(" OFF ");
display.display();
delay(3000);
}
// Display the HTML web page
client.println("");
client.println("");
client.println("");
// CSS to style the on/off buttons
// Feel free to change the background-color and font-size attributes to fit your preferences
client.println("");
// Web Page Heading
client.println("FAB ACADEMY 2023
");
client.println(" USER INTEFACE THAT COMMUNICATE WITH MCU BOARD
");
client.println("ESP32 WEB SERVER TUTORIALS
");
client.println("The purpose of this experiment is to be able to control ESP32 GPIO Via web interface. The content of OLED DISPLAY will be changed when the given gpio button is is clicked
");
// Display current state, and ON/OFF buttons for GPIO 26
client.println("GPIO 25 STATUS: " + output25State + "
");
// If the output25State is off, it displays the ON button
if (output25State=="off") {
client.println("");
} else {
client.println("");
}
// Display current state, and ON/OFF buttons for GPIO 27
client.println("GPIO 26 STATUS : " + output26State + "
");
// If the output27State is off, it displays the ON button
if (output26State=="off") {
client.println("");
} else {
client.println("");
}
client.println("");
// The HTTP response ends with another blank line
client.println();
// Break out of the while loop
break;
} else { // if you got a newline, then clear currentLine
currentLine = "";
}
} else if (c != '\r') { // if you got anything else but a carriage return character,
currentLine += c; // add it to the end of the currentLine
}
}
}
// Clear the header variable
header = "";
// Close the connection
client.stop();
Serial.println("Client disconnected.");
Serial.println("");
}
}
code explanation
This code is written in C++ and is intended to be uploaded to an ESP32 board. It is a simple web server that controls the state of two GPIO pins based on HTTP requests sent by a client. The state of these GPIO pins is also displayed on a small OLED screen.
The code begins with some necessary library imports and defines the screen dimensions. An Adafruit_SSD1306 object is then instantiated with the screen dimensions and the default Wire instance. The Wi-Fi network credentials are then set up and the web server is created with port number 80. Two output variables are assigned to GPIO pins and set to LOW.
In the setup() function, the SSD1306 object is initialized and connected to the Wi-Fi network using the given credentials. A message is displayed on the OLED screen to indicate that the board is connecting to the Wi-Fi network. Once connected, the local IP address is printed and displayed on the OLED screen
The loop() function listens for incoming clients and reads any incoming data. If the HTTP request is for GPIO 25 or 26 to be turned on or off, the respective GPIO pin is set to HIGH or LOW and the state is updated. The OLED screen also updates to reflect the state change.
If the HTTP request does not pertain to the GPIO pins, the web server sends a 200 OK response with a blank message to the client. This code demonstrates how an ESP32 board can act as a simple web server and how to control the state of GPIO pins remotely. It also illustrates how to display information on an OLED screen using the Adafruit_SSD1306 library.

Final Results => More details available in the following video!!!!
This video shows all details of the working scenario where ESP32 is used as a web server