WEEK 13. Networking and communications
individual assignment: design, build, and connect wired or wireless node(s) with network or bus addresses group assignment: send a message between two projects
Objective
I want to use the Xiao Esp32 microcontroller board and an Arduino UNO to communicate with the I2C protocol
Principle
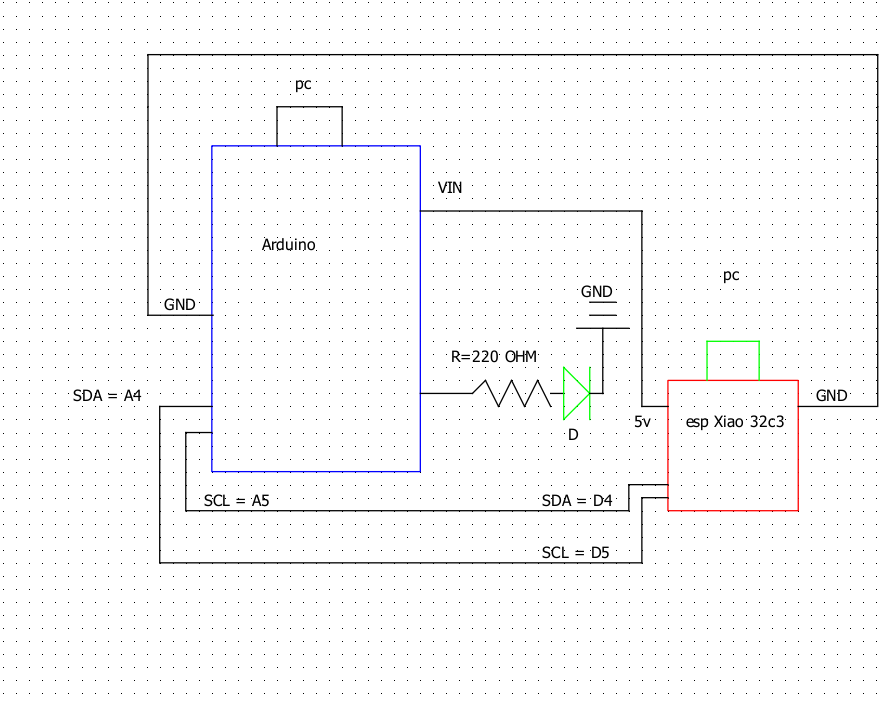
This time the assembly will be divided into 2 parts:
- The Arduino slave: The Arduino slave will have an LED and its resistor wired between its digital 2 output and the GND. It will use its 5V output to power the XIAO ESP 32 C3 master.
- The ESP 32 C3 master: The master Arduino gets its power from the slave Arduino on its Vin input. To finish the good connection of the power supply, it remains to connect between them the GND of the Arduino and the XIAO .
** To establish the connection between these two boards, it will be necessary to connect the SDA/SCL signals:
Between the D 4 (SDA) terminal of the Xiao master and the Analog 4 terminal of the Arduino slave Between the D 5 (SCL) terminal of the Xiao master and the Analog 5 terminal of the Arduino slave.
Cabling
Programing
explanation
The programming of this assembly is based on the Wire library. As it is a library, to use these functions, you have to write “Wire.nameoffunction”. It contains the following functions:
- begin(X) : Initialize the I2C link. It is placed in the “setup” section. The parameter X is the address of the slave card. For the master the parameter remains empty.
- RequestFrom(X, Y): Command used by the master to request information from the slaves (request). The X parameter is the slave address. The Y parameter is the number of bytes requested.
- beginTransmission(X) : Command used by the master to start a transmission with the slave of address X.
- endTransmission(): Command used by the master to end a transmission.
- Write(X) : Command used by the slave to answer the message X to a request from the master.
- Available(): Returns the number of bytes available for reading. This is a very interesting function to know if there are messages waiting to be read.
- Read(): Reads the messages waiting on the bus. Warning: The read function reads character by character.
- OnReceive(X) : This is a command intended only for the slave which will be called when there are messages to read the X function.
- onRequest(): This is a command intended only for the slave that will be called when there is a request from the master.
code of the exclave card
    // Y'ELLOLAB FABACDEMY 2023 week assignment

   #include <Wire.h> // Librairie pour la communication I2C

   const int L1 = 2; // broche 2 du micro-contrôleur se nomme maintenant : L1

   void setup()
 {
   Wire.begin(4); // Rejoindre le bus à l'adresse #4
   Wire.onReceive(receiveEvent); // Preparer une fonction spécifique a la reception de donnee
  Serial.begin(9600); // Demarrer la liaison serie avec le PC
   pinMode(L1, OUTPUT); // L1 est une broche de sortie
 }

   void loop()
  {
 delay(100);
 }

 // Fonction qui s execute si quelque chose est present sur l interface
  void receiveEvent(int howMany)
 {
int x = Wire.read(); // recevoir un chiffre
    Serial.println(x); // afficher ce chiffre sur l'interface serie
if(x == 1)
   {
        digitalWrite(L1, HIGH); // allumer L1
    }
   if(x == 0)
 {
 digitalWrite(L1, LOW); // eteindre L1
 }
  }
code of the master card
  // Y'ELLOLAB FABACDEMY 2023 week assignment
#include <Wire.h>

  void setup()
 {
 Wire.begin(); // Rejoindre le bus I2C (Pas besoin d adresse pour le maitre)
  }

void loop()
{
//contenu du programme
Wire.beginTransmission(4); // Envoyer vers device #4
Wire.write(1); // Envoi un 1
Wire.endTransmission(); // Arreter la transmission
delay(1000); // Attendre 1s
Wire.beginTransmission(4); // Envoyer vers device #4
Wire.write(0); // Envoi un 0
Wire.endTransmission(); // Arreter la transmission
    delay(2000); // Attendre 2s
    }
code execution
