Week 14: Interface and Application Programming
This week I used the Processing and Arduino IDE Software to create an interface that would display the location of the joystick I would be using with a Seeed Xiao RP2040. I used this Arduino Tutorial tutorial to learn how to interface with an Arduino uno. First I found the code on the tutorial and here are the two parts:
Processing code
//Dylan Ferro Fab Academy 2023
import processing.serial.*; //import the Serial library
Serial myPort;

int x; // variable holding the value from A0
int y; // variable holding the value from A1
int b; // variable holding the value from digital pin 2
PFont f; // define the font variable
String portName;
String val;

void setup()
{
  size ( 512 , 512 ) ; // window size

  // we are opening the port
   myPort = new Serial(this, Serial.list()[2], 9600);
  myPort.bufferUntil('\n');

  // choose the font and size
  f = createFont("Arial", 16, true); // Arial, 16px, anti-aliasing
  textFont ( f, 16 ) ; // size 16px
}

// drawing loop
void draw()
{
  fill(0) ; // set the fill color to black
  clear() ; // clean the screen

  fill(255) ; // set the fill color to white

  if (b == 1) // check if the button is pressed
  {
    // draw a larger circle with specified coordinates
    ellipse(x/2,y/2, 50, 50);
  }
  else
  {
    // we draw a circle with a certain coordinates
    ellipse(x/2,y/2, 25, 25);
  }

  // we display data
  text("AnalogX="+(1023-x)+" AnalogY="+(1023-y),10,20);
}


// data support from the serial port
void serialEvent( Serial myPort)
{
  // read the data until the newline n appears
  val = myPort.readStringUntil('\n');

  if (val != null)
  {
        val = trim(val);

    // break up the decimal and new line reading
    int[] vals = int(splitTokens(val, ","));

    // we assign to variables
    x = vals[0];
    y = vals[1] ;
    b = vals[2];

  }
}
Arduino Code
//Dylan Ferro Fab Academy 2023
int xValue = 0 ; // read value of the X axis
int yValue = 0 ; // read value of the Y axis
int bValue = 0 ; // value of the button reading

void setup()
{
Serial.begin(9600) ; // Open the serial port
pinMode(4,INPUT) ; // Configure Pin 2 as input
digitalWrite(4,HIGH);
}

void loop()
{
// Read analog port values A0 and A1
xValue = analogRead(26);
yValue = analogRead(27);

// Read the logic value on pin 2
bValue = digitalRead(8);

// We display our data separated by a comma
Serial.print(xValue,DEC);
Serial.print(",");
Serial.print(yValue,DEC);
Serial.print(",");
Serial.print(!bValue);

// We end with a newline character to facilitate subsequent analysis
Serial.print("\n");

// Small delay before the next measurement
delay(10);
}
To use this code I uploaded the Arduino code to an Arduino Uno and wired the joystick like this.
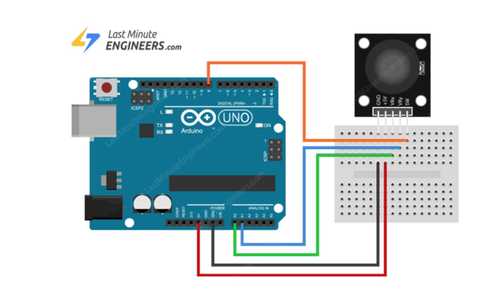
then I uploaded the Arduino code to the Arduino followed by running the processing code. On the first try, it worked.
After this, I edited the code to work with an rp2040. On the Arduino file, I changed the pinout for the x-axis to be 26, the y-axis to be 27, and the button to be 4. Then I uploaded the code as normal and again, it worked!
Here is this week’s group work.
Reflection
This week I worked on making an interface that would display the joystick’s location. I found this difficult due to my little experience in coding. I learned how to use Java to interface and how the serial monitor can be displayed on an interface. I then used some tutorials to teach me how to turn this data into an interface.