Week 9: Outputs
This week I worked on getting a speaker to play audio files and the basics of a neopixel array. I will use the speaker to say the guess of the computer and the neopixel array to show the opponent’s board.
Neopixels
The first output I worked with this week was a 3x3 array of neopixels. I did this because it relates to my final project which will include a 10x10 neopixel array. In my lab, I found an old strip of neopixels lying around. I cut the neopixels into sections of 3 and then lined up the arrows. After that, I soldered some wires connecting the 3 strips of 3 neopixels. I used a black wire for the ground, a red wire for the VCC power, and a yellow wire for the data cable.
![]()
After that, I peeled off the tape on the bottom of the neopixels and stuck them to a piece of scrap cardboard as a makeshift board to hold them in place.
![]()
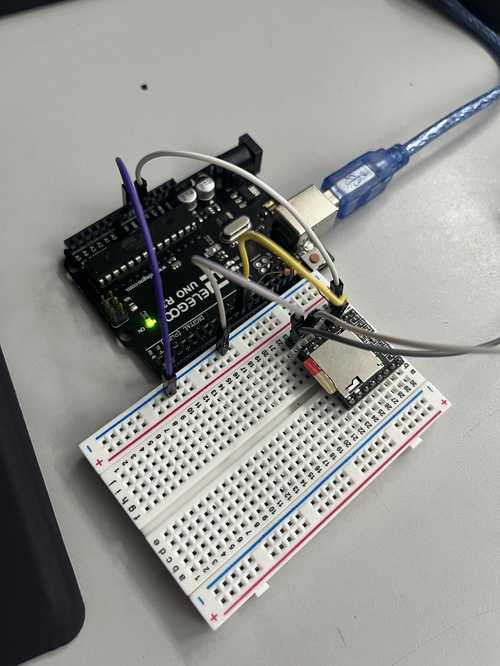
After this, I started by testing the neopixels in a code I knew, on an Arduino Uno with C++ code. I used the simple example that came with this neopixel library. I selected this code, plugged the data line from the neopixels into pin 6 on the Arduino, connected ground to ground, and connected power to the 5v output. Then I changed the number of pixels to 9. As per my teacher, Mr. Dubick’s, advice, I did not need to use an external power supply for 9 neopixels. If you are using more than 9, you should be using a separate 5v DC power supply to make sure you are not drawing too much current from the USB port on the computer. After I plugged it in, here were my results.
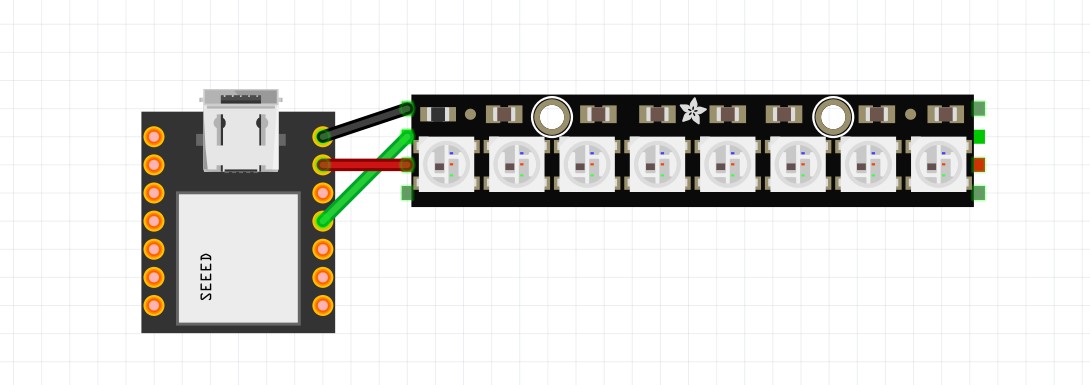
Then I switched the neopixels over to the seeed xiao rp2040, on my milled board from week 8. The only thing I had to change was the pinout, I changed it from pin 6 on the Arduino to pin 3 on the seeed Xiao rp2040. Here is a diagram
Finally, I decided to do the same thing but in micropython. I started this by finding a tutorial on using neopixels in micropython and found this. I had a few issues with the code, I had to change the pin, and number of neopixels, as expected, but I also was not looking at the right part of the document. I ended up having to merge all of the codes that the tutorial gave me. They first set up the libraries, then defined the pin and number of pixels as variables, and finally created the color variables. here was the code I ended up with, and the video of it working.
#Dylan Ferro Fab Academy 2023
import time
import machine, neopixel
np = neopixel.NeoPixel(machine.Pin(3), 9)
np[0] = (255, 0, 0) # set to red, full brightness
np[1] = (0, 128, 0) # set to green, half brightness
np[2] = (0, 0, 64)  # set to blue, quarter brightness
def demo(np):
    n = np.n

    # cycle
    for I in range(4 * n):
        for j in range(n):
            np[j] = (0, 0, 0)
        np[ I  % n] = (255, 255, 255)
        np.write()
        time.sleep_ms(25)

    # bounce
    for I in range(4 * n):
        for j in range(n):
            np[j] = (0, 0, 128)
        if ( I  // n) % 2 == 0:
            np[ I  % n] = (0, 0, 0)
        else:
            np[n - 1 - ( I  % n)] = (0, 0, 0)
        np.write()
        time.sleep_ms(60)

    # fade in/out
    for I in range(0, 4 * 256, 8):
        for j in range(n):
            if ( I  // 256) % 2 == 0:
                val = I & 0xffa
            else:
                val = 255 - ( I  & 0xff)
            np[j] = (val, 0, 0)
        np.write()

    # clear
    for I in range(n):
        np[ I ] = (0, 0, 0)
    np.write()
while True:
    demo(np)
Speaker
To learn how to use a speaker, I first decided that I would do it in Arduino ide with a normal Arduino Uno since I had never done it before. I found this tutorial on how to use the MicroSD card reader and it seemed to be compatible with any speaker. First I made a voice recording to test. The file was saved as an mp3 file and I uploaded that to my SD card. Then I began to wire the speaker according to the diagram.
after uploading this code, it worked.
//Dylan Ferro Fab Academy 2023
#include "Arduino.h"
#include "SoftwareSerial.h"
#include "DFRobotDFPlayerMini.h"

SoftwareSerial mySoftwareSerial(2, 4); // RX, TX
DFRobotDFPlayerMini myDFPlayer;
void printDetail(uint8_t type, int value);

void setup()
{
  mySoftwareSerial.begin(9600);
  Serial.begin(115200);

  Serial.println();
  Serial.println(F("DFRobot DFPlayer Mini Demo"));
  Serial.println(F("Initializing DFPlayer ... (May take 3~5 seconds)"));

  if (!myDFPlayer.begin(mySoftwareSerial)) {  //Use softwareSerial to communicate with mp3.
    Serial.println(F("Unable to begin:"));
    Serial.println(F("1.Please recheck the connection!"));
    Serial.println(F("2.Please insert the SD card!"));
    while(true);
  }
  Serial.println(F("DFPlayer Mini online."));

  myDFPlayer.volume(30);  //Set volume value. From 0 to 30
  myDFPlayer.play(1);  //Play the first mp3
}

void loop()
{
  static unsigned long timer = millis();

  if (millis() - timer > 3000) {
    timer = millis();
    //myDFPlayer.next();  //Play next mp3 every 3 second.
  }

  if (myDFPlayer.available()) {
    printDetail(myDFPlayer.readType(), myDFPlayer.read()); //Print the detail message from DFPlayer to handle different errors and states.
  }
}

void printDetail(uint8_t type, int value){
  switch (type) {
    case TimeOut:
      Serial.println(F("Time Out!"));
      break;
    case WrongStack:
      Serial.println(F("Stack Wrong!"));
      break;
    case DFPlayerCardInserted:
      Serial.println(F("Card Inserted!"));
      break;
    case DFPlayerCardRemoved:
      Serial.println(F("Card Removed!"));
      break;
    case DFPlayerCardOnline:
      Serial.println(F("Card Online!"));
      break;
    case DFPlayerPlayFinished:
      Serial.print(F("Number:"));
      Serial.print(value);
      Serial.println(F(" Play Finished!"));
      break;
    case DFPlayerError:
      Serial.print(F("DFPlayerError:"));
      switch (value) {
        case Busy:
          Serial.println(F("Card not found"));
          break;
        case Sleeping:
          Serial.println(F("Sleeping"));
          break;
        case SerialWrongStack:
          Serial.println(F("Get Wrong Stack"));
          break;
        case CheckSumNotMatch:
          Serial.println(F("Check Sum Not Match"));
          break;
        case FileIndexOut:
          Serial.println(F("File Index Out of Bound"));
          break;
        case FileMismatch:
          Serial.println(F("Cannot Find File"));
          break;
        case Advertise:
          Serial.println(F("In Advertise"));
          break;
        default:
          break;
      }
      break;
    default:
      break;
  }

}
In this video, to clarify, that is the speaker saying a test file, not me talking into the microphone.
Reflection
This week I learned a lot about using neopixels in micropython and the differences it has from C++. I also learned a lot about using speakers in general, since I had never done that before. I learned that they require little programming to work on their own since they output sound waves from an electrical input.
Files and Group Work
Find my files here and my group work here. This week in group work I provided my neopixel array to do the tests along with wiring the power supply to the neopixels.