Week 11: Inputs
This week I worked on my joystick and buttons for my battleship game. I also decided to learn something new, I did the MPU-6050 gyroscope using IIC on the Seeed XIAO RP2040.
Joystick in Micropython
I found this website that set up the code perfectly. After reading the website and analyzing it, I was able to dissect the code into 3 main parts, the initial setup, the joystick initializing, and the if statements.
The initial setup:
#Dylan Ferro Fab Academy 2023
 from machine import Pin, ADC
import utime

xAxis = ADC(Pin(28))
yAxis = ADC(Pin(27))
button = Pin(26,Pin.IN, Pin.PULL_UP)
The joystick initialization:
#Dylan Ferro Fab Academy 2023
while True:
    xValue = xAxis.read_u16()
    yValue = yAxis.read_u16()
    buttonValue = button.value()
    xStatus = "middle"
    yStatus = "middle"
    buttonStatus = "not pressed"
The if statements:
#Dylan Ferro Fab Academy 2023
 if xValue <= 600:
        xStatus = "left"
    elif xValue >= 60000:
        xStatus = "right"
    if yValue <= 600:
        yStatus = "up"
    elif yValue >= 60000:
        yStatus = "down"
    if buttonValue == 0:
        buttonStatus = "pressed"
    print("X: " + xStatus + ", Y: " + yStatus + " -- button " + buttonStatus)
    utime.sleep(0.1)
Here is the full code:
#Dylan Ferro Fab Academy 2023
from machine import Pin, ADC
import utime

xAxis = ADC(Pin(28))
yAxis = ADC(Pin(27))
button = Pin(26,Pin.IN, Pin.PULL_UP)

while True:
    xValue = xAxis.read_u16()
    yValue = yAxis.read_u16()
    buttonValue = button.value()
    xStatus = "middle"
    yStatus = "middle"
    buttonStatus = "not pressed"
    if xValue <= 600:
        xStatus = "left"
    elif xValue >= 60000:
        xStatus = "right"
    if yValue <= 600:
        yStatus = "up"
    elif yValue >= 60000:
        yStatus = "down"
    if buttonValue == 0:
        buttonStatus = "pressed"
    print("X: " + xStatus + ", Y: " + yStatus + " -- button " + buttonStatus)
    utime.sleep(0.1)
Here is it working:
Here is the joystick file.
MPU-6050
I found this tutorial on how to use the mpu6050 with an Arduino UNO. I also found this video that showed how to get it to work with the rp2040.
Arduino Uno
I followed the tutorial and I wired it with this diagram:
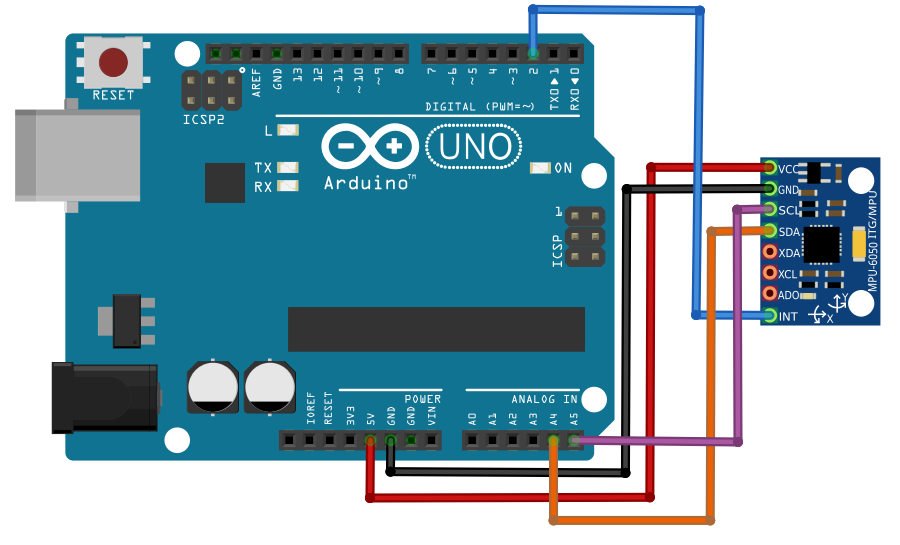
After doing this I uploaded the code to the Arduino. I did this by first adding the I2Cdev Library then the MPU6050 Libray. After that, I went to file>examples>MPU6050>MPU6050_DMP6 and opened that file. Library and Code.
RP2040
I followed the tutorial to make the mpu6050 work with the rp2040. I started by wiring the devices on a breadboard with this diagram.
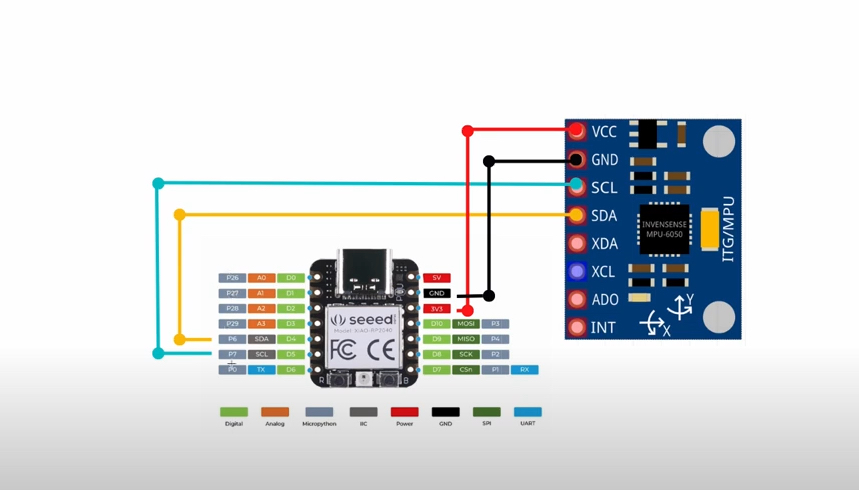
After wiring this diagram I opened this code in thonny.
#Dylan Ferro Fab Academy 2023
from imu import MPU6050
from time import sleep
from machine import Pin, I2C

i2c = I2C(1, sda=Pin(6), scl=Pin(7), freq=400000)
imu = MPU6050(i2c)
#imu.accel_range = 2

while True:
    ax=round(imu.accel.x,2)
    ay=round(imu.accel.y,2)
    az=round(imu.accel.z,2)
    gx=round(imu.gyro.x)
    gy=round(imu.gyro.y)
    gz=round(imu.gyro.z)
    tem=round(imu.temperature,2)
    print("ax",ax,"\t","ay",ay,"\t","az",az,"\t","gx",gx,"\t","gy",gy,"\t","gz",gz,"\t","Temperature",tem,"        ",end="\r")
    sleep(0.4)
If you try to send this code to the rp2040, you will most likely run into at least 2 issues. Either the RP2040 will not show up as a device, or the libraries will not work.
RP2040 in Micropython
To use an rp2040 in micropython, you must prepare it. Download this folder and extract it. Then plug in the rp2040 while holding down the Boot button in the bottom right. If done correctly, a folder will open labeled uf2. Drag and drop the file from the downloaded folder into the uf2 folder, and the folder should disappear. if this happens you did it right. Now go back into thonny and the rp2040 should show up under COM ##.
Building Libraries
With this code, it is required to build your library from a provided code. Here are both libraries you will need. Open both files in thonny. Then save them as “imu.py” and “vector3d.py” on the RP2040 not on the computer. This is done correctly if the labels have brackets around them. Then you can run the code in thonny with the run button.
Here are the results:
Reflection
I think this week was difficult for me because of the building of libraries. Building libraries is something new for me and I will use this skill in my final project.
Group Work
For this week’s group work, I helped set up the tools required to test the input.