Individual Assignment
Browse through the data sheet for your microcontroller.
Program a microcontroller development board to to interact (with local input &/or output) and communicate (remotely) and for extra credit use different languages &/or development environments
Group Assignment
Compare the performace and development workflows for other architecture.
Learning outcomes
- Identify relevant information in a microcontroller datasheet.
- Implement programming protocols.
Browse through the data sheet for your microcontroller.
This week I wanted to get more familiar with the Seeed Studio XIAO Series and compare the development boards. I browsed through the microcontroller datasheets for each development board.
The Seeed Studio XIAO Series development boards are:
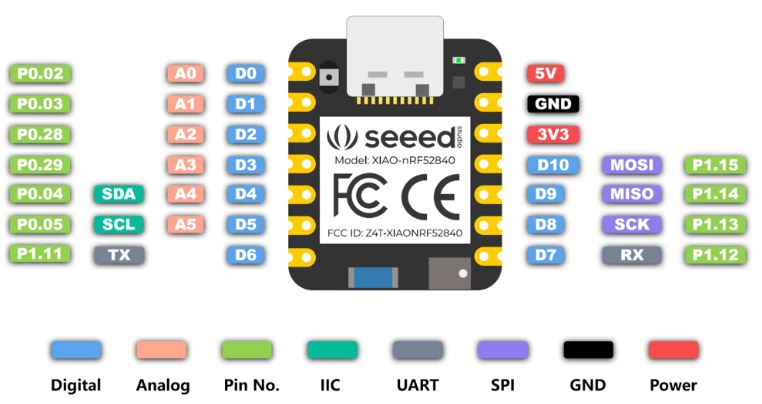
- Seeed XIAO BLE, Seeed XIAO BLE Sense. nRF52850 microcontroller datasheet
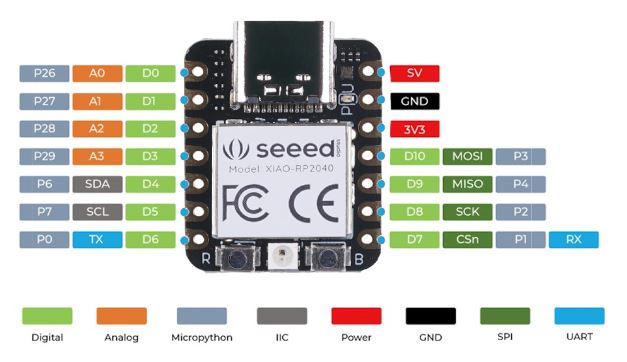
- Seeed XIAO RP2040. RP2040 microcontroller datasheet
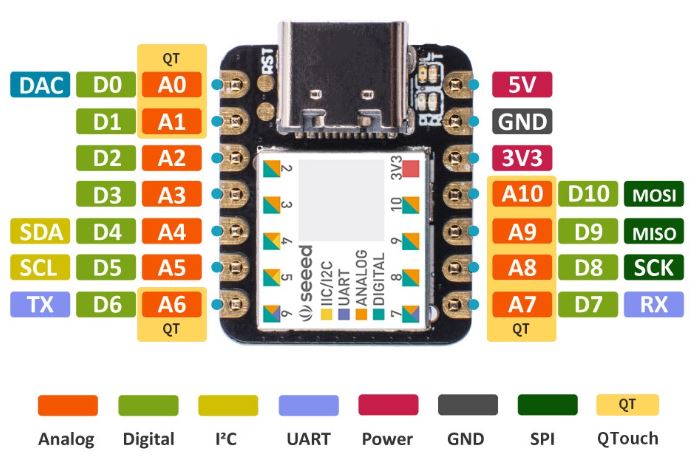
- Seeeduino XIAO. SAM D21 microcontroller datasheet
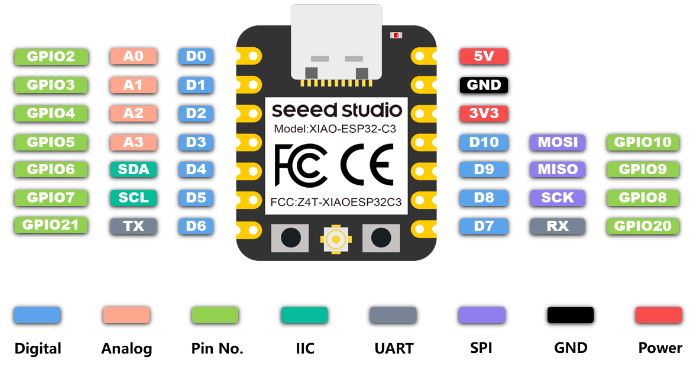
- Seeed Studio XIAO ESP32-C3. ESP32-C3 microcontroller datasheet
The nRF52840, the SAMD21 and the RP2040 in the XIAO BLE, Seeeduino and XIOA RP2040, are all ARM Cortex microcontrollers which means they are harvard architecture, which means that the instructon and data have physically separated memory space. The ESP32-C3 is a single-core Xtensa LX6 microcontroller based on the open-source risc-V architecture. The datasheets contain a lot of information and technical details that are hard to comprehend on a quick browse-through.
So, I also went to the Seeed studio wiki to find more user friendly information that pertain to the XIAO boards.
Seeed XIAO BLE and Seeed XIAO BLE Sense Features
- Bluetooth 5.0 with an integrated antenna
- Nordic nRF52840, ARM® Cortex®-M4 32-bit processor with FPU, running at 64 MHz
- Standby power consumption is less than 5μA
- Chip for battery charging: supports the charge and discharge control of lithium batteries.
- Onboard 2 MB flash
- PDM microphone on board (only in Seeed Studio XIAO nRF52840 Sense) 6-axis internal LSM6DS3TR-C IMU (only in Seeed Studio XIAO nRF52840 Sense)
- 11 digital I/O that can be used as PWM pins and 6 analog I/O that can be used as ADC pins.
- Serial interfaces: UART, I2C, and SPI
- Reset button
- 3-in-one LED/ Charge LED
Seeed XIAO RP2040 Features
- Dual-core RP2040 processor that can flexible clock running up to 133 MHz
- 264KB of SRAM, and 2MB of on-board Flash memory
- 11 digital pins, 4 analog pins, 11 PWM Pins, 1 SWD Bonding pad interface
- Serial interfaces: UART, I2C, and SPI
- Reset button and a bootloader mode button
- Full-color RGB/ 3-in-one LED
Seeeduino XIAO Features
- ARM® Cortex®-M0+ 32bit 48MHz microcontroller(SAMD21G18)
- 256KB of Flash memory, 32KB of SRAM
- 11 digital/analog pins, 10 PWM Pins, 1 DAC output,
- Serial interfaces: UART, I2C, and SPI, SWD Bonding pad interface
Seeed Studio XIAO ESP32-C3 Features
- ESP32-C3, 32bit RISC-V singlecore processor that operates at up to 160 MHz
- Complete WiFi subsystem: Complies with IEEE 802.11b/g/n protocol and supports Station mode, SoftAP mode, SoftAP + Station mode, and promiscuous mode
- Bluetooth LE subsystem: Supports features of Bluetooth 5 and Bluetooth mesh
- External antenna to increase wireless signal strength
- Battery charging chip: Supports lithium battery charge and discharge management
- 4 MB of Flash memory, 400 KB of SRAM
- 11 digital pins that can be used as PWM and 4 analog pins that can be used as ADC
- Serial interfaces: I2C, SPI, I2S, 2xUART, JTAG bonding pad interface
- Reset button and a bootloader mode button
- Charge LED
Comparison table from Seeed wiki page
| Item | Seeed Studio XIAO ESP32C3 | Seeeduino XIAO | Seeed XIAO RP2040 | Seeed XIAO BLE | Seeed XIAO BLE Sense |
|---|---|---|---|---|---|
| Processor | ESP32-C3 32-bit RISC-V @160MHz | SAMD21 M0+@48MHz | RP2040 Dual-core M0+@133Mhz | nRF52840 M4F@64MHz | nRF52840 M4F@64MHz |
| Wireless Connectivity | WiFi and Bluetooth 5 (LE) | N/A | N/A | Bluetooth 5.0/BLE/NFC | Bluetooth 5.0/BLE/NFC |
| Memory | 400KB SRAM, 4MB onboard Flash | 32KB SRAM 256KB FLASH | 264KB SRAM 2MB onboard Flash | 256KB RAM, 1MB Flash 2MB onboard Flash | 256KB RAM,1MB Flash 2MB onboard Flash |
| Built-in Sensors | N/A | N/A | N/A | N/A | 6 DOF IMU (LSM6DS3TR-C), PDM Microphone |
| Interfaces | I2C/UART/SPI/I2S | I2C/UART/SPI | I2C/UART/SPI | I2C/UART/SPI | I2C/UART/SPI |
| PWM/Analog Pins | 11/4 | 11/11 | 11/4 | 11/6 | 11/6 |
| Onboard Buttons | Reset/ Boot Button | N/A | Reset/ Boot Button | Reset Button | Reset Button |
| Onboard LEDs | Charge LED | N/A | Full-color RGB/ 3-in-one LED | 3-in-one LED/ Charge LED | 3-in-one LED/ Charge LED |
| Battery Charge Chip | Built-in | N/A | N/A | BQ25101 | BQ25101 |
| Programming Languages | Arduino | Arduino/ CircuitPython | Arduino/ MicroPython/ CircuitPython | Arduino/ MicroPython/ CircuitPython | Arduino/ MicroPython/ CircuitPython |
Conclusion
Looking through the Seeed XIAO boards I can see the difference in each and which board I would choose for different projects. The physical size of all boards is the same but there is still quite a difference in the boards.
The Seeed XIAO SAMD21 board has the least amount of features but is still a great board. It requires low power and is suitable for small projects for example wearables. it has a digital-to-analog converter on board, so you can play with real analog signals, not just PWM. This can be utilized on pin 0. You can use PWM on pins 1 through 10, so you can connect a lot of peripherals to this tiny board.
The Seeed XIAO nRF52840 board has a bunch of features. NFC and ultra-low power Bluetooth, this model enables wireless use of wearable technology. Because both wireless alternatives have built-in antennas it doesn't require any additional hardware. It provides ultra-low power consumption as 5 μA in deep sleep mode while supporting lithium battery charge management. The XIAO nRF52840 Sense version It has a digital microphone and a 6-axis IMU, enabling voice and gesture recognition. You can also run an AI on this board using TinyML and will allow for machine learning.
The Seeed XIAO ESP32-C3 is an IoT-centric model with Wi-Fi and Bluetooth 5. There is also a power saving mode, but it consumes a slightly higher current load of 44 μA, which is still within the limits of battery power.
I would probably go for the RP2040 over the SAMD21 because they cost the same while the RP2040 has more computing power. I would go for the nRF52840 if my project was battery based especially if I needed the microphone and 6-axis sensor that come with the Sense version. For an IoT project I would go for the ESP32-C3.
Program a microcontroller development board to to interact and communicate.
I have both the Seeeduino XIAO and the XIAO RP2040 and for this exercie I will be using the Seeeduino.
Step 1 would be to download the Arduino IDE, I already have that installed so I didn´t need to go through that step. It´s pretty straightforward just google Arduino IDE, download and install.
Step 2 is to install the Seeeduino XIAO board package. To do this go to Tools > Board > Boards Manager. Search for Seeeduino XIAO and install the package. That´s it, you´re ready to play around with your board.
For this project I just wanted to make a really simple code to interact with the board, blinking the onboard LED with commands from my computer keyboard, so if I press ´1´ the LED will blink onece, if I press ´2´the LED will blink twice etc.
After looking at the blinking light example I browsed online for how I could use keyboard input in my code. I found a code snippet online that got me started. Link to code snippet. The part of the snippet I used was the parseInt() function that takes in a string and converts it to an integer. Then I used an if statement to check if the input was a number between 1-9 and then a for loop that blinks the LED based on the number.
//this program blinks the internal led on a Seeeduino XIAO
//it uses serial communication to send a keypress to the Seeeduino
//the Seeeduino blinks once if the keypress is ´1´ and twice if the keypress is ´2´ etc.

void setup() {
	pinMode(LED_BUILTIN, OUTPUT);
	Serial.begin(9600);
}

void loop() {

	while (Serial.available() == 0) {
	}

	int key = Serial.parseInt();

	if (key >= 1 && key <= 9) {

		Serial.print("You pressed: ");
		Serial.println(key);

		for (int i = 0; i < key; i++) {
			digitalWrite(LED_BUILTIN, HIGH);
			delay(500);
			digitalWrite(LED_BUILTIN, LOW);
			delay(500);
		}

	Serial.println("Press another number on your Keyboard");
	}
}
Project video (hero shot)
Extra credit
Use different languages &/or development environments
I have wanted to try this new IDE and what better time than now and get some extra credit at the same time.
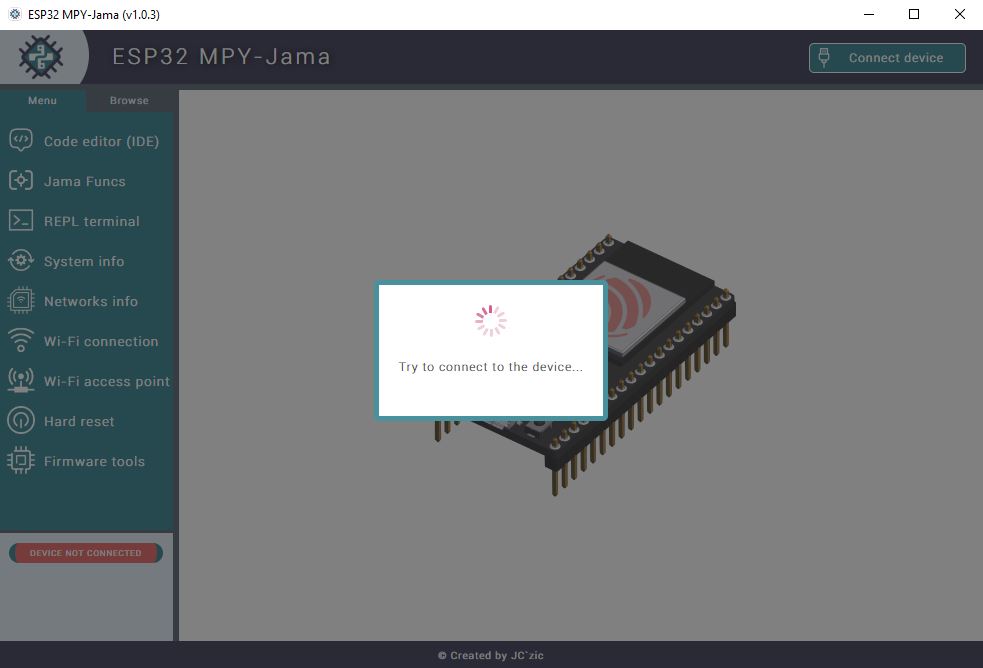
The IDE is called ESP32 MPY-Jama and is available on Github.
Description from the Github page
A powerful tool that easily connects to Espressif ESP32 microcontrollers with MicroPython, providing an IDE, file manager, REPL, real-time dashboards and advanced features for efficient development on MacOS & Windows.
I opened the IDE and pugged in a brand new Seeed XIAO ESP32-C3. I waited for a while but nothing happened. It was unable to connect to the device.
So I plugged in my ESP8266 NodeMCU just to see if it works.
That didn´t work either so I guess I´ll have to get myself a ESP32 or wait a while as they are putting up daily updates and who know, maybe the XIAO ESP32-C3 will be available soon.
I really want to try to use Python instead of C++ and I will update this page when I get the chance.
UPDATE! - Got MPY-JAMA to work!!
My instructor Árni told my I had to flash a micropython firmware on the chip before I could use the IDE. It was a bit of a hassle to get it to work but I was finally able to do so.
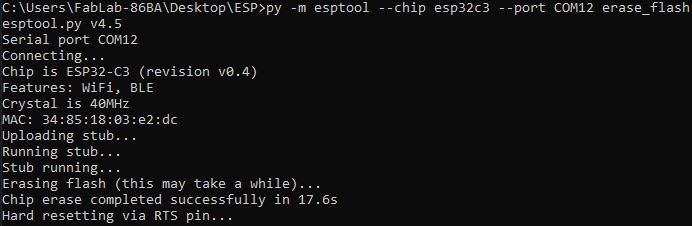
First I had to make sure I had esptool up and running on my computer. I used the following command in cmd: pip install esptool. To make sure I had esptool installed I did the following command py -m esptool --version

Since I was using MicroPython on my board for the first time I had to erase the entire flash on the board using this command: py -m esptool --chip esp32c3 --port COM12 erase_flash. Just make sure to use the right COM port, I was using COM12.
To figure out which port I was using I opened the Arduino IDE and under Tools-Port I could see which port the XIAO was connected to.
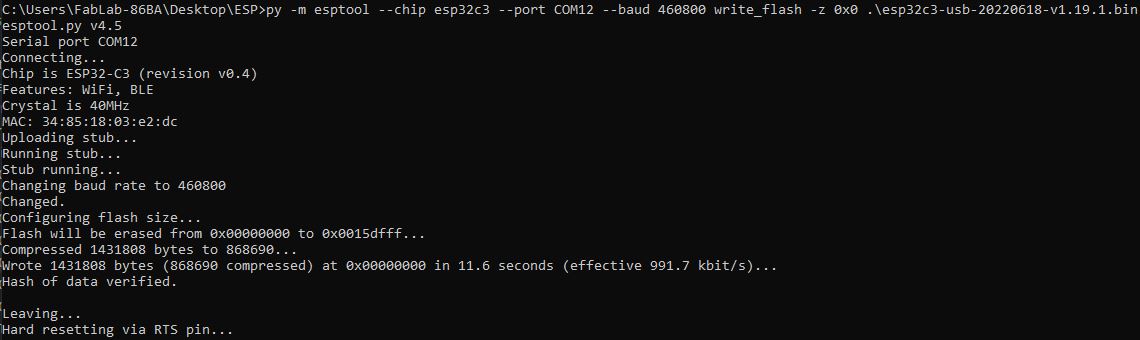
I could then go ahead and flash my XIAO esp32-c3 board with the MicroPython firmware using this command: py -m esptool --chip esp32c3 --port COM12 --baud 460800 write_flash -z 0x0 .\esp32c3-usb-20220618-v1.19.1.bin.
Again making sure the COM port was correct, and I was in the directory in which the firmware was located.
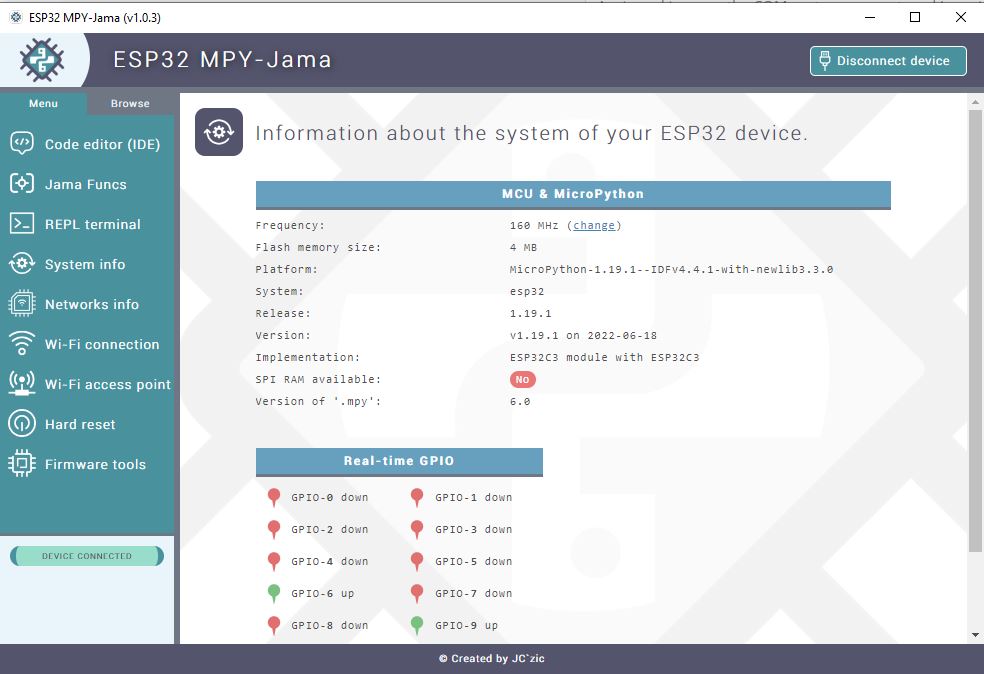
In the ESP32 MPY-Jama IDE I can access information on my XIAO esp32-c3 board and connect directly to wifi and create a hotspot using my XIAO
Board information
Connecto to wifi
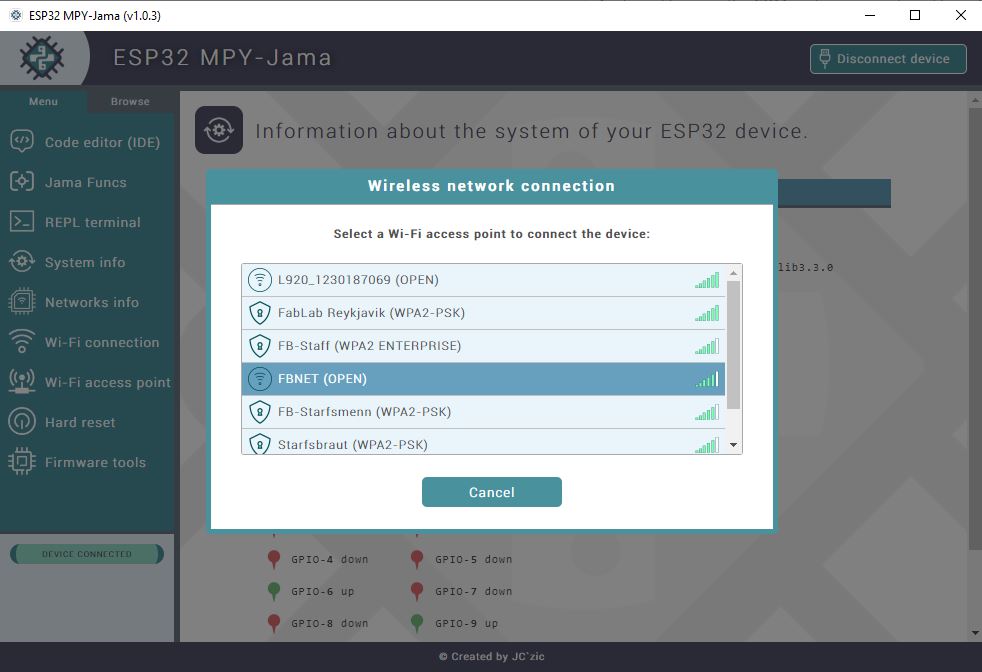
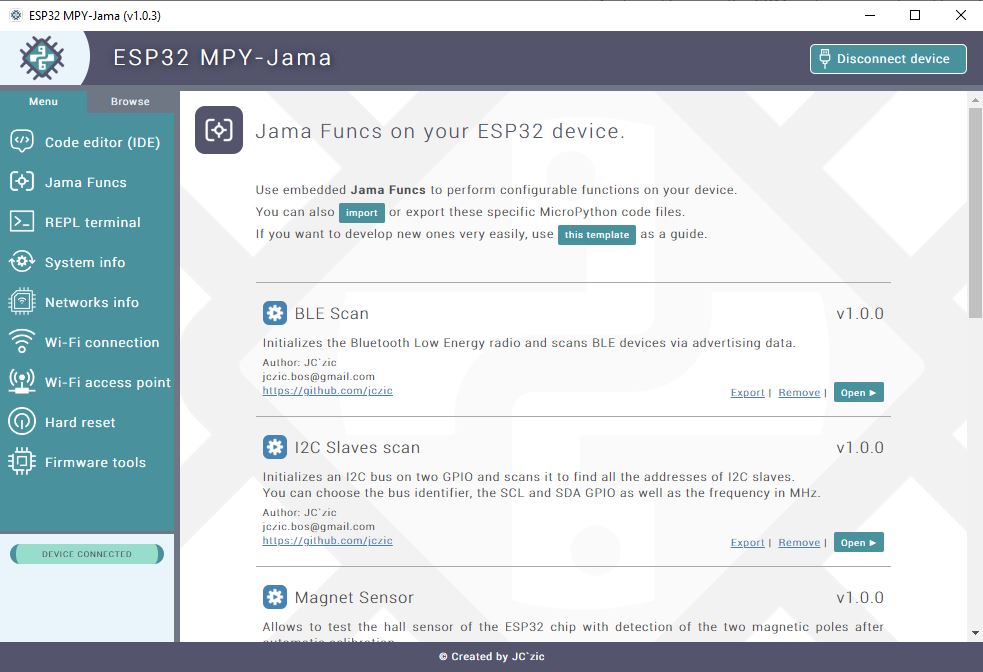
I can also use the code editor and play around with python code in the terminal. There are also some preset functions that I can use such as BLE scan, NTP Time Sync and more.
Code editor
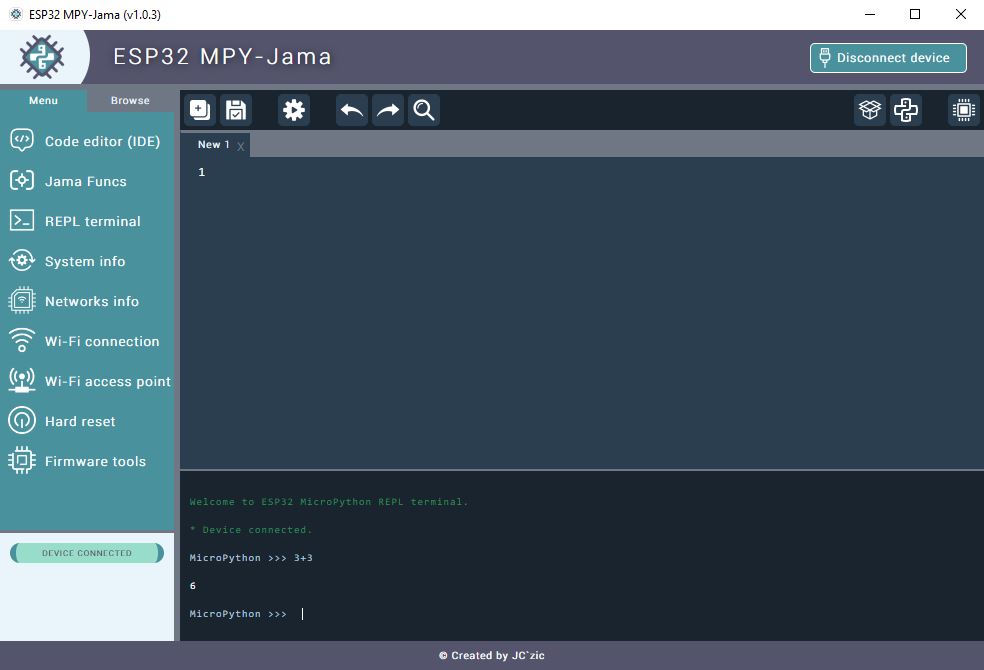
Connecto to wifi
Now I just need to practice coding in python for my XIAO but I´m just happy for now that I got everything to work.
Write a simple program
I wanted to try a simple program just to make sure that everything was working. I wanted to connect the XIAO to a wifi network and print to screen current real time data.
I opened up the ESP32 MPY-JAMA application and was greeted with a prompt to update the application, which I did.
On the left hand side menu I open up the Code Editor. To make the code I asked ChatGPT to give me a simple MicroPython code to display current real time data using wifi.
Here is the code ChatGPT generated.
import utime
import network
import ntptime

# Connect to Wi-Fi
wifi_ssid = "Your_WiFi_SSID"
wifi_password = "Your_WiFi_Password"

wifi = network.WLAN(network.STA_IF)
wifi.active(True)
wifi.connect(wifi_ssid, wifi_password)

while not wifi.isconnected():
	pass

print("Connected to Wi-Fi")

# Main loop
while True:
	try:
		# Synchronize time with NTP server
		ntptime.settime()

		# Get the current time
		current_time = utime.localtime()

		# Format the date, month, year, and time as strings
		date_string = "{:02d}-{:02d}-{}".format(current_time[2], current_time[1], current_time[0])
		time_string = "{:02d}:{:02d}:{:02d}".format(current_time[3], current_time[4], current_time[5])

		# Print the date and time on the screen
		print("{} {}".format(date_string, time_string))

		# Delay for 1 second
		utime.sleep(1)

	except OSError as e:
		print("Error:", e)
		# Retry after a delay
		utime.sleep(10)
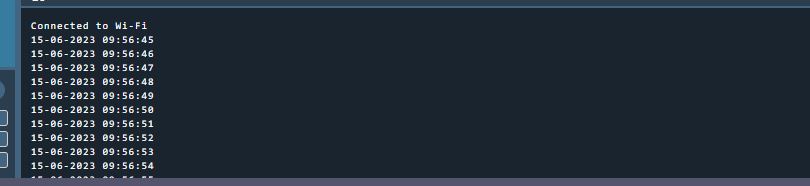
I copy/pasted the code and hit the execute code button.
The code works and prints to screen the current date and time.
Print real time clock on screen
Group Assignment
Compare the performace and development workflows for other architecture.
For our group project me and Hafey did a comparison of a few microcontrollers. Link to group assignment.
The table on the group page shows the technical specs for Seeed Studio XIAO ESP32C3, Seeeduino XIAO, Arduino UNO and Arduino Nano RP2040 Connect. The Seeduino XIAO and the Arduino RP2040 are both from ARM but the XIAO ESP32C3 is RISC-V and the Arduino Uno is AVR from Atmel. The biggest difference to mention in these boards is the memory, pins and wireless connectivity. The Arduino RP2040 has by far the most flash memory of 16mb, the XIAO ESP32C3 has 4mb and the Arduino Uno and Nano RP2040 have 32kb. The Arduino 2040 has 20 pins, 8 of which can be used as analog, the UNO also has 20 pins but only 6 can be used as analog. Both the Seeed boards have 11 pins but the ESP32C3 can only use 4 of those as analog while the Seeeduino can use 6 pins as analog. Both the ESP32C3 and the RP2040 have WiFI and Bluetooth while the other two do not have wireless networking. The Seeeduino XIAO is the only board to support CircuitPython while all boards support Arduino development workflows.
When it comes down to choosing a board for a project it just depends on what you need. If you need wireless connectivity you would need the ESP32C3 or the RP2040, and if you do not need many pins then the XIAO ESP32C3 would be a good pick. However, if many pins are needed then the Arduino RP2040 would be better. Also, if you need a lot of memory then the Arduino RP2040 would be the best choice. If you need a board that supports CircuitPython then the Seeeduino XIAO would be the only choice. Then it is a matter of the form factor. Both Seeed boards are extremely tiny and would work well with for example wearable devices, just depends if you need a lot of processing power or wireless communication. The Uno is the biggest board and would work fine for development but I would choose another board for production based on size alone. In my personal opinion I like the XIAO ESP32C3 the most as it is tiny and has wireless connectivity, but for bigger projects that need many pins I would go for the Arduino RP2040.