14. Interface and application programming
This week we investigated some programming and user interfaces. So far in this course we’ve used Arduino ide, which is basically C++ to program our boards. We haven’t used other programming languages. And we have not created our own user interfaces. This was the week we started delving into that.
Goals for the week
- Linked to the group assignment page and reflected what you learned individually of the group assignment.
- Documented your process
- Explained the UI that you made and how you did it
- Outlined problems and how you fixed them
- Included original code (or a screenshot of the app code if that’s not possible)
- Included a ‘hero shot/video’ of your application running with your board
Useful websites
Group work
Group work wasn’t really group work this week. We were told to investigate some other options for programming languages and to look into other types of user interfaces and graphics that people have designed. So that’s what I did by looking through some of the links from Neil’s lesson page.
Some highlights:
- Language: Julia!! This is something I decided to look at bc my daughter’s name is Giulia (Italian spelling). I didn’t even know this existed. The applications/areas of application that are listed on the page include visualization, data science, machine learning and parallel computing. I should recommend that my colleagues take a look at this as we develop a data science program. This is NOT my area of expertise, but the demos shown are really nice. It’s funny bc the first example I looked at had something to do with visualizing the Mandelbrot set. Is “Julia” from the Julia set? I can’t find that info but probably since this looks like super mathy appications are a strength of Julia.
- Language: Java. So as you see below, I haven’t been programming much in the last 25 or so years… So you would think everyone knows Java. Well, not this math professor. So let’s check it out. According to itself, Java runs on 3 billion devices worldwide, meaning it’s one of the most popular languages out there. I checked out the “hello world” program on this site which had more info than the actual Java site. I will admit that when I opened the code I said “oh god…” because it looks gross. I was able to decipher the python example we were given pretty easily (see below). This code was gross. I guess the gross part is called the “main method” which is already super non descriptive. Is this why no one wants to talk to computer programmers?!?! Blech. Anyway, this line of code is apparently where all the action happens, but so not easy to understand that the page I was looking at didn’t even try: public static void main(String[] args) { … }. Learning Java is not going to be my summer project. Onwards…
- Language: Javascript. Is this different from Java? I literally have no idea. Javascript is apparently “the programming language of the web.” So according to Wikipedia, these are 2 very different beasts. Wow, learn something new every day. I seriously had not paid enough attention to realize this before. The example code I looked at definitely looked a lot more familiar and less gross than the Java ones. Still a lot more gross than Python. But maybe that’s only reflective of the examples I looked at.
- Data Interface: Calc Sure I clicked on this because of its name. I mean, as a math professor who teaches tons of Calc, I had to know: what is this!?!! Turns out it’s a spreadsheet program that the company claims “you’ve always needed.” Um, how do they know it’s the spreadsheet program I always needed. What are my spreadsheet needs? I learned a lot of Excel tools when I taught at the US Military Academy at West Point because we taught with Excel. I can sort like no one’s business… and find mins and stuff (usually with the help of Google, so what do I really know about spreadsheets). Anyway, got distracted. What is the benfit of this Calc thing.... Upon investigating it looks interesting with its abilities to do some data analysis - optimization and all. Again, not my expertise, but may be interesting to check out for folks who do that sort of math. Maybe some nice program/functions options and seems to be able to output data in pleasing ways.
- User Interface: PyClutter So I clicked on this one because I figured it was an interface with Python, which we’ve clearly established is THE programming language to use (sarcasm, but not really). Also because it has the word “clutter” in it and that’s the current status of my life, office and house. I can’t find my office keys because of the clutter. So what is this?!?! Who made this thing. It’s got actors and stages and talks about making 3d interfaces, but not really bc they are only 2d. Don’t mess with dimensions non-math people. So I guess this is just another way to make a stage (like a screen or window maybe) and put actors on it (like rectangles, images or text). The example on this page created a black rectangle in a window. Um…if this is supposed to convince me of the awesomeness of the Clutter theatre-nerd world, I’m not there. I guess I’d have to dive more into this…I wonder if there are more theatre references later. Do they have Shakespeare class objects or Noel Coward settings. Yep, that’s the extent of my playwright knowledge (I mean there is that play by Steve Martin, Picasso at the L’apenagile (just spelled that horribly wrong) that is kind of fun). Ok, moving one. I’m going to look into one more thing.
- Graphics: I clicked on Renderman in Neil’s list. Now I can make pixar-like movies!!?? I’m in. Except I have zero creative talents like writing an awesome script. But the image on this page is from Luca, so we’re all good here. And when you look at a page and one of the topics is “Advanced Hair Shading” where can you go wrong?! We all know how amazing these pixar movies are, but the detail necessary for the images is so totally in depth and nuts. Hair shading!! How many mathematicians/scientists/computer scientists do you think it takes to create all of this. This is a cool page that maybe I’ll come back to visit. I can’t image how it’s going to be useful to me right now.
Individual work
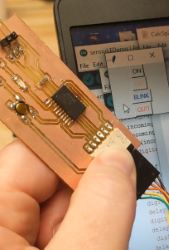
This week we used one of our own boards (I used the LED button board again from week 7 where you can find all the info about the board) as an input/output. I used the one with an LED, so this was an ouput. We all started with Brandon’s code as an example. He shared it from his Fab Academy Programming week last year
Python code
I had never even seen Python code before. When I first learned to program in high school in the 1990s I used Basic. Then in college I learned C/C++. Since then I’ve used small parts of code in Mathematica, Maple and OpenScad, but I’ve not been actually programming. I’m not sure you would call this week programming either. But I took some code that Brandon shared with us, understood what he did (create 3 buttons for an LED output) and adapted it.
To open the python code to edit it you can use any text editor. Brandon suggested sublime and as soon as he showed me his code in the program I was sold. It’s nice because it color codes the text in terms of its useage, etc. This made it much easier to actually figure out how to edit the file he shared with us because it was fairly straightforward to determine what everything was doing.
My python code creates a window for the graphical interface with the following code
window = Tk()
Note right away that one difference between C++ and python is the absence of semicolons at the end of every line.
The next part of the program defined which port we are using to talk to the board and the baud rate. In the Arduino ide those are not part of the code, but are properties that must be selected each time before upload.
port = serial.Serial('COM15', 9600)
Then we wrote some function definitions, as below in the screenshot. Note that one thing I googled was to determine what the “b” did in the code and then you see I wrote a comment. In last week’s work we were taking in ascii characters from the computer serial monitor with the arduino code. Here we are taking in bytes from the GUI window. So we need to make sure we know what kind of data we have. You see in the Arduino program that there’s a note about not needing to adjust the input like we had to for ascii last week (we subtracted 48 to convert the digits).
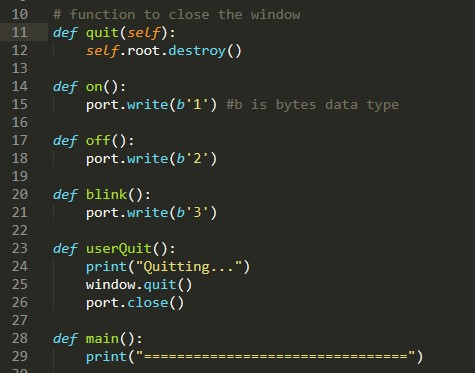
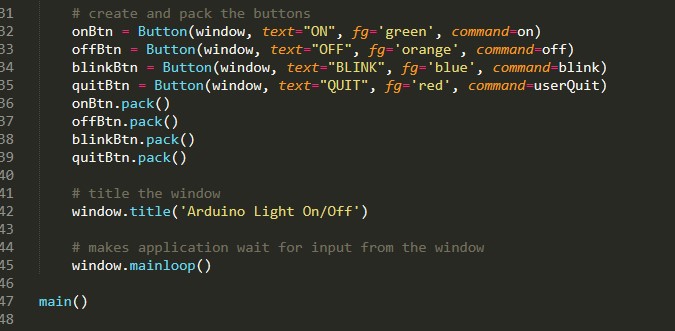
Lastly we needed to define the buttons. Brandon had just given 3 options for his buttons, but I wanted to have differnt options for the LED light on my board. You can see I have defined and On button, an Off bottun, a Blink button and then a Quit button. Below you see the code that creates and then “packs” these buttons. And you see a screenshot of the board and the buttons on the computer screen. Somehow I didn’t manage to take a video of the whole thing working. Will try to come back to do that later. There is a video of the unedited program running - so no blink button yet. That’s also included below.
Tkinter
Tkinter is Python’s default GUI (Graphical User Interface) according to all things on the web.
I used very basic Tkinter in my program. You can see that above.
There is SO MUCH MORE TO LEARN!! The Tkinter tutorial linked above seems like a really great way to work through some of the various options of differing degrees of difficulty. I hope to have more time to play with this soon. I don’t think my final project is going to have computer interface, but this is definitely interesting…
A few things I played with: changing the size and position of the window with the following command:
root.geometry('600x400+50+50')
This makes the window 600 by 400 and then moves it 50 pixels from the left and the top of the screen.
You can change the icon at the top of the window from the little tkinter feather logo. That’s pretty cool. You can convert a jpg or a png to a .ico. I have never heard of that. I will look into it later. Like that idea of having total control over the appearance of your window.
There are a number of different “widgets” that you can add to your window. We used buttons in our code, but there are also radio buttons, frames, etc. You can find more on that page of the tutorial here. I particularly enjoyed this radio button example on selecting shirt sizes. This is really cool.
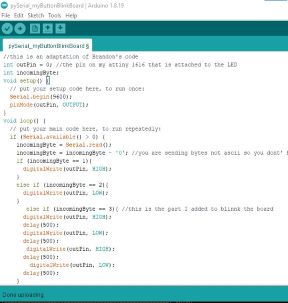
Arduino Code
My Arduino code was pretty straightforward. It took in the bytes sent from the Tkinter window and then told the LED what to do. Here’s a screenshot.
Files
- Arduino code for my board to take input
- Python code for creation of interface and connecting to my board