2. Project management
This week I worked on defining my final project idea and started to getting used to the documentation process.
Goals for the week
- Made a website and described how you did it
- Created a section about yourself on that website
- Added a page with a sketch and description of your final project idea(s)
- Documented steps for creating your Git repository and adding files to it
- Pushed to the class GitLab
- Signed and uploaded Student Agreement
Useful links
- Learn the Basics of Git in Under 10 Minutes
- FabAcademy Tutorials - Git Simple Cheat Sheet -Markdown Tutorial
- TinyPNG
- Markdown
- Video Studio Code Overview
- Getting started with MkDocs
Making a website
Well, I don’t know that what I did was really make a website as much as edit one we were given. While I would love to make a beautiful site, at the moment I haven’t learned enough to make that happen. So here I am editing what I was given. This actually still took quite a bit of learning and trial and error. I am grateful to the folks running our local FabAcademy who helped us all after I tried to read through the tutorials. I also appreciated the FabAcademy Monday morning recitation by Krisjanis Rijnieks. That session really helped answer some questions and gave a great overview that I needed to pull the ideas together after working on this for a few days.
The set up
Ok, we were given a “repo” in/on the FabAcademy Gitlab space. People kept saying “repo” and I had no idea what they were talking about. I’ve come to figure out that they mean repository, basically a space with a bunch of files that we can edit and set up however we want. This is where all our FabAcademy work (and documentation) lives in order to be shared publicly.
So, great! There are files! I can just edit them.... No so fast young chicken. In order for this to work well, you should actually copy that repository onto your local computer so that you can edit there. You can actually edit a whole lot and get everything all set up with no internet access this way. That’s pretty useful for folks with no/spotty internet. So now we need 2 things: A way for my computer to talk to the FabAcademy Gitlab space (Git) and a way to edit the pages (Video Studio Code).
Git
A little background: Again, Kris’s recitation offered a nice overview of what Git is. The analogy I found most helpful was that it is like when a book is published and then a few years later a second edition comes out, but maybe has a new foreword. Then a few years later a third edition comes out and now has a reflection from the author about how they wrote the book. You have seen this kind of thing with either older fiction books or textbooks. The textbooks will always have a section “what is new in this edition” to try to convince you that you really NEED the new edition because it’s got substantial changes. But you can usually access old editions even if there is a new one. This seems like what Git does when it saves all versions of all files.
Note: Git was written “in a day” by Linus Torvalds. Also, Miriam Webster defines “git” as “a foolish or worthless person.” So interpret that all as you wish!
Now on to the details of using Git. We are using Gitbash. So I went to Git for Windows to download the program.
In the Monday recitation I learned that there are 4 “how-to” videos, depending on your platform, on how to install git. You can also find the slides from the recitation, which I totally recommend! Find all that info on the Version Control site.
I followed along two different tutorials to set up Git on my computer and to get it to “speak to” (share files really) with my repo on the FabAcademy Gitlab. It was all pretty straightforward until I got to the part of actually copying my personal repo. So let’s start with the first few steps.
The two pages I used were the FabAcademy Tutorials - Git Simple Cheat Sheet and Learn the Basics of Git in Under 10 Minutes. The latter is totally not an accurate title. Going through this tutorial took me the better part of an hour and I didn’t finish. Both sites have lots of links embedded for the steps.
First steps to set up Git:
- Set your Git username and email.
- Configure your email for uploading.
- Check to see if you have an SSH Key and if not, generate it (link from recitation)[https://docs.gitlab.com/ee/ssh/ ]
- Copy the key and add it to your personal FabAcademy Gitlab site. You find the SSH key page through the profile link on your site.
- Make sure you have a folder set up on your computer and change directory (cd) to get there.
- Clone your student repo. You can find your link on your own site that already exists on the FabAcademy page. This was the part that I didn’t get to work until we went over it in our lab. It also seemed to cause others problems. To be honest, I don’t think we all had the same problem and so I’m not sure why it didn’t work the first time. So if this is where you get stuck too, totally ask someone to go over it with you. It’s might be like when you go to office hours to ask a professor why your problem isn’t working out and then you do what you have been doing, but while they are watching it miraculously works. Spencer said we should talk to our rubber ducky to see if that makes it work: “rubber ducking” was that the term??
Once you have done this, you should never have to do it again, unless you switch computers.
Video Source Code (VSCode)
There are lots of choices for editors once you have your files on your computer. We are using Video Source Code. This is a pretty straightforward text editor using Markdown. This Markdown Tutorial was super helpful to start learning the basics in Markdown. It included information like how to bold words, italicize words, make lists, add images and links, and lots more. It was interactive too, so it was pretty useful to try out the commands and see if you got them right. This was much better than having to put them into a file and then do the whole Git-bit and wait to see what comes out the other end. I HIGHLY recommend this tutorial if you are a beginner. HT to Spencer for the suggestion.
Some of the most useful things I learned:
- Making Headers is done with the hashtag or pound sign. You can have anywhere from 1 to 6 hashtags. The smaller the number the larger the header.
- Images: to include an image you want to write the text below. Note that the location can be in your repo or from the web. Just make sure if you’re using from your repo you navigate to the right folder.

- Links: formatted the same as images without the exclamation point.
- Lists: put an asterisk before the items to be listed (on separate lines).
- Numbered lists: actually number the items on separate lines.
Some things I still do not know how to do as it seems you have to include html code or something called CSS that I do not know about:
- Change the color of the text
- Center images or text
- Make images into links
- Make really nice, not totally text heavy webpages
MkDocs
I kept seeing references to MkDocs throughout and had no idea what people were talking about. Turns out that this is the part that is necessary to change the formatting of your overall webpage. Super useful!! I have not dug into this too much; honestly still have the fear of ruining everything. But it’s a goal for me to play around with this more in the next few weeks.
One really important thing is to edit your mkdocs.yml file. This can be done in the Markdown editor you are using and then pushed to the online repo as done with other files. This file is where you add your name so the title that pops up on your webpage actually has your name, not the generic FabAcademy “your name here” bit. Also you can change the overall color scheme and it looks like the placement of menus. That I want to get back to, but will do so later. The website I used was actually linked in our original mkdocs.yml file. It was the squidfunk site on MkDocs.
Getting files published to the web
Once both Git and Video Studio Code are loaded on your computer you are ready to go! Edit your files in Video Studio Code and then you are ready to move your files from your local repo to your FabAcademy repo which then results in updates on the web. In order to this, save any changes in VSCode and then go to your Git Bash window. There are only a few commands you need here to go in the local to web based files.
First, to make sure your computer knows it has changes to update, you can use the status command:
git status
It seems that people use the command after each of the following commands to make sure that you have executed things properly. So go ahead and check that status after each of the following.
After that you want to add all the files that have been changed so you use the add command. Note, this command below adds all files with changes. If you misplace the period you get some weirdness and it is not going to work. Yes, I did this, so please trust me and put that space between the “add” and the period. If you just want to add one file, instead of the period put the file name.
git add .
Now you are ready to COMMIT. Commitmentphobe? Well, get over it because you are one step away from sending those files and changes over to the Fab Site. WARNING: make sure you check those image sizes. Check them again. We don’t want to be on the HUGE list taking up all the space.
Commit is the step that you use to add a message describing the changes you have made in your editing in Markdown. I understand that one of the beautiful things about Git is that we can see all the changes going back to the beginning of time (yep, that’s what the James Webb telescope is going to do…all the way back to the beginning of Git time), so these messages seem important if they are descriptive. But to be honest, I don’t know where these messages go. However, every resource tells you to do it, so I’ve done my best. But I still have questions: what if you have made lots of changes at once? What do you write? Are you supposed to keep GIT-ting after every change? Not going to lie: this seems SUPER tedious. This was partially answered by Kris during the recitation. He said something along the lines of doing this every hour or so. This seems reasonable if I’m working on one file and it’s going to take awhile. Make lots of edits and then wait to do the commit. Ok, so the general command is “git commit -m ‘message’ “. Ok, syntax again: Dash-m seems ok, and then it seems you can use EITHER single or double quotes, but of course be consistent within any one message. Don’t mix and match your quotation marks!!
git commit -m 'totally useful message here'
And now finally we want our changes to appear out there on Al Gore’s internet, so now let’s push it…push it real good… (Salt-N-Pepa anyone?)
git push
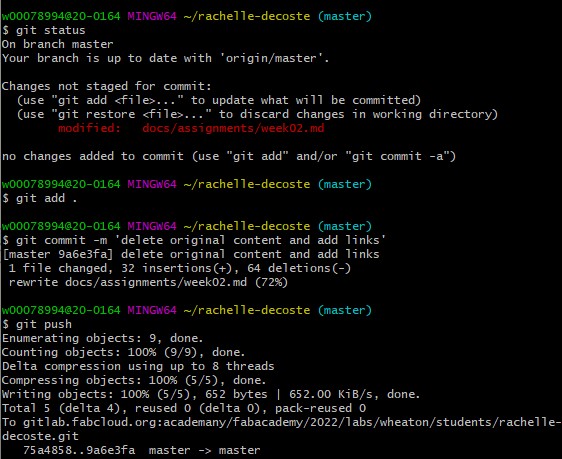
These steps together, with appropriate output, look something like the following:
Other Git commands still need to try
For this week I did not actually edit anything on the web in Gitlab, but you can do that and then you want to make sure that you synch your web version with your local version of your repo. In order to do that you need to pull info from the web into your computer:
git pull
One of the other seemingly awesome and powerful aspects of Git is that you can work with other folks on the same files simultaneously. This is going to involve branching to make sure that both of your edits end up in the online version of things. This was touched upon in Kris’s recitation, but only briefly. There is a lot to learn here and I don’t know much yet.
One other command that Kris mentioned was “reset”. This seems useful if you commit a file and then realize you shouldn’t have done so. When you commit something it is assigned an identifier. If you want to undo a commit, you need to find the identifier. You can do this by going into the git log:
git log
This opens up a new screen which provides the identifiers for each commit (labeled by your message). Copy the text of the identifier for the commit you want to undo. To get out of this screen, press “q” and then you’re back in your terminal screen. Now you want to use the git reset command and put in that identifier:
git reset identifier
This will remove that one commit. Check your status and you’ll see that one commit is no longer ready for the push.
If you want to remove ALL the commits that haven’t been pused you need a hard reset:
git reset --hard identifier
This removes all commits following the identifier that you put in. Again, check that status to make sure you got rid of everything you wanted to.