13. Networking
This week we learned about networking computers and boards together, with the requirement that we have more than one board in a network talking to each other.
Goals for the week
- Linked to the group assignment page and reflected what you learned individually of the group assignment.
- Documented your project.
- Documented what you have learned from implementing networking and/or communication protocols.
- Explained the programming process/es you used.
- Outlined problems and how you fixed them.
- Included design files (or linked to where they are located if you are using a board you have designed and fabricated earlier) and original code.
Group work
Thursday night in lab we spent a good amount of time trouble shooting various previous board work. Make some progress, but still not done with last week.
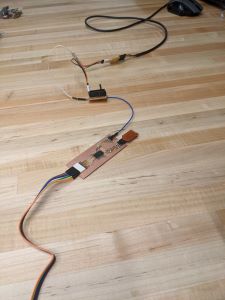
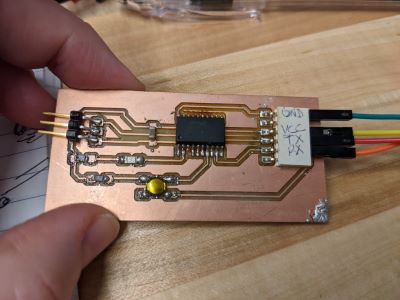
For this week’s work we worked in groups to make boards we had made talk to each other. I worked with Sarah and Garner and used his board and mine to send a code from his board to mine and then print on my serial monitor. This was fairly straightforward. The important pieces of information that we had were to pay attention to pins that allow the boards to talk to each other. On an Arduino there are pins labeled TX (send messages out) and RX (recieve messages in). Clearly if you want to “talk” between boards you have to make sure that one board has TX connected to the other board’s RX (and vice versa).
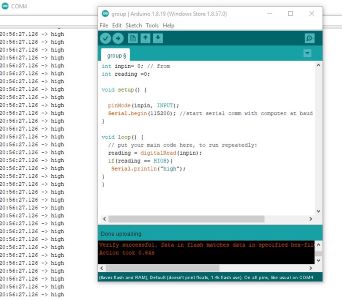
Garner wrote a short program to send info from his computer to his “Garduino” and I wrote a short program to receive that message from his board to mine and then for my board to send a message to the computer. This was a nice example of a network with 2 computers and 2 (made by us) boards. Here are photos of the connected boards we made and screenshots of the output on the serial monitor. When he sent an “H” from his board, my board received it and printed the word “high”.
Code for both programs is included below in the file links.
Individual work
I have already networked things. I did this for the group project. I am the one who made the arduinos talk to each other and take commands from the buttons and spin the machine to spit out the right coffee. So now I should be able to make this work, but…of course it’s not that simple.
I went in circles. I have my button and LED board from weeks ago (all that documentation is in Week 7). I made sure it still works. It does. I have it programmed so when you push the button the LED goes on. So it should be easy enough to push that button and have an LED go on on the Arduino Uno. I looked at Whitney O’Reardon’s page to just get started. You would think that I would be able to just copy her code and get this to work. But no. I can’t even do that and I’ve spent 6 hours.
I made sure Blink runs on the Arduino. So I know I can program each board individually and now it’s just a matter of them talking to each other. JUST. But I can’t do it. And I still have to deal with addresses.
Here’s an image of my board connected to the Arduino Uno I was using. I was trying to run this network without a computer attached because there was no input from the computer. It didn’t work. Here’s an image.
Also here are screenimages of my 2 programs.

I still have the last week of my own classes to go teach. I’m not prepped for that. I haven’t finished grading my students’ work. I am not being fair to them because I’m trying to figure this out. I Just want to learn and it’s just not happening. Yeah, I know this is whiny. I’m done.
Ok, and now I’m back. I met with Brandon today and he suggested that we try to make the communication go in the other direction. So his suggestion was to have the network consist of the computer, the Arduino UNO and then my board. The 2 programs first have the Arduino take input from the serial monitor on the computer. Based on the input, then either the Arduino does something (like blink its built in LED) OR it sends a command to my board and that LED turns on. This is what I did in the end and it works.
The “addresses” come from the 0 and 1 in the code. The serial monitor asks for input that is a digit. When you type a 1 into the Serial monitor code is sent to only the Arduino. When a 0 is typed, the Arduino sends the message along to my board and turns the LED on for 5 seconds.
Below is a video of the light going on when a zero is typed into the Serial Monitor.
Some things I did learn:
When programming 2 boards, unplug EVERYTHING. So even if you have wires plugged in that go nowhere you aren’t going to get that program to load. I think the RX/TX get all confused when they think there are messages coming and going from 2 different sources. This is still something to look into. When we did the group project we defined RX/TX pins, but the Arduino has built-in RX/TX that we use. I labeled my own board so I would be able to easily get the wires connected when I kept pulling them out and plugging them in (over and over and over and over…).
Sometimes people label FTDI cords “Does not work” but they actually do work. Sarah and I were having luck each only with one cord and never the same one. Fun.
Always ask for help. Really I’m trying to learn on my own because it feels like that’s half the challenge of this course, but I just don’t know enough. I am actually thinking about buying myself an Arduino kit and trying to start from scratch to learn a whole lot more and a whole lot better. Realistically that isn’t going to happen before this class ends. Just getting through.
I feel like one of my own students who is just pattern matching to get stuff done. I don’t like it. This is all moving so fast that I’m not getting the level of understandint that I want. Goals remain I guess.
Files
- Group Code Part 1
- Group Code Part 2
- Code that doesn’t work for Button networking
- Code that doesn’t work for Arduino networking