12. Group Work Machine Building Week
We decided to make a coffee capsule carousel for the Nescafe machine in the Wheaton Fab Lab.
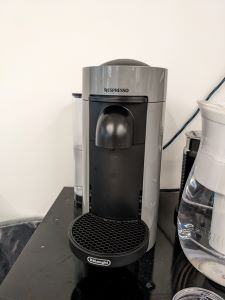
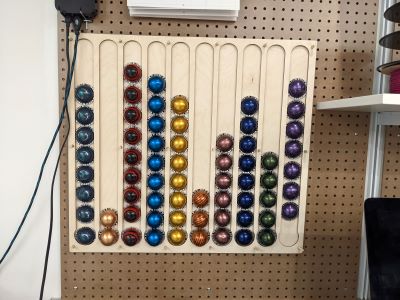
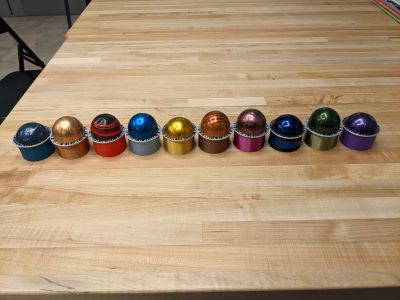
The current set up has the coffee pods mounted inside a wall fixtures, as below:
For more details about this concept and the overall process, you can go to the group page, as it is, is here. Garner put this together with input from the rest of us. It doesn’t have all the details it probably should, but as I write this it’s summer and the undergraduates are all gone so it’s not going to get better. I can’t seem to access that page to edit it, so I’ll add as many design files as I can to the bottom of this page.
The video of the machine working (minus the outer packaging) is below. NOTE: If it doesn’t work, you can find it on the group page.
We split up the work so that we were all working on individual pieces, both design and mechanical, within the larger project.
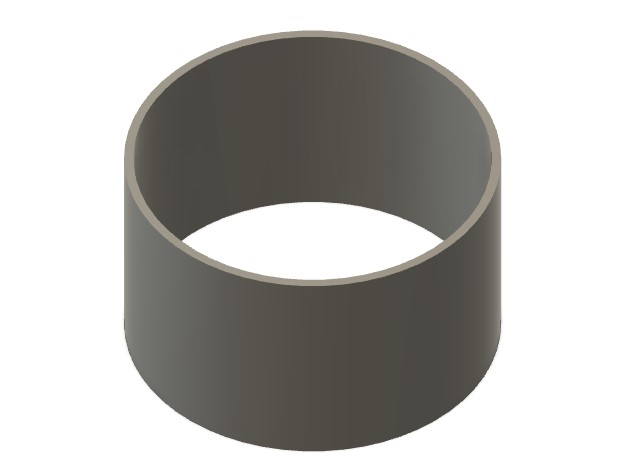
I first designed the pods that the coffee capsules sat in. Since the coffee capsules do not have a flat bottom, they do not stack well. Stacking them was an important part of our project, so I designed a small ring to fit around the capsules so they could stack. I 3d printed these rings over the course of the 2 weeks.
I also worked on using one of the stepper motors to turn the carousel when coffee flavors were selected so that the user received the desired flavor of coffee. This involved learning how to make the stepper motor work, programming so that the motor controlled the carousel and rotated the right amount, depending on the coffee chosen and designing the belt mechanism to make the rotation work. This was all new to me!
I put the final program together using Kobe’s code to choose the coffee flavor and my code to spin the carousel. I have included my code and the overal code below as well.
I also came up with an idea for a logo. I figured we needed something to pull it all together and even though the final product (packaging) was really not good (sorry to my classmate who did this but really it was NOT good and I had to let it go bc it was a group project), at least we had a cool logo.
Designing the coffee carousel pods
The coffee pods are not flat (like Keurig ones are). When we were thinking about the design of the slots for each flavor we tried to fill different shapes with coffee pods, and no matter what we did, it was not going to be possible to stack the pods so that just ONE pod came out when it was time to choose a coffee. So I designed a small ring (they looked like napkin rings) that would allow us to stack the individual pods by flavor inside the larger carousel. I was ready to design the carousel part too, but Justin V and Garner took that on.
Here’s a prototype of the design that I made just cutting paper.
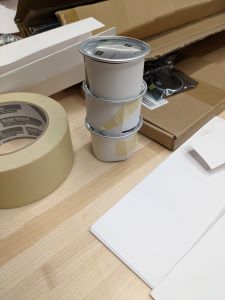
The trick in the end was to make sure the ring fit snugly enough UNDER top lip of the pod. Though the coffee pods were not all the same height, we decided to make the rings all the same height so that the same number of pods would be in each flavor and so that they would all work well with the “kicker” mechanism that pushed the pod out once the carousel rotated to the correct flavor.
I used Fusion360 to design the ring. The dimensions that worked the best were an inner diameter of 1.9145 inches, a thickness of the inner diameter plus 0.1in (so 2.0145) (and yes, I know that these are probably too fine and I could have rounded) and a height of 1.2 inches. I created the object by using parameters so I could play around with the diameters to get something that was just snug enough. Then I drew concentric circles and extruded the ring.
Note, we wanted to 3d print these so they would be reusable. And the color-coordination with the coffee pods was more than a cute, eye-catching gimmick. It makes it easier to refill the pods with the appropriate flavors of coffee. The inside carousel was meant to match the pods, but we ran out of the colors of 3d filament to make that happen entirely.
Programming the stepper motor
To make the coffee carousel worked, we used 2 Ardunio Unos in series. One controlled the LCD and the buttons and sent the coffee choice back to the other one. Kobe programmed that one independently. I programmed the one to receive info from his buttons and then move the stepper motor the appropriate amount and then use the “kicker” to push out the coffee capsule.
First I determed that pins 0 and 1 on the Arduino Uno allow us to serirally connect 2 of them. Then they can talk back and forth (you want both directions in most situations, in this we really only needed the Arduino attached to the buttons to send info to the other one).
Basically our psuedo code for the entire machine is the following:
- Listen to the button (record position 0 through 9 as selected)
- Send Stepper1 to position read from button
- Pause
- Send Stepper2 info to “kick” out the capsule (this is always the same)
- Pause
- Send Stepper1 back to default position 0.
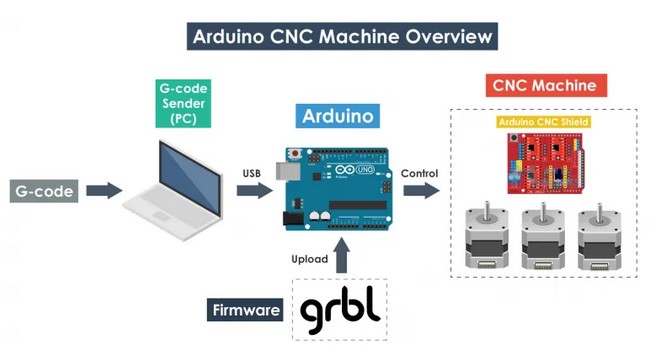
GRBL is the key to making Stepper motors work. You need the GRBL library to use with Arduino.ide. GRBL is open source software that enables motion. G-code is the input for GRBL and it outputs motion. Here’s a nice screenshot of the process from a tutorial from howtomechanics.com
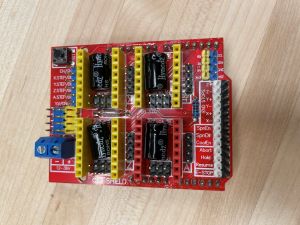
To use the Stepper motor, you need to add CNC shield to your Arduino. Here’s ours:
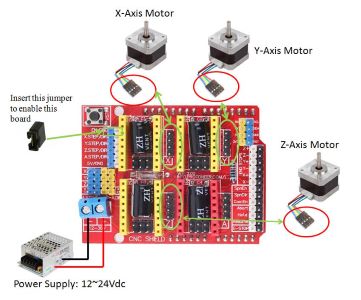
From this site (note I didn’t use this tutorial bc it is about setting up the stepper motor for CNC, but it had nice image) you can see how the shield allows you to control motion in 3 different directions. To start with we just used the X direction to control the rotation of the base of the carousel. Then Garner needed to incorporate Y to use the “kicker” to dispense the coffee.
We had to play around with the motors to determine the units that are used to send a motor in a full rotation. We determined that the command “$100:200” meant that 200 steps corresponds to a full rotation of the motor. We thought that we would have to write our code so that the numbers 0 to 9 would correspond to an appropriate rotation if we multiply 20 by the appropriate number. For instance, I want each coffee selection to be given by an integer, say n, where n is 0 through 9 to create a rotation of n36 (because there are 360 degrees and 10 choices, so each choice should be 36 degrees of a rotation away from the one before it). But because 200 steps was one total rotation, then n20 is the actual command to the motor through GRBL code. It turns out that instead you can change the step sizes once and then you’re done for good. So each digit 0 through 9 corresponds to a 1/10th rotation around the circle (or 36 degrees).
There are 2 inputs needed for using the stepper motors: the speed rate and the number of steps. The following code is how we sent the info for both:
 mySerial.print("F50 \n");
 mySerial.print("G01 X4");
This is a speed rate of 50 units/minute (which is what we used throughout) defined using the “F”. We played around with making this really fast and slow, but 50 seems reasonable. The next line moves the motor attached to the x-coordinate 4 steps through the “GO1” command and the “X”.
To make 2 motors work you use X for the first one and Y for the 2nd. Then you’ve got 2 different axes of motion.
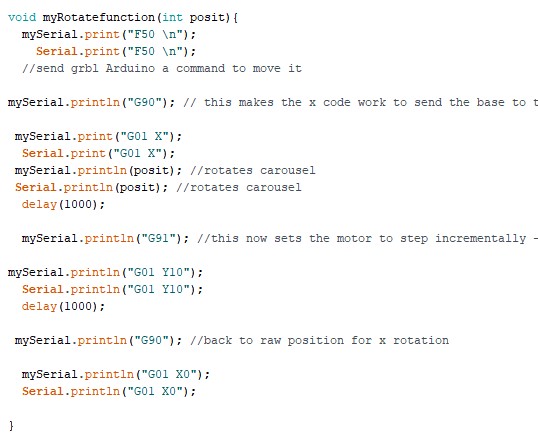
In the end, the part of the main function that was associated to this motion was the following that takes in an integer from 0 to 9 and moves the base the appropriate rotation and then moves the kicker motor. Here’s a screenshot of the function:
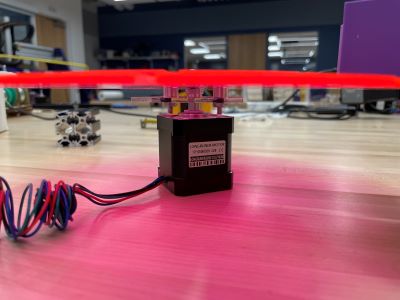
And here’s the physical image of the motor with the base of the carousel sitting on top:
Final program
Kobe wrote most of the menu program, with the additional cpp files, as found below. But I was left to incorporate the motion and make sure all the functions talked to each other. This was the first time I was working with a program with so many parts, but it worked out well and in the end was good practice for the final project.
Logo
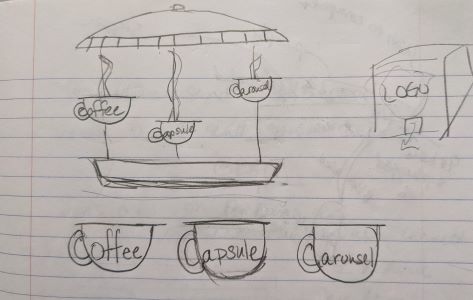
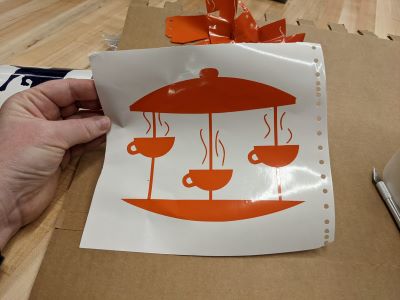
I sketched a logo based on the idea of a merry-go-round, which was my interpretation of a carousel. Here’s that sketch. I thought the use of the coffee cup handles as the “C” for each word was cute and clever, if I do say so myself!!
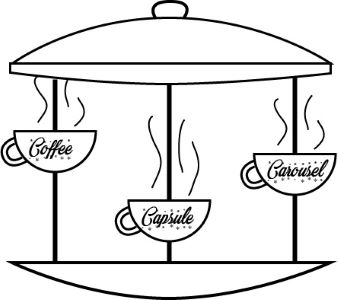
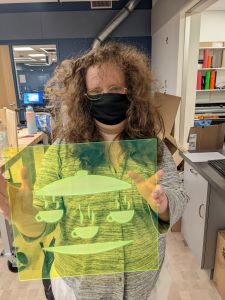
When I showed it to Kobe, he ran with it and designed it in Inkscape. I thought it turned out pretty cool. Here’s the design with the words in it and the vinyl cut I made without the words. This is what we put on the final product. And we used the non-word version on the top lid, which Sarah laser cut on acrylic, also pictured below.
Useful Websites
- Jason’s useful instructions on how to make the stepper motor work using an Arduino Uno
- Arduino program example
- Video setting up Arduino and Steppers
- example code but i don’t know how to call pins
- lots of examples of code
- Example of Serial connecting
- Functions in C++
- Using Functions in a Sketch
Design Files (mine)
- Fusion stl for the ring
- Fusion file for the ring
- The final Arduino program that incorporates my code with Kobe’s code
Design Files (from the group)
- Logo file svg
- constants.cpp for use in the main file
- Flavors.cpp for use in the main file
- Control board schematic
- Control board pcb
- carouselPlateLongTop.dxf
- carouselPlateLongBottom.dxf
- innerCarouselSpacer.dxf
- carouselJustinSpacerPlate.f3d
- vending machine outside design