Interface & Application
Designing a good interface is very important. To be honest, the fabacademy environment go use some refurbishment on that part. Nevertheless, again in honesty, it’s not my main focus during this course. For the assignment I just made a simple visual representation of the signal my throttle handle is producing.
Group assignment
But first we had a nice Thursday working on the group assignment. Bas started with a very nice tutorial on the processing Java environment. I have used these basic to set up my own interface. After that Bente gave us an introduction to Javascript. Those two ways of designing interfaces make up our comparison for this week.
Processing & Java
With Processing and Java I already had a bit of experience, because we used that to program our zoetrope during the machine building week. And it also has a some similarities with programming in C with Arduino IDE. It has a good reference with examples to get a jump start.
Creating simple screens and drawing stuff is quite easy. The commands are straight forward and comprehensible. It get’s a bit complicated when class definitions come in. But with a bit of trial and error it’s doable. And the tutorial from Bas with the bouncing balls was insightful.
Javascript
Javascript is a different story IMHO. Creating the interface part in html is easy, but all the stuff with node, json files and javascript files seems needlessly complicated for what it achieves. It can bu iseful ig you really could publish it and if it’s available web-wide. But my suggestion to Henk to create a server for that on our group page was met with a firm and decisive “no”.
Conclusion from my viepoint: if you need to publish something and if you’re able to set up a server accessible by others it might be worthwhile to dive into this way of creating an interface. If that’s not your goal: don’t bother.
Speedometer
My goal for this week was to create something representing the input of my throttle control handle. It would be nice to show a speedometer kind of thing with a needle thaat moves to the right if you turn “open” the gas.
First Test
Based on my experience above I decided to use processing to achieve this. And I started in a simple way. I drew a circle and made the radius dependent on the voltage level of the throttle handle. I started from the “simple serial read” from the example libranbry. Here’s the sketch I created:
 /**
 reading values from the serial port and use them to do something on a display
 */

 import processing.serial.*;

 Serial myPort;  // Create object from Serial class
 int val;        // Data received from the serial port

 void setup() {
 size(800, 600);                              // display size
 String portName = "/dev/cu.usbmodem144201";  // port used by my SAMD board
 myPort = new Serial(this, portName, 9600);
 }

 void draw() {
   background(63);                      // Set background to dark gray
   while ( myPort.available() > 0) {    // If data is available,
     val = myPort.read();               // read it and store it in val
     println(val);                      // print value on console
     circle(300,240,val);
     }
 }
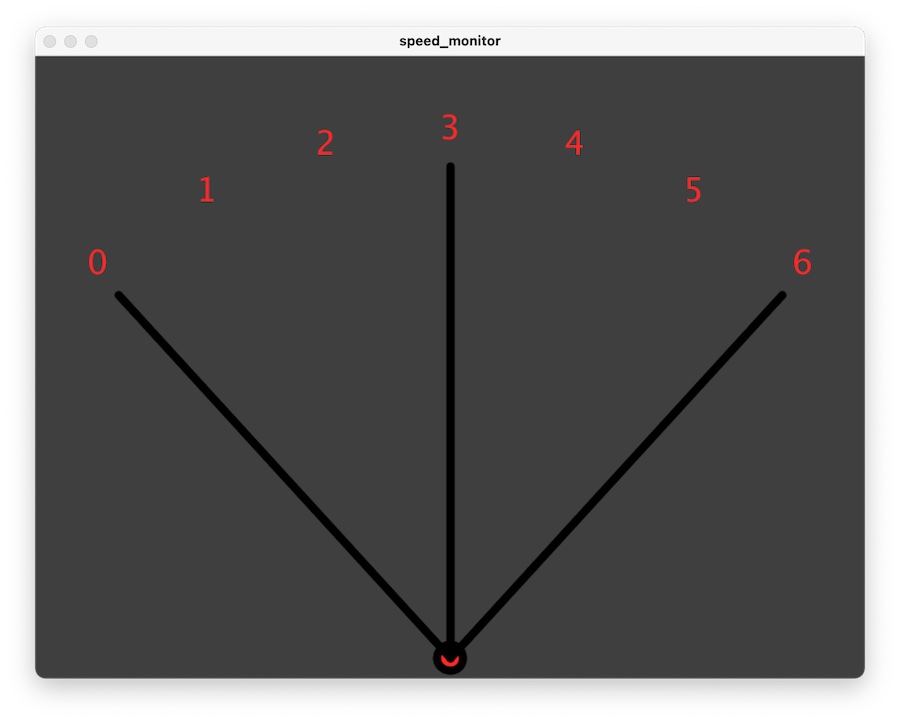
Basic UI Design
When this worked I designed a more sophisticated speedometer. BTW the scale numbers are just an indication. I haven’t connected it to a motor so I don’t have real RPM or speed values yet. I drew some lines to represent the needle so I could derive the formulas for the position related to the values from there.
Here’s the code I added in the draw part:
 void draw() {
   background(63);                   // Set background to dark gray
   textSize(32);
   textAlign(CENTER);
   fill(255, 40, 40);                // text colour dark red
   // draw speedometer scale
   text("0", 60, 210);
   text("1", 165, 140);
   text("2", 280, 95);
   text("3", 400, 80);
   text("4", 520, 95);
   text("5", 635, 140);
   text("6", 740, 210);
   circle(400, 580, 25);              // circle in the base of the needle
   strokeWeight(8);
   line(400, 580, 80, 230);  // line min speed position; ∆x = +/-320; ∆y = 350 ~ 474 ~ 350
   line(400, 580, 400, 106); // line central position
   line(400, 580, 720, 230); // line max speed position
 }
Final Version
And now the final version where the needle is in real time reacting to the throttle handle:
The code:
/**
reading values from the serial port and use them to do something on a display
*/

import processing.serial.*;

Serial myPort;    // Create object from Serial class
int val;          // Data received from the serial port
float xPos2;      // arrow end position x
float yPos2;      // arrow end position y

void setup() {
  size(800, 600);
 String portName = "/dev/cu.usbmodem1422201";
  myPort = new Serial(this, portName, 9600);
}

void draw() {
  background(63);                   // Set background to dark gray
  textSize(32);
  textAlign(CENTER);
  fill(255, 40, 40);                // text colour dark red
  // draw speedometer scale
  text("0", 60, 210);
  text("1", 165, 140);
  text("2", 280, 95);
  text("3", 400, 80);
  text("4", 520, 95);
  text("5", 635, 140);
  text("6", 740, 210);
  circle(400, 580, 25);
  strokeWeight(8);
  // draw line to indicate speed
  while ( myPort.available() > 0) {   // If data is available,
    val = myPort.read();           // read it and store it in val
    println(val);                  // print value on console
    xPos2 = 80 + val*640/255;          // calculate x-position endpoint indicator line
    yPos2 = 580 - sqrt(64900+800*xPos2-pow(xPos2,2)); // calculate y-position endpoint indicator line
    line(400, 580, xPos2, yPos2);      // draw line depending on throttle handle position
  }
}
Below is the Arduino code I used on my SAMD board. Communicating values through serial can be tricky when values are larger than a byte. There are ways to solve that as Bas showed us. You can predefine the size or use a start and end character to descern each value. For this example I didn’t need the resolution so I did it the lazy way: I just mapped the value from full span to an 8 bit number and added a constrain to prevent numbers becomming negative or larger.
// try-out version reading hall-sensor
#define hall_pin 2
int hall_val = 0;

void setup() {
  // setting pin for hall sensor
 pinMode(hall_pin, INPUT);
  Serial.begin(9600);
}

void loop() {
  // read and write hall sensor value
  hall_val = analogRead(hall_pin);
  // Serial.println(hall_val);
  // delay(500);
  hall_val = map(hall_val, 150, 658, 0, 255);
  hall_val = constrain(hall_val, 0, 255);
  Serial.write(hall_val);
  // Serial.println("check");
  // delay(500);
}