9. Molding and casting
Week 9 : To do checklist
- Group work
- Learn and understanding safety data sheets for each of your molding and casting materials
- check the material avalibilty for milling
- Design model and test the material for milling and compared
- Repo to push group work 2022
- Individual Practice
- Design the model for casting : Yoyo model
- Make the G-Code with Fusion 360 Manufacture CAM
- Mill the model
- Make the negatif cast model
- Cast the model
- Continue the final Project Process
- Documentations
Assignment (week 9):
Group assignment:
- review the safety data sheets for each of your molding and casting materials, then make and compare test casts with each of them
- extra credit: try other molding and casting processes
Individual assignment:
- design a mold around the stock and tooling that you’ll be using,
- mill it (rough cut + three-axis finish cut),
- and use it to cast parts
- extra credit: use more then two mold parts
This week I worked on Molding and casting
Please click the button for Group Assignment
Group assignment learning
- In the group assignment, we studied safety for molding and casting materials
- local materials that can be used for molding and can be milled.
- preparation the material
Material Preparation
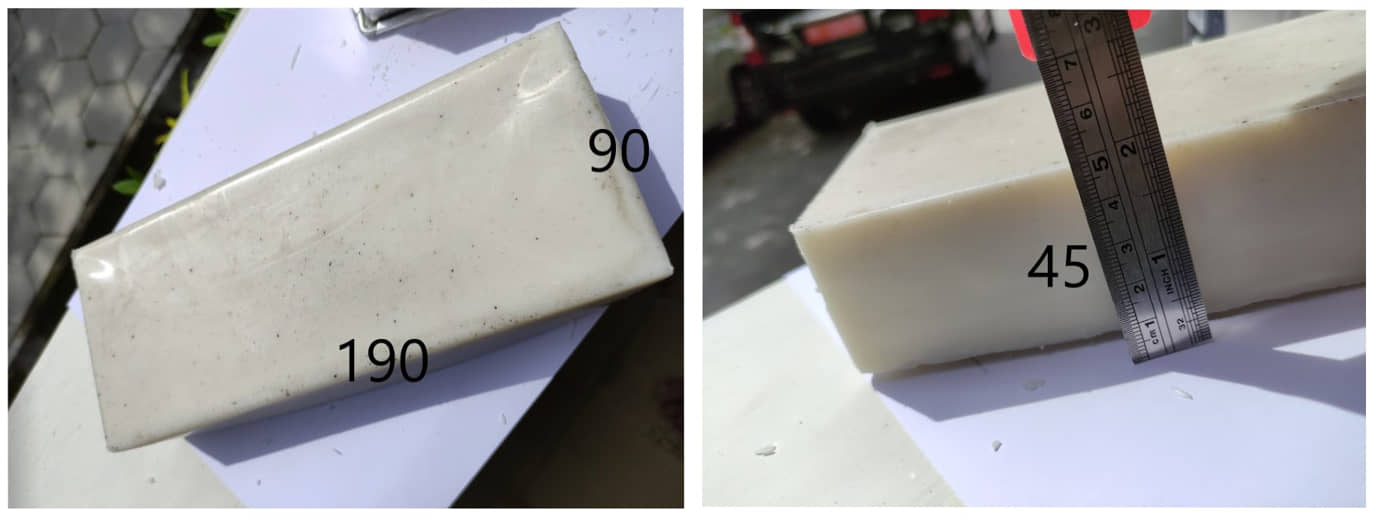
Based on the material we have (local wax material) and best tested on group assignments, I chose to use candle wax for milling as a molding mold. local masterial that can be used for molding and can be milled.
Design the model
Concept
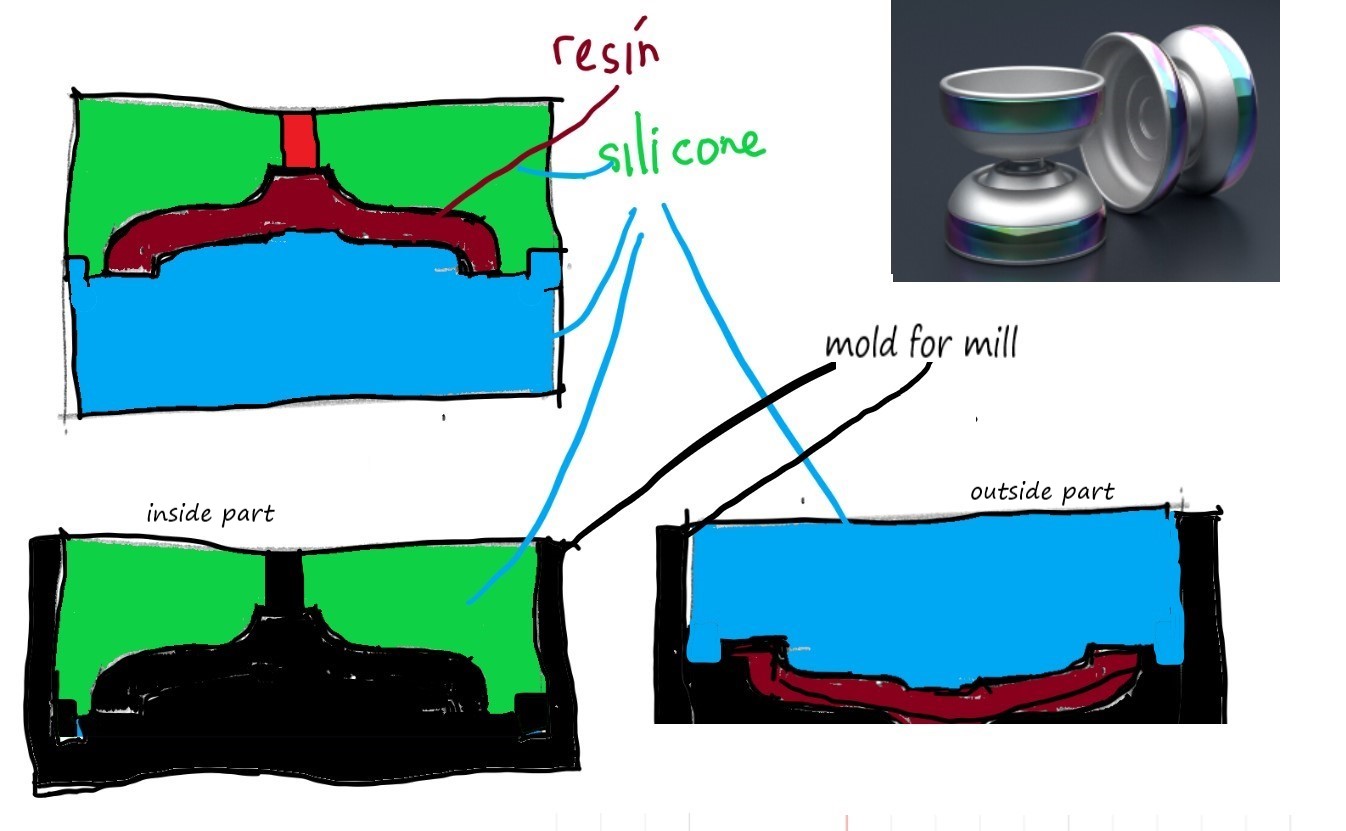
In this week’s assignment I’m going to make a “YoYo”. Because the right and left “YoYo” are symmetrical, the product design will be made in half shape. Later the product will be cast twice and connected to the bearing.
The half YoYo design will be printed on the top and bottom. the upper side surface (inside Yoyo) is molded by the upper silicon mold (cupe), and the lower surface of the Yoyo by the silicone mold (drag). Both will be paired when casting (requires hook between cupe and drag).
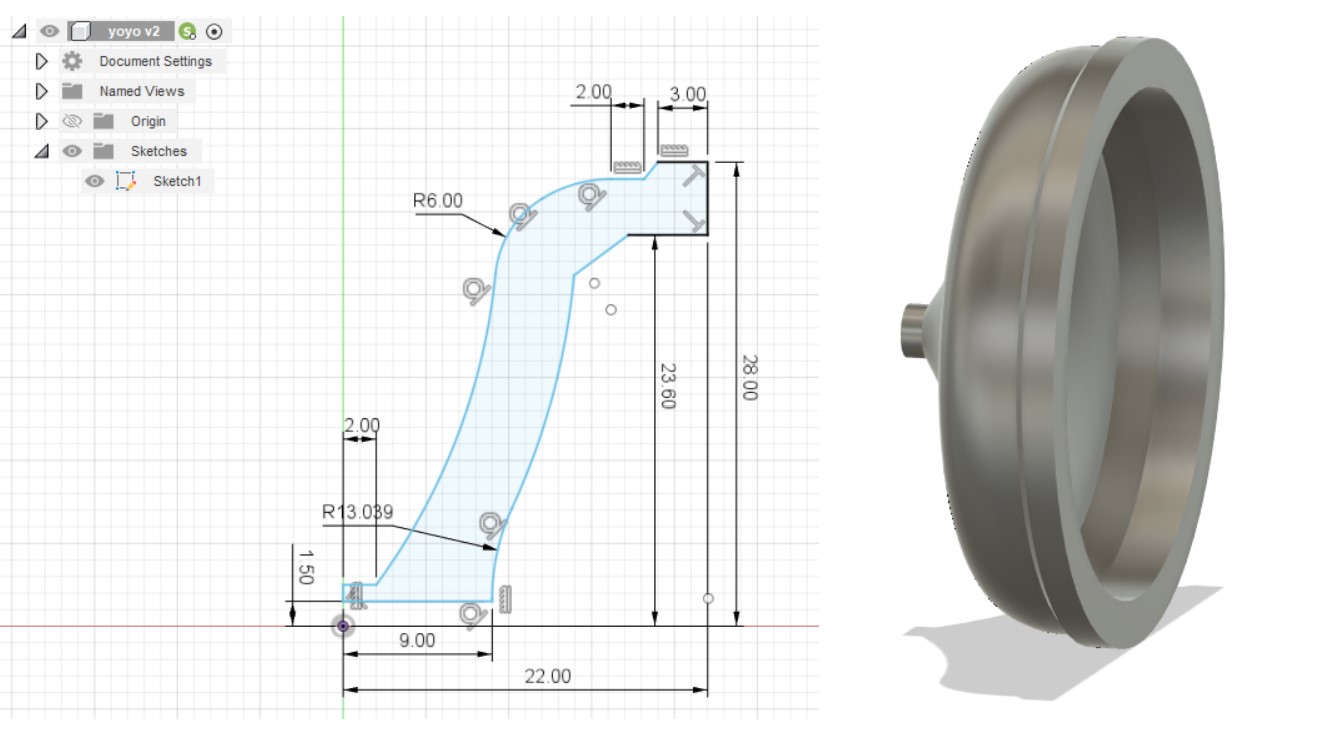
3D Design (Fusion 360)
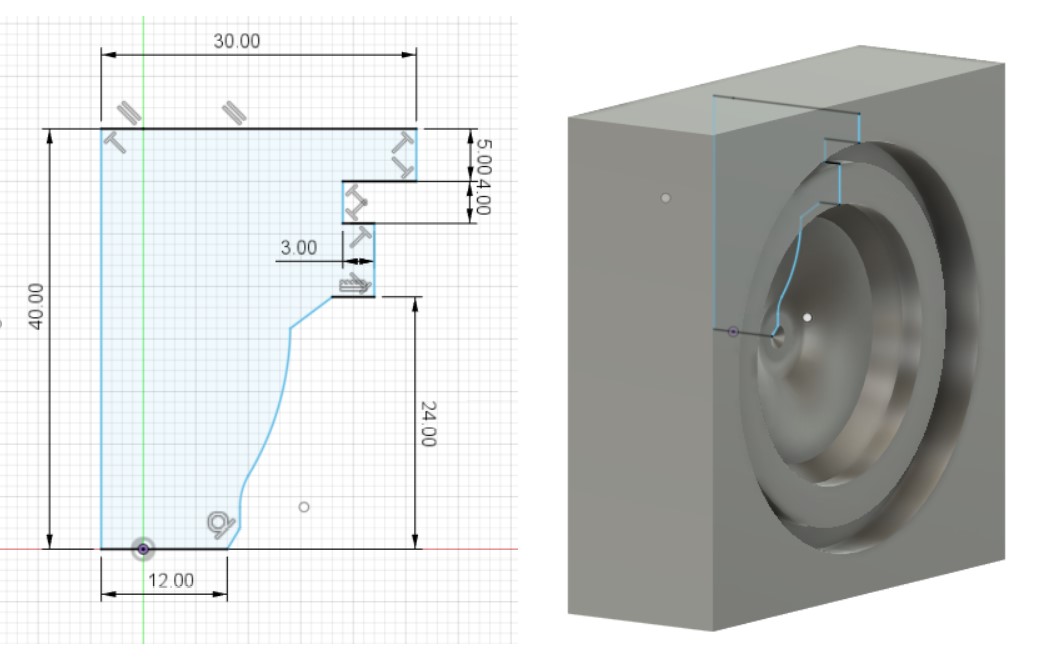
I made the design using Fusion 360. The overall size of the Yoyo must take into account the existing materials. The material has a thickness of 45mm so the design must pay attention to this. The thickness of the Yoyo model is 22mm.
Mold design
Cupe
Cupe is the top cavity die, this design is to make a silicone mold on the inner surface of the yoyo (top). To make this mold there are two techniques that can be used:
- make beams for stock material first, surface profiles (revolve) are used to reduce beams (cut), or
- make a model shape (Yoyo), then make a block as stock material as a new body, then combine (intersect)
The result is a cavity die
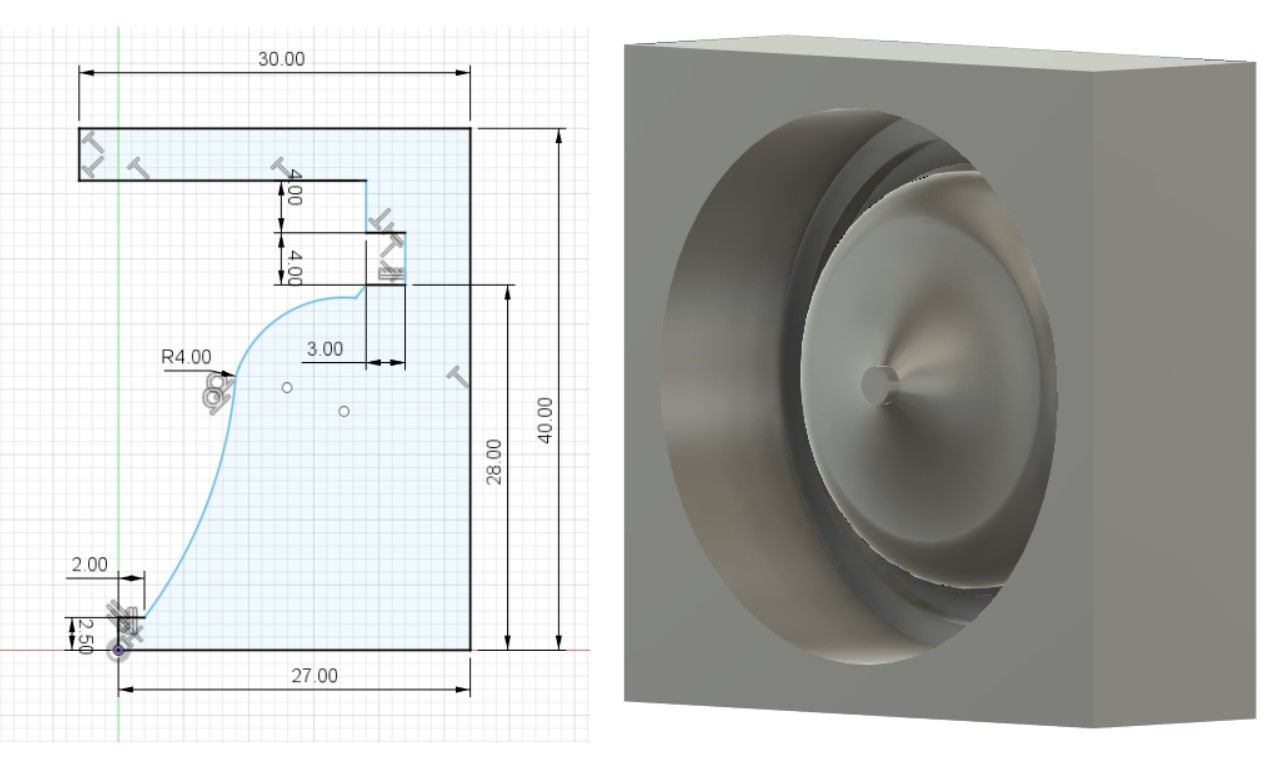
Drag
Drag is the bottom cavity dies, this process is carried out as in the cupe. The result is a drag cavity die form.
CAM (Manufacture)
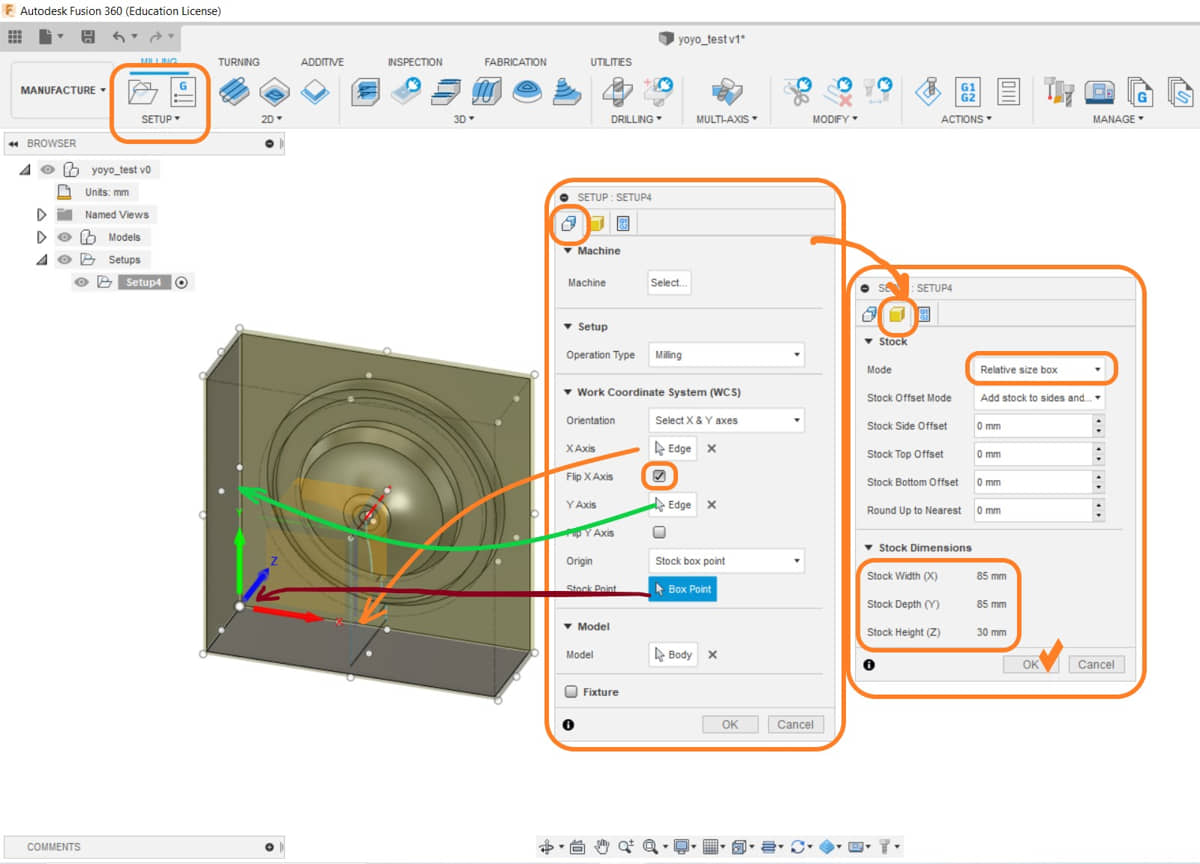
To generate G-Code (CAM) I use “Fusion 360 Manufacture”. After drawing the 3D Model, there are several steps performed for the CAM process.
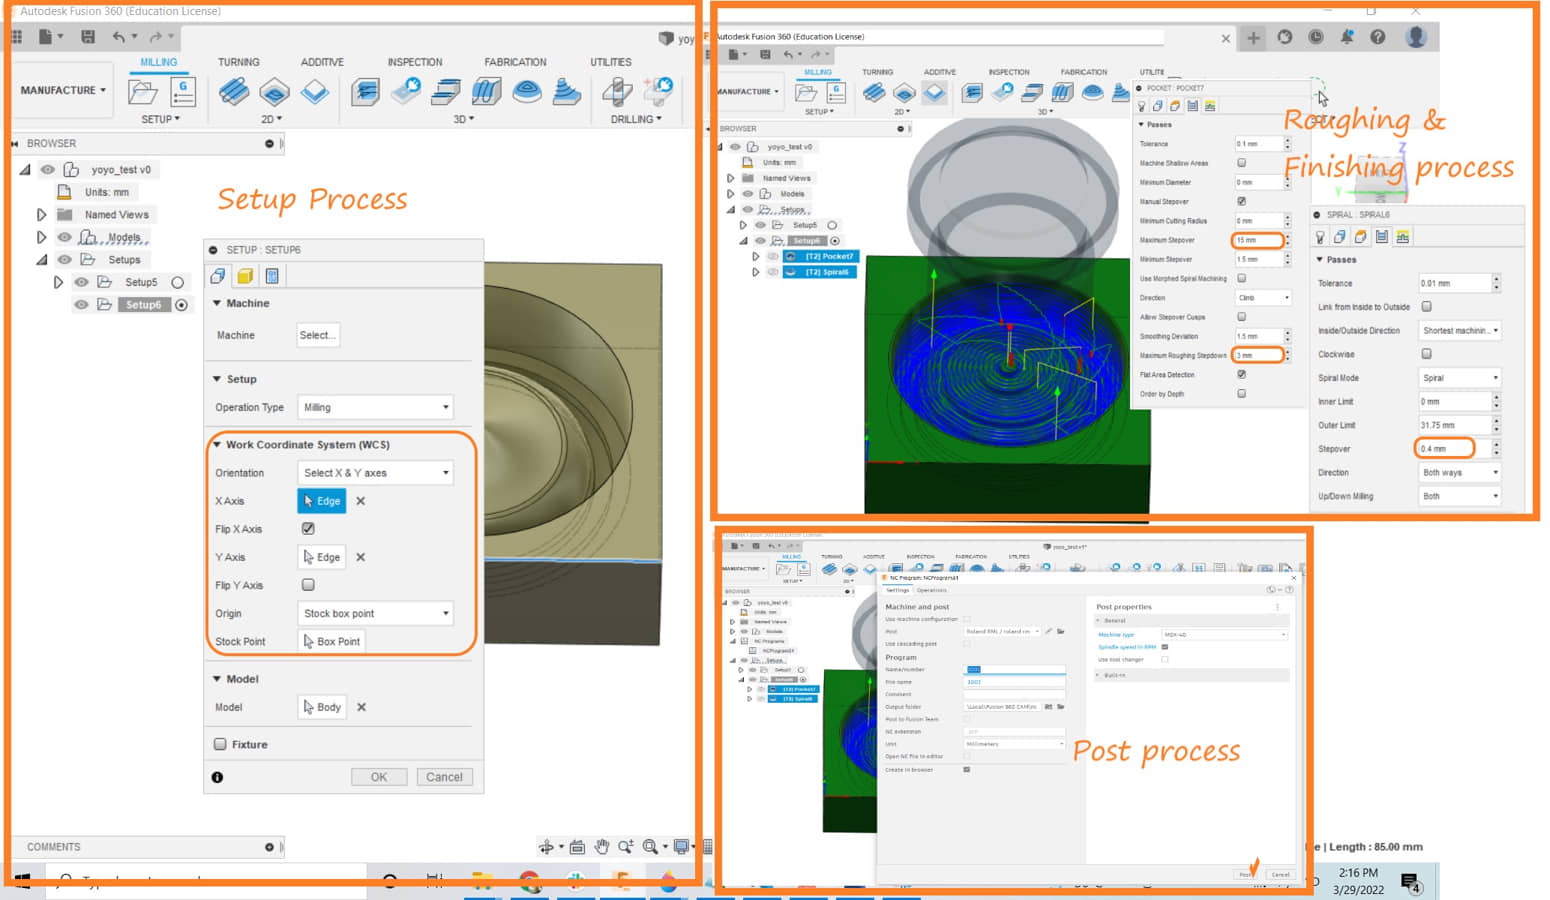
Setup the stock
- Open the Manufacture worksheet
- set to SETUP to set Stock (material for mill), the origin position
Roughing process (pocket)
The first process is roughing, this process is to speed up maching so that it doesn’t need fineness but speed in feeding.
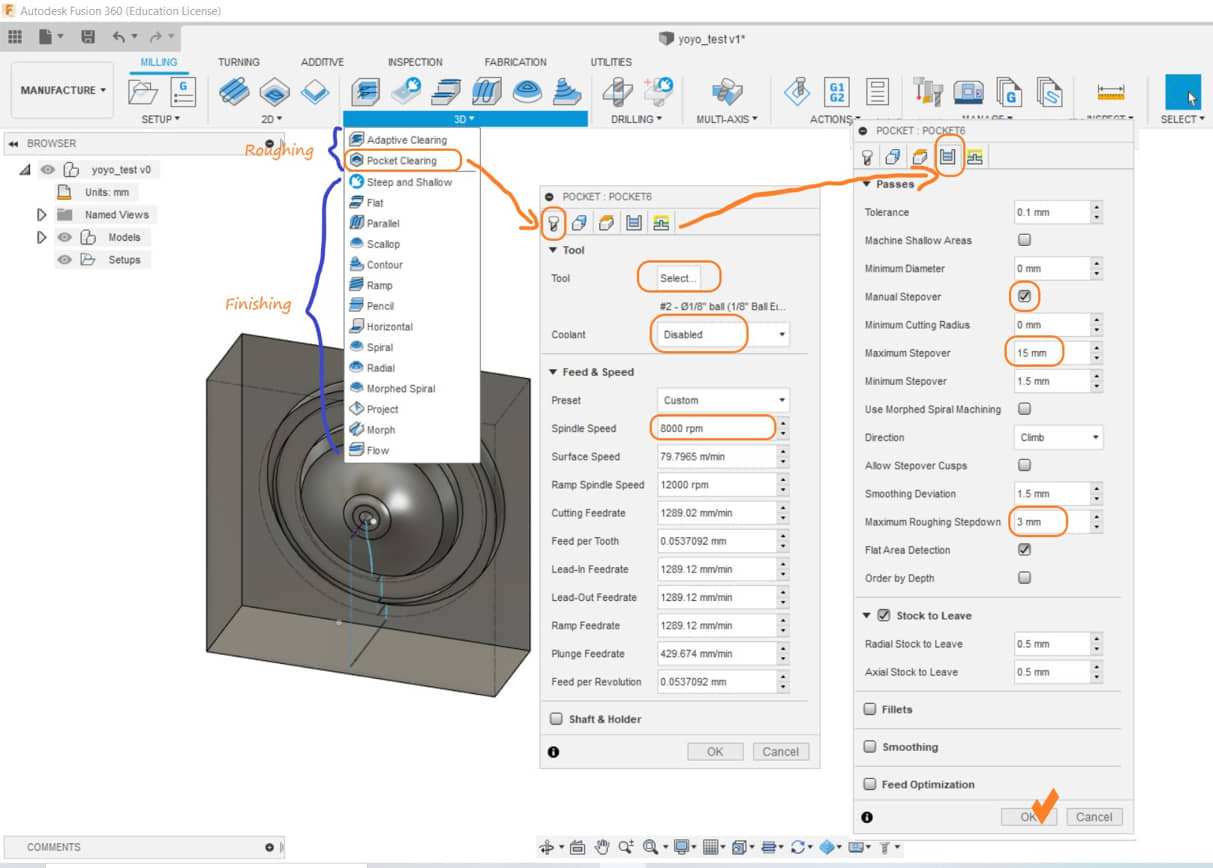
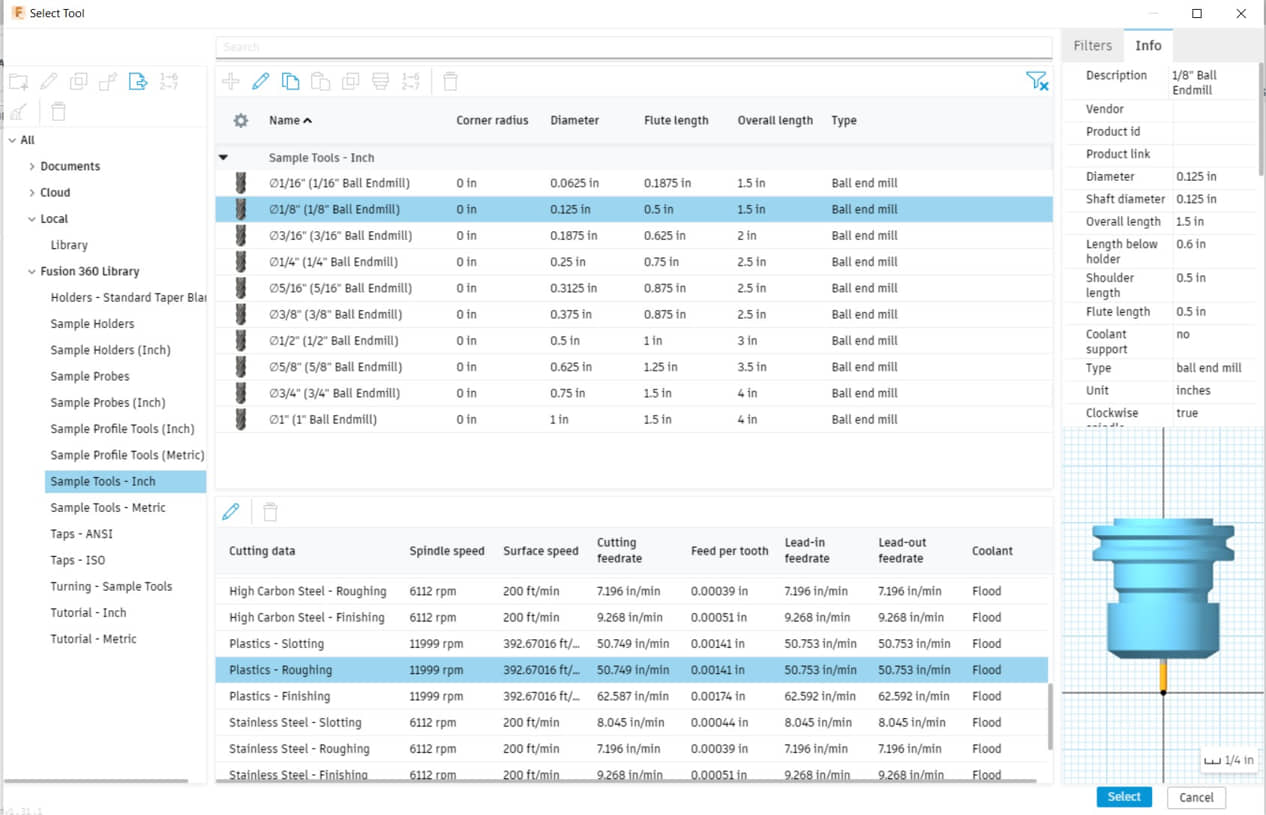
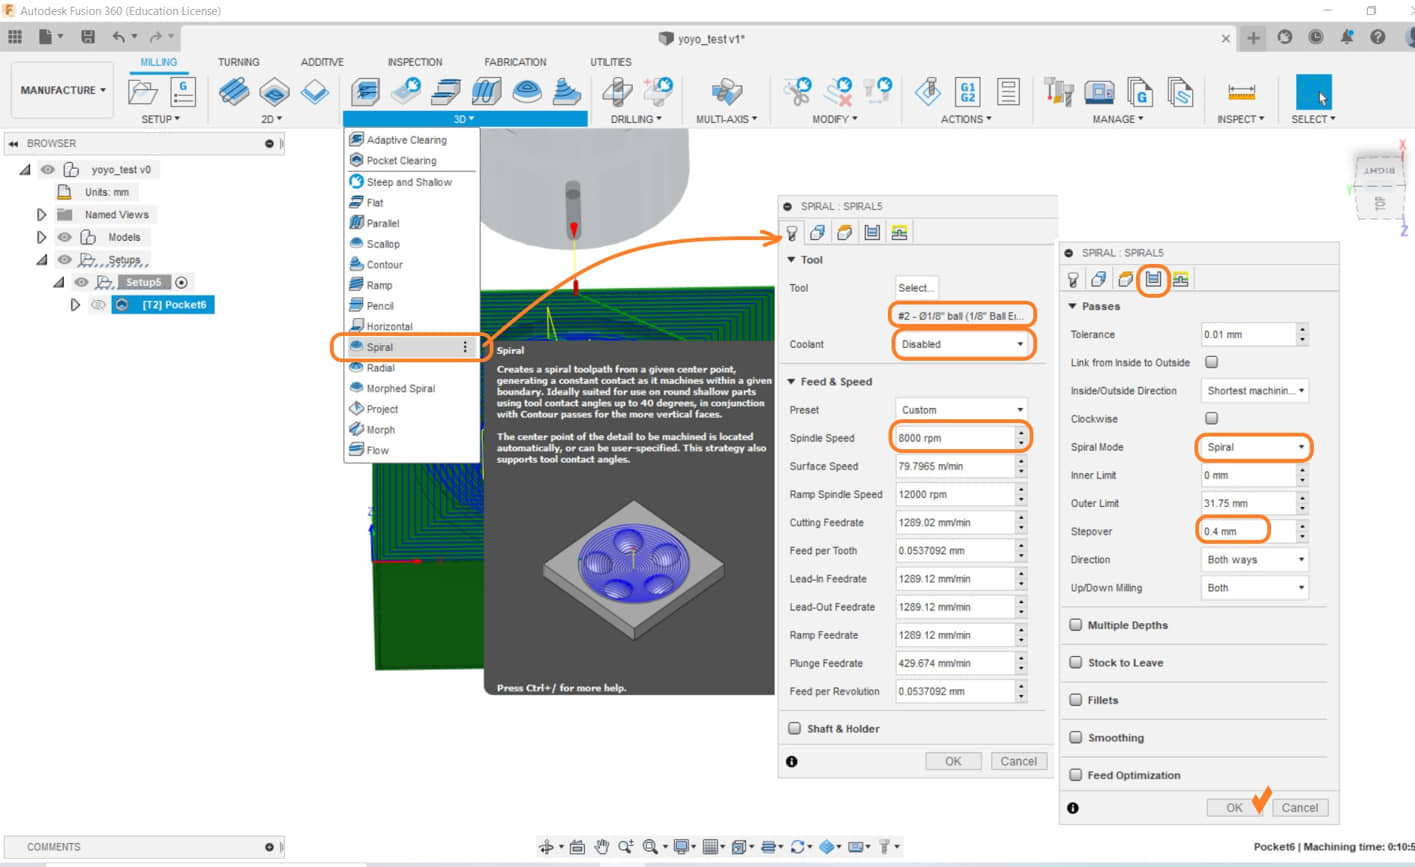
Select the Tools (ball endmill dia 1/8”)
In the roughing process I will make a basic pocket on the 3d design profile that has been made. - I choose a profile up to the bottom of the design curve. - I chose the tool to be used (1/8”), it is necessary to slightly modify the length of the tool according to the actual tool, so that during the simulation the holder does not crash into the workpiece
Finishing cut
The next process is finishing. This process will refine the previous milling results, by adjusting the feeding value in order to obtain smooth cutting results.
Simulation
We can do a simulation to see if the process is correct and safe
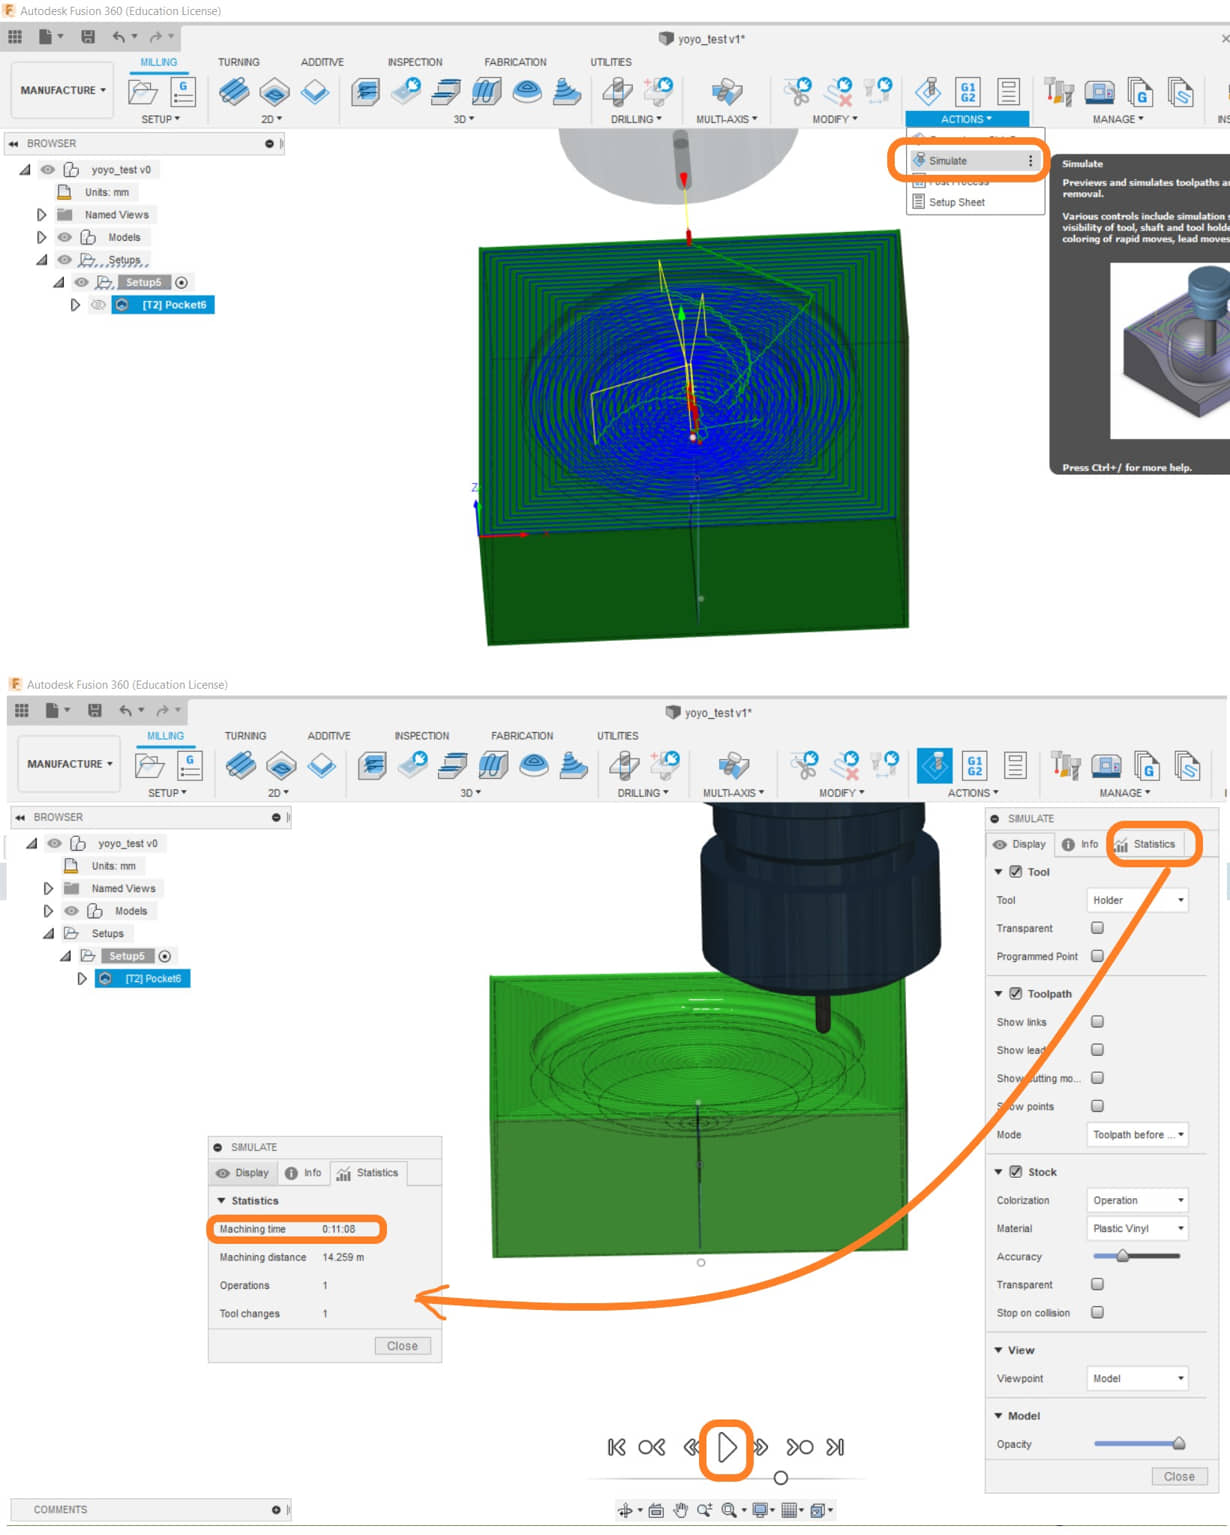
Post process
After obtaining the correct simulation results, the next step is to process the G Code processing. On the Fusion 360, post processing is available for Roland RML with the MDX-15/20 engine type. Save the G Code file which will later be run on the Roland milling machine
Milling
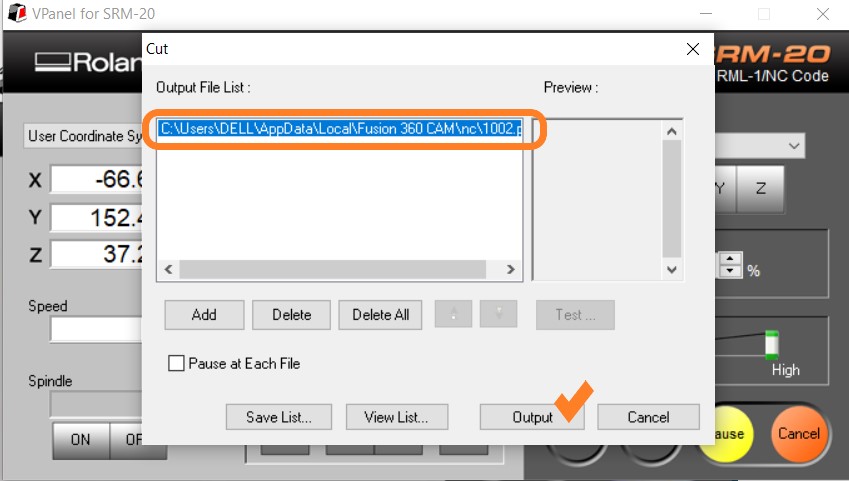
Run Vpanel for the milling process of making molds from the previously generated G code. The material used is candles. The milling process can be seen in the following video.
The milling results are quite good, although there are some small holes due to porosity when printing the candles. Small holes can be patched with the remains of a candle that is hardened into the hole.
Make the Dies
The next process is to make dies to print Yoyo. The results of milling on the candle will be used to print the yo-yo print. The printed material is Silicone Rubber with Mold Star 20T.
- Prepare a candle mold that has been milled
- Prepare Silicone Rubber (A and B), measuring cups, and scales
- Pour liquids A and B into glasses with a weight of 20gr each, stir until evenly distributed, pour on the dies candle
- Wait until the rubber liquid hardens (+/- 10 minutes), remove it from the die
- plug it in to try out the rubber dies fittings,
- checked the size of the resin down hole, it turned out to be too small (dia 3mm) so I enlarged it to about 5mm.

Casting
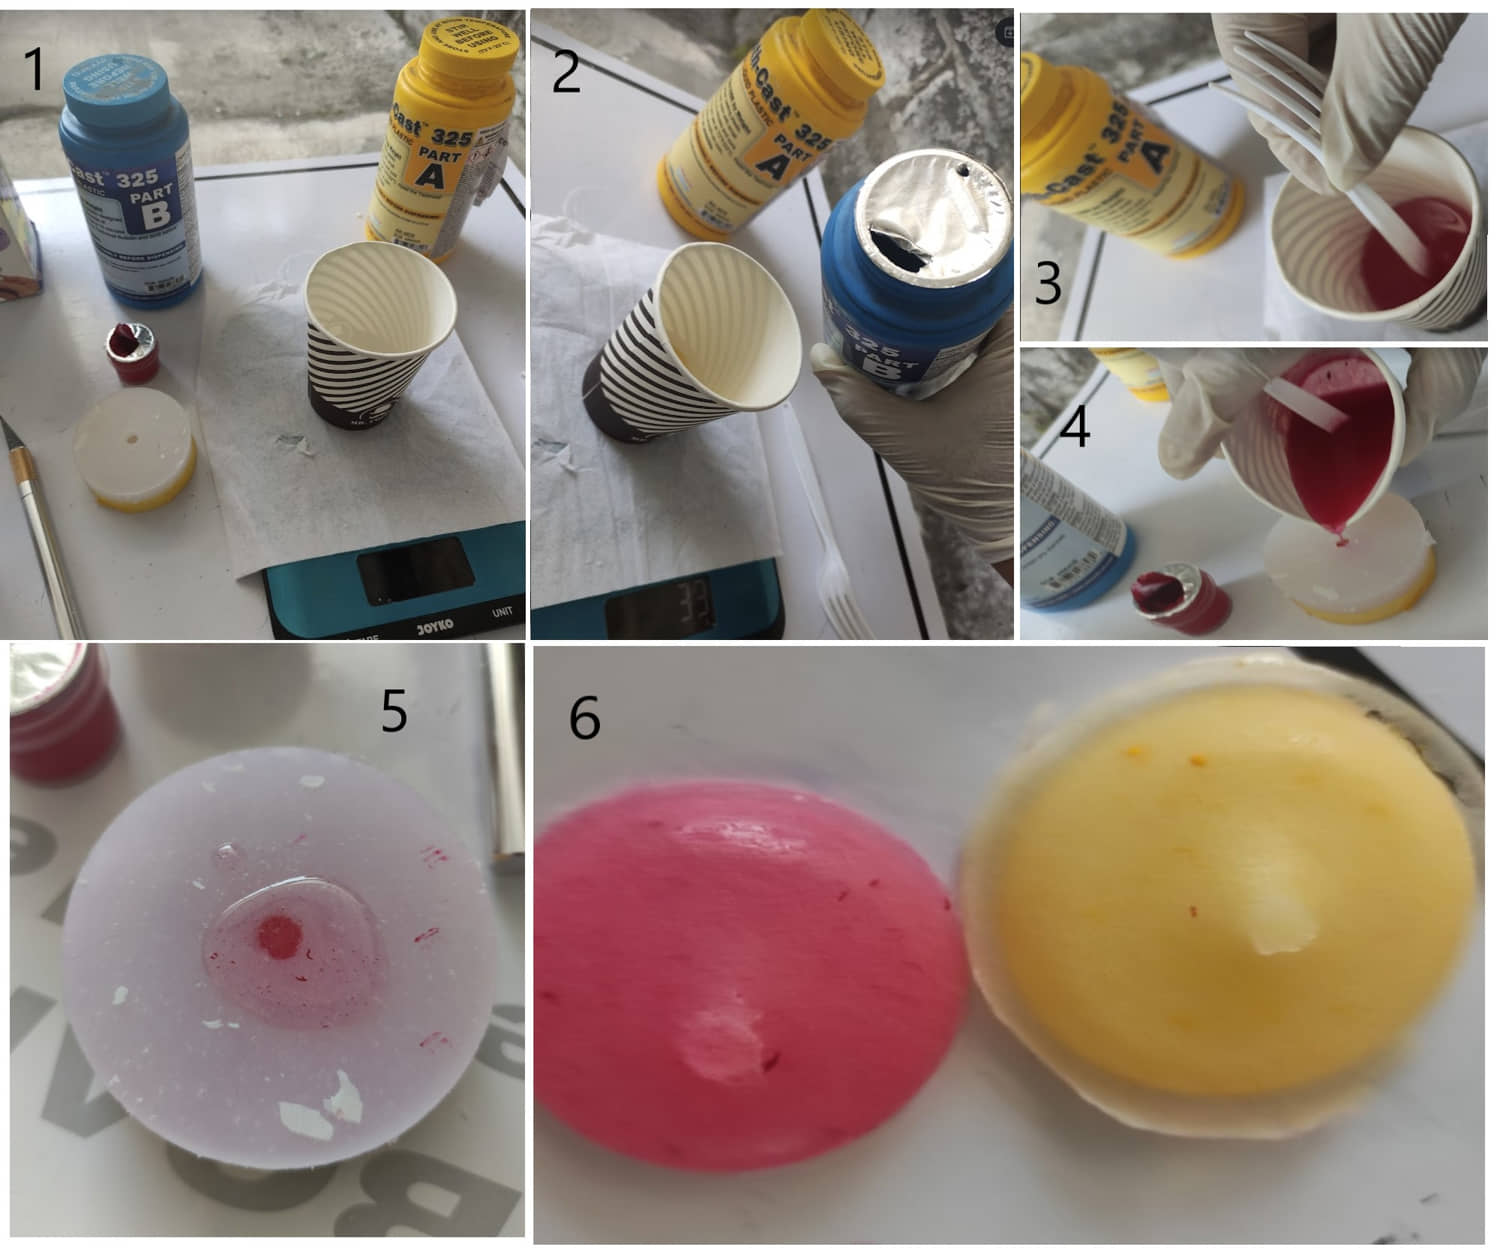
The casting process is a molding process using resin. I use resin with brand Smooth-Cast™ 325
- prepare the resin and hardener (A+B), a container glass and a scale
- pour 30 g of resin A and hardener B each, add dye.
- mix well
- Pour on the rubber mold, wait for 10 minutes.
- Remove the model results from the rubber dies
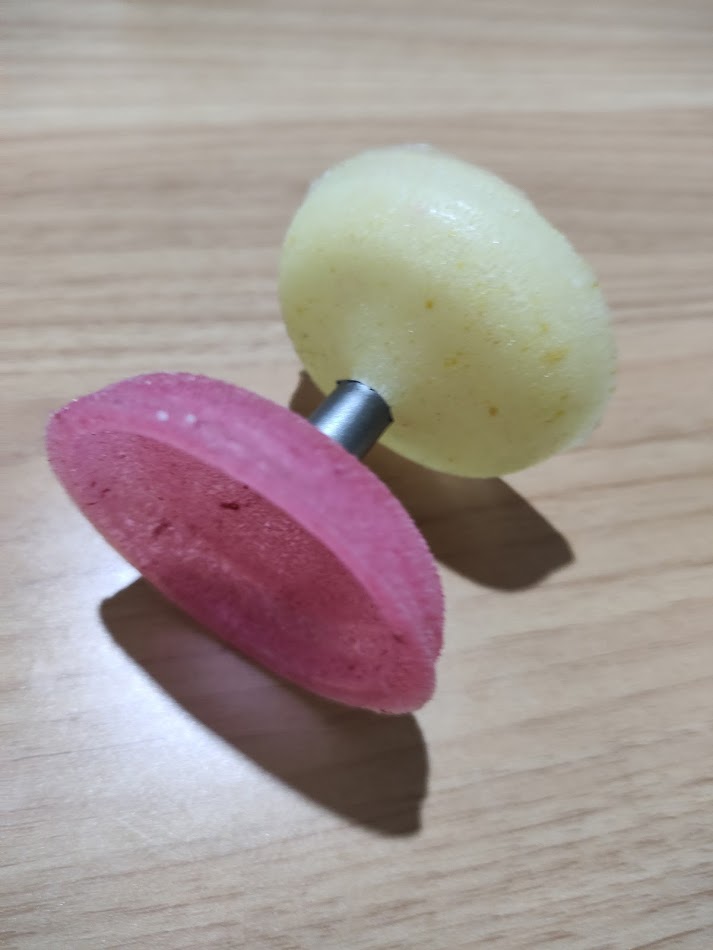
Result :
After two molds have been made, then using the connecting shaft, the two objects can be connected to a “YOYO” model.
Conclusion
The “YOYO” cast I got was usable, but the casting result was very rough. Some things that seem less good expectation in this resin print production:
- many bubbles appear on the resin body,
- the color is also uneven (it seems from some discussions that the dye has expired), not shiny and dull
- Mold results are also not smooth, may need further processing.
The next spiral I will try will cast it again with a different composition/type of resin. Hopefully the results are better.
References
Documentation Files
- Mold Top Yoyo - (.f3d)
- Mold Top Yoyo - (.f3d)
- GCode rough top mold (prn)
- GCode rough top mold (prn)
- GCode finishing top mold (prn)
- GCode finishing bottom mold (prn)
Lessons learned (week 9 : Molding and casting):
- Understanding and applying the molding design
- Understand and apply designs to make Manufacturing CAM
- Understand and be able to choose materials for milling print
- Understand and apply safety in mold-casting
- Understanding and applying the mixing of liquid casting
- Understand and apply the negative casting process
- Understand and apply the molding and casting process using resin