5. 3D Scanning and printing
Week 5 : To do checklist
- Learn about 3D Printer Machine Operations
- Group work
- Print the Printer Test Models (Autodesk/Kickstarter Printer Test)
- Analysis the 3D Printer characteristics operation
- Repo to push group work 2022
- Individual Practice
- Design the models for 3D Printer
- Print the models
- Check print results and if necessary refine it
- Continue the final Project Process
- Documentations
Assignment (week 5):
Group assignment:
- test the design rules for your 3D printer(s)
Individual assignment:
- design and 3D print an object (small, few cm3, limited by printer time) that could not be made subtractively
- 3D scan an object (and optionally print it)
This week I worked on 3D Scanning and Printing
Please click the button for Group Assignment
Group assignment learning
- In the group assignment, we studied the characteristics 3D printer
- What is the best setting of our machine (what it can and cannot do)
- Compared it with another machine
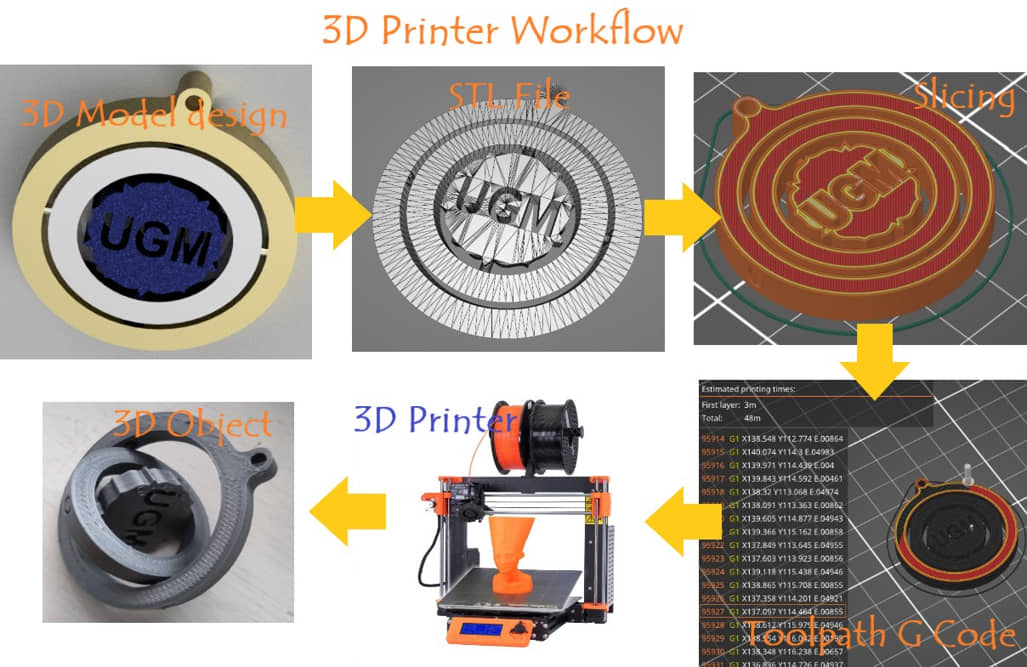
3D Printer workflow
To run a 3D printer and generate a 3D Model there is a sequence that must be done.
- Starting from designing a 3D model (Fusion 360, FreeCAD, Solidwork, etc.),
- the result is output in the form of stl file (a file format native to the stereolithography CAD software created by 3D Systems),
- then the slicing process is carried out,
- the toolpath path will be generated which is derived into G code,
- The G code is sent to the machine for printing,
- and a 3D model is generated.
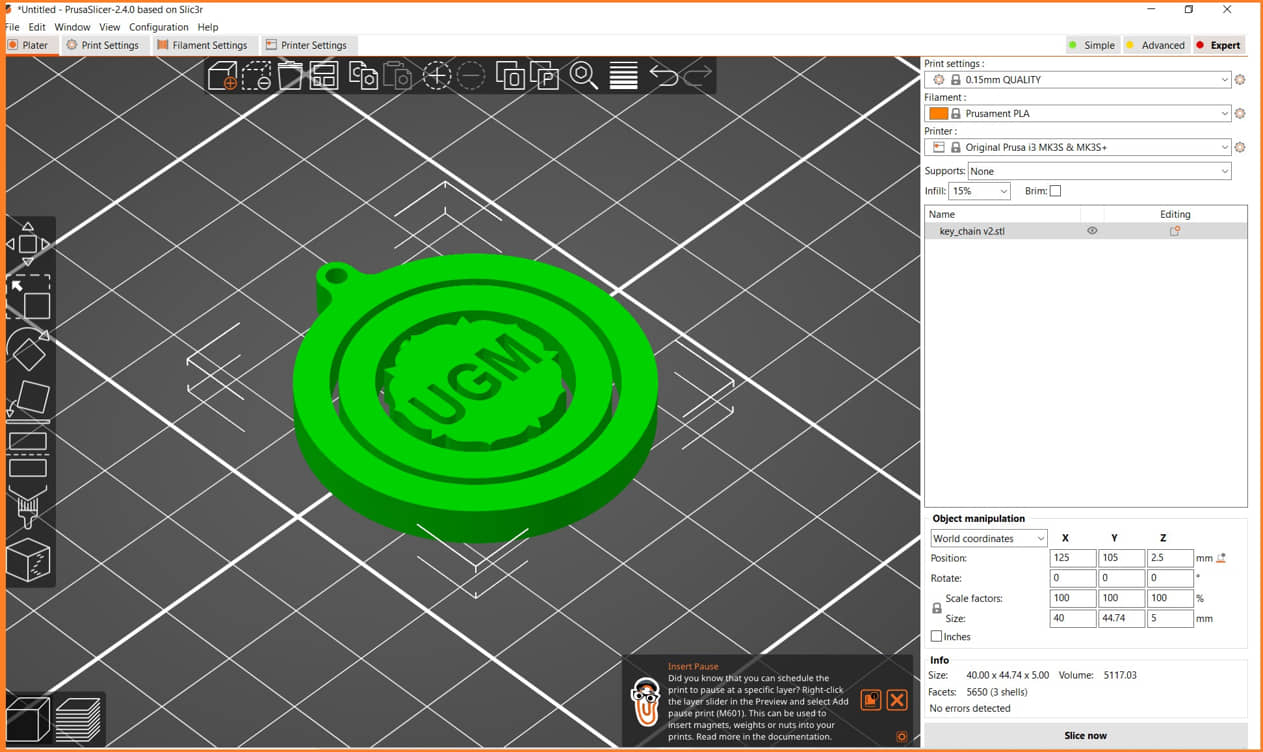
Desaign the 3D Models
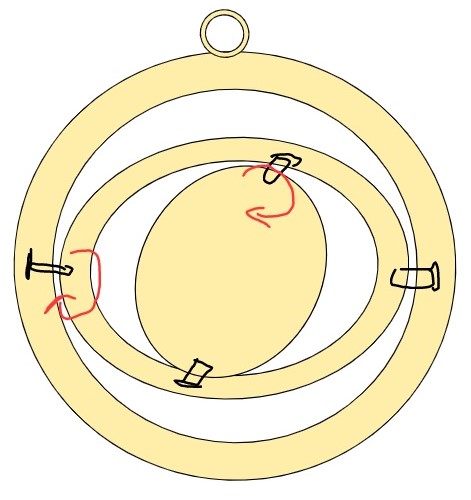
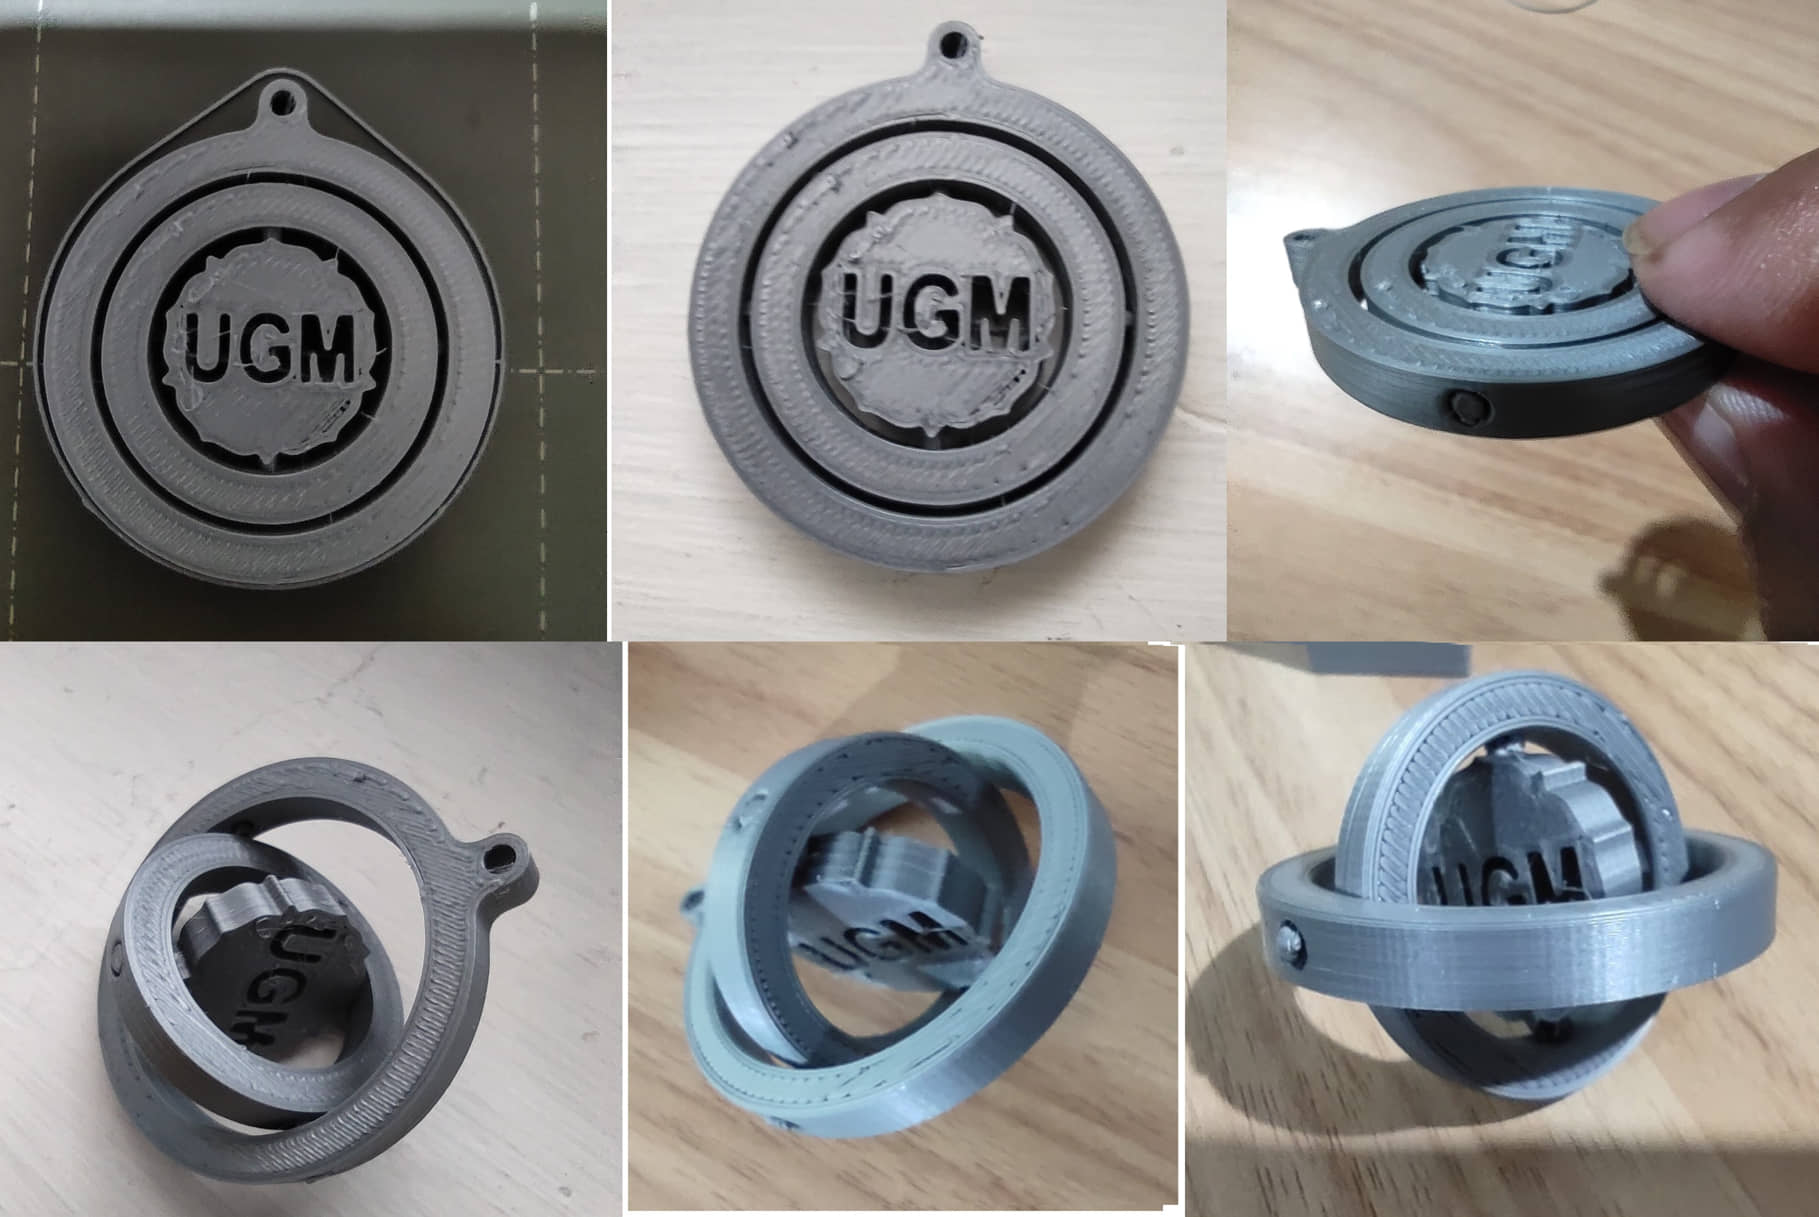
In this design, I will try to make a 3D keychain, consisting of 3 circles (rings) that can be rotated like a ball.
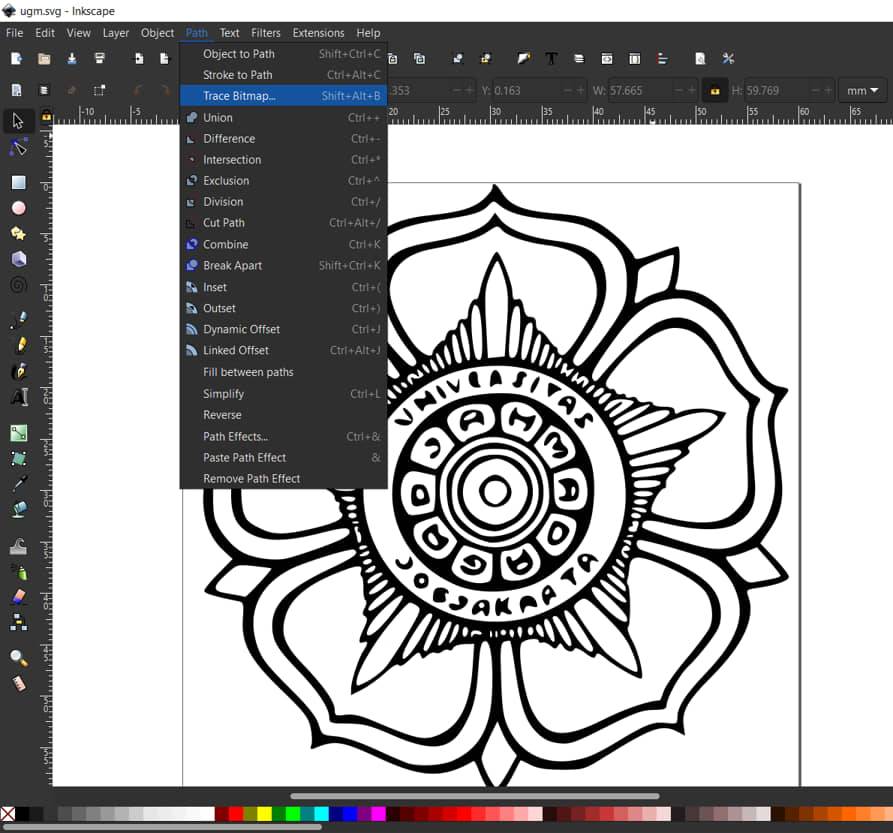
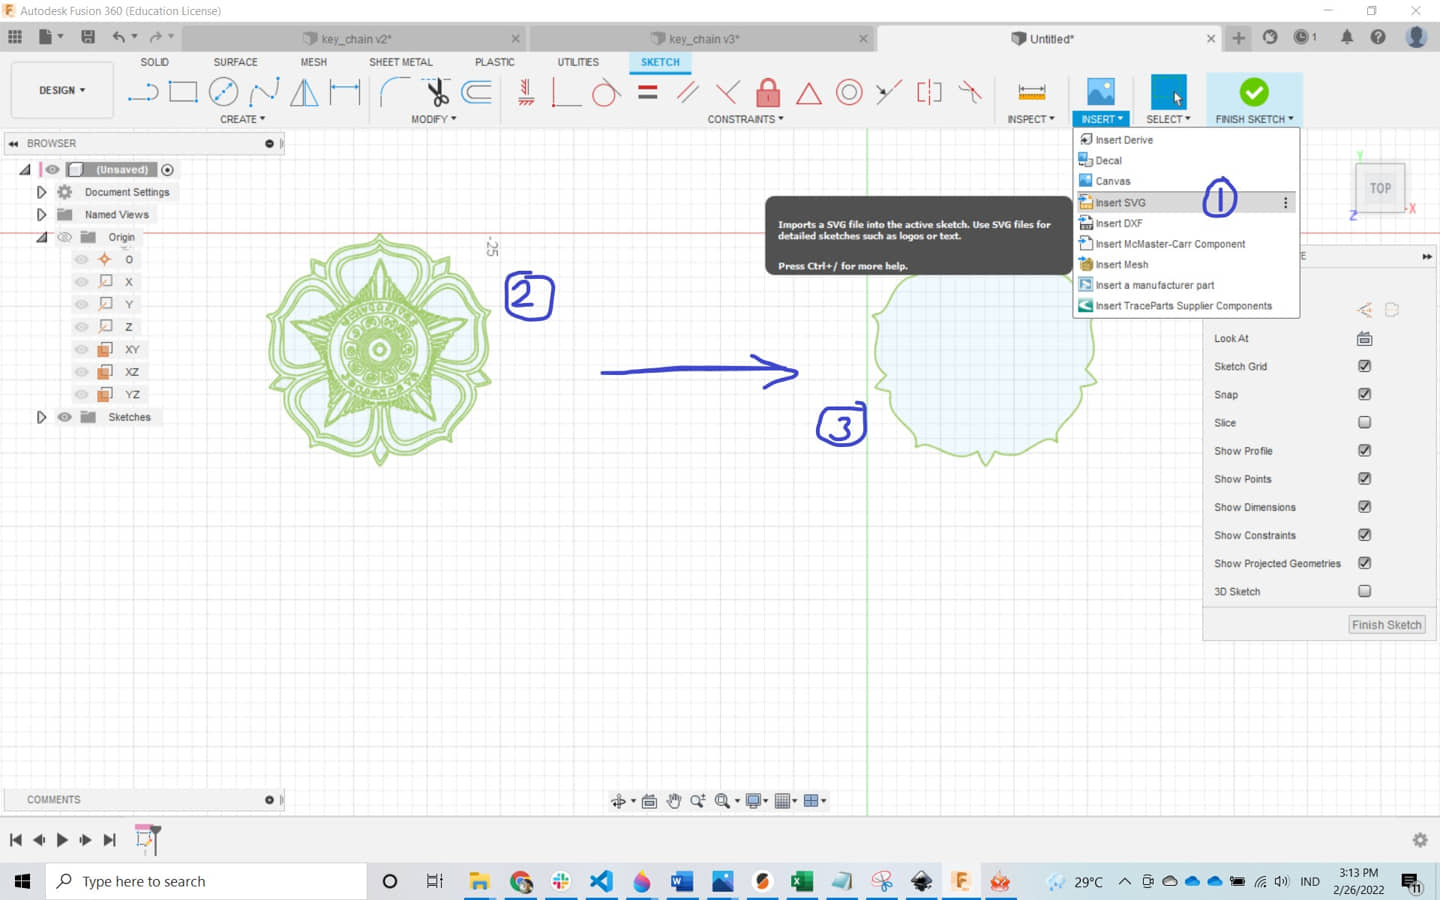
I will make the smallest ring like the logo at my university (UGM). But I need to convert the image to vector so that it can be processed in 3D modeling (Fusion 360)
- Open the logo image in Inkscape, Click Path menu -> Trace Bitmap, delete the original image, save the file (.svg)
- Open Fusion 360, Insert SVG (open .svg file), select image plane.
- Remove the inner image leaving the outer (outline).
Extrude, and make the second and third rings
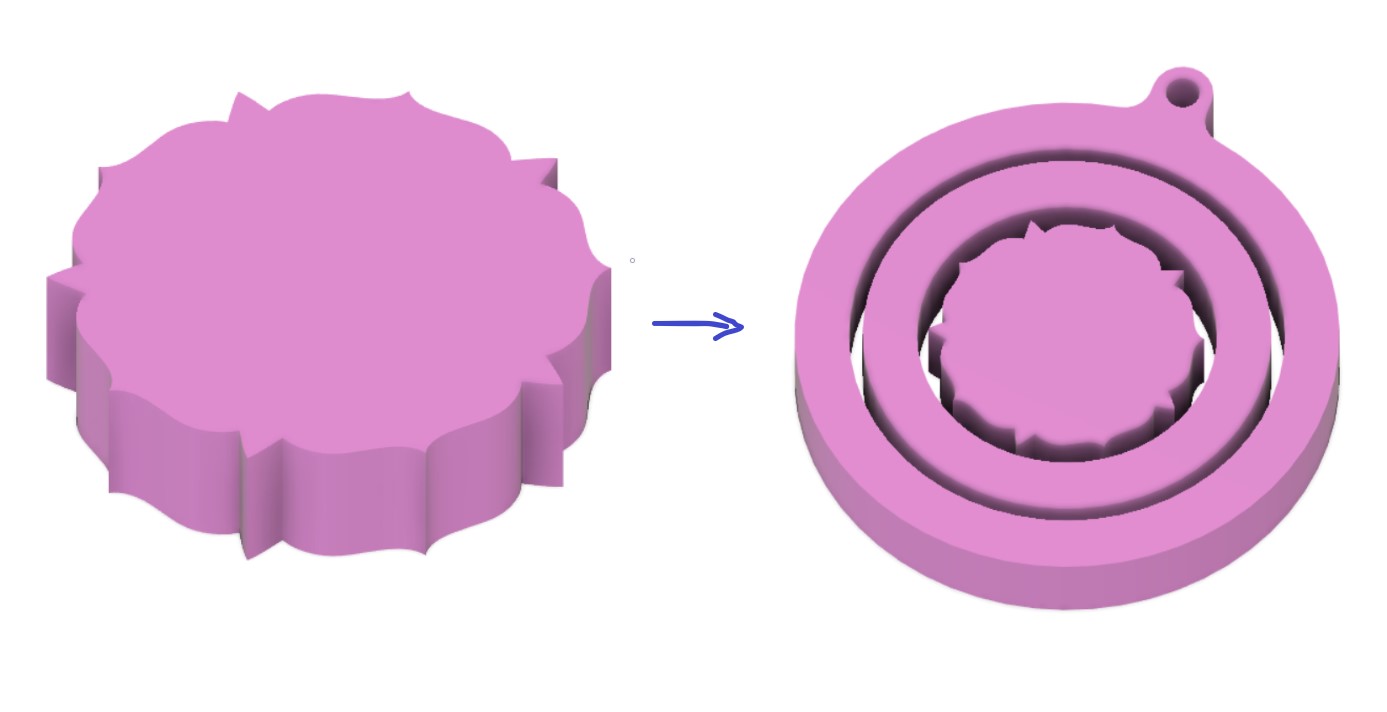
- We can add text in the middle. For example, I write: UGM
- Make a connection between the rings by making a hole in the outer ring and the connecting shaft on the inner ring, do it for the other side
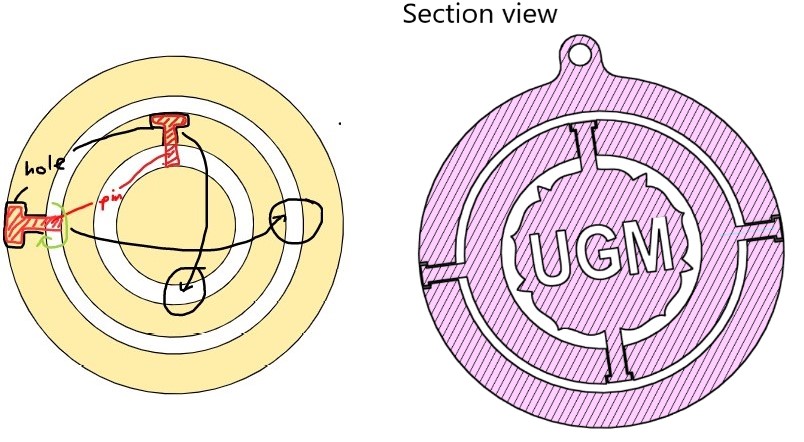
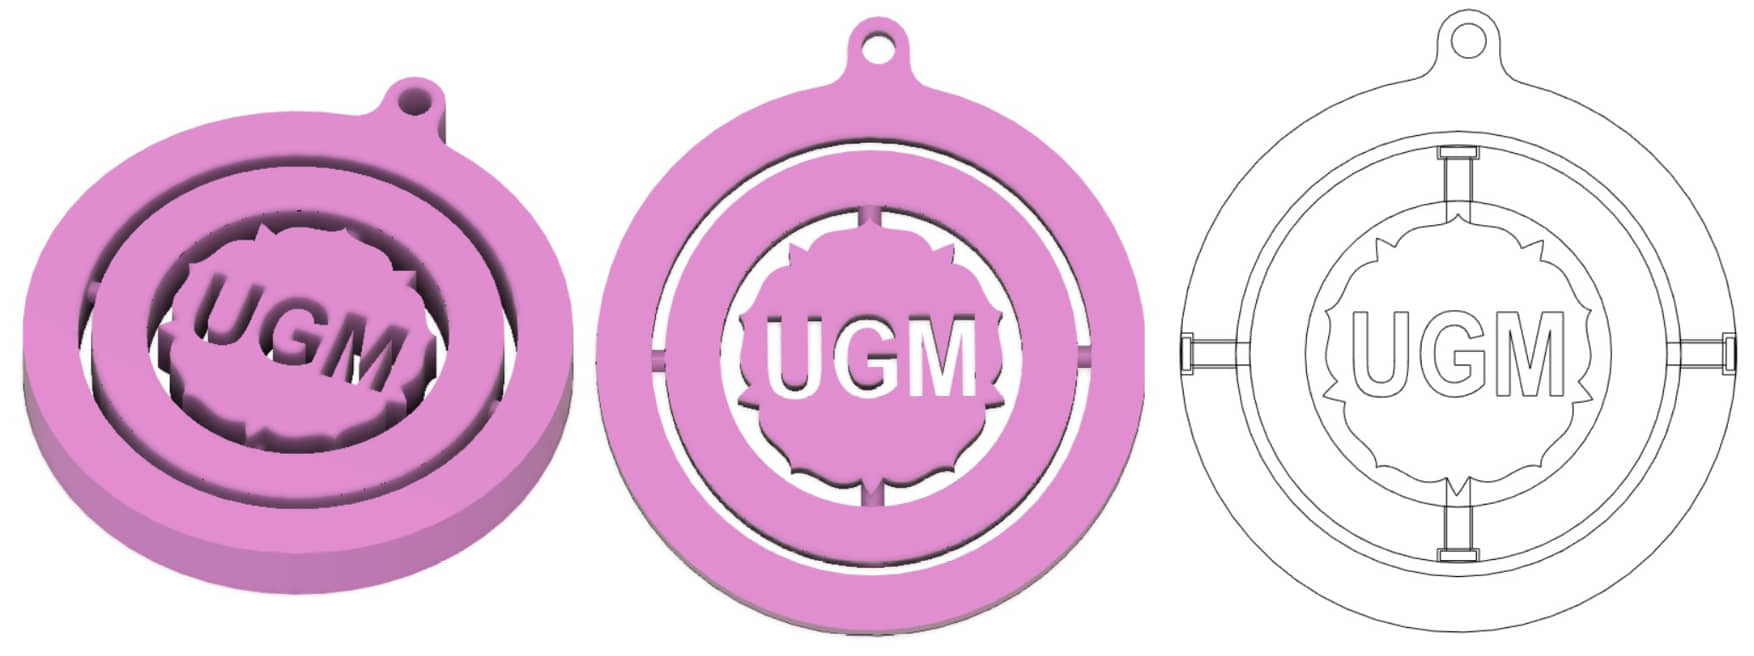
and the design :
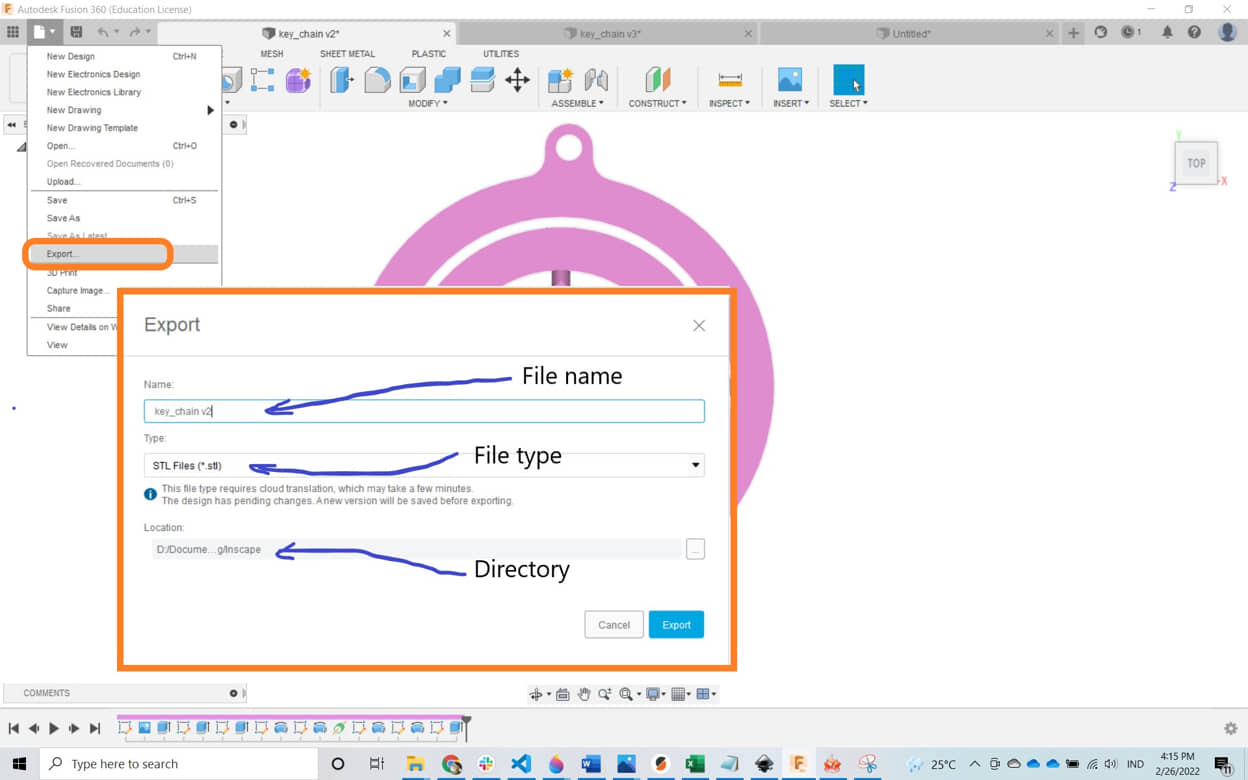
After the design is finished, to prepare for 3D printing, we need to export the design file in .stl format.
Next the file will be downloaded and opened in the slicer software (PrusaSlicer)
Preparation for Printing
- Open PrusaSlicer, import stl files
- Setting the configurations
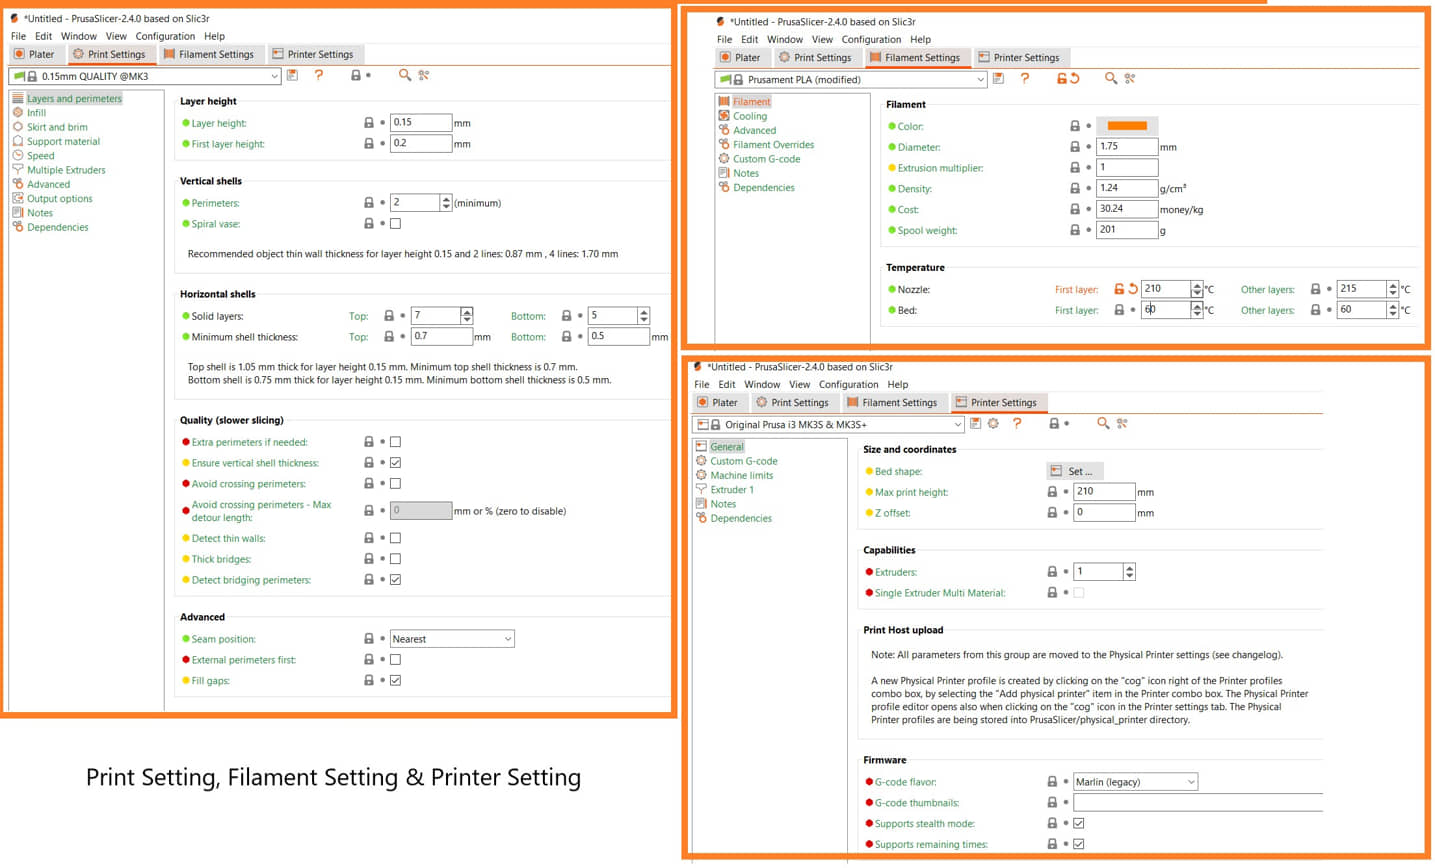
- Slice Now
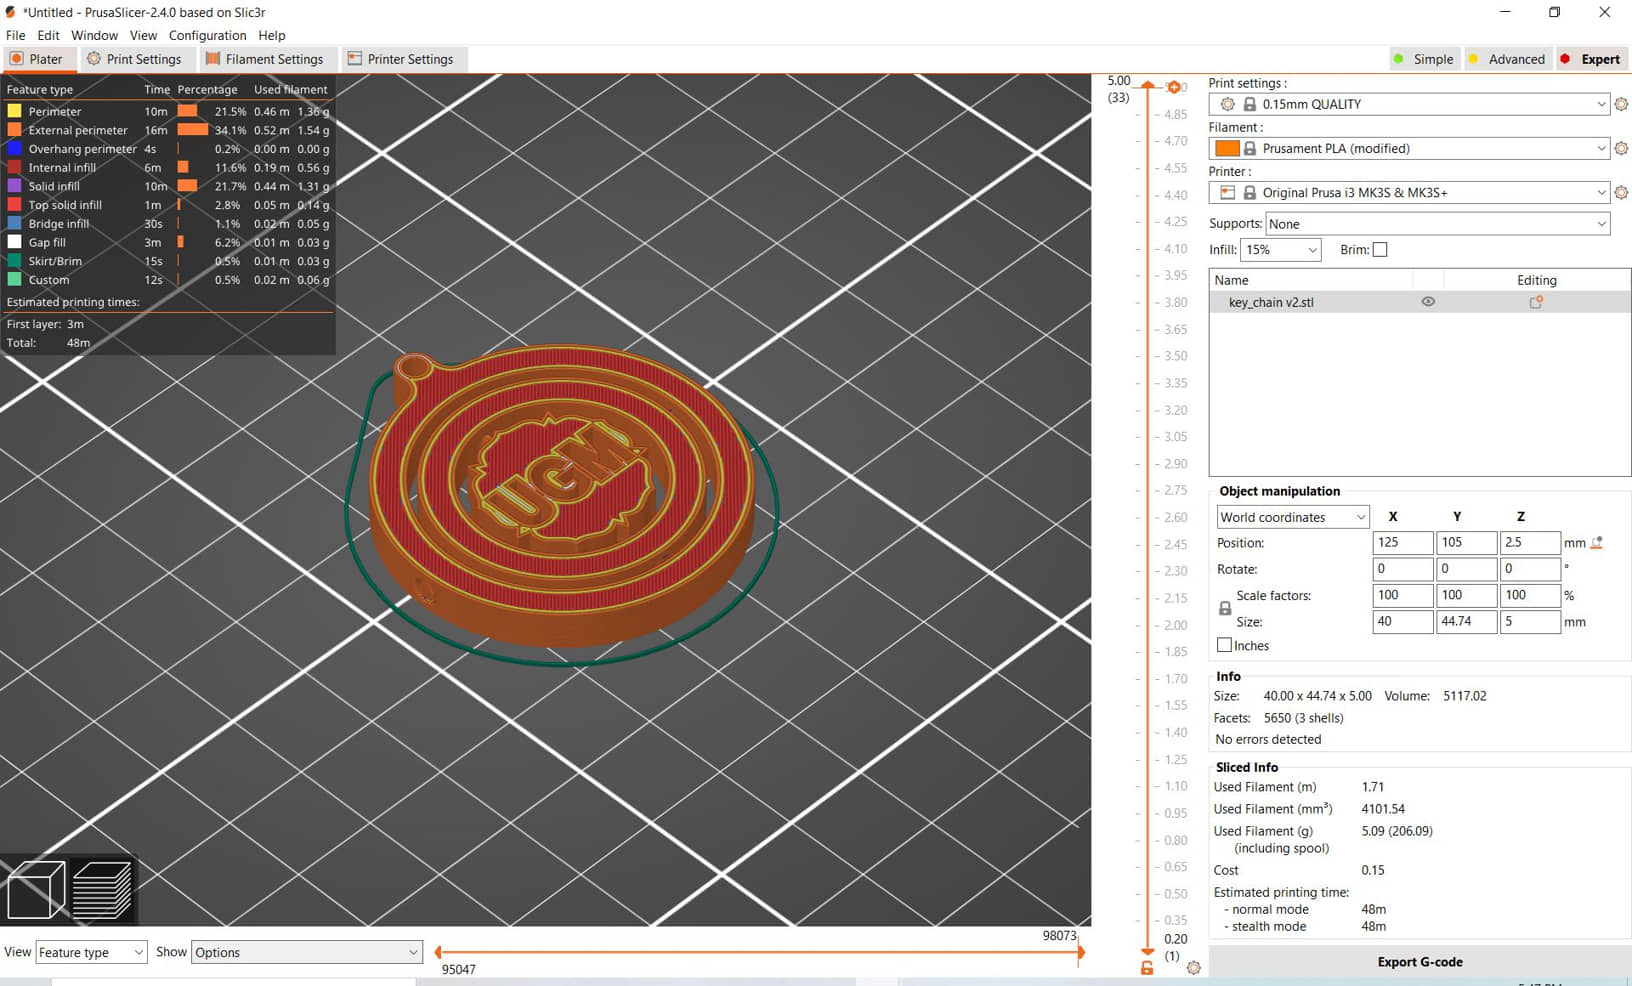
Export G-Code, save to SD Card, bring it to the machine
Printing
When doing the 3D printing process. There are several stages as described in the Group Assignment. These steps include:
- Load the filament (I used PLA filament)
- Setting bed level correction - Fine tuning the first layer
- Print from SD, with configuration :
- material used: PLA 1.75 mm
- infill : 15%
- layer height : 0.15 mm
- Nozzle temperature: 210 degrees Celsius
- bed temperature: 60 degree Celsius
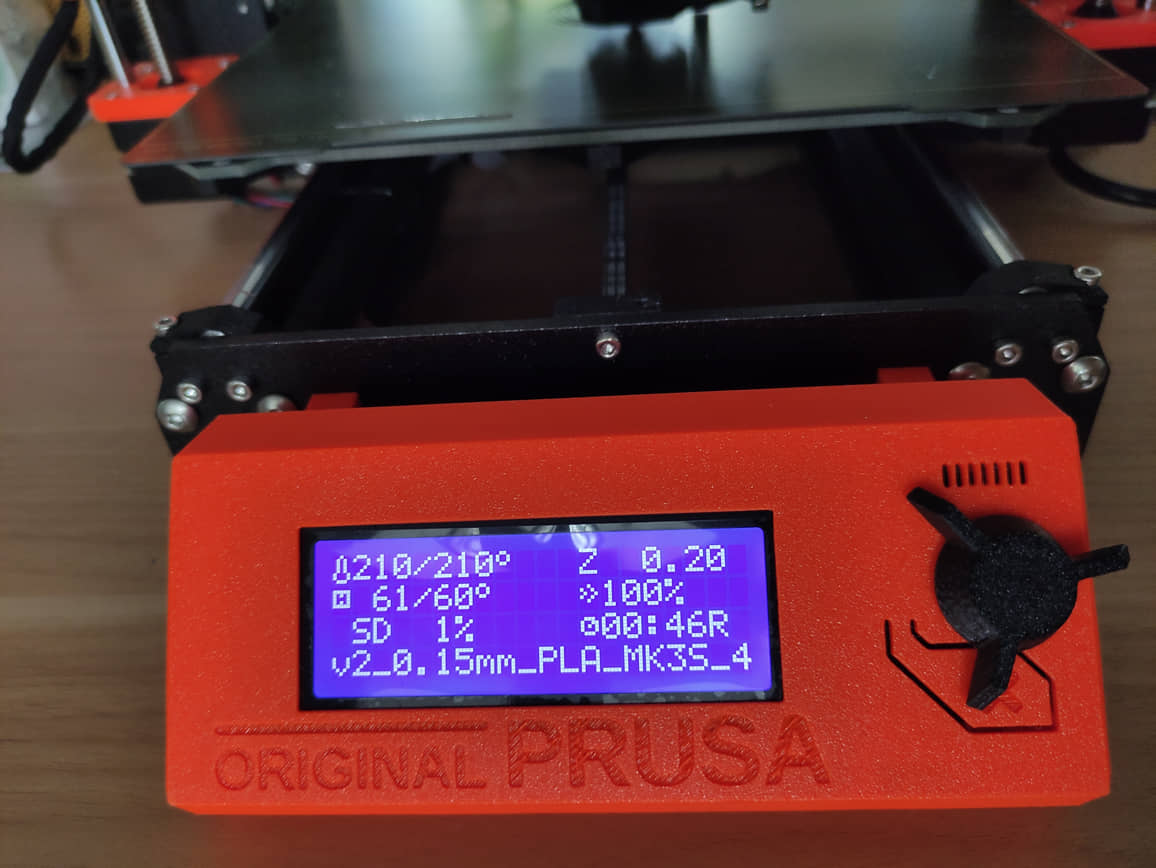
After the printing finish (48 min), I get:
3D Printer printing process comments
The 3D printer printing process is an extraordinary modern manufacturing process. The technology is often referred to as “additive manufacturing”. In this process we can even make specific objects that are inside other objects, which is difficult for “subtractive manufacturing” technology to do. 3D printers allow us to create complex objects with one printing process.
Making objects with a 3d printer process seems long, but when compared to the conventional model prototyping process, prototyping with a 3d printer can be faster and we can adjust the solidity of the printed object so that it is more optimal.
Some things that are still unsatisfactory from this technology are the type of material, and the precision for printing with FDM models, to achieve this requires expensive 3d printer technology. The precision of each machine can be different, so it is necessary to characterize the machine. From this assignment, I also learned that we can characterize our 3d printer machine to find out the extent of the machine’s capabilities. What can be done and what can’t (the result is not perfect), due to limitations such as:
- when printing the shape of the overhank structure,
- small size,
- smooth surface,
- precision,
- different configurations for different materials
- etc.
3D Scanning
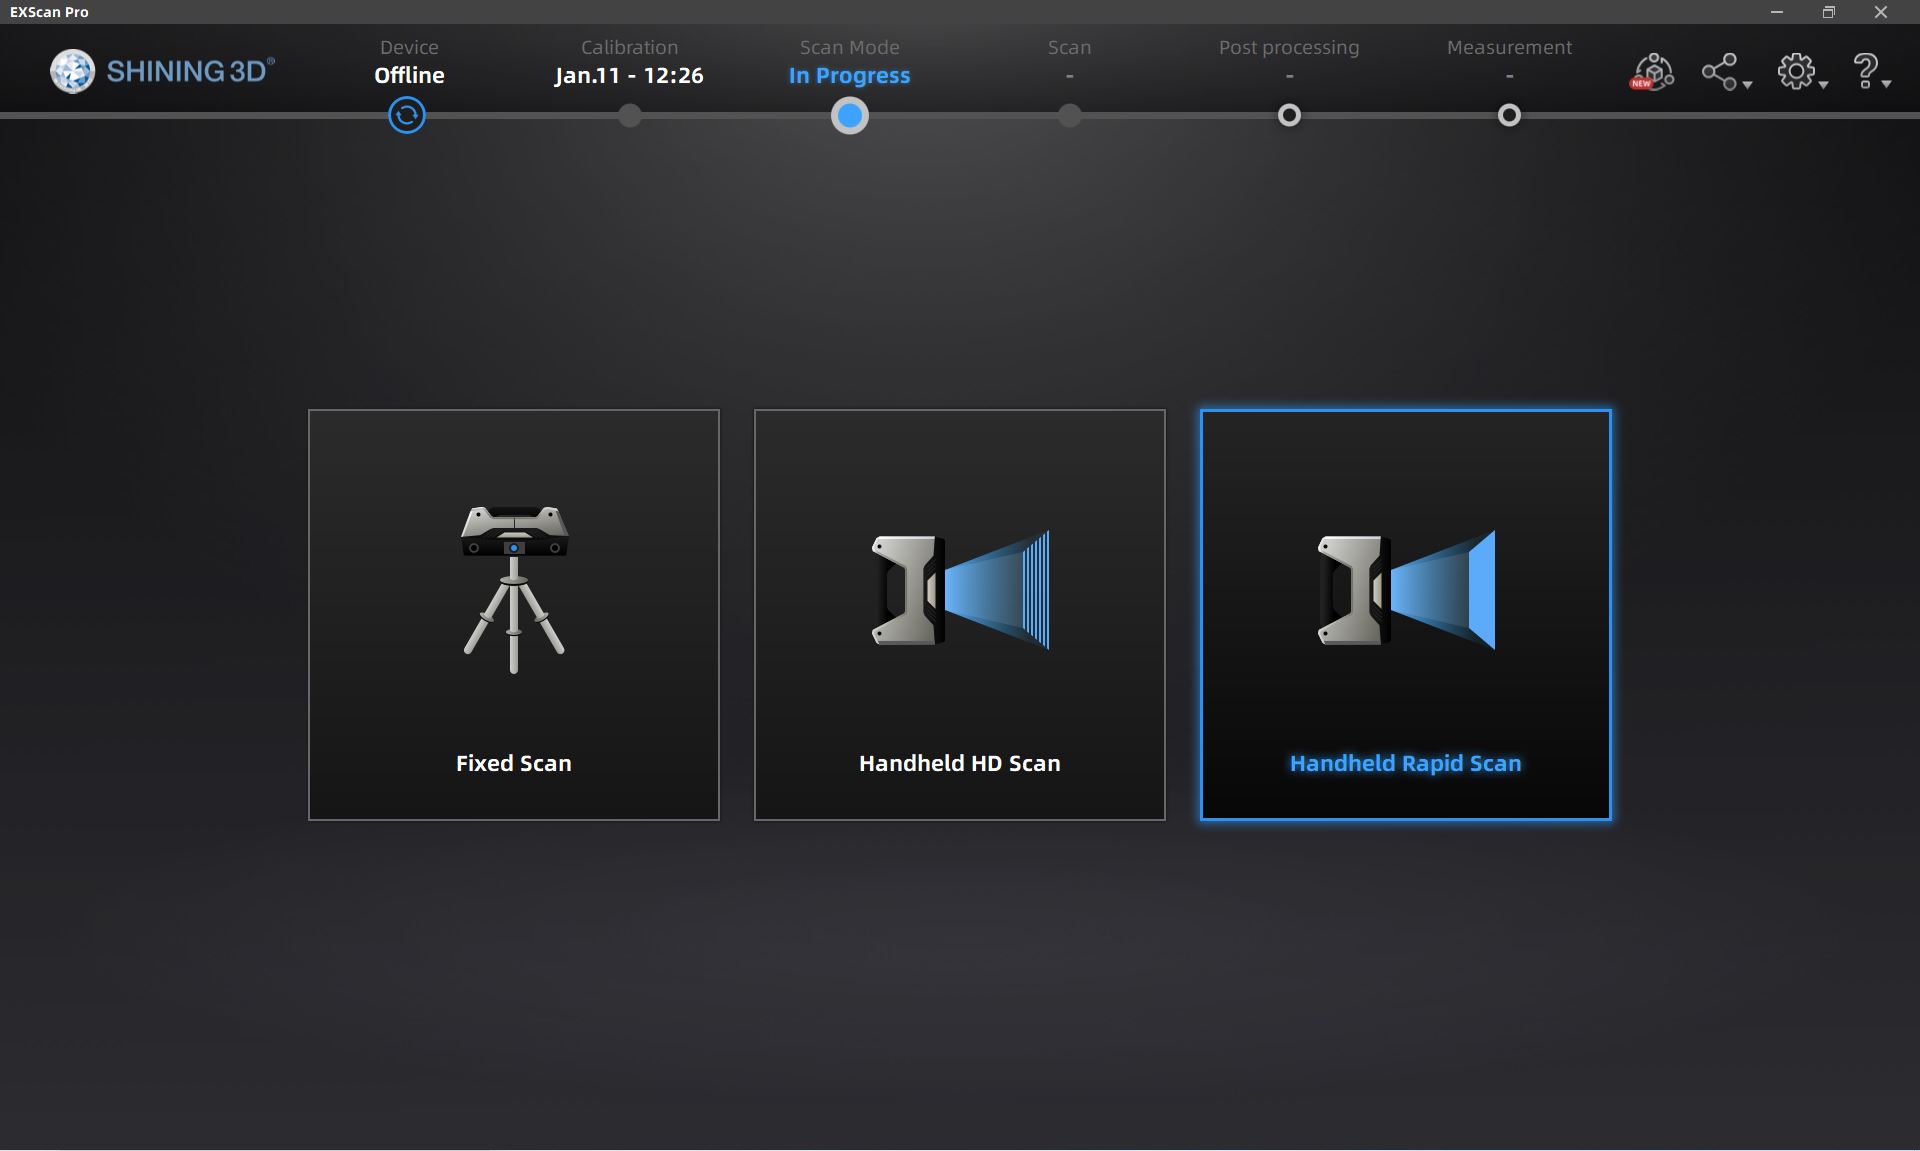
In this week’s assignment I will try to make a 3D scanning process on a small object using the following technique:
- Fix scanner
- Handheld
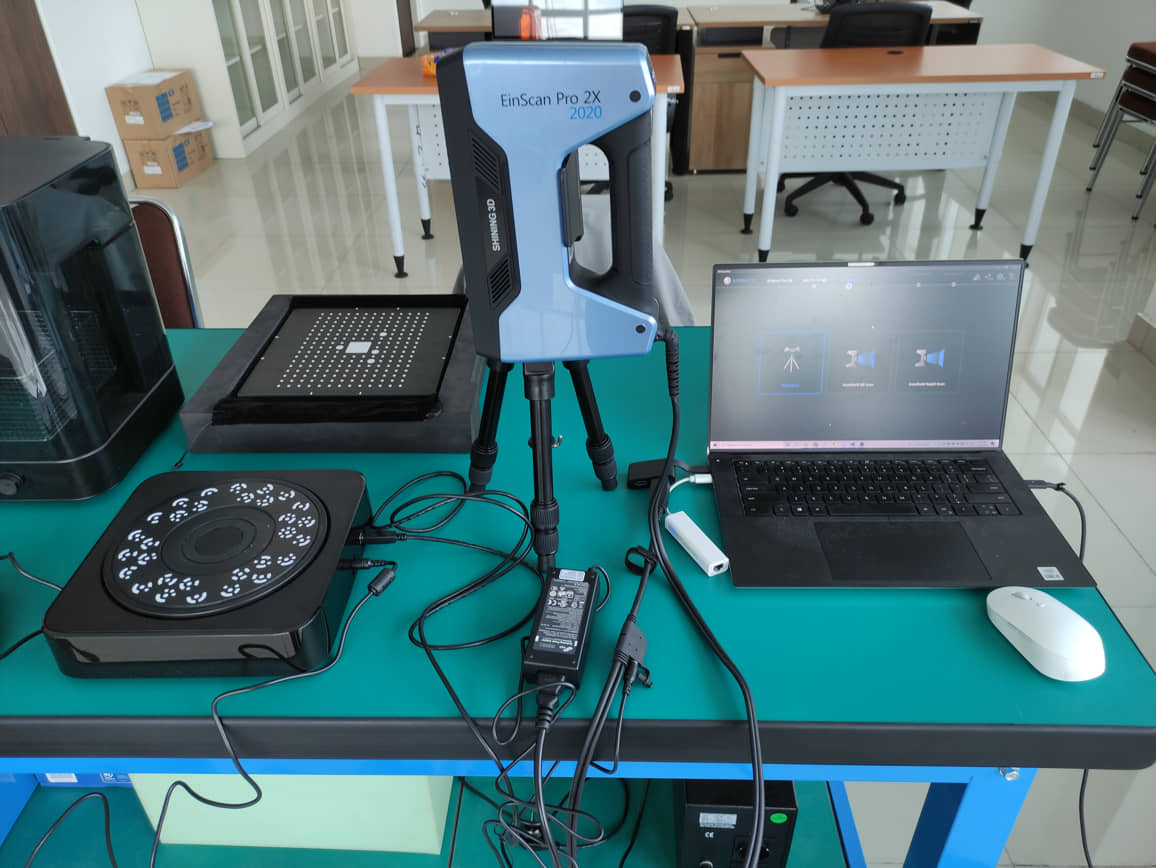
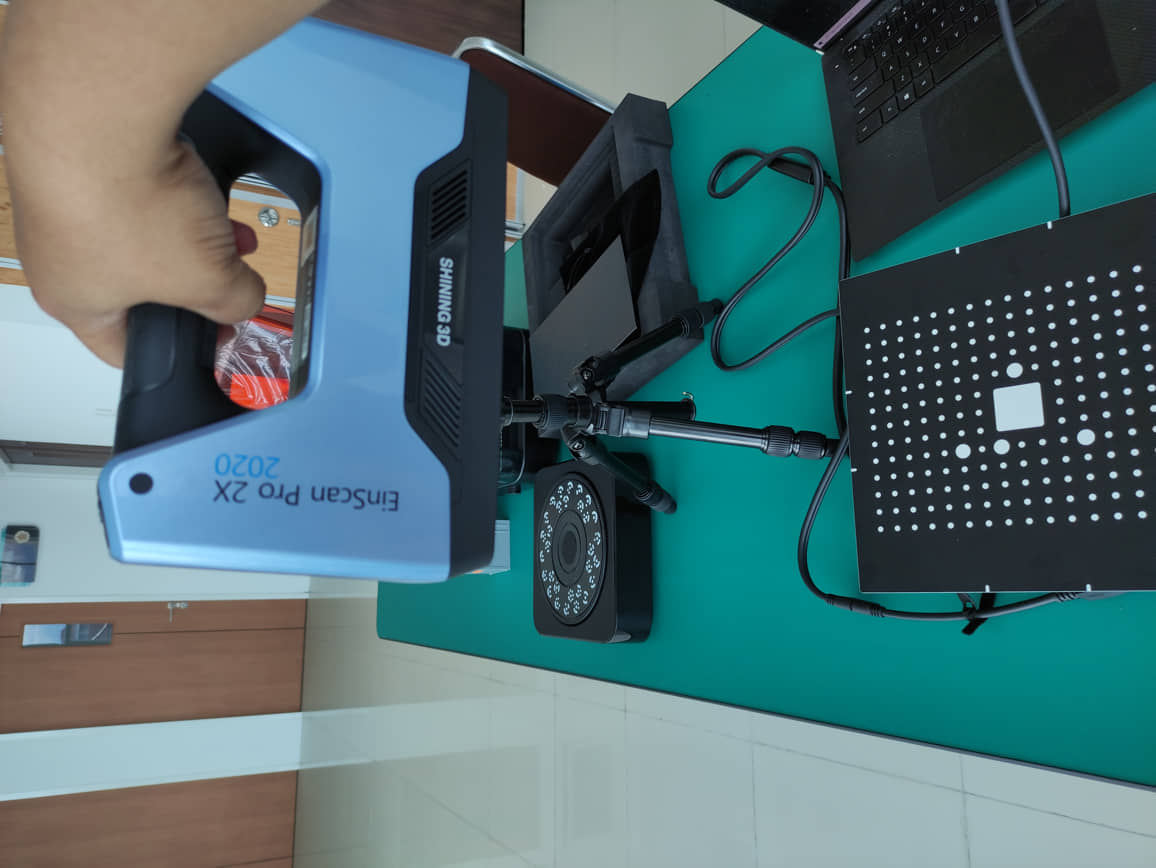
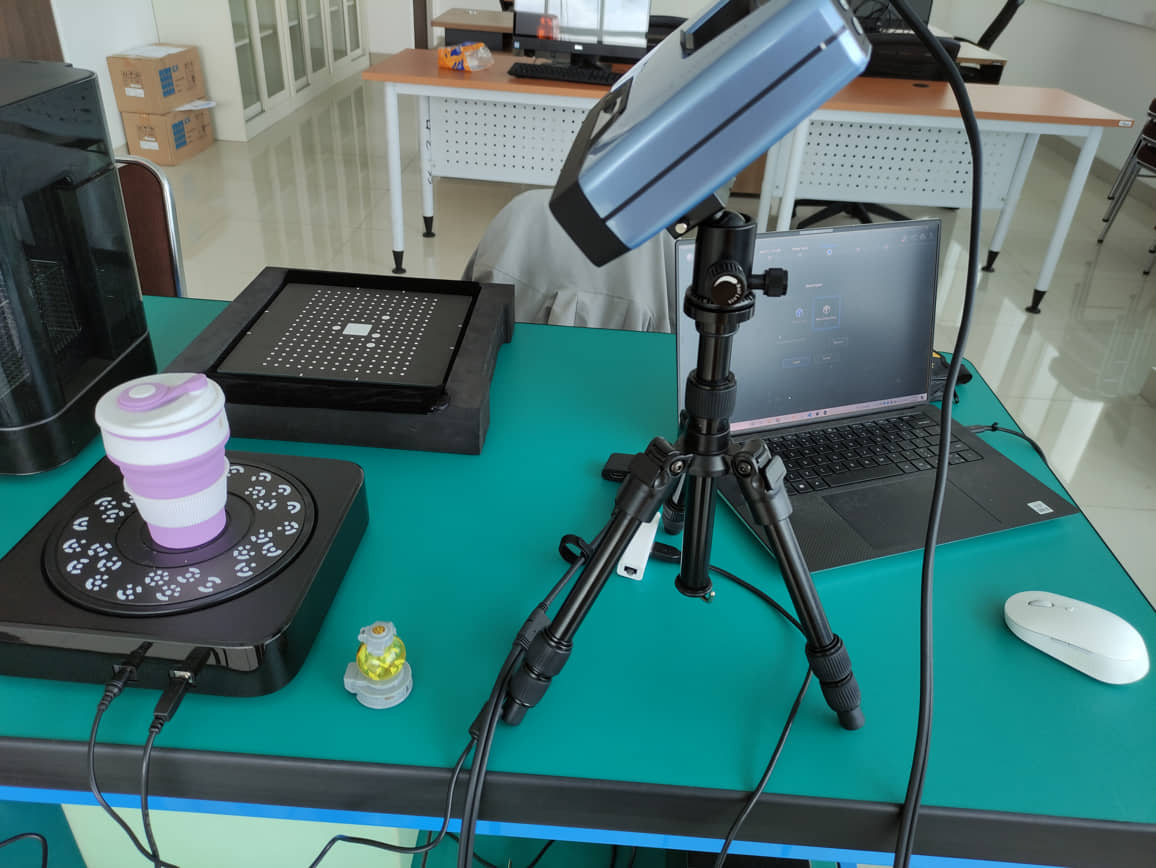
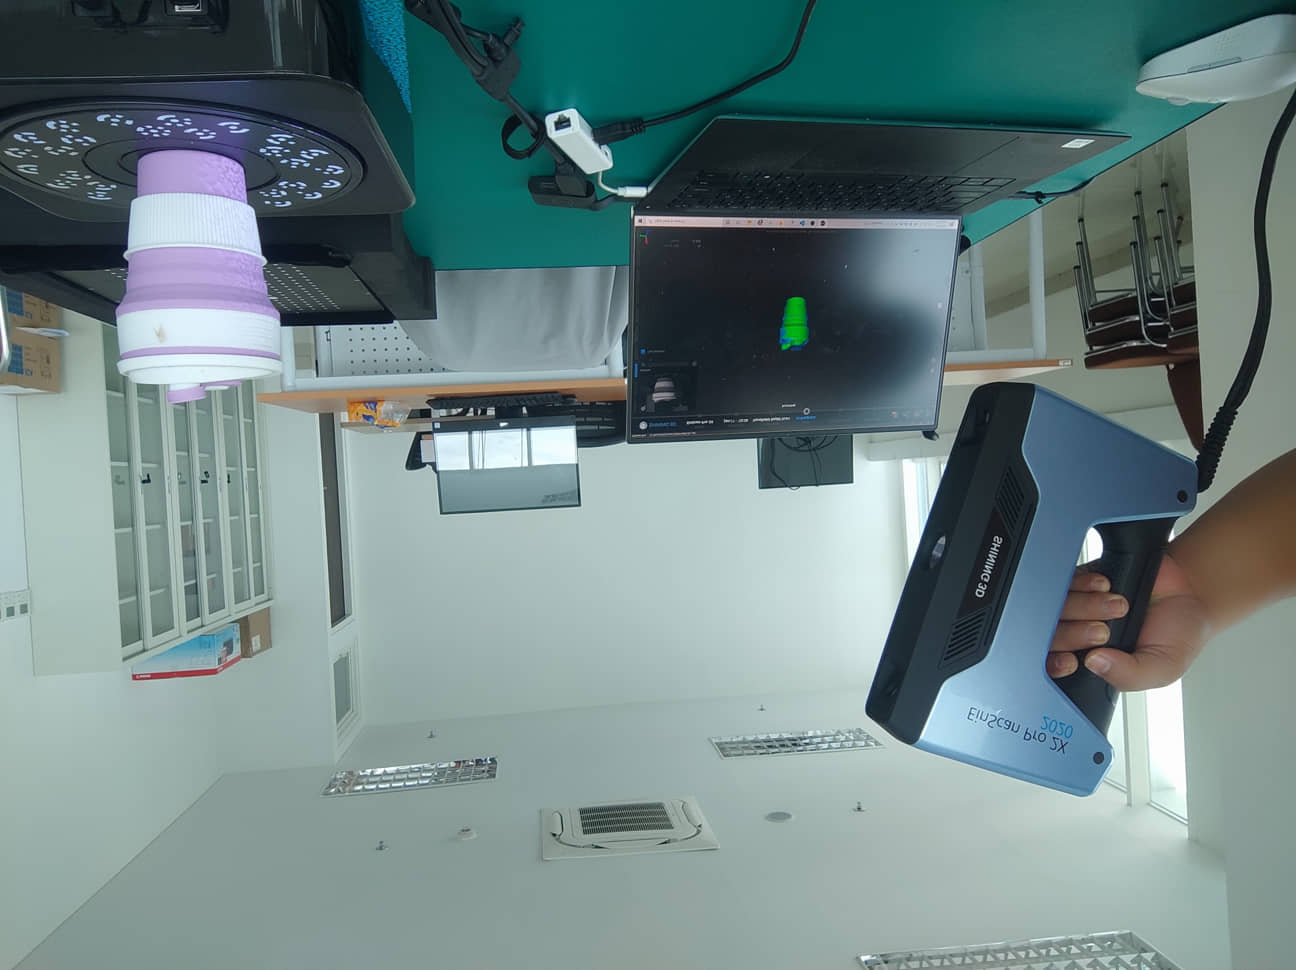
The 3D Scanner equipment that I use is the EinScan Pro 2X Handheld Scanner 2020 Series and its rotary table. And the software we use EXScan Pro Software
The first time we use Einscan hardware we usually have to follow a calibration procedure. From this procedure, the accuracy value of the scanning process will be obtained.
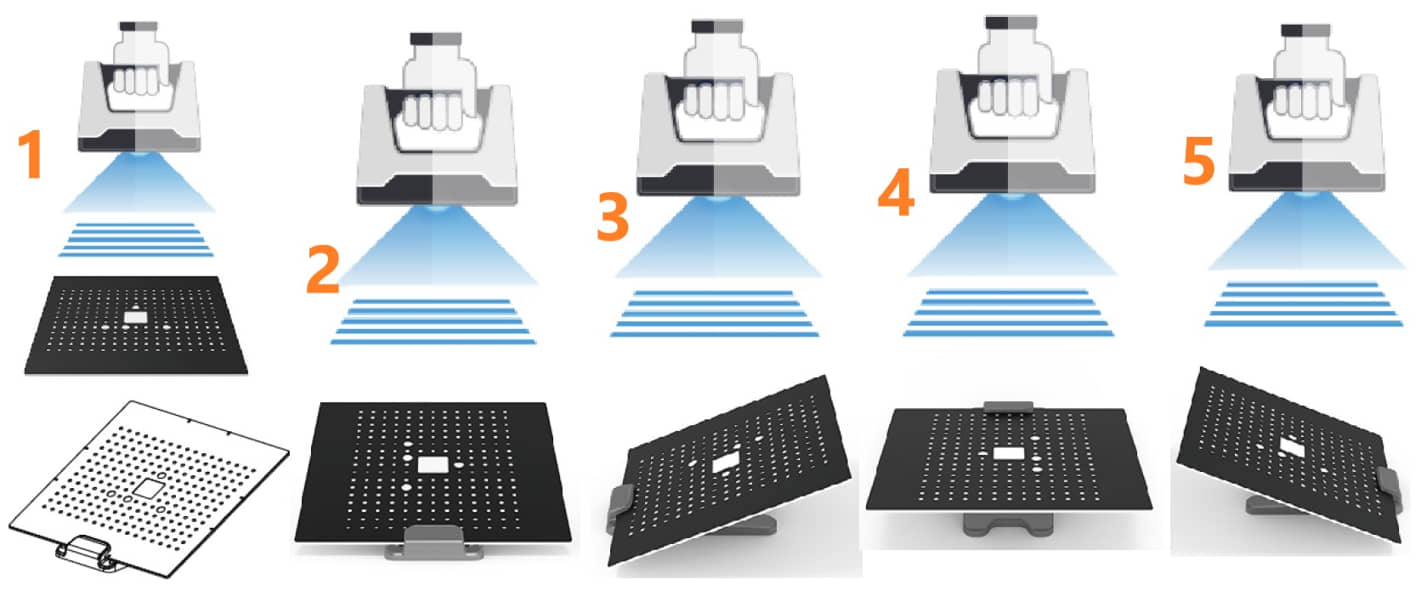
Fix Scanner
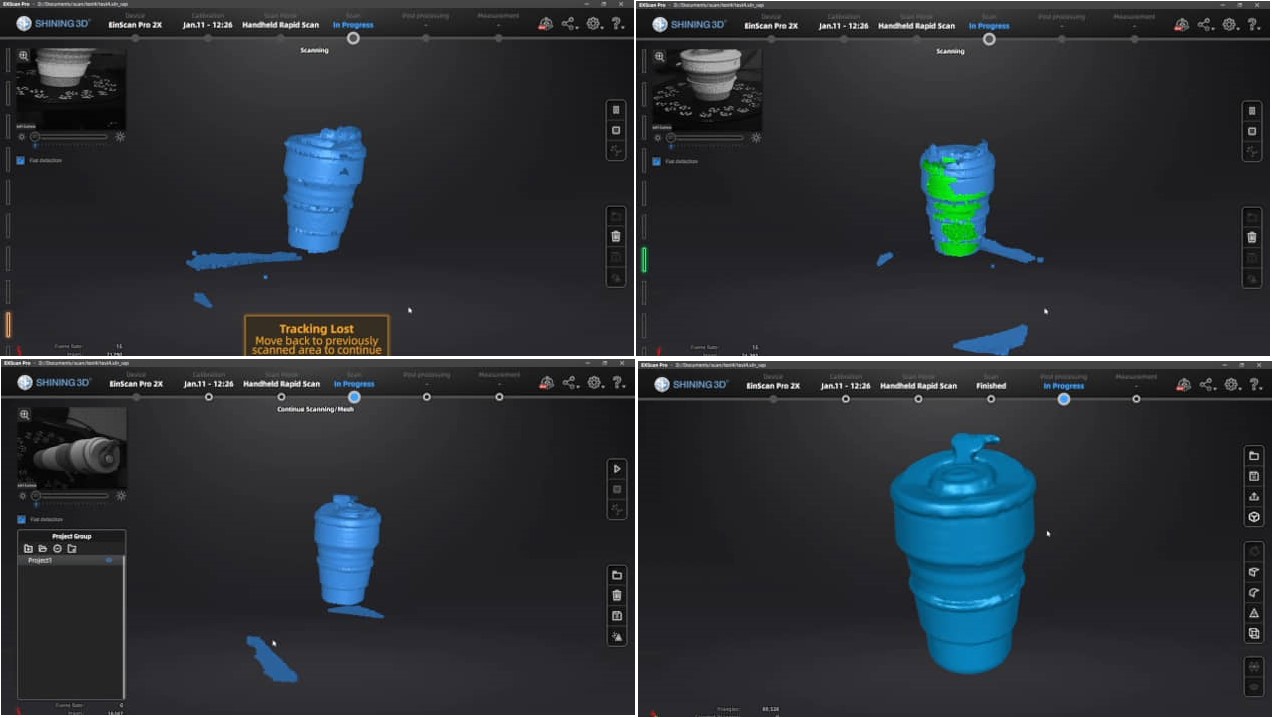
The first scanning process I did was on a glass.
- put the glass on the rotating table.
- In the ExScan software :
- select Fix Scan,
- new project,
- non texture scan,
- positioning the scan marker to the center of object
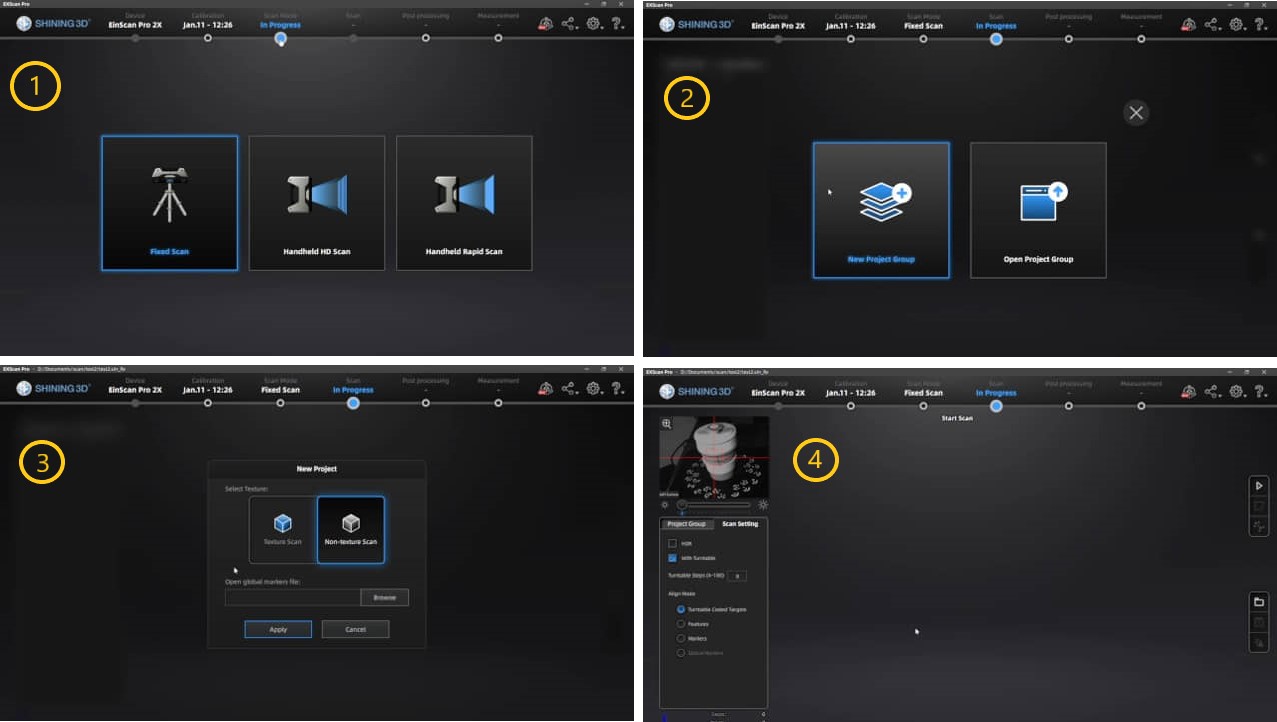
before scan the object we can preview the scan, and align the distance, and brightness
Scan the objects.
Scan options with a rotary table can be selected how many times (rounds) the object will rotate. We can set as many as 8 times (default).
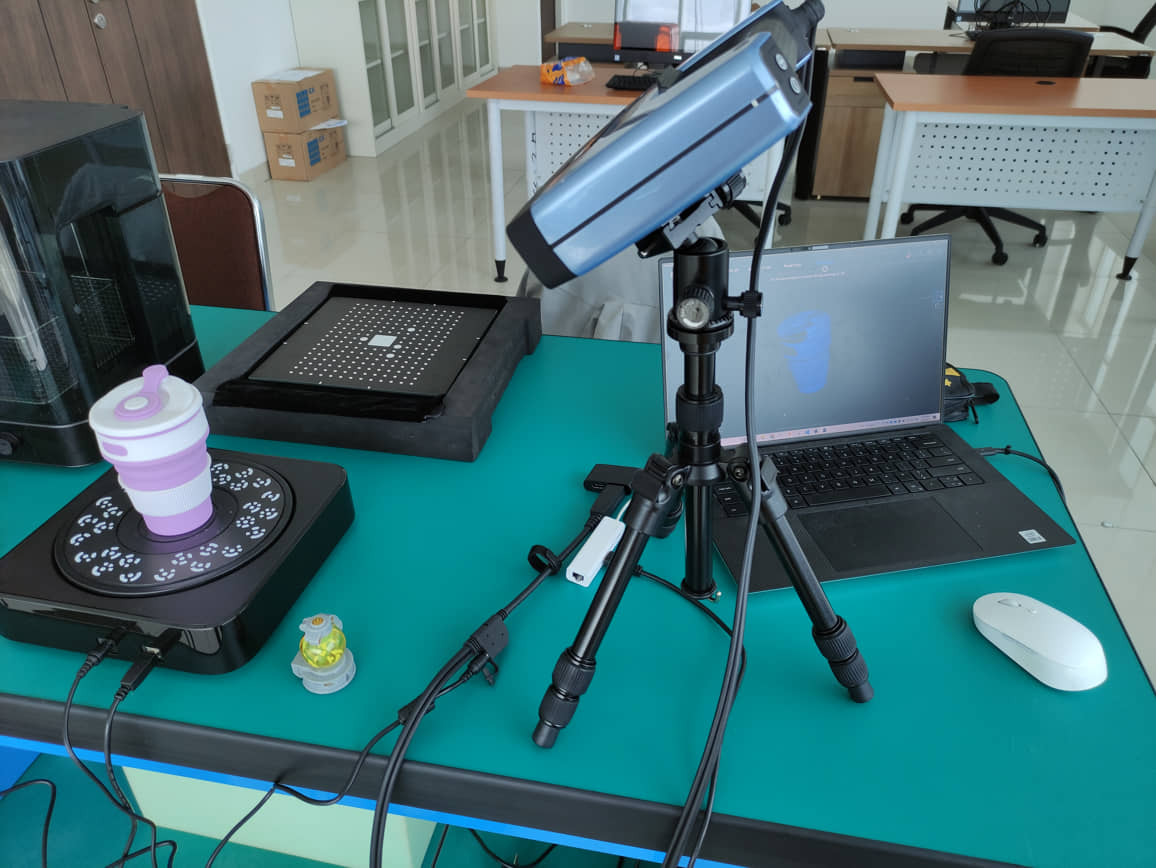
After 8 round/scan steps, the scanned images will be collected in one group. If the scanned image information is still needed, then we can repeat the scan process at a different position of the object (eg the object is lying down), then the scanning process is back. The next batch of scanned images will be generated (Group 2).
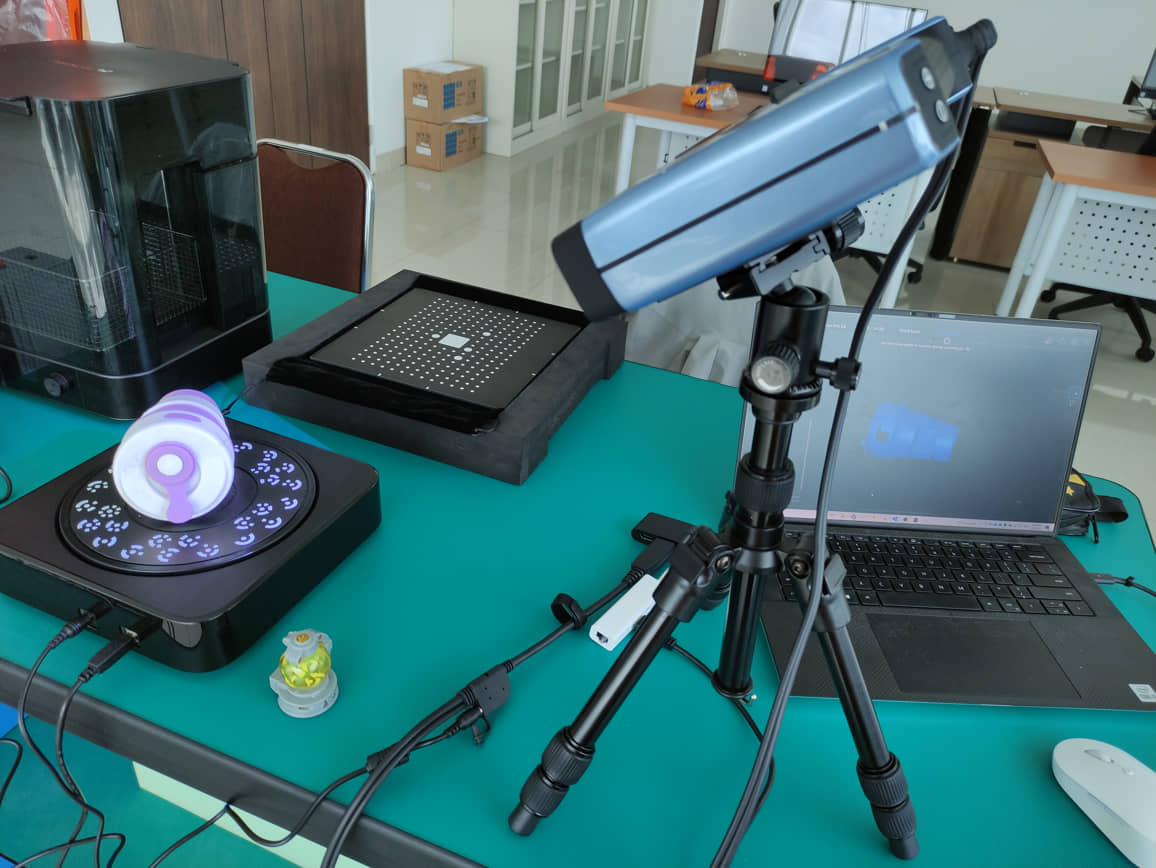
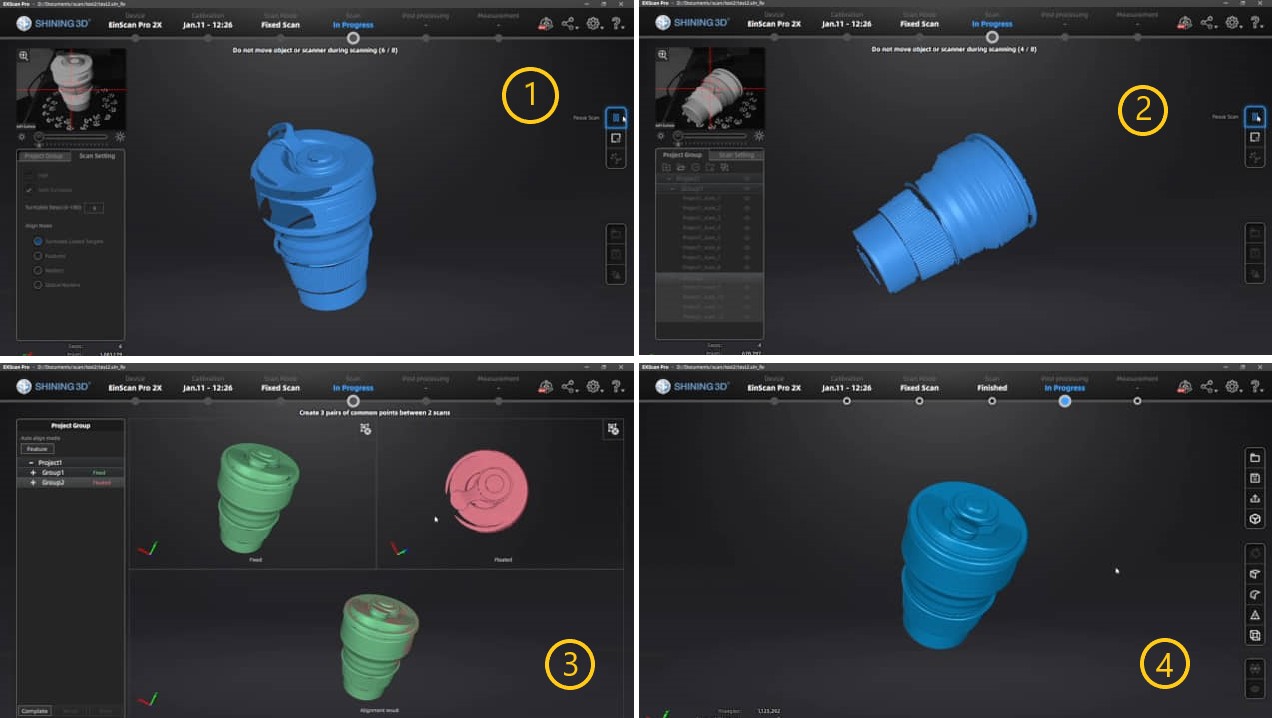
Then we can do Align. In this process the results of the first round will be added to the form of scanning in the next round. Shape matching will be done so that the shape of the scan results will be more perfect.

The next step is to make Mesh. This step is a step to create a 3D model from connecting the scan data points and align. The mesh detailing process can be done high, medium or low, this choice will affect the quality of the 3d model results and the processing time. The results of this mesh can still be modified, such as sharpness, smoothness, etc.
Handheld
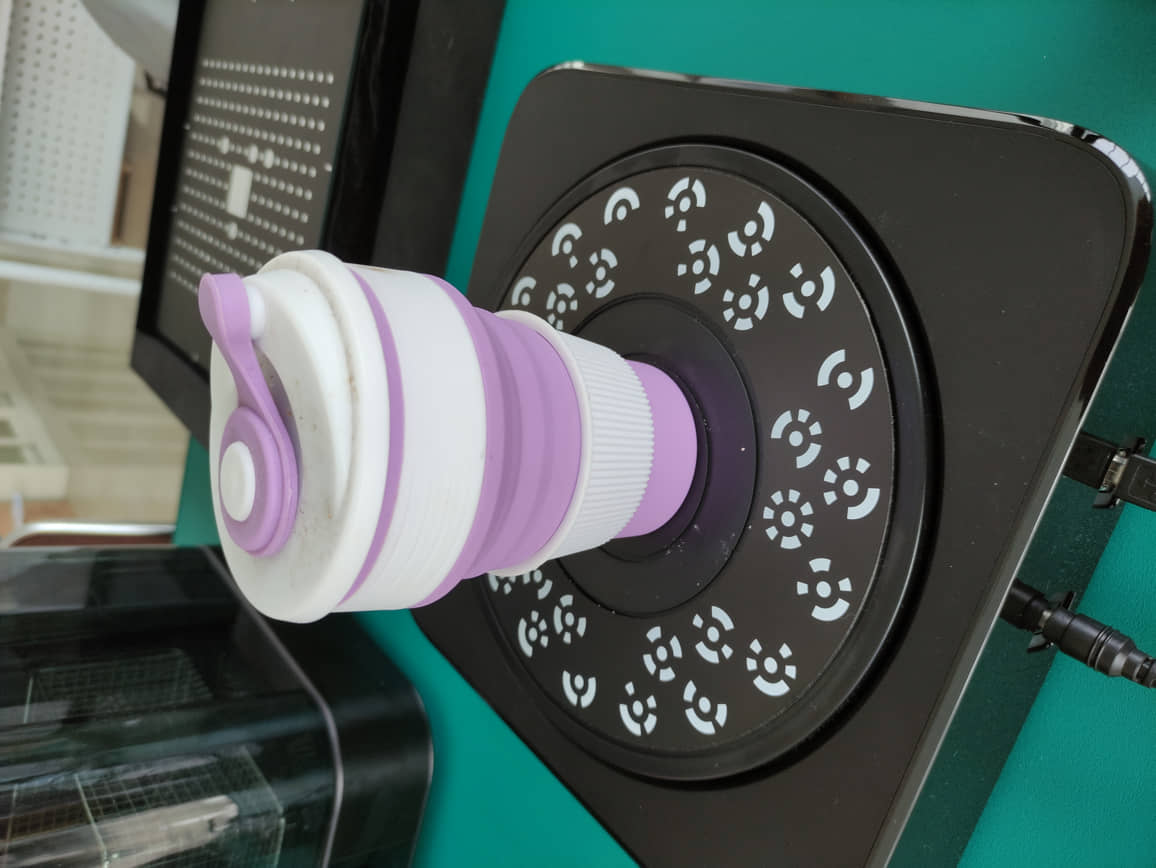
I also tried using the 3D scanner with the Handheld method. This method is more flexible with respect to the size of the object to be scanned. It’s just that because it is held by hand, the stability is not good, it takes patience in the scan process.
- I tried to compare by scanning the glass with the handheld method.
- hold scanner by hand, point at object, adjust distance, start scan.
- point the scanner to the other side of the object carefully. If it is too fast then the matching shape will be lost, it needs to be return to the previous position.
Another model is trying to scan my face.
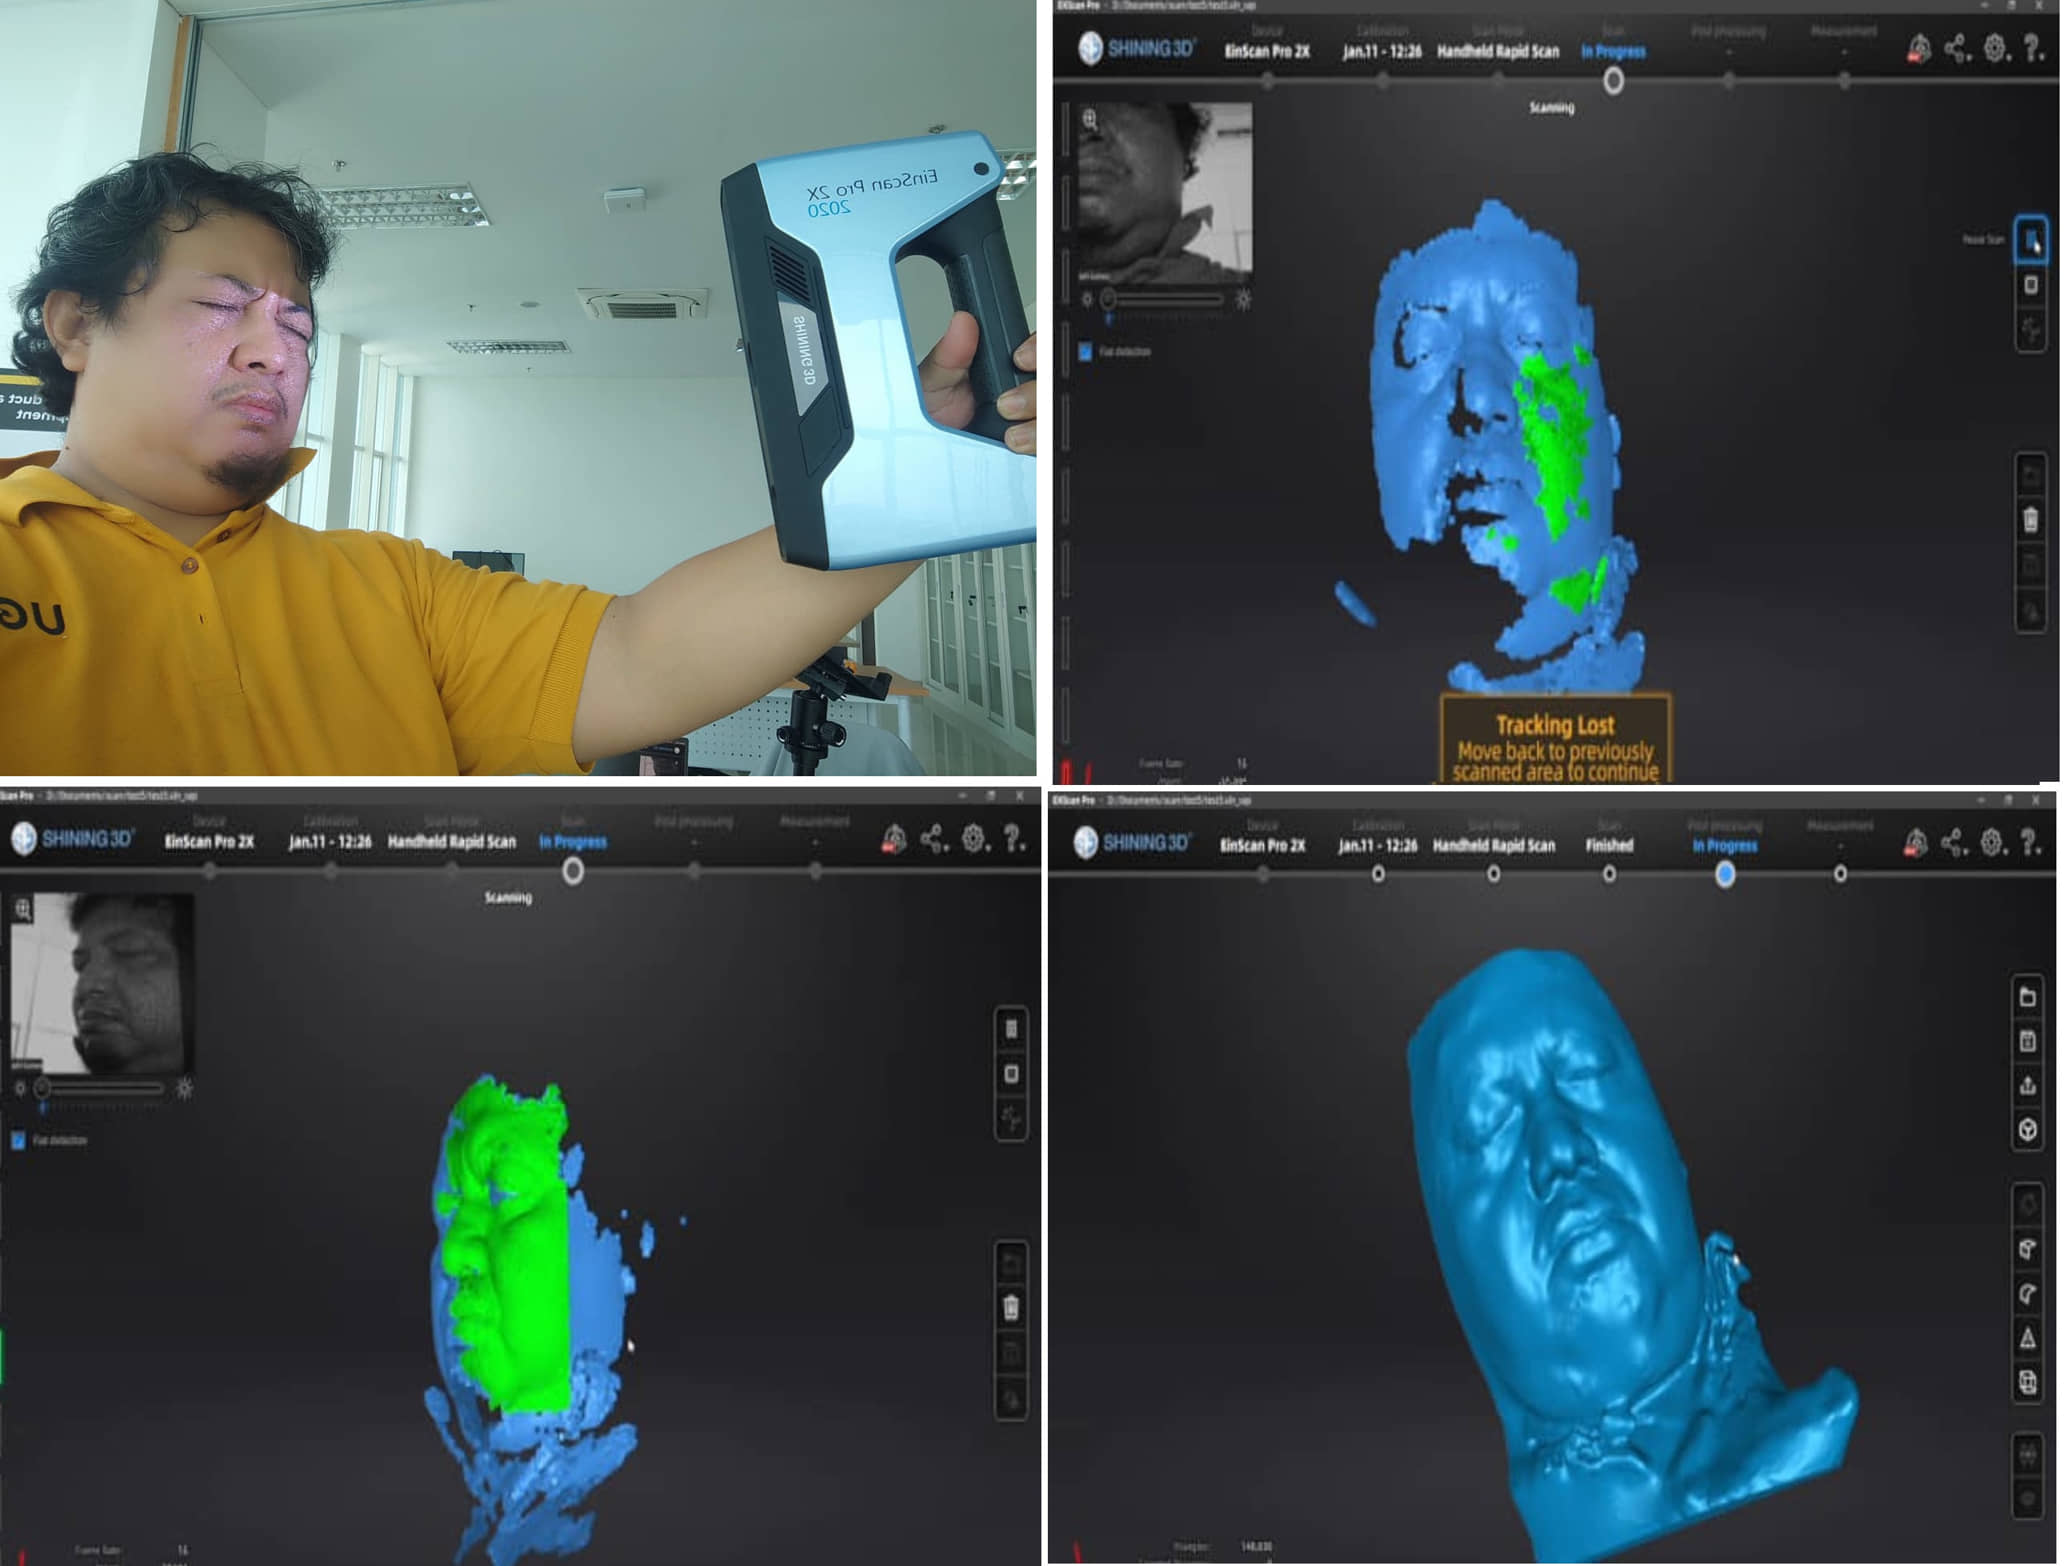
Warning
Be careful when scanning your face. You have to close your eyes because it can damage your eyes !
Comments on 3D Scanning printing process
Amazing technology, I can replicate objects quickly, and reprint them with very similar results. In the future I need to re-explore the results of this 3d scan, how to edit it so that it can be customized according to our needs.
References
- Kamakura : 3D scanning and printing
- Prusa 3D Printer
- Einscan Scanner
- 3D Printing Overhang: How to 3D Print Overhangs
- FDM Assessment Protocol
Documentation Files
Lessons learned (week 5 : 3D Scanning and printing):
- Understanding the principle of 3D Printer Machine operations
- to understand what the machine can and cannot do and anything that affects the results
- understanding the meaning and implications of additive manufacturing
- Applying the design and print it