/** * Simple Read * * Read data from the serial port and change the color of a rectangle * when a switch connected to a Wiring or Arduino board is pressed and released. * This example works with the Wiring / Arduino program that follows below. */importprocessing.serial.*;SerialmyPort;// Create object from Serial classintval;// Data received from the serial portvoidsetup(){size(200,200);// I know that the first port in the serial list on my mac// is always my FTDI adaptor, so I open Serial.list()[0].// On Windows machines, this generally opens COM1.// Open whatever port is the one you're using.StringportName=Serial.list()[0];myPort=newSerial(this,portName,9600);}voiddraw(){if(myPort.available()>0){// If data is available,val=myPort.read();// read it and store it in val}background(255);// Set background to whiteif(val==0){// If the serial value is 0,fill(0);// set fill to black}else{// If the serial value is not 0,fill(204);// set fill to light gray}rect(50,50,100,100);}/*// Wiring / Arduino Code// Code for sensing a switch status and writing the value to the serial port.int switchPin = 4; // Switch connected to pin 4void setup() { pinMode(switchPin, INPUT); // Set pin 0 as an input Serial.begin(9600); // Start serial communication at 9600 bps}void loop() { if (digitalRead(switchPin) == HIGH) { // If switch is ON, Serial.write(1); // send 1 to Processing } else { // If the switch is not ON, Serial.write(0); // send 0 to Processing } delay(100); // Wait 100 milliseconds}*/
/** * Mouse Functions. * * Click on the box and drag it across the screen. */floatbx;floatby;intboxSize=75;booleanoverBox=false;booleanlocked=false;floatxOffset=0.0;floatyOffset=0.0;voidsetup(){size(640,360);bx=width/2.0;by=height/2.0;rectMode(RADIUS);}voiddraw(){background(0);// Test if the cursor is over the box if(mouseX>bx-boxSize&&mouseX<bx+boxSize&&mouseY>by-boxSize&&mouseY<by+boxSize){overBox=true;if(!locked){stroke(255);fill(153);}}else{stroke(153);fill(153);overBox=false;}// Draw the boxrect(bx,by,boxSize,boxSize);}voidmousePressed(){if(overBox){locked=true;fill(255,255,255);}else{locked=false;}xOffset=mouseX-bx;yOffset=mouseY-by;}voidmouseDragged(){if(locked){bx=mouseX-xOffset;by=mouseY-yOffset;}}voidmouseReleased(){locked=false;}
Here is the result:
I don’t mean it to blink. However, it works.
intinputPin=5;// Input sensor pin numberintoutputPin=4;intoutputPin2=2;voidsetup(){pinMode(inputPin,INPUT);// Set pin mode (INPUT / OUTPUT)pinMode(outputPin,OUTPUT);// Set pin mode (INPUT / OUTPUT)pinMode(outputPin2,OUTPUT);// Set pin mode (INPUT / OUTPUT)Serial.begin(9600);// sets the data rate in bits per second (baud) for serial data tranmission}voidloop(){intinputValue=analogRead(inputPin);// read inputPin analog signal (0-1023)// Serial.write(inputPin);if(inputValue!=0){analogWrite(outputPin,255);analogWrite(outputPin2,0);Serial.print(0);}else{analogWrite(outputPin2,255);analogWrite(outputPin,0);}delay(100);}
importprocessing.serial.*;SerialmyPort;// Create object from Serial classcolorcurrentColor;voidsetup(){size(640,360);StringportName=Serial.list()[0];myPort=newSerial(this,portName,9600);}voiddraw(){if(myPort.read()>0){// If data is available,currentColor=color(255);}else{currentColor=color(0);}background(currentColor);}
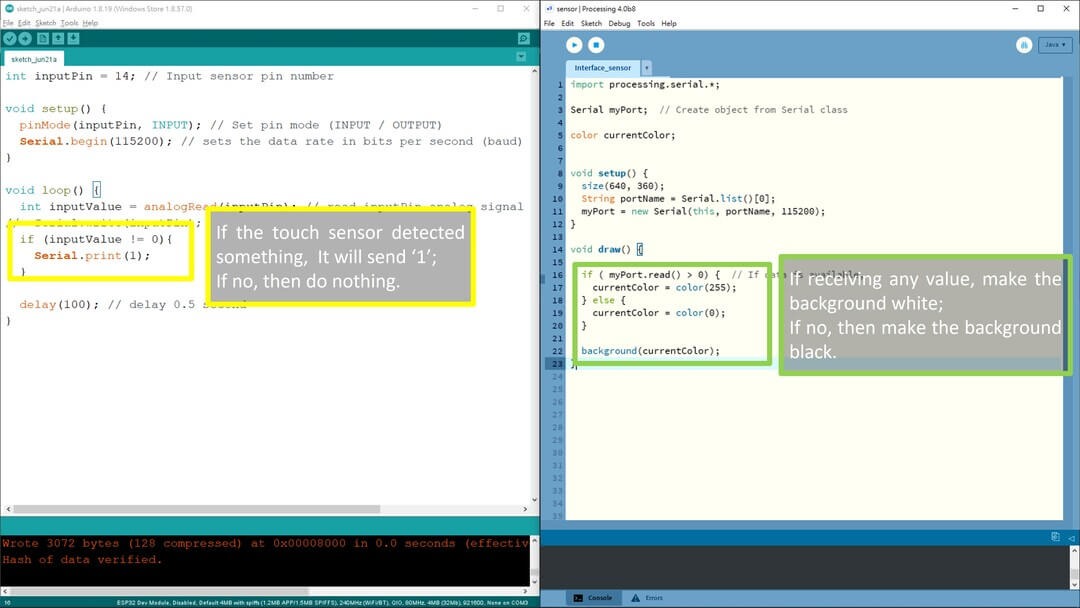
intinputPin=14;// Input sensor pin numbervoidsetup(){pinMode(inputPin,INPUT);// Set pin mode (INPUT / OUTPUT)Serial.begin(115200);// sets the data rate in bits per second (baud) for serial data tranmission}voidloop(){intinputValue=analogRead(inputPin);// read inputPin analog signal (0-1023)// Serial.write(inputPin);if(inputValue!=0){Serial.print(1);}delay(100);}
importprocessing.serial.*;SerialmyPort;// Create object from Serial classcolorcurrentColor;voidsetup(){size(640,360);StringportName=Serial.list()[0];myPort=newSerial(this,portName,115200);}voiddraw(){if(myPort.read()>0){// If data is available,currentColor=color(255);}else{currentColor=color(0);}background(currentColor);}
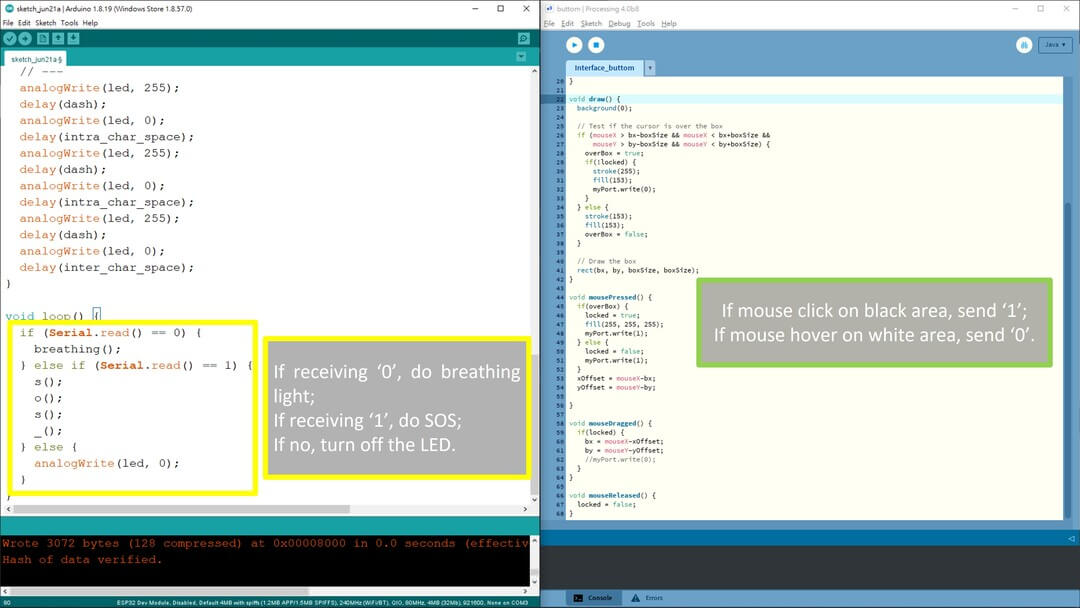
constintbutton=2;constintled=4;constintunit=100;// base time unit for morse code, smaller is fasterconstintdot=unit;// same as dit (.)constintdash=unit*3;// same as dah (-)constintintra_char_space=unit;// the gap between dits and dahs within a characterconstintinter_char_space=unit*3;// the gap between the characters of a wordconstintword_space=unit*7;// the gap between two wordsvoidsetup(){pinMode(button,INPUT);// Set pin mode (INPUT / OUTPUT)pinMode(led,OUTPUT);// Set pin mode (INPUT / OUTPUT)Serial.begin(9600);// sets the data rate in bits per second (baud) for serial data tranmission}// functions of breathing lightvoidbreathing(){for(inti=0;i<255;i++){analogWrite(led,i);delay(1);}for(inti=255;i>0;i--){analogWrite(led,i);delay(1);}}// functions of morse code// "_" is used for spaces in between words. Every char already ends with a inter_char_space of 3 time units.void_(){delay(word_space-inter_char_space);}voids(){// ...analogWrite(led,255);delay(dot);analogWrite(led,0);delay(intra_char_space);analogWrite(led,255);delay(dot);analogWrite(led,0);delay(intra_char_space);analogWrite(led,255);delay(dot);analogWrite(led,0);delay(inter_char_space);}voido(){// ---analogWrite(led,255);delay(dash);analogWrite(led,0);delay(intra_char_space);analogWrite(led,255);delay(dash);analogWrite(led,0);delay(intra_char_space);analogWrite(led,255);delay(dash);analogWrite(led,0);delay(inter_char_space);}voidloop(){if(Serial.read()==0){breathing();}elseif(Serial.read()==1){s();o();s();_();}else{analogWrite(led,0);}}
importprocessing.serial.*;SerialmyPort;// Create object from Serial classfloatbx;floatby;intboxSize=75;booleanoverBox=false;booleanlocked=false;floatxOffset=0.0;floatyOffset=0.0;voidsetup(){size(640,360);bx=width/2.0;by=height/2.0;rectMode(RADIUS);StringportName=Serial.list()[0];myPort=newSerial(this,portName,9600);}voiddraw(){background(0);// Test if the cursor is over the box if(mouseX>bx-boxSize&&mouseX<bx+boxSize&&mouseY>by-boxSize&&mouseY<by+boxSize){overBox=true;if(!locked){stroke(255);fill(153);myPort.write(0);}}else{stroke(153);fill(153);overBox=false;}// Draw the boxrect(bx,by,boxSize,boxSize);}voidmousePressed(){if(overBox){locked=true;fill(255,255,255);myPort.write(1);}else{locked=false;myPort.write(1);}xOffset=mouseX-bx;yOffset=mouseY-by;}voidmouseDragged(){if(locked){bx=mouseX-xOffset;by=mouseY-yOffset;//myPort.write(0);}}voidmouseReleased(){locked=false;}