4. Computer controlled cutting
This week I learned how to do a layered vinyl cut sticker and parametric 2d design.
All files used can be found here
Vinyl Cutting
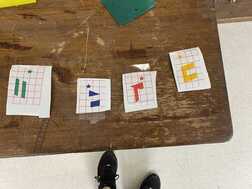
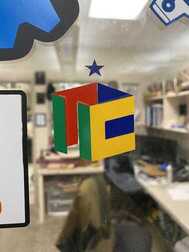
I vinyl cut a sticker of the logo of theCubicle, a Rubick’s cube seller.
To start, I put an image of the logo in Corel Draw, and I did a bitmap trace of it. Then, with the advice of my classmate Aaron Logan, I added a hexagon on top of the logo to have a method of aligning the layers. I then made 4 copies of it and deleted the unnecessary parts of each copy.
I then cut each layer and applied each layer with the hexagons of each lining up.
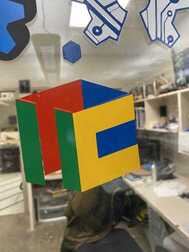
I then measured and realized that the sticker size was about half an inch too big, so I removed it and sized the file down as well as replacing the hexagon with a star. I repeated the process of cutting and applying.


Laser Cut Parametric with Cuttle
Piece 1 Design
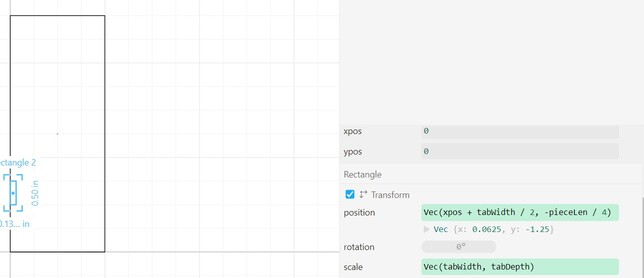
I started with a rectangle with parameters for position and dimensions.

I then added the first tab.
I used the linear repeat modifier to repeat the tab upwards along one side.

To get the tabs on the other side, I used the mirror modifier with the mirror line going down the center of the piece.

I then used the boolean difference modifier to have the tabs cut into the rectangle to form the piece.

I then noticed that there was a problem with the tabs in that the position did not include the ypos parameter that I made, so I added that on.

I also noticed that I had the tabWidth and tabDepth parameters mixed up in the tabs as well, so I switched them.

Piece 2 Design
For the 2nd piece, I wanted it to be essentially the first but with hooks at the end.
I started by copying the first piece over to the second.
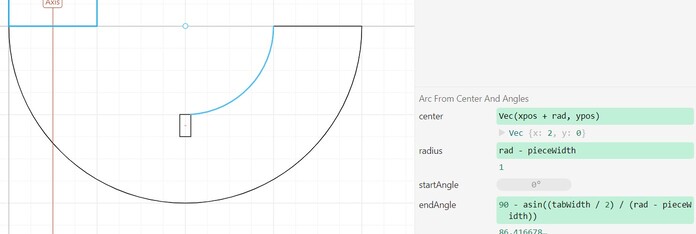
Then, I added a radius parameter for the radius of the outer arc, and I made 2 arcs based on this to form the hook. I also used a line connecting the 2 to complete the hook

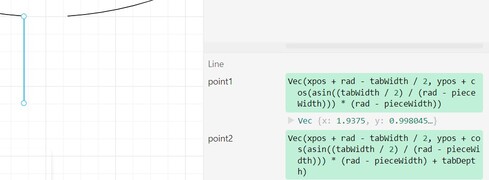
To add the tab onto the middle of the hook, I used some trigonometry to find where the width of the tab would intersect the circle at 2 points while being centered.

I then tried to use the various boolean modifiers to join the tab with the hook, but none of them worked like I wanted, so I decided to redesign the circle in terms of 2 arcs and the tab in terms of 3 lines.
This completed the hook.
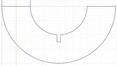
I then repeated the process on the other side.

Then, I had to remove the lines between the center rectangle and the hooks, but using all of the boolean modifiers I couldn’t, so I went through the same process of redesigning the rectangle and tabs as lines.

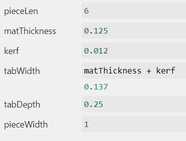
I then adjusted the parameters to account for kerf for both pieces.
Cut
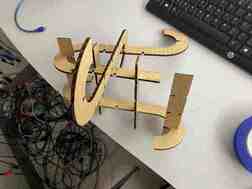
I cut 5 piece 1 pieces and 3 piece 2 pieces and put them together in the following (in my opinion) artistic manner.
Group Work
This is a link to our group site to see the work we did.
My classmate, Andrew Jiang, and I did the speed, power, and frequency characterizations on the laser cutter. I thought of the idea to use color mapping to do all the tests in a single cut and learned how useful color mapping can be beyond an occasional thing niche projects need.
I also figured out how to fork and update forks from a main branch while trying to figure out how to interact with the group site. First I forked the group site into a repo of my own. To test it, I made some changes and made a merge request, and it successfully sent. After some of my classmates made their own merges, I had to update my local fork. I figured it out with the help of this post on stack overflow, and I used the following commands:
git remote add mainRepo <repo link>
git fetch --all
git rebase mainRepo/master