15. Interface and application programming
The purpose of this assignment is to be able to communicate our board with a user interface capable of controlling an input or output device. I decided to use a bluetooth module to take care of the communication and program some images that will be displayed on the OLED screen.
Assignment
group assignment:
- Compare as many tool options as possible.
individual assignment:
- write an application that interfaces a user with an input &/or output device that you made.
Group assignment
PyCharm + Matplotlib + Serial
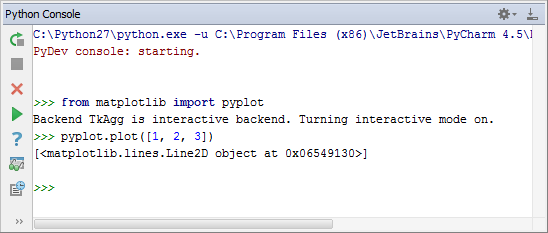
To start using Matplotlib, make sure that the package is properly installed in your project interpreter. Matplotlib is the graphical package that has the interactive mode. In this mode, a graph opens in its own window, allowing you to resize, zoom in and out, etc. In PyCharm, the interactive mode is enabled by default. When starting an interactive console, one can import Matplotlib, and build graphs as required. So doing, when Matplotlib is imported, PyCharm shows a message that interactive mode is on:
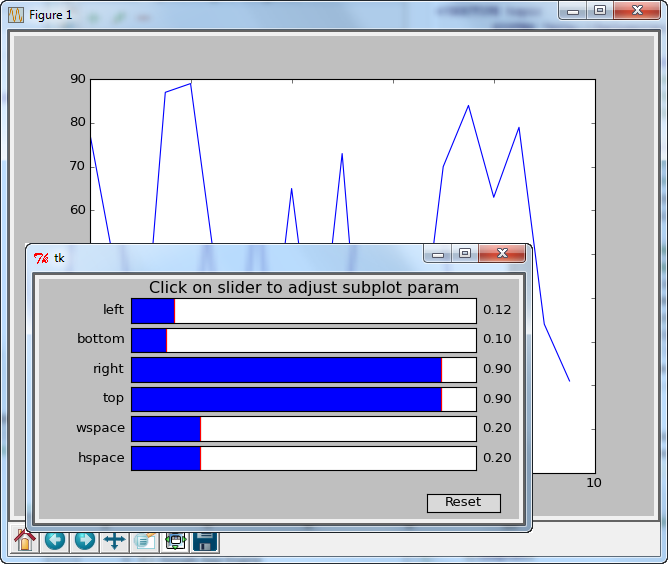
In PyCharm, on invoking the function plot() for each graph, this graph opens in its own pop-up window interactively:
Simulink + Matlab
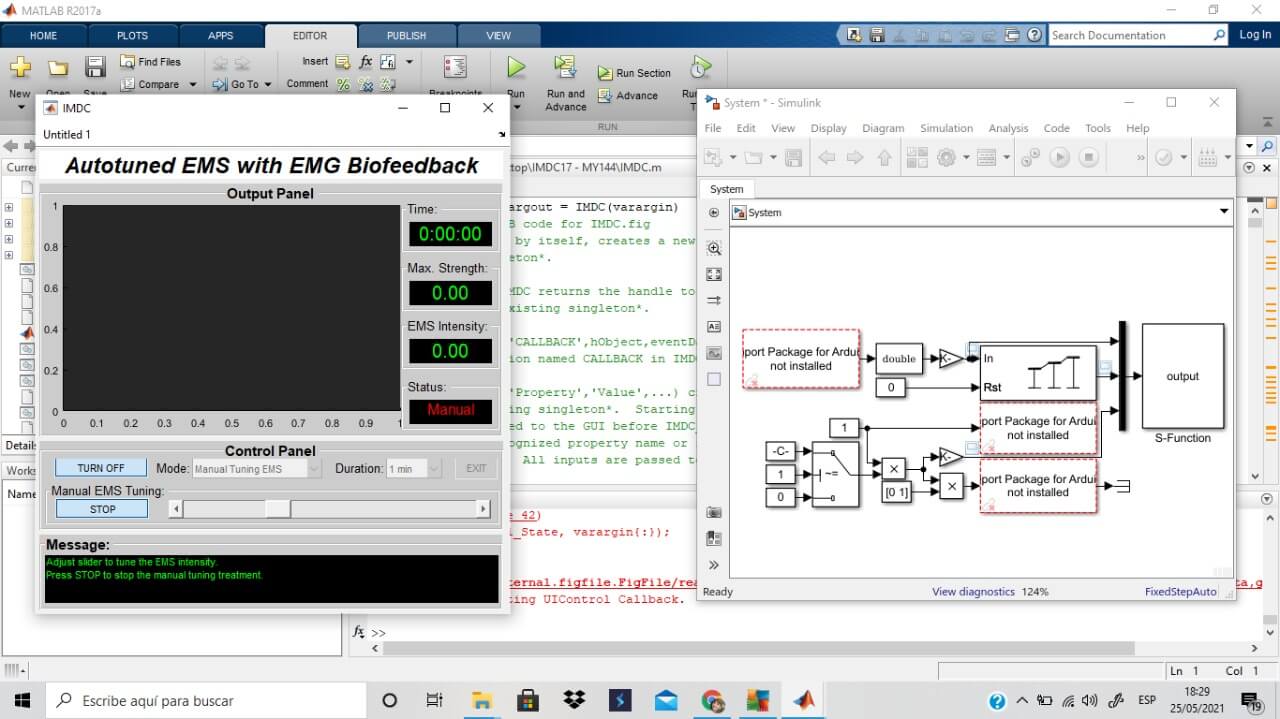
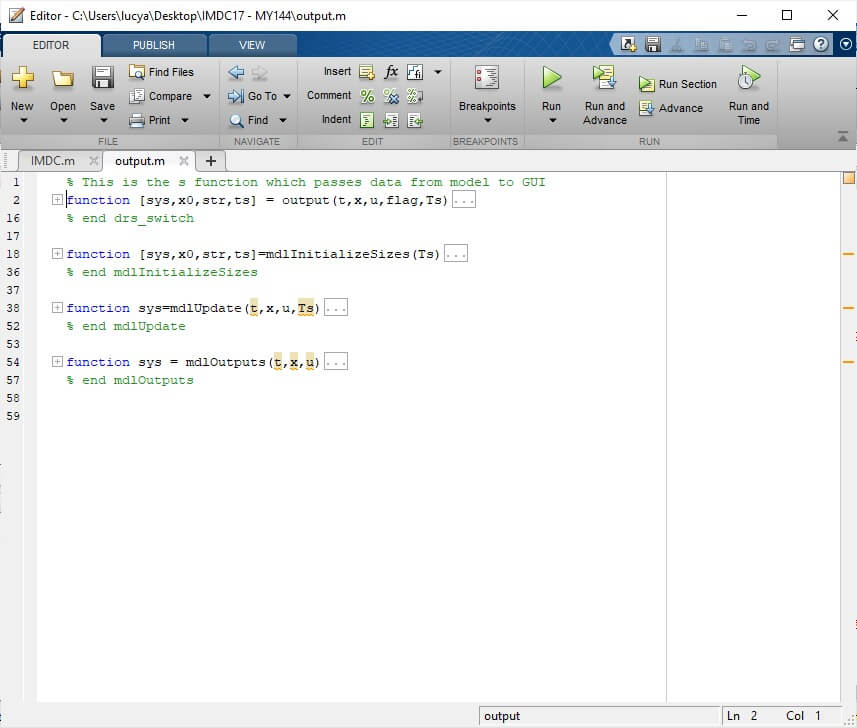
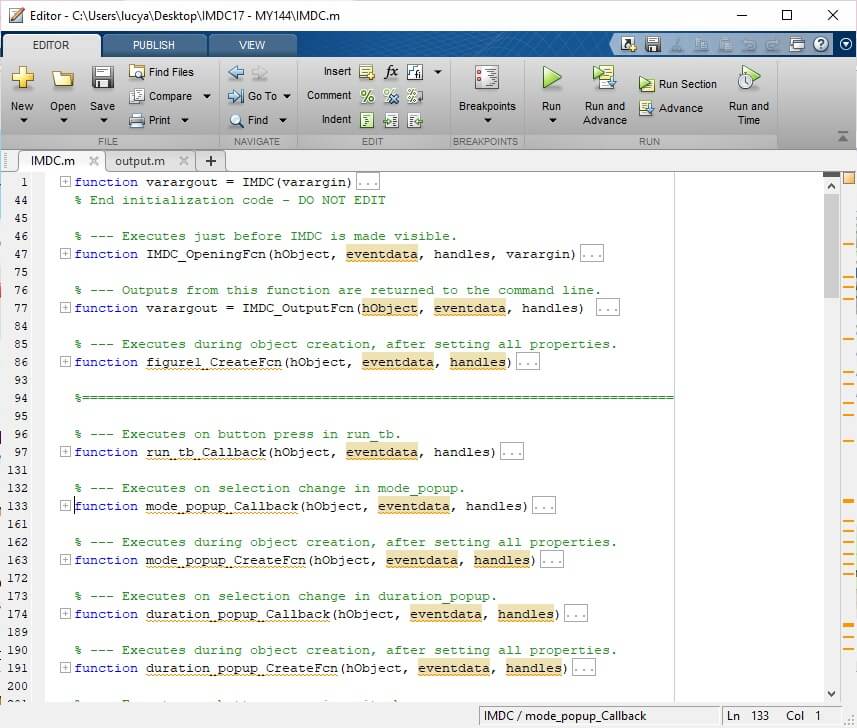
This project used Simulink with Arduino Hardware Support Package to control the behavior of Arduino UNO and observe the analog signal read from the similar Arduino UNO. The simulation was ran in External mode for infinite time to make it real time. The Simulink was then linked to a GUI so that the system can be controlled and observed in the easier interface. The GUI controls the parameter of Simulink blocks using set_param function. However, the crucial part was to send output signal from the Simulink to the GUI in real time. I have used a S-Functions as a sink in the Simulink to store the output value in an m-file. This m-file was then being read by the GUI and display the changes value in the real time as the value in the m-file changes.

Before we start executing the files, here is the brief overview of the system. The PC must be connected to the Arduino UNO R3 through USB cable. The Arduino will controls an actuator using SPI Communication pin 10 with the power on/off controls through digital pin 8. This actuator will give voltage changes of an object. This analog voltage changes is then being measured by a sensor through pin A5.
The files attached should be placed in the same path. Then, we can run the IMDC.m using MATLAB to initialize the GUI and the Simulink diagram. Once the user click on the TURN ON push button in the GUI, the Simulink will starts running the simulation in real time. The user can play around with the other buttons to see the behavior of the system through GUI.
MIT App Inventor (used in individual assignment)
MIT App Inventor is a web application integrated development environment originally provided by Google, and now maintained by the Massachusetts Institute of Technology (MIT). It allows newcomers to computer programming to create application software(apps) for two operating systems (OS): Android, and iOS, which, as of 8 July 2019, is in final beta testing. It is free and open-source software released under dual licensing: a Creative Commons Attribution ShareAlike 3.0 Unported license, and an Apache License 2.0 for the source code.
It uses a graphical user interface (GUI) very similar to the programming languages Scratch (programming language) and the StarLogo, which allows users to drag and drop visual objects to create an application that can run on android devices, while a App-Inventor Companion (The program that allows the app to run and debug on) that works on iOS running devices are still under development. In creating App Inventor, Google drew upon significant prior research in educational computing, and work done within Google on online development environments.
Processing (used in individual assignment)
Processing is a flexible software sketchbook and a language for learning how to code within the context of the visual arts. Since 2001, Processing has promoted software literacy within the visual arts and visual literacy within technology. There are tens of thousands of students, artists, designers, researchers, and hobbyists who use Processing for learning and prototyping.
There are many libraries for different applications. You can also install some extra libraries manually or directly from the menu.
To install new library from menu, go to: Sketch -> Import Library… -> Add Library…
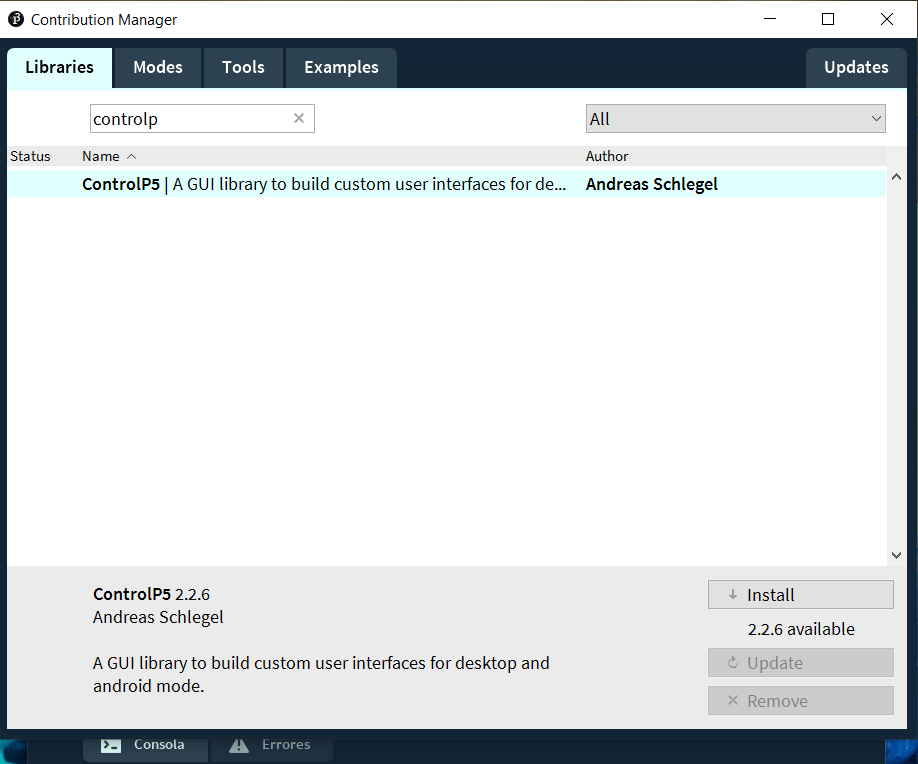
There is a very nice library called ControlP5 is available to create our project. controlP5 is a library written by Andreas Schlegel for the programming environment Processing. To add ControlP5 library to Processing just follow the add library process and search for ControlP5 and then click on install. Now you are ready to create your GUI application.
Individual assignment:
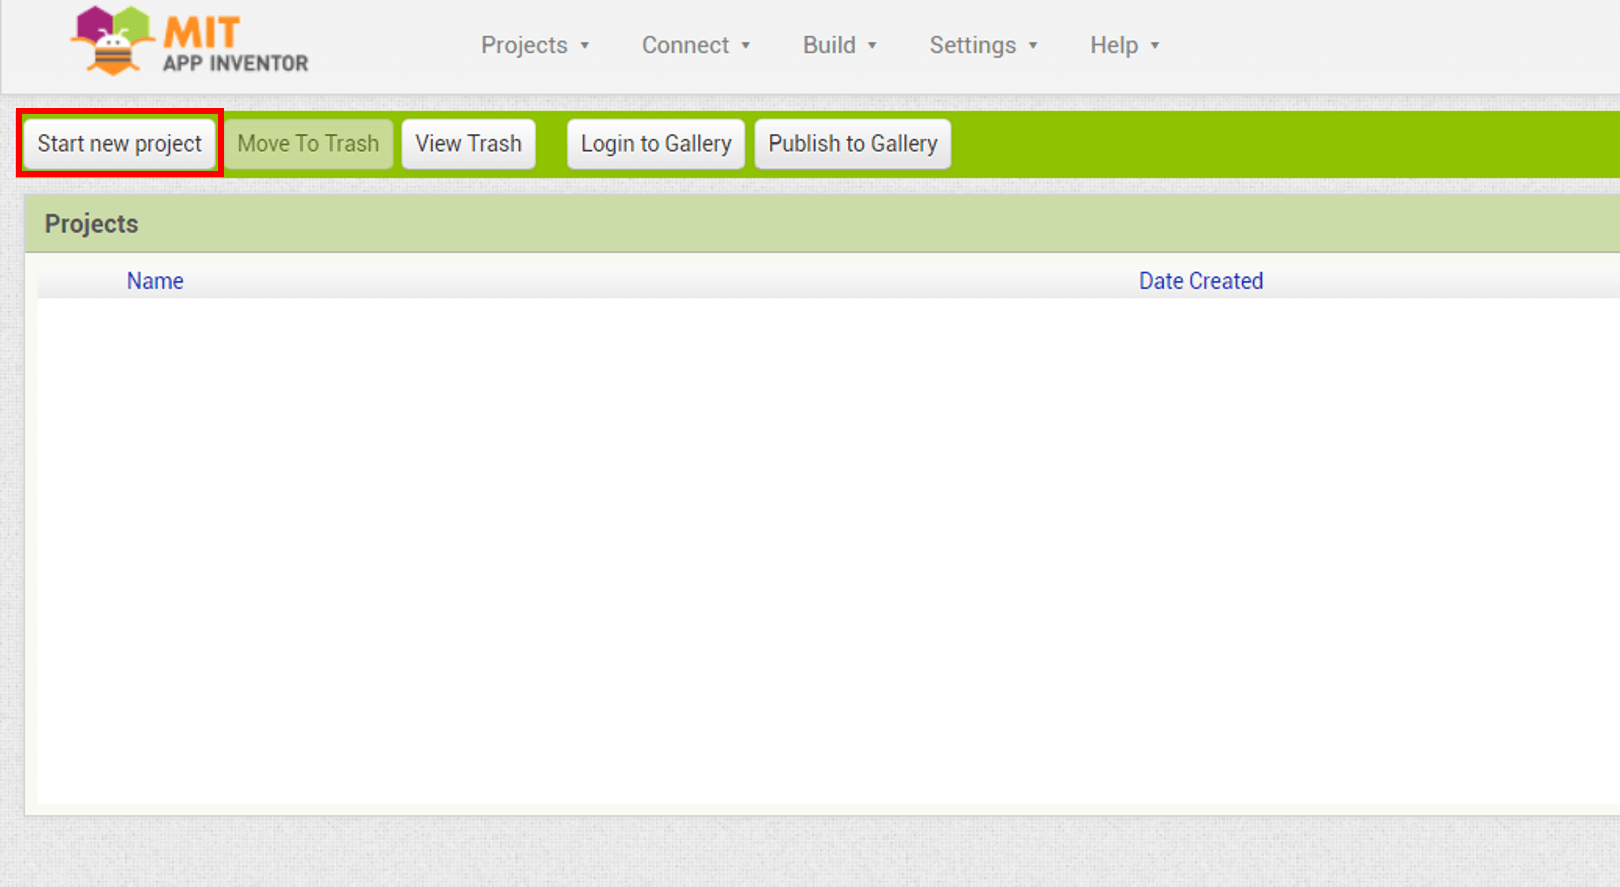
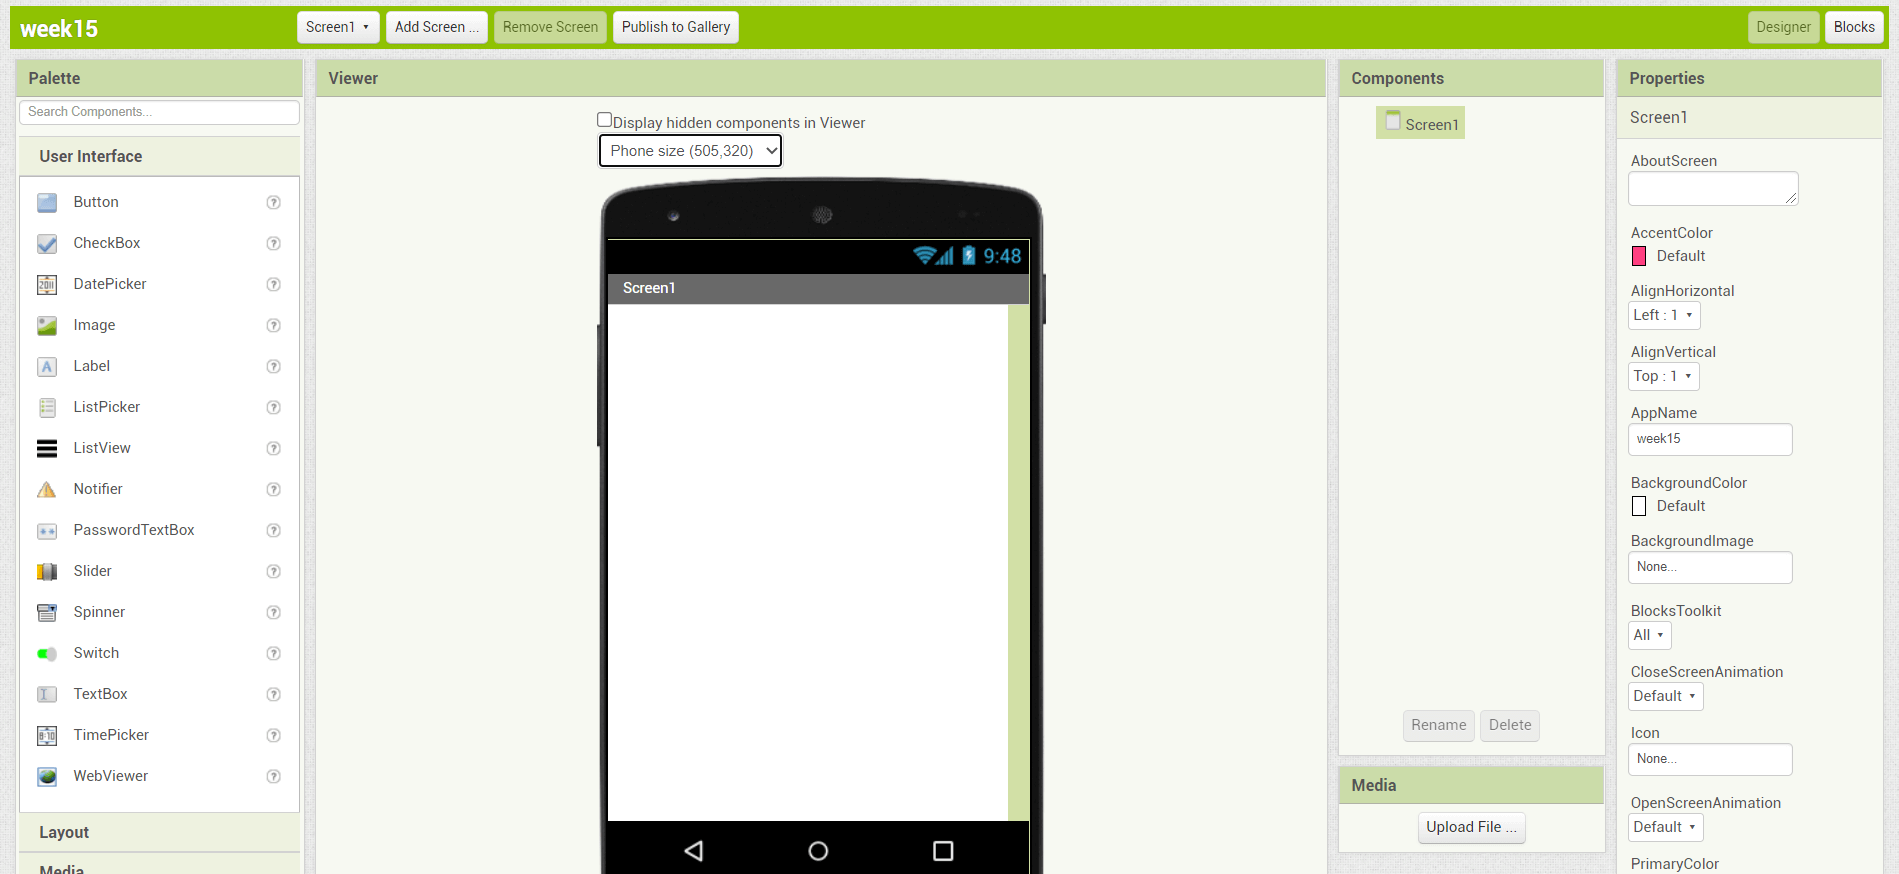
I decided to use MIT App Inventor to develop my bluetooth application, because it seems simple and according to what I investigate it uses blocks for programming, well the first thing we have to do is go to the link of the online application MIT App Inventor and create an account (I will not go into detail because it is intuitive). Then we select on Start new project
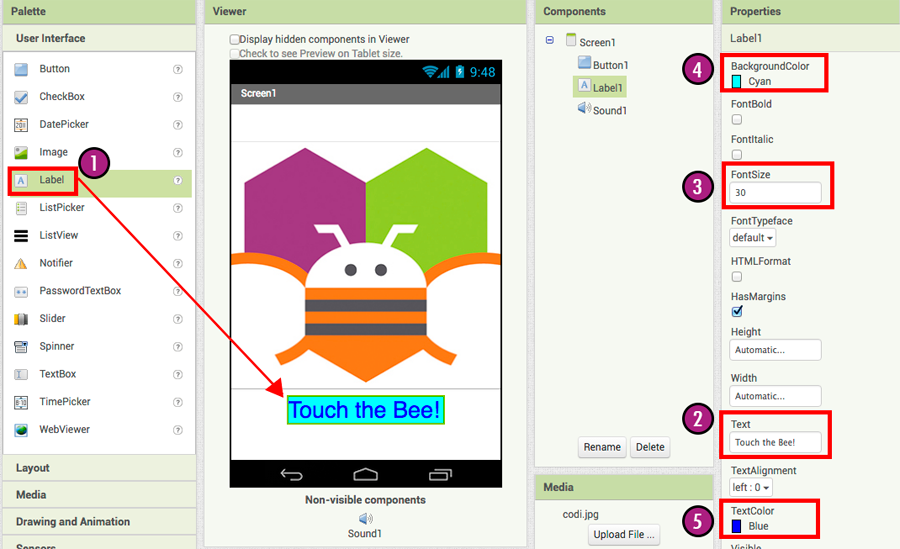
The interface is well marked and as we can see on the left side we have a palette to select everything necessary to develop our application, on the right side we have a window that is updated with all the components that we are adding and also another window that is enabled when we select some component.
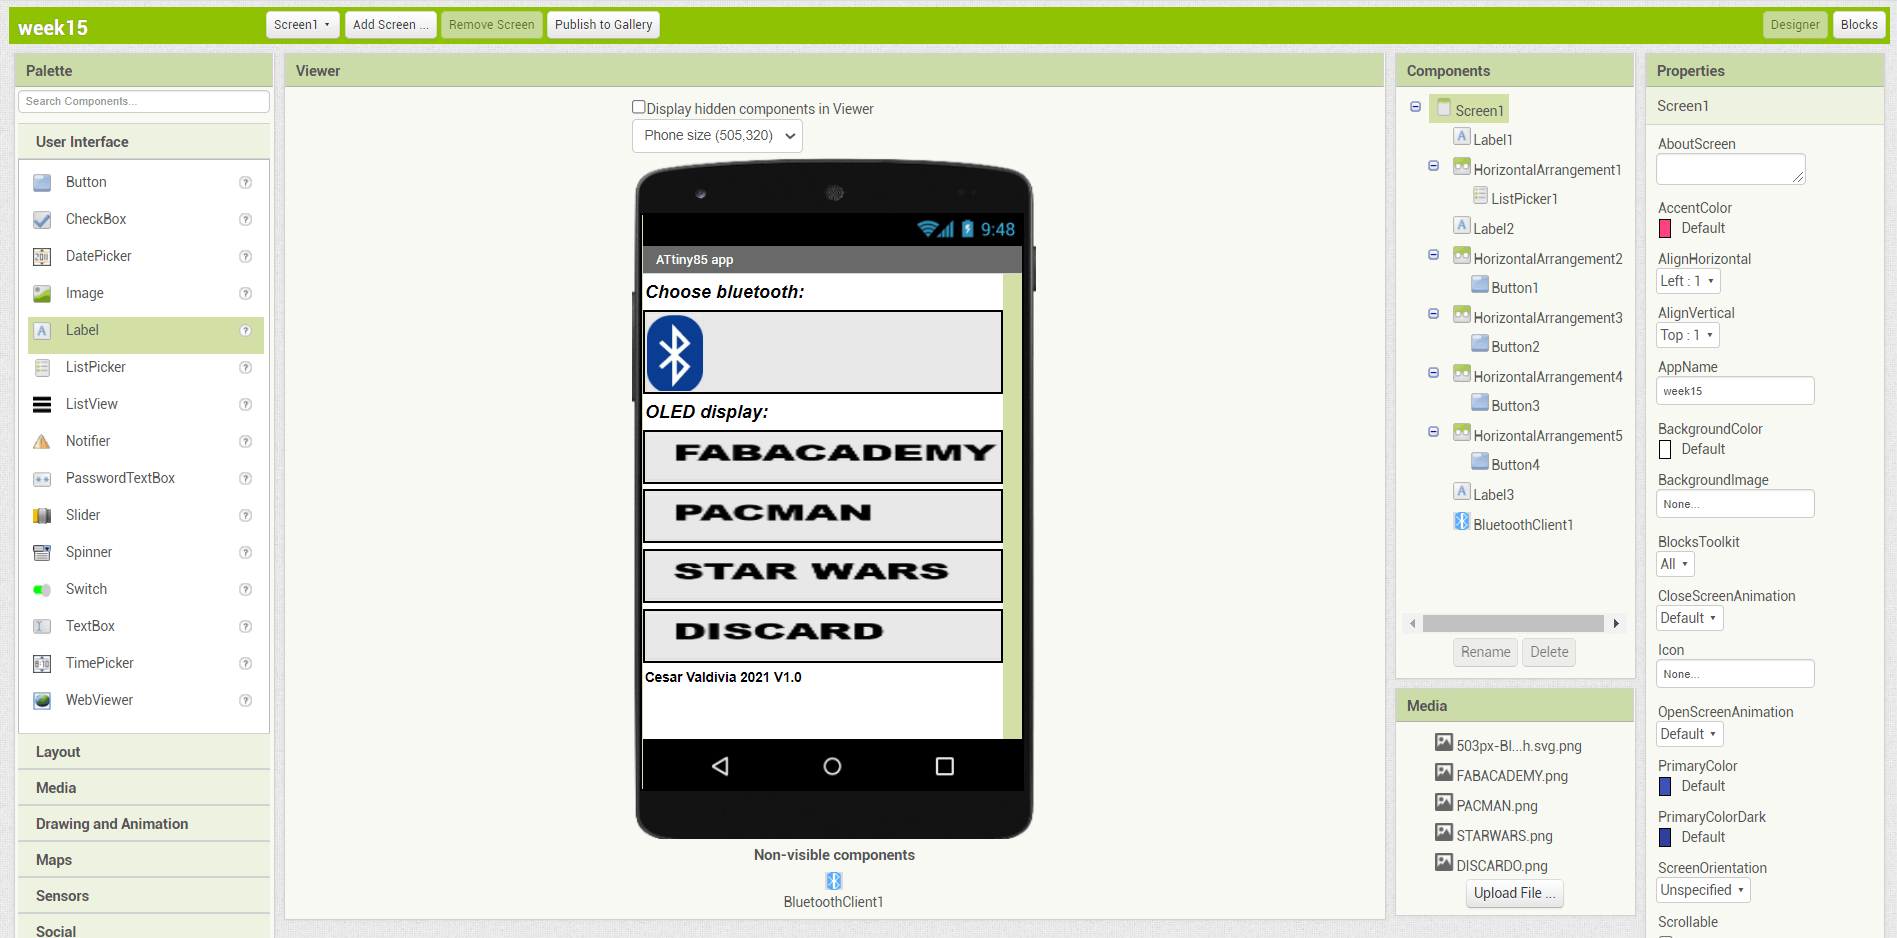
For the development of this application, I will use 3 things from the palette:
- User interface: Buttons to press, labels to point out the parts and a ListPicker to select the appropriate bluetooth module.
- Layout: Horizontal arrangements to assign spaces to position buttons and other things
- Connectivity: We will add a BluetoothClient that will allow us to connect our cell phone with another bluetooth device.
With the options in the right window, we can modify parameters such as dimensions, images assigned to the buttons and text that we want to add.
I know that the final result is not very elegant, but I am sure that it fulfills its purpose, I decided to use 5 buttons in total, one to choose the bluetooth module and 4 to perform certain actions (show images).
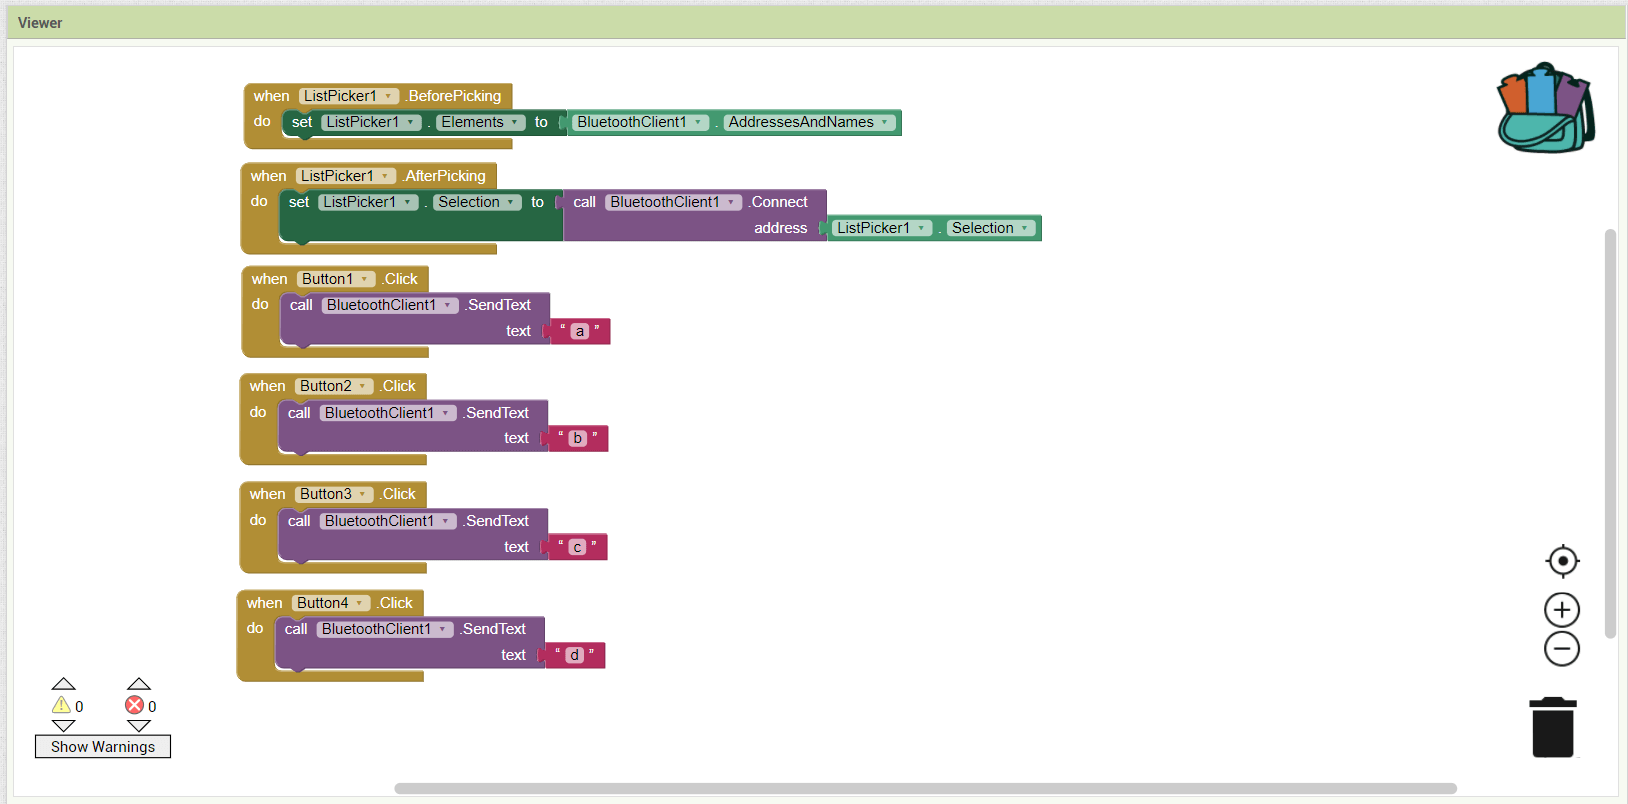
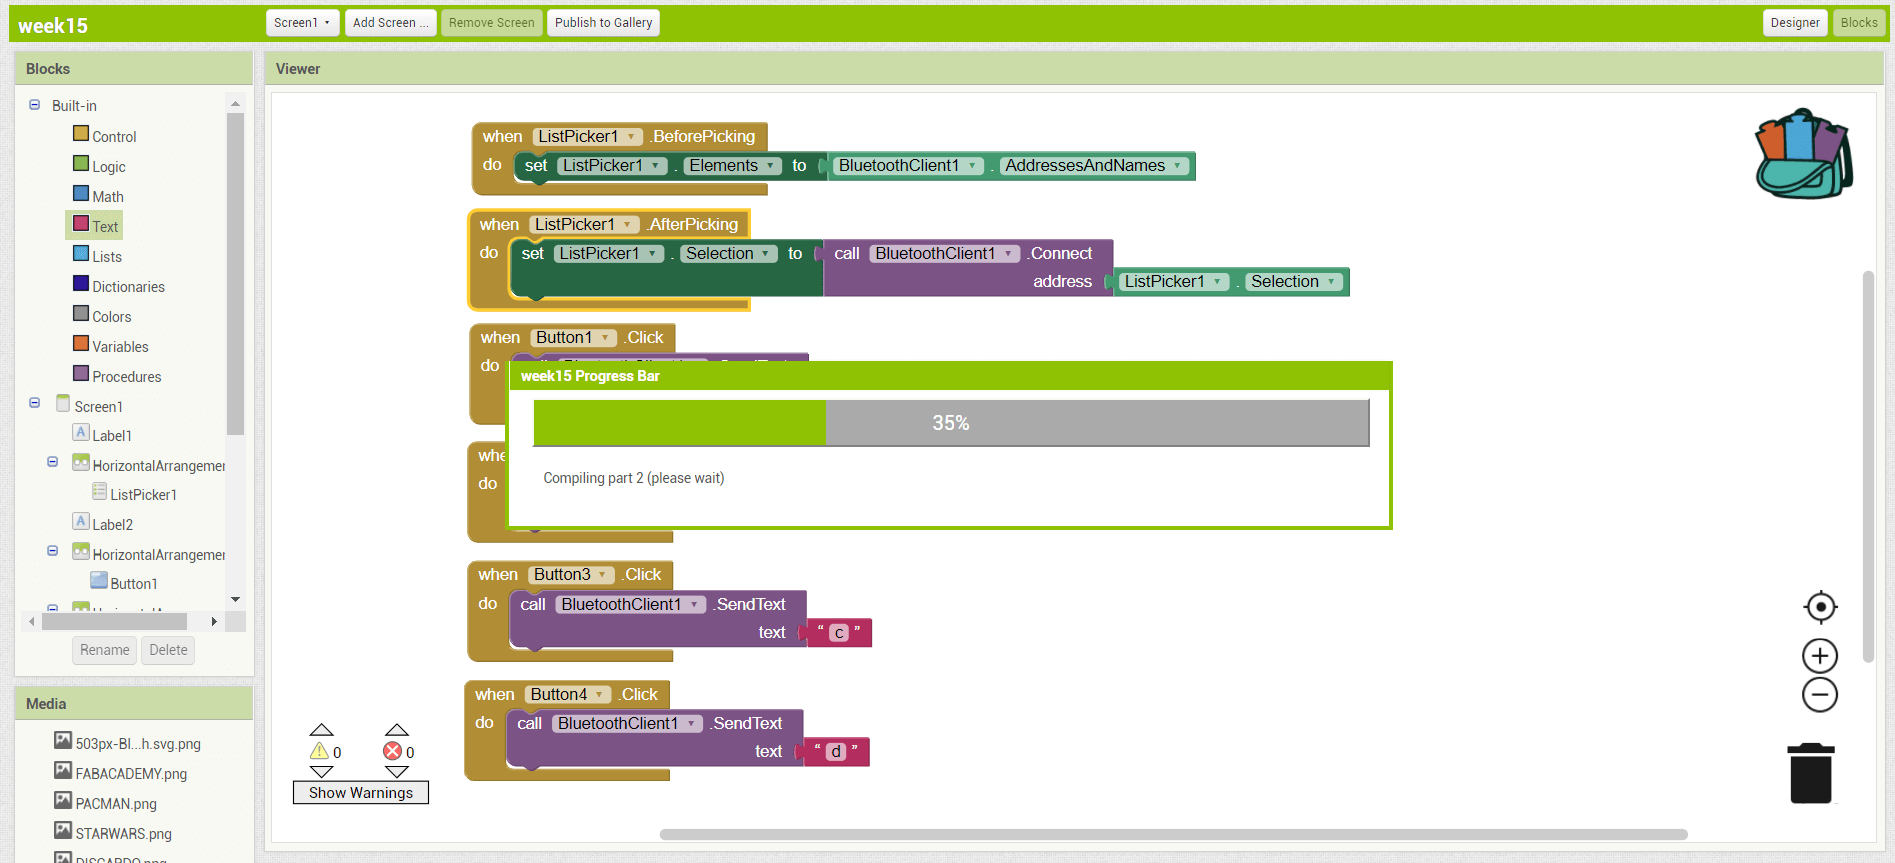
Continuing with the process of developing the app, now we must click on the upper left tab Blocks and assign blocks to all the buttons that we defined previously, for example establish actions both for the start of the bluetooth link and for the end (BeforePicking and AfterPicking).
We must also assign characters that will be sent at the time of pressing each of the buttons, in this case I decided to make it simple and assign a, b, c and d respectively to control the functions.
When we are sure that all our work is correct, we can export the APK, in this case I decided to download it as a file and upload it manually to my cell phone, enabling third-party applications, it is important to remember that these applications are only compatible with Android phones.
Arduino code
I decided to use a basic code in charge of interpreting the characters sent by the mobile application and showing a default image, since this little ATtiny does not have Tx and Rx pins, it is necessary to use the SoftwareSerial library to assign 2 pins that will fulfill the function of Tx = 1 and Rx = 4. Also following the steps of the Output devices assignment, I am going to generate 3 bmp files with the Fabacademy, Pacman and Star Wars images.
#include "TinyWireM.h"
#include "TinyOzOLED.h"
#include <SoftwareSerial.h>
SoftwareSerial SerialATtiny(4, 1); // RX e TX
const int led = 1;

const unsigned char Fabacademy[] PROGMEM = {
  0x00, 0x00, 0x00, 0x00, 0x00, 0x80, 0xC0, 0xC0, 0x60, 0x60, 0x60, 0x40, 0xC0, 0x80, 0x80, 0x00,
  0x00, 0x00, 0x00, 0x00, 0x80, 0x80, 0x80, 0x80, 0x80, 0x80, 0x80, 0x80, 0x80, 0x00, 0x00, 0x80,
  0x80, 0x80, 0x00, 0x00, 0x00, 0x00, 0x80, 0x80, 0x80, 0x80, 0x80, 0x80, 0x00, 0x00, 0x00, 0x00,
  0x00, 0x00, 0x00, 0x00, 0x00, 0x80, 0x00, 0x00, 0x00, 0x00, 0x00, 0x00, 0x00, 0x00, 0x80, 0x80,
  0x80, 0x80, 0x00, 0x00, 0x00, 0x00, 0x00, 0x00, 0x00, 0x00, 0x80, 0x00, 0x00, 0x00, 0x00, 0x00,
  0x80, 0x80, 0x80, 0x80, 0x80, 0x80, 0x00, 0x00, 0x00, 0x00, 0x00, 0x00, 0x80, 0x80, 0x80, 0x80,
  0x80, 0x80, 0x80, 0x80, 0x80, 0x00, 0x80, 0x80, 0x80, 0x00, 0x00, 0x00, 0x00, 0x00, 0x00, 0x80,
  0x80, 0x80, 0x80, 0x80, 0x00, 0x00, 0x00, 0x00, 0x00, 0x00, 0x00, 0x80, 0x00, 0x00, 0x00, 0x00,
  0x00, 0x00, 0xF0, 0x06, 0x07, 0xC1, 0x87, 0x1F, 0x3F, 0x3F, 0x3E, 0x3E, 0x1E, 0xC1, 0xC1, 0xC7,
  0xC6, 0xC0, 0x00, 0x00, 0xFF, 0xFF, 0xC3, 0xC3, 0xC3, 0xC3, 0xC3, 0xC3, 0x03, 0xC0, 0xFF, 0x3F,
  0x3F, 0xFF, 0xE0, 0x80, 0x00, 0x00, 0xFF, 0xFF, 0xC7, 0xC7, 0xC7, 0xE7, 0xFF, 0xFF, 0xC0, 0x00,
  0x00, 0x00, 0x80, 0xF8, 0x3F, 0x0F, 0x3E, 0xF0, 0x00, 0x00, 0xC0, 0xF8, 0xFE, 0x07, 0x01, 0x01,
  0x01, 0x01, 0x01, 0x0F, 0x08, 0x00, 0x00, 0x00, 0xC0, 0x3F, 0x0F, 0x3E, 0xF0, 0xC0, 0x00, 0x00,
  0xFF, 0xFF, 0xFF, 0x01, 0x01, 0x01, 0x01, 0x01, 0x3E, 0xF8, 0x00, 0x00, 0xFF, 0xC1, 0xC1, 0xC1,
  0xC1, 0xC1, 0xC1, 0xC1, 0x01, 0x00, 0xFF, 0xFF, 0x0F, 0xF0, 0xC0, 0x00, 0x00, 0xF0, 0x3F, 0x0F,
  0xFF, 0xFF, 0x01, 0x0F, 0x3E, 0x3E, 0x70, 0xC0, 0xF0, 0x30, 0x0F, 0x07, 0x00, 0x00, 0x00, 0x00,
  0x00, 0x00, 0x0F, 0xC0, 0xC2, 0xFF, 0xFF, 0x3E, 0x00, 0x00, 0x00, 0x3E, 0x3E, 0x3F, 0xBF, 0xC7,
  0x43, 0x07, 0x00, 0x00, 0x7F, 0x7F, 0x01, 0x01, 0x01, 0x01, 0x01, 0x01, 0x7E, 0x7F, 0x07, 0x06,
  0x06, 0x07, 0x7F, 0x7F, 0x7C, 0x00, 0x7F, 0x7F, 0x71, 0x71, 0x71, 0x71, 0x7B, 0x7B, 0x3F, 0x0E,
  0x00, 0x78, 0x3F, 0x07, 0x06, 0x06, 0x06, 0x07, 0x7E, 0x78, 0x01, 0x0F, 0x3F, 0x70, 0x40, 0x40,
  0x40, 0x40, 0x78, 0x38, 0x06, 0x00, 0x40, 0x3E, 0x07, 0x06, 0x06, 0x06, 0x07, 0x3F, 0x78, 0x40,
  0x7F, 0x7F, 0x7F, 0x40, 0x40, 0x40, 0x40, 0x70, 0x3E, 0x3F, 0x00, 0x00, 0x7F, 0x61, 0x61, 0x61,
  0x61, 0x61, 0x61, 0x61, 0x60, 0x00, 0x7F, 0x7F, 0x00, 0x01, 0x0F, 0x70, 0x7E, 0x01, 0x00, 0x00,
  0x7F, 0x7F, 0x00, 0x00, 0x00, 0x00, 0x00, 0x7F, 0x01, 0x00, 0x00, 0x00, 0x00, 0x00, 0x00, 0x00,
  0x00, 0x00, 0x00, 0x00, 0x00, 0x01, 0x07, 0x07, 0x06, 0x06, 0x00, 0x06, 0x07, 0x07, 0x01, 0x00,
  0x00, 0x00, 0x00, 0x00, 0x00, 0x00, 0x00, 0x00, 0x00, 0x00, 0x00, 0x00, 0x00, 0x00, 0x00, 0x00,
  0x00, 0x00, 0x00, 0x00, 0x00, 0x00, 0x00, 0x00, 0x00, 0x00, 0x00, 0x00, 0x00, 0x00, 0x00, 0x00,
  0x00, 0x00, 0x00, 0x00, 0x00, 0x00, 0x00, 0x00, 0x00, 0x00, 0x00, 0x00, 0x00, 0x00, 0x00, 0x00,
  0x00, 0x00, 0x00, 0x00, 0x00, 0x00, 0x00, 0x00, 0x00, 0x00, 0x00, 0x00, 0x00, 0x00, 0x00, 0x00,
  0x00, 0x00, 0x00, 0x00, 0x00, 0x00, 0x00, 0x00, 0x00, 0x00, 0x00, 0x00, 0x00, 0x00, 0x00, 0x00,
  0x00, 0x00, 0x00, 0x00, 0x00, 0x00, 0x00, 0x00, 0x00, 0x00, 0x00, 0x00, 0x00, 0x00, 0x00, 0x00,
  0x00, 0x00, 0x00, 0x00, 0x00, 0x00, 0x00, 0x00, 0x00, 0x00, 0x00, 0x00, 0x00, 0x00, 0x00, 0x00
};

const unsigned char Pacman[] PROGMEM = {
  0x00, 0x00, 0x00, 0x00, 0x00, 0x00, 0x00, 0x00, 0x00, 0xC0, 0xE0, 0xF8, 0xF8, 0xF8, 0xFC, 0xFC,
  0xFC, 0xFC, 0xFC, 0x3C, 0x3C, 0xF8, 0xF8, 0xF8, 0xF0, 0xE0, 0xC0, 0x00, 0x00, 0x00, 0x00, 0x00,
  0x00, 0x00, 0x00, 0x00, 0x00, 0x00, 0x00, 0x00, 0x00, 0x00, 0x00, 0x00, 0x00, 0x00, 0x00, 0x00,
  0x00, 0x00, 0x00, 0x00, 0x80, 0xC0, 0xE0, 0xF0, 0xF8, 0xFC, 0xFC, 0xFC, 0xFC, 0xFC, 0xFC, 0xFC,
  0xF8, 0xF8, 0xF0, 0xE0, 0xC0, 0x00, 0x00, 0x00, 0x00, 0x00, 0x00, 0x00, 0x00, 0x80, 0xC0, 0xE0,
  0xF8, 0xF8, 0xF8, 0xFC, 0xFC, 0xFC, 0xFC, 0xFC, 0xFC, 0xF8, 0xF8, 0xF0, 0xE0, 0xC0, 0x00, 0x00,
  0x00, 0x00, 0x00, 0x00, 0x00, 0x00, 0x00, 0xE0, 0xE0, 0xF8, 0xF8, 0xF8, 0xFC, 0xFC, 0xFC, 0xFC,
  0xFC, 0xFC, 0xF8, 0xF8, 0xF8, 0xF0, 0xE0, 0xC0, 0x00, 0x00, 0x00, 0x00, 0x00, 0x00, 0x00, 0x00,
  0x00, 0x00, 0x00, 0x00, 0x00, 0x00, 0xF0, 0xFE, 0xFF, 0xFF, 0xFF, 0xFF, 0xFF, 0xFF, 0xFF, 0xFF,
  0xFF, 0xFF, 0xFF, 0x3C, 0x1C, 0x0F, 0x0F, 0x07, 0x03, 0x03, 0xE1, 0xE0, 0xE0, 0x00, 0x00, 0x00,
  0x00, 0x00, 0xE0, 0xE0, 0xE0, 0xE0, 0x00, 0x00, 0x00, 0x00, 0x00, 0xE0, 0xE0, 0x00, 0x00, 0x00,
  0x00, 0x00, 0xF8, 0xFF, 0xFF, 0xBB, 0xBB, 0x13, 0x83, 0x83, 0xFF, 0xFF, 0xFF, 0xFF, 0x3B, 0x3B,
  0x13, 0x83, 0x87, 0xFF, 0xFF, 0xFF, 0xFC, 0x00, 0x00, 0x00, 0x00, 0xF0, 0xFE, 0xFF, 0xBB, 0x33,
  0x03, 0x03, 0x83, 0xFF, 0xFF, 0xFF, 0xBB, 0x33, 0x03, 0x03, 0x83, 0xFF, 0xFF, 0xFF, 0xFF, 0xFE,
  0x80, 0x00, 0x00, 0x00, 0x00, 0xFC, 0xFF, 0xBB, 0x33, 0x03, 0x03, 0x83, 0xFF, 0xFF, 0xFF, 0xBB,
  0x33, 0x03, 0x83, 0x87, 0xFF, 0xFF, 0xFF, 0xFF, 0xFC, 0x00, 0x00, 0x00, 0x00, 0x00, 0x00, 0x00,
  0x00, 0x00, 0x00, 0x00, 0x00, 0x00, 0x03, 0x1F, 0x7F, 0xFF, 0xFF, 0xFF, 0xFF, 0xFF, 0xFF, 0xFF,
  0xFF, 0xFF, 0xFF, 0xFF, 0xFE, 0xFC, 0xF8, 0xF8, 0xF0, 0xF0, 0xE1, 0x01, 0x01, 0x00, 0x00, 0x00,
  0x00, 0x00, 0x01, 0x01, 0x01, 0x01, 0x00, 0x00, 0x00, 0x00, 0x00, 0x01, 0x01, 0x00, 0x00, 0x00,
  0x00, 0x00, 0xFF, 0xFF, 0xFF, 0xFF, 0xFF, 0xFF, 0xFF, 0xFF, 0xFF, 0xFF, 0xFF, 0xFF, 0xFF, 0xFF,
  0xFF, 0xFF, 0xFF, 0xFF, 0xFF, 0xFF, 0xFF, 0x00, 0x00, 0x00, 0x00, 0xFF, 0xFF, 0xFF, 0xFF, 0xFF,
  0xFF, 0xFF, 0xFF, 0xFF, 0xFF, 0xFF, 0xFF, 0xFF, 0xFF, 0xFF, 0xFF, 0xFF, 0xFF, 0xFF, 0xFF, 0xFF,
  0xFF, 0x00, 0x00, 0x00, 0x00, 0xFF, 0xFF, 0xFF, 0xFF, 0xFF, 0xFF, 0xFF, 0xFF, 0xFF, 0xFF, 0xFF,
  0xFF, 0xFF, 0xFF, 0xFF, 0xFF, 0xFF, 0xFF, 0xFF, 0xFF, 0x00, 0x00, 0x00, 0x00, 0x00, 0x00, 0x00,
  0x00, 0x00, 0x00, 0x00, 0x00, 0x00, 0x00, 0x00, 0x00, 0x00, 0x03, 0x03, 0x07, 0x07, 0x0F, 0x0F,
  0x0F, 0x0F, 0x0F, 0x0F, 0x0F, 0x07, 0x07, 0x03, 0x03, 0x01, 0x00, 0x00, 0x00, 0x00, 0x00, 0x00,
  0x00, 0x00, 0x00, 0x00, 0x00, 0x00, 0x00, 0x00, 0x00, 0x00, 0x00, 0x00, 0x00, 0x00, 0x00, 0x00,
  0x00, 0x00, 0x0F, 0x1F, 0x07, 0x07, 0x03, 0x03, 0x0F, 0x1F, 0x1F, 0x07, 0x03, 0x03, 0x0F, 0x1F,
  0x1F, 0x07, 0x03, 0x03, 0x07, 0x1F, 0x1F, 0x00, 0x00, 0x00, 0x00, 0x07, 0x1F, 0x0F, 0x07, 0x03,
  0x07, 0x0F, 0x1F, 0x1F, 0x07, 0x03, 0x07, 0x07, 0x1F, 0x1F, 0x0F, 0x03, 0x03, 0x07, 0x0F, 0x1F,
  0x03, 0x00, 0x00, 0x00, 0x00, 0x0F, 0x1F, 0x03, 0x03, 0x03, 0x07, 0x0F, 0x1F, 0x07, 0x03, 0x03,
  0x07, 0x0F, 0x1F, 0x07, 0x03, 0x03, 0x03, 0x07, 0x0F, 0x00, 0x00, 0x00, 0x00, 0x00, 0x00, 0x00
};

const unsigned char Starwars[] PROGMEM = {
  0x00, 0x00, 0x00, 0x00, 0x00, 0x00, 0x00, 0x00, 0x00, 0x00, 0x00, 0x00, 0x00, 0x00, 0x00, 0x00,
  0x00, 0x00, 0x00, 0x00, 0x00, 0x40, 0xE0, 0xF0, 0xF0, 0xF8, 0xF8, 0xF8, 0xF8, 0xF8, 0xF8, 0xF8,
  0xF8, 0x78, 0x78, 0x78, 0x78, 0x78, 0x78, 0x78, 0x78, 0x78, 0x78, 0xF8, 0xF8, 0xF8, 0xF8, 0xF8,
  0xF8, 0xF8, 0xF8, 0xF8, 0x78, 0x78, 0x78, 0x78, 0x78, 0x78, 0x78, 0x78, 0x78, 0x78, 0x00, 0x80,
  0xE0, 0xF8, 0xF8, 0xF8, 0xF8, 0xF8, 0xF8, 0xF8, 0x78, 0xF8, 0xF8, 0xF8, 0xF8, 0xF8, 0xF8, 0xF8,
  0xE0, 0x80, 0x00, 0x00, 0x00, 0x00, 0x00, 0x00, 0xF8, 0xF8, 0xF8, 0xF8, 0xF8, 0xF8, 0xF8, 0xF8,
  0xF8, 0xF8, 0x38, 0x38, 0x38, 0x38, 0x38, 0x38, 0xF8, 0xF8, 0xF8, 0xF8, 0xF8, 0xF0, 0xF0, 0xE0,
  0xC0, 0x00, 0x00, 0x00, 0x00, 0x00, 0x00, 0x00, 0x00, 0x00, 0x00, 0x00, 0x00, 0x00, 0x00, 0x00,
  0x00, 0x00, 0x00, 0x00, 0x00, 0x00, 0x00, 0x78, 0x78, 0x78, 0x78, 0x78, 0x78, 0x78, 0x78, 0x78,
  0x78, 0x78, 0x78, 0x78, 0x78, 0x78, 0x79, 0x79, 0x7B, 0x7B, 0x7F, 0x7F, 0x7F, 0x7F, 0x7F, 0x7F,
  0x7F, 0x7F, 0x3F, 0x3E, 0x1C, 0x00, 0x00, 0x00, 0x00, 0x00, 0x00, 0x7F, 0x7F, 0x7F, 0x7F, 0x7F,
  0x7F, 0x7F, 0x7F, 0x7F, 0x00, 0x00, 0x00, 0x00, 0x00, 0x00, 0x00, 0x40, 0x70, 0x7C, 0x7E, 0x7F,
  0x7F, 0x7F, 0x7F, 0x7F, 0x3F, 0x3F, 0x3F, 0x3D, 0x3C, 0x3C, 0x3F, 0x3F, 0x3F, 0x7F, 0x7F, 0x7F,
  0x7F, 0x7F, 0x7E, 0x7C, 0x70, 0x40, 0x00, 0x00, 0x7F, 0x7F, 0x7F, 0x7F, 0x7F, 0x7F, 0x7F, 0x7F,
  0x7F, 0x0F, 0x0F, 0x1F, 0x1F, 0x3F, 0x3F, 0x7F, 0x7F, 0x7F, 0x7F, 0x7F, 0x7B, 0x7B, 0x7B, 0x79,
  0x78, 0x78, 0x78, 0x78, 0x78, 0x78, 0x78, 0x78, 0x78, 0x00, 0x00, 0x00, 0x00, 0x00, 0x00, 0x00,
  0x00, 0x00, 0x00, 0x00, 0x00, 0x00, 0x00, 0x03, 0x0F, 0x1F, 0x7F, 0xFF, 0xFF, 0xFF, 0xFF, 0xFF,
  0xFE, 0xFC, 0xF8, 0xFE, 0xFF, 0xFF, 0xFF, 0xFF, 0xFF, 0xFF, 0xFF, 0xFF, 0xFF, 0xFF, 0xFE, 0xF8,
  0xF8, 0xFE, 0xFF, 0xFF, 0xFF, 0xFF, 0xFF, 0x3F, 0x1F, 0x07, 0x01, 0xC0, 0xE0, 0xF8, 0xFE, 0xFF,
  0xFF, 0xFF, 0xFF, 0xFF, 0x7F, 0x1F, 0x1F, 0x7F, 0xFF, 0xFF, 0xFF, 0xFF, 0xFE, 0xFC, 0xF0, 0xC0,
  0x00, 0x00, 0x00, 0x00, 0x00, 0x00, 0xFF, 0xFF, 0xFF, 0xFF, 0xFF, 0xFF, 0xFF, 0xFF, 0xFF, 0xEF,
  0xEF, 0xEF, 0xEF, 0xEF, 0xEF, 0xEF, 0xFF, 0xFF, 0xFE, 0xFE, 0xFE, 0x7E, 0x7C, 0x38, 0x00, 0x00,
  0x00, 0x00, 0x00, 0x3C, 0x7C, 0x7E, 0xFE, 0xFE, 0xFF, 0xFF, 0xFF, 0xFF, 0xFF, 0xEF, 0xEF, 0xCF,
  0xCF, 0x8F, 0x0F, 0x0F, 0x0F, 0x0F, 0x0F, 0x0F, 0x0F, 0x00, 0x00, 0x00, 0x00, 0x00, 0x00, 0x00,
  0x00, 0x00, 0x00, 0x00, 0x00, 0x00, 0x00, 0x00, 0x00, 0x00, 0x00, 0x01, 0x03, 0x0F, 0x1F, 0x1F,
  0x1F, 0x1F, 0x1F, 0x1F, 0x1F, 0x1F, 0x0F, 0x03, 0x01, 0x01, 0x07, 0x1F, 0x1F, 0x1F, 0x1F, 0x1F,
  0x1F, 0x1F, 0x1F, 0x1F, 0x0F, 0x03, 0x00, 0x00, 0x10, 0x1C, 0x1F, 0x1F, 0x1F, 0x1F, 0x1F, 0x1F,
  0x1F, 0x0F, 0x07, 0x07, 0x07, 0x07, 0x07, 0x07, 0x07, 0x07, 0x0F, 0x1F, 0x1F, 0x1F, 0x1F, 0x1F,
  0x1F, 0x1E, 0x18, 0x00, 0x00, 0x00, 0x1F, 0x1F, 0x1F, 0x1F, 0x1F, 0x1F, 0x1F, 0x1F, 0x1F, 0x03,
  0x03, 0x07, 0x07, 0x0F, 0x0F, 0x1F, 0x1F, 0x1F, 0x1F, 0x1F, 0x1F, 0x1F, 0x1F, 0x1F, 0x1F, 0x1F,
  0x1F, 0x1F, 0x1F, 0x1F, 0x1F, 0x1F, 0x1F, 0x1F, 0x1F, 0x1F, 0x1F, 0x1F, 0x1F, 0x1F, 0x0F, 0x0F,
  0x0F, 0x07, 0x00, 0x00, 0x00, 0x00, 0x00, 0x00, 0x00, 0x00, 0x00, 0x00, 0x00, 0x00, 0x00, 0x00
};


void setup() {
  SerialATtiny.begin(9600);
  pinMode(led, OUTPUT);
  OzOled.init();
  OzOled.sendCommand(0xA1);   //orientation
  OzOled.sendCommand(0xC8);
  OzOled.setNormalDisplay();  // Invert display
  OzOled.setDeactivateScroll();
  OzOled.clearDisplay();
  //OzOled.drawBitmap(FabLogo, 0, 0, 16, 8);
  //delay(1000);
}

void loop() {

  if (SerialATtiny.available()) {
    char BT_read = SerialATtiny.read();

    if (BT_read == 'a'){
      OzOled.clearDisplay();
      OzOled.drawBitmap(Fabacademy, 0, 0, 16, 8);
    }


    if (BT_read == 'b'){
      OzOled.clearDisplay();
      OzOled.drawBitmap(Pacman, 0, 0, 16, 8);
    }

    if (BT_read == 'c'){
      OzOled.clearDisplay();
      OzOled.drawBitmap(Starwars, 0, 0, 16, 8);
    }

    if (BT_read == 'd'){
      OzOled.clearDisplay();
    }
  }
}
Small problem, pending solution
I realized that when connecting the bluetooth module to the card it did not turn on, making a more detailed inspection I confirmed that it was because it wasn’t receiving enough voltage to work correctly (3.6V), due to the short time I had I decided to power my board through the pins of an Arduino UNO, but for a next iteration I think I’ll use another bluetooth BLE module, because I feel like this little board has a lot of potential.
![]()
Final Result


As extra work (because I don’t have a group to compare the tools they used), I decided to develop an application in Processing to control my board based on the button I pressed on the graphical interface of the PC, but in order to perform the tests I must enable bluetooth communication between the PC and the board, I must also identify the port COM assigned to bluetooth communication to later add it in the code.
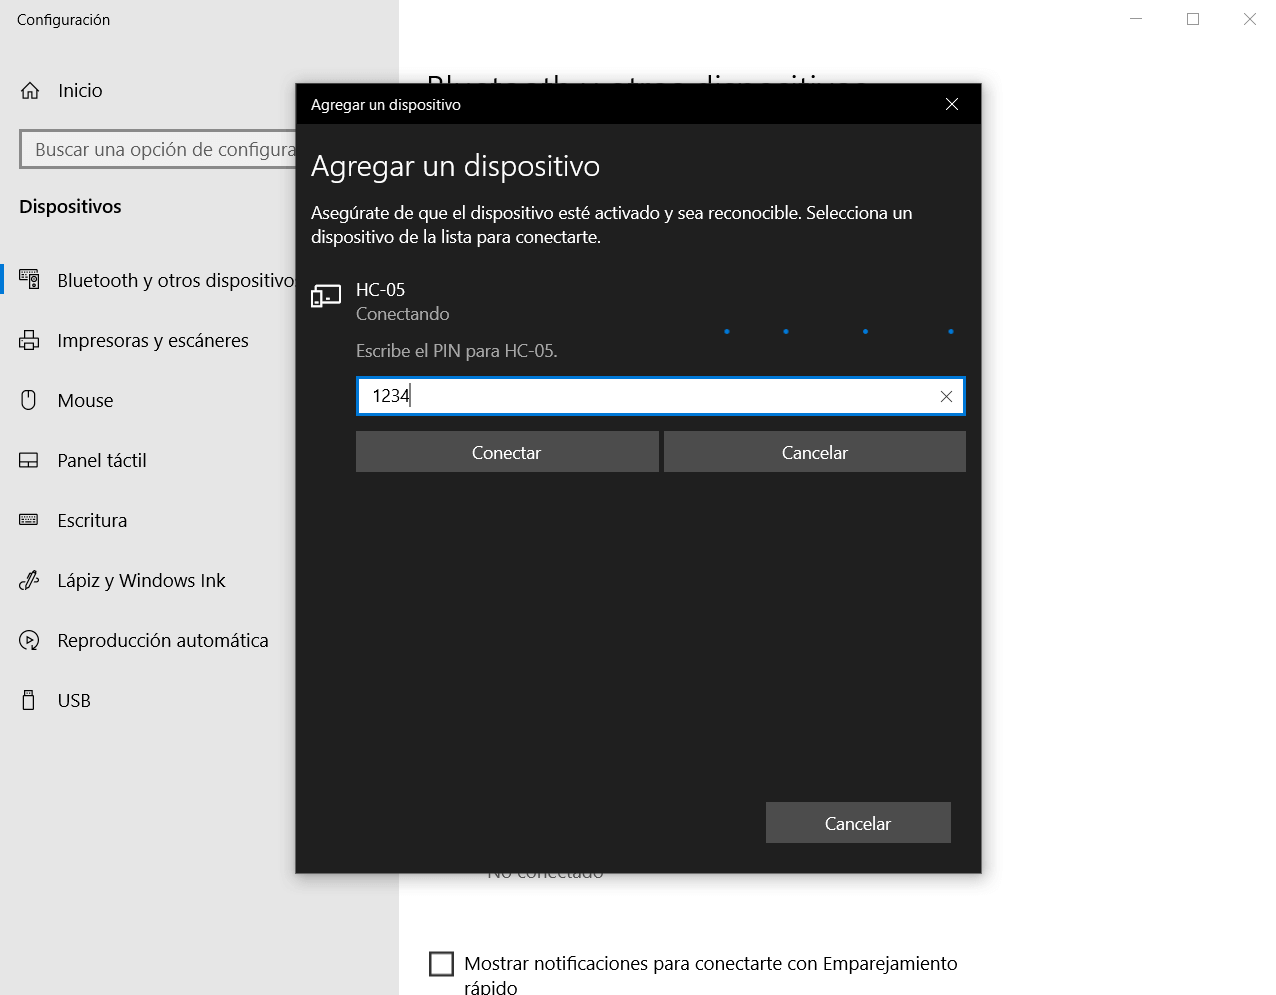
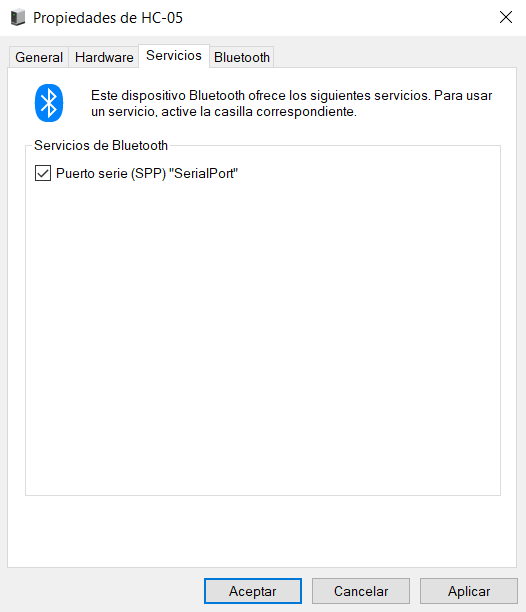
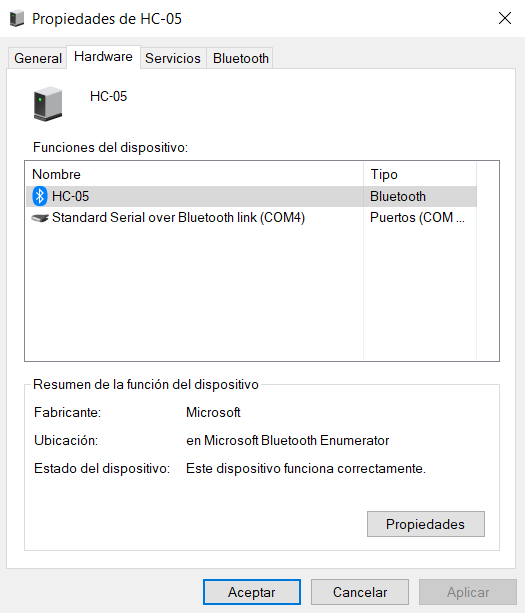
We can easily identify this by checking the properties of the bluetooth device after having paired it with the PC, if it does not appear then we must enable the SPP serial port and it will automatically assign a COM port to our device.
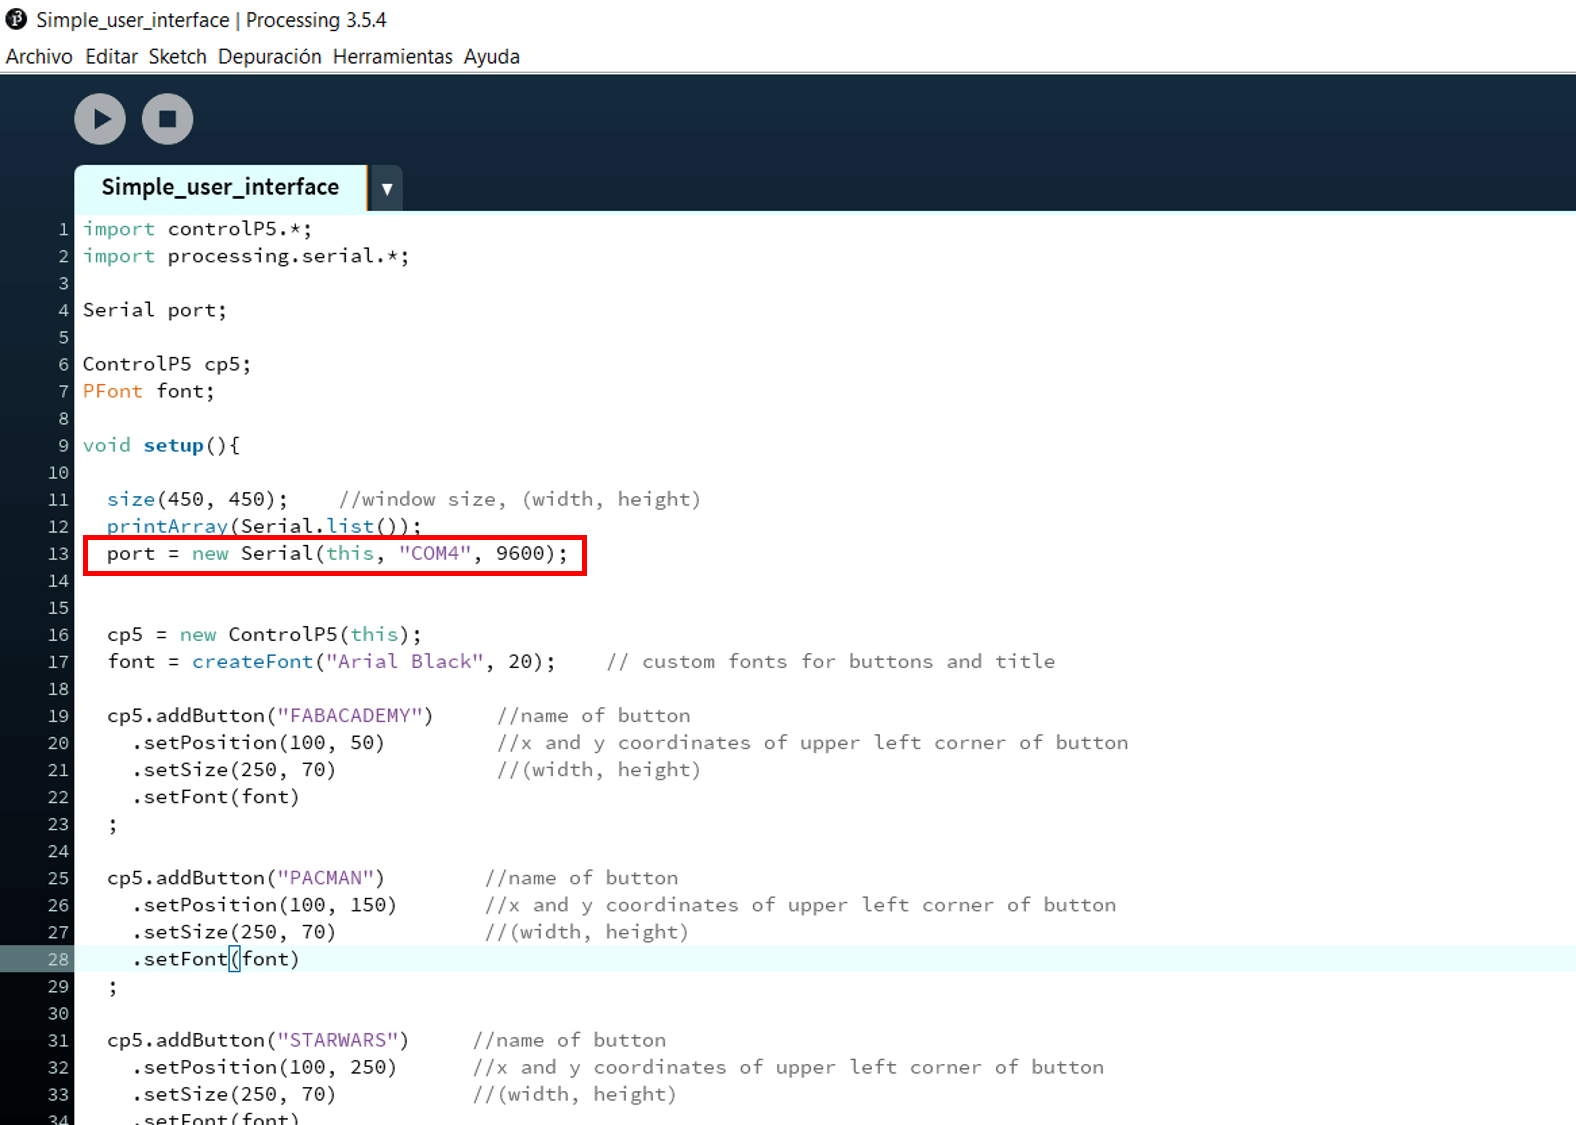
After importing the library we can start to develop the code for the graphical user interface GUI, since we will keep the same code on our board, this code focuses more on assigning sizes, colors, text and sending the characters that we assign when pressing a button, I used Control Arduino using GUI Processing as a starting point to build my code and it was very helpful, plus most of the instructions were explained.
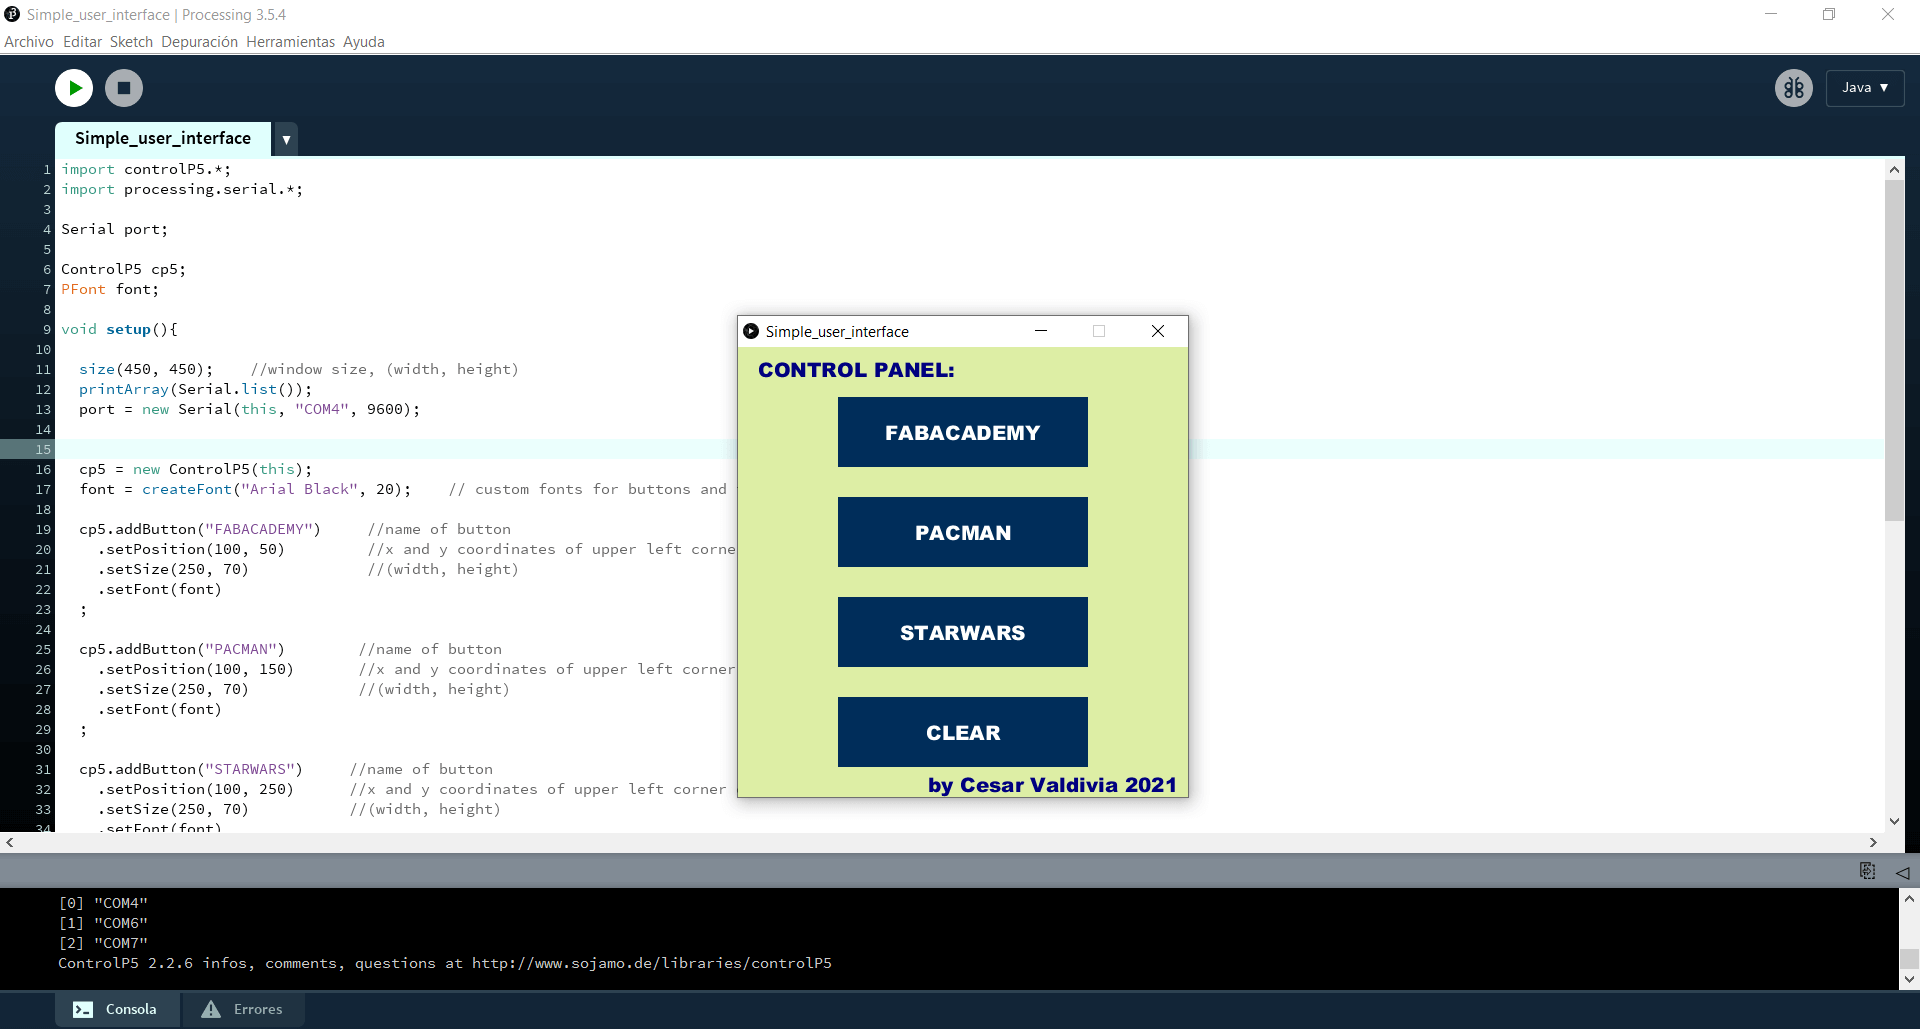
Processing code
import controlP5.*;
import processing.serial.*;

Serial port;

ControlP5 cp5;
PFont font;

void setup(){

  size(450, 450);    //window size, (width, height)
  printArray(Serial.list());
  port = new Serial(this, "COM4", 9600);


  cp5 = new ControlP5(this);
  font = createFont("Arial Black", 20);    // custom fonts for buttons and title

  cp5.addButton("FABACADEMY")     //name of button
    .setPosition(100, 50)         //x and y coordinates of upper left corner of button
    .setSize(250, 70)             //(width, height)
    .setFont(font)
  ;

  cp5.addButton("PACMAN")        //name of button
    .setPosition(100, 150)       //x and y coordinates of upper left corner of button
    .setSize(250, 70)            //(width, height)
    .setFont(font)
  ;

  cp5.addButton("STARWARS")     //name of button
    .setPosition(100, 250)      //x and y coordinates of upper left corner of button
    .setSize(250, 70)           //(width, height)
    .setFont(font)
  ;

  cp5.addButton("CLEAR")        //name of button
    .setPosition(100, 350)      //x and y coordinates of upper left corner of button
    .setSize(250, 70)           //(width, height)
    .setFont(font)

  ;
}

void draw(){  //same as loop in arduino

  background(221, 238, 165);      // background color of window (r, g, b) or (0 to 255)
  fill(0, 0, 128);               //text color (r, g, b)
  textFont(font);
  text("CONTROL PANEL:", 20, 30);  // ("text", x coordinate, y coordinat)
  text("by Cesar Valdivia 2021", 190, 445);  // ("text", x coordinate, y coordinat)
}


void FABACADEMY(){port.write('a');}

void PACMAN(){port.write('b');}

void STARWARS(){port.write('c');}

void CLEAR(){port.write('d');}
Final Result

You can download the files below:
Week Assessment
During this week, have I :
-
[ ] Linked to the group assignment page ? Yes, I did.
-
[ ] Documented my process ? Everything is duly documented.
-
[ ] Explained the UI that I made and how I did it ? I detailed all the steps I followed to develop the user interface, in the case of Processing I added comments to the code.
-
[ ] Outlined problems and how I fixed them ? All the steps were straight forward, the only problem was insufficient voltage for my bluetooth device.
-
[ ] Included original code (or a screenshot of the app code if that’s not possible) ? Yep.
-
[ ] Included a hero shot/video of my application running with my board ? It is always satisfactory to document the obtained results.